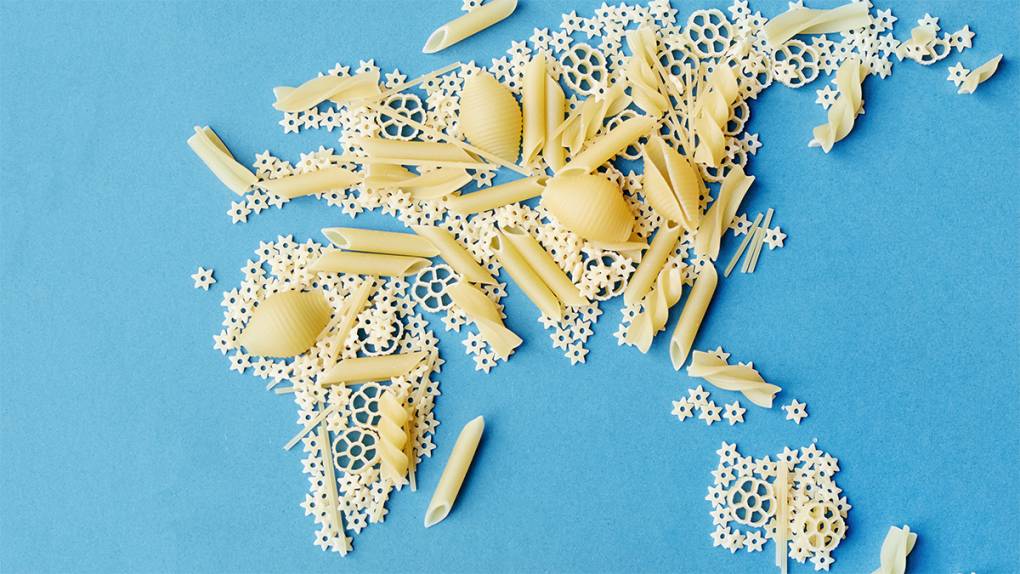
How Colonialism Brought a New Evolution of Pasta to East Africa
The Science (and Magic) of Egg Noodles
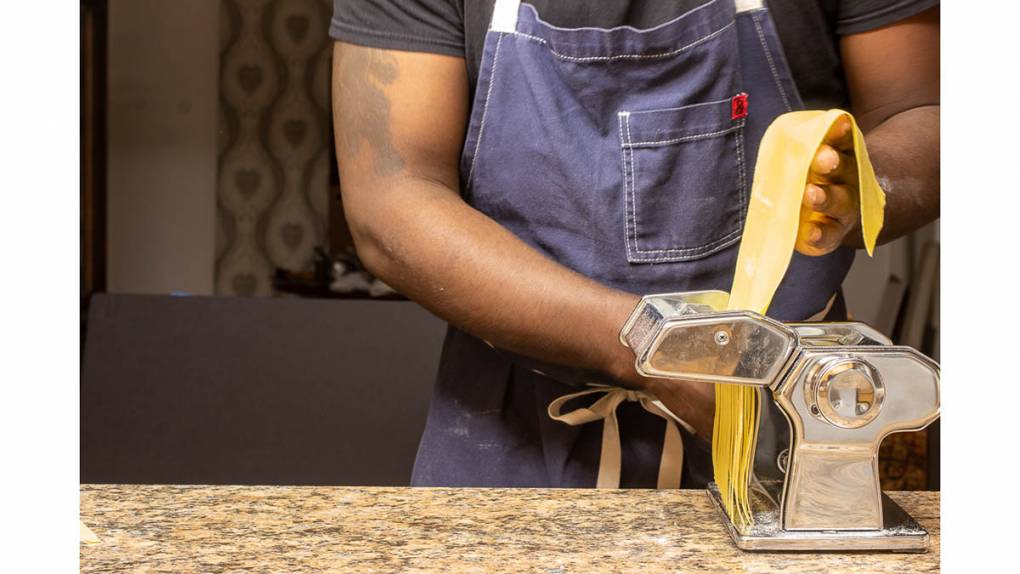
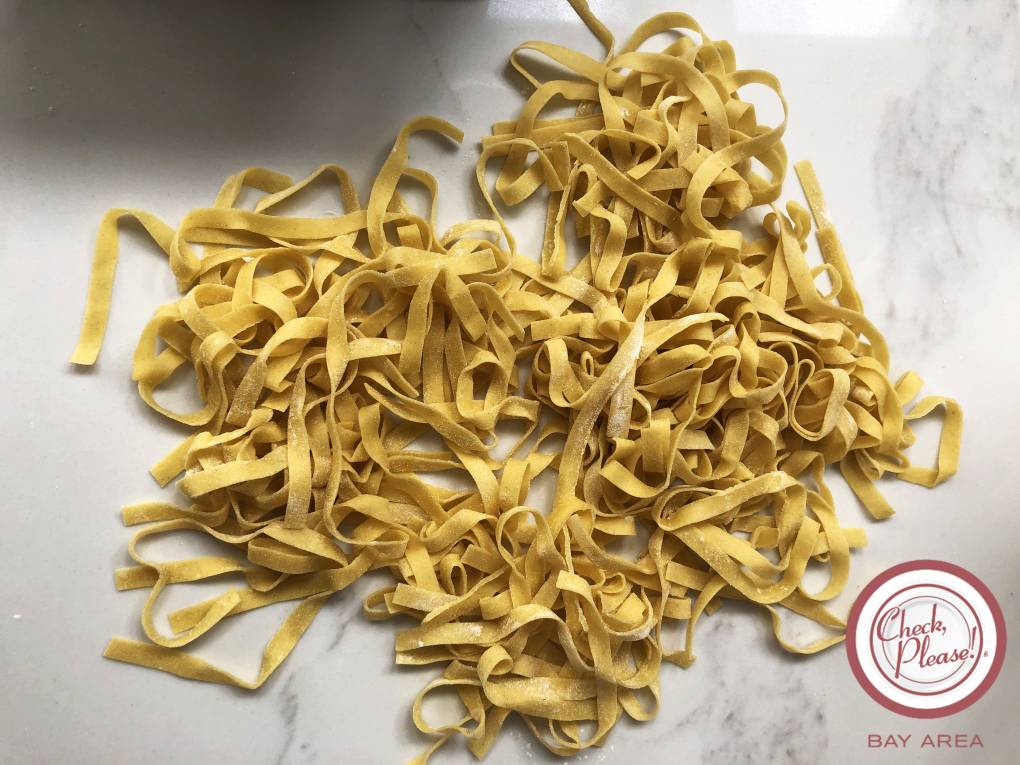
'Check, Please! Bay Area' Presents: a Mano's Handmade Tagliatelle al Pesto Genovese
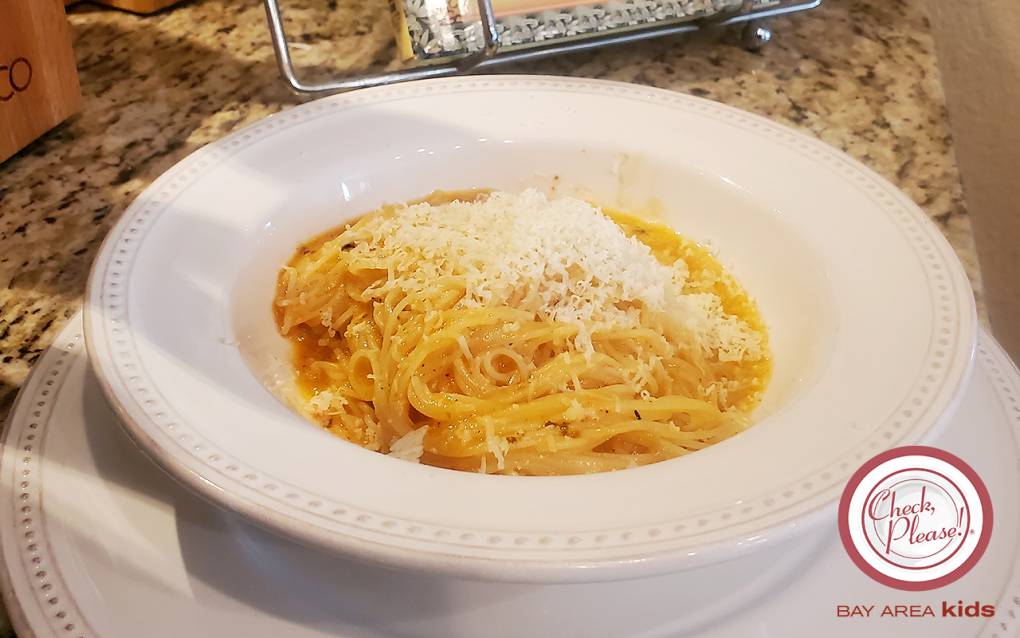
'Check, Please! Bay Area Kids' Presents: Agrodolce Osteria's Pasta al Burro Rosa
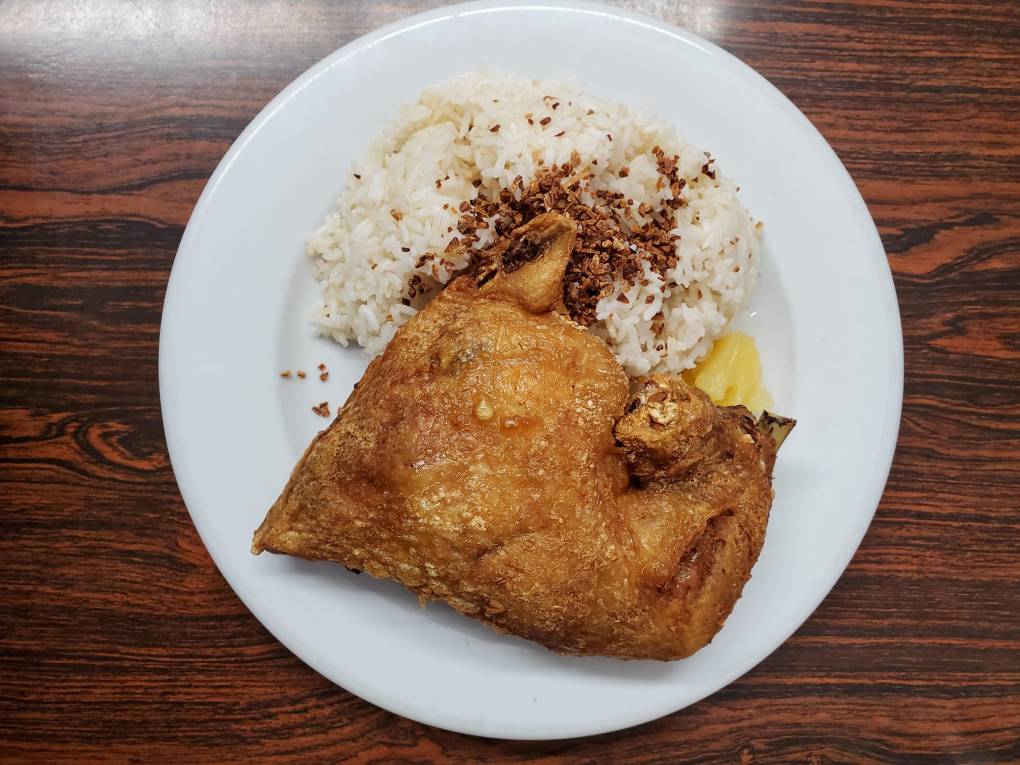
Flavors Worth Finding: Winter Comfort Food Isn't Always About Soup
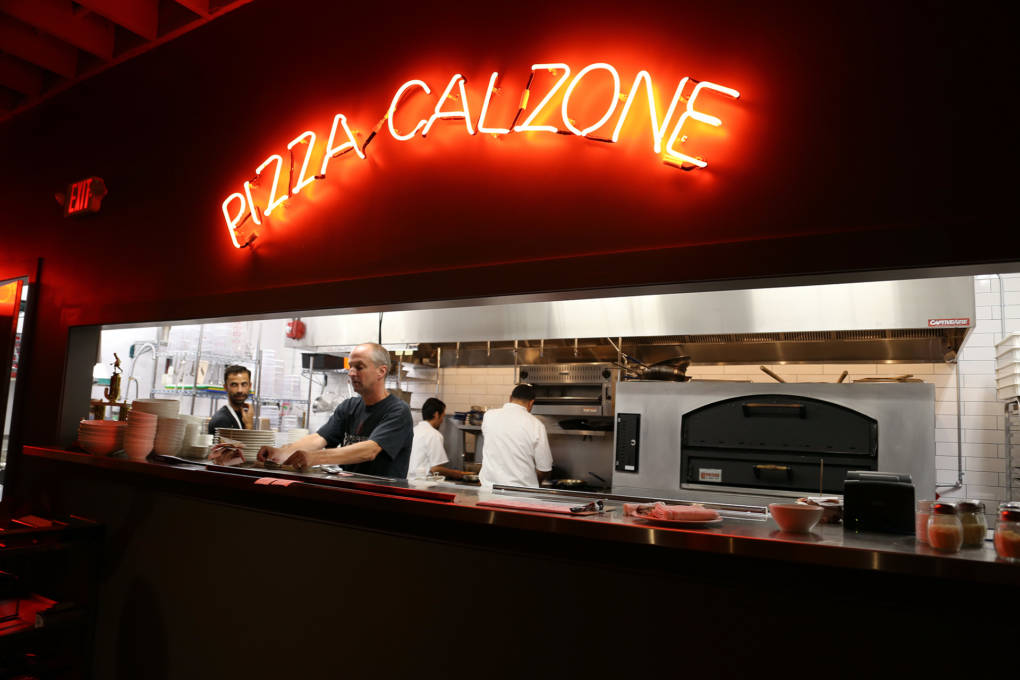
Che Fico Opens on Divisadero — Cool Figs, Wood-Fired Chicken and Hot Pizza
Gio’s Pizza & Bocce Opens in Downtown Berkeley After Complete Remodel of Former Giovanni Space
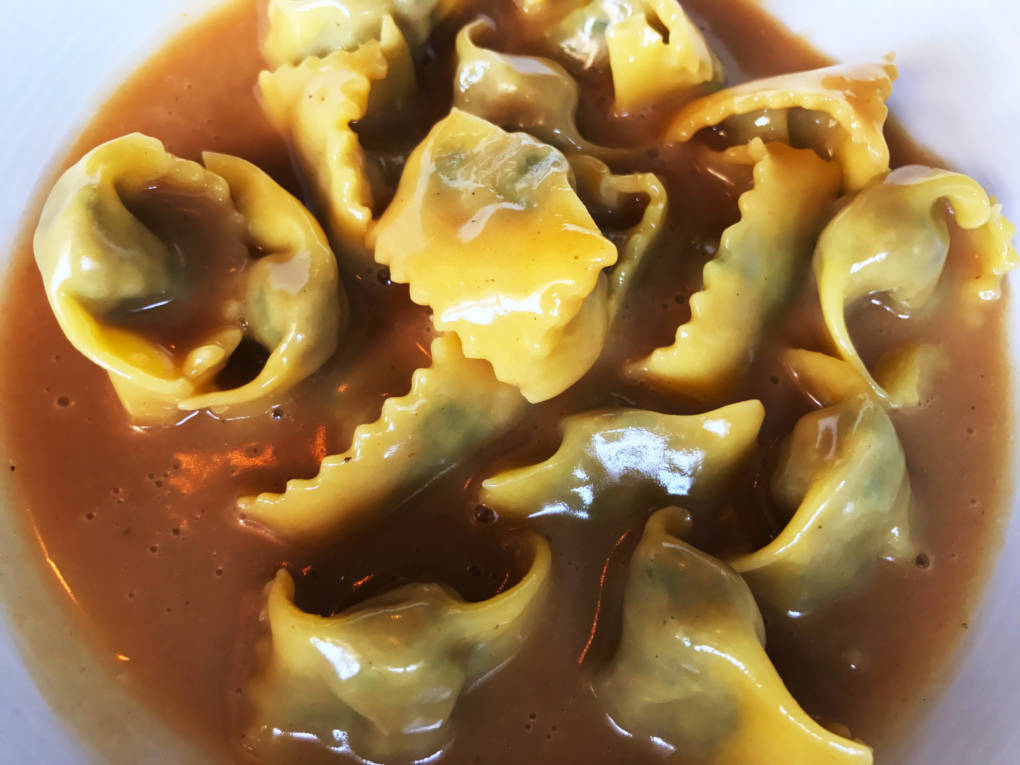
Belotti Ristorante: The East Bay’s Best Homemade Pasta is in Oakland’s Rockridge Neighborhood
Sponsored
window.__IS_SSR__=true
window.__INITIAL_STATE__={"attachmentsReducer":{"audio_0":{"type":"attachments","id":"audio_0","imgSizes":{"kqedFullSize":{"file":"https://ww2.kqed.org/news/wp-content/themes/KQED-unified/img/audio_bgs/background0.jpg"}}},"audio_1":{"type":"attachments","id":"audio_1","imgSizes":{"kqedFullSize":{"file":"https://ww2.kqed.org/news/wp-content/themes/KQED-unified/img/audio_bgs/background1.jpg"}}},"audio_2":{"type":"attachments","id":"audio_2","imgSizes":{"kqedFullSize":{"file":"https://ww2.kqed.org/news/wp-content/themes/KQED-unified/img/audio_bgs/background2.jpg"}}},"audio_3":{"type":"attachments","id":"audio_3","imgSizes":{"kqedFullSize":{"file":"https://ww2.kqed.org/news/wp-content/themes/KQED-unified/img/audio_bgs/background3.jpg"}}},"audio_4":{"type":"attachments","id":"audio_4","imgSizes":{"kqedFullSize":{"file":"https://ww2.kqed.org/news/wp-content/themes/KQED-unified/img/audio_bgs/background4.jpg"}}},"placeholder":{"type":"attachments","id":"placeholder","imgSizes":{"thumbnail":{"file":"https://ww2.kqed.org/wp-content/uploads/sites/10/2018/01/GettyImages-896326950-160x96.jpg","width":160,"height":96,"mimeType":"image/jpeg"},"medium":{"file":"https://ww2.kqed.org/wp-content/uploads/sites/10/2018/01/GettyImages-896326950-800x478.jpg","width":800,"height":478,"mimeType":"image/jpeg"},"large":{"file":"https://ww2.kqed.org/wp-content/uploads/sites/10/2018/01/GettyImages-896326950-1020x610.jpg","width":1020,"height":610,"mimeType":"image/jpeg"},"fd-lrg":{"file":"https://ww2.kqed.org/wp-content/uploads/sites/10/2018/01/GettyImages-896326950-1920x1148.jpg","width":1920,"height":1148,"mimeType":"image/jpeg"},"fd-med":{"file":"https://ww2.kqed.org/wp-content/uploads/sites/10/2018/01/GettyImages-896326950-1180x705.jpg","width":1180,"height":705,"mimeType":"image/jpeg"},"fd-sm":{"file":"https://ww2.kqed.org/wp-content/uploads/sites/10/2018/01/GettyImages-896326950-960x574.jpg","width":960,"height":574,"mimeType":"image/jpeg"},"post-thumbnail":{"file":"https://ww2.kqed.org/wp-content/uploads/sites/10/2018/01/GettyImages-896326950-672x372.jpg","width":672,"height":372,"mimeType":"image/jpeg"},"twentyfourteen-full-width":{"file":"https://ww2.kqed.org/wp-content/uploads/sites/10/2018/01/GettyImages-896326950-1038x576.jpg","width":1038,"height":576,"mimeType":"image/jpeg"},"xxsmall":{"file":"https://ww2.kqed.org/wp-content/uploads/sites/10/2018/01/GettyImages-896326950-240x143.jpg","width":240,"height":143,"mimeType":"image/jpeg"},"xsmall":{"file":"https://ww2.kqed.org/wp-content/uploads/sites/10/2018/01/GettyImages-896326950-375x224.jpg","width":375,"height":224,"mimeType":"image/jpeg"},"small":{"file":"https://ww2.kqed.org/wp-content/uploads/sites/10/2018/01/GettyImages-896326950-520x311.jpg","width":520,"height":311,"mimeType":"image/jpeg"},"xlarge":{"file":"https://ww2.kqed.org/wp-content/uploads/sites/10/2018/01/GettyImages-896326950-1180x705.jpg","width":1180,"height":705,"mimeType":"image/jpeg"},"full-width":{"file":"https://ww2.kqed.org/wp-content/uploads/sites/10/2018/01/GettyImages-896326950-1920x1148.jpg","width":1920,"height":1148,"mimeType":"image/jpeg"},"guest-author-32":{"file":"https://ww2.kqed.org/wp-content/uploads/sites/10/2018/01/GettyImages-896326950-32x32.jpg","width":32,"height":32,"mimeType":"image/jpeg"},"guest-author-50":{"file":"https://ww2.kqed.org/wp-content/uploads/sites/10/2018/01/GettyImages-896326950-50x50.jpg","width":50,"height":50,"mimeType":"image/jpeg"},"guest-author-64":{"file":"https://ww2.kqed.org/wp-content/uploads/sites/10/2018/01/GettyImages-896326950-64x64.jpg","width":64,"height":64,"mimeType":"image/jpeg"},"guest-author-96":{"file":"https://ww2.kqed.org/wp-content/uploads/sites/10/2018/01/GettyImages-896326950-96x96.jpg","width":96,"height":96,"mimeType":"image/jpeg"},"guest-author-128":{"file":"https://ww2.kqed.org/wp-content/uploads/sites/10/2018/01/GettyImages-896326950-128x128.jpg","width":128,"height":128,"mimeType":"image/jpeg"},"detail":{"file":"https://ww2.kqed.org/wp-content/uploads/sites/10/2018/01/GettyImages-896326950-150x150.jpg","width":150,"height":150,"mimeType":"image/jpeg"},"kqedFullSize":{"file":"https://ww2.kqed.org/wp-content/uploads/sites/10/2018/01/GettyImages-896326950-e1514998105161.jpg","width":1920,"height":1148}}},"bayareabites_139621":{"type":"attachments","id":"bayareabites_139621","meta":{"index":"attachments_1591205162","site":"bayareabites","id":"139621","found":true},"title":"ArtIbleto.PastaKing","publishDate":1606331761,"status":"inherit","parent":139616,"modified":1606331792,"caption":"Art Ibleto, the Pasta King of Sonoma County, died Tuesday at age 94.","credit":"Pasta King","description":null,"imgSizes":{"thumbnail":{"file":"https://ww2.kqed.org/app/uploads/sites/24/2020/11/ArtIbleto.PastaKing-160x90.jpg","width":160,"height":90,"mimeType":"image/jpeg"},"medium_large":{"file":"https://ww2.kqed.org/app/uploads/sites/24/2020/11/ArtIbleto.PastaKing-768x432.jpg","width":768,"height":432,"mimeType":"image/jpeg"},"post-thumbnail":{"file":"https://ww2.kqed.org/app/uploads/sites/24/2020/11/ArtIbleto.PastaKing-672x372.jpg","width":672,"height":372,"mimeType":"image/jpeg"},"kqedFullSize":{"file":"https://ww2.kqed.org/app/uploads/sites/24/2020/11/ArtIbleto.PastaKing.jpg","width":800,"height":450}},"fetchFailed":false,"isLoading":false},"bayareabites_138984":{"type":"attachments","id":"bayareabites_138984","meta":{"index":"attachments_1591205162","site":"bayareabites","id":"138984","found":true},"title":"Pasta map","publishDate":1601068315,"status":"inherit","parent":138982,"modified":1601068330,"caption":"iStock","credit":null,"description":null,"imgSizes":{"medium":{"file":"https://ww2.kqed.org/app/uploads/sites/24/2020/09/iStock-538562556-copy-800x450.jpg","width":800,"height":450,"mimeType":"image/jpeg"},"large":{"file":"https://ww2.kqed.org/app/uploads/sites/24/2020/09/iStock-538562556-copy-1020x574.jpg","width":1020,"height":574,"mimeType":"image/jpeg"},"thumbnail":{"file":"https://ww2.kqed.org/app/uploads/sites/24/2020/09/iStock-538562556-copy-160x90.jpg","width":160,"height":90,"mimeType":"image/jpeg"},"medium_large":{"file":"https://ww2.kqed.org/app/uploads/sites/24/2020/09/iStock-538562556-copy-768x432.jpg","width":768,"height":432,"mimeType":"image/jpeg"},"post-thumbnail":{"file":"https://ww2.kqed.org/app/uploads/sites/24/2020/09/iStock-538562556-copy-672x372.jpg","width":672,"height":372,"mimeType":"image/jpeg"},"twentyfourteen-full-width":{"file":"https://ww2.kqed.org/app/uploads/sites/24/2020/09/iStock-538562556-copy-1038x576.jpg","width":1038,"height":576,"mimeType":"image/jpeg"},"kqedFullSize":{"file":"https://ww2.kqed.org/app/uploads/sites/24/2020/09/iStock-538562556-copy.jpg","width":1200,"height":675}},"fetchFailed":false,"isLoading":false},"bayareabites_139008":{"type":"attachments","id":"bayareabites_139008","meta":{"index":"attachments_1591205162","site":"bayareabites","id":"139008","found":true},"title":"Pasta photos-10","publishDate":1601073273,"status":"inherit","parent":139003,"modified":1601073545,"caption":"Malik Francis is a biochemist and a chef. He explains the science and magic of noodles. ","credit":"Malik Francis","description":null,"imgSizes":{"medium":{"file":"https://ww2.kqed.org/app/uploads/sites/24/2020/09/Pasta-photos-10-800x450.jpg","width":800,"height":450,"mimeType":"image/jpeg"},"large":{"file":"https://ww2.kqed.org/app/uploads/sites/24/2020/09/Pasta-photos-10-1020x574.jpg","width":1020,"height":574,"mimeType":"image/jpeg"},"thumbnail":{"file":"https://ww2.kqed.org/app/uploads/sites/24/2020/09/Pasta-photos-10-160x90.jpg","width":160,"height":90,"mimeType":"image/jpeg"},"medium_large":{"file":"https://ww2.kqed.org/app/uploads/sites/24/2020/09/Pasta-photos-10-768x432.jpg","width":768,"height":432,"mimeType":"image/jpeg"},"post-thumbnail":{"file":"https://ww2.kqed.org/app/uploads/sites/24/2020/09/Pasta-photos-10-672x372.jpg","width":672,"height":372,"mimeType":"image/jpeg"},"twentyfourteen-full-width":{"file":"https://ww2.kqed.org/app/uploads/sites/24/2020/09/Pasta-photos-10-1038x576.jpg","width":1038,"height":576,"mimeType":"image/jpeg"},"kqedFullSize":{"file":"https://ww2.kqed.org/app/uploads/sites/24/2020/09/Pasta-photos-10.jpg","width":1200,"height":675}},"fetchFailed":false,"isLoading":false},"bayareabites_137166":{"type":"attachments","id":"bayareabites_137166","meta":{"index":"attachments_1591205162","site":"bayareabites","id":"137166","found":true},"title":"cpbataglia","publishDate":1589243328,"status":"inherit","parent":137157,"modified":1589243445,"caption":"Chef Freedom Rains from San Francisco's a Mano shares a simple pasta dough recipe that yields ribbons of eggy tagliatelle.","credit":"Courtesy of Freedom Rains","description":"Chef Freedom Rains from San Francisco's a Mano shares a simple pasta dough recipe that yields ribbons of eggy tagliatelle.","imgSizes":{"thumbnail":{"file":"https://ww2.kqed.org/app/uploads/sites/24/2020/05/cpbataglia-160x120.jpg","width":160,"height":120,"mimeType":"image/jpeg"},"medium":{"file":"https://ww2.kqed.org/app/uploads/sites/24/2020/05/cpbataglia-800x600.jpg","width":800,"height":600,"mimeType":"image/jpeg"},"medium_large":{"file":"https://ww2.kqed.org/app/uploads/sites/24/2020/05/cpbataglia-768x576.jpg","width":768,"height":576,"mimeType":"image/jpeg"},"large":{"file":"https://ww2.kqed.org/app/uploads/sites/24/2020/05/cpbataglia-1020x765.jpg","width":1020,"height":765,"mimeType":"image/jpeg"},"post-thumbnail":{"file":"https://ww2.kqed.org/app/uploads/sites/24/2020/05/cpbataglia-672x372.jpg","width":672,"height":372,"mimeType":"image/jpeg"},"twentyfourteen-full-width":{"file":"https://ww2.kqed.org/app/uploads/sites/24/2020/05/cpbataglia-1038x576.jpg","width":1038,"height":576,"mimeType":"image/jpeg"},"full-width":{"file":"https://ww2.kqed.org/app/uploads/sites/24/2020/05/cpbataglia-1920x1440.jpg","width":1920,"height":1440,"mimeType":"image/jpeg"},"kqedFullSize":{"file":"https://ww2.kqed.org/app/uploads/sites/24/2020/05/cpbataglia.jpg","width":4032,"height":3024}},"fetchFailed":false,"isLoading":false},"bayareabites_137052":{"type":"attachments","id":"bayareabites_137052","meta":{"index":"attachments_1591205162","site":"bayareabites","id":"137052","found":true},"title":"agrodolce check please bay area pasta kids","publishDate":1588348648,"status":"inherit","parent":137009,"modified":1588348692,"caption":"Featured on the latest episode of 'Check, Please! Bay Area Kids,' Agrodolce Osteria's chef Angelo D'Alo shares his daughter's favorite pasta dish that's easy to make with the whole family. ","credit":"Courtesy of Angelo D'Alo","description":"Featured on the latest episode of 'Check, Please! Bay Area Kids,' Agrodolce Osteria's chef Angelo D'Alo shares his daughter's favorite pasta dish that's easy to make with the whole family. ","imgSizes":{"thumbnail":{"file":"https://ww2.kqed.org/app/uploads/sites/24/2020/05/agrodolce-160x100.jpg","width":160,"height":100,"mimeType":"image/jpeg"},"medium":{"file":"https://ww2.kqed.org/app/uploads/sites/24/2020/05/agrodolce-800x500.jpg","width":800,"height":500,"mimeType":"image/jpeg"},"medium_large":{"file":"https://ww2.kqed.org/app/uploads/sites/24/2020/05/agrodolce-768x480.jpg","width":768,"height":480,"mimeType":"image/jpeg"},"large":{"file":"https://ww2.kqed.org/app/uploads/sites/24/2020/05/agrodolce-1020x638.jpg","width":1020,"height":638,"mimeType":"image/jpeg"},"post-thumbnail":{"file":"https://ww2.kqed.org/app/uploads/sites/24/2020/05/agrodolce-672x372.jpg","width":672,"height":372,"mimeType":"image/jpeg"},"twentyfourteen-full-width":{"file":"https://ww2.kqed.org/app/uploads/sites/24/2020/05/agrodolce-1038x576.jpg","width":1038,"height":576,"mimeType":"image/jpeg"},"kqedFullSize":{"file":"https://ww2.kqed.org/app/uploads/sites/24/2020/05/agrodolce.jpg","width":1280,"height":800}},"fetchFailed":false,"isLoading":false},"bayareabites_135822":{"type":"attachments","id":"bayareabites_135822","meta":{"index":"attachments_1591205162","site":"bayareabites","id":"135822","found":true},"title":"gatewaykitchen_2","publishDate":1575922237,"status":"inherit","parent":135820,"modified":1575923092,"caption":"The satisfyingly crunchy crispy chicken silog at Gateway Kitchen. ","credit":"Grace Cheung","description":"A crispy chicken silog with a side of garlic rice and pineapple at Gateway Kitchen.","imgSizes":{"thumbnail":{"file":"https://ww2.kqed.org/app/uploads/sites/24/2019/12/gatewaykitchen_2-160x120.jpg","width":160,"height":120,"mimeType":"image/jpeg"},"medium":{"file":"https://ww2.kqed.org/app/uploads/sites/24/2019/12/gatewaykitchen_2-800x600.jpg","width":800,"height":600,"mimeType":"image/jpeg"},"medium_large":{"file":"https://ww2.kqed.org/app/uploads/sites/24/2019/12/gatewaykitchen_2-768x576.jpg","width":768,"height":576,"mimeType":"image/jpeg"},"large":{"file":"https://ww2.kqed.org/app/uploads/sites/24/2019/12/gatewaykitchen_2-1020x765.jpg","width":1020,"height":765,"mimeType":"image/jpeg"},"complete_open_graph":{"file":"https://ww2.kqed.org/app/uploads/sites/24/2019/12/gatewaykitchen_2-1200x900.jpg","width":1200,"height":900,"mimeType":"image/jpeg"},"post-thumbnail":{"file":"https://ww2.kqed.org/app/uploads/sites/24/2019/12/gatewaykitchen_2-672x372.jpg","width":672,"height":372,"mimeType":"image/jpeg"},"twentyfourteen-full-width":{"file":"https://ww2.kqed.org/app/uploads/sites/24/2019/12/gatewaykitchen_2-1038x576.jpg","width":1038,"height":576,"mimeType":"image/jpeg"},"full-width":{"file":"https://ww2.kqed.org/app/uploads/sites/24/2019/12/gatewaykitchen_2-1920x1440.jpg","width":1920,"height":1440,"mimeType":"image/jpeg"},"kqedFullSize":{"file":"https://ww2.kqed.org/app/uploads/sites/24/2019/12/gatewaykitchen_2.jpg","width":1920,"height":1440}},"fetchFailed":false,"isLoading":false},"bayareabites_126231":{"type":"attachments","id":"bayareabites_126231","meta":{"index":"attachments_1591205162","site":"bayareabites","id":"126231","found":true},"title":"IMG_1998-new","publishDate":1522354199,"status":"inherit","parent":126218,"modified":1522357715,"caption":"Chef/Co-Owner David Nayfeld holding Marinara, Anchovy, Arugula Pizze at Che Fico","credit":"Wendy Goodfriend","description":null,"imgSizes":{"thumbnail":{"file":"https://ww2.kqed.org/app/uploads/sites/24/2018/03/IMG_1998-new-160x107.jpg","width":160,"height":107,"mimeType":"image/jpeg"},"medium":{"file":"https://ww2.kqed.org/app/uploads/sites/24/2018/03/IMG_1998-new-800x533.jpg","width":800,"height":533,"mimeType":"image/jpeg"},"medium_large":{"file":"https://ww2.kqed.org/app/uploads/sites/24/2018/03/IMG_1998-new-768x512.jpg","width":768,"height":512,"mimeType":"image/jpeg"},"large":{"file":"https://ww2.kqed.org/app/uploads/sites/24/2018/03/IMG_1998-new-1020x680.jpg","width":1020,"height":680,"mimeType":"image/jpeg"},"fd-lrg":{"file":"https://ww2.kqed.org/app/uploads/sites/24/2018/03/IMG_1998-new-1920x1280.jpg","width":1920,"height":1280,"mimeType":"image/jpeg"},"fd-med":{"file":"https://ww2.kqed.org/app/uploads/sites/24/2018/03/IMG_1998-new-1180x787.jpg","width":1180,"height":787,"mimeType":"image/jpeg"},"fd-sm":{"file":"https://ww2.kqed.org/app/uploads/sites/24/2018/03/IMG_1998-new-960x640.jpg","width":960,"height":640,"mimeType":"image/jpeg"},"post-thumbnail":{"file":"https://ww2.kqed.org/app/uploads/sites/24/2018/03/IMG_1998-new-672x372.jpg","width":672,"height":372,"mimeType":"image/jpeg"},"twentyfourteen-full-width":{"file":"https://ww2.kqed.org/app/uploads/sites/24/2018/03/IMG_1998-new-1038x576.jpg","width":1038,"height":576,"mimeType":"image/jpeg"},"xxsmall":{"file":"https://ww2.kqed.org/app/uploads/sites/24/2018/03/IMG_1998-new-240x160.jpg","width":240,"height":160,"mimeType":"image/jpeg"},"xsmall":{"file":"https://ww2.kqed.org/app/uploads/sites/24/2018/03/IMG_1998-new-375x250.jpg","width":375,"height":250,"mimeType":"image/jpeg"},"small":{"file":"https://ww2.kqed.org/app/uploads/sites/24/2018/03/IMG_1998-new-520x347.jpg","width":520,"height":347,"mimeType":"image/jpeg"},"xlarge":{"file":"https://ww2.kqed.org/app/uploads/sites/24/2018/03/IMG_1998-new-1180x787.jpg","width":1180,"height":787,"mimeType":"image/jpeg"},"full-width":{"file":"https://ww2.kqed.org/app/uploads/sites/24/2018/03/IMG_1998-new-1920x1280.jpg","width":1920,"height":1280,"mimeType":"image/jpeg"},"guest-author-32":{"file":"https://ww2.kqed.org/app/uploads/sites/24/2018/03/IMG_1998-new-32x32.jpg","width":32,"height":32,"mimeType":"image/jpeg"},"guest-author-50":{"file":"https://ww2.kqed.org/app/uploads/sites/24/2018/03/IMG_1998-new-50x50.jpg","width":50,"height":50,"mimeType":"image/jpeg"},"guest-author-64":{"file":"https://ww2.kqed.org/app/uploads/sites/24/2018/03/IMG_1998-new-64x64.jpg","width":64,"height":64,"mimeType":"image/jpeg"},"guest-author-96":{"file":"https://ww2.kqed.org/app/uploads/sites/24/2018/03/IMG_1998-new-96x96.jpg","width":96,"height":96,"mimeType":"image/jpeg"},"guest-author-128":{"file":"https://ww2.kqed.org/app/uploads/sites/24/2018/03/IMG_1998-new-128x128.jpg","width":128,"height":128,"mimeType":"image/jpeg"},"detail":{"file":"https://ww2.kqed.org/app/uploads/sites/24/2018/03/IMG_1998-new-150x150.jpg","width":150,"height":150,"mimeType":"image/jpeg"},"kqedFullSize":{"file":"https://ww2.kqed.org/app/uploads/sites/24/2018/03/IMG_1998-new.jpg","width":1920,"height":1280}},"fetchFailed":false,"isLoading":false},"bayareabites_120159":{"type":"attachments","id":"bayareabites_120159","meta":{"index":"attachments_1591205162","site":"bayareabites","id":"120159","found":true},"title":"IMG_0248-new","publishDate":1503507462,"status":"inherit","parent":120126,"modified":1503509056,"caption":"Gio’s open kitchen with original Giovanni's neon signage.","credit":"Wendy Goodfriend","description":null,"imgSizes":{"thumbnail":{"file":"https://ww2.kqed.org/app/uploads/sites/24/2017/08/IMG_0248-new-160x107.jpg","width":160,"height":107,"mimeType":"image/jpeg"},"medium":{"file":"https://ww2.kqed.org/app/uploads/sites/24/2017/08/IMG_0248-new-800x533.jpg","width":800,"height":533,"mimeType":"image/jpeg"},"medium_large":{"file":"https://ww2.kqed.org/app/uploads/sites/24/2017/08/IMG_0248-new-768x512.jpg","width":768,"height":512,"mimeType":"image/jpeg"},"large":{"file":"https://ww2.kqed.org/app/uploads/sites/24/2017/08/IMG_0248-new-1020x680.jpg","width":1020,"height":680,"mimeType":"image/jpeg"},"fd-lrg":{"file":"https://ww2.kqed.org/app/uploads/sites/24/2017/08/IMG_0248-new-1920x1280.jpg","width":1920,"height":1280,"mimeType":"image/jpeg"},"fd-med":{"file":"https://ww2.kqed.org/app/uploads/sites/24/2017/08/IMG_0248-new-1180x787.jpg","width":1180,"height":787,"mimeType":"image/jpeg"},"fd-sm":{"file":"https://ww2.kqed.org/app/uploads/sites/24/2017/08/IMG_0248-new-960x640.jpg","width":960,"height":640,"mimeType":"image/jpeg"},"post-thumbnail":{"file":"https://ww2.kqed.org/app/uploads/sites/24/2017/08/IMG_0248-new-672x372.jpg","width":672,"height":372,"mimeType":"image/jpeg"},"twentyfourteen-full-width":{"file":"https://ww2.kqed.org/app/uploads/sites/24/2017/08/IMG_0248-new-1038x576.jpg","width":1038,"height":576,"mimeType":"image/jpeg"},"xxsmall":{"file":"https://ww2.kqed.org/app/uploads/sites/24/2017/08/IMG_0248-new-240x160.jpg","width":240,"height":160,"mimeType":"image/jpeg"},"xsmall":{"file":"https://ww2.kqed.org/app/uploads/sites/24/2017/08/IMG_0248-new-375x250.jpg","width":375,"height":250,"mimeType":"image/jpeg"},"small":{"file":"https://ww2.kqed.org/app/uploads/sites/24/2017/08/IMG_0248-new-520x347.jpg","width":520,"height":347,"mimeType":"image/jpeg"},"xlarge":{"file":"https://ww2.kqed.org/app/uploads/sites/24/2017/08/IMG_0248-new-1180x787.jpg","width":1180,"height":787,"mimeType":"image/jpeg"},"full-width":{"file":"https://ww2.kqed.org/app/uploads/sites/24/2017/08/IMG_0248-new-1920x1280.jpg","width":1920,"height":1280,"mimeType":"image/jpeg"},"guest-author-32":{"file":"https://ww2.kqed.org/app/uploads/sites/24/2017/08/IMG_0248-new-32x32.jpg","width":32,"height":32,"mimeType":"image/jpeg"},"guest-author-50":{"file":"https://ww2.kqed.org/app/uploads/sites/24/2017/08/IMG_0248-new-50x50.jpg","width":50,"height":50,"mimeType":"image/jpeg"},"guest-author-64":{"file":"https://ww2.kqed.org/app/uploads/sites/24/2017/08/IMG_0248-new-64x64.jpg","width":64,"height":64,"mimeType":"image/jpeg"},"guest-author-96":{"file":"https://ww2.kqed.org/app/uploads/sites/24/2017/08/IMG_0248-new-96x96.jpg","width":96,"height":96,"mimeType":"image/jpeg"},"guest-author-128":{"file":"https://ww2.kqed.org/app/uploads/sites/24/2017/08/IMG_0248-new-128x128.jpg","width":128,"height":128,"mimeType":"image/jpeg"},"detail":{"file":"https://ww2.kqed.org/app/uploads/sites/24/2017/08/IMG_0248-new-150x150.jpg","width":150,"height":150,"mimeType":"image/jpeg"},"kqedFullSize":{"file":"https://ww2.kqed.org/app/uploads/sites/24/2017/08/IMG_0248-new.jpg","width":1920,"height":1280}},"fetchFailed":false,"isLoading":false},"bayareabites_119912":{"type":"attachments","id":"bayareabites_119912","meta":{"index":"attachments_1591205162","site":"bayareabites","id":"119912","found":true},"title":"IMG_0400-new","publishDate":1502841423,"status":"inherit","parent":119881,"modified":1502842782,"caption":"Agnolotti di Lidia, stuffed with a blend of meats in a rich beef reduction sauce.","credit":"Kim Westerman","description":null,"imgSizes":{"thumbnail":{"file":"https://ww2.kqed.org/app/uploads/sites/24/2017/08/IMG_0400-new-160x120.jpg","width":160,"height":120,"mimeType":"image/jpeg"},"medium":{"file":"https://ww2.kqed.org/app/uploads/sites/24/2017/08/IMG_0400-new-800x600.jpg","width":800,"height":600,"mimeType":"image/jpeg"},"medium_large":{"file":"https://ww2.kqed.org/app/uploads/sites/24/2017/08/IMG_0400-new-768x576.jpg","width":768,"height":576,"mimeType":"image/jpeg"},"large":{"file":"https://ww2.kqed.org/app/uploads/sites/24/2017/08/IMG_0400-new-1020x765.jpg","width":1020,"height":765,"mimeType":"image/jpeg"},"fd-lrg":{"file":"https://ww2.kqed.org/app/uploads/sites/24/2017/08/IMG_0400-new-1920x1440.jpg","width":1920,"height":1440,"mimeType":"image/jpeg"},"fd-med":{"file":"https://ww2.kqed.org/app/uploads/sites/24/2017/08/IMG_0400-new-1180x885.jpg","width":1180,"height":885,"mimeType":"image/jpeg"},"fd-sm":{"file":"https://ww2.kqed.org/app/uploads/sites/24/2017/08/IMG_0400-new-960x720.jpg","width":960,"height":720,"mimeType":"image/jpeg"},"post-thumbnail":{"file":"https://ww2.kqed.org/app/uploads/sites/24/2017/08/IMG_0400-new-672x372.jpg","width":672,"height":372,"mimeType":"image/jpeg"},"twentyfourteen-full-width":{"file":"https://ww2.kqed.org/app/uploads/sites/24/2017/08/IMG_0400-new-1038x576.jpg","width":1038,"height":576,"mimeType":"image/jpeg"},"xxsmall":{"file":"https://ww2.kqed.org/app/uploads/sites/24/2017/08/IMG_0400-new-240x180.jpg","width":240,"height":180,"mimeType":"image/jpeg"},"xsmall":{"file":"https://ww2.kqed.org/app/uploads/sites/24/2017/08/IMG_0400-new-375x281.jpg","width":375,"height":281,"mimeType":"image/jpeg"},"small":{"file":"https://ww2.kqed.org/app/uploads/sites/24/2017/08/IMG_0400-new-520x390.jpg","width":520,"height":390,"mimeType":"image/jpeg"},"xlarge":{"file":"https://ww2.kqed.org/app/uploads/sites/24/2017/08/IMG_0400-new-1180x885.jpg","width":1180,"height":885,"mimeType":"image/jpeg"},"full-width":{"file":"https://ww2.kqed.org/app/uploads/sites/24/2017/08/IMG_0400-new-1920x1440.jpg","width":1920,"height":1440,"mimeType":"image/jpeg"},"guest-author-32":{"file":"https://ww2.kqed.org/app/uploads/sites/24/2017/08/IMG_0400-new-32x32.jpg","width":32,"height":32,"mimeType":"image/jpeg"},"guest-author-50":{"file":"https://ww2.kqed.org/app/uploads/sites/24/2017/08/IMG_0400-new-50x50.jpg","width":50,"height":50,"mimeType":"image/jpeg"},"guest-author-64":{"file":"https://ww2.kqed.org/app/uploads/sites/24/2017/08/IMG_0400-new-64x64.jpg","width":64,"height":64,"mimeType":"image/jpeg"},"guest-author-96":{"file":"https://ww2.kqed.org/app/uploads/sites/24/2017/08/IMG_0400-new-96x96.jpg","width":96,"height":96,"mimeType":"image/jpeg"},"guest-author-128":{"file":"https://ww2.kqed.org/app/uploads/sites/24/2017/08/IMG_0400-new-128x128.jpg","width":128,"height":128,"mimeType":"image/jpeg"},"detail":{"file":"https://ww2.kqed.org/app/uploads/sites/24/2017/08/IMG_0400-new-150x150.jpg","width":150,"height":150,"mimeType":"image/jpeg"},"kqedFullSize":{"file":"https://ww2.kqed.org/app/uploads/sites/24/2017/08/IMG_0400-new.jpg","width":4032,"height":3024}},"fetchFailed":false,"isLoading":false}},"audioPlayerReducer":{"postId":"stream_live"},"authorsReducer":{"byline_bayareabites_139003":{"type":"authors","id":"byline_bayareabites_139003","meta":{"override":true},"slug":"byline_bayareabites_139003","name":"Malik Francis","isLoading":false},"gmeline":{"type":"authors","id":"185","meta":{"index":"authors_1591205172","id":"185","found":true},"name":"Gabe Meline","firstName":"Gabe","lastName":"Meline","slug":"gmeline","email":"gmeline@kqed.org","display_author_email":false,"staff_mastheads":["arts"],"title":"Senior Editor, KQED Arts & Culture","bio":"Gabe Meline entered journalism at age 15 making photocopied zines, and has since earned awards from the Edward R. Murrow Awards, the Society for Professional Journalists, the Online Journalism Awards, the Association of Alternative Newsweeklies and the California Newspaper Publishers Association. Prior to KQED, he was the editor of the \u003cem>North Bay Bohemian\u003c/em> and a touring musician. He lives with his wife, his daughter, and a 1964 Volvo in his hometown of Santa Rosa, CA.","avatar":"https://secure.gravatar.com/avatar/80e9715844c5fc3f07edac5b08973b76?s=600&d=blank&r=g","twitter":"gmeline","facebook":null,"instagram":null,"linkedin":null,"sites":[{"site":"","roles":["editor"]},{"site":"arts","roles":["administrator"]},{"site":"artschool","roles":["editor"]},{"site":"news","roles":["author"]},{"site":"pop","roles":["editor"]},{"site":"bayareabites","roles":["editor"]},{"site":"food","roles":["editor"]},{"site":"liveblog","roles":["editor"]},{"site":"hiphop","roles":["editor"]}],"headData":{"title":"Gabe Meline | KQED","description":"Senior Editor, KQED Arts & Culture","ogImgSrc":"https://secure.gravatar.com/avatar/80e9715844c5fc3f07edac5b08973b76?s=600&d=blank&r=g","twImgSrc":"https://secure.gravatar.com/avatar/80e9715844c5fc3f07edac5b08973b76?s=600&d=blank&r=g"},"isLoading":false,"link":"/author/gmeline"},"wendy-goodfriend":{"type":"authors","id":"5014","meta":{"index":"authors_1591205172","id":"5014","found":true},"name":"Wendy Goodfriend","firstName":"Wendy","lastName":"Goodfriend","slug":"wendy-goodfriend","email":"wendy@wendygoodfriend.com","display_author_email":false,"staff_mastheads":[],"title":null,"bio":"I was the Senior Digital Producer for KQED Food up until July, 2018. Since 2001, I designed, produced, managed and contributed to mostly food-related websites and blogs for KQED including: KQED.org; KQED Food; Bay Area Bites; Check, Please! Bay Area; Taste This; Celebrity Chefs; seven of Jacques Pepin's TV series websites; and Joanne Weir's Cooking in the City. I initiated the majority of KQED Food's social media feeds and maintained them up until 2017. As far as content creation, photography is my passion and I also shoot video and write stories. My photos have been used in articles for KQED Food, News, Arts, and Science as well as for promotional purposes in print and online. Professional education and training includes: clinical psychology, photography, commercial cooking, web design, information architecture and UX.","avatar":"https://secure.gravatar.com/avatar/dfba64372339cc34cf17e446e6f18fa8?s=600&d=blank&r=g","twitter":null,"facebook":"bayareabites","instagram":null,"linkedin":"wendygoodfriend","sites":[{"site":"jpepinheart","roles":["administrator"]},{"site":"about","roles":["editor"]},{"site":"bayareabites","roles":["subscriber"]},{"site":"science","roles":["administrator"]},{"site":"checkplease","roles":["subscriber"]},{"site":"food","roles":["author"]},{"site":"essentialpepin","roles":["administrator"]}],"headData":{"title":"Wendy Goodfriend | KQED","description":null,"ogImgSrc":"https://secure.gravatar.com/avatar/dfba64372339cc34cf17e446e6f18fa8?s=600&d=blank&r=g","twImgSrc":"https://secure.gravatar.com/avatar/dfba64372339cc34cf17e446e6f18fa8?s=600&d=blank&r=g"},"isLoading":false,"link":"/author/wendy-goodfriend"},"bayareabites":{"type":"authors","id":"5083","meta":{"index":"authors_1591205172","id":"5083","found":true},"name":"KQED Food Staff","firstName":null,"lastName":null,"slug":"bayareabites","email":"bayareabites@kqed.org","display_author_email":false,"staff_mastheads":[],"title":"KQED Contributor","bio":"Bay Area Bites (BAB), KQED's public media food blog, feeds you visually compelling food-related stories, news, recipes and reviews from the San Francisco Bay Area and beyond.","avatar":"https://secure.gravatar.com/avatar/7113fdeeace4c1251f9bbe4b2fab415a?s=600&d=blank&r=g","twitter":"bayareabites","facebook":"bayareabites","instagram":null,"linkedin":null,"sites":[{"site":"arts","roles":["contributor"]},{"site":"bayareabites","roles":["administrator"]},{"site":"food","roles":["author"]}],"headData":{"title":"KQED Food Staff | KQED","description":"KQED Contributor","ogImgSrc":"https://secure.gravatar.com/avatar/7113fdeeace4c1251f9bbe4b2fab415a?s=600&d=blank&r=g","twImgSrc":"https://secure.gravatar.com/avatar/7113fdeeace4c1251f9bbe4b2fab415a?s=600&d=blank&r=g"},"isLoading":false,"link":"/author/bayareabites"},"kimwesterman":{"type":"authors","id":"5575","meta":{"index":"authors_1591205172","id":"5575","found":true},"name":"Kim Westerman","firstName":"Kim","lastName":"Westerman","slug":"kimwesterman","email":"kim.westerman@gmail.com","display_author_email":false,"staff_mastheads":[],"title":null,"bio":"Kim Westerman has been writing about food and wine for most of her adult life. Originally from North Carolina, she moved to Berkeley in 2006 to pursue the California dream, which, it turns out, is all it’s cracked up to be. She’s a farmers' market junkie, a lover of all things tomato, and Champagne-obsessed. She loves to cook with her kids, eight and three, and she makes frequent pilgrimages to International Boulevard in search of her next favorite Mexican dish. She spends an inordinate amount of time thinking about food and wine pairing, often starting with the wine and working backwards when planning menus. She is a Level I Sommelier and a Licensed Q-Grader. Her work has appeared in KQED's Bay Area Bites, Forbes.com, the New York Times, the San Francisco Chronicle, Tasting Table, Fodor’s Travel Guides, and lots of other publications. You can follow Kim on Twitter and Instagram @throughtraveler.","avatar":"https://secure.gravatar.com/avatar/2eb7f890ab19ead33f77fd8554ac4c39?s=600&d=blank&r=g","twitter":null,"facebook":null,"instagram":null,"linkedin":null,"sites":[{"site":"bayareabites","roles":["contributor"]},{"site":"food","roles":["contributor"]}],"headData":{"title":"Kim Westerman | KQED","description":null,"ogImgSrc":"https://secure.gravatar.com/avatar/2eb7f890ab19ead33f77fd8554ac4c39?s=600&d=blank&r=g","twImgSrc":"https://secure.gravatar.com/avatar/2eb7f890ab19ead33f77fd8554ac4c39?s=600&d=blank&r=g"},"isLoading":false,"link":"/author/kimwesterman"},"trevorfelch":{"type":"authors","id":"11338","meta":{"index":"authors_1591205172","id":"11338","found":true},"name":"Trevor Felch","firstName":"Trevor","lastName":"Felch","slug":"trevorfelch","email":"trevor.felch@gmail.com","display_author_email":false,"staff_mastheads":[],"title":null,"bio":"\u003cp class=\"p1\">I'm the SF Bay Area editor for Zagat. Before this post, I was a restaurants writer for Thrillist and SF Weekly, along with covering the wine industry for Vino 24/7. I've also dabbled in tech start-ups (of course) and TV journalism (most recently with NBC on their Rio Olympics research team). You'll find me at taquerias, bakeries, bars, pizzerias, corner bistros and tasting menu destinations throughout the Bay Area. Cheers!\u003c/p>","avatar":"https://secure.gravatar.com/avatar/a65d07ea1835bde4c52ca144f9269930?s=600&d=blank&r=g","twitter":null,"facebook":null,"instagram":null,"linkedin":null,"sites":[{"site":"bayareabites","roles":["author"]},{"site":"food","roles":["contributor"]}],"headData":{"title":"Trevor Felch | KQED","description":null,"ogImgSrc":"https://secure.gravatar.com/avatar/a65d07ea1835bde4c52ca144f9269930?s=600&d=blank&r=g","twImgSrc":"https://secure.gravatar.com/avatar/a65d07ea1835bde4c52ca144f9269930?s=600&d=blank&r=g"},"isLoading":false,"link":"/author/trevorfelch"},"owon":{"type":"authors","id":"11614","meta":{"index":"authors_1591205172","id":"11614","found":true},"name":"Olivia Won","firstName":"Olivia","lastName":"Won","slug":"owon","email":"owon@kqed.org","display_author_email":false,"staff_mastheads":[],"title":null,"bio":"\u003cspan style=\"font-weight: 400;\">Olivia Won is a writer, producer, and plant-tender living in her hometown of Oakland, California. She currently works with KQED Food, where she writes about Bay Area food culture and produces \u003c/span>\u003ci>\u003cspan style=\"font-weight: 400;\">Check, Please! Bay Area\u003c/span>\u003c/i>\u003cspan style=\"font-weight: 400;\">. \u003c/span>","avatar":"https://secure.gravatar.com/avatar/a0ce8718461a291f08887a424d1ce561?s=600&d=blank&r=g","twitter":null,"facebook":null,"instagram":null,"linkedin":null,"sites":[{"site":"bayareabites","roles":["editor"]},{"site":"checkplease","roles":["editor"]},{"site":"food","roles":["editor"]}],"headData":{"title":"Olivia Won | KQED","description":null,"ogImgSrc":"https://secure.gravatar.com/avatar/a0ce8718461a291f08887a424d1ce561?s=600&d=blank&r=g","twImgSrc":"https://secure.gravatar.com/avatar/a0ce8718461a291f08887a424d1ce561?s=600&d=blank&r=g"},"isLoading":false,"link":"/author/owon"},"rgebreyesus":{"type":"authors","id":"11625","meta":{"index":"authors_1591205172","id":"11625","found":true},"name":"Ruth Gebreyesus","firstName":"Ruth","lastName":"Gebreyesus","slug":"rgebreyesus","email":"rgebreyesus@KQED.org","display_author_email":false,"staff_mastheads":[],"title":"Food Writer","bio":"Ruth Gebreyesus is a freelance writer and producer based in the Bay Area. Through stories across various mediums, Ruth explores the creation and consumption of cultural products. You can find more of her work \u003ca href=\"https://www.kotetakotet.com/\">here\u003c/a>.","avatar":"https://secure.gravatar.com/avatar/68980beab511750abbb1a58f1c768b45?s=600&d=blank&r=g","twitter":"root_g","facebook":null,"instagram":null,"linkedin":null,"sites":[{"site":"arts","roles":["subscriber"]},{"site":"bayareabites","roles":["subscriber"]},{"site":"checkplease","roles":["editor"]},{"site":"food","roles":["editor"]}],"headData":{"title":"Ruth Gebreyesus | KQED","description":"Food Writer","ogImgSrc":"https://secure.gravatar.com/avatar/68980beab511750abbb1a58f1c768b45?s=600&d=blank&r=g","twImgSrc":"https://secure.gravatar.com/avatar/68980beab511750abbb1a58f1c768b45?s=600&d=blank&r=g"},"isLoading":false,"link":"/author/rgebreyesus"}},"breakingNewsReducer":{},"campaignFinanceReducer":{},"firebase":{"requesting":{},"requested":{},"timestamps":{},"data":{},"ordered":{},"auth":{"isLoaded":false,"isEmpty":true},"authError":null,"profile":{"isLoaded":false,"isEmpty":true},"listeners":{"byId":{},"allIds":[]},"isInitializing":false,"errors":[]},"navBarReducer":{"navBarId":"arts","fullView":true,"showPlayer":false},"navMenuReducer":{"menus":[{"key":"menu1","items":[{"name":"News","link":"/","type":"title"},{"name":"Politics","link":"/politics"},{"name":"Science","link":"/science"},{"name":"Education","link":"/educationnews"},{"name":"Housing","link":"/housing"},{"name":"Immigration","link":"/immigration"},{"name":"Criminal Justice","link":"/criminaljustice"},{"name":"Silicon Valley","link":"/siliconvalley"},{"name":"Forum","link":"/forum"},{"name":"The California Report","link":"/californiareport"}]},{"key":"menu2","items":[{"name":"Arts & Culture","link":"/arts","type":"title"},{"name":"Critics’ Picks","link":"/thedolist"},{"name":"Cultural Commentary","link":"/artscommentary"},{"name":"Food & Drink","link":"/food"},{"name":"Bay Area Hip-Hop","link":"/bayareahiphop"},{"name":"Rebel Girls","link":"/rebelgirls"},{"name":"Arts Video","link":"/artsvideos"}]},{"key":"menu3","items":[{"name":"Podcasts","link":"/podcasts","type":"title"},{"name":"Bay Curious","link":"/podcasts/baycurious"},{"name":"Rightnowish","link":"/podcasts/rightnowish"},{"name":"The Bay","link":"/podcasts/thebay"},{"name":"On Our Watch","link":"/podcasts/onourwatch"},{"name":"Mindshift","link":"/podcasts/mindshift"},{"name":"Consider This","link":"/podcasts/considerthis"},{"name":"Political Breakdown","link":"/podcasts/politicalbreakdown"}]},{"key":"menu4","items":[{"name":"Live Radio","link":"/radio","type":"title"},{"name":"TV","link":"/tv","type":"title"},{"name":"Events","link":"/events","type":"title"},{"name":"For Educators","link":"/education","type":"title"},{"name":"Support KQED","link":"/support","type":"title"},{"name":"About","link":"/about","type":"title"},{"name":"Help Center","link":"https://kqed-helpcenter.kqed.org/s","type":"title"}]}]},"pagesReducer":{},"postsReducer":{"stream_live":{"type":"live","id":"stream_live","audioUrl":"https://streams.kqed.org/kqedradio","title":"Live Stream","excerpt":"Live Stream information currently unavailable.","link":"/radio","featImg":"","label":{"name":"KQED Live","link":"/"}},"stream_kqedNewscast":{"type":"posts","id":"stream_kqedNewscast","audioUrl":"https://www.kqed.org/.stream/anon/radio/RDnews/newscast.mp3?_=1","title":"KQED Newscast","featImg":"","label":{"name":"88.5 FM","link":"/"}},"bayareabites_139616":{"type":"posts","id":"bayareabites_139616","meta":{"index":"posts_1591205157","site":"bayareabites","id":"139616","score":null,"sort":[1606333913000]},"guestAuthors":[],"slug":"the-pasta-king-trusted-us-on-our-honor","title":"The Pasta King Trusted Us—On Our Honor","publishDate":1606333913,"format":"standard","headTitle":"Bay Area Bites | KQED Food","labelTerm":{},"content":"\u003cp>\u003cspan style=\"font-size: 4.6875em;float: left;line-height: 0.733em;padding: 0.05em 0.1em 0 0;font-family: times, serif, georgia\">I\u003c/span>nside the spacious kitchen shed at his Cotati home where he made his famous pasta, Art Ibleto taped a sign to the large industrial refrigerator:\u003c/p>\n\u003cblockquote>\u003cp>WE TRUST YOU. PLEASE TAKE WHAT YOU NEED AND LEAVE THE MONEY ON THE TABLE. —PASTA KING.\u003c/p>\u003c/blockquote>\n\u003cp>For drivers who’d notice the “Pasta King” sign from the rural Sonoma County road and pull into in Ibleto’s driveway, the door to the kitchen was always unlocked. The fridge was always full of penne, marinara, pesto and lasagna. And when Ibleto wasn’t around to take people’s money, the desk was nearly always covered with folds of cash next to the touch-tone landline phone and old Rolodex, accompanied by notes of appreciation. \u003c/p>\n\u003cp>Ibleto, who \u003ca href=\"https://www.pressdemocrat.com/article/news/art-ibleto-sonoma-countys-pasta-king-dies-at-94/\" rel=\"noopener noreferrer\" target=\"_blank\">died Tuesday morning\u003c/a> at the age of 94, was the kind of person for whom this honor system was natural, instead of novel. For all of Ibleto’s philanthropy and civic service to the Sonoma County community that he adopted as a young immigrant from Italy, one fact sticks with many of the Pasta King’s fans most: he trusted you. \u003c/p>\n\u003cfigure id=\"attachment_139620\" class=\"wp-caption aligncenter\" style=\"max-width: 800px\">\u003cimg src=\"https://ww2.kqed.org/app/uploads/sites/24/2020/11/DDM33ZoV0AUup6Y-800x600.jpg\" alt=\"Piles of cash on the desk of the Pasta King at his Cotati kitchen.\" width=\"800\" height=\"600\" class=\"size-medium wp-image-139620\" srcset=\"https://ww2.kqed.org/app/uploads/sites/24/2020/11/DDM33ZoV0AUup6Y-800x600.jpg 800w, https://ww2.kqed.org/app/uploads/sites/24/2020/11/DDM33ZoV0AUup6Y-1020x765.jpg 1020w, https://ww2.kqed.org/app/uploads/sites/24/2020/11/DDM33ZoV0AUup6Y-160x120.jpg 160w, https://ww2.kqed.org/app/uploads/sites/24/2020/11/DDM33ZoV0AUup6Y-768x576.jpg 768w, https://ww2.kqed.org/app/uploads/sites/24/2020/11/DDM33ZoV0AUup6Y.jpg 1024w\" sizes=\"(max-width: 800px) 100vw, 800px\">\u003cfigcaption class=\"wp-caption-text\">Piles of cash on the desk of the Pasta King at his Cotati kitchen. \u003ccite>(Gabe Meline)\u003c/cite>\u003c/figcaption>\u003c/figure>\n\u003cp>The word “iconic” is overused these days. But Ibleto was, without question, a Sonoma County icon. The man was everywhere—at the Sonoma County Fairgrounds where he built his “\u003ca href=\"https://i.imgur.com/akeut6b.jpg\" rel=\"noopener noreferrer\" target=\"_blank\">Spaghetti Palace\u003c/a>” in the early 1970s; at Santa Rosa’s Wednesday Night Market; at all manner of charity feeds and bakes and luncheons and parties, many for which he donated his time and food; at special events, celebrations, weddings and funerals; and back at his \u003ca href=\"https://petalumaunwound.files.wordpress.com/2015/02/img_1839.jpg\" rel=\"noopener noreferrer\" target=\"_blank\">home kitchen in Cotati\u003c/a>, where he’d greet visitors in a thick Italian accent: “Ciao bella! You like pasta? Red or green?”\u003c/p>\n\u003cp>[ad fullwidth]\u003c/p>\n\u003cp>Ibleto’s life wasn’t always so public. As a teenager in Italy drafted into Mussolini’s army, he escaped and joined the resistance forces as an underground freedom fighter in hiding, planting explosives on roads and railroads to thwart fascism’s spread across Europe. At 22, he immigrated to the United States and settled in Petaluma, trusting not only the people in his new chosen home, but in hard work, common sense and a we’re-all-in-this-together belief. \u003c/p>\n\u003cp>Over at the \u003cem>\u003ca href=\"https://www.pressdemocrat.com/article/news/art-ibleto-sonoma-countys-pasta-king-dies-at-94/\" rel=\"noopener noreferrer\" target=\"_blank\">Press Democrat\u003c/a>\u003c/em>, Ibleto’s longtime friend and biographer Chris Smith tells the details of the Pasta King’s long life, including his business ventures and philanthropy. It’s \u003ca href=\"https://www.pressdemocrat.com/article/news/art-ibleto-sonoma-countys-pasta-king-dies-at-94/\" rel=\"noopener noreferrer\" target=\"_blank\">worth a read\u003c/a>.\u003c/p>\n\u003cfigure id=\"attachment_139619\" class=\"wp-caption aligncenter\" style=\"max-width: 800px\">\u003cimg src=\"https://ww2.kqed.org/app/uploads/sites/24/2020/11/DDM33ZmVwAEIMO9-800x600.jpg\" alt=\"A sign on the Pasta King's refrigerator instructed visitors to leave cash for their purchases.\" width=\"800\" height=\"600\" class=\"size-medium wp-image-139619\" srcset=\"https://ww2.kqed.org/app/uploads/sites/24/2020/11/DDM33ZmVwAEIMO9-800x600.jpg 800w, https://ww2.kqed.org/app/uploads/sites/24/2020/11/DDM33ZmVwAEIMO9-1020x765.jpg 1020w, https://ww2.kqed.org/app/uploads/sites/24/2020/11/DDM33ZmVwAEIMO9-160x120.jpg 160w, https://ww2.kqed.org/app/uploads/sites/24/2020/11/DDM33ZmVwAEIMO9-768x576.jpg 768w, https://ww2.kqed.org/app/uploads/sites/24/2020/11/DDM33ZmVwAEIMO9.jpg 1024w\" sizes=\"(max-width: 800px) 100vw, 800px\">\u003cfigcaption class=\"wp-caption-text\">A sign on the Pasta King's refrigerator instructed visitors to leave cash for their purchases. \u003ccite>(Gabe Meline)\u003c/cite>\u003c/figcaption>\u003c/figure>\n\u003cp>\u003cspan style=\"font-size: 4.6875em;float: left;line-height: 0.733em;padding: 0.05em 0.1em 0 0;font-family: times, serif, georgia\">B\u003c/span>ut Ibleto touched even those who hadn’t the faintest awareness of his stature in the community. Often, he ignored his own honor system and simply gave pasta away for free—to those down on their luck, or to people he thought looked too thin—a gesture that was rarely forgotten. \u003c/p>\n\u003cp>The whole reason I’m writing this, probably, is because I was one of those people once, a skinny kid without the $6 for a plate of pasta at Santa Rosa’s Wednesday Night Market. Later, when my wife and I got married, it only made sense to hire the Pasta King to cater our wedding; even later, when we had a daughter, we occasionally brought her by Ibleto’s place so he could see the results.\u003c/p>\n\u003cfigure id=\"attachment_139618\" class=\"wp-caption aligncenter\" style=\"max-width: 800px\">\u003cimg src=\"https://ww2.kqed.org/app/uploads/sites/24/2020/11/PastaKing.Lena_-800x800.jpg\" alt=\"The Pasta King with the author's daughter\" width=\"800\" height=\"800\" class=\"size-medium wp-image-139618\" srcset=\"https://ww2.kqed.org/app/uploads/sites/24/2020/11/PastaKing.Lena_-800x800.jpg 800w, https://ww2.kqed.org/app/uploads/sites/24/2020/11/PastaKing.Lena_-1020x1020.jpg 1020w, https://ww2.kqed.org/app/uploads/sites/24/2020/11/PastaKing.Lena_-160x160.jpg 160w, https://ww2.kqed.org/app/uploads/sites/24/2020/11/PastaKing.Lena_-768x768.jpg 768w, https://ww2.kqed.org/app/uploads/sites/24/2020/11/PastaKing.Lena_.jpg 1080w\" sizes=\"(max-width: 800px) 100vw, 800px\">\u003cfigcaption class=\"wp-caption-text\">“Your name Lena? Good Italian name! What kind of pasta you like? I give to you, you no pay!” \u003ccite>(Gabe Meline)\u003c/cite>\u003c/figcaption>\u003c/figure>\n\u003cp>\u003cspan style=\"font-size: 4.6875em;float: left;line-height: 0.733em;padding: 0.05em 0.1em 0 0;font-family: times, serif, georgia\">A\u003c/span>nd of course, there was his loud, deep laugh. When, a few years back, I found myself without the proper change to leave on his old wooden desk for some lasagna, I knew I couldn’t cheat his trust. So I wrote him a letter when I got home and enclosed the missing amount of two quarters, taped to the letter, with two stamps to cover the extra weight. \u003c/p>\n\u003cp>Ibleto never put the quarters in his till. Instead, he \u003ca href=\"https://www.facebook.com/gmeline/posts/10203999120075892:0\" rel=\"noopener noreferrer\" target=\"_blank\">taped the letter to his refrigerator\u003c/a>, along with the quarters and the stamps, in what many presumed was a proud display of reciprocal trust; the public’s allegiance to the honor system.\u003c/p>\n\u003cp>I learned the real reason later, when a friend reported stopping in and telling Ibleto that he knew the sender of the quarters. Ibleto pointed to the stamps, amused. \u003c/p>\n\u003cp>“He your friend? You see what he do?!” Ibleto said. “He spend 88 cents to send me 50 cents! Maybe I have a bridge to sell him!” \u003c/p>\n\u003cp>And then, after a long, heavy laugh, he looked up and said, “So. You like pasta? Red or green?”\u003c/p>\n\u003cp>And that was the Pasta King. It truly won't be the same without his huge, gracious presence here in Sonoma County. \u003c/p>\n\u003cp>\u003cimg src=\"https://ww2.kqed.org/app/uploads/sites/24/2020/11/Q.Logo_.Break_.jpg\" alt=\"\" width=\"800\" height=\"78\" class=\"aligncenter size-full wp-image-139626\" srcset=\"https://ww2.kqed.org/app/uploads/sites/24/2020/11/Q.Logo_.Break_.jpg 800w, https://ww2.kqed.org/app/uploads/sites/24/2020/11/Q.Logo_.Break_-160x16.jpg 160w, https://ww2.kqed.org/app/uploads/sites/24/2020/11/Q.Logo_.Break_-768x75.jpg 768w\" sizes=\"(max-width: 800px) 100vw, 800px\">\u003c/p>\n\u003cp>\u003cem>Learn more about the Pasta King \u003ca href=\"https://www.pressdemocrat.com/article/news/art-ibleto-sonoma-countys-pasta-king-dies-at-94/\" rel=\"noopener noreferrer\" target=\"_blank\">here\u003c/a>.\u003c/em>\u003c/p>\n\u003cp>\u003c/p>\n","blocks":[],"excerpt":"Art Ibleto, who died Tuesday at age 94, was a genuine Sonoma County icon.","status":"publish","parent":0,"modified":1628811746,"stats":{"hasAudio":false,"hasVideo":false,"hasChartOrMap":false,"iframeSrcs":[],"hasGoogleForm":false,"hasGallery":false,"hasHearkenModule":false,"hasPolis":false,"paragraphCount":19,"wordCount":836},"headData":{"title":"The Pasta King Trusted Us—On Our Honor | KQED","description":"Art Ibleto, who died Tuesday at age 94, was a genuine Sonoma County icon.","ogTitle":"","ogDescription":"","ogImgId":"","twTitle":"","twDescription":"","twImgId":"","schema":{"@context":"http://schema.org","@type":"Article","headline":"The Pasta King Trusted Us—On Our Honor","datePublished":"2020-11-25T19:51:53.000Z","dateModified":"2021-08-12T23:42:26.000Z","image":"https://cdn.kqed.org/wp-content/uploads/2020/02/KQED-OG-Image@1x.png"}},"disqusIdentifier":"139616 https://ww2.kqed.org/bayareabites/?p=139616","disqusUrl":"https://ww2.kqed.org/bayareabites/2020/11/25/the-pasta-king-trusted-us-on-our-honor/","disqusTitle":"The Pasta King Trusted Us—On Our Honor","source":"Food","sourceUrl":"/food/","templateType":"standard","featuredImageType":"standard","path":"/bayareabites/139616/the-pasta-king-trusted-us-on-our-honor","audioTrackLength":null,"parsedContent":[{"type":"contentString","content":"\u003cdiv class=\"post-body\">\u003cp>\u003cp>\u003cspan style=\"font-size: 4.6875em;float: left;line-height: 0.733em;padding: 0.05em 0.1em 0 0;font-family: times, serif, georgia\">I\u003c/span>nside the spacious kitchen shed at his Cotati home where he made his famous pasta, Art Ibleto taped a sign to the large industrial refrigerator:\u003c/p>\n\u003cblockquote>\u003cp>WE TRUST YOU. PLEASE TAKE WHAT YOU NEED AND LEAVE THE MONEY ON THE TABLE. —PASTA KING.\u003c/p>\u003c/blockquote>\n\u003cp>For drivers who’d notice the “Pasta King” sign from the rural Sonoma County road and pull into in Ibleto’s driveway, the door to the kitchen was always unlocked. The fridge was always full of penne, marinara, pesto and lasagna. And when Ibleto wasn’t around to take people’s money, the desk was nearly always covered with folds of cash next to the touch-tone landline phone and old Rolodex, accompanied by notes of appreciation. \u003c/p>\n\u003cp>Ibleto, who \u003ca href=\"https://www.pressdemocrat.com/article/news/art-ibleto-sonoma-countys-pasta-king-dies-at-94/\" rel=\"noopener noreferrer\" target=\"_blank\">died Tuesday morning\u003c/a> at the age of 94, was the kind of person for whom this honor system was natural, instead of novel. For all of Ibleto’s philanthropy and civic service to the Sonoma County community that he adopted as a young immigrant from Italy, one fact sticks with many of the Pasta King’s fans most: he trusted you. \u003c/p>\n\u003cfigure id=\"attachment_139620\" class=\"wp-caption aligncenter\" style=\"max-width: 800px\">\u003cimg src=\"https://ww2.kqed.org/app/uploads/sites/24/2020/11/DDM33ZoV0AUup6Y-800x600.jpg\" alt=\"Piles of cash on the desk of the Pasta King at his Cotati kitchen.\" width=\"800\" height=\"600\" class=\"size-medium wp-image-139620\" srcset=\"https://ww2.kqed.org/app/uploads/sites/24/2020/11/DDM33ZoV0AUup6Y-800x600.jpg 800w, https://ww2.kqed.org/app/uploads/sites/24/2020/11/DDM33ZoV0AUup6Y-1020x765.jpg 1020w, https://ww2.kqed.org/app/uploads/sites/24/2020/11/DDM33ZoV0AUup6Y-160x120.jpg 160w, https://ww2.kqed.org/app/uploads/sites/24/2020/11/DDM33ZoV0AUup6Y-768x576.jpg 768w, https://ww2.kqed.org/app/uploads/sites/24/2020/11/DDM33ZoV0AUup6Y.jpg 1024w\" sizes=\"(max-width: 800px) 100vw, 800px\">\u003cfigcaption class=\"wp-caption-text\">Piles of cash on the desk of the Pasta King at his Cotati kitchen. \u003ccite>(Gabe Meline)\u003c/cite>\u003c/figcaption>\u003c/figure>\n\u003cp>The word “iconic” is overused these days. But Ibleto was, without question, a Sonoma County icon. The man was everywhere—at the Sonoma County Fairgrounds where he built his “\u003ca href=\"https://i.imgur.com/akeut6b.jpg\" rel=\"noopener noreferrer\" target=\"_blank\">Spaghetti Palace\u003c/a>” in the early 1970s; at Santa Rosa’s Wednesday Night Market; at all manner of charity feeds and bakes and luncheons and parties, many for which he donated his time and food; at special events, celebrations, weddings and funerals; and back at his \u003ca href=\"https://petalumaunwound.files.wordpress.com/2015/02/img_1839.jpg\" rel=\"noopener noreferrer\" target=\"_blank\">home kitchen in Cotati\u003c/a>, where he’d greet visitors in a thick Italian accent: “Ciao bella! You like pasta? Red or green?”\u003c/p>\n\u003cp>\u003c/p>\u003c/div>","attributes":{"named":{},"numeric":[]}},{"type":"component","content":"","name":"ad","attributes":{"named":{"label":"fullwidth"},"numeric":["fullwidth"]}},{"type":"contentString","content":"\u003cdiv class=\"post-body\">\u003cp>\u003c/p>\n\u003cp>Ibleto’s life wasn’t always so public. As a teenager in Italy drafted into Mussolini’s army, he escaped and joined the resistance forces as an underground freedom fighter in hiding, planting explosives on roads and railroads to thwart fascism’s spread across Europe. At 22, he immigrated to the United States and settled in Petaluma, trusting not only the people in his new chosen home, but in hard work, common sense and a we’re-all-in-this-together belief. \u003c/p>\n\u003cp>Over at the \u003cem>\u003ca href=\"https://www.pressdemocrat.com/article/news/art-ibleto-sonoma-countys-pasta-king-dies-at-94/\" rel=\"noopener noreferrer\" target=\"_blank\">Press Democrat\u003c/a>\u003c/em>, Ibleto’s longtime friend and biographer Chris Smith tells the details of the Pasta King’s long life, including his business ventures and philanthropy. It’s \u003ca href=\"https://www.pressdemocrat.com/article/news/art-ibleto-sonoma-countys-pasta-king-dies-at-94/\" rel=\"noopener noreferrer\" target=\"_blank\">worth a read\u003c/a>.\u003c/p>\n\u003cfigure id=\"attachment_139619\" class=\"wp-caption aligncenter\" style=\"max-width: 800px\">\u003cimg src=\"https://ww2.kqed.org/app/uploads/sites/24/2020/11/DDM33ZmVwAEIMO9-800x600.jpg\" alt=\"A sign on the Pasta King's refrigerator instructed visitors to leave cash for their purchases.\" width=\"800\" height=\"600\" class=\"size-medium wp-image-139619\" srcset=\"https://ww2.kqed.org/app/uploads/sites/24/2020/11/DDM33ZmVwAEIMO9-800x600.jpg 800w, https://ww2.kqed.org/app/uploads/sites/24/2020/11/DDM33ZmVwAEIMO9-1020x765.jpg 1020w, https://ww2.kqed.org/app/uploads/sites/24/2020/11/DDM33ZmVwAEIMO9-160x120.jpg 160w, https://ww2.kqed.org/app/uploads/sites/24/2020/11/DDM33ZmVwAEIMO9-768x576.jpg 768w, https://ww2.kqed.org/app/uploads/sites/24/2020/11/DDM33ZmVwAEIMO9.jpg 1024w\" sizes=\"(max-width: 800px) 100vw, 800px\">\u003cfigcaption class=\"wp-caption-text\">A sign on the Pasta King's refrigerator instructed visitors to leave cash for their purchases. \u003ccite>(Gabe Meline)\u003c/cite>\u003c/figcaption>\u003c/figure>\n\u003cp>\u003cspan style=\"font-size: 4.6875em;float: left;line-height: 0.733em;padding: 0.05em 0.1em 0 0;font-family: times, serif, georgia\">B\u003c/span>ut Ibleto touched even those who hadn’t the faintest awareness of his stature in the community. Often, he ignored his own honor system and simply gave pasta away for free—to those down on their luck, or to people he thought looked too thin—a gesture that was rarely forgotten. \u003c/p>\n\u003cp>The whole reason I’m writing this, probably, is because I was one of those people once, a skinny kid without the $6 for a plate of pasta at Santa Rosa’s Wednesday Night Market. Later, when my wife and I got married, it only made sense to hire the Pasta King to cater our wedding; even later, when we had a daughter, we occasionally brought her by Ibleto’s place so he could see the results.\u003c/p>\n\u003cfigure id=\"attachment_139618\" class=\"wp-caption aligncenter\" style=\"max-width: 800px\">\u003cimg src=\"https://ww2.kqed.org/app/uploads/sites/24/2020/11/PastaKing.Lena_-800x800.jpg\" alt=\"The Pasta King with the author's daughter\" width=\"800\" height=\"800\" class=\"size-medium wp-image-139618\" srcset=\"https://ww2.kqed.org/app/uploads/sites/24/2020/11/PastaKing.Lena_-800x800.jpg 800w, https://ww2.kqed.org/app/uploads/sites/24/2020/11/PastaKing.Lena_-1020x1020.jpg 1020w, https://ww2.kqed.org/app/uploads/sites/24/2020/11/PastaKing.Lena_-160x160.jpg 160w, https://ww2.kqed.org/app/uploads/sites/24/2020/11/PastaKing.Lena_-768x768.jpg 768w, https://ww2.kqed.org/app/uploads/sites/24/2020/11/PastaKing.Lena_.jpg 1080w\" sizes=\"(max-width: 800px) 100vw, 800px\">\u003cfigcaption class=\"wp-caption-text\">“Your name Lena? Good Italian name! What kind of pasta you like? I give to you, you no pay!” \u003ccite>(Gabe Meline)\u003c/cite>\u003c/figcaption>\u003c/figure>\n\u003cp>\u003cspan style=\"font-size: 4.6875em;float: left;line-height: 0.733em;padding: 0.05em 0.1em 0 0;font-family: times, serif, georgia\">A\u003c/span>nd of course, there was his loud, deep laugh. When, a few years back, I found myself without the proper change to leave on his old wooden desk for some lasagna, I knew I couldn’t cheat his trust. So I wrote him a letter when I got home and enclosed the missing amount of two quarters, taped to the letter, with two stamps to cover the extra weight. \u003c/p>\n\u003cp>Ibleto never put the quarters in his till. Instead, he \u003ca href=\"https://www.facebook.com/gmeline/posts/10203999120075892:0\" rel=\"noopener noreferrer\" target=\"_blank\">taped the letter to his refrigerator\u003c/a>, along with the quarters and the stamps, in what many presumed was a proud display of reciprocal trust; the public’s allegiance to the honor system.\u003c/p>\n\u003cp>I learned the real reason later, when a friend reported stopping in and telling Ibleto that he knew the sender of the quarters. Ibleto pointed to the stamps, amused. \u003c/p>\n\u003cp>“He your friend? You see what he do?!” Ibleto said. “He spend 88 cents to send me 50 cents! Maybe I have a bridge to sell him!” \u003c/p>\n\u003cp>And then, after a long, heavy laugh, he looked up and said, “So. You like pasta? Red or green?”\u003c/p>\n\u003cp>And that was the Pasta King. It truly won't be the same without his huge, gracious presence here in Sonoma County. \u003c/p>\n\u003cp>\u003cimg src=\"https://ww2.kqed.org/app/uploads/sites/24/2020/11/Q.Logo_.Break_.jpg\" alt=\"\" width=\"800\" height=\"78\" class=\"aligncenter size-full wp-image-139626\" srcset=\"https://ww2.kqed.org/app/uploads/sites/24/2020/11/Q.Logo_.Break_.jpg 800w, https://ww2.kqed.org/app/uploads/sites/24/2020/11/Q.Logo_.Break_-160x16.jpg 160w, https://ww2.kqed.org/app/uploads/sites/24/2020/11/Q.Logo_.Break_-768x75.jpg 768w\" sizes=\"(max-width: 800px) 100vw, 800px\">\u003c/p>\n\u003cp>\u003cem>Learn more about the Pasta King \u003ca href=\"https://www.pressdemocrat.com/article/news/art-ibleto-sonoma-countys-pasta-king-dies-at-94/\" rel=\"noopener noreferrer\" target=\"_blank\">here\u003c/a>.\u003c/em>\u003c/p>\n\u003cp>\u003c/p>\n\u003c/div>\u003c/p>","attributes":{"named":{},"numeric":[]}}],"link":"/bayareabites/139616/the-pasta-king-trusted-us-on-our-honor","authors":["185"],"categories":["bayareabites_16558","bayareabites_17082","bayareabites_15155","bayareabites_16794","bayareabites_15156"],"tags":["bayareabites_17045","bayareabites_17048","bayareabites_17044","bayareabites_16575","bayareabites_14177","bayareabites_17046","bayareabites_755","bayareabites_17043","bayareabites_17049","bayareabites_17047","bayareabites_14869"],"featImg":"bayareabites_139621","label":"source_bayareabites_139616"},"bayareabites_138982":{"type":"posts","id":"bayareabites_138982","meta":{"index":"posts_1591205157","site":"bayareabites","id":"138982","score":null,"sort":[1601650853000]},"guestAuthors":[],"slug":"how-colonialism-brought-a-new-evolution-of-pasta-to-east-africa","title":"How Colonialism Brought a New Evolution of Pasta to East Africa","publishDate":1601650853,"format":"standard","headTitle":"Bay Area Bites | KQED Food","labelTerm":{},"content":"\u003cp>\u003cspan style=\"font-weight: 400\">A starch paired with another starch is an already dubious inclination, but spaghetti laced with a berbere-fortified tomato sauce and served on injera is even more so. The two carbs, one splayed flat with the other piled in a nest on top, appear to be unnatural companions on a plate. Yet the occurrence of this pairing in Ethiopian restaurants and homes qualifies this as a dish worth considering. And that consideration leads to a conversation about colonialism. \u003c/span>\u003c/p>\n\u003cp>\u003cspan style=\"font-weight: 400\">Italy’s colonial interest in East Africa spread from present-day Eritrea, down the coast of the Red Sea to Somalia and inland to Ethiopia. From the late-19th century to the 1940s, these territories were seized, ruled or occupied. Italy’s monarchy, then its fascist regime, carried out massacres and the subjugation and segregation of people whose land they sought to make their own. If spaghetti appeared in this corner of the world before, this bloody period is one that guaranteed its stay. \u003c/span>\u003c/p>\n\u003cp>[aside tag=\"noodles2020\" label=\"More Noodles.\"]\u003c/p>\n\u003cp>\u003cspan style=\"font-weight: 400\">In Somalia, a particular kind of spaghetti dish is ubiquitous. Those noodles are served with suugo suqaar, an often meat-enriched,\u003c/span>\u003ca href=\"https://www.theguardian.com/food/2019/jul/14/recipe-that-reminds-me-of-home-souvlaki-somali-bean-stew\">\u003cspan style=\"font-weight: 400\"> xawaash\u003c/span>\u003c/a>-\u003cspan style=\"font-weight: 400\">spiced tomato sauce. As with other savory dishes from the coastal nation, a banana is offered on the side to be peeled, chopped and distributed throughout the warmly-spiced pasta, adding both a sweet note and a different texture of starchiness. \u003c/span>\u003c/p>\n\u003cp>\u003cspan style=\"font-weight: 400\">In both East African iterations of spaghetti, the preparation and presentation firmly bend the Italian dish towards centuries-old local tastes. The interventions at play, of spices and other starches, have no allegiance to European techniques. This defiance tells a particular story about food’s movement across cultural and national margins. Appropriation is a mode of transit we see often lamented in cultural writing—an erasure of authorship often followed by manufacturing at a capitalistic pace and design. Spaghetti on injera or with suugo suqaar are born out of a different modality: the absorption of a cultural product introduced by abject violence and forced occupation. \u003c/span>\u003c/p>\n\u003cp>[ad fullwidth]\u003c/p>\n\u003cp>https://youtu.be/LFmmQ4G9xk4\u003c/p>\n\u003cp>\u003cspan style=\"font-weight: 400\">There’s something about pasta’s bipartite composition of noodles and sauce that takes well to modifications and possibilities. There’s also what writer Hannah Giorgis called a “\u003c/span>\u003ca href=\"https://www.tastecooking.com/ethiopian-diasporas-long-history-lasagna/\">\u003cspan style=\"font-weight: 400\">culinary rebellion\u003c/span>\u003c/a>\u003cspan style=\"font-weight: 400\">” when she wrote about lasagna’s ubiquitous presence among a sea of indigenous fare at Eritrean and Ethiopian gatherings. As Giorgis described it, lasagna in East Africa is a richly spiced, conservatively cheesed version—all revisions that honor the local appetites. It’d be unfair to say all of these choices are political by intention. \u003c/span>\u003c/p>\n\u003cfigure id=\"attachment_138988\" class=\"wp-caption alignnone\" style=\"max-width: 800px\">\u003cimg class=\"size-medium wp-image-138988\" src=\"https://ww2.kqed.org/app/uploads/sites/24/2020/09/IMG_3441-scaled-e1601069423219-800x1067.jpg\" alt=\"a meat and vegetable dish at Somali restaurant Jubba\" width=\"800\" height=\"1067\" srcset=\"https://ww2.kqed.org/app/uploads/sites/24/2020/09/IMG_3441-scaled-e1601069423219-800x1067.jpg 800w, https://ww2.kqed.org/app/uploads/sites/24/2020/09/IMG_3441-scaled-e1601069423219-1020x1360.jpg 1020w, https://ww2.kqed.org/app/uploads/sites/24/2020/09/IMG_3441-scaled-e1601069423219-160x213.jpg 160w, https://ww2.kqed.org/app/uploads/sites/24/2020/09/IMG_3441-scaled-e1601069423219-768x1024.jpg 768w, https://ww2.kqed.org/app/uploads/sites/24/2020/09/IMG_3441-scaled-e1601069423219-1152x1536.jpg 1152w, https://ww2.kqed.org/app/uploads/sites/24/2020/09/IMG_3441-scaled-e1601069423219-1536x2048.jpg 1536w, https://ww2.kqed.org/app/uploads/sites/24/2020/09/IMG_3441-scaled-e1601069423219.jpg 1920w\" sizes=\"(max-width: 800px) 100vw, 800px\">\u003cfigcaption class=\"wp-caption-text\">One of the dishes at Jubba in San Jose. \u003ccite>(KQED)\u003c/cite>\u003c/figcaption>\u003c/figure>\n\u003cp>\u003cspan style=\"font-weight: 400\">At San Jose’s \u003c/span>\u003ca href=\"https://www.google.com/search?q=jubba+kqed&oq=jubba+kqed&aqs=chrome..69i57.2640j0j7&sourceid=chrome&ie=UTF-8\">\u003cspan style=\"font-weight: 400\">Jubba\u003c/span>\u003c/a>\u003cspan style=\"font-weight: 400\">, the Bay Area’s only brick-and-mortar Somali restaurant, you’ll find a menu reflecting the country’s various influences that drifted in via its ports and trading partners. Blending flavors from South Asia, the Middle East and neighboring African nations, Italy’s coercive history in the region lives in the baasto suugo suqaar on the menu. Jubba’s version features tomato paste, tomato sauce, bell peppers, onions, garlic, cilantro and xawaash, a blend of aromatic spices including cinnamon, cumin and cardamom, among others. “It’s a really robust pasta,” said Jubba cook Antonio Gomez, who worked at an Italian restaurant kitchen before joining the kitchen at the South Bay eatery two years ago. “It’s unique. You don’t get that flavor in Italian pasta.” \u003c/span>\u003c/p>\n\u003cp>https://www.instagram.com/p/LTsXeRFMaM/\u003c/p>\n\u003cp>\u003cspan style=\"font-weight: 400\">Owner Amina Nur’s daughter, Leyla Mohamed, has her preferences when it comes to the dish, which can be served with beef, chicken or meat-free. “I like the tuna suugo and my family likes it with ground beef,” Mohamed said. Asked about the Somali’s transformation of Italian pasta, Mohamed sees it simply: “We like flavorful [food]. So it gives it extra flavor instead of it being plain.” Hence the spices, the banana and sometimes even a squeeze of lime juice. \u003c/span>\u003c/p>\n\u003cp>\u003cspan style=\"font-weight: 400\">The first instance of an injera-swaddled pasta bite likely came as a circumstance of the two things sharing a plate. A noodle slinking away into a bite of injera and wot. Now, this combination is something that can be ordered at a restaurant where pasta shares equal real estate with native stews and greens on one platter. Suugo with pasta similarly shares a plate and flavor profiles with Somali-born dishes. \u003c/span>\u003c/p>\n\u003cp>\u003c/p>\n\u003cp>\u003cspan style=\"font-weight: 400\">The source of pasta of course can never be obfuscated and that isn't a righteous venture. The casual way that pasta dishes in East Africa are enjoyed, their \u003c/span>\u003cspan style=\"font-weight: 400\">juxtapositions of starches and histories, don't rely on that rememberance. Rather historical harms are inoculated from the plate by the imposition of local preferences on foreign ingredients. \u003c/span>\u003c/p>\n\n","blocks":[],"excerpt":"Italy has long held ownership of spaghetti, but Ethiopian and Somali chefs evolved the dish away from its colonial origins.","status":"publish","parent":0,"modified":1621632446,"stats":{"hasAudio":false,"hasVideo":false,"hasChartOrMap":false,"iframeSrcs":[],"hasGoogleForm":false,"hasGallery":false,"hasHearkenModule":false,"hasPolis":false,"paragraphCount":12,"wordCount":826},"headData":{"title":"How Colonialism Brought a New Evolution of Pasta to East Africa | KQED","description":"Italy has long held ownership of spaghetti, but Ethiopian and Somali chefs evolved the dish away from its colonial origins.","ogTitle":"","ogDescription":"","ogImgId":"","twTitle":"","twDescription":"","twImgId":"","schema":{"@context":"http://schema.org","@type":"Article","headline":"How Colonialism Brought a New Evolution of Pasta to East Africa","datePublished":"2020-10-02T15:00:53.000Z","dateModified":"2021-05-21T21:27:26.000Z","image":"https://cdn.kqed.org/wp-content/uploads/2020/02/KQED-OG-Image@1x.png"}},"disqusIdentifier":"138982 https://ww2.kqed.org/bayareabites/?p=138982","disqusUrl":"https://ww2.kqed.org/bayareabites/2020/10/02/how-colonialism-brought-a-new-evolution-of-pasta-to-east-africa/","disqusTitle":"How Colonialism Brought a New Evolution of Pasta to East Africa","source":"KQED Noodle Week","sourceUrl":"https://www.kqed.org/noodles","templateType":"standard","featuredImageType":"standard","path":"/bayareabites/138982/how-colonialism-brought-a-new-evolution-of-pasta-to-east-africa","audioTrackLength":null,"parsedContent":[{"type":"contentString","content":"\u003cdiv class=\"post-body\">\u003cp>\u003cp>\u003cspan style=\"font-weight: 400\">A starch paired with another starch is an already dubious inclination, but spaghetti laced with a berbere-fortified tomato sauce and served on injera is even more so. The two carbs, one splayed flat with the other piled in a nest on top, appear to be unnatural companions on a plate. Yet the occurrence of this pairing in Ethiopian restaurants and homes qualifies this as a dish worth considering. And that consideration leads to a conversation about colonialism. \u003c/span>\u003c/p>\n\u003cp>\u003cspan style=\"font-weight: 400\">Italy’s colonial interest in East Africa spread from present-day Eritrea, down the coast of the Red Sea to Somalia and inland to Ethiopia. From the late-19th century to the 1940s, these territories were seized, ruled or occupied. Italy’s monarchy, then its fascist regime, carried out massacres and the subjugation and segregation of people whose land they sought to make their own. If spaghetti appeared in this corner of the world before, this bloody period is one that guaranteed its stay. \u003c/span>\u003c/p>\n\u003cp>\u003c/p>\u003c/div>","attributes":{"named":{},"numeric":[]}},{"type":"component","content":"","name":"aside","attributes":{"named":{"tag":"noodles2020","label":"More Noodles. "},"numeric":[]}},{"type":"contentString","content":"\u003cdiv class=\"post-body\">\u003cp>\u003c/p>\n\u003cp>\u003cspan style=\"font-weight: 400\">In Somalia, a particular kind of spaghetti dish is ubiquitous. Those noodles are served with suugo suqaar, an often meat-enriched,\u003c/span>\u003ca href=\"https://www.theguardian.com/food/2019/jul/14/recipe-that-reminds-me-of-home-souvlaki-somali-bean-stew\">\u003cspan style=\"font-weight: 400\"> xawaash\u003c/span>\u003c/a>-\u003cspan style=\"font-weight: 400\">spiced tomato sauce. As with other savory dishes from the coastal nation, a banana is offered on the side to be peeled, chopped and distributed throughout the warmly-spiced pasta, adding both a sweet note and a different texture of starchiness. \u003c/span>\u003c/p>\n\u003cp>\u003cspan style=\"font-weight: 400\">In both East African iterations of spaghetti, the preparation and presentation firmly bend the Italian dish towards centuries-old local tastes. The interventions at play, of spices and other starches, have no allegiance to European techniques. This defiance tells a particular story about food’s movement across cultural and national margins. Appropriation is a mode of transit we see often lamented in cultural writing—an erasure of authorship often followed by manufacturing at a capitalistic pace and design. Spaghetti on injera or with suugo suqaar are born out of a different modality: the absorption of a cultural product introduced by abject violence and forced occupation. \u003c/span>\u003c/p>\n\u003cp>\u003c/p>\u003c/div>","attributes":{"named":{},"numeric":[]}},{"type":"component","content":"","name":"ad","attributes":{"named":{"label":"fullwidth"},"numeric":["fullwidth"]}},{"type":"contentString","content":"\u003cdiv class=\"post-body\">\u003cp>\u003c/p>\u003c/p>\u003cp>\u003cspan class='utils-parseShortcode-shortcodes-__youtubeShortcode__embedYoutube'>\n \u003cspan class='utils-parseShortcode-shortcodes-__youtubeShortcode__embedYoutubeInside'>\n \u003ciframe\n loading='lazy'\n class='utils-parseShortcode-shortcodes-__youtubeShortcode__youtubePlayer'\n type='text/html'\n src='//www.youtube.com/embed/LFmmQ4G9xk4'\n title='//www.youtube.com/embed/LFmmQ4G9xk4'\n allowfullscreen='true'\n style='border:0;'>\u003c/iframe>\n \u003c/span>\n \u003c/span>\u003c/p>\u003cp>\u003cp>\u003cspan style=\"font-weight: 400\">There’s something about pasta’s bipartite composition of noodles and sauce that takes well to modifications and possibilities. There’s also what writer Hannah Giorgis called a “\u003c/span>\u003ca href=\"https://www.tastecooking.com/ethiopian-diasporas-long-history-lasagna/\">\u003cspan style=\"font-weight: 400\">culinary rebellion\u003c/span>\u003c/a>\u003cspan style=\"font-weight: 400\">” when she wrote about lasagna’s ubiquitous presence among a sea of indigenous fare at Eritrean and Ethiopian gatherings. As Giorgis described it, lasagna in East Africa is a richly spiced, conservatively cheesed version—all revisions that honor the local appetites. It’d be unfair to say all of these choices are political by intention. \u003c/span>\u003c/p>\n\u003cfigure id=\"attachment_138988\" class=\"wp-caption alignnone\" style=\"max-width: 800px\">\u003cimg class=\"size-medium wp-image-138988\" src=\"https://ww2.kqed.org/app/uploads/sites/24/2020/09/IMG_3441-scaled-e1601069423219-800x1067.jpg\" alt=\"a meat and vegetable dish at Somali restaurant Jubba\" width=\"800\" height=\"1067\" srcset=\"https://ww2.kqed.org/app/uploads/sites/24/2020/09/IMG_3441-scaled-e1601069423219-800x1067.jpg 800w, https://ww2.kqed.org/app/uploads/sites/24/2020/09/IMG_3441-scaled-e1601069423219-1020x1360.jpg 1020w, https://ww2.kqed.org/app/uploads/sites/24/2020/09/IMG_3441-scaled-e1601069423219-160x213.jpg 160w, https://ww2.kqed.org/app/uploads/sites/24/2020/09/IMG_3441-scaled-e1601069423219-768x1024.jpg 768w, https://ww2.kqed.org/app/uploads/sites/24/2020/09/IMG_3441-scaled-e1601069423219-1152x1536.jpg 1152w, https://ww2.kqed.org/app/uploads/sites/24/2020/09/IMG_3441-scaled-e1601069423219-1536x2048.jpg 1536w, https://ww2.kqed.org/app/uploads/sites/24/2020/09/IMG_3441-scaled-e1601069423219.jpg 1920w\" sizes=\"(max-width: 800px) 100vw, 800px\">\u003cfigcaption class=\"wp-caption-text\">One of the dishes at Jubba in San Jose. \u003ccite>(KQED)\u003c/cite>\u003c/figcaption>\u003c/figure>\n\u003cp>\u003cspan style=\"font-weight: 400\">At San Jose’s \u003c/span>\u003ca href=\"https://www.google.com/search?q=jubba+kqed&oq=jubba+kqed&aqs=chrome..69i57.2640j0j7&sourceid=chrome&ie=UTF-8\">\u003cspan style=\"font-weight: 400\">Jubba\u003c/span>\u003c/a>\u003cspan style=\"font-weight: 400\">, the Bay Area’s only brick-and-mortar Somali restaurant, you’ll find a menu reflecting the country’s various influences that drifted in via its ports and trading partners. Blending flavors from South Asia, the Middle East and neighboring African nations, Italy’s coercive history in the region lives in the baasto suugo suqaar on the menu. Jubba’s version features tomato paste, tomato sauce, bell peppers, onions, garlic, cilantro and xawaash, a blend of aromatic spices including cinnamon, cumin and cardamom, among others. “It’s a really robust pasta,” said Jubba cook Antonio Gomez, who worked at an Italian restaurant kitchen before joining the kitchen at the South Bay eatery two years ago. “It’s unique. You don’t get that flavor in Italian pasta.” \u003c/span>\u003c/p>\u003c/p>\u003c/div>","attributes":{"named":{},"numeric":[]}},{"type":"component","content":"","name":"instagramLink","attributes":{"named":{"instagramId":"LTsXeRFMaM"},"numeric":[]}},{"type":"contentString","content":"\u003cdiv class=\"post-body\">\u003cp>\u003cp>\u003cspan style=\"font-weight: 400\">Owner Amina Nur’s daughter, Leyla Mohamed, has her preferences when it comes to the dish, which can be served with beef, chicken or meat-free. “I like the tuna suugo and my family likes it with ground beef,” Mohamed said. Asked about the Somali’s transformation of Italian pasta, Mohamed sees it simply: “We like flavorful [food]. So it gives it extra flavor instead of it being plain.” Hence the spices, the banana and sometimes even a squeeze of lime juice. \u003c/span>\u003c/p>\n\u003cp>\u003cspan style=\"font-weight: 400\">The first instance of an injera-swaddled pasta bite likely came as a circumstance of the two things sharing a plate. A noodle slinking away into a bite of injera and wot. Now, this combination is something that can be ordered at a restaurant where pasta shares equal real estate with native stews and greens on one platter. Suugo with pasta similarly shares a plate and flavor profiles with Somali-born dishes. \u003c/span>\u003c/p>\n\u003cp>\u003c/p>\n\u003cp>\u003cspan style=\"font-weight: 400\">The source of pasta of course can never be obfuscated and that isn't a righteous venture. The casual way that pasta dishes in East Africa are enjoyed, their \u003c/span>\u003cspan style=\"font-weight: 400\">juxtapositions of starches and histories, don't rely on that rememberance. Rather historical harms are inoculated from the plate by the imposition of local preferences on foreign ingredients. \u003c/span>\u003c/p>\n\n\u003c/div>\u003c/p>","attributes":{"named":{},"numeric":[]}}],"link":"/bayareabites/138982/how-colonialism-brought-a-new-evolution-of-pasta-to-east-africa","authors":["11625"],"categories":["bayareabites_16558","bayareabites_752","bayareabites_17082"],"tags":["bayareabites_16557","bayareabites_16941","bayareabites_377","bayareabites_16940","bayareabites_755","bayareabites_1280"],"featImg":"bayareabites_138984","label":"source_bayareabites_138982"},"bayareabites_139003":{"type":"posts","id":"bayareabites_139003","meta":{"index":"posts_1591205157","site":"bayareabites","id":"139003","score":null,"sort":[1601650818000]},"guestAuthors":[],"slug":"the-science-and-magicof-egg-noodles","title":"The Science (and Magic) of Egg Noodles","publishDate":1601650818,"format":"image","headTitle":"Bay Area Bites | KQED Food","labelTerm":{},"content":"\u003cp>I was a biochemist before becoming a chef. So I write this as a skeptical scientist: A bowl of pasta has an almost magical quality. Hidden in plain sight are layers of flavor, technique, thoughtfulness, science, exploration and love that reveal who we are as cooks.\u003c/p>\n\u003cp>Making fresh pasta can feel like an intimidating task. Most of us (including this pro) have experienced the awful frustration of fresh pasta gone awry. In fact, the worst night of my culinary career was punctuated by a failed pasta course ruined by a dried, cracked and unsalvageable egg pasta dough. As a result of that public failure, I realized that I had to learn more about the science of pasta\u003ca href=\"#1\">\u003csup>1\u003c/sup>\u003c/a>.\u003c/p>\n\u003cp id=\"practicing\">So, I share my knowledge and experience from a place of great humility.\u003c/p>\n\u003cfigure id=\"attachment_139018\" class=\"wp-caption alignnone\" style=\"max-width: 800px\">\u003cimg class=\"size-medium wp-image-139018\" src=\"https://ww2.kqed.org/app/uploads/sites/24/2020/09/Pasta-photos-13-800x607.jpg\" alt=\"Eggs and flour\" width=\"800\" height=\"607\" srcset=\"https://ww2.kqed.org/app/uploads/sites/24/2020/09/Pasta-photos-13-800x607.jpg 800w, https://ww2.kqed.org/app/uploads/sites/24/2020/09/Pasta-photos-13-1020x774.jpg 1020w, https://ww2.kqed.org/app/uploads/sites/24/2020/09/Pasta-photos-13-160x121.jpg 160w, https://ww2.kqed.org/app/uploads/sites/24/2020/09/Pasta-photos-13-768x583.jpg 768w, https://ww2.kqed.org/app/uploads/sites/24/2020/09/Pasta-photos-13.jpg 1080w\" sizes=\"(max-width: 800px) 100vw, 800px\">\u003cfigcaption class=\"wp-caption-text\">There's a science behind mixing eggs and flour together to create the perfect pasta. \u003ccite>(Malik Francis)\u003c/cite>\u003c/figcaption>\u003c/figure>\n\u003cp>The transformation of flour\u003ca href=\"#2\">\u003csup>2\u003c/sup>\u003c/a> and eggs into a noodle begins with the thoughtful development of gluten. What we think of gluten is a mixture of two protein groups, gliadins and glutenins. Each contribute different but complementary chemical properties to the strength of the pasta dough.\u003c/p>\n\u003cp>Gliadins provide viscosity and increased extensibility (the stretch of the dough). Glutenins gives the dough elasticity (the ability to return to its original shape after stretching).\u003c/p>\n\u003cfigure id=\"attachment_139019\" class=\"wp-caption alignnone\" style=\"max-width: 800px\">\u003cimg class=\"size-medium wp-image-139019\" src=\"https://ww2.kqed.org/app/uploads/sites/24/2020/09/Pasta-photos-16-800x624.jpg\" alt=\"fork whisking eggs and flour\" width=\"800\" height=\"624\" srcset=\"https://ww2.kqed.org/app/uploads/sites/24/2020/09/Pasta-photos-16-800x624.jpg 800w, https://ww2.kqed.org/app/uploads/sites/24/2020/09/Pasta-photos-16-1020x796.jpg 1020w, https://ww2.kqed.org/app/uploads/sites/24/2020/09/Pasta-photos-16-160x125.jpg 160w, https://ww2.kqed.org/app/uploads/sites/24/2020/09/Pasta-photos-16-768x599.jpg 768w, https://ww2.kqed.org/app/uploads/sites/24/2020/09/Pasta-photos-16.jpg 1080w\" sizes=\"(max-width: 800px) 100vw, 800px\">\u003cfigcaption class=\"wp-caption-text\">Using a fork to whisk eggs can offer some precision and keep eggs within their flour well. \u003ccite>(Malik Francis)\u003c/cite>\u003c/figcaption>\u003c/figure>\n\u003cp>To fully exploit the properties of the gluten proteins and the egg’s chemistry, slowly incorporate the flour into the eggs\u003ca href=\"#3\">\u003csup>3\u003c/sup>\u003c/a>. I use a fork and pretend I am making a\u003ca href=\"https://www.youtube.com/watch?v=_Wb5Crj917I\" target=\"_blank\" rel=\"noopener noreferrer\"> French omelet\u003c/a>. After the dough takes on a “Play-Doh” appearance, knead it. The natural rhythm of folding and pushing the dough increases the probability that the gluten proteins will interact with each other and with the \u003ca href=\"https://www.scienceofcooking.com/eggs/cooking-eggs-sous-vide.html\" target=\"_blank\" rel=\"noopener noreferrer\">ovalbumin protein\u003c/a> from the egg. When exposed to the oxidative environment of ambient air, the sulfur containing cysteine amino acids in the gluten and egg ovalbumin protein form disulfide bonds with each other\u003ca href=\"#4\">\u003csup>4\u003c/sup>\u003c/a>. These interactions are the basis of the gluten network characteristic of pasta.\u003c/p>\n\u003cfigure id=\"attachment_139020\" class=\"wp-caption alignleft\" style=\"max-width: 800px\">\u003cimg class=\"size-medium wp-image-139020\" src=\"https://ww2.kqed.org/app/uploads/sites/24/2020/09/Pasta-photos-17-800x533.jpg\" alt=\"fork mixing pasta dough\" width=\"800\" height=\"533\" srcset=\"https://ww2.kqed.org/app/uploads/sites/24/2020/09/Pasta-photos-17-800x533.jpg 800w, https://ww2.kqed.org/app/uploads/sites/24/2020/09/Pasta-photos-17-1020x680.jpg 1020w, https://ww2.kqed.org/app/uploads/sites/24/2020/09/Pasta-photos-17-160x107.jpg 160w, https://ww2.kqed.org/app/uploads/sites/24/2020/09/Pasta-photos-17-768x512.jpg 768w, https://ww2.kqed.org/app/uploads/sites/24/2020/09/Pasta-photos-17.jpg 1080w\" sizes=\"(max-width: 800px) 100vw, 800px\">\u003cfigcaption class=\"wp-caption-text\">This is what the dough will look like when all the flour has been incorporated. \u003ccite>(Malik Francis)\u003c/cite>\u003c/figcaption>\u003c/figure>\n\u003cfigure id=\"attachment_139027\" class=\"wp-caption alignright\" style=\"max-width: 800px\">\u003cimg class=\"size-medium wp-image-139027\" src=\"https://ww2.kqed.org/app/uploads/sites/24/2020/09/Pasta-photos-20-800x533.jpg\" alt=\"Ball of pasta dough\" width=\"800\" height=\"533\" srcset=\"https://ww2.kqed.org/app/uploads/sites/24/2020/09/Pasta-photos-20-800x533.jpg 800w, https://ww2.kqed.org/app/uploads/sites/24/2020/09/Pasta-photos-20-1020x680.jpg 1020w, https://ww2.kqed.org/app/uploads/sites/24/2020/09/Pasta-photos-20-160x107.jpg 160w, https://ww2.kqed.org/app/uploads/sites/24/2020/09/Pasta-photos-20-768x512.jpg 768w, https://ww2.kqed.org/app/uploads/sites/24/2020/09/Pasta-photos-20.jpg 1080w\" sizes=\"(max-width: 800px) 100vw, 800px\">\u003cfigcaption class=\"wp-caption-text\">The dough should eventually form into a ball like this. \u003ccite>(Malik Francis)\u003c/cite>\u003c/figcaption>\u003c/figure>\n\u003cp>As the dough forms a stable but slight dry looking ball, vacuum seal it in a large bag\u003ca href=\"#5\">\u003csup>5\u003c/sup>\u003c/a>. This step may seem, unnecessary especially when you consider people have crafted amazing handmade noodle for hundreds of years, but vacuum sealing enhances many of the dough’s chemical and physical characteristics. First, by decreasing the surface tension associated with air, vacuum sealing promotes even and more efficient hydration of the flour granules than kneading alone.\u003c/p>\n\u003cfigure id=\"attachment_139028\" class=\"wp-caption alignnone\" style=\"max-width: 800px\">\u003cimg class=\"size-medium wp-image-139028\" src=\"https://ww2.kqed.org/app/uploads/sites/24/2020/09/Pasta-photos-18-800x533.jpg\" alt=\"pasta dough ball\" width=\"800\" height=\"533\" srcset=\"https://ww2.kqed.org/app/uploads/sites/24/2020/09/Pasta-photos-18-800x533.jpg 800w, https://ww2.kqed.org/app/uploads/sites/24/2020/09/Pasta-photos-18-1020x680.jpg 1020w, https://ww2.kqed.org/app/uploads/sites/24/2020/09/Pasta-photos-18-160x107.jpg 160w, https://ww2.kqed.org/app/uploads/sites/24/2020/09/Pasta-photos-18-768x512.jpg 768w, https://ww2.kqed.org/app/uploads/sites/24/2020/09/Pasta-photos-18.jpg 1080w\" sizes=\"(max-width: 800px) 100vw, 800px\">\u003cfigcaption class=\"wp-caption-text\">When the dough looks like this, it's ready to vacuum seal. \u003ccite>(Malik Francis)\u003c/cite>\u003c/figcaption>\u003c/figure>\n\u003cp>Second, the dough’s strength is increased by removing the small air bubbles trapped in the dough. Third, the oxidation of egg yolk’s \u003ca href=\"https://www.livescience.com/52487-carotenoids.html\" target=\"_blank\" rel=\"noopener noreferrer\">carotenoids\u003c/a> (lycopene, β‐carotene, lutein and vitamin A) is slowed thereby maintaining the dough’s deep golden hue for a longer period of time. And lastly, I really love the additional layers of sheen and silkiness vacuum sealing adds to the final pasta noodle.\u003c/p>\n\u003cfigure id=\"attachment_139035\" class=\"wp-caption alignnone\" style=\"max-width: 800px\">\u003cimg class=\"size-medium wp-image-139035\" src=\"https://ww2.kqed.org/app/uploads/sites/24/2020/09/Pasta-photos-19-800x640.jpg\" alt=\"Vaccum sealed pasta dough ball\" width=\"800\" height=\"640\" srcset=\"https://ww2.kqed.org/app/uploads/sites/24/2020/09/Pasta-photos-19-800x640.jpg 800w, https://ww2.kqed.org/app/uploads/sites/24/2020/09/Pasta-photos-19-1020x816.jpg 1020w, https://ww2.kqed.org/app/uploads/sites/24/2020/09/Pasta-photos-19-160x128.jpg 160w, https://ww2.kqed.org/app/uploads/sites/24/2020/09/Pasta-photos-19-768x614.jpg 768w, https://ww2.kqed.org/app/uploads/sites/24/2020/09/Pasta-photos-19.jpg 1080w\" sizes=\"(max-width: 800px) 100vw, 800px\">\u003cfigcaption class=\"wp-caption-text\">It might seem excessive, but vacuum sealing pasta dough has its scientific and culinary benefits, says Francis. \u003ccite>(Malik Francis)\u003c/cite>\u003c/figcaption>\u003c/figure>\n\u003cp>At this point the interlocked gluten and ovalbumin proteins are distributed randomly throughout dough. Rolling out the dough, folding and gradual thinning gives order and direction to the egg-fortified gluten network. If done properly, you can see and feel the rows of gluten form on a smooth silky elastic sheet of dough as it glides over your hands. The science behind an egg noodle is beautiful.\u003c/p>\n\u003cfigure id=\"attachment_139023\" class=\"wp-caption alignnone\" style=\"max-width: 800px\">\u003cimg class=\"size-medium wp-image-139023\" src=\"https://ww2.kqed.org/app/uploads/sites/24/2020/09/Pasta-photos-3-800x533.jpg\" alt=\"sheeting pasta dough\" width=\"800\" height=\"533\" srcset=\"https://ww2.kqed.org/app/uploads/sites/24/2020/09/Pasta-photos-3-800x533.jpg 800w, https://ww2.kqed.org/app/uploads/sites/24/2020/09/Pasta-photos-3-1020x680.jpg 1020w, https://ww2.kqed.org/app/uploads/sites/24/2020/09/Pasta-photos-3-160x107.jpg 160w, https://ww2.kqed.org/app/uploads/sites/24/2020/09/Pasta-photos-3-768x512.jpg 768w, https://ww2.kqed.org/app/uploads/sites/24/2020/09/Pasta-photos-3.jpg 1080w\" sizes=\"(max-width: 800px) 100vw, 800px\">\u003cfigcaption class=\"wp-caption-text\">Malik Francis sheets his pasta dough. \u003ccite>(Malik Francis)\u003c/cite>\u003c/figcaption>\u003c/figure>\n\u003cp>When I make this pasta dish at the \u003ca href=\"https://www.materialsandmethodssf.com/\" target=\"_blank\" rel=\"noopener noreferrer\">Materials+Methods\u003c/a> pop-up, I start by giving a demonstration on how to make fresh pasta. The demonstration is prelude to sharing my story of how transitioned from away my research science career towards becoming a chef. This dish explores my connection\u003ca href=\"#6\">\u003csup>6 \u003c/sup>\u003c/a>with eggs and cheese\u003ca href=\"#7\">\u003csup>7\u003c/sup>\u003c/a> and is a platform to stack additional layers of depth.\u003c/p>\n\u003cfigure id=\"attachment_139021\" class=\"wp-caption alignnone\" style=\"max-width: 800px\">\u003cimg class=\"size-medium wp-image-139021\" src=\"https://ww2.kqed.org/app/uploads/sites/24/2020/09/Pasta-photos-23-800x533.jpg\" alt=\"bowl of pasta with cheese\" width=\"800\" height=\"533\" srcset=\"https://ww2.kqed.org/app/uploads/sites/24/2020/09/Pasta-photos-23-800x533.jpg 800w, https://ww2.kqed.org/app/uploads/sites/24/2020/09/Pasta-photos-23-1020x680.jpg 1020w, https://ww2.kqed.org/app/uploads/sites/24/2020/09/Pasta-photos-23-160x107.jpg 160w, https://ww2.kqed.org/app/uploads/sites/24/2020/09/Pasta-photos-23-768x512.jpg 768w, https://ww2.kqed.org/app/uploads/sites/24/2020/09/Pasta-photos-23.jpg 1080w\" sizes=\"(max-width: 800px) 100vw, 800px\">\u003cfigcaption class=\"wp-caption-text\">A good bowl of pasta comes down to ingredients. \u003ccite>(Malik Francis)\u003c/cite>\u003c/figcaption>\u003c/figure>\n\u003cp>Fettuccinii\u003ca href=\"#8\">\u003csup>8 \u003c/sup>\u003c/a> hits a nice sweet spot: Thin enough to twirl, but wide enough to carry the eggy sauce along for the ride. Woven throughout the dish is smoke flavor layered in the form of smoked egg yolks\u003ca href=\"#9\">\u003csup>9\u003c/sup>\u003c/a>, slow rendered bacon\u003ca href=\"#10\">\u003csup>10\u003c/sup>,\u003c/a> and charcoal-activated Cyprus flake salt. When grated over the pasta, the egg yolks and bacon supply a subtle umami-rich smoke flavor that enhances the pasta’s egg flavor.\u003c/p>\n\u003cp>[ad fullwidth]\u003c/p>\n\u003cp>[aside tag=\"noodles2020\" label=\"More Noodles.\"]\u003c/p>\n\u003cp>A fruity arbequina olive oil not only prevents the fettuccini from sticking to each other, but also elevates the smoky notes with a subtle fruity heat that cuts through the richness of the egg. A custardy slow-cooked egg adorns the pasta. But it’s the salinity, texture and flavor of the charcoal-activated Cyprus sea salt that unlocks the egg’s rich beauty and unifies the whole dish. The pasta and eggs are covered in a snow of the deliciously nutty Esquirrou, a life-affirming sheep milk cheese from the French Basque region.\u003c/p>\n\u003cfigure id=\"attachment_139036\" class=\"wp-caption alignnone\" style=\"max-width: 800px\">\u003cimg class=\"size-medium wp-image-139036\" src=\"https://ww2.kqed.org/app/uploads/sites/24/2020/09/Pasta-photos-24-800x533.jpg\" alt=\"Bowl of pasta with a fork\" width=\"800\" height=\"533\" srcset=\"https://ww2.kqed.org/app/uploads/sites/24/2020/09/Pasta-photos-24-800x533.jpg 800w, https://ww2.kqed.org/app/uploads/sites/24/2020/09/Pasta-photos-24-1020x680.jpg 1020w, https://ww2.kqed.org/app/uploads/sites/24/2020/09/Pasta-photos-24-160x107.jpg 160w, https://ww2.kqed.org/app/uploads/sites/24/2020/09/Pasta-photos-24-768x512.jpg 768w, https://ww2.kqed.org/app/uploads/sites/24/2020/09/Pasta-photos-24.jpg 1080w\" sizes=\"(max-width: 800px) 100vw, 800px\">\u003cfigcaption class=\"wp-caption-text\">Malik Francis\u003c/figcaption>\u003c/figure>\n\u003cp>This egg pasta dish evokes a playfulness. The joy of cutting into the slow cooked egg, and watching the yolk ooze out of it, is paired with the fun of tossing the pasta with runny egg and cheese until it becomes a cohesive slurp.\u003c/p>\n\u003cp>Beyond the playfulness is an overarching truth: I can passionately pursue my true love of cooking while retaining my identity as a scientist. And as a skeptical scientist, even I would say \u003cem>that’s \u003c/em>a pretty sweet magic trick!\u003c/p>\n\u003chr>\n\u003ch6>\u003csup>1 \u003c/sup>There are so many “perfect” egg pasta recipes, it can be overwhelming to know where to start. Most all of them are awesome. What I want to stress is that no matter what recipe you choose, focus on developing good technique. Learning how a proper dough should feel and taste. It sounds trite, but there is no substitution for practicing.\u003c/h6>\n\u003cp> \u003c/p>\n\u003ch6 id=\"2\">\u003csup>2 \u003c/sup>You can make an awesome pasta with any of these flours durum (semolina), AP, and “00”. Durum flour has the highest protein content, and “00” has the lowest. The dough will be enriched and fortified by proteins in the eggs, so obsessing about one over the other is not time well spent. The higher protein content of semolina, does however, allows for hydration with only water.\u003c/h6>\n\u003cp> \u003c/p>\n\u003ch6 id=\"3\">>\u003csup>3 \u003c/sup>At most restaurants I have worked in, we used a stand mixer with a dough hook attachment, but at home I always employ the well method. Also I find using a scale and the metric measurements gives more consistent results and the are easier to scale or down. A decent scale is affordable, and even if it was not how much would you pay not divide a 1/8 of a tsp in half?\u003c/h6>\n\u003cp> \u003c/p>\n\u003ch6 id=\"4\">>\u003csup>4 \u003c/sup>The majority of the protein in the egg white is ovalbumin at about 54% of total egg-white\u003c/h6>\n\u003cp> \u003c/p>\n\u003ch6 id=\"5\">\u003csup>5 \u003c/sup>Almost any pasta dough can be made \u003cu>better by vacuum sealing\u003c/u>. Knead dough until it forms a stable ball then vacuum seal in a large bag. I typically let the dough rest for 4-12 hours before rolling out into sheets. 6 One of the first haute recipes I mastered during grad school was a wonderful gruyere soufflé. It was just me, a whisk, and an amazing community who lovingly ate many of my disasters. And once I started to reproducibly craft successful soufflés, I started hosting dinner parties. Those dinner parties ultimately gave me the confidence to start working in professional\u003c/h6>\n\u003cp> \u003c/p>\n\u003ch6 id=\"6\">\u003csup>6 \u003c/sup>One of the first haute recipes I mastered during grad school was a wonderful gruyere soufflé. It was just me, a whisk, and an amazing community who lovingly ate many of my disasters. And once I started to reproducibly craft successful soufflés, I started hosting dinner parties. Those dinner parties ultimately gave me the confidence to start working in professional kitchens.\u003c/h6>\n\u003cp> \u003c/p>\n\u003ch6 id=\"7\">\u003csup>7 \u003c/sup>\u003cu>Alpine cheeses\u003c/u>, like \u003cu>schallenberg\u003c/u>, \u003cu>hornbacher\u003c/u> or \u003cu>chällerhocker\u003c/u>, are some of my cherished flavors. They are wonderful on their own, and glorious in a French omelet (I was OCD about mastering those as well).\u003c/h6>\n\u003cp> \u003c/p>\n\u003ch6 id=\"8\">\u003csup>8 \u003c/sup> I am not an absolutist about the rules of governing pasta and sauce\u003c/h6>\n\u003cp> \u003c/p>\n\u003ch6 id=\"9\">\u003csup>9 \u003c/sup>Cure egg yolks (find recipes here or here) and cold smoke with cherry or pear wood smoke for 2 hours. It’s important to cold smoke as to not cook the yolks. I will say they are pretty tasty over charred asparagus.\u003c/h6>\n\u003cp>[ad floatright]\u003c/p>\n\u003cp> \u003c/p>\n\u003ch6 id=\"10\">\u003csup>10 \u003c/sup>Take a small slab (think like “credit card cut in half” size) from the meaty portion of smoky bacon and slow render it in the oven on low heat until it takes on a caramelized jerky appearance. Cool on a lint-free towel or over a wire rack. When finely grated, this will give you a clean, smoky, umami rich bacon flavor with eating tons of fat, but save the bacon fat anyway.\u003c/h6>\n\n","blocks":[],"excerpt":"Creating pasta from scratch can be intimidating, but understanding the science behind it can help create the perfect bowl of egg noodles any time. ","status":"publish","parent":0,"modified":1621632470,"stats":{"hasAudio":false,"hasVideo":false,"hasChartOrMap":false,"iframeSrcs":[],"hasGoogleForm":false,"hasGallery":false,"hasHearkenModule":false,"hasPolis":false,"paragraphCount":16,"wordCount":1561},"headData":{"title":"The Science (and Magic) of Egg Noodles | KQED","description":"Creating pasta from scratch can be intimidating, but understanding the science behind it can help create the perfect bowl of egg noodles any time. ","ogTitle":"","ogDescription":"","ogImgId":"","twTitle":"","twDescription":"","twImgId":"","schema":{"@context":"http://schema.org","@type":"Article","headline":"The Science (and Magic) of Egg Noodles","datePublished":"2020-10-02T15:00:18.000Z","dateModified":"2021-05-21T21:27:50.000Z","image":"https://cdn.kqed.org/wp-content/uploads/2020/02/KQED-OG-Image@1x.png"}},"disqusIdentifier":"139003 https://ww2.kqed.org/bayareabites/?p=139003","disqusUrl":"https://ww2.kqed.org/bayareabites/2020/10/02/the-science-and-magicof-egg-noodles/","disqusTitle":"The Science (and Magic) of Egg Noodles","source":"KQED Noodle Week","sourceUrl":"https://www.kqed.org/noodles","nprByline":"Malik Francis","templateType":"standard","featuredImageType":"standard","path":"/bayareabites/139003/the-science-and-magicof-egg-noodles","audioTrackLength":null,"parsedContent":[{"type":"contentString","content":"\u003cdiv class=\"post-body\">\u003cp>\u003cp>I was a biochemist before becoming a chef. So I write this as a skeptical scientist: A bowl of pasta has an almost magical quality. Hidden in plain sight are layers of flavor, technique, thoughtfulness, science, exploration and love that reveal who we are as cooks.\u003c/p>\n\u003cp>Making fresh pasta can feel like an intimidating task. Most of us (including this pro) have experienced the awful frustration of fresh pasta gone awry. In fact, the worst night of my culinary career was punctuated by a failed pasta course ruined by a dried, cracked and unsalvageable egg pasta dough. As a result of that public failure, I realized that I had to learn more about the science of pasta\u003ca href=\"#1\">\u003csup>1\u003c/sup>\u003c/a>.\u003c/p>\n\u003cp id=\"practicing\">So, I share my knowledge and experience from a place of great humility.\u003c/p>\n\u003cfigure id=\"attachment_139018\" class=\"wp-caption alignnone\" style=\"max-width: 800px\">\u003cimg class=\"size-medium wp-image-139018\" src=\"https://ww2.kqed.org/app/uploads/sites/24/2020/09/Pasta-photos-13-800x607.jpg\" alt=\"Eggs and flour\" width=\"800\" height=\"607\" srcset=\"https://ww2.kqed.org/app/uploads/sites/24/2020/09/Pasta-photos-13-800x607.jpg 800w, https://ww2.kqed.org/app/uploads/sites/24/2020/09/Pasta-photos-13-1020x774.jpg 1020w, https://ww2.kqed.org/app/uploads/sites/24/2020/09/Pasta-photos-13-160x121.jpg 160w, https://ww2.kqed.org/app/uploads/sites/24/2020/09/Pasta-photos-13-768x583.jpg 768w, https://ww2.kqed.org/app/uploads/sites/24/2020/09/Pasta-photos-13.jpg 1080w\" sizes=\"(max-width: 800px) 100vw, 800px\">\u003cfigcaption class=\"wp-caption-text\">There's a science behind mixing eggs and flour together to create the perfect pasta. \u003ccite>(Malik Francis)\u003c/cite>\u003c/figcaption>\u003c/figure>\n\u003cp>The transformation of flour\u003ca href=\"#2\">\u003csup>2\u003c/sup>\u003c/a> and eggs into a noodle begins with the thoughtful development of gluten. What we think of gluten is a mixture of two protein groups, gliadins and glutenins. Each contribute different but complementary chemical properties to the strength of the pasta dough.\u003c/p>\n\u003cp>Gliadins provide viscosity and increased extensibility (the stretch of the dough). Glutenins gives the dough elasticity (the ability to return to its original shape after stretching).\u003c/p>\n\u003cfigure id=\"attachment_139019\" class=\"wp-caption alignnone\" style=\"max-width: 800px\">\u003cimg class=\"size-medium wp-image-139019\" src=\"https://ww2.kqed.org/app/uploads/sites/24/2020/09/Pasta-photos-16-800x624.jpg\" alt=\"fork whisking eggs and flour\" width=\"800\" height=\"624\" srcset=\"https://ww2.kqed.org/app/uploads/sites/24/2020/09/Pasta-photos-16-800x624.jpg 800w, https://ww2.kqed.org/app/uploads/sites/24/2020/09/Pasta-photos-16-1020x796.jpg 1020w, https://ww2.kqed.org/app/uploads/sites/24/2020/09/Pasta-photos-16-160x125.jpg 160w, https://ww2.kqed.org/app/uploads/sites/24/2020/09/Pasta-photos-16-768x599.jpg 768w, https://ww2.kqed.org/app/uploads/sites/24/2020/09/Pasta-photos-16.jpg 1080w\" sizes=\"(max-width: 800px) 100vw, 800px\">\u003cfigcaption class=\"wp-caption-text\">Using a fork to whisk eggs can offer some precision and keep eggs within their flour well. \u003ccite>(Malik Francis)\u003c/cite>\u003c/figcaption>\u003c/figure>\n\u003cp>To fully exploit the properties of the gluten proteins and the egg’s chemistry, slowly incorporate the flour into the eggs\u003ca href=\"#3\">\u003csup>3\u003c/sup>\u003c/a>. I use a fork and pretend I am making a\u003ca href=\"https://www.youtube.com/watch?v=_Wb5Crj917I\" target=\"_blank\" rel=\"noopener noreferrer\"> French omelet\u003c/a>. After the dough takes on a “Play-Doh” appearance, knead it. The natural rhythm of folding and pushing the dough increases the probability that the gluten proteins will interact with each other and with the \u003ca href=\"https://www.scienceofcooking.com/eggs/cooking-eggs-sous-vide.html\" target=\"_blank\" rel=\"noopener noreferrer\">ovalbumin protein\u003c/a> from the egg. When exposed to the oxidative environment of ambient air, the sulfur containing cysteine amino acids in the gluten and egg ovalbumin protein form disulfide bonds with each other\u003ca href=\"#4\">\u003csup>4\u003c/sup>\u003c/a>. These interactions are the basis of the gluten network characteristic of pasta.\u003c/p>\n\u003cfigure id=\"attachment_139020\" class=\"wp-caption alignleft\" style=\"max-width: 800px\">\u003cimg class=\"size-medium wp-image-139020\" src=\"https://ww2.kqed.org/app/uploads/sites/24/2020/09/Pasta-photos-17-800x533.jpg\" alt=\"fork mixing pasta dough\" width=\"800\" height=\"533\" srcset=\"https://ww2.kqed.org/app/uploads/sites/24/2020/09/Pasta-photos-17-800x533.jpg 800w, https://ww2.kqed.org/app/uploads/sites/24/2020/09/Pasta-photos-17-1020x680.jpg 1020w, https://ww2.kqed.org/app/uploads/sites/24/2020/09/Pasta-photos-17-160x107.jpg 160w, https://ww2.kqed.org/app/uploads/sites/24/2020/09/Pasta-photos-17-768x512.jpg 768w, https://ww2.kqed.org/app/uploads/sites/24/2020/09/Pasta-photos-17.jpg 1080w\" sizes=\"(max-width: 800px) 100vw, 800px\">\u003cfigcaption class=\"wp-caption-text\">This is what the dough will look like when all the flour has been incorporated. \u003ccite>(Malik Francis)\u003c/cite>\u003c/figcaption>\u003c/figure>\n\u003cfigure id=\"attachment_139027\" class=\"wp-caption alignright\" style=\"max-width: 800px\">\u003cimg class=\"size-medium wp-image-139027\" src=\"https://ww2.kqed.org/app/uploads/sites/24/2020/09/Pasta-photos-20-800x533.jpg\" alt=\"Ball of pasta dough\" width=\"800\" height=\"533\" srcset=\"https://ww2.kqed.org/app/uploads/sites/24/2020/09/Pasta-photos-20-800x533.jpg 800w, https://ww2.kqed.org/app/uploads/sites/24/2020/09/Pasta-photos-20-1020x680.jpg 1020w, https://ww2.kqed.org/app/uploads/sites/24/2020/09/Pasta-photos-20-160x107.jpg 160w, https://ww2.kqed.org/app/uploads/sites/24/2020/09/Pasta-photos-20-768x512.jpg 768w, https://ww2.kqed.org/app/uploads/sites/24/2020/09/Pasta-photos-20.jpg 1080w\" sizes=\"(max-width: 800px) 100vw, 800px\">\u003cfigcaption class=\"wp-caption-text\">The dough should eventually form into a ball like this. \u003ccite>(Malik Francis)\u003c/cite>\u003c/figcaption>\u003c/figure>\n\u003cp>As the dough forms a stable but slight dry looking ball, vacuum seal it in a large bag\u003ca href=\"#5\">\u003csup>5\u003c/sup>\u003c/a>. This step may seem, unnecessary especially when you consider people have crafted amazing handmade noodle for hundreds of years, but vacuum sealing enhances many of the dough’s chemical and physical characteristics. First, by decreasing the surface tension associated with air, vacuum sealing promotes even and more efficient hydration of the flour granules than kneading alone.\u003c/p>\n\u003cfigure id=\"attachment_139028\" class=\"wp-caption alignnone\" style=\"max-width: 800px\">\u003cimg class=\"size-medium wp-image-139028\" src=\"https://ww2.kqed.org/app/uploads/sites/24/2020/09/Pasta-photos-18-800x533.jpg\" alt=\"pasta dough ball\" width=\"800\" height=\"533\" srcset=\"https://ww2.kqed.org/app/uploads/sites/24/2020/09/Pasta-photos-18-800x533.jpg 800w, https://ww2.kqed.org/app/uploads/sites/24/2020/09/Pasta-photos-18-1020x680.jpg 1020w, https://ww2.kqed.org/app/uploads/sites/24/2020/09/Pasta-photos-18-160x107.jpg 160w, https://ww2.kqed.org/app/uploads/sites/24/2020/09/Pasta-photos-18-768x512.jpg 768w, https://ww2.kqed.org/app/uploads/sites/24/2020/09/Pasta-photos-18.jpg 1080w\" sizes=\"(max-width: 800px) 100vw, 800px\">\u003cfigcaption class=\"wp-caption-text\">When the dough looks like this, it's ready to vacuum seal. \u003ccite>(Malik Francis)\u003c/cite>\u003c/figcaption>\u003c/figure>\n\u003cp>Second, the dough’s strength is increased by removing the small air bubbles trapped in the dough. Third, the oxidation of egg yolk’s \u003ca href=\"https://www.livescience.com/52487-carotenoids.html\" target=\"_blank\" rel=\"noopener noreferrer\">carotenoids\u003c/a> (lycopene, β‐carotene, lutein and vitamin A) is slowed thereby maintaining the dough’s deep golden hue for a longer period of time. And lastly, I really love the additional layers of sheen and silkiness vacuum sealing adds to the final pasta noodle.\u003c/p>\n\u003cfigure id=\"attachment_139035\" class=\"wp-caption alignnone\" style=\"max-width: 800px\">\u003cimg class=\"size-medium wp-image-139035\" src=\"https://ww2.kqed.org/app/uploads/sites/24/2020/09/Pasta-photos-19-800x640.jpg\" alt=\"Vaccum sealed pasta dough ball\" width=\"800\" height=\"640\" srcset=\"https://ww2.kqed.org/app/uploads/sites/24/2020/09/Pasta-photos-19-800x640.jpg 800w, https://ww2.kqed.org/app/uploads/sites/24/2020/09/Pasta-photos-19-1020x816.jpg 1020w, https://ww2.kqed.org/app/uploads/sites/24/2020/09/Pasta-photos-19-160x128.jpg 160w, https://ww2.kqed.org/app/uploads/sites/24/2020/09/Pasta-photos-19-768x614.jpg 768w, https://ww2.kqed.org/app/uploads/sites/24/2020/09/Pasta-photos-19.jpg 1080w\" sizes=\"(max-width: 800px) 100vw, 800px\">\u003cfigcaption class=\"wp-caption-text\">It might seem excessive, but vacuum sealing pasta dough has its scientific and culinary benefits, says Francis. \u003ccite>(Malik Francis)\u003c/cite>\u003c/figcaption>\u003c/figure>\n\u003cp>At this point the interlocked gluten and ovalbumin proteins are distributed randomly throughout dough. Rolling out the dough, folding and gradual thinning gives order and direction to the egg-fortified gluten network. If done properly, you can see and feel the rows of gluten form on a smooth silky elastic sheet of dough as it glides over your hands. The science behind an egg noodle is beautiful.\u003c/p>\n\u003cfigure id=\"attachment_139023\" class=\"wp-caption alignnone\" style=\"max-width: 800px\">\u003cimg class=\"size-medium wp-image-139023\" src=\"https://ww2.kqed.org/app/uploads/sites/24/2020/09/Pasta-photos-3-800x533.jpg\" alt=\"sheeting pasta dough\" width=\"800\" height=\"533\" srcset=\"https://ww2.kqed.org/app/uploads/sites/24/2020/09/Pasta-photos-3-800x533.jpg 800w, https://ww2.kqed.org/app/uploads/sites/24/2020/09/Pasta-photos-3-1020x680.jpg 1020w, https://ww2.kqed.org/app/uploads/sites/24/2020/09/Pasta-photos-3-160x107.jpg 160w, https://ww2.kqed.org/app/uploads/sites/24/2020/09/Pasta-photos-3-768x512.jpg 768w, https://ww2.kqed.org/app/uploads/sites/24/2020/09/Pasta-photos-3.jpg 1080w\" sizes=\"(max-width: 800px) 100vw, 800px\">\u003cfigcaption class=\"wp-caption-text\">Malik Francis sheets his pasta dough. \u003ccite>(Malik Francis)\u003c/cite>\u003c/figcaption>\u003c/figure>\n\u003cp>When I make this pasta dish at the \u003ca href=\"https://www.materialsandmethodssf.com/\" target=\"_blank\" rel=\"noopener noreferrer\">Materials+Methods\u003c/a> pop-up, I start by giving a demonstration on how to make fresh pasta. The demonstration is prelude to sharing my story of how transitioned from away my research science career towards becoming a chef. This dish explores my connection\u003ca href=\"#6\">\u003csup>6 \u003c/sup>\u003c/a>with eggs and cheese\u003ca href=\"#7\">\u003csup>7\u003c/sup>\u003c/a> and is a platform to stack additional layers of depth.\u003c/p>\n\u003cfigure id=\"attachment_139021\" class=\"wp-caption alignnone\" style=\"max-width: 800px\">\u003cimg class=\"size-medium wp-image-139021\" src=\"https://ww2.kqed.org/app/uploads/sites/24/2020/09/Pasta-photos-23-800x533.jpg\" alt=\"bowl of pasta with cheese\" width=\"800\" height=\"533\" srcset=\"https://ww2.kqed.org/app/uploads/sites/24/2020/09/Pasta-photos-23-800x533.jpg 800w, https://ww2.kqed.org/app/uploads/sites/24/2020/09/Pasta-photos-23-1020x680.jpg 1020w, https://ww2.kqed.org/app/uploads/sites/24/2020/09/Pasta-photos-23-160x107.jpg 160w, https://ww2.kqed.org/app/uploads/sites/24/2020/09/Pasta-photos-23-768x512.jpg 768w, https://ww2.kqed.org/app/uploads/sites/24/2020/09/Pasta-photos-23.jpg 1080w\" sizes=\"(max-width: 800px) 100vw, 800px\">\u003cfigcaption class=\"wp-caption-text\">A good bowl of pasta comes down to ingredients. \u003ccite>(Malik Francis)\u003c/cite>\u003c/figcaption>\u003c/figure>\n\u003cp>Fettuccinii\u003ca href=\"#8\">\u003csup>8 \u003c/sup>\u003c/a> hits a nice sweet spot: Thin enough to twirl, but wide enough to carry the eggy sauce along for the ride. Woven throughout the dish is smoke flavor layered in the form of smoked egg yolks\u003ca href=\"#9\">\u003csup>9\u003c/sup>\u003c/a>, slow rendered bacon\u003ca href=\"#10\">\u003csup>10\u003c/sup>,\u003c/a> and charcoal-activated Cyprus flake salt. When grated over the pasta, the egg yolks and bacon supply a subtle umami-rich smoke flavor that enhances the pasta’s egg flavor.\u003c/p>\n\u003cp>\u003c/p>\u003c/div>","attributes":{"named":{},"numeric":[]}},{"type":"component","content":"","name":"ad","attributes":{"named":{"label":"fullwidth"},"numeric":["fullwidth"]}},{"type":"contentString","content":"\u003cdiv class=\"post-body\">\u003cp>\u003c/p>\n\u003cp>\u003c/p>\u003c/div>","attributes":{"named":{},"numeric":[]}},{"type":"component","content":"","name":"aside","attributes":{"named":{"tag":"noodles2020","label":"More Noodles. "},"numeric":[]}},{"type":"contentString","content":"\u003cdiv class=\"post-body\">\u003cp>\u003c/p>\n\u003cp>A fruity arbequina olive oil not only prevents the fettuccini from sticking to each other, but also elevates the smoky notes with a subtle fruity heat that cuts through the richness of the egg. A custardy slow-cooked egg adorns the pasta. But it’s the salinity, texture and flavor of the charcoal-activated Cyprus sea salt that unlocks the egg’s rich beauty and unifies the whole dish. The pasta and eggs are covered in a snow of the deliciously nutty Esquirrou, a life-affirming sheep milk cheese from the French Basque region.\u003c/p>\n\u003cfigure id=\"attachment_139036\" class=\"wp-caption alignnone\" style=\"max-width: 800px\">\u003cimg class=\"size-medium wp-image-139036\" src=\"https://ww2.kqed.org/app/uploads/sites/24/2020/09/Pasta-photos-24-800x533.jpg\" alt=\"Bowl of pasta with a fork\" width=\"800\" height=\"533\" srcset=\"https://ww2.kqed.org/app/uploads/sites/24/2020/09/Pasta-photos-24-800x533.jpg 800w, https://ww2.kqed.org/app/uploads/sites/24/2020/09/Pasta-photos-24-1020x680.jpg 1020w, https://ww2.kqed.org/app/uploads/sites/24/2020/09/Pasta-photos-24-160x107.jpg 160w, https://ww2.kqed.org/app/uploads/sites/24/2020/09/Pasta-photos-24-768x512.jpg 768w, https://ww2.kqed.org/app/uploads/sites/24/2020/09/Pasta-photos-24.jpg 1080w\" sizes=\"(max-width: 800px) 100vw, 800px\">\u003cfigcaption class=\"wp-caption-text\">Malik Francis\u003c/figcaption>\u003c/figure>\n\u003cp>This egg pasta dish evokes a playfulness. The joy of cutting into the slow cooked egg, and watching the yolk ooze out of it, is paired with the fun of tossing the pasta with runny egg and cheese until it becomes a cohesive slurp.\u003c/p>\n\u003cp>Beyond the playfulness is an overarching truth: I can passionately pursue my true love of cooking while retaining my identity as a scientist. And as a skeptical scientist, even I would say \u003cem>that’s \u003c/em>a pretty sweet magic trick!\u003c/p>\n\u003chr>\n\u003ch6>\u003csup>1 \u003c/sup>There are so many “perfect” egg pasta recipes, it can be overwhelming to know where to start. Most all of them are awesome. What I want to stress is that no matter what recipe you choose, focus on developing good technique. Learning how a proper dough should feel and taste. It sounds trite, but there is no substitution for practicing.\u003c/h6>\n\u003cp> \u003c/p>\n\u003ch6 id=\"2\">\u003csup>2 \u003c/sup>You can make an awesome pasta with any of these flours durum (semolina), AP, and “00”. Durum flour has the highest protein content, and “00” has the lowest. The dough will be enriched and fortified by proteins in the eggs, so obsessing about one over the other is not time well spent. The higher protein content of semolina, does however, allows for hydration with only water.\u003c/h6>\n\u003cp> \u003c/p>\n\u003ch6 id=\"3\">>\u003csup>3 \u003c/sup>At most restaurants I have worked in, we used a stand mixer with a dough hook attachment, but at home I always employ the well method. Also I find using a scale and the metric measurements gives more consistent results and the are easier to scale or down. A decent scale is affordable, and even if it was not how much would you pay not divide a 1/8 of a tsp in half?\u003c/h6>\n\u003cp> \u003c/p>\n\u003ch6 id=\"4\">>\u003csup>4 \u003c/sup>The majority of the protein in the egg white is ovalbumin at about 54% of total egg-white\u003c/h6>\n\u003cp> \u003c/p>\n\u003ch6 id=\"5\">\u003csup>5 \u003c/sup>Almost any pasta dough can be made \u003cu>better by vacuum sealing\u003c/u>. Knead dough until it forms a stable ball then vacuum seal in a large bag. I typically let the dough rest for 4-12 hours before rolling out into sheets. 6 One of the first haute recipes I mastered during grad school was a wonderful gruyere soufflé. It was just me, a whisk, and an amazing community who lovingly ate many of my disasters. And once I started to reproducibly craft successful soufflés, I started hosting dinner parties. Those dinner parties ultimately gave me the confidence to start working in professional\u003c/h6>\n\u003cp> \u003c/p>\n\u003ch6 id=\"6\">\u003csup>6 \u003c/sup>One of the first haute recipes I mastered during grad school was a wonderful gruyere soufflé. It was just me, a whisk, and an amazing community who lovingly ate many of my disasters. And once I started to reproducibly craft successful soufflés, I started hosting dinner parties. Those dinner parties ultimately gave me the confidence to start working in professional kitchens.\u003c/h6>\n\u003cp> \u003c/p>\n\u003ch6 id=\"7\">\u003csup>7 \u003c/sup>\u003cu>Alpine cheeses\u003c/u>, like \u003cu>schallenberg\u003c/u>, \u003cu>hornbacher\u003c/u> or \u003cu>chällerhocker\u003c/u>, are some of my cherished flavors. They are wonderful on their own, and glorious in a French omelet (I was OCD about mastering those as well).\u003c/h6>\n\u003cp> \u003c/p>\n\u003ch6 id=\"8\">\u003csup>8 \u003c/sup> I am not an absolutist about the rules of governing pasta and sauce\u003c/h6>\n\u003cp> \u003c/p>\n\u003ch6 id=\"9\">\u003csup>9 \u003c/sup>Cure egg yolks (find recipes here or here) and cold smoke with cherry or pear wood smoke for 2 hours. It’s important to cold smoke as to not cook the yolks. I will say they are pretty tasty over charred asparagus.\u003c/h6>\n\u003cp>\u003c/p>\u003c/div>","attributes":{"named":{},"numeric":[]}},{"type":"component","content":"","name":"ad","attributes":{"named":{"label":"floatright"},"numeric":["floatright"]}},{"type":"contentString","content":"\u003cdiv class=\"post-body\">\u003cp>\u003c/p>\n\u003cp> \u003c/p>\n\u003ch6 id=\"10\">\u003csup>10 \u003c/sup>Take a small slab (think like “credit card cut in half” size) from the meaty portion of smoky bacon and slow render it in the oven on low heat until it takes on a caramelized jerky appearance. Cool on a lint-free towel or over a wire rack. When finely grated, this will give you a clean, smoky, umami rich bacon flavor with eating tons of fat, but save the bacon fat anyway.\u003c/h6>\n\n\u003c/div>\u003c/p>","attributes":{"named":{},"numeric":[]}}],"link":"/bayareabites/139003/the-science-and-magicof-egg-noodles","authors":["byline_bayareabites_139003"],"categories":["bayareabites_16558","bayareabites_752","bayareabites_17082"],"tags":["bayareabites_569","bayareabites_16946","bayareabites_13504","bayareabites_16945","bayareabites_377","bayareabites_16940","bayareabites_755","bayareabites_14756","bayareabites_16944"],"featImg":"bayareabites_139008","label":"source_bayareabites_139003"},"bayareabites_137157":{"type":"posts","id":"bayareabites_137157","meta":{"index":"posts_1591205157","site":"bayareabites","id":"137157","score":null,"sort":[1589323172000]},"guestAuthors":[],"slug":"check-please-bay-area-presents-a-manos-handmade-tagliatelle-al-pesto-genovese","title":"'Check, Please! Bay Area' Presents: a Mano's Handmade Tagliatelle al Pesto Genovese","publishDate":1589323172,"format":"standard","headTitle":"Bay Area Bites | KQED Food","labelTerm":{"site":"bayareabites"},"content":"\u003cp>[aside postID='bayareabites_136855,bayareabites_137009,bayareabites_137114' label='More Check, Please! Recipes To Try']\u003c/p>\n\u003cp> \u003c/p>\n\u003cp>In Hayes Valley, \u003ca href=\"https://amanosf.com/\">a Mano\u003c/a> is renowned for its pasta, made \"by hand.\" Featured on this week’s upcoming episode of \u003ca href=\"https://www.kqed.org/checkplease\">\u003cem>Check, Please! Bay Area\u003c/em>\u003c/a>, this eatery prides itself on marrying California ingredients with traditional Italian techniques in an accessible, welcoming environment. To bring the experience into your home kitchen, Chef Freedom Rains, formerly of Flour + Water and Boulevard, shares a recipe he's been making with his daughter during shelter-in-place.\u003c/p>\n\u003cfigure id=\"attachment_137171\" class=\"wp-caption alignnone\" style=\"max-width: 800px\">\u003cimg class=\"wp-image-137171 size-medium\" src=\"https://ww2.kqed.org/app/uploads/sites/24/2020/05/IMG_7150-e1589299682609-800x603.jpg\" alt=\"\" width=\"800\" height=\"603\" srcset=\"https://ww2.kqed.org/app/uploads/sites/24/2020/05/IMG_7150-e1589299682609-800x603.jpg 800w, https://ww2.kqed.org/app/uploads/sites/24/2020/05/IMG_7150-e1589299682609-160x121.jpg 160w, https://ww2.kqed.org/app/uploads/sites/24/2020/05/IMG_7150-e1589299682609-768x579.jpg 768w, https://ww2.kqed.org/app/uploads/sites/24/2020/05/IMG_7150-e1589299682609-1020x768.jpg 1020w, https://ww2.kqed.org/app/uploads/sites/24/2020/05/IMG_7150-e1589299682609-1920x1446.jpg 1920w\" sizes=\"(max-width: 800px) 100vw, 800px\">\u003cfigcaption class=\"wp-caption-text\">You only need four ingredients to craft handmade pasta at home. \u003ccite>(Courtesy of Freedom Rains)\u003c/cite>\u003c/figcaption>\u003c/figure>\n\u003cp>Making pasta by hand is an intimidating proposition to many home cooks, but Chef Rains offers a straightforward approach that yields thick ribbon noodles. The fresh, eggy tagliatelle pairs well with his improvisational take on Genovese pesto. In lieu of the basil traditionally used in Genoa, Chef Rains swaps in kale from his \u003ca href=\"https://countylineharvest.com/\">County Line Harvest\u003c/a> CSA box. This simple dish is both a well-suited project for the slow days of shelter-in-place and a serendipitous illustration of \u003ca href=\"https://amanosf.com/\">a Mano\u003c/a>'s guiding philosophy: California cooking, influenced by Italy.\u003c/p>\n\u003cp>[aside postID='bayareabites_136549,bayareabites_124323' label='CSA Box Inspiration']\u003c/p>\n\u003ch3>Tagliatelle al Pesto Genovese\u003c/h3>\n\u003cp>\u003cem>Serves 4\u003c/em>\u003c/p>\n\u003cp>[ad fullwidth]\u003c/p>\n\u003cp>\u003cstrong>Ingredients\u003c/strong>\u003cbr>\n\u003cstrong>\u003cem>Pasta Dough\u003c/em>\u003c/strong>\u003c/p>\n\u003cul>\n\u003cli>4 egg yolks\u003c/li>\n\u003cli>150g 00 pasta flour\u003c/li>\n\u003cli>5g water\u003c/li>\n\u003cli>10g extra virgin olive oil\u003c/li>\n\u003c/ul>\n\u003cp>\u003cb>\u003ci>Kale Pesto\u003c/i>\u003c/b>\u003c/p>\n\u003cul>\n\u003cli>2 cloves garlic\u003c/li>\n\u003cli>½ bunch kale\u003c/li>\n\u003cli>100g grated parmagiano\u003c/li>\n\u003cli>105g extra virgin olive oil\u003c/li>\n\u003c/ul>\n\u003cp>\u003cstrong>\u003cem>Making the pasta:\u003c/em>\u003c/strong>\u003c/p>\n\u003col>\n\u003cli>Place flour on a clean workspace. Gather into a pile and create a well on the top.\u003c/li>\n\u003cli>Place egg yolks, water, and oil in center. Mix to gradually incorporate with surrounding flour.\u003c/li>\n\u003cli>Form dough into a ball. It should be smooth. Let rest for 30 minutes.\u003c/li>\n\u003cli> Roll out dough with a rolling pin and feed through pasta machine until you reach a uniformly thin sheet. Cut into thick strips.\u003c/li>\n\u003c/ol>\n\u003cfigure id=\"attachment_137160\" class=\"wp-caption alignnone\" style=\"max-width: 800px\">\u003cimg class=\"size-medium wp-image-137160\" src=\"https://ww2.kqed.org/app/uploads/sites/24/2020/05/IMG_7124-800x600.jpg\" alt=\"\" width=\"800\" height=\"600\" srcset=\"https://ww2.kqed.org/app/uploads/sites/24/2020/05/IMG_7124-800x600.jpg 800w, https://ww2.kqed.org/app/uploads/sites/24/2020/05/IMG_7124-160x120.jpg 160w, https://ww2.kqed.org/app/uploads/sites/24/2020/05/IMG_7124-768x576.jpg 768w, https://ww2.kqed.org/app/uploads/sites/24/2020/05/IMG_7124-1020x765.jpg 1020w, https://ww2.kqed.org/app/uploads/sites/24/2020/05/IMG_7124-1920x1440.jpg 1920w\" sizes=\"(max-width: 800px) 100vw, 800px\">\u003cfigcaption class=\"wp-caption-text\">Create a well in your flour pile to contain the egg, oil, and water. \u003ccite>(Courtesy of Freedom Rains)\u003c/cite>\u003c/figcaption>\u003c/figure>\n\u003cfigure id=\"attachment_137161\" class=\"wp-caption alignnone\" style=\"max-width: 800px\">\u003cimg class=\"size-medium wp-image-137161\" src=\"https://ww2.kqed.org/app/uploads/sites/24/2020/05/IMG_7125-800x600.jpg\" alt=\"\" width=\"800\" height=\"600\" srcset=\"https://ww2.kqed.org/app/uploads/sites/24/2020/05/IMG_7125-800x600.jpg 800w, https://ww2.kqed.org/app/uploads/sites/24/2020/05/IMG_7125-160x120.jpg 160w, https://ww2.kqed.org/app/uploads/sites/24/2020/05/IMG_7125-768x576.jpg 768w, https://ww2.kqed.org/app/uploads/sites/24/2020/05/IMG_7125-1020x765.jpg 1020w, https://ww2.kqed.org/app/uploads/sites/24/2020/05/IMG_7125-1920x1440.jpg 1920w\" sizes=\"(max-width: 800px) 100vw, 800px\">\u003cfigcaption class=\"wp-caption-text\">Pasta dough should be smooth and supple, with no dry spots. \u003ccite>(Courtesy of Freedom Rains)\u003c/cite>\u003c/figcaption>\u003c/figure>\n\u003cfigure id=\"attachment_137162\" class=\"wp-caption alignnone\" style=\"max-width: 800px\">\u003cimg class=\"size-medium wp-image-137162\" src=\"https://ww2.kqed.org/app/uploads/sites/24/2020/05/IMG_7129-800x600.jpg\" alt=\"\" width=\"800\" height=\"600\" srcset=\"https://ww2.kqed.org/app/uploads/sites/24/2020/05/IMG_7129-800x600.jpg 800w, https://ww2.kqed.org/app/uploads/sites/24/2020/05/IMG_7129-160x120.jpg 160w, https://ww2.kqed.org/app/uploads/sites/24/2020/05/IMG_7129-768x576.jpg 768w, https://ww2.kqed.org/app/uploads/sites/24/2020/05/IMG_7129-1020x765.jpg 1020w, https://ww2.kqed.org/app/uploads/sites/24/2020/05/IMG_7129-1920x1440.jpg 1920w\" sizes=\"(max-width: 800px) 100vw, 800px\">\u003cfigcaption class=\"wp-caption-text\">After 30 minutes of rest, you can pre-roll your dough to feed through a pasta machine. \u003ccite>(Courtesy of Freedom Rains)\u003c/cite>\u003c/figcaption>\u003c/figure>\n\u003cfigure id=\"attachment_137170\" class=\"wp-caption alignnone\" style=\"max-width: 800px\">\u003cimg class=\"wp-image-137170 size-medium\" src=\"https://ww2.kqed.org/app/uploads/sites/24/2020/05/IMG_7138-e1589299125238-800x1067.jpg\" alt=\"\" width=\"800\" height=\"1067\" srcset=\"https://ww2.kqed.org/app/uploads/sites/24/2020/05/IMG_7138-e1589299125238-800x1067.jpg 800w, https://ww2.kqed.org/app/uploads/sites/24/2020/05/IMG_7138-e1589299125238-160x213.jpg 160w, https://ww2.kqed.org/app/uploads/sites/24/2020/05/IMG_7138-e1589299125238-768x1024.jpg 768w, https://ww2.kqed.org/app/uploads/sites/24/2020/05/IMG_7138-e1589299125238-1020x1360.jpg 1020w, https://ww2.kqed.org/app/uploads/sites/24/2020/05/IMG_7138-e1589299125238-1920x2560.jpg 1920w\" sizes=\"(max-width: 800px) 100vw, 800px\">\u003cfigcaption class=\"wp-caption-text\">Feed pasta dough through a pasta machine until you reach a thin sheet. \u003ccite>(Courtesy of Freedom Rains)\u003c/cite>\u003c/figcaption>\u003c/figure>\n\u003cp>\u003cstrong>\u003cem>Adding the pesto:\u003c/em>\u003c/strong>\u003c/p>\n\u003col>\n\u003cli>Blanch kale until soft.\u003c/li>\n\u003cli>Puree with parmaigano, garlic, and olive oil. Add salt and pepper to taste.\u003c/li>\n\u003cli>Cook pasta in salted water (about 10g salt per liter of water) until al dente. (Remember, fresh pasta cooks much faster than pantry pasta!)\u003c/li>\n\u003cli>Toss pasta in a sauté pan with pasta cooking water and pesto.\u003c/li>\n\u003cli>Add parmaigiano on top and enjoy!\u003c/li>\n\u003c/ol>\n\u003cfigure id=\"attachment_137194\" class=\"wp-caption alignnone\" style=\"max-width: 800px\">\u003cimg class=\"wp-image-137194 size-medium\" src=\"https://ww2.kqed.org/app/uploads/sites/24/2020/05/IMG_7153-800x1067.jpg\" alt=\"\" width=\"800\" height=\"1067\" srcset=\"https://ww2.kqed.org/app/uploads/sites/24/2020/05/IMG_7153-800x1067.jpg 800w, https://ww2.kqed.org/app/uploads/sites/24/2020/05/IMG_7153-160x213.jpg 160w, https://ww2.kqed.org/app/uploads/sites/24/2020/05/IMG_7153-768x1024.jpg 768w, https://ww2.kqed.org/app/uploads/sites/24/2020/05/IMG_7153-1020x1360.jpg 1020w, https://ww2.kqed.org/app/uploads/sites/24/2020/05/IMG_7153-1920x2560.jpg 1920w\" sizes=\"(max-width: 800px) 100vw, 800px\">\u003cfigcaption class=\"wp-caption-text\">Like Chef Rains, you can combine classic technique and improvisational inspiration from your CSA box. \u003ccite>(Courtesy of Freedom Rains)\u003c/cite>\u003c/figcaption>\u003c/figure>\n\u003cfigure id=\"attachment_137192\" class=\"wp-caption alignnone\" style=\"max-width: 800px\">\u003cimg class=\"size-medium wp-image-137192\" src=\"https://ww2.kqed.org/app/uploads/sites/24/2020/05/IMG_7160-800x1067.jpg\" alt=\"\" width=\"800\" height=\"1067\" srcset=\"https://ww2.kqed.org/app/uploads/sites/24/2020/05/IMG_7160-800x1067.jpg 800w, https://ww2.kqed.org/app/uploads/sites/24/2020/05/IMG_7160-160x213.jpg 160w, https://ww2.kqed.org/app/uploads/sites/24/2020/05/IMG_7160-768x1024.jpg 768w, https://ww2.kqed.org/app/uploads/sites/24/2020/05/IMG_7160-1020x1360.jpg 1020w, https://ww2.kqed.org/app/uploads/sites/24/2020/05/IMG_7160-1920x2560.jpg 1920w\" sizes=\"(max-width: 800px) 100vw, 800px\">\u003cfigcaption class=\"wp-caption-text\">By blanching the kale (briefly cooking and submerging into an ice bath), the pesto ends up with a vibrant green color.. \u003ccite>(Courtesy of Freedom Rains)\u003c/cite>\u003c/figcaption>\u003c/figure>\n\u003cfigure id=\"attachment_137195\" class=\"wp-caption alignnone\" style=\"max-width: 800px\">\u003cimg class=\"size-medium wp-image-137195\" src=\"https://ww2.kqed.org/app/uploads/sites/24/2020/05/IMG_7185-800x1067.jpg\" alt=\"\" width=\"800\" height=\"1067\" srcset=\"https://ww2.kqed.org/app/uploads/sites/24/2020/05/IMG_7185-800x1067.jpg 800w, https://ww2.kqed.org/app/uploads/sites/24/2020/05/IMG_7185-160x213.jpg 160w, https://ww2.kqed.org/app/uploads/sites/24/2020/05/IMG_7185-768x1024.jpg 768w, https://ww2.kqed.org/app/uploads/sites/24/2020/05/IMG_7185-1020x1360.jpg 1020w, https://ww2.kqed.org/app/uploads/sites/24/2020/05/IMG_7185-1920x2560.jpg 1920w\" sizes=\"(max-width: 800px) 100vw, 800px\">\u003cfigcaption class=\"wp-caption-text\">No fresh pasta dish is complete without grated parmagiano! \u003ccite>(Courtesy of Freedom Rains)\u003c/cite>\u003c/figcaption>\u003c/figure>\n\u003cp>\u003c/p>\n\u003cp>\u003cem>Tune in to watch the \u003ca href=\"http://kqed.org/checkplease\">Check, Please! Bay Area episode\u003c/a> featuring a Mano as well as Mahila and Le Paradis, this Thursday at 7:30pm on KQED 9\u003cb>.\u003c/b>\u003c/em>\u003c/p>\n\n","blocks":[],"excerpt":"Hayes Valley's a Mano transports handmade pasta from 'Check Please! Bay Area' to your home kitchen.","status":"publish","parent":0,"modified":1621634358,"stats":{"hasAudio":false,"hasVideo":false,"hasChartOrMap":false,"iframeSrcs":[],"hasGoogleForm":false,"hasGallery":false,"hasHearkenModule":false,"hasPolis":false,"paragraphCount":12,"wordCount":533},"headData":{"title":"'Check, Please! Bay Area' Presents: a Mano's Handmade Tagliatelle al Pesto Genovese | KQED","description":"Hayes Valley's a Mano transports handmade pasta from 'Check Please! Bay Area' to your home kitchen.","ogTitle":"","ogDescription":"","ogImgId":"","twTitle":"","twDescription":"","twImgId":"","schema":{"@context":"http://schema.org","@type":"Article","headline":"'Check, Please! Bay Area' Presents: a Mano's Handmade Tagliatelle al Pesto Genovese","datePublished":"2020-05-12T22:39:32.000Z","dateModified":"2021-05-21T21:59:18.000Z","image":"https://cdn.kqed.org/wp-content/uploads/2020/02/KQED-OG-Image@1x.png"}},"disqusIdentifier":"137157 https://ww2.kqed.org/bayareabites/?p=137157","disqusUrl":"https://ww2.kqed.org/bayareabites/2020/05/12/check-please-bay-area-presents-a-manos-handmade-tagliatelle-al-pesto-genovese/","disqusTitle":"'Check, Please! Bay Area' Presents: a Mano's Handmade Tagliatelle al Pesto Genovese","templateType":"standard","featuredImageType":"standard","path":"/bayareabites/137157/check-please-bay-area-presents-a-manos-handmade-tagliatelle-al-pesto-genovese","audioTrackLength":null,"parsedContent":[{"type":"contentString","content":"\u003cdiv class=\"post-body\">\u003cp>\u003cp>\u003c/p>\u003c/div>","attributes":{"named":{},"numeric":[]}},{"type":"component","content":"","name":"aside","attributes":{"named":{"postid":"bayareabites_136855,bayareabites_137009,bayareabites_137114","label":"More Check, Please! Recipes To Try "},"numeric":[]}},{"type":"contentString","content":"\u003cdiv class=\"post-body\">\u003cp>\u003c/p>\n\u003cp> \u003c/p>\n\u003cp>In Hayes Valley, \u003ca href=\"https://amanosf.com/\">a Mano\u003c/a> is renowned for its pasta, made \"by hand.\" Featured on this week’s upcoming episode of \u003ca href=\"https://www.kqed.org/checkplease\">\u003cem>Check, Please! Bay Area\u003c/em>\u003c/a>, this eatery prides itself on marrying California ingredients with traditional Italian techniques in an accessible, welcoming environment. To bring the experience into your home kitchen, Chef Freedom Rains, formerly of Flour + Water and Boulevard, shares a recipe he's been making with his daughter during shelter-in-place.\u003c/p>\n\u003cfigure id=\"attachment_137171\" class=\"wp-caption alignnone\" style=\"max-width: 800px\">\u003cimg class=\"wp-image-137171 size-medium\" src=\"https://ww2.kqed.org/app/uploads/sites/24/2020/05/IMG_7150-e1589299682609-800x603.jpg\" alt=\"\" width=\"800\" height=\"603\" srcset=\"https://ww2.kqed.org/app/uploads/sites/24/2020/05/IMG_7150-e1589299682609-800x603.jpg 800w, https://ww2.kqed.org/app/uploads/sites/24/2020/05/IMG_7150-e1589299682609-160x121.jpg 160w, https://ww2.kqed.org/app/uploads/sites/24/2020/05/IMG_7150-e1589299682609-768x579.jpg 768w, https://ww2.kqed.org/app/uploads/sites/24/2020/05/IMG_7150-e1589299682609-1020x768.jpg 1020w, https://ww2.kqed.org/app/uploads/sites/24/2020/05/IMG_7150-e1589299682609-1920x1446.jpg 1920w\" sizes=\"(max-width: 800px) 100vw, 800px\">\u003cfigcaption class=\"wp-caption-text\">You only need four ingredients to craft handmade pasta at home. \u003ccite>(Courtesy of Freedom Rains)\u003c/cite>\u003c/figcaption>\u003c/figure>\n\u003cp>Making pasta by hand is an intimidating proposition to many home cooks, but Chef Rains offers a straightforward approach that yields thick ribbon noodles. The fresh, eggy tagliatelle pairs well with his improvisational take on Genovese pesto. In lieu of the basil traditionally used in Genoa, Chef Rains swaps in kale from his \u003ca href=\"https://countylineharvest.com/\">County Line Harvest\u003c/a> CSA box. This simple dish is both a well-suited project for the slow days of shelter-in-place and a serendipitous illustration of \u003ca href=\"https://amanosf.com/\">a Mano\u003c/a>'s guiding philosophy: California cooking, influenced by Italy.\u003c/p>\n\u003cp>\u003c/p>\u003c/div>","attributes":{"named":{},"numeric":[]}},{"type":"component","content":"","name":"aside","attributes":{"named":{"postid":"bayareabites_136549,bayareabites_124323","label":"CSA Box Inspiration "},"numeric":[]}},{"type":"contentString","content":"\u003cdiv class=\"post-body\">\u003cp>\u003c/p>\n\u003ch3>Tagliatelle al Pesto Genovese\u003c/h3>\n\u003cp>\u003cem>Serves 4\u003c/em>\u003c/p>\n\u003cp>\u003c/p>\u003c/div>","attributes":{"named":{},"numeric":[]}},{"type":"component","content":"","name":"ad","attributes":{"named":{"label":"fullwidth"},"numeric":["fullwidth"]}},{"type":"contentString","content":"\u003cdiv class=\"post-body\">\u003cp>\u003c/p>\n\u003cp>\u003cstrong>Ingredients\u003c/strong>\u003cbr>\n\u003cstrong>\u003cem>Pasta Dough\u003c/em>\u003c/strong>\u003c/p>\n\u003cul>\n\u003cli>4 egg yolks\u003c/li>\n\u003cli>150g 00 pasta flour\u003c/li>\n\u003cli>5g water\u003c/li>\n\u003cli>10g extra virgin olive oil\u003c/li>\n\u003c/ul>\n\u003cp>\u003cb>\u003ci>Kale Pesto\u003c/i>\u003c/b>\u003c/p>\n\u003cul>\n\u003cli>2 cloves garlic\u003c/li>\n\u003cli>½ bunch kale\u003c/li>\n\u003cli>100g grated parmagiano\u003c/li>\n\u003cli>105g extra virgin olive oil\u003c/li>\n\u003c/ul>\n\u003cp>\u003cstrong>\u003cem>Making the pasta:\u003c/em>\u003c/strong>\u003c/p>\n\u003col>\n\u003cli>Place flour on a clean workspace. Gather into a pile and create a well on the top.\u003c/li>\n\u003cli>Place egg yolks, water, and oil in center. Mix to gradually incorporate with surrounding flour.\u003c/li>\n\u003cli>Form dough into a ball. It should be smooth. Let rest for 30 minutes.\u003c/li>\n\u003cli> Roll out dough with a rolling pin and feed through pasta machine until you reach a uniformly thin sheet. Cut into thick strips.\u003c/li>\n\u003c/ol>\n\u003cfigure id=\"attachment_137160\" class=\"wp-caption alignnone\" style=\"max-width: 800px\">\u003cimg class=\"size-medium wp-image-137160\" src=\"https://ww2.kqed.org/app/uploads/sites/24/2020/05/IMG_7124-800x600.jpg\" alt=\"\" width=\"800\" height=\"600\" srcset=\"https://ww2.kqed.org/app/uploads/sites/24/2020/05/IMG_7124-800x600.jpg 800w, https://ww2.kqed.org/app/uploads/sites/24/2020/05/IMG_7124-160x120.jpg 160w, https://ww2.kqed.org/app/uploads/sites/24/2020/05/IMG_7124-768x576.jpg 768w, https://ww2.kqed.org/app/uploads/sites/24/2020/05/IMG_7124-1020x765.jpg 1020w, https://ww2.kqed.org/app/uploads/sites/24/2020/05/IMG_7124-1920x1440.jpg 1920w\" sizes=\"(max-width: 800px) 100vw, 800px\">\u003cfigcaption class=\"wp-caption-text\">Create a well in your flour pile to contain the egg, oil, and water. \u003ccite>(Courtesy of Freedom Rains)\u003c/cite>\u003c/figcaption>\u003c/figure>\n\u003cfigure id=\"attachment_137161\" class=\"wp-caption alignnone\" style=\"max-width: 800px\">\u003cimg class=\"size-medium wp-image-137161\" src=\"https://ww2.kqed.org/app/uploads/sites/24/2020/05/IMG_7125-800x600.jpg\" alt=\"\" width=\"800\" height=\"600\" srcset=\"https://ww2.kqed.org/app/uploads/sites/24/2020/05/IMG_7125-800x600.jpg 800w, https://ww2.kqed.org/app/uploads/sites/24/2020/05/IMG_7125-160x120.jpg 160w, https://ww2.kqed.org/app/uploads/sites/24/2020/05/IMG_7125-768x576.jpg 768w, https://ww2.kqed.org/app/uploads/sites/24/2020/05/IMG_7125-1020x765.jpg 1020w, https://ww2.kqed.org/app/uploads/sites/24/2020/05/IMG_7125-1920x1440.jpg 1920w\" sizes=\"(max-width: 800px) 100vw, 800px\">\u003cfigcaption class=\"wp-caption-text\">Pasta dough should be smooth and supple, with no dry spots. \u003ccite>(Courtesy of Freedom Rains)\u003c/cite>\u003c/figcaption>\u003c/figure>\n\u003cfigure id=\"attachment_137162\" class=\"wp-caption alignnone\" style=\"max-width: 800px\">\u003cimg class=\"size-medium wp-image-137162\" src=\"https://ww2.kqed.org/app/uploads/sites/24/2020/05/IMG_7129-800x600.jpg\" alt=\"\" width=\"800\" height=\"600\" srcset=\"https://ww2.kqed.org/app/uploads/sites/24/2020/05/IMG_7129-800x600.jpg 800w, https://ww2.kqed.org/app/uploads/sites/24/2020/05/IMG_7129-160x120.jpg 160w, https://ww2.kqed.org/app/uploads/sites/24/2020/05/IMG_7129-768x576.jpg 768w, https://ww2.kqed.org/app/uploads/sites/24/2020/05/IMG_7129-1020x765.jpg 1020w, https://ww2.kqed.org/app/uploads/sites/24/2020/05/IMG_7129-1920x1440.jpg 1920w\" sizes=\"(max-width: 800px) 100vw, 800px\">\u003cfigcaption class=\"wp-caption-text\">After 30 minutes of rest, you can pre-roll your dough to feed through a pasta machine. \u003ccite>(Courtesy of Freedom Rains)\u003c/cite>\u003c/figcaption>\u003c/figure>\n\u003cfigure id=\"attachment_137170\" class=\"wp-caption alignnone\" style=\"max-width: 800px\">\u003cimg class=\"wp-image-137170 size-medium\" src=\"https://ww2.kqed.org/app/uploads/sites/24/2020/05/IMG_7138-e1589299125238-800x1067.jpg\" alt=\"\" width=\"800\" height=\"1067\" srcset=\"https://ww2.kqed.org/app/uploads/sites/24/2020/05/IMG_7138-e1589299125238-800x1067.jpg 800w, https://ww2.kqed.org/app/uploads/sites/24/2020/05/IMG_7138-e1589299125238-160x213.jpg 160w, https://ww2.kqed.org/app/uploads/sites/24/2020/05/IMG_7138-e1589299125238-768x1024.jpg 768w, https://ww2.kqed.org/app/uploads/sites/24/2020/05/IMG_7138-e1589299125238-1020x1360.jpg 1020w, https://ww2.kqed.org/app/uploads/sites/24/2020/05/IMG_7138-e1589299125238-1920x2560.jpg 1920w\" sizes=\"(max-width: 800px) 100vw, 800px\">\u003cfigcaption class=\"wp-caption-text\">Feed pasta dough through a pasta machine until you reach a thin sheet. \u003ccite>(Courtesy of Freedom Rains)\u003c/cite>\u003c/figcaption>\u003c/figure>\n\u003cp>\u003cstrong>\u003cem>Adding the pesto:\u003c/em>\u003c/strong>\u003c/p>\n\u003col>\n\u003cli>Blanch kale until soft.\u003c/li>\n\u003cli>Puree with parmaigano, garlic, and olive oil. Add salt and pepper to taste.\u003c/li>\n\u003cli>Cook pasta in salted water (about 10g salt per liter of water) until al dente. (Remember, fresh pasta cooks much faster than pantry pasta!)\u003c/li>\n\u003cli>Toss pasta in a sauté pan with pasta cooking water and pesto.\u003c/li>\n\u003cli>Add parmaigiano on top and enjoy!\u003c/li>\n\u003c/ol>\n\u003cfigure id=\"attachment_137194\" class=\"wp-caption alignnone\" style=\"max-width: 800px\">\u003cimg class=\"wp-image-137194 size-medium\" src=\"https://ww2.kqed.org/app/uploads/sites/24/2020/05/IMG_7153-800x1067.jpg\" alt=\"\" width=\"800\" height=\"1067\" srcset=\"https://ww2.kqed.org/app/uploads/sites/24/2020/05/IMG_7153-800x1067.jpg 800w, https://ww2.kqed.org/app/uploads/sites/24/2020/05/IMG_7153-160x213.jpg 160w, https://ww2.kqed.org/app/uploads/sites/24/2020/05/IMG_7153-768x1024.jpg 768w, https://ww2.kqed.org/app/uploads/sites/24/2020/05/IMG_7153-1020x1360.jpg 1020w, https://ww2.kqed.org/app/uploads/sites/24/2020/05/IMG_7153-1920x2560.jpg 1920w\" sizes=\"(max-width: 800px) 100vw, 800px\">\u003cfigcaption class=\"wp-caption-text\">Like Chef Rains, you can combine classic technique and improvisational inspiration from your CSA box. \u003ccite>(Courtesy of Freedom Rains)\u003c/cite>\u003c/figcaption>\u003c/figure>\n\u003cfigure id=\"attachment_137192\" class=\"wp-caption alignnone\" style=\"max-width: 800px\">\u003cimg class=\"size-medium wp-image-137192\" src=\"https://ww2.kqed.org/app/uploads/sites/24/2020/05/IMG_7160-800x1067.jpg\" alt=\"\" width=\"800\" height=\"1067\" srcset=\"https://ww2.kqed.org/app/uploads/sites/24/2020/05/IMG_7160-800x1067.jpg 800w, https://ww2.kqed.org/app/uploads/sites/24/2020/05/IMG_7160-160x213.jpg 160w, https://ww2.kqed.org/app/uploads/sites/24/2020/05/IMG_7160-768x1024.jpg 768w, https://ww2.kqed.org/app/uploads/sites/24/2020/05/IMG_7160-1020x1360.jpg 1020w, https://ww2.kqed.org/app/uploads/sites/24/2020/05/IMG_7160-1920x2560.jpg 1920w\" sizes=\"(max-width: 800px) 100vw, 800px\">\u003cfigcaption class=\"wp-caption-text\">By blanching the kale (briefly cooking and submerging into an ice bath), the pesto ends up with a vibrant green color.. \u003ccite>(Courtesy of Freedom Rains)\u003c/cite>\u003c/figcaption>\u003c/figure>\n\u003cfigure id=\"attachment_137195\" class=\"wp-caption alignnone\" style=\"max-width: 800px\">\u003cimg class=\"size-medium wp-image-137195\" src=\"https://ww2.kqed.org/app/uploads/sites/24/2020/05/IMG_7185-800x1067.jpg\" alt=\"\" width=\"800\" height=\"1067\" srcset=\"https://ww2.kqed.org/app/uploads/sites/24/2020/05/IMG_7185-800x1067.jpg 800w, https://ww2.kqed.org/app/uploads/sites/24/2020/05/IMG_7185-160x213.jpg 160w, https://ww2.kqed.org/app/uploads/sites/24/2020/05/IMG_7185-768x1024.jpg 768w, https://ww2.kqed.org/app/uploads/sites/24/2020/05/IMG_7185-1020x1360.jpg 1020w, https://ww2.kqed.org/app/uploads/sites/24/2020/05/IMG_7185-1920x2560.jpg 1920w\" sizes=\"(max-width: 800px) 100vw, 800px\">\u003cfigcaption class=\"wp-caption-text\">No fresh pasta dish is complete without grated parmagiano! \u003ccite>(Courtesy of Freedom Rains)\u003c/cite>\u003c/figcaption>\u003c/figure>\n\u003cp>\u003c/p>\n\u003cp>\u003cem>Tune in to watch the \u003ca href=\"http://kqed.org/checkplease\">Check, Please! Bay Area episode\u003c/a> featuring a Mano as well as Mahila and Le Paradis, this Thursday at 7:30pm on KQED 9\u003cb>.\u003c/b>\u003c/em>\u003c/p>\n\n\u003c/div>\u003c/p>","attributes":{"named":{},"numeric":[]}}],"link":"/bayareabites/137157/check-please-bay-area-presents-a-manos-handmade-tagliatelle-al-pesto-genovese","authors":["5083","11614"],"categories":["bayareabites_109","bayareabites_2695","bayareabites_17082","bayareabites_1246","bayareabites_1875","bayareabites_12","bayareabites_1807","bayareabites_90"],"tags":["bayareabites_757","bayareabites_763","bayareabites_16580","bayareabites_766","bayareabites_755","bayareabites_14738","bayareabites_14745"],"featImg":"bayareabites_137166","label":"bayareabites"},"bayareabites_137009":{"type":"posts","id":"bayareabites_137009","meta":{"index":"posts_1591205157","site":"bayareabites","id":"137009","score":null,"sort":[1588359603000]},"guestAuthors":[],"slug":"check-please-bay-area-presents-agrodolce-osterias-pasta-al-burro-rosa","title":"'Check, Please! Bay Area Kids' Presents: Agrodolce Osteria's Pasta al Burro Rosa","publishDate":1588359603,"format":"standard","headTitle":"Bay Area Bites | KQED Food","labelTerm":{"site":"bayareabites"},"content":"\u003cp>In North Berkeley, generations of Sicilian cooking come together with local ingredients at \u003ca href=\"https://www.agrodolceberkeley.com/\">Agrodolce Osteria\u003c/a>. Featured on the \u003ca href=\"https://www.kqed.org/checkplease/20623\">first episode of this season's \u003cem>Check, Please! Bay Area Kids\u003c/em>\u003c/a>, the family-run restaurant transports diners to Palermo, where Chef Angelo D'Alo grew up.\u003c/p>\n\u003cfigure id=\"attachment_137028\" class=\"wp-caption aligncenter\" style=\"max-width: 640px\">\u003cimg class=\"wp-image-137028 size-full\" src=\"https://ww2.kqed.org/app/uploads/sites/24/2020/04/Portrain-on-wall.jpg\" alt=\"Agrodolce Osteria family portrait\" width=\"640\" height=\"360\" srcset=\"https://ww2.kqed.org/app/uploads/sites/24/2020/04/Portrain-on-wall.jpg 640w, https://ww2.kqed.org/app/uploads/sites/24/2020/04/Portrain-on-wall-160x90.jpg 160w\" sizes=\"(max-width: 640px) 100vw, 640px\">\u003cfigcaption class=\"wp-caption-text\">Family portraits hang on the walls at North Berkeley's Agrodolce Osteria. \u003ccite>(Blake McHugh)\u003c/cite>\u003c/figcaption>\u003c/figure>\n\u003cp>[aside postID='bayareabites_136855,bayareabites_136716' label='More Recipes To Try']\u003cbr>\nAgrodolce, meaning sour and sweet, \u003ca href=\"https://www.agrodolceberkeley.com/\">offers take-out for pick up as well as delivery\u003c/a> every evening. The restaurant continues to offer the warmth of an old Italian home with a robust take-out menu including antipasti, an array of fresh pastas and mains and wine bottles for 50% off.\u003c/p>\n\u003cp>Having learned everything about cooking from his mother, Angelo upholds the tradition by cooking with his own kids. He and his daughter shared their recipe for easy kid-friendly pasta. For an evening of family fun, grab a few pantry staples and gather in the heart of home, the kitchen.\u003c/p>\n\u003cp>\u003cem>To follow along, check out their video tutorial featured on \u003ca href=\"https://www.instagram.com/kqedbayareabites/\">@kqedbayareabites\u003c/a>' Instagram Story.\u003c/em>\u003c/p>\n\u003cfigure id=\"attachment_137032\" class=\"wp-caption alignright\" style=\"max-width: 480px\">\u003cimg class=\"wp-image-137032 size-full\" src=\"https://ww2.kqed.org/app/uploads/sites/24/2020/04/kid-cooking-2.jpg\" alt=\"Agrodolce Osteria cooking at home\" width=\"480\" height=\"640\" srcset=\"https://ww2.kqed.org/app/uploads/sites/24/2020/04/kid-cooking-2.jpg 480w, https://ww2.kqed.org/app/uploads/sites/24/2020/04/kid-cooking-2-160x213.jpg 160w\" sizes=\"(max-width: 480px) 100vw, 480px\">\u003cfigcaption class=\"wp-caption-text\">Chef Angelo and his daughter Valentina combine ingredients for their pasta while cooking at home.\u003c/figcaption>\u003c/figure>\n\u003ch3>Pasta al Burro Rosa\u003c/h3>\n\u003cp>\u003cem>Serves 4\u003c/em>\u003c/p>\n\u003cp>[ad fullwidth]\u003c/p>\n\u003cp>\u003cstrong>Ingredients\u003c/strong>\u003c/p>\n\u003cul>\n\u003cli>1 lb pasta (any kind you prefer)\u003c/li>\n\u003cli>1 stick of butter\u003c/li>\n\u003cli>3 tbsp tomato sauce or 1 tsp of tomato paste\u003c/li>\n\u003cli>1 cup grated parmigiano-reggiano\u003c/li>\n\u003cli>1 cup chicken stock\u003c/li>\n\u003cli>1/2 tsp nutmeg\u003c/li>\n\u003cli>Salt and pepper to taste\u003c/li>\n\u003c/ul>\n\u003cp>1. Cook the pasta according to instructions. Drain and set aside.\u003c/p>\n\u003cp>2. While pasta is cooking, melt butter in large saute pan until liquefied.\u003c/p>\n\u003cp>3. Add chicken stock, salt, pepper, and nutmeg. Cook together for a minute.\u003c/p>\n\u003cp>4. Add cooked pasta, cheese, and tomato sauce/tomato paste. Cook for 15 to 20 seconds.\u003c/p>\n\u003cp>6. Garnish with more cheese. Buon appetito!\u003c/p>\n\u003cp>\u003c/p>\n\u003cp>\u003cem>Check out the \u003ca href=\"https://www.kqed.org/checkplease/20623/check-please-bay-area-kids-reviews-kura-revolving-sushi-agrodolce-osteria-burmatown\">Check, Please! Bay Area Kids episode\u003c/a> featuring \u003cstrong>Agrodolce Osteria\u003c/strong> as well as Japanese delights at Cupertino's \u003cb data-stringify-type=\"bold\">Kura Revolving Sushi\u003c/b> and Burmese-fusion at Corte Madera's tucked-away treasure \u003cb data-stringify-type=\"bold\">Burmatown\u003c/b>.\u003c/em>\u003c/p>\n\n","blocks":[],"excerpt":"A North Berkeley restaurant's family-friendly, kid-approved recipe that brings 'Check Please! Bay Area' into your home kitchen. ","status":"publish","parent":0,"modified":1588348786,"stats":{"hasAudio":false,"hasVideo":false,"hasChartOrMap":false,"iframeSrcs":[],"hasGoogleForm":false,"hasGallery":false,"hasHearkenModule":false,"hasPolis":false,"paragraphCount":14,"wordCount":337},"headData":{"title":"'Check, Please! Bay Area Kids' Presents: Agrodolce Osteria's Pasta al Burro Rosa | KQED","description":"A North Berkeley restaurant's family-friendly, kid-approved recipe that brings 'Check Please! Bay Area' into your home kitchen. ","ogTitle":"","ogDescription":"","ogImgId":"","twTitle":"","twDescription":"","twImgId":"","schema":{"@context":"http://schema.org","@type":"Article","headline":"'Check, Please! Bay Area Kids' Presents: Agrodolce Osteria's Pasta al Burro Rosa","datePublished":"2020-05-01T19:00:03.000Z","dateModified":"2020-05-01T15:59:46.000Z","image":"https://cdn.kqed.org/wp-content/uploads/2020/02/KQED-OG-Image@1x.png"}},"disqusIdentifier":"137009 https://ww2.kqed.org/bayareabites/?p=137009","disqusUrl":"https://ww2.kqed.org/bayareabites/2020/05/01/check-please-bay-area-presents-agrodolce-osterias-pasta-al-burro-rosa/","disqusTitle":"'Check, Please! Bay Area Kids' Presents: Agrodolce Osteria's Pasta al Burro Rosa","templateType":"standard","featuredImageType":"standard","path":"/bayareabites/137009/check-please-bay-area-presents-agrodolce-osterias-pasta-al-burro-rosa","audioTrackLength":null,"parsedContent":[{"type":"contentString","content":"\u003cdiv class=\"post-body\">\u003cp>\u003cp>In North Berkeley, generations of Sicilian cooking come together with local ingredients at \u003ca href=\"https://www.agrodolceberkeley.com/\">Agrodolce Osteria\u003c/a>. Featured on the \u003ca href=\"https://www.kqed.org/checkplease/20623\">first episode of this season's \u003cem>Check, Please! Bay Area Kids\u003c/em>\u003c/a>, the family-run restaurant transports diners to Palermo, where Chef Angelo D'Alo grew up.\u003c/p>\n\u003cfigure id=\"attachment_137028\" class=\"wp-caption aligncenter\" style=\"max-width: 640px\">\u003cimg class=\"wp-image-137028 size-full\" src=\"https://ww2.kqed.org/app/uploads/sites/24/2020/04/Portrain-on-wall.jpg\" alt=\"Agrodolce Osteria family portrait\" width=\"640\" height=\"360\" srcset=\"https://ww2.kqed.org/app/uploads/sites/24/2020/04/Portrain-on-wall.jpg 640w, https://ww2.kqed.org/app/uploads/sites/24/2020/04/Portrain-on-wall-160x90.jpg 160w\" sizes=\"(max-width: 640px) 100vw, 640px\">\u003cfigcaption class=\"wp-caption-text\">Family portraits hang on the walls at North Berkeley's Agrodolce Osteria. \u003ccite>(Blake McHugh)\u003c/cite>\u003c/figcaption>\u003c/figure>\n\u003cp>\u003c/p>\u003c/div>","attributes":{"named":{},"numeric":[]}},{"type":"component","content":"","name":"aside","attributes":{"named":{"postid":"bayareabites_136855,bayareabites_136716","label":"More Recipes To Try "},"numeric":[]}},{"type":"contentString","content":"\u003cdiv class=\"post-body\">\u003cp>\u003cbr>\nAgrodolce, meaning sour and sweet, \u003ca href=\"https://www.agrodolceberkeley.com/\">offers take-out for pick up as well as delivery\u003c/a> every evening. The restaurant continues to offer the warmth of an old Italian home with a robust take-out menu including antipasti, an array of fresh pastas and mains and wine bottles for 50% off.\u003c/p>\n\u003cp>Having learned everything about cooking from his mother, Angelo upholds the tradition by cooking with his own kids. He and his daughter shared their recipe for easy kid-friendly pasta. For an evening of family fun, grab a few pantry staples and gather in the heart of home, the kitchen.\u003c/p>\n\u003cp>\u003cem>To follow along, check out their video tutorial featured on \u003ca href=\"https://www.instagram.com/kqedbayareabites/\">@kqedbayareabites\u003c/a>' Instagram Story.\u003c/em>\u003c/p>\n\u003cfigure id=\"attachment_137032\" class=\"wp-caption alignright\" style=\"max-width: 480px\">\u003cimg class=\"wp-image-137032 size-full\" src=\"https://ww2.kqed.org/app/uploads/sites/24/2020/04/kid-cooking-2.jpg\" alt=\"Agrodolce Osteria cooking at home\" width=\"480\" height=\"640\" srcset=\"https://ww2.kqed.org/app/uploads/sites/24/2020/04/kid-cooking-2.jpg 480w, https://ww2.kqed.org/app/uploads/sites/24/2020/04/kid-cooking-2-160x213.jpg 160w\" sizes=\"(max-width: 480px) 100vw, 480px\">\u003cfigcaption class=\"wp-caption-text\">Chef Angelo and his daughter Valentina combine ingredients for their pasta while cooking at home.\u003c/figcaption>\u003c/figure>\n\u003ch3>Pasta al Burro Rosa\u003c/h3>\n\u003cp>\u003cem>Serves 4\u003c/em>\u003c/p>\n\u003cp>\u003c/p>\u003c/div>","attributes":{"named":{},"numeric":[]}},{"type":"component","content":"","name":"ad","attributes":{"named":{"label":"fullwidth"},"numeric":["fullwidth"]}},{"type":"contentString","content":"\u003cdiv class=\"post-body\">\u003cp>\u003c/p>\n\u003cp>\u003cstrong>Ingredients\u003c/strong>\u003c/p>\n\u003cul>\n\u003cli>1 lb pasta (any kind you prefer)\u003c/li>\n\u003cli>1 stick of butter\u003c/li>\n\u003cli>3 tbsp tomato sauce or 1 tsp of tomato paste\u003c/li>\n\u003cli>1 cup grated parmigiano-reggiano\u003c/li>\n\u003cli>1 cup chicken stock\u003c/li>\n\u003cli>1/2 tsp nutmeg\u003c/li>\n\u003cli>Salt and pepper to taste\u003c/li>\n\u003c/ul>\n\u003cp>1. Cook the pasta according to instructions. Drain and set aside.\u003c/p>\n\u003cp>2. While pasta is cooking, melt butter in large saute pan until liquefied.\u003c/p>\n\u003cp>3. Add chicken stock, salt, pepper, and nutmeg. Cook together for a minute.\u003c/p>\n\u003cp>4. Add cooked pasta, cheese, and tomato sauce/tomato paste. Cook for 15 to 20 seconds.\u003c/p>\n\u003cp>6. Garnish with more cheese. Buon appetito!\u003c/p>\n\u003cp>\u003c/p>\n\u003cp>\u003cem>Check out the \u003ca href=\"https://www.kqed.org/checkplease/20623/check-please-bay-area-kids-reviews-kura-revolving-sushi-agrodolce-osteria-burmatown\">Check, Please! Bay Area Kids episode\u003c/a> featuring \u003cstrong>Agrodolce Osteria\u003c/strong> as well as Japanese delights at Cupertino's \u003cb data-stringify-type=\"bold\">Kura Revolving Sushi\u003c/b> and Burmese-fusion at Corte Madera's tucked-away treasure \u003cb data-stringify-type=\"bold\">Burmatown\u003c/b>.\u003c/em>\u003c/p>\n\n\u003c/div>\u003c/p>","attributes":{"named":{},"numeric":[]}}],"link":"/bayareabites/137009/check-please-bay-area-presents-agrodolce-osterias-pasta-al-burro-rosa","authors":["5083"],"categories":["bayareabites_109","bayareabites_264","bayareabites_188","bayareabites_2695","bayareabites_8770","bayareabites_1246","bayareabites_1875","bayareabites_12","bayareabites_1807"],"tags":["bayareabites_16577","bayareabites_14751","bayareabites_757","bayareabites_763","bayareabites_15290","bayareabites_755","bayareabites_14436"],"featImg":"bayareabites_137052","label":"bayareabites"},"bayareabites_135820":{"type":"posts","id":"bayareabites_135820","meta":{"index":"posts_1591205157","site":"bayareabites","id":"135820","score":null,"sort":[1575936742000]},"guestAuthors":[],"slug":"flavors-worth-finding-winter-comfort-food-isnt-always-about-soup","title":"Flavors Worth Finding: Winter Comfort Food Isn't Always About Soup","publishDate":1575936742,"format":"standard","headTitle":"Bay Area Bites | KQED Food","labelTerm":{"site":"bayareabites"},"content":"\u003cp>\u003cem>Dining in the Bay Area can mean lots of optimized salad bars and grain bowls inhaled between meetings. Here, the staff at KQED Arts & Culture shares recent meals that demanded we slow down and enjoy them thoroughly.\u003c/em>\u003c/p>\n\u003cp>[aside postID='bayareabites_133626,news_10966514,bayareabites_78315' label='More servings of silog, malfatti, and Olivier salad']\u003cbr>\n \u003c/p>\n\u003ch2>Gateway Kitchen’s Crispy Chicken\u003c/h2>\n\u003cp>\u003cspan style=\"font-weight: 400\">Cold day food cravings don't always call for soup—sometimes you want proper texture. So o\u003c/span>\u003cspan style=\"font-weight: 400\">n a recent chilly evening, my boyfriend and I headed to a small Filipino restaurant in Daly City called\u003ca href=\"https://www.yelp.com/biz/gateway-kitchen-daly-city\"> Gateway Kitchen\u003c/a>. \u003c/span>\u003c/p>\n\u003cp>\u003cspan style=\"font-weight: 400\">Its menu is as efficiently sized as its interior, with silog, a hearty, classic breakfast dish, as the main offering. Each variety comes with a different protein, including crispy chicken, longanisa, bacon, Hong Kong-style pork chops and more. We chose a crispy chicken silog and a longanisa silog with a side of bacon, and each came with a heaping mound of garlic rice and pineapple. (We also added eggs to both orders.)\u003c/span>\u003c/p>\n\u003cfigure id=\"attachment_135823\" class=\"wp-caption alignnone\" style=\"max-width: 1920px\">\u003cimg class=\"size-full wp-image-135823\" src=\"https://ww2.kqed.org/app/uploads/sites/24/2019/12/gatewaykitche_1.jpg\" alt=\"Gateway Kitchen's longanisa silog served with a side of bacon and garlic rice.\" width=\"1920\" height=\"1440\" srcset=\"https://ww2.kqed.org/app/uploads/sites/24/2019/12/gatewaykitche_1.jpg 1920w, https://ww2.kqed.org/app/uploads/sites/24/2019/12/gatewaykitche_1-160x120.jpg 160w, https://ww2.kqed.org/app/uploads/sites/24/2019/12/gatewaykitche_1-800x600.jpg 800w, https://ww2.kqed.org/app/uploads/sites/24/2019/12/gatewaykitche_1-768x576.jpg 768w, https://ww2.kqed.org/app/uploads/sites/24/2019/12/gatewaykitche_1-1020x765.jpg 1020w, https://ww2.kqed.org/app/uploads/sites/24/2019/12/gatewaykitche_1-1200x900.jpg 1200w\" sizes=\"(max-width: 1920px) 100vw, 1920px\">\u003cfigcaption class=\"wp-caption-text\">Gateway Kitchen's longanisa silog served with a side of bacon and garlic rice. \u003ccite>(Grace Cheung)\u003c/cite>\u003c/figcaption>\u003c/figure>\n\u003cp>\u003cspan style=\"font-weight: 400\">At Gateway Kitchen, when you tap the surface of the chicken with a fork, the crispy, hard shell taps back. Imagine how satisfying it is to hear the crispy crunch when your fork and knife first breach that umami shell—yep, it was just as good as you’re thinking! The fatty longanisa and crispy bacon provided a great texture and flavor contrast to the garlic rice, especially once we broke the yolk and mixed it all together.\u003c/span>\u003cspan style=\"font-weight: 400\"> \u003c/span>\u003c/p>\n\u003cp>[ad fullwidth]\u003c/p>\n\u003cp>\u003cspan style=\"font-weight: 400\">And yes, I’m still thinking about that crispy chicken over a week later!—\u003cem>Grace Cheung\u003c/em>\u003c/span>\u003c/p>\n\u003ch2>MAMA Oakland's Prix-Fixe Menu\u003c/h2>\n\u003cp>\u003cspan style=\"font-weight: 400\">After a trusted recommendation, I dragged along two friends to try \u003ca href=\"https://mama-oakland.com/\">MAMA Oakland\u003c/a>’s fairly affordable $30 three-course dinner. The restaurant opened this summer amid a stretch of eateries and bars on Grand Avenue, and its seasonal prix-fixe offerings make it a standout—and a hard reservation to snag on a Friday night. \u003c/span>\u003c/p>\n\u003cp>\u003cspan style=\"font-weight: 400\">Luckily, MAMA saves room for walk-ins, so my group and I settled at a cozy corner table with prime people-watching views to contemplate the night’s choices. Roasted mushroom soup or fennel-and-blood orange salad with toasted walnuts for the first course? Spaghetti with meatballs or malfatti with roasted vegetables for the second? And finally, our dessert options were a pumpkin cheesecake with rosemary graham crust or a spiced persimmon upside-down cake.\u003c/span>\u003c/p>\n\u003cp>https://www.instagram.com/p/B5GFpksBapy/\u003c/p>\n\u003cp>\u003cspan style=\"font-weight: 400\">Between the three of us, we were able to order every dish. But I’m here to tell you about the malfatti: the delicate spinach-and-cheese dumplings sat on a butternut squash purée, leaning on roasted root vegetables, all glistening in brown butter and topped with crispy sage. It was a thoughtful and delicious dish—so good that nothing was left on the plate by the end.\u003c/span>\u003c/p>\n\u003cp>\u003cspan style=\"font-weight: 400\">The rest of the meal was also carefully prepared and lovely, and not just for its price. Also noteworthy is MAMA’s wine list, which is much longer than its food menu. (The restaurant’s owners first started with the wine bar Bay Grape, just a block west on Grand.) I’m going back to MAMA, and probably very soon.—\u003cem>Ruth Gebreyesus\u003c/em>\u003c/span>\u003c/p>\n\u003ch2>Homemade Belarusian Classics on Thanksgiving\u003c/h2>\n\u003cp>\u003cspan style=\"font-weight: 400\">The best thing I ate recently was a Thanksgiving meal at my mom’s place in Hayward, which featured a mix of American dishes like roasted turkey, mashed potatoes, gravy and a delicious truffle salt stuffing, and a couple of classics on the table from Belarus. My mom brought back our childhood favorites, including Russian-style deviled eggs made with mushrooms and fresh dill, and the rich Olivier salad, which is eaten across many former-Soviet nations. \u003c/span>\u003c/p>\n\u003cp>\u003cspan style=\"font-weight: 400\">Like many other salads from the region, Olivier is dressed in mayonnaise and resembles a potato salad but with more “stuff” in it: cubed potatoes, carrots, peas, mushrooms, eggs and a cured meat of some kind, usually ham. I had this dish at every family gathering growing up, but nowadays I eat it on rare occasions since it’s more laborious to put together than your average green salad. (If I'm craving it I head to San Francisco's \u003c/span>\u003cspan style=\"font-weight: 400\">\u003ca href=\"https://www.newworldmarketsf.com/gallery\">New World Market\u003c/a> to get my fix.) \u003c/span>\u003c/p>\n\u003cfigure id=\"attachment_135825\" class=\"wp-caption alignnone\" style=\"max-width: 1920px\">\u003cimg class=\"size-full wp-image-135825\" src=\"https://ww2.kqed.org/app/uploads/sites/24/2019/12/IMG_5871.jpeg\" alt=\"The spread at Masha Pershay's mother's house on Thanksgiving.\" width=\"1920\" height=\"2560\" srcset=\"https://ww2.kqed.org/app/uploads/sites/24/2019/12/IMG_5871.jpeg 1920w, https://ww2.kqed.org/app/uploads/sites/24/2019/12/IMG_5871-160x213.jpeg 160w, https://ww2.kqed.org/app/uploads/sites/24/2019/12/IMG_5871-800x1067.jpeg 800w, https://ww2.kqed.org/app/uploads/sites/24/2019/12/IMG_5871-768x1024.jpeg 768w, https://ww2.kqed.org/app/uploads/sites/24/2019/12/IMG_5871-1020x1360.jpeg 1020w, https://ww2.kqed.org/app/uploads/sites/24/2019/12/IMG_5871-900x1200.jpeg 900w\" sizes=\"(max-width: 1920px) 100vw, 1920px\">\u003cfigcaption class=\"wp-caption-text\">The spread at Masha Pershay's mother's house on Thanksgiving. \u003ccite>(Oxana Sapronova)\u003c/cite>\u003c/figcaption>\u003c/figure>\n\u003cp>\u003c/p>\n\u003cp>\u003cspan style=\"font-weight: 400\">For dessert, I was reunited with another childhood favorite, medovik, a Slavic honey cake made by my sister’s friend, who’s from Kazakhstan. Made from several thin layers of soft, honey-sweetened sponge cake with sour cream in between, the velvety, soft texture and balanced sweetness of medovik was the best way round out the holiday meal.—\u003cem>Masha Pershay\u003c/em>\u003c/span>\u003c/p>\n\n","blocks":[],"excerpt":"KQED Arts & Culture writers recommend Filipino silog, Italian malfatti and Olivier salad from the former Soviet Union. ","status":"publish","parent":0,"modified":1575938141,"stats":{"hasAudio":false,"hasVideo":false,"hasChartOrMap":false,"iframeSrcs":[],"hasGoogleForm":false,"hasGallery":false,"hasHearkenModule":false,"hasPolis":false,"paragraphCount":15,"wordCount":824},"headData":{"title":"Flavors Worth Finding: Winter Comfort Food Isn't Always About Soup | KQED","description":"KQED Arts & Culture writers recommend Filipino silog, Italian malfatti and Olivier salad from the former Soviet Union. ","ogTitle":"","ogDescription":"","ogImgId":"","twTitle":"","twDescription":"","twImgId":"","schema":{"@context":"http://schema.org","@type":"Article","headline":"Flavors Worth Finding: Winter Comfort Food Isn't Always About Soup","datePublished":"2019-12-10T00:12:22.000Z","dateModified":"2019-12-10T00:35:41.000Z","image":"https://cdn.kqed.org/wp-content/uploads/2020/02/KQED-OG-Image@1x.png"}},"disqusIdentifier":"135820 https://ww2.kqed.org/bayareabites/?p=135820","disqusUrl":"https://ww2.kqed.org/bayareabites/2019/12/09/flavors-worth-finding-winter-comfort-food-isnt-always-about-soup/","disqusTitle":"Flavors Worth Finding: Winter Comfort Food Isn't Always About Soup","templateType":"standard","featuredImageType":"standard","path":"/bayareabites/135820/flavors-worth-finding-winter-comfort-food-isnt-always-about-soup","audioTrackLength":null,"parsedContent":[{"type":"contentString","content":"\u003cdiv class=\"post-body\">\u003cp>\u003cp>\u003cem>Dining in the Bay Area can mean lots of optimized salad bars and grain bowls inhaled between meetings. Here, the staff at KQED Arts & Culture shares recent meals that demanded we slow down and enjoy them thoroughly.\u003c/em>\u003c/p>\n\u003cp>\u003c/p>\u003c/div>","attributes":{"named":{},"numeric":[]}},{"type":"component","content":"","name":"aside","attributes":{"named":{"postid":"bayareabites_133626,news_10966514,bayareabites_78315","label":"More servings of silog, malfatti, and Olivier salad "},"numeric":[]}},{"type":"contentString","content":"\u003cdiv class=\"post-body\">\u003cp>\u003cbr>\n \u003c/p>\n\u003ch2>Gateway Kitchen’s Crispy Chicken\u003c/h2>\n\u003cp>\u003cspan style=\"font-weight: 400\">Cold day food cravings don't always call for soup—sometimes you want proper texture. So o\u003c/span>\u003cspan style=\"font-weight: 400\">n a recent chilly evening, my boyfriend and I headed to a small Filipino restaurant in Daly City called\u003ca href=\"https://www.yelp.com/biz/gateway-kitchen-daly-city\"> Gateway Kitchen\u003c/a>. \u003c/span>\u003c/p>\n\u003cp>\u003cspan style=\"font-weight: 400\">Its menu is as efficiently sized as its interior, with silog, a hearty, classic breakfast dish, as the main offering. Each variety comes with a different protein, including crispy chicken, longanisa, bacon, Hong Kong-style pork chops and more. We chose a crispy chicken silog and a longanisa silog with a side of bacon, and each came with a heaping mound of garlic rice and pineapple. (We also added eggs to both orders.)\u003c/span>\u003c/p>\n\u003cfigure id=\"attachment_135823\" class=\"wp-caption alignnone\" style=\"max-width: 1920px\">\u003cimg class=\"size-full wp-image-135823\" src=\"https://ww2.kqed.org/app/uploads/sites/24/2019/12/gatewaykitche_1.jpg\" alt=\"Gateway Kitchen's longanisa silog served with a side of bacon and garlic rice.\" width=\"1920\" height=\"1440\" srcset=\"https://ww2.kqed.org/app/uploads/sites/24/2019/12/gatewaykitche_1.jpg 1920w, https://ww2.kqed.org/app/uploads/sites/24/2019/12/gatewaykitche_1-160x120.jpg 160w, https://ww2.kqed.org/app/uploads/sites/24/2019/12/gatewaykitche_1-800x600.jpg 800w, https://ww2.kqed.org/app/uploads/sites/24/2019/12/gatewaykitche_1-768x576.jpg 768w, https://ww2.kqed.org/app/uploads/sites/24/2019/12/gatewaykitche_1-1020x765.jpg 1020w, https://ww2.kqed.org/app/uploads/sites/24/2019/12/gatewaykitche_1-1200x900.jpg 1200w\" sizes=\"(max-width: 1920px) 100vw, 1920px\">\u003cfigcaption class=\"wp-caption-text\">Gateway Kitchen's longanisa silog served with a side of bacon and garlic rice. \u003ccite>(Grace Cheung)\u003c/cite>\u003c/figcaption>\u003c/figure>\n\u003cp>\u003cspan style=\"font-weight: 400\">At Gateway Kitchen, when you tap the surface of the chicken with a fork, the crispy, hard shell taps back. Imagine how satisfying it is to hear the crispy crunch when your fork and knife first breach that umami shell—yep, it was just as good as you’re thinking! The fatty longanisa and crispy bacon provided a great texture and flavor contrast to the garlic rice, especially once we broke the yolk and mixed it all together.\u003c/span>\u003cspan style=\"font-weight: 400\"> \u003c/span>\u003c/p>\n\u003cp>\u003c/p>\u003c/div>","attributes":{"named":{},"numeric":[]}},{"type":"component","content":"","name":"ad","attributes":{"named":{"label":"fullwidth"},"numeric":["fullwidth"]}},{"type":"contentString","content":"\u003cdiv class=\"post-body\">\u003cp>\u003c/p>\n\u003cp>\u003cspan style=\"font-weight: 400\">And yes, I’m still thinking about that crispy chicken over a week later!—\u003cem>Grace Cheung\u003c/em>\u003c/span>\u003c/p>\n\u003ch2>MAMA Oakland's Prix-Fixe Menu\u003c/h2>\n\u003cp>\u003cspan style=\"font-weight: 400\">After a trusted recommendation, I dragged along two friends to try \u003ca href=\"https://mama-oakland.com/\">MAMA Oakland\u003c/a>’s fairly affordable $30 three-course dinner. The restaurant opened this summer amid a stretch of eateries and bars on Grand Avenue, and its seasonal prix-fixe offerings make it a standout—and a hard reservation to snag on a Friday night. \u003c/span>\u003c/p>\n\u003cp>\u003cspan style=\"font-weight: 400\">Luckily, MAMA saves room for walk-ins, so my group and I settled at a cozy corner table with prime people-watching views to contemplate the night’s choices. Roasted mushroom soup or fennel-and-blood orange salad with toasted walnuts for the first course? Spaghetti with meatballs or malfatti with roasted vegetables for the second? And finally, our dessert options were a pumpkin cheesecake with rosemary graham crust or a spiced persimmon upside-down cake.\u003c/span>\u003c/p>\u003c/p>\u003c/div>","attributes":{"named":{},"numeric":[]}},{"type":"component","content":"","name":"instagramLink","attributes":{"named":{"instagramId":"B5GFpksBapy"},"numeric":[]}},{"type":"contentString","content":"\u003cdiv class=\"post-body\">\u003cp>\u003cp>\u003cspan style=\"font-weight: 400\">Between the three of us, we were able to order every dish. But I’m here to tell you about the malfatti: the delicate spinach-and-cheese dumplings sat on a butternut squash purée, leaning on roasted root vegetables, all glistening in brown butter and topped with crispy sage. It was a thoughtful and delicious dish—so good that nothing was left on the plate by the end.\u003c/span>\u003c/p>\n\u003cp>\u003cspan style=\"font-weight: 400\">The rest of the meal was also carefully prepared and lovely, and not just for its price. Also noteworthy is MAMA’s wine list, which is much longer than its food menu. (The restaurant’s owners first started with the wine bar Bay Grape, just a block west on Grand.) I’m going back to MAMA, and probably very soon.—\u003cem>Ruth Gebreyesus\u003c/em>\u003c/span>\u003c/p>\n\u003ch2>Homemade Belarusian Classics on Thanksgiving\u003c/h2>\n\u003cp>\u003cspan style=\"font-weight: 400\">The best thing I ate recently was a Thanksgiving meal at my mom’s place in Hayward, which featured a mix of American dishes like roasted turkey, mashed potatoes, gravy and a delicious truffle salt stuffing, and a couple of classics on the table from Belarus. My mom brought back our childhood favorites, including Russian-style deviled eggs made with mushrooms and fresh dill, and the rich Olivier salad, which is eaten across many former-Soviet nations. \u003c/span>\u003c/p>\n\u003cp>\u003cspan style=\"font-weight: 400\">Like many other salads from the region, Olivier is dressed in mayonnaise and resembles a potato salad but with more “stuff” in it: cubed potatoes, carrots, peas, mushrooms, eggs and a cured meat of some kind, usually ham. I had this dish at every family gathering growing up, but nowadays I eat it on rare occasions since it’s more laborious to put together than your average green salad. (If I'm craving it I head to San Francisco's \u003c/span>\u003cspan style=\"font-weight: 400\">\u003ca href=\"https://www.newworldmarketsf.com/gallery\">New World Market\u003c/a> to get my fix.) \u003c/span>\u003c/p>\n\u003cfigure id=\"attachment_135825\" class=\"wp-caption alignnone\" style=\"max-width: 1920px\">\u003cimg class=\"size-full wp-image-135825\" src=\"https://ww2.kqed.org/app/uploads/sites/24/2019/12/IMG_5871.jpeg\" alt=\"The spread at Masha Pershay's mother's house on Thanksgiving.\" width=\"1920\" height=\"2560\" srcset=\"https://ww2.kqed.org/app/uploads/sites/24/2019/12/IMG_5871.jpeg 1920w, https://ww2.kqed.org/app/uploads/sites/24/2019/12/IMG_5871-160x213.jpeg 160w, https://ww2.kqed.org/app/uploads/sites/24/2019/12/IMG_5871-800x1067.jpeg 800w, https://ww2.kqed.org/app/uploads/sites/24/2019/12/IMG_5871-768x1024.jpeg 768w, https://ww2.kqed.org/app/uploads/sites/24/2019/12/IMG_5871-1020x1360.jpeg 1020w, https://ww2.kqed.org/app/uploads/sites/24/2019/12/IMG_5871-900x1200.jpeg 900w\" sizes=\"(max-width: 1920px) 100vw, 1920px\">\u003cfigcaption class=\"wp-caption-text\">The spread at Masha Pershay's mother's house on Thanksgiving. \u003ccite>(Oxana Sapronova)\u003c/cite>\u003c/figcaption>\u003c/figure>\n\u003cp>\u003c/p>\n\u003cp>\u003cspan style=\"font-weight: 400\">For dessert, I was reunited with another childhood favorite, medovik, a Slavic honey cake made by my sister’s friend, who’s from Kazakhstan. Made from several thin layers of soft, honey-sweetened sponge cake with sour cream in between, the velvety, soft texture and balanced sweetness of medovik was the best way round out the holiday meal.—\u003cem>Masha Pershay\u003c/em>\u003c/span>\u003c/p>\n\n\u003c/div>\u003c/p>","attributes":{"named":{},"numeric":[]}}],"link":"/bayareabites/135820/flavors-worth-finding-winter-comfort-food-isnt-always-about-soup","authors":["11625","5083"],"categories":["bayareabites_2998","bayareabites_1516","bayareabites_109","bayareabites_1653","bayareabites_8770","bayareabites_1763","bayareabites_366","bayareabites_1807","bayareabites_1873"],"tags":["bayareabites_16243","bayareabites_9710","bayareabites_16515","bayareabites_330","bayareabites_725","bayareabites_755","bayareabites_16252","bayareabites_16516"],"featImg":"bayareabites_135822","label":"bayareabites"},"bayareabites_126313":{"type":"posts","id":"bayareabites_126313","meta":{"index":"posts_1591205157","site":"bayareabites","id":"126313","score":null,"sort":[1522438084000]},"guestAuthors":[],"slug":"che-fico-opens-on-divisadero-cool-figs-wood-fired-chicken-and-hot-pizza","title":"Che Fico Opens on Divisadero — Cool Figs, Wood-Fired Chicken and Hot Pizza","publishDate":1522438084,"format":"standard","headTitle":"New Restaurants 2018 | Bay Area Bites | KQED Food","labelTerm":{"term":16196,"site":"bayareabites"},"content":"\u003cp>\u003cem>Four years in the making, a trio of alums from some of Chicago and New York’s most important restaurants arrive on Divisadero with a chic, lofty Italian spot serving rustic pastas, San Francisco-style pizza, and can’t miss cocktails and desserts.\u003c/em>\u003c/p>\n\u003cp>Walking into the second floor dining room of NoPa’s newly-opened Cal-Ital destination, diners can’t help but think to themselves how cool the design is. They’ll tell themselves, “Wow, what a formidable pizza oven.” Or, “My goodness, that is one long, never-ending communal table.” Perhaps, they’ll even ask themselves, “When was the last time I saw a skylight in a San Francisco restaurant?” However, the most likely initial comment will undoubtedly be “What a fig” because of the ever-photogenic fig tree-printed wallpaper that greets everyone entering \u003ca href=\"http://www.chefico.com/\">Che Fico\u003c/a> (for the record, it’s pronounced like Kay fee-koh).\u003c/p>\n\u003cfigure id=\"attachment_126247\" class=\"wp-caption aligncenter\" style=\"max-width: 1920px\">\u003cimg src=\"https://ww2.kqed.org/bayareabites/wp-content/uploads/sites/24/2018/03/IMG_1486-new.jpg\" alt=\"Entryway to Che Fico is adorned with fig wallpaper.\" width=\"1920\" height=\"1280\" class=\"size-full wp-image-126247\" srcset=\"https://ww2.kqed.org/app/uploads/sites/24/2018/03/IMG_1486-new.jpg 1920w, https://ww2.kqed.org/app/uploads/sites/24/2018/03/IMG_1486-new-160x107.jpg 160w, https://ww2.kqed.org/app/uploads/sites/24/2018/03/IMG_1486-new-800x533.jpg 800w, https://ww2.kqed.org/app/uploads/sites/24/2018/03/IMG_1486-new-768x512.jpg 768w, https://ww2.kqed.org/app/uploads/sites/24/2018/03/IMG_1486-new-1020x680.jpg 1020w, https://ww2.kqed.org/app/uploads/sites/24/2018/03/IMG_1486-new-1180x787.jpg 1180w, https://ww2.kqed.org/app/uploads/sites/24/2018/03/IMG_1486-new-960x640.jpg 960w, https://ww2.kqed.org/app/uploads/sites/24/2018/03/IMG_1486-new-240x160.jpg 240w, https://ww2.kqed.org/app/uploads/sites/24/2018/03/IMG_1486-new-375x250.jpg 375w, https://ww2.kqed.org/app/uploads/sites/24/2018/03/IMG_1486-new-520x347.jpg 520w\" sizes=\"(max-width: 1920px) 100vw, 1920px\">\u003cfigcaption class=\"wp-caption-text\">Entryway to Che Fico is adorned with fig wallpaper. \u003ccite>(Wendy Goodfriend)\u003c/cite>\u003c/figcaption>\u003c/figure>\n\u003cfigure id=\"attachment_126251\" class=\"wp-caption aligncenter\" style=\"max-width: 1920px\">\u003cimg src=\"https://ww2.kqed.org/bayareabites/wp-content/uploads/sites/24/2018/03/IMG_1511-new.jpg\" alt=\"Communal table inside Che Fico.\" width=\"1920\" height=\"1280\" class=\"size-full wp-image-126251\" srcset=\"https://ww2.kqed.org/app/uploads/sites/24/2018/03/IMG_1511-new.jpg 1920w, https://ww2.kqed.org/app/uploads/sites/24/2018/03/IMG_1511-new-160x107.jpg 160w, https://ww2.kqed.org/app/uploads/sites/24/2018/03/IMG_1511-new-800x533.jpg 800w, https://ww2.kqed.org/app/uploads/sites/24/2018/03/IMG_1511-new-768x512.jpg 768w, https://ww2.kqed.org/app/uploads/sites/24/2018/03/IMG_1511-new-1020x680.jpg 1020w, https://ww2.kqed.org/app/uploads/sites/24/2018/03/IMG_1511-new-1180x787.jpg 1180w, https://ww2.kqed.org/app/uploads/sites/24/2018/03/IMG_1511-new-960x640.jpg 960w, https://ww2.kqed.org/app/uploads/sites/24/2018/03/IMG_1511-new-240x160.jpg 240w, https://ww2.kqed.org/app/uploads/sites/24/2018/03/IMG_1511-new-375x250.jpg 375w, https://ww2.kqed.org/app/uploads/sites/24/2018/03/IMG_1511-new-520x347.jpg 520w\" sizes=\"(max-width: 1920px) 100vw, 1920px\">\u003cfigcaption class=\"wp-caption-text\">Communal table inside Che Fico. \u003ccite>(Wendy Goodfriend)\u003c/cite>\u003c/figcaption>\u003c/figure>\n\u003cp>Well, there are no figs on any plates during the early spring season at this restaurant (sorry, \u003ca href=\"https://archives.sfweekly.com/foodie/2009/10/28/david-chang-sf-reaction-to-fig-gate-retardedly-stupid\">David Chang\u003c/a>) but the fig design motif makes obvious sense because Che Fico does literally translate to “What a fig” in Italian. More appropriately, though, for this chic Italy-via-seasonal California taverna, the phrase also means, “Oh that’s cool” in Italian slang. Indeed, this joint project from a trio of alums who spent significant time working at some of Chicago and New York’s restaurant heavyweights is indeed a really, really cool addition to the Divisadero corridor that just might be SF’s coolest dining neighborhood of the moment. There is a definite “it” factor going on here.\u003c/p>\n\u003cfigure id=\"attachment_126234\" class=\"wp-caption aligncenter\" style=\"max-width: 1920px\">\u003cimg src=\"https://ww2.kqed.org/bayareabites/wp-content/uploads/sites/24/2018/03/IMG_1198-new.jpg\" alt=\"A chef wearing a cool fig-patterned shirt.\" width=\"1920\" height=\"1280\" class=\"size-full wp-image-126234\" srcset=\"https://ww2.kqed.org/app/uploads/sites/24/2018/03/IMG_1198-new.jpg 1920w, https://ww2.kqed.org/app/uploads/sites/24/2018/03/IMG_1198-new-160x107.jpg 160w, https://ww2.kqed.org/app/uploads/sites/24/2018/03/IMG_1198-new-800x533.jpg 800w, https://ww2.kqed.org/app/uploads/sites/24/2018/03/IMG_1198-new-768x512.jpg 768w, https://ww2.kqed.org/app/uploads/sites/24/2018/03/IMG_1198-new-1020x680.jpg 1020w, https://ww2.kqed.org/app/uploads/sites/24/2018/03/IMG_1198-new-1180x787.jpg 1180w, https://ww2.kqed.org/app/uploads/sites/24/2018/03/IMG_1198-new-960x640.jpg 960w, https://ww2.kqed.org/app/uploads/sites/24/2018/03/IMG_1198-new-240x160.jpg 240w, https://ww2.kqed.org/app/uploads/sites/24/2018/03/IMG_1198-new-375x250.jpg 375w, https://ww2.kqed.org/app/uploads/sites/24/2018/03/IMG_1198-new-520x347.jpg 520w\" sizes=\"(max-width: 1920px) 100vw, 1920px\">\u003cfigcaption class=\"wp-caption-text\">A chef wearing a cool fig-patterned shirt. \u003ccite>(Wendy Goodfriend)\u003c/cite>\u003c/figcaption>\u003c/figure>\n\u003cp>Che Fico comes courtesy of chef David Nayfeld, pastry chef Angela Pinkerton and co-owner and partner Matt Brewer. They are rock stars of the restaurant industry without the Instagram-crazy, TV-watching groupie followings that seem to be the defining mark for celebrity chefs and restaurateurs today. Nayfeld grew up in the East Bay and used to hang out in what is now Che Fico’s neighborhood all the time because his mom is a chiropractor at the Fillmore Health Center just a few blocks away. As he likes to sarcastically say now, at least his mother can walk along Divisadero and show all her friends and colleagues that her son may have been up to trouble in the teenage years but it all worked out just fine. His resume is a story unto itself, beginning by stocking vegetables at Paul’s Produce in Alameda as a teenager and making pizzas at a Greek restaurant, then heading to Los Angeles as an 18-year old with no real agenda. He eventually landed at the \u003ca href=\"https://www.ciachef.edu/cia-new-york/\">Culinary Institute of America in Hyde Park\u003c/a>, NY and landed coveted externships at Nobu in Manhattan and now-closed Aqua here in San Francisco. \u003c/p>\n\u003cp>After graduation, one of Aqua’s chefs Peter Armellino (now the chef of \u003ca href=\"https://www.youtube.com/watch?v=Bncc1teQrf4\">The Plumed Horse\u003c/a> and Pasta Armellino in Saratoga and one of the Bay area’s true pasta maestros) brought Nayfeld back to Aqua as a line cook. From there, Nayfeld’s career touched all over New York, Europe and Las Vegas with stints in the kitchens of some of the world’s great restaurants (Mirazur in the south of France, Frenchie in Paris, Tickets in Barcelona, New York’s \u003ca href=\"https://www.elevenmadisonpark.com/\">Eleven Madison Park\u003c/a>) and the now-closed Cru in New York where chef Shea Gallante’s pasta tasting menus helped give Nayfeld the pasta bug that is very apparent at Che Fico. Basically, Nayfeld’s chef credentials are the culinary equivalent of a Stanford undergraduate degree combined with a Yale law degree. Yes, there is some serious talent here.\u003c/p>\n\u003cp>[ad fullwidth]\u003c/p>\n\u003cp>Nayfeld met Pinkerton at Eleven Madison Park (where she won a James Beard award for her exquisite dessert creations) and kept in contact with her when she moved west to help orchestrate the pastries for the Mission’s beloved \u003ca href=\"http://www.craftsman-wolves.com/\">Craftsman and Wolves\u003c/a>. Meanwhile, Brewer comes to the Bay Area via Chicago, where he served as a chef de partie at the much-acclaimed fine dining spot, L2O, and co-founded Hogsalt Hospitality, a restaurant group with a slew of popular, casual-meets-midscale hits (Bavette’s, Au Cheval) in that city à la Hi Neighbor Group (Stones Throw, Trestle) here in San Francisco. Together, it’s a powerful team that mixes fine dining experience with successful trendy, more concepts of the past. The one common trait for the trio is that they all certainly want Che Fico to be unfussy and relaxed. After all, there is fig tree-print wallpaper at the entrance. \u003c/p>\n\u003cp>Don’t get carried away thinking that Che Fico is following the wave of openings in recent months (Souvla, Namu Stonepot, Horsefeather, Sightglass Coffee). Che Fico has been an anticipated opening not just for a year — but for years. The planned was first hatched four years ago and media coverage started shortly thereafter because anytime that “Eleven Madison Park” is attached to a name, it’s automatically a big deal. Unlike many other long-delayed restaurant openings in this city construction-jammed, expensive city, Che Fico wasn’t really delayed. It just wasn’t ready until now and the media attention incorrectly made it seem destined to open long before any realistic date.\u003c/p>\n\u003cp>Nowhere does it say “rustic Cal-Ital” on the trio’s resumes but that is exactly the genre they are working with here, partly out of their love for it and partly because of San Francisco diners’ unwavering adoration for what is basically the city’s unofficial official cuisine. Nayfeld counts \u003ca href=\"http://zunicafe.com/\">Zuni Café\u003c/a> and Che Fico’s neighbor, \u003ca href=\"http://nopasf.com/\">Nopa\u003c/a>, as his favorite spots in San Francisco. Those two restaurants are beloved by a wide cross-section of San Franciscans for being something for everyone, whether it’s a celebratory blowout dinner or a quick plate of pasta and a cocktail. We’ll have to wait at least a decade to see if he’s found the same recipe for success as those timeless modern legends. \u003c/p>\n\u003cp>If you are looking for the Cal-Ital background in the kitchen, it comes notably via Nayfeld’s chef de cuisine, Evan Allumbaugh, who most recently was chef de cuisine at \u003ca href=\"https://www.flourandwater.com/\">Flour + Water\u003c/a>. While that Mission favorite is much more pasta-skewed, Che Fico really does look at the broader picture around the boot from Rome’s Jewish ghetto to Bologna’s hearty and meaty pastas.\u003c/p>\n\u003cfigure id=\"attachment_126266\" class=\"wp-caption aligncenter\" style=\"max-width: 1920px\">\u003cimg src=\"https://ww2.kqed.org/bayareabites/wp-content/uploads/sites/24/2018/03/IMG_2025-new.jpg\" alt=\"Che Fico's chef de cuisine, Evan Allumbaugh.\" width=\"1920\" height=\"1377\" class=\"size-full wp-image-126266\" srcset=\"https://ww2.kqed.org/app/uploads/sites/24/2018/03/IMG_2025-new.jpg 1920w, https://ww2.kqed.org/app/uploads/sites/24/2018/03/IMG_2025-new-160x115.jpg 160w, https://ww2.kqed.org/app/uploads/sites/24/2018/03/IMG_2025-new-800x574.jpg 800w, https://ww2.kqed.org/app/uploads/sites/24/2018/03/IMG_2025-new-768x551.jpg 768w, https://ww2.kqed.org/app/uploads/sites/24/2018/03/IMG_2025-new-1020x732.jpg 1020w, https://ww2.kqed.org/app/uploads/sites/24/2018/03/IMG_2025-new-1180x846.jpg 1180w, https://ww2.kqed.org/app/uploads/sites/24/2018/03/IMG_2025-new-960x689.jpg 960w, https://ww2.kqed.org/app/uploads/sites/24/2018/03/IMG_2025-new-240x172.jpg 240w, https://ww2.kqed.org/app/uploads/sites/24/2018/03/IMG_2025-new-375x269.jpg 375w, https://ww2.kqed.org/app/uploads/sites/24/2018/03/IMG_2025-new-520x373.jpg 520w\" sizes=\"(max-width: 1920px) 100vw, 1920px\">\u003cfigcaption class=\"wp-caption-text\">Che Fico's chef de cuisine, Evan Allumbaugh. \u003ccite>(Wendy Goodfriend)\u003c/cite>\u003c/figcaption>\u003c/figure>\n\u003cfigure id=\"attachment_126239\" class=\"wp-caption aligncenter\" style=\"max-width: 1920px\">\u003cimg src=\"https://ww2.kqed.org/bayareabites/wp-content/uploads/sites/24/2018/03/IMG_1221-new.jpg\" alt=\"Prepping for dinner service at Che Fico.\" width=\"1920\" height=\"1280\" class=\"size-full wp-image-126239\" srcset=\"https://ww2.kqed.org/app/uploads/sites/24/2018/03/IMG_1221-new.jpg 1920w, https://ww2.kqed.org/app/uploads/sites/24/2018/03/IMG_1221-new-160x107.jpg 160w, https://ww2.kqed.org/app/uploads/sites/24/2018/03/IMG_1221-new-800x533.jpg 800w, https://ww2.kqed.org/app/uploads/sites/24/2018/03/IMG_1221-new-768x512.jpg 768w, https://ww2.kqed.org/app/uploads/sites/24/2018/03/IMG_1221-new-1020x680.jpg 1020w, https://ww2.kqed.org/app/uploads/sites/24/2018/03/IMG_1221-new-1180x787.jpg 1180w, https://ww2.kqed.org/app/uploads/sites/24/2018/03/IMG_1221-new-960x640.jpg 960w, https://ww2.kqed.org/app/uploads/sites/24/2018/03/IMG_1221-new-240x160.jpg 240w, https://ww2.kqed.org/app/uploads/sites/24/2018/03/IMG_1221-new-375x250.jpg 375w, https://ww2.kqed.org/app/uploads/sites/24/2018/03/IMG_1221-new-520x347.jpg 520w\" sizes=\"(max-width: 1920px) 100vw, 1920px\">\u003cfigcaption class=\"wp-caption-text\">Prepping for dinner service at Che Fico. \u003ccite>(Wendy Goodfriend)\u003c/cite>\u003c/figcaption>\u003c/figure>\n\u003cp>There are four primary anchors of Nayfeld’s menu — San Franciso-style pizza (more on what THAT means later), pasta, a trio of wood-roasted large platters, and a section devoted to the Judeo-Roman cooking of Italy, cucina ebraica. \u003c/p>\n\u003cp>All you really need to know about Nayfeld’s pizza-making at Che Fico is that the name of the dough’s precious sourdough starter (“Loretta”) appears on the façade of the highly specified brick oven made in Naples. Yes, those bricks can handle the heat — they can even handle the heat of Vesuvius according to Nayfeld. \u003c/p>\n\u003cfigure id=\"attachment_126267\" class=\"wp-caption aligncenter\" style=\"max-width: 1920px\">\u003cimg src=\"https://ww2.kqed.org/bayareabites/wp-content/uploads/sites/24/2018/03/IMG_2035-new.jpg\" alt='\"Loretta\"' width=\"1920\" height=\"1280\" class=\"size-full wp-image-126267\" srcset=\"https://ww2.kqed.org/app/uploads/sites/24/2018/03/IMG_2035-new.jpg 1920w, https://ww2.kqed.org/app/uploads/sites/24/2018/03/IMG_2035-new-160x107.jpg 160w, https://ww2.kqed.org/app/uploads/sites/24/2018/03/IMG_2035-new-800x533.jpg 800w, https://ww2.kqed.org/app/uploads/sites/24/2018/03/IMG_2035-new-768x512.jpg 768w, https://ww2.kqed.org/app/uploads/sites/24/2018/03/IMG_2035-new-1020x680.jpg 1020w, https://ww2.kqed.org/app/uploads/sites/24/2018/03/IMG_2035-new-1180x787.jpg 1180w, https://ww2.kqed.org/app/uploads/sites/24/2018/03/IMG_2035-new-960x640.jpg 960w, https://ww2.kqed.org/app/uploads/sites/24/2018/03/IMG_2035-new-240x160.jpg 240w, https://ww2.kqed.org/app/uploads/sites/24/2018/03/IMG_2035-new-375x250.jpg 375w, https://ww2.kqed.org/app/uploads/sites/24/2018/03/IMG_2035-new-520x347.jpg 520w\" sizes=\"(max-width: 1920px) 100vw, 1920px\">\u003cfigcaption class=\"wp-caption-text\">\"Loretta\" \u003ccite>(Wendy Goodfriend)\u003c/cite>\u003c/figcaption>\u003c/figure>\n\u003cp>This San Francisco-style stems from the whole-wheat, ancient grains crust itself, produced like sourdough bread from natural fermentation and yielding a crispy exterior and bubbly-spongy inner texture with the distinctive “crumb” holes that are so coveted by the likes of \u003ca href=\"http://www.joseybakerbread.com/\">Josey Baker\u003c/a> and \u003ca href=\"http://www.tartinebakery.com/\">Tartine\u003c/a>, but rarely discussed in pizza circles. The style also alludes to the fact that Nayfeld is a certified Neopolitan pizzaiolo but he also loves New York-style slices. Neopolitan pizza can’t be eaten by hand without becoming a taco or a mess. Nayfeld had to take matters into his own hands (literally and figuratively) and adapt the best of Naples, New York and sourdough-made San Francisco for the pies. He also dusts the pizzas with semolina instead of flour, like is sometimes done in this city, to avoid excess charring. \u003c/p>\n\u003cfigure id=\"attachment_126235\" class=\"wp-caption aligncenter\" style=\"max-width: 1920px\">\u003cimg src=\"https://ww2.kqed.org/bayareabites/wp-content/uploads/sites/24/2018/03/IMG_1199-new.jpg\" alt=\"Making the pizze\" width=\"1920\" height=\"1280\" class=\"size-full wp-image-126235\" srcset=\"https://ww2.kqed.org/app/uploads/sites/24/2018/03/IMG_1199-new.jpg 1920w, https://ww2.kqed.org/app/uploads/sites/24/2018/03/IMG_1199-new-160x107.jpg 160w, https://ww2.kqed.org/app/uploads/sites/24/2018/03/IMG_1199-new-800x533.jpg 800w, https://ww2.kqed.org/app/uploads/sites/24/2018/03/IMG_1199-new-768x512.jpg 768w, https://ww2.kqed.org/app/uploads/sites/24/2018/03/IMG_1199-new-1020x680.jpg 1020w, https://ww2.kqed.org/app/uploads/sites/24/2018/03/IMG_1199-new-1180x787.jpg 1180w, https://ww2.kqed.org/app/uploads/sites/24/2018/03/IMG_1199-new-960x640.jpg 960w, https://ww2.kqed.org/app/uploads/sites/24/2018/03/IMG_1199-new-240x160.jpg 240w, https://ww2.kqed.org/app/uploads/sites/24/2018/03/IMG_1199-new-375x250.jpg 375w, https://ww2.kqed.org/app/uploads/sites/24/2018/03/IMG_1199-new-520x347.jpg 520w\" sizes=\"(max-width: 1920px) 100vw, 1920px\">\u003cfigcaption class=\"wp-caption-text\">Making the pizze \u003ccite>(Wendy Goodfriend)\u003c/cite>\u003c/figcaption>\u003c/figure>\n\u003cfigure id=\"attachment_126237\" class=\"wp-caption aligncenter\" style=\"max-width: 1920px\">\u003cimg src=\"https://ww2.kqed.org/bayareabites/wp-content/uploads/sites/24/2018/03/IMG_1208-new.jpg\" alt=\"Adding the sauce to the pizze dough\" width=\"1920\" height=\"1280\" class=\"size-full wp-image-126237\" srcset=\"https://ww2.kqed.org/app/uploads/sites/24/2018/03/IMG_1208-new.jpg 1920w, https://ww2.kqed.org/app/uploads/sites/24/2018/03/IMG_1208-new-160x107.jpg 160w, https://ww2.kqed.org/app/uploads/sites/24/2018/03/IMG_1208-new-800x533.jpg 800w, https://ww2.kqed.org/app/uploads/sites/24/2018/03/IMG_1208-new-768x512.jpg 768w, https://ww2.kqed.org/app/uploads/sites/24/2018/03/IMG_1208-new-1020x680.jpg 1020w, https://ww2.kqed.org/app/uploads/sites/24/2018/03/IMG_1208-new-1180x787.jpg 1180w, https://ww2.kqed.org/app/uploads/sites/24/2018/03/IMG_1208-new-960x640.jpg 960w, https://ww2.kqed.org/app/uploads/sites/24/2018/03/IMG_1208-new-240x160.jpg 240w, https://ww2.kqed.org/app/uploads/sites/24/2018/03/IMG_1208-new-375x250.jpg 375w, https://ww2.kqed.org/app/uploads/sites/24/2018/03/IMG_1208-new-520x347.jpg 520w\" sizes=\"(max-width: 1920px) 100vw, 1920px\">\u003cfigcaption class=\"wp-caption-text\">Adding the sauce to the pizze dough \u003ccite>(Wendy Goodfriend)\u003c/cite>\u003c/figcaption>\u003c/figure>\n\u003cp>His half-dozen kinds of pizze ($17-21) range from the funky (pineapple, red onion and fermented chili) to classic (margherita or mushroom and sausage) to salad-like with a pile of arugula hiding marinara sauce and anchovy. There is also a nod to the late, great leader of Zuni Café with the Ode to Judy Rodgers pie, topped simply with marinara and ricotta salata, just like one of the Zuni Café lunch pizza standards. \u003c/p>\n\u003cfigure id=\"attachment_126273\" class=\"wp-caption aligncenter\" style=\"max-width: 1920px\">\u003cimg src=\"https://ww2.kqed.org/bayareabites/wp-content/uploads/sites/24/2018/03/IMG_2161-new.jpg\" alt=\"Pizze: Marinara, Anchovy, Knoll Farms Arugula.\" width=\"1920\" height=\"1280\" class=\"size-full wp-image-126273\" srcset=\"https://ww2.kqed.org/app/uploads/sites/24/2018/03/IMG_2161-new.jpg 1920w, https://ww2.kqed.org/app/uploads/sites/24/2018/03/IMG_2161-new-160x107.jpg 160w, https://ww2.kqed.org/app/uploads/sites/24/2018/03/IMG_2161-new-800x533.jpg 800w, https://ww2.kqed.org/app/uploads/sites/24/2018/03/IMG_2161-new-768x512.jpg 768w, https://ww2.kqed.org/app/uploads/sites/24/2018/03/IMG_2161-new-1020x680.jpg 1020w, https://ww2.kqed.org/app/uploads/sites/24/2018/03/IMG_2161-new-1180x787.jpg 1180w, https://ww2.kqed.org/app/uploads/sites/24/2018/03/IMG_2161-new-960x640.jpg 960w, https://ww2.kqed.org/app/uploads/sites/24/2018/03/IMG_2161-new-240x160.jpg 240w, https://ww2.kqed.org/app/uploads/sites/24/2018/03/IMG_2161-new-375x250.jpg 375w, https://ww2.kqed.org/app/uploads/sites/24/2018/03/IMG_2161-new-520x347.jpg 520w\" sizes=\"(max-width: 1920px) 100vw, 1920px\">\u003cfigcaption class=\"wp-caption-text\">Pizze: Marinara, Anchovy, Knoll Farms Arugula. \u003ccite>(Wendy Goodfriend)\u003c/cite>\u003c/figcaption>\u003c/figure>\n\u003cp>Pastas are made in-house, sometimes extruded by machines or rolled out on tables during the afternoon or made by hand. The latter category includes a goat’s milk ricotta gnudi with pomodoro sauce ($19); cavatelli tossed with broccoli ($16); and the Bologna classic, tagliatelle al ragu ($21), where thin strands of al dente dough are lightly coated with a deeply nuanced ground beef compote. Nayfeld also tosses together razor clams and Dungeness crab with biggoli nero ($24), offers a chile-laced rigatoni amatraciana with guanciale and the rarely-seen mafaldini (a thin, curvy and ribbon-like pasta) with hazelnuts and a pesto made of fava beans and preserved Meyer lemons from Warm Springs Ranch, Brewer’s family farm in Sonoma County ($16). It is worth noting that the pastas at Che Fico are priced substantially lower than the average primi at Cal-Ital peers Cotogna and Flour + Water, and half of the price of those at SPQR.\u003c/p>\n\u003cfigure id=\"attachment_126240\" class=\"wp-caption aligncenter\" style=\"max-width: 1920px\">\u003cimg src=\"https://ww2.kqed.org/bayareabites/wp-content/uploads/sites/24/2018/03/IMG_1284-new.jpg\" alt=\"Weighing housemade pasta\" width=\"1920\" height=\"1280\" class=\"size-full wp-image-126240\" srcset=\"https://ww2.kqed.org/app/uploads/sites/24/2018/03/IMG_1284-new.jpg 1920w, https://ww2.kqed.org/app/uploads/sites/24/2018/03/IMG_1284-new-160x107.jpg 160w, https://ww2.kqed.org/app/uploads/sites/24/2018/03/IMG_1284-new-800x533.jpg 800w, https://ww2.kqed.org/app/uploads/sites/24/2018/03/IMG_1284-new-768x512.jpg 768w, https://ww2.kqed.org/app/uploads/sites/24/2018/03/IMG_1284-new-1020x680.jpg 1020w, https://ww2.kqed.org/app/uploads/sites/24/2018/03/IMG_1284-new-1180x787.jpg 1180w, https://ww2.kqed.org/app/uploads/sites/24/2018/03/IMG_1284-new-960x640.jpg 960w, https://ww2.kqed.org/app/uploads/sites/24/2018/03/IMG_1284-new-240x160.jpg 240w, https://ww2.kqed.org/app/uploads/sites/24/2018/03/IMG_1284-new-375x250.jpg 375w, https://ww2.kqed.org/app/uploads/sites/24/2018/03/IMG_1284-new-520x347.jpg 520w\" sizes=\"(max-width: 1920px) 100vw, 1920px\">\u003cfigcaption class=\"wp-caption-text\">Weighing housemade pasta \u003ccite>(Wendy Goodfriend)\u003c/cite>\u003c/figcaption>\u003c/figure>\n\u003cfigure id=\"attachment_126297\" class=\"wp-caption aligncenter\" style=\"max-width: 1920px\">\u003cimg src=\"https://ww2.kqed.org/bayareabites/wp-content/uploads/sites/24/2018/03/IMG_1945-new.jpg\" alt=\"Housemade pasta\" width=\"1920\" height=\"1280\" class=\"size-full wp-image-126297\" srcset=\"https://ww2.kqed.org/app/uploads/sites/24/2018/03/IMG_1945-new.jpg 1920w, https://ww2.kqed.org/app/uploads/sites/24/2018/03/IMG_1945-new-160x107.jpg 160w, https://ww2.kqed.org/app/uploads/sites/24/2018/03/IMG_1945-new-800x533.jpg 800w, https://ww2.kqed.org/app/uploads/sites/24/2018/03/IMG_1945-new-768x512.jpg 768w, https://ww2.kqed.org/app/uploads/sites/24/2018/03/IMG_1945-new-1020x680.jpg 1020w, https://ww2.kqed.org/app/uploads/sites/24/2018/03/IMG_1945-new-1180x787.jpg 1180w, https://ww2.kqed.org/app/uploads/sites/24/2018/03/IMG_1945-new-960x640.jpg 960w, https://ww2.kqed.org/app/uploads/sites/24/2018/03/IMG_1945-new-240x160.jpg 240w, https://ww2.kqed.org/app/uploads/sites/24/2018/03/IMG_1945-new-375x250.jpg 375w, https://ww2.kqed.org/app/uploads/sites/24/2018/03/IMG_1945-new-520x347.jpg 520w\" sizes=\"(max-width: 1920px) 100vw, 1920px\">\u003cfigcaption class=\"wp-caption-text\">Housemade pasta \u003ccite>(Wendy Goodfriend)\u003c/cite>\u003c/figcaption>\u003c/figure>\n\u003cfigure id=\"attachment_126277\" class=\"wp-caption aligncenter\" style=\"max-width: 1920px\">\u003cimg src=\"https://ww2.kqed.org/bayareabites/wp-content/uploads/sites/24/2018/03/IMG_2256-new.jpg\" alt=\"Tagliatelle al ragu\" width=\"1920\" height=\"1280\" class=\"size-full wp-image-126277\" srcset=\"https://ww2.kqed.org/app/uploads/sites/24/2018/03/IMG_2256-new.jpg 1920w, https://ww2.kqed.org/app/uploads/sites/24/2018/03/IMG_2256-new-160x107.jpg 160w, https://ww2.kqed.org/app/uploads/sites/24/2018/03/IMG_2256-new-800x533.jpg 800w, https://ww2.kqed.org/app/uploads/sites/24/2018/03/IMG_2256-new-768x512.jpg 768w, https://ww2.kqed.org/app/uploads/sites/24/2018/03/IMG_2256-new-1020x680.jpg 1020w, https://ww2.kqed.org/app/uploads/sites/24/2018/03/IMG_2256-new-1180x787.jpg 1180w, https://ww2.kqed.org/app/uploads/sites/24/2018/03/IMG_2256-new-960x640.jpg 960w, https://ww2.kqed.org/app/uploads/sites/24/2018/03/IMG_2256-new-240x160.jpg 240w, https://ww2.kqed.org/app/uploads/sites/24/2018/03/IMG_2256-new-375x250.jpg 375w, https://ww2.kqed.org/app/uploads/sites/24/2018/03/IMG_2256-new-520x347.jpg 520w\" sizes=\"(max-width: 1920px) 100vw, 1920px\">\u003cfigcaption class=\"wp-caption-text\">Tagliatelle al ragu \u003ccite>(Wendy Goodfriend)\u003c/cite>\u003c/figcaption>\u003c/figure>\n\u003cp>Outside of fried artichokes as a seasonal appetizer at the Roman-themed Locanda in the Mission, San Franciscans probably only know Italy’s centuries-old Judeo-Roman cuisine from trips to the Eternal City because the guidebooks tell them to try it when in Rome. Che Fico does indeed have those fried artichokes, ready to dip in a lemon aioli ($11), but will also introduce most dinners to the arancini-resembling fried rice and provolone croquettes called suppli ($4 each) and caponata Ebraica a la Rosi ($8), a ratatouille-like concoction of potatoes, peas, olives, peppers, eggplant, golden raisins and walnuts. The cuisine also paid special attention to resurrecting lesser cuts of meat and offal, so diners will find grilled chopped duck liver with onions in various forms ($9); a chicken heart and gizzard salad ($14); and corned veal tongue with salsa verde ($16). \u003c/p>\n\u003cp>It won’t be easy with a party of less than four to save room for the large portion-only secondi but the massive wood-fired oven in the heart of the kitchen almost demands for tables to comply. A half or whole roast chicken ($27/$48) is another Zuni nod and an early signature dish, accompanied by agrodolce and creamy polenta. The opening secondi roster also features a whole-grilled turbot with collard greens and crispy capers (MP) and a slow-roasted lamb leg with wood-roasted potatoes and watercress salad ($44).\u003c/p>\n\u003cp>Still hungry? Before all of this, diners can enjoy some light antipasti like a half or whole chopped salad ($8/$15), house-pickled giardiniera ($8) that you can’t miss in the preserving jars around the open kitchen or an almost Provençal albacore tuna conserva with caper berries, artichoke, olives and aïoli ($14). Take note that the coppa “sando” starter is currently the only way to try the excellent housemade focaccia ($8). It’s literally a coppa di testa mini-sandwich wedged into a hunk of olive oil-slicked focaccia. \u003c/p>\n\u003cfigure id=\"attachment_126296\" class=\"wp-caption aligncenter\" style=\"max-width: 1920px\">\u003cimg src=\"https://ww2.kqed.org/bayareabites/wp-content/uploads/sites/24/2018/03/IMG_1991-new.jpg\" alt=\"Housemade focaccia\" width=\"1920\" height=\"1280\" class=\"size-full wp-image-126296\" srcset=\"https://ww2.kqed.org/app/uploads/sites/24/2018/03/IMG_1991-new.jpg 1920w, https://ww2.kqed.org/app/uploads/sites/24/2018/03/IMG_1991-new-160x107.jpg 160w, https://ww2.kqed.org/app/uploads/sites/24/2018/03/IMG_1991-new-800x533.jpg 800w, https://ww2.kqed.org/app/uploads/sites/24/2018/03/IMG_1991-new-768x512.jpg 768w, https://ww2.kqed.org/app/uploads/sites/24/2018/03/IMG_1991-new-1020x680.jpg 1020w, https://ww2.kqed.org/app/uploads/sites/24/2018/03/IMG_1991-new-1180x787.jpg 1180w, https://ww2.kqed.org/app/uploads/sites/24/2018/03/IMG_1991-new-960x640.jpg 960w, https://ww2.kqed.org/app/uploads/sites/24/2018/03/IMG_1991-new-240x160.jpg 240w, https://ww2.kqed.org/app/uploads/sites/24/2018/03/IMG_1991-new-375x250.jpg 375w, https://ww2.kqed.org/app/uploads/sites/24/2018/03/IMG_1991-new-520x347.jpg 520w\" sizes=\"(max-width: 1920px) 100vw, 1920px\">\u003cfigcaption class=\"wp-caption-text\">Housemade focaccia \u003ccite>(Wendy Goodfriend)\u003c/cite>\u003c/figcaption>\u003c/figure>\n\u003cp>On that cured meat subject, housemade charcuterie is a huge project that Nayfeld is working on, as seen by the charcuterie locker in the dining room and the out-of-sight charcuterie aging in the kitchen’s walk-in. The sad news is that all of the charcuterie isn’t ready yet. Diners need to have patience, though, because great housemade mortadella, nduja and culatello take a lot of time and love in order to become an antipasti. They will come in the months to come. In the meantime, have another pasta.\u003c/p>\n\u003cfigure id=\"attachment_126246\" class=\"wp-caption aligncenter\" style=\"max-width: 1920px\">\u003cimg src=\"https://ww2.kqed.org/bayareabites/wp-content/uploads/sites/24/2018/03/IMG_1484-new.jpg\" alt=\"The charcuterie locker in the dining room. \" width=\"1920\" height=\"1280\" class=\"size-full wp-image-126246\" srcset=\"https://ww2.kqed.org/app/uploads/sites/24/2018/03/IMG_1484-new.jpg 1920w, https://ww2.kqed.org/app/uploads/sites/24/2018/03/IMG_1484-new-160x107.jpg 160w, https://ww2.kqed.org/app/uploads/sites/24/2018/03/IMG_1484-new-800x533.jpg 800w, https://ww2.kqed.org/app/uploads/sites/24/2018/03/IMG_1484-new-768x512.jpg 768w, https://ww2.kqed.org/app/uploads/sites/24/2018/03/IMG_1484-new-1020x680.jpg 1020w, https://ww2.kqed.org/app/uploads/sites/24/2018/03/IMG_1484-new-1180x787.jpg 1180w, https://ww2.kqed.org/app/uploads/sites/24/2018/03/IMG_1484-new-960x640.jpg 960w, https://ww2.kqed.org/app/uploads/sites/24/2018/03/IMG_1484-new-240x160.jpg 240w, https://ww2.kqed.org/app/uploads/sites/24/2018/03/IMG_1484-new-375x250.jpg 375w, https://ww2.kqed.org/app/uploads/sites/24/2018/03/IMG_1484-new-520x347.jpg 520w\" sizes=\"(max-width: 1920px) 100vw, 1920px\">\u003cfigcaption class=\"wp-caption-text\">The charcuterie locker in the dining room. \u003ccite>(Wendy Goodfriend)\u003c/cite>\u003c/figcaption>\u003c/figure>\n\u003cp>All of this food will make you thirsty and that’s where we’re remiss in saying that Nayfeld, Pinkerton and Brewer are the only headliners of this trio. Christopher Longoria is a star in the San Francisco cocktail world thanks to his fantastic drink creations over the years at Polk Street’s 1760, blending elaborate combinations and quirky ingredients with careful balance. At Che Fico, he’s taking dry, often herb-forward Italian libation profiles way, way beyond the Aperol and Negroni sphere. Each cocktail ($14) is named for an herb or simply an elevated classic of the canon, like a Cognac-based milk punch or the chile vodka-forward “Basil” mellowed with eau de vie and Dimmi, a sharp, savory aperitivo. Amaro plays a prominent role in most drinks such as the boozy cold brew-based “Cafe” with Amaro Montenegro, absinthe, sweet vermouth and rum. Meanwhile, Italian pre-dinner classics like limoncello slip into the fold, joining Strega (a liqueur), Cardamaro, lime and black pepper cachaça in the “Pepper.”\u003c/p>\n\u003cfigure id=\"attachment_126257\" class=\"wp-caption aligncenter\" style=\"max-width: 1920px\">\u003cimg src=\"https://ww2.kqed.org/bayareabites/wp-content/uploads/sites/24/2018/03/IMG_1582-new.jpg\" alt='Christopher Longoria preparing a \"Basil.\"' width=\"1920\" height=\"1280\" class=\"size-full wp-image-126257\" srcset=\"https://ww2.kqed.org/app/uploads/sites/24/2018/03/IMG_1582-new.jpg 1920w, https://ww2.kqed.org/app/uploads/sites/24/2018/03/IMG_1582-new-160x107.jpg 160w, https://ww2.kqed.org/app/uploads/sites/24/2018/03/IMG_1582-new-800x533.jpg 800w, https://ww2.kqed.org/app/uploads/sites/24/2018/03/IMG_1582-new-768x512.jpg 768w, https://ww2.kqed.org/app/uploads/sites/24/2018/03/IMG_1582-new-1020x680.jpg 1020w, https://ww2.kqed.org/app/uploads/sites/24/2018/03/IMG_1582-new-1180x787.jpg 1180w, https://ww2.kqed.org/app/uploads/sites/24/2018/03/IMG_1582-new-960x640.jpg 960w, https://ww2.kqed.org/app/uploads/sites/24/2018/03/IMG_1582-new-240x160.jpg 240w, https://ww2.kqed.org/app/uploads/sites/24/2018/03/IMG_1582-new-375x250.jpg 375w, https://ww2.kqed.org/app/uploads/sites/24/2018/03/IMG_1582-new-520x347.jpg 520w\" sizes=\"(max-width: 1920px) 100vw, 1920px\">\u003cfigcaption class=\"wp-caption-text\">Christopher Longoria preparing a \"Basil.\" \u003ccite>(Wendy Goodfriend)\u003c/cite>\u003c/figcaption>\u003c/figure>\n\u003cfigure id=\"attachment_126280\" class=\"wp-caption aligncenter\" style=\"max-width: 1920px\">\u003cimg src=\"https://ww2.kqed.org/bayareabites/wp-content/uploads/sites/24/2018/03/IMG_2282-new.jpg\" alt='Christopher Longoria pouring a \"Basil.\"' width=\"1920\" height=\"1280\" class=\"size-full wp-image-126280\" srcset=\"https://ww2.kqed.org/app/uploads/sites/24/2018/03/IMG_2282-new.jpg 1920w, https://ww2.kqed.org/app/uploads/sites/24/2018/03/IMG_2282-new-160x107.jpg 160w, https://ww2.kqed.org/app/uploads/sites/24/2018/03/IMG_2282-new-800x533.jpg 800w, https://ww2.kqed.org/app/uploads/sites/24/2018/03/IMG_2282-new-768x512.jpg 768w, https://ww2.kqed.org/app/uploads/sites/24/2018/03/IMG_2282-new-1020x680.jpg 1020w, https://ww2.kqed.org/app/uploads/sites/24/2018/03/IMG_2282-new-1180x787.jpg 1180w, https://ww2.kqed.org/app/uploads/sites/24/2018/03/IMG_2282-new-960x640.jpg 960w, https://ww2.kqed.org/app/uploads/sites/24/2018/03/IMG_2282-new-240x160.jpg 240w, https://ww2.kqed.org/app/uploads/sites/24/2018/03/IMG_2282-new-375x250.jpg 375w, https://ww2.kqed.org/app/uploads/sites/24/2018/03/IMG_2282-new-520x347.jpg 520w\" sizes=\"(max-width: 1920px) 100vw, 1920px\">\u003cfigcaption class=\"wp-caption-text\">Christopher Longoria pouring a \"Basil\" cocktail. \u003ccite>(Wendy Goodfriend)\u003c/cite>\u003c/figcaption>\u003c/figure>\n\u003cfigure id=\"attachment_126261\" class=\"wp-caption aligncenter\" style=\"max-width: 1000px\">\u003cimg src=\"https://ww2.kqed.org/bayareabites/wp-content/uploads/sites/24/2018/03/IMG_1643-new.jpg\" alt=\"Cocktail: Chile vodka-forward “Basil” mellowed with eau de vie and Dimmi.\" width=\"1000\" height=\"1500\" class=\"size-full wp-image-126261\" srcset=\"https://ww2.kqed.org/app/uploads/sites/24/2018/03/IMG_1643-new.jpg 1000w, https://ww2.kqed.org/app/uploads/sites/24/2018/03/IMG_1643-new-160x240.jpg 160w, https://ww2.kqed.org/app/uploads/sites/24/2018/03/IMG_1643-new-800x1200.jpg 800w, https://ww2.kqed.org/app/uploads/sites/24/2018/03/IMG_1643-new-768x1152.jpg 768w, https://ww2.kqed.org/app/uploads/sites/24/2018/03/IMG_1643-new-960x1440.jpg 960w, https://ww2.kqed.org/app/uploads/sites/24/2018/03/IMG_1643-new-240x360.jpg 240w, https://ww2.kqed.org/app/uploads/sites/24/2018/03/IMG_1643-new-375x563.jpg 375w, https://ww2.kqed.org/app/uploads/sites/24/2018/03/IMG_1643-new-520x780.jpg 520w\" sizes=\"(max-width: 1000px) 100vw, 1000px\">\u003cfigcaption class=\"wp-caption-text\">Cocktail: Chile vodka-forward “Basil” mellowed with eau de vie and Dimmi. \u003ccite>(Wendy Goodfriend)\u003c/cite>\u003c/figcaption>\u003c/figure>\n\u003cp>On the wine front, Francesca Maniace (Commonwealth) created a strong Italy-centric list with several California favorites involved, as well. About 80% of the 60 or so bottles are below the $100 mark, many of which come from beloved producers of all ages with cult followings like Produttori del Barbaresco or Matthisasson and Massican of California. With such tempting wines and cocktails — and the food to sop up a few rounds of them — it’s great to see that Che Fico will be open until 1am on Fridays and Saturdays, following in the late night footsteps of the NoPa neighborhood’s restaurant namesake.\u003c/p>\n\u003cp>Che Fico’s design is by the Oakland–based firm of architect Jon de la Cruz, DLC ID, and the gorgeous layout and subtle details go well beyond the figs. The main feature of the 120-seat space is just that — it’s big and spacious with an open, loft-like feel similar to a small cathedral but actually hails from its prior incarnation as an auto body shop. That auto body shop has shifted into an assortment of contemporary elements (raw wood, lots of tile, Italian marble chef’s counter overlooking the kitchen, giant communal table) mingling with old-school red sauce joints (plush red leather booths, dim lighting) and an Instagram-ready glow in the daytime when sunlight streams in through a pair of skylights and the side windows overlooking Divisadero. Heck, everything here is gorgeous, detailed and cheery — already filtered and ready for photo-sharing in the same way SF’s hippest atmospheric restaurants are like Liholiho Yacht Club and Leo’s Oyster Bar. Not surprisingly, the latter is a DLC ID design. James Beard voters might as well already put Che Fico into the semifinalist round for the 2019 Best Design awards. \u003c/p>\n\u003cfigure id=\"attachment_126249\" class=\"wp-caption aligncenter\" style=\"max-width: 1920px\">\u003cimg src=\"https://ww2.kqed.org/bayareabites/wp-content/uploads/sites/24/2018/03/IMG_1488-new.jpg\" alt=\"Che Fico interior overlooking Divisidero Street\" width=\"1920\" height=\"1280\" class=\"size-full wp-image-126249\" srcset=\"https://ww2.kqed.org/app/uploads/sites/24/2018/03/IMG_1488-new.jpg 1920w, https://ww2.kqed.org/app/uploads/sites/24/2018/03/IMG_1488-new-160x107.jpg 160w, https://ww2.kqed.org/app/uploads/sites/24/2018/03/IMG_1488-new-800x533.jpg 800w, https://ww2.kqed.org/app/uploads/sites/24/2018/03/IMG_1488-new-768x512.jpg 768w, https://ww2.kqed.org/app/uploads/sites/24/2018/03/IMG_1488-new-1020x680.jpg 1020w, https://ww2.kqed.org/app/uploads/sites/24/2018/03/IMG_1488-new-1180x787.jpg 1180w, https://ww2.kqed.org/app/uploads/sites/24/2018/03/IMG_1488-new-960x640.jpg 960w, https://ww2.kqed.org/app/uploads/sites/24/2018/03/IMG_1488-new-240x160.jpg 240w, https://ww2.kqed.org/app/uploads/sites/24/2018/03/IMG_1488-new-375x250.jpg 375w, https://ww2.kqed.org/app/uploads/sites/24/2018/03/IMG_1488-new-520x347.jpg 520w\" sizes=\"(max-width: 1920px) 100vw, 1920px\">\u003cfigcaption class=\"wp-caption-text\">Che Fico interior overlooking Divisidero Street \u003ccite>(Wendy Goodfriend)\u003c/cite>\u003c/figcaption>\u003c/figure>\n\u003cp>Roughly a third of the tables and all bar spots at Che Fico’s 15-seat zinc topped bar by the entrance will be set aside for walk-ins. There is also a private dining room for 16 with a table made of a Valley Oak tree from the Brewer’s family farm. The private dining room also has more quirky wallpaper but, this time, it’s a colorful print of Italian pop singer Adriano Celentano’s record albums. Nayfeld’s parents used to play his music all the time as their first taste of uncensored music after leaving communist Russia. The bathrooms have both the same wallpaper in black and white and Celentano’s music playing constantly. It’s a great way to make sure nobody will linger too long there…\u003c/p>\n\u003cfigure id=\"attachment_126268\" class=\"wp-caption aligncenter\" style=\"max-width: 1920px\">\u003cimg src=\"https://ww2.kqed.org/bayareabites/wp-content/uploads/sites/24/2018/03/IMG_2069-new.jpg\" alt=\"Private dining room adorned with Italian pop singer Adriano Celentano’s record albums.\" width=\"1920\" height=\"1280\" class=\"size-full wp-image-126268\" srcset=\"https://ww2.kqed.org/app/uploads/sites/24/2018/03/IMG_2069-new.jpg 1920w, https://ww2.kqed.org/app/uploads/sites/24/2018/03/IMG_2069-new-160x107.jpg 160w, https://ww2.kqed.org/app/uploads/sites/24/2018/03/IMG_2069-new-800x533.jpg 800w, https://ww2.kqed.org/app/uploads/sites/24/2018/03/IMG_2069-new-768x512.jpg 768w, https://ww2.kqed.org/app/uploads/sites/24/2018/03/IMG_2069-new-1020x680.jpg 1020w, https://ww2.kqed.org/app/uploads/sites/24/2018/03/IMG_2069-new-1180x787.jpg 1180w, https://ww2.kqed.org/app/uploads/sites/24/2018/03/IMG_2069-new-960x640.jpg 960w, https://ww2.kqed.org/app/uploads/sites/24/2018/03/IMG_2069-new-240x160.jpg 240w, https://ww2.kqed.org/app/uploads/sites/24/2018/03/IMG_2069-new-375x250.jpg 375w, https://ww2.kqed.org/app/uploads/sites/24/2018/03/IMG_2069-new-520x347.jpg 520w\" sizes=\"(max-width: 1920px) 100vw, 1920px\">\u003cfigcaption class=\"wp-caption-text\">Private dining room adorned with Italian pop singer Adriano Celentano’s record albums. \u003ccite>(Wendy Goodfriend)\u003c/cite>\u003c/figcaption>\u003c/figure>\n\u003cp>With all of this interior talk, it’s impossible to forget the single most striking design feature. Yes, it’s the exterior sign where a local company made Che Fico’s sign and nestled it into the retro arrow sign that the auto body shop had. And, no, the restaurant is not allowed to turn on the lights per neighborhood rules. As far as marquees of San Francisco, this one isn’t quite the Castro Theater but isn’t too far behind.\u003c/p>\n\u003cfigure id=\"attachment_126250\" class=\"wp-caption aligncenter\" style=\"max-width: 1920px\">\u003cimg src=\"https://ww2.kqed.org/bayareabites/wp-content/uploads/sites/24/2018/03/IMG_1505-new.jpg\" alt=\"The cool Che Fico sign.\" width=\"1920\" height=\"1280\" class=\"size-full wp-image-126250\" srcset=\"https://ww2.kqed.org/app/uploads/sites/24/2018/03/IMG_1505-new.jpg 1920w, https://ww2.kqed.org/app/uploads/sites/24/2018/03/IMG_1505-new-160x107.jpg 160w, https://ww2.kqed.org/app/uploads/sites/24/2018/03/IMG_1505-new-800x533.jpg 800w, https://ww2.kqed.org/app/uploads/sites/24/2018/03/IMG_1505-new-768x512.jpg 768w, https://ww2.kqed.org/app/uploads/sites/24/2018/03/IMG_1505-new-1020x680.jpg 1020w, https://ww2.kqed.org/app/uploads/sites/24/2018/03/IMG_1505-new-1180x787.jpg 1180w, https://ww2.kqed.org/app/uploads/sites/24/2018/03/IMG_1505-new-960x640.jpg 960w, https://ww2.kqed.org/app/uploads/sites/24/2018/03/IMG_1505-new-240x160.jpg 240w, https://ww2.kqed.org/app/uploads/sites/24/2018/03/IMG_1505-new-375x250.jpg 375w, https://ww2.kqed.org/app/uploads/sites/24/2018/03/IMG_1505-new-520x347.jpg 520w\" sizes=\"(max-width: 1920px) 100vw, 1920px\">\u003cfigcaption class=\"wp-caption-text\">The cool Che Fico sign. \u003ccite>(Wendy Goodfriend)\u003c/cite>\u003c/figcaption>\u003c/figure>\n\u003cp>Don’t think for a moment that we skipped dessert. Nayfeld purposely bypassed yeast for his pizza crust because that’s a key ingredient in making heavy pizza slices sit like bricks in diners’ stomachs — but chances are the table will be slowing down once the dessert menu arrives. Pinkerton is truly one of the country’s most gifted pastry chefs. Using Bay Area seasonal fruit and Italy’s more dense-style of pastries as a template, it’s a thrill for Bay Area diners to see her producing the likes of wood-fired citrus crostata ($16 and serves two) or an olive oil cake with roasted strawberry vinaigrette ($12). The showstopper, without question, is the bittersweet chocolate budino ($13) with a host of textural contrasts ranging from crunchy salt and pepper walnuts to a silky salted caramel gelato to a hefty pour of olive oil as a finishing, assertive touch. For more gelato fun, by the way, diners can finish with scoops of house-churned gelato in flavors like malted yogurt or strawberry rhubarb sorbetto ($4 for one scoop). \u003c/p>\n\u003cfigure id=\"attachment_126253\" class=\"wp-caption aligncenter\" style=\"max-width: 1920px\">\u003cimg src=\"https://ww2.kqed.org/bayareabites/wp-content/uploads/sites/24/2018/03/IMG_1515-new.jpg\" alt=\"Pastry chef Angela Pinkerton delivers the amazing bittersweet chocolate budino.\" width=\"1920\" height=\"1280\" class=\"size-full wp-image-126253\" srcset=\"https://ww2.kqed.org/app/uploads/sites/24/2018/03/IMG_1515-new.jpg 1920w, https://ww2.kqed.org/app/uploads/sites/24/2018/03/IMG_1515-new-160x107.jpg 160w, https://ww2.kqed.org/app/uploads/sites/24/2018/03/IMG_1515-new-800x533.jpg 800w, https://ww2.kqed.org/app/uploads/sites/24/2018/03/IMG_1515-new-768x512.jpg 768w, https://ww2.kqed.org/app/uploads/sites/24/2018/03/IMG_1515-new-1020x680.jpg 1020w, https://ww2.kqed.org/app/uploads/sites/24/2018/03/IMG_1515-new-1180x787.jpg 1180w, https://ww2.kqed.org/app/uploads/sites/24/2018/03/IMG_1515-new-960x640.jpg 960w, https://ww2.kqed.org/app/uploads/sites/24/2018/03/IMG_1515-new-240x160.jpg 240w, https://ww2.kqed.org/app/uploads/sites/24/2018/03/IMG_1515-new-375x250.jpg 375w, https://ww2.kqed.org/app/uploads/sites/24/2018/03/IMG_1515-new-520x347.jpg 520w\" sizes=\"(max-width: 1920px) 100vw, 1920px\">\u003cfigcaption class=\"wp-caption-text\">Pastry chef Angela Pinkerton delivers the amazing bittersweet chocolate budino. \u003ccite>(Wendy Goodfriend)\u003c/cite>\u003c/figcaption>\u003c/figure>\n\u003cfigure id=\"attachment_126254\" class=\"wp-caption aligncenter\" style=\"max-width: 1920px\">\u003cimg src=\"https://ww2.kqed.org/bayareabites/wp-content/uploads/sites/24/2018/03/IMG_1519-new.jpg\" alt=\"Che Fico's bittersweet chocolate budino.\" width=\"1920\" height=\"1280\" class=\"size-full wp-image-126254\" srcset=\"https://ww2.kqed.org/app/uploads/sites/24/2018/03/IMG_1519-new.jpg 1920w, https://ww2.kqed.org/app/uploads/sites/24/2018/03/IMG_1519-new-160x107.jpg 160w, https://ww2.kqed.org/app/uploads/sites/24/2018/03/IMG_1519-new-800x533.jpg 800w, https://ww2.kqed.org/app/uploads/sites/24/2018/03/IMG_1519-new-768x512.jpg 768w, https://ww2.kqed.org/app/uploads/sites/24/2018/03/IMG_1519-new-1020x680.jpg 1020w, https://ww2.kqed.org/app/uploads/sites/24/2018/03/IMG_1519-new-1180x787.jpg 1180w, https://ww2.kqed.org/app/uploads/sites/24/2018/03/IMG_1519-new-960x640.jpg 960w, https://ww2.kqed.org/app/uploads/sites/24/2018/03/IMG_1519-new-240x160.jpg 240w, https://ww2.kqed.org/app/uploads/sites/24/2018/03/IMG_1519-new-375x250.jpg 375w, https://ww2.kqed.org/app/uploads/sites/24/2018/03/IMG_1519-new-520x347.jpg 520w\" sizes=\"(max-width: 1920px) 100vw, 1920px\">\u003cfigcaption class=\"wp-caption-text\">Che Fico's bittersweet chocolate budino. \u003ccite>(Wendy Goodfriend)\u003c/cite>\u003c/figcaption>\u003c/figure>\n\u003cp>With the last spoonful of budino gone, don’t despair, there is still more to come — in the coming year ahead. When a restaurant waited as long as an entire Summer Olympics or presidential election cycle to open, patience is dearly important. There is the aforementioned housemade charcuterie to wait for. There will also be Pinkerton’s ground-level luncheonette-evoking concept called “Theorita,” where pastries, pies and lunch favorites in the daytime will evolve into Nayfeld’s adaptations of Americana classics for dinner.\u003c/p>\n\u003cp>San Francisco diners are obviously more than excited that Che Fico finally is here and surely the reservations and walk-in seats will be filled from happy hour until late night for the foreseeable future. Sure, it’s another pasta and pizza spot in this pasta and pizza-mad city. But it also isn’t — they’re just one of many components to the whole experience. In Nayfeld’s eyes, this is “noble food” that requires painstaking “craftsmanship.” He’s right. This is home-cooking that nobody, or at least most of us non-professional chefs, can come close to replicating. It’s bringing together one of the world’s most treasured cuisines with the ingredients of the world’s most produce-friendly climate and having fun in the process with a few cocktails. \u003c/p>\n\u003cp>Oh that’s cool.\u003c/p>\n\u003cp>[ad floatright]\u003c/p>\n\u003cp>\u003ca href=\"http://www.chefico.com/\">\u003cstrong>Che Fico\u003c/strong>\u003c/a>\u003cbr>\n838 Divisadero St.\u003cbr>\nSan Francisco, CA 94117\u003cbr>\nPh: (415) 416-6959\u003cbr>\nHours: Dinner Tue-Thu 5:30pm-11pm, Fri-Sat 5:30pm-1am; closed Sunday and Monday\u003cbr>\nFacebook: \u003ca href=\"https://www.facebook.com/ChefDavidNayfeld/\">Chef David Nayfeld\u003c/a>\u003cbr>\nTwitter: \u003ca href=\"https://twitter.com/DavidNayfeld\">@DavidNayfeld\u003c/a>\u003cbr>\nInstagram: \u003ca href=\"https://www.instagram.com/chefico/\">@chefico\u003c/a>\u003cbr>\nPrice Range: $$$ (most dishes $16-$20)\u003c/p>\n\n","blocks":[],"excerpt":"Four years in the making, a trio of alums from some of Chicago and New York’s most important restaurants arrive on Divisadero with a chic, lofty Italian spot serving rustic pastas, San Francisco-style pizza, and can’t miss cocktails and desserts.","status":"publish","parent":0,"modified":1530252148,"stats":{"hasAudio":false,"hasVideo":false,"hasChartOrMap":false,"iframeSrcs":[],"hasGoogleForm":false,"hasGallery":false,"hasHearkenModule":false,"hasPolis":false,"paragraphCount":30,"wordCount":3413},"headData":{"title":"Che Fico Opens on Divisadero — Cool Figs, Wood-Fired Chicken and Hot Pizza | KQED","description":"Four years in the making, a trio of alums from some of Chicago and New York’s most important restaurants arrive on Divisadero with a chic, lofty Italian spot serving rustic pastas, San Francisco-style pizza, and can’t miss cocktails and desserts.","ogTitle":"","ogDescription":"","ogImgId":"","twTitle":"","twDescription":"","twImgId":"","schema":{"@context":"http://schema.org","@type":"Article","headline":"Che Fico Opens on Divisadero — Cool Figs, Wood-Fired Chicken and Hot Pizza","datePublished":"2018-03-30T19:28:04.000Z","dateModified":"2018-06-29T06:02:28.000Z","image":"https://cdn.kqed.org/wp-content/uploads/2020/02/KQED-OG-Image@1x.png"}},"disqusIdentifier":"126313 https://ww2.kqed.org/bayareabites/?p=126313","disqusUrl":"https://ww2.kqed.org/bayareabites/2018/03/30/che-fico-opens-on-divisadero-cool-figs-wood-fired-chicken-and-hot-pizza/","disqusTitle":"Che Fico Opens on Divisadero — Cool Figs, Wood-Fired Chicken and Hot Pizza","path":"/bayareabites/126313/che-fico-opens-on-divisadero-cool-figs-wood-fired-chicken-and-hot-pizza","audioTrackLength":null,"parsedContent":[{"type":"contentString","content":"\u003cdiv class=\"post-body\">\u003cp>\u003cp>\u003cem>Four years in the making, a trio of alums from some of Chicago and New York’s most important restaurants arrive on Divisadero with a chic, lofty Italian spot serving rustic pastas, San Francisco-style pizza, and can’t miss cocktails and desserts.\u003c/em>\u003c/p>\n\u003cp>Walking into the second floor dining room of NoPa’s newly-opened Cal-Ital destination, diners can’t help but think to themselves how cool the design is. They’ll tell themselves, “Wow, what a formidable pizza oven.” Or, “My goodness, that is one long, never-ending communal table.” Perhaps, they’ll even ask themselves, “When was the last time I saw a skylight in a San Francisco restaurant?” However, the most likely initial comment will undoubtedly be “What a fig” because of the ever-photogenic fig tree-printed wallpaper that greets everyone entering \u003ca href=\"http://www.chefico.com/\">Che Fico\u003c/a> (for the record, it’s pronounced like Kay fee-koh).\u003c/p>\n\u003cfigure id=\"attachment_126247\" class=\"wp-caption aligncenter\" style=\"max-width: 1920px\">\u003cimg src=\"https://ww2.kqed.org/bayareabites/wp-content/uploads/sites/24/2018/03/IMG_1486-new.jpg\" alt=\"Entryway to Che Fico is adorned with fig wallpaper.\" width=\"1920\" height=\"1280\" class=\"size-full wp-image-126247\" srcset=\"https://ww2.kqed.org/app/uploads/sites/24/2018/03/IMG_1486-new.jpg 1920w, https://ww2.kqed.org/app/uploads/sites/24/2018/03/IMG_1486-new-160x107.jpg 160w, https://ww2.kqed.org/app/uploads/sites/24/2018/03/IMG_1486-new-800x533.jpg 800w, https://ww2.kqed.org/app/uploads/sites/24/2018/03/IMG_1486-new-768x512.jpg 768w, https://ww2.kqed.org/app/uploads/sites/24/2018/03/IMG_1486-new-1020x680.jpg 1020w, https://ww2.kqed.org/app/uploads/sites/24/2018/03/IMG_1486-new-1180x787.jpg 1180w, https://ww2.kqed.org/app/uploads/sites/24/2018/03/IMG_1486-new-960x640.jpg 960w, https://ww2.kqed.org/app/uploads/sites/24/2018/03/IMG_1486-new-240x160.jpg 240w, https://ww2.kqed.org/app/uploads/sites/24/2018/03/IMG_1486-new-375x250.jpg 375w, https://ww2.kqed.org/app/uploads/sites/24/2018/03/IMG_1486-new-520x347.jpg 520w\" sizes=\"(max-width: 1920px) 100vw, 1920px\">\u003cfigcaption class=\"wp-caption-text\">Entryway to Che Fico is adorned with fig wallpaper. \u003ccite>(Wendy Goodfriend)\u003c/cite>\u003c/figcaption>\u003c/figure>\n\u003cfigure id=\"attachment_126251\" class=\"wp-caption aligncenter\" style=\"max-width: 1920px\">\u003cimg src=\"https://ww2.kqed.org/bayareabites/wp-content/uploads/sites/24/2018/03/IMG_1511-new.jpg\" alt=\"Communal table inside Che Fico.\" width=\"1920\" height=\"1280\" class=\"size-full wp-image-126251\" srcset=\"https://ww2.kqed.org/app/uploads/sites/24/2018/03/IMG_1511-new.jpg 1920w, https://ww2.kqed.org/app/uploads/sites/24/2018/03/IMG_1511-new-160x107.jpg 160w, https://ww2.kqed.org/app/uploads/sites/24/2018/03/IMG_1511-new-800x533.jpg 800w, https://ww2.kqed.org/app/uploads/sites/24/2018/03/IMG_1511-new-768x512.jpg 768w, https://ww2.kqed.org/app/uploads/sites/24/2018/03/IMG_1511-new-1020x680.jpg 1020w, https://ww2.kqed.org/app/uploads/sites/24/2018/03/IMG_1511-new-1180x787.jpg 1180w, https://ww2.kqed.org/app/uploads/sites/24/2018/03/IMG_1511-new-960x640.jpg 960w, https://ww2.kqed.org/app/uploads/sites/24/2018/03/IMG_1511-new-240x160.jpg 240w, https://ww2.kqed.org/app/uploads/sites/24/2018/03/IMG_1511-new-375x250.jpg 375w, https://ww2.kqed.org/app/uploads/sites/24/2018/03/IMG_1511-new-520x347.jpg 520w\" sizes=\"(max-width: 1920px) 100vw, 1920px\">\u003cfigcaption class=\"wp-caption-text\">Communal table inside Che Fico. \u003ccite>(Wendy Goodfriend)\u003c/cite>\u003c/figcaption>\u003c/figure>\n\u003cp>Well, there are no figs on any plates during the early spring season at this restaurant (sorry, \u003ca href=\"https://archives.sfweekly.com/foodie/2009/10/28/david-chang-sf-reaction-to-fig-gate-retardedly-stupid\">David Chang\u003c/a>) but the fig design motif makes obvious sense because Che Fico does literally translate to “What a fig” in Italian. More appropriately, though, for this chic Italy-via-seasonal California taverna, the phrase also means, “Oh that’s cool” in Italian slang. Indeed, this joint project from a trio of alums who spent significant time working at some of Chicago and New York’s restaurant heavyweights is indeed a really, really cool addition to the Divisadero corridor that just might be SF’s coolest dining neighborhood of the moment. There is a definite “it” factor going on here.\u003c/p>\n\u003cfigure id=\"attachment_126234\" class=\"wp-caption aligncenter\" style=\"max-width: 1920px\">\u003cimg src=\"https://ww2.kqed.org/bayareabites/wp-content/uploads/sites/24/2018/03/IMG_1198-new.jpg\" alt=\"A chef wearing a cool fig-patterned shirt.\" width=\"1920\" height=\"1280\" class=\"size-full wp-image-126234\" srcset=\"https://ww2.kqed.org/app/uploads/sites/24/2018/03/IMG_1198-new.jpg 1920w, https://ww2.kqed.org/app/uploads/sites/24/2018/03/IMG_1198-new-160x107.jpg 160w, https://ww2.kqed.org/app/uploads/sites/24/2018/03/IMG_1198-new-800x533.jpg 800w, https://ww2.kqed.org/app/uploads/sites/24/2018/03/IMG_1198-new-768x512.jpg 768w, https://ww2.kqed.org/app/uploads/sites/24/2018/03/IMG_1198-new-1020x680.jpg 1020w, https://ww2.kqed.org/app/uploads/sites/24/2018/03/IMG_1198-new-1180x787.jpg 1180w, https://ww2.kqed.org/app/uploads/sites/24/2018/03/IMG_1198-new-960x640.jpg 960w, https://ww2.kqed.org/app/uploads/sites/24/2018/03/IMG_1198-new-240x160.jpg 240w, https://ww2.kqed.org/app/uploads/sites/24/2018/03/IMG_1198-new-375x250.jpg 375w, https://ww2.kqed.org/app/uploads/sites/24/2018/03/IMG_1198-new-520x347.jpg 520w\" sizes=\"(max-width: 1920px) 100vw, 1920px\">\u003cfigcaption class=\"wp-caption-text\">A chef wearing a cool fig-patterned shirt. \u003ccite>(Wendy Goodfriend)\u003c/cite>\u003c/figcaption>\u003c/figure>\n\u003cp>Che Fico comes courtesy of chef David Nayfeld, pastry chef Angela Pinkerton and co-owner and partner Matt Brewer. They are rock stars of the restaurant industry without the Instagram-crazy, TV-watching groupie followings that seem to be the defining mark for celebrity chefs and restaurateurs today. Nayfeld grew up in the East Bay and used to hang out in what is now Che Fico’s neighborhood all the time because his mom is a chiropractor at the Fillmore Health Center just a few blocks away. As he likes to sarcastically say now, at least his mother can walk along Divisadero and show all her friends and colleagues that her son may have been up to trouble in the teenage years but it all worked out just fine. His resume is a story unto itself, beginning by stocking vegetables at Paul’s Produce in Alameda as a teenager and making pizzas at a Greek restaurant, then heading to Los Angeles as an 18-year old with no real agenda. He eventually landed at the \u003ca href=\"https://www.ciachef.edu/cia-new-york/\">Culinary Institute of America in Hyde Park\u003c/a>, NY and landed coveted externships at Nobu in Manhattan and now-closed Aqua here in San Francisco. \u003c/p>\n\u003cp>After graduation, one of Aqua’s chefs Peter Armellino (now the chef of \u003ca href=\"https://www.youtube.com/watch?v=Bncc1teQrf4\">The Plumed Horse\u003c/a> and Pasta Armellino in Saratoga and one of the Bay area’s true pasta maestros) brought Nayfeld back to Aqua as a line cook. From there, Nayfeld’s career touched all over New York, Europe and Las Vegas with stints in the kitchens of some of the world’s great restaurants (Mirazur in the south of France, Frenchie in Paris, Tickets in Barcelona, New York’s \u003ca href=\"https://www.elevenmadisonpark.com/\">Eleven Madison Park\u003c/a>) and the now-closed Cru in New York where chef Shea Gallante’s pasta tasting menus helped give Nayfeld the pasta bug that is very apparent at Che Fico. Basically, Nayfeld’s chef credentials are the culinary equivalent of a Stanford undergraduate degree combined with a Yale law degree. Yes, there is some serious talent here.\u003c/p>\n\u003cp>\u003c/p>\u003c/div>","attributes":{"named":{},"numeric":[]}},{"type":"component","content":"","name":"ad","attributes":{"named":{"label":"fullwidth"},"numeric":["fullwidth"]}},{"type":"contentString","content":"\u003cdiv class=\"post-body\">\u003cp>\u003c/p>\n\u003cp>Nayfeld met Pinkerton at Eleven Madison Park (where she won a James Beard award for her exquisite dessert creations) and kept in contact with her when she moved west to help orchestrate the pastries for the Mission’s beloved \u003ca href=\"http://www.craftsman-wolves.com/\">Craftsman and Wolves\u003c/a>. Meanwhile, Brewer comes to the Bay Area via Chicago, where he served as a chef de partie at the much-acclaimed fine dining spot, L2O, and co-founded Hogsalt Hospitality, a restaurant group with a slew of popular, casual-meets-midscale hits (Bavette’s, Au Cheval) in that city à la Hi Neighbor Group (Stones Throw, Trestle) here in San Francisco. Together, it’s a powerful team that mixes fine dining experience with successful trendy, more concepts of the past. The one common trait for the trio is that they all certainly want Che Fico to be unfussy and relaxed. After all, there is fig tree-print wallpaper at the entrance. \u003c/p>\n\u003cp>Don’t get carried away thinking that Che Fico is following the wave of openings in recent months (Souvla, Namu Stonepot, Horsefeather, Sightglass Coffee). Che Fico has been an anticipated opening not just for a year — but for years. The planned was first hatched four years ago and media coverage started shortly thereafter because anytime that “Eleven Madison Park” is attached to a name, it’s automatically a big deal. Unlike many other long-delayed restaurant openings in this city construction-jammed, expensive city, Che Fico wasn’t really delayed. It just wasn’t ready until now and the media attention incorrectly made it seem destined to open long before any realistic date.\u003c/p>\n\u003cp>Nowhere does it say “rustic Cal-Ital” on the trio’s resumes but that is exactly the genre they are working with here, partly out of their love for it and partly because of San Francisco diners’ unwavering adoration for what is basically the city’s unofficial official cuisine. Nayfeld counts \u003ca href=\"http://zunicafe.com/\">Zuni Café\u003c/a> and Che Fico’s neighbor, \u003ca href=\"http://nopasf.com/\">Nopa\u003c/a>, as his favorite spots in San Francisco. Those two restaurants are beloved by a wide cross-section of San Franciscans for being something for everyone, whether it’s a celebratory blowout dinner or a quick plate of pasta and a cocktail. We’ll have to wait at least a decade to see if he’s found the same recipe for success as those timeless modern legends. \u003c/p>\n\u003cp>If you are looking for the Cal-Ital background in the kitchen, it comes notably via Nayfeld’s chef de cuisine, Evan Allumbaugh, who most recently was chef de cuisine at \u003ca href=\"https://www.flourandwater.com/\">Flour + Water\u003c/a>. While that Mission favorite is much more pasta-skewed, Che Fico really does look at the broader picture around the boot from Rome’s Jewish ghetto to Bologna’s hearty and meaty pastas.\u003c/p>\n\u003cfigure id=\"attachment_126266\" class=\"wp-caption aligncenter\" style=\"max-width: 1920px\">\u003cimg src=\"https://ww2.kqed.org/bayareabites/wp-content/uploads/sites/24/2018/03/IMG_2025-new.jpg\" alt=\"Che Fico's chef de cuisine, Evan Allumbaugh.\" width=\"1920\" height=\"1377\" class=\"size-full wp-image-126266\" srcset=\"https://ww2.kqed.org/app/uploads/sites/24/2018/03/IMG_2025-new.jpg 1920w, https://ww2.kqed.org/app/uploads/sites/24/2018/03/IMG_2025-new-160x115.jpg 160w, https://ww2.kqed.org/app/uploads/sites/24/2018/03/IMG_2025-new-800x574.jpg 800w, https://ww2.kqed.org/app/uploads/sites/24/2018/03/IMG_2025-new-768x551.jpg 768w, https://ww2.kqed.org/app/uploads/sites/24/2018/03/IMG_2025-new-1020x732.jpg 1020w, https://ww2.kqed.org/app/uploads/sites/24/2018/03/IMG_2025-new-1180x846.jpg 1180w, https://ww2.kqed.org/app/uploads/sites/24/2018/03/IMG_2025-new-960x689.jpg 960w, https://ww2.kqed.org/app/uploads/sites/24/2018/03/IMG_2025-new-240x172.jpg 240w, https://ww2.kqed.org/app/uploads/sites/24/2018/03/IMG_2025-new-375x269.jpg 375w, https://ww2.kqed.org/app/uploads/sites/24/2018/03/IMG_2025-new-520x373.jpg 520w\" sizes=\"(max-width: 1920px) 100vw, 1920px\">\u003cfigcaption class=\"wp-caption-text\">Che Fico's chef de cuisine, Evan Allumbaugh. \u003ccite>(Wendy Goodfriend)\u003c/cite>\u003c/figcaption>\u003c/figure>\n\u003cfigure id=\"attachment_126239\" class=\"wp-caption aligncenter\" style=\"max-width: 1920px\">\u003cimg src=\"https://ww2.kqed.org/bayareabites/wp-content/uploads/sites/24/2018/03/IMG_1221-new.jpg\" alt=\"Prepping for dinner service at Che Fico.\" width=\"1920\" height=\"1280\" class=\"size-full wp-image-126239\" srcset=\"https://ww2.kqed.org/app/uploads/sites/24/2018/03/IMG_1221-new.jpg 1920w, https://ww2.kqed.org/app/uploads/sites/24/2018/03/IMG_1221-new-160x107.jpg 160w, https://ww2.kqed.org/app/uploads/sites/24/2018/03/IMG_1221-new-800x533.jpg 800w, https://ww2.kqed.org/app/uploads/sites/24/2018/03/IMG_1221-new-768x512.jpg 768w, https://ww2.kqed.org/app/uploads/sites/24/2018/03/IMG_1221-new-1020x680.jpg 1020w, https://ww2.kqed.org/app/uploads/sites/24/2018/03/IMG_1221-new-1180x787.jpg 1180w, https://ww2.kqed.org/app/uploads/sites/24/2018/03/IMG_1221-new-960x640.jpg 960w, https://ww2.kqed.org/app/uploads/sites/24/2018/03/IMG_1221-new-240x160.jpg 240w, https://ww2.kqed.org/app/uploads/sites/24/2018/03/IMG_1221-new-375x250.jpg 375w, https://ww2.kqed.org/app/uploads/sites/24/2018/03/IMG_1221-new-520x347.jpg 520w\" sizes=\"(max-width: 1920px) 100vw, 1920px\">\u003cfigcaption class=\"wp-caption-text\">Prepping for dinner service at Che Fico. \u003ccite>(Wendy Goodfriend)\u003c/cite>\u003c/figcaption>\u003c/figure>\n\u003cp>There are four primary anchors of Nayfeld’s menu — San Franciso-style pizza (more on what THAT means later), pasta, a trio of wood-roasted large platters, and a section devoted to the Judeo-Roman cooking of Italy, cucina ebraica. \u003c/p>\n\u003cp>All you really need to know about Nayfeld’s pizza-making at Che Fico is that the name of the dough’s precious sourdough starter (“Loretta”) appears on the façade of the highly specified brick oven made in Naples. Yes, those bricks can handle the heat — they can even handle the heat of Vesuvius according to Nayfeld. \u003c/p>\n\u003cfigure id=\"attachment_126267\" class=\"wp-caption aligncenter\" style=\"max-width: 1920px\">\u003cimg src=\"https://ww2.kqed.org/bayareabites/wp-content/uploads/sites/24/2018/03/IMG_2035-new.jpg\" alt='\"Loretta\"' width=\"1920\" height=\"1280\" class=\"size-full wp-image-126267\" srcset=\"https://ww2.kqed.org/app/uploads/sites/24/2018/03/IMG_2035-new.jpg 1920w, https://ww2.kqed.org/app/uploads/sites/24/2018/03/IMG_2035-new-160x107.jpg 160w, https://ww2.kqed.org/app/uploads/sites/24/2018/03/IMG_2035-new-800x533.jpg 800w, https://ww2.kqed.org/app/uploads/sites/24/2018/03/IMG_2035-new-768x512.jpg 768w, https://ww2.kqed.org/app/uploads/sites/24/2018/03/IMG_2035-new-1020x680.jpg 1020w, https://ww2.kqed.org/app/uploads/sites/24/2018/03/IMG_2035-new-1180x787.jpg 1180w, https://ww2.kqed.org/app/uploads/sites/24/2018/03/IMG_2035-new-960x640.jpg 960w, https://ww2.kqed.org/app/uploads/sites/24/2018/03/IMG_2035-new-240x160.jpg 240w, https://ww2.kqed.org/app/uploads/sites/24/2018/03/IMG_2035-new-375x250.jpg 375w, https://ww2.kqed.org/app/uploads/sites/24/2018/03/IMG_2035-new-520x347.jpg 520w\" sizes=\"(max-width: 1920px) 100vw, 1920px\">\u003cfigcaption class=\"wp-caption-text\">\"Loretta\" \u003ccite>(Wendy Goodfriend)\u003c/cite>\u003c/figcaption>\u003c/figure>\n\u003cp>This San Francisco-style stems from the whole-wheat, ancient grains crust itself, produced like sourdough bread from natural fermentation and yielding a crispy exterior and bubbly-spongy inner texture with the distinctive “crumb” holes that are so coveted by the likes of \u003ca href=\"http://www.joseybakerbread.com/\">Josey Baker\u003c/a> and \u003ca href=\"http://www.tartinebakery.com/\">Tartine\u003c/a>, but rarely discussed in pizza circles. The style also alludes to the fact that Nayfeld is a certified Neopolitan pizzaiolo but he also loves New York-style slices. Neopolitan pizza can’t be eaten by hand without becoming a taco or a mess. Nayfeld had to take matters into his own hands (literally and figuratively) and adapt the best of Naples, New York and sourdough-made San Francisco for the pies. He also dusts the pizzas with semolina instead of flour, like is sometimes done in this city, to avoid excess charring. \u003c/p>\n\u003cfigure id=\"attachment_126235\" class=\"wp-caption aligncenter\" style=\"max-width: 1920px\">\u003cimg src=\"https://ww2.kqed.org/bayareabites/wp-content/uploads/sites/24/2018/03/IMG_1199-new.jpg\" alt=\"Making the pizze\" width=\"1920\" height=\"1280\" class=\"size-full wp-image-126235\" srcset=\"https://ww2.kqed.org/app/uploads/sites/24/2018/03/IMG_1199-new.jpg 1920w, https://ww2.kqed.org/app/uploads/sites/24/2018/03/IMG_1199-new-160x107.jpg 160w, https://ww2.kqed.org/app/uploads/sites/24/2018/03/IMG_1199-new-800x533.jpg 800w, https://ww2.kqed.org/app/uploads/sites/24/2018/03/IMG_1199-new-768x512.jpg 768w, https://ww2.kqed.org/app/uploads/sites/24/2018/03/IMG_1199-new-1020x680.jpg 1020w, https://ww2.kqed.org/app/uploads/sites/24/2018/03/IMG_1199-new-1180x787.jpg 1180w, https://ww2.kqed.org/app/uploads/sites/24/2018/03/IMG_1199-new-960x640.jpg 960w, https://ww2.kqed.org/app/uploads/sites/24/2018/03/IMG_1199-new-240x160.jpg 240w, https://ww2.kqed.org/app/uploads/sites/24/2018/03/IMG_1199-new-375x250.jpg 375w, https://ww2.kqed.org/app/uploads/sites/24/2018/03/IMG_1199-new-520x347.jpg 520w\" sizes=\"(max-width: 1920px) 100vw, 1920px\">\u003cfigcaption class=\"wp-caption-text\">Making the pizze \u003ccite>(Wendy Goodfriend)\u003c/cite>\u003c/figcaption>\u003c/figure>\n\u003cfigure id=\"attachment_126237\" class=\"wp-caption aligncenter\" style=\"max-width: 1920px\">\u003cimg src=\"https://ww2.kqed.org/bayareabites/wp-content/uploads/sites/24/2018/03/IMG_1208-new.jpg\" alt=\"Adding the sauce to the pizze dough\" width=\"1920\" height=\"1280\" class=\"size-full wp-image-126237\" srcset=\"https://ww2.kqed.org/app/uploads/sites/24/2018/03/IMG_1208-new.jpg 1920w, https://ww2.kqed.org/app/uploads/sites/24/2018/03/IMG_1208-new-160x107.jpg 160w, https://ww2.kqed.org/app/uploads/sites/24/2018/03/IMG_1208-new-800x533.jpg 800w, https://ww2.kqed.org/app/uploads/sites/24/2018/03/IMG_1208-new-768x512.jpg 768w, https://ww2.kqed.org/app/uploads/sites/24/2018/03/IMG_1208-new-1020x680.jpg 1020w, https://ww2.kqed.org/app/uploads/sites/24/2018/03/IMG_1208-new-1180x787.jpg 1180w, https://ww2.kqed.org/app/uploads/sites/24/2018/03/IMG_1208-new-960x640.jpg 960w, https://ww2.kqed.org/app/uploads/sites/24/2018/03/IMG_1208-new-240x160.jpg 240w, https://ww2.kqed.org/app/uploads/sites/24/2018/03/IMG_1208-new-375x250.jpg 375w, https://ww2.kqed.org/app/uploads/sites/24/2018/03/IMG_1208-new-520x347.jpg 520w\" sizes=\"(max-width: 1920px) 100vw, 1920px\">\u003cfigcaption class=\"wp-caption-text\">Adding the sauce to the pizze dough \u003ccite>(Wendy Goodfriend)\u003c/cite>\u003c/figcaption>\u003c/figure>\n\u003cp>His half-dozen kinds of pizze ($17-21) range from the funky (pineapple, red onion and fermented chili) to classic (margherita or mushroom and sausage) to salad-like with a pile of arugula hiding marinara sauce and anchovy. There is also a nod to the late, great leader of Zuni Café with the Ode to Judy Rodgers pie, topped simply with marinara and ricotta salata, just like one of the Zuni Café lunch pizza standards. \u003c/p>\n\u003cfigure id=\"attachment_126273\" class=\"wp-caption aligncenter\" style=\"max-width: 1920px\">\u003cimg src=\"https://ww2.kqed.org/bayareabites/wp-content/uploads/sites/24/2018/03/IMG_2161-new.jpg\" alt=\"Pizze: Marinara, Anchovy, Knoll Farms Arugula.\" width=\"1920\" height=\"1280\" class=\"size-full wp-image-126273\" srcset=\"https://ww2.kqed.org/app/uploads/sites/24/2018/03/IMG_2161-new.jpg 1920w, https://ww2.kqed.org/app/uploads/sites/24/2018/03/IMG_2161-new-160x107.jpg 160w, https://ww2.kqed.org/app/uploads/sites/24/2018/03/IMG_2161-new-800x533.jpg 800w, https://ww2.kqed.org/app/uploads/sites/24/2018/03/IMG_2161-new-768x512.jpg 768w, https://ww2.kqed.org/app/uploads/sites/24/2018/03/IMG_2161-new-1020x680.jpg 1020w, https://ww2.kqed.org/app/uploads/sites/24/2018/03/IMG_2161-new-1180x787.jpg 1180w, https://ww2.kqed.org/app/uploads/sites/24/2018/03/IMG_2161-new-960x640.jpg 960w, https://ww2.kqed.org/app/uploads/sites/24/2018/03/IMG_2161-new-240x160.jpg 240w, https://ww2.kqed.org/app/uploads/sites/24/2018/03/IMG_2161-new-375x250.jpg 375w, https://ww2.kqed.org/app/uploads/sites/24/2018/03/IMG_2161-new-520x347.jpg 520w\" sizes=\"(max-width: 1920px) 100vw, 1920px\">\u003cfigcaption class=\"wp-caption-text\">Pizze: Marinara, Anchovy, Knoll Farms Arugula. \u003ccite>(Wendy Goodfriend)\u003c/cite>\u003c/figcaption>\u003c/figure>\n\u003cp>Pastas are made in-house, sometimes extruded by machines or rolled out on tables during the afternoon or made by hand. The latter category includes a goat’s milk ricotta gnudi with pomodoro sauce ($19); cavatelli tossed with broccoli ($16); and the Bologna classic, tagliatelle al ragu ($21), where thin strands of al dente dough are lightly coated with a deeply nuanced ground beef compote. Nayfeld also tosses together razor clams and Dungeness crab with biggoli nero ($24), offers a chile-laced rigatoni amatraciana with guanciale and the rarely-seen mafaldini (a thin, curvy and ribbon-like pasta) with hazelnuts and a pesto made of fava beans and preserved Meyer lemons from Warm Springs Ranch, Brewer’s family farm in Sonoma County ($16). It is worth noting that the pastas at Che Fico are priced substantially lower than the average primi at Cal-Ital peers Cotogna and Flour + Water, and half of the price of those at SPQR.\u003c/p>\n\u003cfigure id=\"attachment_126240\" class=\"wp-caption aligncenter\" style=\"max-width: 1920px\">\u003cimg src=\"https://ww2.kqed.org/bayareabites/wp-content/uploads/sites/24/2018/03/IMG_1284-new.jpg\" alt=\"Weighing housemade pasta\" width=\"1920\" height=\"1280\" class=\"size-full wp-image-126240\" srcset=\"https://ww2.kqed.org/app/uploads/sites/24/2018/03/IMG_1284-new.jpg 1920w, https://ww2.kqed.org/app/uploads/sites/24/2018/03/IMG_1284-new-160x107.jpg 160w, https://ww2.kqed.org/app/uploads/sites/24/2018/03/IMG_1284-new-800x533.jpg 800w, https://ww2.kqed.org/app/uploads/sites/24/2018/03/IMG_1284-new-768x512.jpg 768w, https://ww2.kqed.org/app/uploads/sites/24/2018/03/IMG_1284-new-1020x680.jpg 1020w, https://ww2.kqed.org/app/uploads/sites/24/2018/03/IMG_1284-new-1180x787.jpg 1180w, https://ww2.kqed.org/app/uploads/sites/24/2018/03/IMG_1284-new-960x640.jpg 960w, https://ww2.kqed.org/app/uploads/sites/24/2018/03/IMG_1284-new-240x160.jpg 240w, https://ww2.kqed.org/app/uploads/sites/24/2018/03/IMG_1284-new-375x250.jpg 375w, https://ww2.kqed.org/app/uploads/sites/24/2018/03/IMG_1284-new-520x347.jpg 520w\" sizes=\"(max-width: 1920px) 100vw, 1920px\">\u003cfigcaption class=\"wp-caption-text\">Weighing housemade pasta \u003ccite>(Wendy Goodfriend)\u003c/cite>\u003c/figcaption>\u003c/figure>\n\u003cfigure id=\"attachment_126297\" class=\"wp-caption aligncenter\" style=\"max-width: 1920px\">\u003cimg src=\"https://ww2.kqed.org/bayareabites/wp-content/uploads/sites/24/2018/03/IMG_1945-new.jpg\" alt=\"Housemade pasta\" width=\"1920\" height=\"1280\" class=\"size-full wp-image-126297\" srcset=\"https://ww2.kqed.org/app/uploads/sites/24/2018/03/IMG_1945-new.jpg 1920w, https://ww2.kqed.org/app/uploads/sites/24/2018/03/IMG_1945-new-160x107.jpg 160w, https://ww2.kqed.org/app/uploads/sites/24/2018/03/IMG_1945-new-800x533.jpg 800w, https://ww2.kqed.org/app/uploads/sites/24/2018/03/IMG_1945-new-768x512.jpg 768w, https://ww2.kqed.org/app/uploads/sites/24/2018/03/IMG_1945-new-1020x680.jpg 1020w, https://ww2.kqed.org/app/uploads/sites/24/2018/03/IMG_1945-new-1180x787.jpg 1180w, https://ww2.kqed.org/app/uploads/sites/24/2018/03/IMG_1945-new-960x640.jpg 960w, https://ww2.kqed.org/app/uploads/sites/24/2018/03/IMG_1945-new-240x160.jpg 240w, https://ww2.kqed.org/app/uploads/sites/24/2018/03/IMG_1945-new-375x250.jpg 375w, https://ww2.kqed.org/app/uploads/sites/24/2018/03/IMG_1945-new-520x347.jpg 520w\" sizes=\"(max-width: 1920px) 100vw, 1920px\">\u003cfigcaption class=\"wp-caption-text\">Housemade pasta \u003ccite>(Wendy Goodfriend)\u003c/cite>\u003c/figcaption>\u003c/figure>\n\u003cfigure id=\"attachment_126277\" class=\"wp-caption aligncenter\" style=\"max-width: 1920px\">\u003cimg src=\"https://ww2.kqed.org/bayareabites/wp-content/uploads/sites/24/2018/03/IMG_2256-new.jpg\" alt=\"Tagliatelle al ragu\" width=\"1920\" height=\"1280\" class=\"size-full wp-image-126277\" srcset=\"https://ww2.kqed.org/app/uploads/sites/24/2018/03/IMG_2256-new.jpg 1920w, https://ww2.kqed.org/app/uploads/sites/24/2018/03/IMG_2256-new-160x107.jpg 160w, https://ww2.kqed.org/app/uploads/sites/24/2018/03/IMG_2256-new-800x533.jpg 800w, https://ww2.kqed.org/app/uploads/sites/24/2018/03/IMG_2256-new-768x512.jpg 768w, https://ww2.kqed.org/app/uploads/sites/24/2018/03/IMG_2256-new-1020x680.jpg 1020w, https://ww2.kqed.org/app/uploads/sites/24/2018/03/IMG_2256-new-1180x787.jpg 1180w, https://ww2.kqed.org/app/uploads/sites/24/2018/03/IMG_2256-new-960x640.jpg 960w, https://ww2.kqed.org/app/uploads/sites/24/2018/03/IMG_2256-new-240x160.jpg 240w, https://ww2.kqed.org/app/uploads/sites/24/2018/03/IMG_2256-new-375x250.jpg 375w, https://ww2.kqed.org/app/uploads/sites/24/2018/03/IMG_2256-new-520x347.jpg 520w\" sizes=\"(max-width: 1920px) 100vw, 1920px\">\u003cfigcaption class=\"wp-caption-text\">Tagliatelle al ragu \u003ccite>(Wendy Goodfriend)\u003c/cite>\u003c/figcaption>\u003c/figure>\n\u003cp>Outside of fried artichokes as a seasonal appetizer at the Roman-themed Locanda in the Mission, San Franciscans probably only know Italy’s centuries-old Judeo-Roman cuisine from trips to the Eternal City because the guidebooks tell them to try it when in Rome. Che Fico does indeed have those fried artichokes, ready to dip in a lemon aioli ($11), but will also introduce most dinners to the arancini-resembling fried rice and provolone croquettes called suppli ($4 each) and caponata Ebraica a la Rosi ($8), a ratatouille-like concoction of potatoes, peas, olives, peppers, eggplant, golden raisins and walnuts. The cuisine also paid special attention to resurrecting lesser cuts of meat and offal, so diners will find grilled chopped duck liver with onions in various forms ($9); a chicken heart and gizzard salad ($14); and corned veal tongue with salsa verde ($16). \u003c/p>\n\u003cp>It won’t be easy with a party of less than four to save room for the large portion-only secondi but the massive wood-fired oven in the heart of the kitchen almost demands for tables to comply. A half or whole roast chicken ($27/$48) is another Zuni nod and an early signature dish, accompanied by agrodolce and creamy polenta. The opening secondi roster also features a whole-grilled turbot with collard greens and crispy capers (MP) and a slow-roasted lamb leg with wood-roasted potatoes and watercress salad ($44).\u003c/p>\n\u003cp>Still hungry? Before all of this, diners can enjoy some light antipasti like a half or whole chopped salad ($8/$15), house-pickled giardiniera ($8) that you can’t miss in the preserving jars around the open kitchen or an almost Provençal albacore tuna conserva with caper berries, artichoke, olives and aïoli ($14). Take note that the coppa “sando” starter is currently the only way to try the excellent housemade focaccia ($8). It’s literally a coppa di testa mini-sandwich wedged into a hunk of olive oil-slicked focaccia. \u003c/p>\n\u003cfigure id=\"attachment_126296\" class=\"wp-caption aligncenter\" style=\"max-width: 1920px\">\u003cimg src=\"https://ww2.kqed.org/bayareabites/wp-content/uploads/sites/24/2018/03/IMG_1991-new.jpg\" alt=\"Housemade focaccia\" width=\"1920\" height=\"1280\" class=\"size-full wp-image-126296\" srcset=\"https://ww2.kqed.org/app/uploads/sites/24/2018/03/IMG_1991-new.jpg 1920w, https://ww2.kqed.org/app/uploads/sites/24/2018/03/IMG_1991-new-160x107.jpg 160w, https://ww2.kqed.org/app/uploads/sites/24/2018/03/IMG_1991-new-800x533.jpg 800w, https://ww2.kqed.org/app/uploads/sites/24/2018/03/IMG_1991-new-768x512.jpg 768w, https://ww2.kqed.org/app/uploads/sites/24/2018/03/IMG_1991-new-1020x680.jpg 1020w, https://ww2.kqed.org/app/uploads/sites/24/2018/03/IMG_1991-new-1180x787.jpg 1180w, https://ww2.kqed.org/app/uploads/sites/24/2018/03/IMG_1991-new-960x640.jpg 960w, https://ww2.kqed.org/app/uploads/sites/24/2018/03/IMG_1991-new-240x160.jpg 240w, https://ww2.kqed.org/app/uploads/sites/24/2018/03/IMG_1991-new-375x250.jpg 375w, https://ww2.kqed.org/app/uploads/sites/24/2018/03/IMG_1991-new-520x347.jpg 520w\" sizes=\"(max-width: 1920px) 100vw, 1920px\">\u003cfigcaption class=\"wp-caption-text\">Housemade focaccia \u003ccite>(Wendy Goodfriend)\u003c/cite>\u003c/figcaption>\u003c/figure>\n\u003cp>On that cured meat subject, housemade charcuterie is a huge project that Nayfeld is working on, as seen by the charcuterie locker in the dining room and the out-of-sight charcuterie aging in the kitchen’s walk-in. The sad news is that all of the charcuterie isn’t ready yet. Diners need to have patience, though, because great housemade mortadella, nduja and culatello take a lot of time and love in order to become an antipasti. They will come in the months to come. In the meantime, have another pasta.\u003c/p>\n\u003cfigure id=\"attachment_126246\" class=\"wp-caption aligncenter\" style=\"max-width: 1920px\">\u003cimg src=\"https://ww2.kqed.org/bayareabites/wp-content/uploads/sites/24/2018/03/IMG_1484-new.jpg\" alt=\"The charcuterie locker in the dining room. \" width=\"1920\" height=\"1280\" class=\"size-full wp-image-126246\" srcset=\"https://ww2.kqed.org/app/uploads/sites/24/2018/03/IMG_1484-new.jpg 1920w, https://ww2.kqed.org/app/uploads/sites/24/2018/03/IMG_1484-new-160x107.jpg 160w, https://ww2.kqed.org/app/uploads/sites/24/2018/03/IMG_1484-new-800x533.jpg 800w, https://ww2.kqed.org/app/uploads/sites/24/2018/03/IMG_1484-new-768x512.jpg 768w, https://ww2.kqed.org/app/uploads/sites/24/2018/03/IMG_1484-new-1020x680.jpg 1020w, https://ww2.kqed.org/app/uploads/sites/24/2018/03/IMG_1484-new-1180x787.jpg 1180w, https://ww2.kqed.org/app/uploads/sites/24/2018/03/IMG_1484-new-960x640.jpg 960w, https://ww2.kqed.org/app/uploads/sites/24/2018/03/IMG_1484-new-240x160.jpg 240w, https://ww2.kqed.org/app/uploads/sites/24/2018/03/IMG_1484-new-375x250.jpg 375w, https://ww2.kqed.org/app/uploads/sites/24/2018/03/IMG_1484-new-520x347.jpg 520w\" sizes=\"(max-width: 1920px) 100vw, 1920px\">\u003cfigcaption class=\"wp-caption-text\">The charcuterie locker in the dining room. \u003ccite>(Wendy Goodfriend)\u003c/cite>\u003c/figcaption>\u003c/figure>\n\u003cp>All of this food will make you thirsty and that’s where we’re remiss in saying that Nayfeld, Pinkerton and Brewer are the only headliners of this trio. Christopher Longoria is a star in the San Francisco cocktail world thanks to his fantastic drink creations over the years at Polk Street’s 1760, blending elaborate combinations and quirky ingredients with careful balance. At Che Fico, he’s taking dry, often herb-forward Italian libation profiles way, way beyond the Aperol and Negroni sphere. Each cocktail ($14) is named for an herb or simply an elevated classic of the canon, like a Cognac-based milk punch or the chile vodka-forward “Basil” mellowed with eau de vie and Dimmi, a sharp, savory aperitivo. Amaro plays a prominent role in most drinks such as the boozy cold brew-based “Cafe” with Amaro Montenegro, absinthe, sweet vermouth and rum. Meanwhile, Italian pre-dinner classics like limoncello slip into the fold, joining Strega (a liqueur), Cardamaro, lime and black pepper cachaça in the “Pepper.”\u003c/p>\n\u003cfigure id=\"attachment_126257\" class=\"wp-caption aligncenter\" style=\"max-width: 1920px\">\u003cimg src=\"https://ww2.kqed.org/bayareabites/wp-content/uploads/sites/24/2018/03/IMG_1582-new.jpg\" alt='Christopher Longoria preparing a \"Basil.\"' width=\"1920\" height=\"1280\" class=\"size-full wp-image-126257\" srcset=\"https://ww2.kqed.org/app/uploads/sites/24/2018/03/IMG_1582-new.jpg 1920w, https://ww2.kqed.org/app/uploads/sites/24/2018/03/IMG_1582-new-160x107.jpg 160w, https://ww2.kqed.org/app/uploads/sites/24/2018/03/IMG_1582-new-800x533.jpg 800w, https://ww2.kqed.org/app/uploads/sites/24/2018/03/IMG_1582-new-768x512.jpg 768w, https://ww2.kqed.org/app/uploads/sites/24/2018/03/IMG_1582-new-1020x680.jpg 1020w, https://ww2.kqed.org/app/uploads/sites/24/2018/03/IMG_1582-new-1180x787.jpg 1180w, https://ww2.kqed.org/app/uploads/sites/24/2018/03/IMG_1582-new-960x640.jpg 960w, https://ww2.kqed.org/app/uploads/sites/24/2018/03/IMG_1582-new-240x160.jpg 240w, https://ww2.kqed.org/app/uploads/sites/24/2018/03/IMG_1582-new-375x250.jpg 375w, https://ww2.kqed.org/app/uploads/sites/24/2018/03/IMG_1582-new-520x347.jpg 520w\" sizes=\"(max-width: 1920px) 100vw, 1920px\">\u003cfigcaption class=\"wp-caption-text\">Christopher Longoria preparing a \"Basil.\" \u003ccite>(Wendy Goodfriend)\u003c/cite>\u003c/figcaption>\u003c/figure>\n\u003cfigure id=\"attachment_126280\" class=\"wp-caption aligncenter\" style=\"max-width: 1920px\">\u003cimg src=\"https://ww2.kqed.org/bayareabites/wp-content/uploads/sites/24/2018/03/IMG_2282-new.jpg\" alt='Christopher Longoria pouring a \"Basil.\"' width=\"1920\" height=\"1280\" class=\"size-full wp-image-126280\" srcset=\"https://ww2.kqed.org/app/uploads/sites/24/2018/03/IMG_2282-new.jpg 1920w, https://ww2.kqed.org/app/uploads/sites/24/2018/03/IMG_2282-new-160x107.jpg 160w, https://ww2.kqed.org/app/uploads/sites/24/2018/03/IMG_2282-new-800x533.jpg 800w, https://ww2.kqed.org/app/uploads/sites/24/2018/03/IMG_2282-new-768x512.jpg 768w, https://ww2.kqed.org/app/uploads/sites/24/2018/03/IMG_2282-new-1020x680.jpg 1020w, https://ww2.kqed.org/app/uploads/sites/24/2018/03/IMG_2282-new-1180x787.jpg 1180w, https://ww2.kqed.org/app/uploads/sites/24/2018/03/IMG_2282-new-960x640.jpg 960w, https://ww2.kqed.org/app/uploads/sites/24/2018/03/IMG_2282-new-240x160.jpg 240w, https://ww2.kqed.org/app/uploads/sites/24/2018/03/IMG_2282-new-375x250.jpg 375w, https://ww2.kqed.org/app/uploads/sites/24/2018/03/IMG_2282-new-520x347.jpg 520w\" sizes=\"(max-width: 1920px) 100vw, 1920px\">\u003cfigcaption class=\"wp-caption-text\">Christopher Longoria pouring a \"Basil\" cocktail. \u003ccite>(Wendy Goodfriend)\u003c/cite>\u003c/figcaption>\u003c/figure>\n\u003cfigure id=\"attachment_126261\" class=\"wp-caption aligncenter\" style=\"max-width: 1000px\">\u003cimg src=\"https://ww2.kqed.org/bayareabites/wp-content/uploads/sites/24/2018/03/IMG_1643-new.jpg\" alt=\"Cocktail: Chile vodka-forward “Basil” mellowed with eau de vie and Dimmi.\" width=\"1000\" height=\"1500\" class=\"size-full wp-image-126261\" srcset=\"https://ww2.kqed.org/app/uploads/sites/24/2018/03/IMG_1643-new.jpg 1000w, https://ww2.kqed.org/app/uploads/sites/24/2018/03/IMG_1643-new-160x240.jpg 160w, https://ww2.kqed.org/app/uploads/sites/24/2018/03/IMG_1643-new-800x1200.jpg 800w, https://ww2.kqed.org/app/uploads/sites/24/2018/03/IMG_1643-new-768x1152.jpg 768w, https://ww2.kqed.org/app/uploads/sites/24/2018/03/IMG_1643-new-960x1440.jpg 960w, https://ww2.kqed.org/app/uploads/sites/24/2018/03/IMG_1643-new-240x360.jpg 240w, https://ww2.kqed.org/app/uploads/sites/24/2018/03/IMG_1643-new-375x563.jpg 375w, https://ww2.kqed.org/app/uploads/sites/24/2018/03/IMG_1643-new-520x780.jpg 520w\" sizes=\"(max-width: 1000px) 100vw, 1000px\">\u003cfigcaption class=\"wp-caption-text\">Cocktail: Chile vodka-forward “Basil” mellowed with eau de vie and Dimmi. \u003ccite>(Wendy Goodfriend)\u003c/cite>\u003c/figcaption>\u003c/figure>\n\u003cp>On the wine front, Francesca Maniace (Commonwealth) created a strong Italy-centric list with several California favorites involved, as well. About 80% of the 60 or so bottles are below the $100 mark, many of which come from beloved producers of all ages with cult followings like Produttori del Barbaresco or Matthisasson and Massican of California. With such tempting wines and cocktails — and the food to sop up a few rounds of them — it’s great to see that Che Fico will be open until 1am on Fridays and Saturdays, following in the late night footsteps of the NoPa neighborhood’s restaurant namesake.\u003c/p>\n\u003cp>Che Fico’s design is by the Oakland–based firm of architect Jon de la Cruz, DLC ID, and the gorgeous layout and subtle details go well beyond the figs. The main feature of the 120-seat space is just that — it’s big and spacious with an open, loft-like feel similar to a small cathedral but actually hails from its prior incarnation as an auto body shop. That auto body shop has shifted into an assortment of contemporary elements (raw wood, lots of tile, Italian marble chef’s counter overlooking the kitchen, giant communal table) mingling with old-school red sauce joints (plush red leather booths, dim lighting) and an Instagram-ready glow in the daytime when sunlight streams in through a pair of skylights and the side windows overlooking Divisadero. Heck, everything here is gorgeous, detailed and cheery — already filtered and ready for photo-sharing in the same way SF’s hippest atmospheric restaurants are like Liholiho Yacht Club and Leo’s Oyster Bar. Not surprisingly, the latter is a DLC ID design. James Beard voters might as well already put Che Fico into the semifinalist round for the 2019 Best Design awards. \u003c/p>\n\u003cfigure id=\"attachment_126249\" class=\"wp-caption aligncenter\" style=\"max-width: 1920px\">\u003cimg src=\"https://ww2.kqed.org/bayareabites/wp-content/uploads/sites/24/2018/03/IMG_1488-new.jpg\" alt=\"Che Fico interior overlooking Divisidero Street\" width=\"1920\" height=\"1280\" class=\"size-full wp-image-126249\" srcset=\"https://ww2.kqed.org/app/uploads/sites/24/2018/03/IMG_1488-new.jpg 1920w, https://ww2.kqed.org/app/uploads/sites/24/2018/03/IMG_1488-new-160x107.jpg 160w, https://ww2.kqed.org/app/uploads/sites/24/2018/03/IMG_1488-new-800x533.jpg 800w, https://ww2.kqed.org/app/uploads/sites/24/2018/03/IMG_1488-new-768x512.jpg 768w, https://ww2.kqed.org/app/uploads/sites/24/2018/03/IMG_1488-new-1020x680.jpg 1020w, https://ww2.kqed.org/app/uploads/sites/24/2018/03/IMG_1488-new-1180x787.jpg 1180w, https://ww2.kqed.org/app/uploads/sites/24/2018/03/IMG_1488-new-960x640.jpg 960w, https://ww2.kqed.org/app/uploads/sites/24/2018/03/IMG_1488-new-240x160.jpg 240w, https://ww2.kqed.org/app/uploads/sites/24/2018/03/IMG_1488-new-375x250.jpg 375w, https://ww2.kqed.org/app/uploads/sites/24/2018/03/IMG_1488-new-520x347.jpg 520w\" sizes=\"(max-width: 1920px) 100vw, 1920px\">\u003cfigcaption class=\"wp-caption-text\">Che Fico interior overlooking Divisidero Street \u003ccite>(Wendy Goodfriend)\u003c/cite>\u003c/figcaption>\u003c/figure>\n\u003cp>Roughly a third of the tables and all bar spots at Che Fico’s 15-seat zinc topped bar by the entrance will be set aside for walk-ins. There is also a private dining room for 16 with a table made of a Valley Oak tree from the Brewer’s family farm. The private dining room also has more quirky wallpaper but, this time, it’s a colorful print of Italian pop singer Adriano Celentano’s record albums. Nayfeld’s parents used to play his music all the time as their first taste of uncensored music after leaving communist Russia. The bathrooms have both the same wallpaper in black and white and Celentano’s music playing constantly. It’s a great way to make sure nobody will linger too long there…\u003c/p>\n\u003cfigure id=\"attachment_126268\" class=\"wp-caption aligncenter\" style=\"max-width: 1920px\">\u003cimg src=\"https://ww2.kqed.org/bayareabites/wp-content/uploads/sites/24/2018/03/IMG_2069-new.jpg\" alt=\"Private dining room adorned with Italian pop singer Adriano Celentano’s record albums.\" width=\"1920\" height=\"1280\" class=\"size-full wp-image-126268\" srcset=\"https://ww2.kqed.org/app/uploads/sites/24/2018/03/IMG_2069-new.jpg 1920w, https://ww2.kqed.org/app/uploads/sites/24/2018/03/IMG_2069-new-160x107.jpg 160w, https://ww2.kqed.org/app/uploads/sites/24/2018/03/IMG_2069-new-800x533.jpg 800w, https://ww2.kqed.org/app/uploads/sites/24/2018/03/IMG_2069-new-768x512.jpg 768w, https://ww2.kqed.org/app/uploads/sites/24/2018/03/IMG_2069-new-1020x680.jpg 1020w, https://ww2.kqed.org/app/uploads/sites/24/2018/03/IMG_2069-new-1180x787.jpg 1180w, https://ww2.kqed.org/app/uploads/sites/24/2018/03/IMG_2069-new-960x640.jpg 960w, https://ww2.kqed.org/app/uploads/sites/24/2018/03/IMG_2069-new-240x160.jpg 240w, https://ww2.kqed.org/app/uploads/sites/24/2018/03/IMG_2069-new-375x250.jpg 375w, https://ww2.kqed.org/app/uploads/sites/24/2018/03/IMG_2069-new-520x347.jpg 520w\" sizes=\"(max-width: 1920px) 100vw, 1920px\">\u003cfigcaption class=\"wp-caption-text\">Private dining room adorned with Italian pop singer Adriano Celentano’s record albums. \u003ccite>(Wendy Goodfriend)\u003c/cite>\u003c/figcaption>\u003c/figure>\n\u003cp>With all of this interior talk, it’s impossible to forget the single most striking design feature. Yes, it’s the exterior sign where a local company made Che Fico’s sign and nestled it into the retro arrow sign that the auto body shop had. And, no, the restaurant is not allowed to turn on the lights per neighborhood rules. As far as marquees of San Francisco, this one isn’t quite the Castro Theater but isn’t too far behind.\u003c/p>\n\u003cfigure id=\"attachment_126250\" class=\"wp-caption aligncenter\" style=\"max-width: 1920px\">\u003cimg src=\"https://ww2.kqed.org/bayareabites/wp-content/uploads/sites/24/2018/03/IMG_1505-new.jpg\" alt=\"The cool Che Fico sign.\" width=\"1920\" height=\"1280\" class=\"size-full wp-image-126250\" srcset=\"https://ww2.kqed.org/app/uploads/sites/24/2018/03/IMG_1505-new.jpg 1920w, https://ww2.kqed.org/app/uploads/sites/24/2018/03/IMG_1505-new-160x107.jpg 160w, https://ww2.kqed.org/app/uploads/sites/24/2018/03/IMG_1505-new-800x533.jpg 800w, https://ww2.kqed.org/app/uploads/sites/24/2018/03/IMG_1505-new-768x512.jpg 768w, https://ww2.kqed.org/app/uploads/sites/24/2018/03/IMG_1505-new-1020x680.jpg 1020w, https://ww2.kqed.org/app/uploads/sites/24/2018/03/IMG_1505-new-1180x787.jpg 1180w, https://ww2.kqed.org/app/uploads/sites/24/2018/03/IMG_1505-new-960x640.jpg 960w, https://ww2.kqed.org/app/uploads/sites/24/2018/03/IMG_1505-new-240x160.jpg 240w, https://ww2.kqed.org/app/uploads/sites/24/2018/03/IMG_1505-new-375x250.jpg 375w, https://ww2.kqed.org/app/uploads/sites/24/2018/03/IMG_1505-new-520x347.jpg 520w\" sizes=\"(max-width: 1920px) 100vw, 1920px\">\u003cfigcaption class=\"wp-caption-text\">The cool Che Fico sign. \u003ccite>(Wendy Goodfriend)\u003c/cite>\u003c/figcaption>\u003c/figure>\n\u003cp>Don’t think for a moment that we skipped dessert. Nayfeld purposely bypassed yeast for his pizza crust because that’s a key ingredient in making heavy pizza slices sit like bricks in diners’ stomachs — but chances are the table will be slowing down once the dessert menu arrives. Pinkerton is truly one of the country’s most gifted pastry chefs. Using Bay Area seasonal fruit and Italy’s more dense-style of pastries as a template, it’s a thrill for Bay Area diners to see her producing the likes of wood-fired citrus crostata ($16 and serves two) or an olive oil cake with roasted strawberry vinaigrette ($12). The showstopper, without question, is the bittersweet chocolate budino ($13) with a host of textural contrasts ranging from crunchy salt and pepper walnuts to a silky salted caramel gelato to a hefty pour of olive oil as a finishing, assertive touch. For more gelato fun, by the way, diners can finish with scoops of house-churned gelato in flavors like malted yogurt or strawberry rhubarb sorbetto ($4 for one scoop). \u003c/p>\n\u003cfigure id=\"attachment_126253\" class=\"wp-caption aligncenter\" style=\"max-width: 1920px\">\u003cimg src=\"https://ww2.kqed.org/bayareabites/wp-content/uploads/sites/24/2018/03/IMG_1515-new.jpg\" alt=\"Pastry chef Angela Pinkerton delivers the amazing bittersweet chocolate budino.\" width=\"1920\" height=\"1280\" class=\"size-full wp-image-126253\" srcset=\"https://ww2.kqed.org/app/uploads/sites/24/2018/03/IMG_1515-new.jpg 1920w, https://ww2.kqed.org/app/uploads/sites/24/2018/03/IMG_1515-new-160x107.jpg 160w, https://ww2.kqed.org/app/uploads/sites/24/2018/03/IMG_1515-new-800x533.jpg 800w, https://ww2.kqed.org/app/uploads/sites/24/2018/03/IMG_1515-new-768x512.jpg 768w, https://ww2.kqed.org/app/uploads/sites/24/2018/03/IMG_1515-new-1020x680.jpg 1020w, https://ww2.kqed.org/app/uploads/sites/24/2018/03/IMG_1515-new-1180x787.jpg 1180w, https://ww2.kqed.org/app/uploads/sites/24/2018/03/IMG_1515-new-960x640.jpg 960w, https://ww2.kqed.org/app/uploads/sites/24/2018/03/IMG_1515-new-240x160.jpg 240w, https://ww2.kqed.org/app/uploads/sites/24/2018/03/IMG_1515-new-375x250.jpg 375w, https://ww2.kqed.org/app/uploads/sites/24/2018/03/IMG_1515-new-520x347.jpg 520w\" sizes=\"(max-width: 1920px) 100vw, 1920px\">\u003cfigcaption class=\"wp-caption-text\">Pastry chef Angela Pinkerton delivers the amazing bittersweet chocolate budino. \u003ccite>(Wendy Goodfriend)\u003c/cite>\u003c/figcaption>\u003c/figure>\n\u003cfigure id=\"attachment_126254\" class=\"wp-caption aligncenter\" style=\"max-width: 1920px\">\u003cimg src=\"https://ww2.kqed.org/bayareabites/wp-content/uploads/sites/24/2018/03/IMG_1519-new.jpg\" alt=\"Che Fico's bittersweet chocolate budino.\" width=\"1920\" height=\"1280\" class=\"size-full wp-image-126254\" srcset=\"https://ww2.kqed.org/app/uploads/sites/24/2018/03/IMG_1519-new.jpg 1920w, https://ww2.kqed.org/app/uploads/sites/24/2018/03/IMG_1519-new-160x107.jpg 160w, https://ww2.kqed.org/app/uploads/sites/24/2018/03/IMG_1519-new-800x533.jpg 800w, https://ww2.kqed.org/app/uploads/sites/24/2018/03/IMG_1519-new-768x512.jpg 768w, https://ww2.kqed.org/app/uploads/sites/24/2018/03/IMG_1519-new-1020x680.jpg 1020w, https://ww2.kqed.org/app/uploads/sites/24/2018/03/IMG_1519-new-1180x787.jpg 1180w, https://ww2.kqed.org/app/uploads/sites/24/2018/03/IMG_1519-new-960x640.jpg 960w, https://ww2.kqed.org/app/uploads/sites/24/2018/03/IMG_1519-new-240x160.jpg 240w, https://ww2.kqed.org/app/uploads/sites/24/2018/03/IMG_1519-new-375x250.jpg 375w, https://ww2.kqed.org/app/uploads/sites/24/2018/03/IMG_1519-new-520x347.jpg 520w\" sizes=\"(max-width: 1920px) 100vw, 1920px\">\u003cfigcaption class=\"wp-caption-text\">Che Fico's bittersweet chocolate budino. \u003ccite>(Wendy Goodfriend)\u003c/cite>\u003c/figcaption>\u003c/figure>\n\u003cp>With the last spoonful of budino gone, don’t despair, there is still more to come — in the coming year ahead. When a restaurant waited as long as an entire Summer Olympics or presidential election cycle to open, patience is dearly important. There is the aforementioned housemade charcuterie to wait for. There will also be Pinkerton’s ground-level luncheonette-evoking concept called “Theorita,” where pastries, pies and lunch favorites in the daytime will evolve into Nayfeld’s adaptations of Americana classics for dinner.\u003c/p>\n\u003cp>San Francisco diners are obviously more than excited that Che Fico finally is here and surely the reservations and walk-in seats will be filled from happy hour until late night for the foreseeable future. Sure, it’s another pasta and pizza spot in this pasta and pizza-mad city. But it also isn’t — they’re just one of many components to the whole experience. In Nayfeld’s eyes, this is “noble food” that requires painstaking “craftsmanship.” He’s right. This is home-cooking that nobody, or at least most of us non-professional chefs, can come close to replicating. It’s bringing together one of the world’s most treasured cuisines with the ingredients of the world’s most produce-friendly climate and having fun in the process with a few cocktails. \u003c/p>\n\u003cp>Oh that’s cool.\u003c/p>\n\u003cp>\u003c/p>\u003c/div>","attributes":{"named":{},"numeric":[]}},{"type":"component","content":"","name":"ad","attributes":{"named":{"label":"floatright"},"numeric":["floatright"]}},{"type":"contentString","content":"\u003cdiv class=\"post-body\">\u003cp>\u003c/p>\n\u003cp>\u003ca href=\"http://www.chefico.com/\">\u003cstrong>Che Fico\u003c/strong>\u003c/a>\u003cbr>\n838 Divisadero St.\u003cbr>\nSan Francisco, CA 94117\u003cbr>\nPh: (415) 416-6959\u003cbr>\nHours: Dinner Tue-Thu 5:30pm-11pm, Fri-Sat 5:30pm-1am; closed Sunday and Monday\u003cbr>\nFacebook: \u003ca href=\"https://www.facebook.com/ChefDavidNayfeld/\">Chef David Nayfeld\u003c/a>\u003cbr>\nTwitter: \u003ca href=\"https://twitter.com/DavidNayfeld\">@DavidNayfeld\u003c/a>\u003cbr>\nInstagram: \u003ca href=\"https://www.instagram.com/chefico/\">@chefico\u003c/a>\u003cbr>\nPrice Range: $$$ (most dishes $16-$20)\u003c/p>\n\n\u003c/div>\u003c/p>","attributes":{"named":{},"numeric":[]}}],"link":"/bayareabites/126313/che-fico-opens-on-divisadero-cool-figs-wood-fired-chicken-and-hot-pizza","authors":["11338","5014"],"series":["bayareabites_16196"],"categories":["bayareabites_109","bayareabites_63","bayareabites_11028","bayareabites_10028","bayareabites_1875","bayareabites_1807"],"tags":["bayareabites_16087","bayareabites_16088","bayareabites_9087","bayareabites_16089","bayareabites_766","bayareabites_71","bayareabites_755","bayareabites_443"],"featImg":"bayareabites_126231","label":"bayareabites_16196"},"bayareabites_120126":{"type":"posts","id":"bayareabites_120126","meta":{"index":"posts_1591205157","site":"bayareabites","id":"120126","score":null,"sort":[1503511769000]},"guestAuthors":[],"slug":"gios-pizza-bocce-opens-in-downtown-berkeley-after-complete-remodel-of-former-giovanni-space","title":"Gio’s Pizza & Bocce Opens in Downtown Berkeley After Complete Remodel of Former Giovanni Space","publishDate":1503511769,"format":"image","headTitle":"Bay Area Bites | KQED Food","labelTerm":{},"content":"\u003cp>\u003cem>A beloved downtown Berkeley haunt is reinvigorated with the grand opening of Gio’s Pizza & Bocce.\u003c/em>\u003c/p>\n\u003cp>After a complete overhaul of the long-beloved Giovanni Bar & Grill in downtown Berkeley, \u003ca href=\"http://giosberkeley.com/\">Gio’s Pizza & Bocce\u003c/a> has transformed the once dark, cavernous space into a cool, golden-hued hangout with an indoor bocce court, an obsession with Italian \u003cem>appertivi\u003c/em>, and a menu of solid pastas and salads. We visited the newly christened spot last week during Gio’s soft opening and tried most of the dishes on the limited menu (which will expand this week at the grand opening today, Wednesday, August 23).\u003c/p>\n\u003cfigure id=\"attachment_120154\" class=\"wp-caption aligncenter\" style=\"max-width: 1920px\">\u003cimg src=\"https://ww2.kqed.org/bayareabites/wp-content/uploads/sites/24/2017/08/IMG_9966-new.jpg\" alt=\"Gio's Pizza & Bocce exterior\" width=\"1920\" height=\"1280\" class=\"size-full wp-image-120154\" srcset=\"https://ww2.kqed.org/app/uploads/sites/24/2017/08/IMG_9966-new.jpg 1920w, https://ww2.kqed.org/app/uploads/sites/24/2017/08/IMG_9966-new-160x107.jpg 160w, https://ww2.kqed.org/app/uploads/sites/24/2017/08/IMG_9966-new-800x533.jpg 800w, https://ww2.kqed.org/app/uploads/sites/24/2017/08/IMG_9966-new-768x512.jpg 768w, https://ww2.kqed.org/app/uploads/sites/24/2017/08/IMG_9966-new-1020x680.jpg 1020w, https://ww2.kqed.org/app/uploads/sites/24/2017/08/IMG_9966-new-1180x787.jpg 1180w, https://ww2.kqed.org/app/uploads/sites/24/2017/08/IMG_9966-new-960x640.jpg 960w, https://ww2.kqed.org/app/uploads/sites/24/2017/08/IMG_9966-new-240x160.jpg 240w, https://ww2.kqed.org/app/uploads/sites/24/2017/08/IMG_9966-new-375x250.jpg 375w, https://ww2.kqed.org/app/uploads/sites/24/2017/08/IMG_9966-new-520x347.jpg 520w\" sizes=\"(max-width: 1920px) 100vw, 1920px\">\u003cfigcaption class=\"wp-caption-text\">Gio's Pizza & Bocce exterior \u003ccite>(Wendy Goodfriend)\u003c/cite>\u003c/figcaption>\u003c/figure>\n\u003cfigure id=\"attachment_120133\" class=\"wp-caption aligncenter\" style=\"max-width: 1920px\">\u003cimg src=\"https://ww2.kqed.org/bayareabites/wp-content/uploads/sites/24/2017/08/IMG_0001-new.jpg\" alt=\"Gio's front room interior with bar, tables and Bocce court.\" width=\"1920\" height=\"1280\" class=\"size-full wp-image-120133\" srcset=\"https://ww2.kqed.org/app/uploads/sites/24/2017/08/IMG_0001-new.jpg 1920w, https://ww2.kqed.org/app/uploads/sites/24/2017/08/IMG_0001-new-160x107.jpg 160w, https://ww2.kqed.org/app/uploads/sites/24/2017/08/IMG_0001-new-800x533.jpg 800w, https://ww2.kqed.org/app/uploads/sites/24/2017/08/IMG_0001-new-768x512.jpg 768w, https://ww2.kqed.org/app/uploads/sites/24/2017/08/IMG_0001-new-1020x680.jpg 1020w, https://ww2.kqed.org/app/uploads/sites/24/2017/08/IMG_0001-new-1180x787.jpg 1180w, https://ww2.kqed.org/app/uploads/sites/24/2017/08/IMG_0001-new-960x640.jpg 960w, https://ww2.kqed.org/app/uploads/sites/24/2017/08/IMG_0001-new-240x160.jpg 240w, https://ww2.kqed.org/app/uploads/sites/24/2017/08/IMG_0001-new-375x250.jpg 375w, https://ww2.kqed.org/app/uploads/sites/24/2017/08/IMG_0001-new-520x347.jpg 520w\" sizes=\"(max-width: 1920px) 100vw, 1920px\">\u003cfigcaption class=\"wp-caption-text\">Gio's front room interior with bar, tables and Bocce court. \u003ccite>(Wendy Goodfriend)\u003c/cite>\u003c/figcaption>\u003c/figure>\n\u003cp>The huge space was beautifully designed by Farm League Design Management, who nailed just the right shade of orange for the mid-century Modern look of the banquettes and wisely retained the original murals along the back wall and neon lights above the kitchen announcing “PIZZA CALZONE.” Adam Stemmler, from the design firm, manages all restaurant operations, and Frederico Oliveira, formerly of La Mar Cebicheria and Boulevard in San Francisco, is the chef de cuisine.\u003c/p>\n\u003cfigure id=\"attachment_120141\" class=\"wp-caption aligncenter\" style=\"max-width: 1920px\">\u003cimg src=\"https://ww2.kqed.org/bayareabites/wp-content/uploads/sites/24/2017/08/IMG_0110-new.jpg\" alt=\"Gio’s open kitchen with original Giovanni's neon signage.\" width=\"1920\" height=\"1280\" class=\"size-full wp-image-120141\" srcset=\"https://ww2.kqed.org/app/uploads/sites/24/2017/08/IMG_0110-new.jpg 1920w, https://ww2.kqed.org/app/uploads/sites/24/2017/08/IMG_0110-new-160x107.jpg 160w, https://ww2.kqed.org/app/uploads/sites/24/2017/08/IMG_0110-new-800x533.jpg 800w, https://ww2.kqed.org/app/uploads/sites/24/2017/08/IMG_0110-new-768x512.jpg 768w, https://ww2.kqed.org/app/uploads/sites/24/2017/08/IMG_0110-new-1020x680.jpg 1020w, https://ww2.kqed.org/app/uploads/sites/24/2017/08/IMG_0110-new-1180x787.jpg 1180w, https://ww2.kqed.org/app/uploads/sites/24/2017/08/IMG_0110-new-960x640.jpg 960w, https://ww2.kqed.org/app/uploads/sites/24/2017/08/IMG_0110-new-240x160.jpg 240w, https://ww2.kqed.org/app/uploads/sites/24/2017/08/IMG_0110-new-375x250.jpg 375w, https://ww2.kqed.org/app/uploads/sites/24/2017/08/IMG_0110-new-520x347.jpg 520w\" sizes=\"(max-width: 1920px) 100vw, 1920px\">\u003cfigcaption class=\"wp-caption-text\">Gio’s open kitchen with original Giovanni's neon signage. \u003ccite>(Wendy Goodfriend)\u003c/cite>\u003c/figcaption>\u003c/figure>\n\u003cp>The brilliance of the new space, opened by locals Xin and Michele Jin and developer Nathan George, and what the eye is continually drawn to, is the indoor bocce court, where you can let your kids roam and play while you peruse the beverage list. Above the astro-turf-lined court are several big TVs playing black-and-white Italian gangster movies. The whole deal almost fell apart during the pair’s negotiations to buy the place from longtime owners, the Schipani family, when a fire broke out and did enough damage to make the renovation a considerably more extensive proposition. But it worked out nearly two years later, as the restaurant opened its doors to guests last week.\u003c/p>\n\u003cfigure id=\"attachment_120136\" class=\"wp-caption aligncenter\" style=\"max-width: 1920px\">\u003cimg src=\"https://ww2.kqed.org/bayareabites/wp-content/uploads/sites/24/2017/08/IMG_0033-new.jpg\" alt=\"Kid-friendly indoor bocce court.\" width=\"1920\" height=\"1280\" class=\"size-full wp-image-120136\" srcset=\"https://ww2.kqed.org/app/uploads/sites/24/2017/08/IMG_0033-new.jpg 1920w, https://ww2.kqed.org/app/uploads/sites/24/2017/08/IMG_0033-new-160x107.jpg 160w, https://ww2.kqed.org/app/uploads/sites/24/2017/08/IMG_0033-new-800x533.jpg 800w, https://ww2.kqed.org/app/uploads/sites/24/2017/08/IMG_0033-new-768x512.jpg 768w, https://ww2.kqed.org/app/uploads/sites/24/2017/08/IMG_0033-new-1020x680.jpg 1020w, https://ww2.kqed.org/app/uploads/sites/24/2017/08/IMG_0033-new-1180x787.jpg 1180w, https://ww2.kqed.org/app/uploads/sites/24/2017/08/IMG_0033-new-960x640.jpg 960w, https://ww2.kqed.org/app/uploads/sites/24/2017/08/IMG_0033-new-240x160.jpg 240w, https://ww2.kqed.org/app/uploads/sites/24/2017/08/IMG_0033-new-375x250.jpg 375w, https://ww2.kqed.org/app/uploads/sites/24/2017/08/IMG_0033-new-520x347.jpg 520w\" sizes=\"(max-width: 1920px) 100vw, 1920px\">\u003cfigcaption class=\"wp-caption-text\">Kid-friendly indoor bocce court. \u003ccite>(Wendy Goodfriend)\u003c/cite>\u003c/figcaption>\u003c/figure>\n\u003cp>The drinks menu leads with six classic apertifs, from the sweet Cocchi Americano vermouth to the bitterish digestif Carpano Punt e Mes, also available in flights of three (stick with sweet or bitter or mix it up). We enjoyed a refreshing spritz of watermelon and mint with another digestif, Carpano Bianco, and a splash of Mezcal. The classic Venetian aperol spritz (with soda water and prosecco) is also available.\u003c/p>\n\u003cfigure id=\"attachment_120146\" class=\"wp-caption aligncenter\" style=\"max-width: 600px\">\u003cimg src=\"https://ww2.kqed.org/bayareabites/wp-content/uploads/sites/24/2017/08/IMG_0185-new-800x1200.jpg\" alt=\"Spritz of watermelon and mint with Carpano Bianco, and a splash of Mezcal.\" width=\"600\" class=\"size-medium wp-image-120146\" srcset=\"https://ww2.kqed.org/app/uploads/sites/24/2017/08/IMG_0185-new-800x1200.jpg 800w, https://ww2.kqed.org/app/uploads/sites/24/2017/08/IMG_0185-new-160x240.jpg 160w, https://ww2.kqed.org/app/uploads/sites/24/2017/08/IMG_0185-new-768x1152.jpg 768w, https://ww2.kqed.org/app/uploads/sites/24/2017/08/IMG_0185-new-960x1440.jpg 960w, https://ww2.kqed.org/app/uploads/sites/24/2017/08/IMG_0185-new-240x360.jpg 240w, https://ww2.kqed.org/app/uploads/sites/24/2017/08/IMG_0185-new-375x563.jpg 375w, https://ww2.kqed.org/app/uploads/sites/24/2017/08/IMG_0185-new-520x780.jpg 520w, https://ww2.kqed.org/app/uploads/sites/24/2017/08/IMG_0185-new.jpg 1000w\" sizes=\"(max-width: 800px) 100vw, 800px\">\u003cfigcaption class=\"wp-caption-text\">Spritz of watermelon and mint with Carpano Bianco, and a splash of Mezcal. \u003ccite>(Wendy Goodfriend)\u003c/cite>\u003c/figcaption>\u003c/figure>\n\u003cp>We ordered two appetizers, two salads, two pastas, two little pizzas and one main dish to share among six, and there was ample food to go around. Fried calamari was light and crispy, served with lemon aioli and sprinkled with fried parsley. We also tried the spicy meatballs, a little bowl of tender beef and pork meatballs with bread and grana Padano, swimming in a deliciously sweet, chile-inflected tomato sauce. When the meatballs were gone, we saved the sauce for dipping the pizza crusts that were to come later. \u003c/p>\n\u003cfigure id=\"attachment_120138\" class=\"wp-caption aligncenter\" style=\"max-width: 1920px\">\u003cimg src=\"https://ww2.kqed.org/bayareabites/wp-content/uploads/sites/24/2017/08/IMG_0077-new.jpg\" alt=\"Fried Calamari\" width=\"1920\" height=\"1280\" class=\"size-full wp-image-120138\" srcset=\"https://ww2.kqed.org/app/uploads/sites/24/2017/08/IMG_0077-new.jpg 1920w, https://ww2.kqed.org/app/uploads/sites/24/2017/08/IMG_0077-new-160x107.jpg 160w, https://ww2.kqed.org/app/uploads/sites/24/2017/08/IMG_0077-new-800x533.jpg 800w, https://ww2.kqed.org/app/uploads/sites/24/2017/08/IMG_0077-new-768x512.jpg 768w, https://ww2.kqed.org/app/uploads/sites/24/2017/08/IMG_0077-new-1020x680.jpg 1020w, https://ww2.kqed.org/app/uploads/sites/24/2017/08/IMG_0077-new-1180x787.jpg 1180w, https://ww2.kqed.org/app/uploads/sites/24/2017/08/IMG_0077-new-960x640.jpg 960w, https://ww2.kqed.org/app/uploads/sites/24/2017/08/IMG_0077-new-240x160.jpg 240w, https://ww2.kqed.org/app/uploads/sites/24/2017/08/IMG_0077-new-375x250.jpg 375w, https://ww2.kqed.org/app/uploads/sites/24/2017/08/IMG_0077-new-520x347.jpg 520w\" sizes=\"(max-width: 1920px) 100vw, 1920px\">\u003cfigcaption class=\"wp-caption-text\">Fried Calamari \u003ccite>(Wendy Goodfriend)\u003c/cite>\u003c/figcaption>\u003c/figure>\n\u003cfigure id=\"attachment_120137\" class=\"wp-caption aligncenter\" style=\"max-width: 1920px\">\u003cimg src=\"https://ww2.kqed.org/bayareabites/wp-content/uploads/sites/24/2017/08/IMG_0070-new.jpg\" alt=\"Spicy Meatballs\" width=\"1920\" height=\"1280\" class=\"size-full wp-image-120137\" srcset=\"https://ww2.kqed.org/app/uploads/sites/24/2017/08/IMG_0070-new.jpg 1920w, https://ww2.kqed.org/app/uploads/sites/24/2017/08/IMG_0070-new-160x107.jpg 160w, https://ww2.kqed.org/app/uploads/sites/24/2017/08/IMG_0070-new-800x533.jpg 800w, https://ww2.kqed.org/app/uploads/sites/24/2017/08/IMG_0070-new-768x512.jpg 768w, https://ww2.kqed.org/app/uploads/sites/24/2017/08/IMG_0070-new-1020x680.jpg 1020w, https://ww2.kqed.org/app/uploads/sites/24/2017/08/IMG_0070-new-1180x787.jpg 1180w, https://ww2.kqed.org/app/uploads/sites/24/2017/08/IMG_0070-new-960x640.jpg 960w, https://ww2.kqed.org/app/uploads/sites/24/2017/08/IMG_0070-new-240x160.jpg 240w, https://ww2.kqed.org/app/uploads/sites/24/2017/08/IMG_0070-new-375x250.jpg 375w, https://ww2.kqed.org/app/uploads/sites/24/2017/08/IMG_0070-new-520x347.jpg 520w\" sizes=\"(max-width: 1920px) 100vw, 1920px\">\u003cfigcaption class=\"wp-caption-text\">Spicy Meatballs \u003ccite>(Wendy Goodfriend)\u003c/cite>\u003c/figcaption>\u003c/figure>\n\u003cp>Salads and pastas were the highlight of the meal. A generous caprese salad with perfectly ripe heirloom tomatoes and room-temperature burrata (much preferable to straight out of the fridge) was dressed with olive oil and a splash of sweet balsamic vinegar reduction. And the equally attractive yellow beet salad was composed of thin coins of beets on the bottom and a mound of baby arugula on top, tossed in a pleasingly tart lemon vinaigrette. \u003c/p>\n\u003cfigure id=\"attachment_120176\" class=\"wp-caption aligncenter\" style=\"max-width: 1920px\">\u003cimg src=\"https://ww2.kqed.org/bayareabites/wp-content/uploads/sites/24/2017/08/IMG_0131-new-1.jpg\" alt=\"Caprese salad\" width=\"1920\" height=\"1280\" class=\"size-full wp-image-120176\" srcset=\"https://ww2.kqed.org/app/uploads/sites/24/2017/08/IMG_0131-new-1.jpg 1920w, https://ww2.kqed.org/app/uploads/sites/24/2017/08/IMG_0131-new-1-160x107.jpg 160w, https://ww2.kqed.org/app/uploads/sites/24/2017/08/IMG_0131-new-1-800x533.jpg 800w, https://ww2.kqed.org/app/uploads/sites/24/2017/08/IMG_0131-new-1-768x512.jpg 768w, https://ww2.kqed.org/app/uploads/sites/24/2017/08/IMG_0131-new-1-1020x680.jpg 1020w, https://ww2.kqed.org/app/uploads/sites/24/2017/08/IMG_0131-new-1-1180x787.jpg 1180w, https://ww2.kqed.org/app/uploads/sites/24/2017/08/IMG_0131-new-1-960x640.jpg 960w, https://ww2.kqed.org/app/uploads/sites/24/2017/08/IMG_0131-new-1-240x160.jpg 240w, https://ww2.kqed.org/app/uploads/sites/24/2017/08/IMG_0131-new-1-375x250.jpg 375w, https://ww2.kqed.org/app/uploads/sites/24/2017/08/IMG_0131-new-1-520x347.jpg 520w\" sizes=\"(max-width: 1920px) 100vw, 1920px\">\u003cfigcaption class=\"wp-caption-text\">Caprese salad \u003ccite>(Wendy Goodfriend)\u003c/cite>\u003c/figcaption>\u003c/figure>\n\u003cfigure id=\"attachment_120177\" class=\"wp-caption aligncenter\" style=\"max-width: 1920px\">\u003cimg src=\"https://ww2.kqed.org/bayareabites/wp-content/uploads/sites/24/2017/08/IMG_0145-new-1.jpg\" alt=\"Beet Salad\" width=\"1920\" height=\"1280\" class=\"size-full wp-image-120177\" srcset=\"https://ww2.kqed.org/app/uploads/sites/24/2017/08/IMG_0145-new-1.jpg 1920w, https://ww2.kqed.org/app/uploads/sites/24/2017/08/IMG_0145-new-1-160x107.jpg 160w, https://ww2.kqed.org/app/uploads/sites/24/2017/08/IMG_0145-new-1-800x533.jpg 800w, https://ww2.kqed.org/app/uploads/sites/24/2017/08/IMG_0145-new-1-768x512.jpg 768w, https://ww2.kqed.org/app/uploads/sites/24/2017/08/IMG_0145-new-1-1020x680.jpg 1020w, https://ww2.kqed.org/app/uploads/sites/24/2017/08/IMG_0145-new-1-1180x787.jpg 1180w, https://ww2.kqed.org/app/uploads/sites/24/2017/08/IMG_0145-new-1-960x640.jpg 960w, https://ww2.kqed.org/app/uploads/sites/24/2017/08/IMG_0145-new-1-240x160.jpg 240w, https://ww2.kqed.org/app/uploads/sites/24/2017/08/IMG_0145-new-1-375x250.jpg 375w, https://ww2.kqed.org/app/uploads/sites/24/2017/08/IMG_0145-new-1-520x347.jpg 520w\" sizes=\"(max-width: 1920px) 100vw, 1920px\">\u003cfigcaption class=\"wp-caption-text\">Beet Salad \u003ccite>(Wendy Goodfriend)\u003c/cite>\u003c/figcaption>\u003c/figure>\n\u003cp>Our two pasta selections were winners, according to kids and adults alike. A study in both contrast and simplicity, the linguine marinara was tossed with the same sauce as the meatballs, without the chiles, while the fettucine Alfredo (now an American classic more than an Italian one) was subtly complex, creamy, egg-laden, and with hints of spices (perhaps nutmeg?). Both were served \u003cem>al dente\u003c/em>. \u003c/p>\n\u003cfigure id=\"attachment_120144\" class=\"wp-caption aligncenter\" style=\"max-width: 1920px\">\u003cimg src=\"https://ww2.kqed.org/bayareabites/wp-content/uploads/sites/24/2017/08/IMG_0161-new.jpg\" alt=\"Linguine & Marinara (served with spaghetti pasta)\" width=\"1920\" height=\"1280\" class=\"size-full wp-image-120144\" srcset=\"https://ww2.kqed.org/app/uploads/sites/24/2017/08/IMG_0161-new.jpg 1920w, https://ww2.kqed.org/app/uploads/sites/24/2017/08/IMG_0161-new-160x107.jpg 160w, https://ww2.kqed.org/app/uploads/sites/24/2017/08/IMG_0161-new-800x533.jpg 800w, https://ww2.kqed.org/app/uploads/sites/24/2017/08/IMG_0161-new-768x512.jpg 768w, https://ww2.kqed.org/app/uploads/sites/24/2017/08/IMG_0161-new-1020x680.jpg 1020w, https://ww2.kqed.org/app/uploads/sites/24/2017/08/IMG_0161-new-1180x787.jpg 1180w, https://ww2.kqed.org/app/uploads/sites/24/2017/08/IMG_0161-new-960x640.jpg 960w, https://ww2.kqed.org/app/uploads/sites/24/2017/08/IMG_0161-new-240x160.jpg 240w, https://ww2.kqed.org/app/uploads/sites/24/2017/08/IMG_0161-new-375x250.jpg 375w, https://ww2.kqed.org/app/uploads/sites/24/2017/08/IMG_0161-new-520x347.jpg 520w\" sizes=\"(max-width: 1920px) 100vw, 1920px\">\u003cfigcaption class=\"wp-caption-text\">Linguine & Marinara (served with spaghetti pasta on our visit) \u003ccite>(Wendy Goodfriend)\u003c/cite>\u003c/figcaption>\u003c/figure>\n\u003cfigure id=\"attachment_120145\" class=\"wp-caption aligncenter\" style=\"max-width: 1920px\">\u003cimg src=\"https://ww2.kqed.org/bayareabites/wp-content/uploads/sites/24/2017/08/IMG_0176-new.jpg\" alt=\"Fettucine Alfredo\" width=\"1920\" height=\"1280\" class=\"size-full wp-image-120145\" srcset=\"https://ww2.kqed.org/app/uploads/sites/24/2017/08/IMG_0176-new.jpg 1920w, https://ww2.kqed.org/app/uploads/sites/24/2017/08/IMG_0176-new-160x107.jpg 160w, https://ww2.kqed.org/app/uploads/sites/24/2017/08/IMG_0176-new-800x533.jpg 800w, https://ww2.kqed.org/app/uploads/sites/24/2017/08/IMG_0176-new-768x512.jpg 768w, https://ww2.kqed.org/app/uploads/sites/24/2017/08/IMG_0176-new-1020x680.jpg 1020w, https://ww2.kqed.org/app/uploads/sites/24/2017/08/IMG_0176-new-1180x787.jpg 1180w, https://ww2.kqed.org/app/uploads/sites/24/2017/08/IMG_0176-new-960x640.jpg 960w, https://ww2.kqed.org/app/uploads/sites/24/2017/08/IMG_0176-new-240x160.jpg 240w, https://ww2.kqed.org/app/uploads/sites/24/2017/08/IMG_0176-new-375x250.jpg 375w, https://ww2.kqed.org/app/uploads/sites/24/2017/08/IMG_0176-new-520x347.jpg 520w\" sizes=\"(max-width: 1920px) 100vw, 1920px\">\u003cfigcaption class=\"wp-caption-text\">Fettucine Alfredo \u003ccite>(Wendy Goodfriend)\u003c/cite>\u003c/figcaption>\u003c/figure>\n\u003cp>The pizza genre is a bit of a mystery. Billed as “single Sicilian-style,” these little flatbreads are just the right size for kids and have quality ingredients. But they’re rather doughy, not crisp, something to be aware of if you prefer thin and crispy pizza. Both the Margherita with pepperoni added and the fungi & sausage are quite cheesy, the former with red sauce and the latter with a cream-based sauce with a sprinkle of thyme.\u003c/p>\n\u003cfigure id=\"attachment_120139\" class=\"wp-caption aligncenter\" style=\"max-width: 1920px\">\u003cimg src=\"https://ww2.kqed.org/bayareabites/wp-content/uploads/sites/24/2017/08/IMG_0084-new.jpg\" alt=\"Margherita pizza with pepperoni added\" width=\"1920\" height=\"1280\" class=\"size-full wp-image-120139\" srcset=\"https://ww2.kqed.org/app/uploads/sites/24/2017/08/IMG_0084-new.jpg 1920w, https://ww2.kqed.org/app/uploads/sites/24/2017/08/IMG_0084-new-160x107.jpg 160w, https://ww2.kqed.org/app/uploads/sites/24/2017/08/IMG_0084-new-800x533.jpg 800w, https://ww2.kqed.org/app/uploads/sites/24/2017/08/IMG_0084-new-768x512.jpg 768w, https://ww2.kqed.org/app/uploads/sites/24/2017/08/IMG_0084-new-1020x680.jpg 1020w, https://ww2.kqed.org/app/uploads/sites/24/2017/08/IMG_0084-new-1180x787.jpg 1180w, https://ww2.kqed.org/app/uploads/sites/24/2017/08/IMG_0084-new-960x640.jpg 960w, https://ww2.kqed.org/app/uploads/sites/24/2017/08/IMG_0084-new-240x160.jpg 240w, https://ww2.kqed.org/app/uploads/sites/24/2017/08/IMG_0084-new-375x250.jpg 375w, https://ww2.kqed.org/app/uploads/sites/24/2017/08/IMG_0084-new-520x347.jpg 520w\" sizes=\"(max-width: 1920px) 100vw, 1920px\">\u003cfigcaption class=\"wp-caption-text\">Margherita pizza with pepperoni added. \u003ccite>(Wendy Goodfriend)\u003c/cite>\u003c/figcaption>\u003c/figure>\n\u003cfigure id=\"attachment_120140\" class=\"wp-caption aligncenter\" style=\"max-width: 1920px\">\u003cimg src=\"https://ww2.kqed.org/bayareabites/wp-content/uploads/sites/24/2017/08/IMG_0100-new.jpg\" alt=\"Fungi & sausage pizza ordered without sausage.\" width=\"1920\" height=\"1280\" class=\"size-full wp-image-120140\" srcset=\"https://ww2.kqed.org/app/uploads/sites/24/2017/08/IMG_0100-new.jpg 1920w, https://ww2.kqed.org/app/uploads/sites/24/2017/08/IMG_0100-new-160x107.jpg 160w, https://ww2.kqed.org/app/uploads/sites/24/2017/08/IMG_0100-new-800x533.jpg 800w, https://ww2.kqed.org/app/uploads/sites/24/2017/08/IMG_0100-new-768x512.jpg 768w, https://ww2.kqed.org/app/uploads/sites/24/2017/08/IMG_0100-new-1020x680.jpg 1020w, https://ww2.kqed.org/app/uploads/sites/24/2017/08/IMG_0100-new-1180x787.jpg 1180w, https://ww2.kqed.org/app/uploads/sites/24/2017/08/IMG_0100-new-960x640.jpg 960w, https://ww2.kqed.org/app/uploads/sites/24/2017/08/IMG_0100-new-240x160.jpg 240w, https://ww2.kqed.org/app/uploads/sites/24/2017/08/IMG_0100-new-375x250.jpg 375w, https://ww2.kqed.org/app/uploads/sites/24/2017/08/IMG_0100-new-520x347.jpg 520w\" sizes=\"(max-width: 1920px) 100vw, 1920px\">\u003cfigcaption class=\"wp-caption-text\">Fungi & sausage pizza ordered without sausage. \u003ccite>(Wendy Goodfriend)\u003c/cite>\u003c/figcaption>\u003c/figure>\n\u003cp>There was one entrée special, and the carnivores among us shared it: medium-rare hanger steak with fingerling potatoes and a baby arugula salad, paired with the house red wine (a Sierra Foothills red blend) for $5.\u003c/p>\n\u003cfigure id=\"attachment_120147\" class=\"wp-caption aligncenter\" style=\"max-width: 1920px\">\u003cimg src=\"https://ww2.kqed.org/bayareabites/wp-content/uploads/sites/24/2017/08/IMG_0193-new.jpg\" alt=\"Medium-rare hanger steak with fingerling potatoes and a baby arugula salad.\" width=\"1920\" height=\"1280\" class=\"size-full wp-image-120147\" srcset=\"https://ww2.kqed.org/app/uploads/sites/24/2017/08/IMG_0193-new.jpg 1920w, https://ww2.kqed.org/app/uploads/sites/24/2017/08/IMG_0193-new-160x107.jpg 160w, https://ww2.kqed.org/app/uploads/sites/24/2017/08/IMG_0193-new-800x533.jpg 800w, https://ww2.kqed.org/app/uploads/sites/24/2017/08/IMG_0193-new-768x512.jpg 768w, https://ww2.kqed.org/app/uploads/sites/24/2017/08/IMG_0193-new-1020x680.jpg 1020w, https://ww2.kqed.org/app/uploads/sites/24/2017/08/IMG_0193-new-1180x787.jpg 1180w, https://ww2.kqed.org/app/uploads/sites/24/2017/08/IMG_0193-new-960x640.jpg 960w, https://ww2.kqed.org/app/uploads/sites/24/2017/08/IMG_0193-new-240x160.jpg 240w, https://ww2.kqed.org/app/uploads/sites/24/2017/08/IMG_0193-new-375x250.jpg 375w, https://ww2.kqed.org/app/uploads/sites/24/2017/08/IMG_0193-new-520x347.jpg 520w\" sizes=\"(max-width: 1920px) 100vw, 1920px\">\u003cfigcaption class=\"wp-caption-text\">Medium-rare hanger steak with fingerling potatoes and a baby arugula salad. \u003ccite>(Wendy Goodfriend)\u003c/cite>\u003c/figcaption>\u003c/figure>\n\u003cp>The one dessert on the menu offered something for everyone. Large enough for all six of us to snag a few bites, the polenta cake was topped with ricotta cream, summer fruit, and a surprising and wonderful garnish of kettle corn.\u003c/p>\n\u003cfigure id=\"attachment_120150\" class=\"wp-caption aligncenter\" style=\"max-width: 1920px\">\u003cimg src=\"https://ww2.kqed.org/bayareabites/wp-content/uploads/sites/24/2017/08/IMG_0216-new.jpg\" alt=\"Polenta cake topped with ricotta cream, summer fruit, and a surprising and wonderful garnish of kettle corn.\" width=\"1920\" height=\"1280\" class=\"size-full wp-image-120150\" srcset=\"https://ww2.kqed.org/app/uploads/sites/24/2017/08/IMG_0216-new.jpg 1920w, https://ww2.kqed.org/app/uploads/sites/24/2017/08/IMG_0216-new-160x107.jpg 160w, https://ww2.kqed.org/app/uploads/sites/24/2017/08/IMG_0216-new-800x533.jpg 800w, https://ww2.kqed.org/app/uploads/sites/24/2017/08/IMG_0216-new-768x512.jpg 768w, https://ww2.kqed.org/app/uploads/sites/24/2017/08/IMG_0216-new-1020x680.jpg 1020w, https://ww2.kqed.org/app/uploads/sites/24/2017/08/IMG_0216-new-1180x787.jpg 1180w, https://ww2.kqed.org/app/uploads/sites/24/2017/08/IMG_0216-new-960x640.jpg 960w, https://ww2.kqed.org/app/uploads/sites/24/2017/08/IMG_0216-new-240x160.jpg 240w, https://ww2.kqed.org/app/uploads/sites/24/2017/08/IMG_0216-new-375x250.jpg 375w, https://ww2.kqed.org/app/uploads/sites/24/2017/08/IMG_0216-new-520x347.jpg 520w\" sizes=\"(max-width: 1920px) 100vw, 1920px\">\u003cfigcaption class=\"wp-caption-text\">Polenta cake topped with ricotta cream, summer fruit, and a surprising and wonderful garnish of kettle corn. \u003ccite>(Wendy Goodfriend)\u003c/cite>\u003c/figcaption>\u003c/figure>\n\u003cp>\u003cstrong>Pro tip:\u003c/strong> If you peak behind the mystery door made of olive oil cans (which doubles as an art piece on view for guests in the main dining room), you’ll find a little museum of the old Giovanni’s space, a dimly lit private dining area with movies, a loungey feel, and full menu service.\u003c/p>\n\u003cfigure id=\"attachment_120134\" class=\"wp-caption aligncenter\" style=\"max-width: 600px\">\u003cimg src=\"https://ww2.kqed.org/bayareabites/wp-content/uploads/sites/24/2017/08/IMG_0007-new.jpg\" alt=\"Olive oil cans doorway to private dining room\" width=\"600\" class=\"size-full wp-image-120134\" srcset=\"https://ww2.kqed.org/app/uploads/sites/24/2017/08/IMG_0007-new.jpg 1000w, https://ww2.kqed.org/app/uploads/sites/24/2017/08/IMG_0007-new-160x240.jpg 160w, https://ww2.kqed.org/app/uploads/sites/24/2017/08/IMG_0007-new-800x1200.jpg 800w, https://ww2.kqed.org/app/uploads/sites/24/2017/08/IMG_0007-new-768x1152.jpg 768w, https://ww2.kqed.org/app/uploads/sites/24/2017/08/IMG_0007-new-960x1440.jpg 960w, https://ww2.kqed.org/app/uploads/sites/24/2017/08/IMG_0007-new-240x360.jpg 240w, https://ww2.kqed.org/app/uploads/sites/24/2017/08/IMG_0007-new-375x563.jpg 375w, https://ww2.kqed.org/app/uploads/sites/24/2017/08/IMG_0007-new-520x780.jpg 520w\" sizes=\"(max-width: 1000px) 100vw, 1000px\">\u003cfigcaption class=\"wp-caption-text\">Olive oil cans doorway to private dining room \u003ccite>(Wendy Goodfriend)\u003c/cite>\u003c/figcaption>\u003c/figure>\n\u003cp>[gallery columns=\"2\" link=\"none\" size=\"full\" ids=\"120135,120152\"]\u003c/p>\n\u003cp>Gio’s is a fun downtown-Berkeley destination, nicely situated near movie theaters and BAMPFA, and with bocce to boot!\u003c/p>\n\u003cfigure id=\"attachment_120153\" class=\"wp-caption aligncenter\" style=\"max-width: 1920px\">\u003cimg src=\"https://ww2.kqed.org/bayareabites/wp-content/uploads/sites/24/2017/08/IMG_0264-new.jpg\" alt=\"Gio's Pizza & Bocce exterior at night.\" width=\"1920\" height=\"1280\" class=\"size-full wp-image-120153\" srcset=\"https://ww2.kqed.org/app/uploads/sites/24/2017/08/IMG_0264-new.jpg 1920w, https://ww2.kqed.org/app/uploads/sites/24/2017/08/IMG_0264-new-160x107.jpg 160w, https://ww2.kqed.org/app/uploads/sites/24/2017/08/IMG_0264-new-800x533.jpg 800w, https://ww2.kqed.org/app/uploads/sites/24/2017/08/IMG_0264-new-768x512.jpg 768w, https://ww2.kqed.org/app/uploads/sites/24/2017/08/IMG_0264-new-1020x680.jpg 1020w, https://ww2.kqed.org/app/uploads/sites/24/2017/08/IMG_0264-new-1180x787.jpg 1180w, https://ww2.kqed.org/app/uploads/sites/24/2017/08/IMG_0264-new-960x640.jpg 960w, https://ww2.kqed.org/app/uploads/sites/24/2017/08/IMG_0264-new-240x160.jpg 240w, https://ww2.kqed.org/app/uploads/sites/24/2017/08/IMG_0264-new-375x250.jpg 375w, https://ww2.kqed.org/app/uploads/sites/24/2017/08/IMG_0264-new-520x347.jpg 520w\" sizes=\"(max-width: 1920px) 100vw, 1920px\">\u003cfigcaption class=\"wp-caption-text\">Gio's Pizza & Bocce exterior at night. \u003ccite>(Wendy Goodfriend)\u003c/cite>\u003c/figcaption>\u003c/figure>\n\u003cp>\u003ca href=\"http://giosberkeley.com/\">\u003cstrong>Gio’s Pizza & Bocce\u003c/strong>\u003c/a>\u003cbr>\n2420 Shattuck Ave.\u003cbr>\nBerkeley, CA 94704 [ \u003ca href=\"https://goo.gl/p9CUXn\">Map\u003c/a> ]\u003cbr>\nPh: (510) 647-9963\u003cbr>\nHours: Wed-Sun, 5-10pm; closed Mon-Tue\u003cbr>\nPrice Range: $$-$$$ ($12-$25)\u003cbr>\nFacebook: \u003ca href=\"https://www.facebook.com/giosberkeley/\">@giosberkeley\u003c/a>\u003cbr>\nInstagram: \u003ca href=\"https://www.instagram.com/giosberkeley/\">@giosberkeley\u003c/a> \u003c/p>\n\u003cp>[ad fullwidth]\u003c/p>\u003cp>\u003c/p>\n","blocks":[],"excerpt":"A beloved downtown Berkeley haunt is reinvigorated with the grand opening of Gio’s Pizza & Bocce.","status":"publish","parent":0,"modified":1504359925,"stats":{"hasAudio":false,"hasVideo":false,"hasChartOrMap":false,"iframeSrcs":[],"hasGoogleForm":false,"hasGallery":true,"hasHearkenModule":false,"hasPolis":false,"paragraphCount":17,"wordCount":1046},"headData":{"title":"Gio’s Pizza & Bocce Opens in Downtown Berkeley After Complete Remodel of Former Giovanni Space | KQED","description":"A beloved downtown Berkeley haunt is reinvigorated with the grand opening of Gio’s Pizza & Bocce.","ogTitle":"","ogDescription":"","ogImgId":"","twTitle":"","twDescription":"","twImgId":"","schema":{"@context":"http://schema.org","@type":"Article","headline":"Gio’s Pizza & Bocce Opens in Downtown Berkeley After Complete Remodel of Former Giovanni Space","datePublished":"2017-08-23T18:09:29.000Z","dateModified":"2017-09-02T13:45:25.000Z","image":"https://cdn.kqed.org/wp-content/uploads/2020/02/KQED-OG-Image@1x.png"}},"disqusIdentifier":"120126 https://ww2.kqed.org/bayareabites/?p=120126","disqusUrl":"https://ww2.kqed.org/bayareabites/2017/08/23/gios-pizza-bocce-opens-in-downtown-berkeley-after-complete-remodel-of-former-giovanni-space/","disqusTitle":"Gio’s Pizza & Bocce Opens in Downtown Berkeley After Complete Remodel of Former Giovanni Space","source":"Restaurants, Bars, Cafes, Pop-Ups","sourceUrl":"https://ww2.kqed.org/bayareabites/category/restaurants-and-bars/","path":"/bayareabites/120126/gios-pizza-bocce-opens-in-downtown-berkeley-after-complete-remodel-of-former-giovanni-space","audioTrackLength":null,"parsedContent":[{"type":"contentString","content":"\u003cdiv class=\"post-body\">\u003cp>\u003cp>\u003cem>A beloved downtown Berkeley haunt is reinvigorated with the grand opening of Gio’s Pizza & Bocce.\u003c/em>\u003c/p>\n\u003cp>After a complete overhaul of the long-beloved Giovanni Bar & Grill in downtown Berkeley, \u003ca href=\"http://giosberkeley.com/\">Gio’s Pizza & Bocce\u003c/a> has transformed the once dark, cavernous space into a cool, golden-hued hangout with an indoor bocce court, an obsession with Italian \u003cem>appertivi\u003c/em>, and a menu of solid pastas and salads. We visited the newly christened spot last week during Gio’s soft opening and tried most of the dishes on the limited menu (which will expand this week at the grand opening today, Wednesday, August 23).\u003c/p>\n\u003cfigure id=\"attachment_120154\" class=\"wp-caption aligncenter\" style=\"max-width: 1920px\">\u003cimg src=\"https://ww2.kqed.org/bayareabites/wp-content/uploads/sites/24/2017/08/IMG_9966-new.jpg\" alt=\"Gio's Pizza & Bocce exterior\" width=\"1920\" height=\"1280\" class=\"size-full wp-image-120154\" srcset=\"https://ww2.kqed.org/app/uploads/sites/24/2017/08/IMG_9966-new.jpg 1920w, https://ww2.kqed.org/app/uploads/sites/24/2017/08/IMG_9966-new-160x107.jpg 160w, https://ww2.kqed.org/app/uploads/sites/24/2017/08/IMG_9966-new-800x533.jpg 800w, https://ww2.kqed.org/app/uploads/sites/24/2017/08/IMG_9966-new-768x512.jpg 768w, https://ww2.kqed.org/app/uploads/sites/24/2017/08/IMG_9966-new-1020x680.jpg 1020w, https://ww2.kqed.org/app/uploads/sites/24/2017/08/IMG_9966-new-1180x787.jpg 1180w, https://ww2.kqed.org/app/uploads/sites/24/2017/08/IMG_9966-new-960x640.jpg 960w, https://ww2.kqed.org/app/uploads/sites/24/2017/08/IMG_9966-new-240x160.jpg 240w, https://ww2.kqed.org/app/uploads/sites/24/2017/08/IMG_9966-new-375x250.jpg 375w, https://ww2.kqed.org/app/uploads/sites/24/2017/08/IMG_9966-new-520x347.jpg 520w\" sizes=\"(max-width: 1920px) 100vw, 1920px\">\u003cfigcaption class=\"wp-caption-text\">Gio's Pizza & Bocce exterior \u003ccite>(Wendy Goodfriend)\u003c/cite>\u003c/figcaption>\u003c/figure>\n\u003cfigure id=\"attachment_120133\" class=\"wp-caption aligncenter\" style=\"max-width: 1920px\">\u003cimg src=\"https://ww2.kqed.org/bayareabites/wp-content/uploads/sites/24/2017/08/IMG_0001-new.jpg\" alt=\"Gio's front room interior with bar, tables and Bocce court.\" width=\"1920\" height=\"1280\" class=\"size-full wp-image-120133\" srcset=\"https://ww2.kqed.org/app/uploads/sites/24/2017/08/IMG_0001-new.jpg 1920w, https://ww2.kqed.org/app/uploads/sites/24/2017/08/IMG_0001-new-160x107.jpg 160w, https://ww2.kqed.org/app/uploads/sites/24/2017/08/IMG_0001-new-800x533.jpg 800w, https://ww2.kqed.org/app/uploads/sites/24/2017/08/IMG_0001-new-768x512.jpg 768w, https://ww2.kqed.org/app/uploads/sites/24/2017/08/IMG_0001-new-1020x680.jpg 1020w, https://ww2.kqed.org/app/uploads/sites/24/2017/08/IMG_0001-new-1180x787.jpg 1180w, https://ww2.kqed.org/app/uploads/sites/24/2017/08/IMG_0001-new-960x640.jpg 960w, https://ww2.kqed.org/app/uploads/sites/24/2017/08/IMG_0001-new-240x160.jpg 240w, https://ww2.kqed.org/app/uploads/sites/24/2017/08/IMG_0001-new-375x250.jpg 375w, https://ww2.kqed.org/app/uploads/sites/24/2017/08/IMG_0001-new-520x347.jpg 520w\" sizes=\"(max-width: 1920px) 100vw, 1920px\">\u003cfigcaption class=\"wp-caption-text\">Gio's front room interior with bar, tables and Bocce court. \u003ccite>(Wendy Goodfriend)\u003c/cite>\u003c/figcaption>\u003c/figure>\n\u003cp>The huge space was beautifully designed by Farm League Design Management, who nailed just the right shade of orange for the mid-century Modern look of the banquettes and wisely retained the original murals along the back wall and neon lights above the kitchen announcing “PIZZA CALZONE.” Adam Stemmler, from the design firm, manages all restaurant operations, and Frederico Oliveira, formerly of La Mar Cebicheria and Boulevard in San Francisco, is the chef de cuisine.\u003c/p>\n\u003cfigure id=\"attachment_120141\" class=\"wp-caption aligncenter\" style=\"max-width: 1920px\">\u003cimg src=\"https://ww2.kqed.org/bayareabites/wp-content/uploads/sites/24/2017/08/IMG_0110-new.jpg\" alt=\"Gio’s open kitchen with original Giovanni's neon signage.\" width=\"1920\" height=\"1280\" class=\"size-full wp-image-120141\" srcset=\"https://ww2.kqed.org/app/uploads/sites/24/2017/08/IMG_0110-new.jpg 1920w, https://ww2.kqed.org/app/uploads/sites/24/2017/08/IMG_0110-new-160x107.jpg 160w, https://ww2.kqed.org/app/uploads/sites/24/2017/08/IMG_0110-new-800x533.jpg 800w, https://ww2.kqed.org/app/uploads/sites/24/2017/08/IMG_0110-new-768x512.jpg 768w, https://ww2.kqed.org/app/uploads/sites/24/2017/08/IMG_0110-new-1020x680.jpg 1020w, https://ww2.kqed.org/app/uploads/sites/24/2017/08/IMG_0110-new-1180x787.jpg 1180w, https://ww2.kqed.org/app/uploads/sites/24/2017/08/IMG_0110-new-960x640.jpg 960w, https://ww2.kqed.org/app/uploads/sites/24/2017/08/IMG_0110-new-240x160.jpg 240w, https://ww2.kqed.org/app/uploads/sites/24/2017/08/IMG_0110-new-375x250.jpg 375w, https://ww2.kqed.org/app/uploads/sites/24/2017/08/IMG_0110-new-520x347.jpg 520w\" sizes=\"(max-width: 1920px) 100vw, 1920px\">\u003cfigcaption class=\"wp-caption-text\">Gio’s open kitchen with original Giovanni's neon signage. \u003ccite>(Wendy Goodfriend)\u003c/cite>\u003c/figcaption>\u003c/figure>\n\u003cp>The brilliance of the new space, opened by locals Xin and Michele Jin and developer Nathan George, and what the eye is continually drawn to, is the indoor bocce court, where you can let your kids roam and play while you peruse the beverage list. Above the astro-turf-lined court are several big TVs playing black-and-white Italian gangster movies. The whole deal almost fell apart during the pair’s negotiations to buy the place from longtime owners, the Schipani family, when a fire broke out and did enough damage to make the renovation a considerably more extensive proposition. But it worked out nearly two years later, as the restaurant opened its doors to guests last week.\u003c/p>\n\u003cfigure id=\"attachment_120136\" class=\"wp-caption aligncenter\" style=\"max-width: 1920px\">\u003cimg src=\"https://ww2.kqed.org/bayareabites/wp-content/uploads/sites/24/2017/08/IMG_0033-new.jpg\" alt=\"Kid-friendly indoor bocce court.\" width=\"1920\" height=\"1280\" class=\"size-full wp-image-120136\" srcset=\"https://ww2.kqed.org/app/uploads/sites/24/2017/08/IMG_0033-new.jpg 1920w, https://ww2.kqed.org/app/uploads/sites/24/2017/08/IMG_0033-new-160x107.jpg 160w, https://ww2.kqed.org/app/uploads/sites/24/2017/08/IMG_0033-new-800x533.jpg 800w, https://ww2.kqed.org/app/uploads/sites/24/2017/08/IMG_0033-new-768x512.jpg 768w, https://ww2.kqed.org/app/uploads/sites/24/2017/08/IMG_0033-new-1020x680.jpg 1020w, https://ww2.kqed.org/app/uploads/sites/24/2017/08/IMG_0033-new-1180x787.jpg 1180w, https://ww2.kqed.org/app/uploads/sites/24/2017/08/IMG_0033-new-960x640.jpg 960w, https://ww2.kqed.org/app/uploads/sites/24/2017/08/IMG_0033-new-240x160.jpg 240w, https://ww2.kqed.org/app/uploads/sites/24/2017/08/IMG_0033-new-375x250.jpg 375w, https://ww2.kqed.org/app/uploads/sites/24/2017/08/IMG_0033-new-520x347.jpg 520w\" sizes=\"(max-width: 1920px) 100vw, 1920px\">\u003cfigcaption class=\"wp-caption-text\">Kid-friendly indoor bocce court. \u003ccite>(Wendy Goodfriend)\u003c/cite>\u003c/figcaption>\u003c/figure>\n\u003cp>The drinks menu leads with six classic apertifs, from the sweet Cocchi Americano vermouth to the bitterish digestif Carpano Punt e Mes, also available in flights of three (stick with sweet or bitter or mix it up). We enjoyed a refreshing spritz of watermelon and mint with another digestif, Carpano Bianco, and a splash of Mezcal. The classic Venetian aperol spritz (with soda water and prosecco) is also available.\u003c/p>\n\u003cfigure id=\"attachment_120146\" class=\"wp-caption aligncenter\" style=\"max-width: 600px\">\u003cimg src=\"https://ww2.kqed.org/bayareabites/wp-content/uploads/sites/24/2017/08/IMG_0185-new-800x1200.jpg\" alt=\"Spritz of watermelon and mint with Carpano Bianco, and a splash of Mezcal.\" width=\"600\" class=\"size-medium wp-image-120146\" srcset=\"https://ww2.kqed.org/app/uploads/sites/24/2017/08/IMG_0185-new-800x1200.jpg 800w, https://ww2.kqed.org/app/uploads/sites/24/2017/08/IMG_0185-new-160x240.jpg 160w, https://ww2.kqed.org/app/uploads/sites/24/2017/08/IMG_0185-new-768x1152.jpg 768w, https://ww2.kqed.org/app/uploads/sites/24/2017/08/IMG_0185-new-960x1440.jpg 960w, https://ww2.kqed.org/app/uploads/sites/24/2017/08/IMG_0185-new-240x360.jpg 240w, https://ww2.kqed.org/app/uploads/sites/24/2017/08/IMG_0185-new-375x563.jpg 375w, https://ww2.kqed.org/app/uploads/sites/24/2017/08/IMG_0185-new-520x780.jpg 520w, https://ww2.kqed.org/app/uploads/sites/24/2017/08/IMG_0185-new.jpg 1000w\" sizes=\"(max-width: 800px) 100vw, 800px\">\u003cfigcaption class=\"wp-caption-text\">Spritz of watermelon and mint with Carpano Bianco, and a splash of Mezcal. \u003ccite>(Wendy Goodfriend)\u003c/cite>\u003c/figcaption>\u003c/figure>\n\u003cp>We ordered two appetizers, two salads, two pastas, two little pizzas and one main dish to share among six, and there was ample food to go around. Fried calamari was light and crispy, served with lemon aioli and sprinkled with fried parsley. We also tried the spicy meatballs, a little bowl of tender beef and pork meatballs with bread and grana Padano, swimming in a deliciously sweet, chile-inflected tomato sauce. When the meatballs were gone, we saved the sauce for dipping the pizza crusts that were to come later. \u003c/p>\n\u003cfigure id=\"attachment_120138\" class=\"wp-caption aligncenter\" style=\"max-width: 1920px\">\u003cimg src=\"https://ww2.kqed.org/bayareabites/wp-content/uploads/sites/24/2017/08/IMG_0077-new.jpg\" alt=\"Fried Calamari\" width=\"1920\" height=\"1280\" class=\"size-full wp-image-120138\" srcset=\"https://ww2.kqed.org/app/uploads/sites/24/2017/08/IMG_0077-new.jpg 1920w, https://ww2.kqed.org/app/uploads/sites/24/2017/08/IMG_0077-new-160x107.jpg 160w, https://ww2.kqed.org/app/uploads/sites/24/2017/08/IMG_0077-new-800x533.jpg 800w, https://ww2.kqed.org/app/uploads/sites/24/2017/08/IMG_0077-new-768x512.jpg 768w, https://ww2.kqed.org/app/uploads/sites/24/2017/08/IMG_0077-new-1020x680.jpg 1020w, https://ww2.kqed.org/app/uploads/sites/24/2017/08/IMG_0077-new-1180x787.jpg 1180w, https://ww2.kqed.org/app/uploads/sites/24/2017/08/IMG_0077-new-960x640.jpg 960w, https://ww2.kqed.org/app/uploads/sites/24/2017/08/IMG_0077-new-240x160.jpg 240w, https://ww2.kqed.org/app/uploads/sites/24/2017/08/IMG_0077-new-375x250.jpg 375w, https://ww2.kqed.org/app/uploads/sites/24/2017/08/IMG_0077-new-520x347.jpg 520w\" sizes=\"(max-width: 1920px) 100vw, 1920px\">\u003cfigcaption class=\"wp-caption-text\">Fried Calamari \u003ccite>(Wendy Goodfriend)\u003c/cite>\u003c/figcaption>\u003c/figure>\n\u003cfigure id=\"attachment_120137\" class=\"wp-caption aligncenter\" style=\"max-width: 1920px\">\u003cimg src=\"https://ww2.kqed.org/bayareabites/wp-content/uploads/sites/24/2017/08/IMG_0070-new.jpg\" alt=\"Spicy Meatballs\" width=\"1920\" height=\"1280\" class=\"size-full wp-image-120137\" srcset=\"https://ww2.kqed.org/app/uploads/sites/24/2017/08/IMG_0070-new.jpg 1920w, https://ww2.kqed.org/app/uploads/sites/24/2017/08/IMG_0070-new-160x107.jpg 160w, https://ww2.kqed.org/app/uploads/sites/24/2017/08/IMG_0070-new-800x533.jpg 800w, https://ww2.kqed.org/app/uploads/sites/24/2017/08/IMG_0070-new-768x512.jpg 768w, https://ww2.kqed.org/app/uploads/sites/24/2017/08/IMG_0070-new-1020x680.jpg 1020w, https://ww2.kqed.org/app/uploads/sites/24/2017/08/IMG_0070-new-1180x787.jpg 1180w, https://ww2.kqed.org/app/uploads/sites/24/2017/08/IMG_0070-new-960x640.jpg 960w, https://ww2.kqed.org/app/uploads/sites/24/2017/08/IMG_0070-new-240x160.jpg 240w, https://ww2.kqed.org/app/uploads/sites/24/2017/08/IMG_0070-new-375x250.jpg 375w, https://ww2.kqed.org/app/uploads/sites/24/2017/08/IMG_0070-new-520x347.jpg 520w\" sizes=\"(max-width: 1920px) 100vw, 1920px\">\u003cfigcaption class=\"wp-caption-text\">Spicy Meatballs \u003ccite>(Wendy Goodfriend)\u003c/cite>\u003c/figcaption>\u003c/figure>\n\u003cp>Salads and pastas were the highlight of the meal. A generous caprese salad with perfectly ripe heirloom tomatoes and room-temperature burrata (much preferable to straight out of the fridge) was dressed with olive oil and a splash of sweet balsamic vinegar reduction. And the equally attractive yellow beet salad was composed of thin coins of beets on the bottom and a mound of baby arugula on top, tossed in a pleasingly tart lemon vinaigrette. \u003c/p>\n\u003cfigure id=\"attachment_120176\" class=\"wp-caption aligncenter\" style=\"max-width: 1920px\">\u003cimg src=\"https://ww2.kqed.org/bayareabites/wp-content/uploads/sites/24/2017/08/IMG_0131-new-1.jpg\" alt=\"Caprese salad\" width=\"1920\" height=\"1280\" class=\"size-full wp-image-120176\" srcset=\"https://ww2.kqed.org/app/uploads/sites/24/2017/08/IMG_0131-new-1.jpg 1920w, https://ww2.kqed.org/app/uploads/sites/24/2017/08/IMG_0131-new-1-160x107.jpg 160w, https://ww2.kqed.org/app/uploads/sites/24/2017/08/IMG_0131-new-1-800x533.jpg 800w, https://ww2.kqed.org/app/uploads/sites/24/2017/08/IMG_0131-new-1-768x512.jpg 768w, https://ww2.kqed.org/app/uploads/sites/24/2017/08/IMG_0131-new-1-1020x680.jpg 1020w, https://ww2.kqed.org/app/uploads/sites/24/2017/08/IMG_0131-new-1-1180x787.jpg 1180w, https://ww2.kqed.org/app/uploads/sites/24/2017/08/IMG_0131-new-1-960x640.jpg 960w, https://ww2.kqed.org/app/uploads/sites/24/2017/08/IMG_0131-new-1-240x160.jpg 240w, https://ww2.kqed.org/app/uploads/sites/24/2017/08/IMG_0131-new-1-375x250.jpg 375w, https://ww2.kqed.org/app/uploads/sites/24/2017/08/IMG_0131-new-1-520x347.jpg 520w\" sizes=\"(max-width: 1920px) 100vw, 1920px\">\u003cfigcaption class=\"wp-caption-text\">Caprese salad \u003ccite>(Wendy Goodfriend)\u003c/cite>\u003c/figcaption>\u003c/figure>\n\u003cfigure id=\"attachment_120177\" class=\"wp-caption aligncenter\" style=\"max-width: 1920px\">\u003cimg src=\"https://ww2.kqed.org/bayareabites/wp-content/uploads/sites/24/2017/08/IMG_0145-new-1.jpg\" alt=\"Beet Salad\" width=\"1920\" height=\"1280\" class=\"size-full wp-image-120177\" srcset=\"https://ww2.kqed.org/app/uploads/sites/24/2017/08/IMG_0145-new-1.jpg 1920w, https://ww2.kqed.org/app/uploads/sites/24/2017/08/IMG_0145-new-1-160x107.jpg 160w, https://ww2.kqed.org/app/uploads/sites/24/2017/08/IMG_0145-new-1-800x533.jpg 800w, https://ww2.kqed.org/app/uploads/sites/24/2017/08/IMG_0145-new-1-768x512.jpg 768w, https://ww2.kqed.org/app/uploads/sites/24/2017/08/IMG_0145-new-1-1020x680.jpg 1020w, https://ww2.kqed.org/app/uploads/sites/24/2017/08/IMG_0145-new-1-1180x787.jpg 1180w, https://ww2.kqed.org/app/uploads/sites/24/2017/08/IMG_0145-new-1-960x640.jpg 960w, https://ww2.kqed.org/app/uploads/sites/24/2017/08/IMG_0145-new-1-240x160.jpg 240w, https://ww2.kqed.org/app/uploads/sites/24/2017/08/IMG_0145-new-1-375x250.jpg 375w, https://ww2.kqed.org/app/uploads/sites/24/2017/08/IMG_0145-new-1-520x347.jpg 520w\" sizes=\"(max-width: 1920px) 100vw, 1920px\">\u003cfigcaption class=\"wp-caption-text\">Beet Salad \u003ccite>(Wendy Goodfriend)\u003c/cite>\u003c/figcaption>\u003c/figure>\n\u003cp>Our two pasta selections were winners, according to kids and adults alike. A study in both contrast and simplicity, the linguine marinara was tossed with the same sauce as the meatballs, without the chiles, while the fettucine Alfredo (now an American classic more than an Italian one) was subtly complex, creamy, egg-laden, and with hints of spices (perhaps nutmeg?). Both were served \u003cem>al dente\u003c/em>. \u003c/p>\n\u003cfigure id=\"attachment_120144\" class=\"wp-caption aligncenter\" style=\"max-width: 1920px\">\u003cimg src=\"https://ww2.kqed.org/bayareabites/wp-content/uploads/sites/24/2017/08/IMG_0161-new.jpg\" alt=\"Linguine & Marinara (served with spaghetti pasta)\" width=\"1920\" height=\"1280\" class=\"size-full wp-image-120144\" srcset=\"https://ww2.kqed.org/app/uploads/sites/24/2017/08/IMG_0161-new.jpg 1920w, https://ww2.kqed.org/app/uploads/sites/24/2017/08/IMG_0161-new-160x107.jpg 160w, https://ww2.kqed.org/app/uploads/sites/24/2017/08/IMG_0161-new-800x533.jpg 800w, https://ww2.kqed.org/app/uploads/sites/24/2017/08/IMG_0161-new-768x512.jpg 768w, https://ww2.kqed.org/app/uploads/sites/24/2017/08/IMG_0161-new-1020x680.jpg 1020w, https://ww2.kqed.org/app/uploads/sites/24/2017/08/IMG_0161-new-1180x787.jpg 1180w, https://ww2.kqed.org/app/uploads/sites/24/2017/08/IMG_0161-new-960x640.jpg 960w, https://ww2.kqed.org/app/uploads/sites/24/2017/08/IMG_0161-new-240x160.jpg 240w, https://ww2.kqed.org/app/uploads/sites/24/2017/08/IMG_0161-new-375x250.jpg 375w, https://ww2.kqed.org/app/uploads/sites/24/2017/08/IMG_0161-new-520x347.jpg 520w\" sizes=\"(max-width: 1920px) 100vw, 1920px\">\u003cfigcaption class=\"wp-caption-text\">Linguine & Marinara (served with spaghetti pasta on our visit) \u003ccite>(Wendy Goodfriend)\u003c/cite>\u003c/figcaption>\u003c/figure>\n\u003cfigure id=\"attachment_120145\" class=\"wp-caption aligncenter\" style=\"max-width: 1920px\">\u003cimg src=\"https://ww2.kqed.org/bayareabites/wp-content/uploads/sites/24/2017/08/IMG_0176-new.jpg\" alt=\"Fettucine Alfredo\" width=\"1920\" height=\"1280\" class=\"size-full wp-image-120145\" srcset=\"https://ww2.kqed.org/app/uploads/sites/24/2017/08/IMG_0176-new.jpg 1920w, https://ww2.kqed.org/app/uploads/sites/24/2017/08/IMG_0176-new-160x107.jpg 160w, https://ww2.kqed.org/app/uploads/sites/24/2017/08/IMG_0176-new-800x533.jpg 800w, https://ww2.kqed.org/app/uploads/sites/24/2017/08/IMG_0176-new-768x512.jpg 768w, https://ww2.kqed.org/app/uploads/sites/24/2017/08/IMG_0176-new-1020x680.jpg 1020w, https://ww2.kqed.org/app/uploads/sites/24/2017/08/IMG_0176-new-1180x787.jpg 1180w, https://ww2.kqed.org/app/uploads/sites/24/2017/08/IMG_0176-new-960x640.jpg 960w, https://ww2.kqed.org/app/uploads/sites/24/2017/08/IMG_0176-new-240x160.jpg 240w, https://ww2.kqed.org/app/uploads/sites/24/2017/08/IMG_0176-new-375x250.jpg 375w, https://ww2.kqed.org/app/uploads/sites/24/2017/08/IMG_0176-new-520x347.jpg 520w\" sizes=\"(max-width: 1920px) 100vw, 1920px\">\u003cfigcaption class=\"wp-caption-text\">Fettucine Alfredo \u003ccite>(Wendy Goodfriend)\u003c/cite>\u003c/figcaption>\u003c/figure>\n\u003cp>The pizza genre is a bit of a mystery. Billed as “single Sicilian-style,” these little flatbreads are just the right size for kids and have quality ingredients. But they’re rather doughy, not crisp, something to be aware of if you prefer thin and crispy pizza. Both the Margherita with pepperoni added and the fungi & sausage are quite cheesy, the former with red sauce and the latter with a cream-based sauce with a sprinkle of thyme.\u003c/p>\n\u003cfigure id=\"attachment_120139\" class=\"wp-caption aligncenter\" style=\"max-width: 1920px\">\u003cimg src=\"https://ww2.kqed.org/bayareabites/wp-content/uploads/sites/24/2017/08/IMG_0084-new.jpg\" alt=\"Margherita pizza with pepperoni added\" width=\"1920\" height=\"1280\" class=\"size-full wp-image-120139\" srcset=\"https://ww2.kqed.org/app/uploads/sites/24/2017/08/IMG_0084-new.jpg 1920w, https://ww2.kqed.org/app/uploads/sites/24/2017/08/IMG_0084-new-160x107.jpg 160w, https://ww2.kqed.org/app/uploads/sites/24/2017/08/IMG_0084-new-800x533.jpg 800w, https://ww2.kqed.org/app/uploads/sites/24/2017/08/IMG_0084-new-768x512.jpg 768w, https://ww2.kqed.org/app/uploads/sites/24/2017/08/IMG_0084-new-1020x680.jpg 1020w, https://ww2.kqed.org/app/uploads/sites/24/2017/08/IMG_0084-new-1180x787.jpg 1180w, https://ww2.kqed.org/app/uploads/sites/24/2017/08/IMG_0084-new-960x640.jpg 960w, https://ww2.kqed.org/app/uploads/sites/24/2017/08/IMG_0084-new-240x160.jpg 240w, https://ww2.kqed.org/app/uploads/sites/24/2017/08/IMG_0084-new-375x250.jpg 375w, https://ww2.kqed.org/app/uploads/sites/24/2017/08/IMG_0084-new-520x347.jpg 520w\" sizes=\"(max-width: 1920px) 100vw, 1920px\">\u003cfigcaption class=\"wp-caption-text\">Margherita pizza with pepperoni added. \u003ccite>(Wendy Goodfriend)\u003c/cite>\u003c/figcaption>\u003c/figure>\n\u003cfigure id=\"attachment_120140\" class=\"wp-caption aligncenter\" style=\"max-width: 1920px\">\u003cimg src=\"https://ww2.kqed.org/bayareabites/wp-content/uploads/sites/24/2017/08/IMG_0100-new.jpg\" alt=\"Fungi & sausage pizza ordered without sausage.\" width=\"1920\" height=\"1280\" class=\"size-full wp-image-120140\" srcset=\"https://ww2.kqed.org/app/uploads/sites/24/2017/08/IMG_0100-new.jpg 1920w, https://ww2.kqed.org/app/uploads/sites/24/2017/08/IMG_0100-new-160x107.jpg 160w, https://ww2.kqed.org/app/uploads/sites/24/2017/08/IMG_0100-new-800x533.jpg 800w, https://ww2.kqed.org/app/uploads/sites/24/2017/08/IMG_0100-new-768x512.jpg 768w, https://ww2.kqed.org/app/uploads/sites/24/2017/08/IMG_0100-new-1020x680.jpg 1020w, https://ww2.kqed.org/app/uploads/sites/24/2017/08/IMG_0100-new-1180x787.jpg 1180w, https://ww2.kqed.org/app/uploads/sites/24/2017/08/IMG_0100-new-960x640.jpg 960w, https://ww2.kqed.org/app/uploads/sites/24/2017/08/IMG_0100-new-240x160.jpg 240w, https://ww2.kqed.org/app/uploads/sites/24/2017/08/IMG_0100-new-375x250.jpg 375w, https://ww2.kqed.org/app/uploads/sites/24/2017/08/IMG_0100-new-520x347.jpg 520w\" sizes=\"(max-width: 1920px) 100vw, 1920px\">\u003cfigcaption class=\"wp-caption-text\">Fungi & sausage pizza ordered without sausage. \u003ccite>(Wendy Goodfriend)\u003c/cite>\u003c/figcaption>\u003c/figure>\n\u003cp>There was one entrée special, and the carnivores among us shared it: medium-rare hanger steak with fingerling potatoes and a baby arugula salad, paired with the house red wine (a Sierra Foothills red blend) for $5.\u003c/p>\n\u003cfigure id=\"attachment_120147\" class=\"wp-caption aligncenter\" style=\"max-width: 1920px\">\u003cimg src=\"https://ww2.kqed.org/bayareabites/wp-content/uploads/sites/24/2017/08/IMG_0193-new.jpg\" alt=\"Medium-rare hanger steak with fingerling potatoes and a baby arugula salad.\" width=\"1920\" height=\"1280\" class=\"size-full wp-image-120147\" srcset=\"https://ww2.kqed.org/app/uploads/sites/24/2017/08/IMG_0193-new.jpg 1920w, https://ww2.kqed.org/app/uploads/sites/24/2017/08/IMG_0193-new-160x107.jpg 160w, https://ww2.kqed.org/app/uploads/sites/24/2017/08/IMG_0193-new-800x533.jpg 800w, https://ww2.kqed.org/app/uploads/sites/24/2017/08/IMG_0193-new-768x512.jpg 768w, https://ww2.kqed.org/app/uploads/sites/24/2017/08/IMG_0193-new-1020x680.jpg 1020w, https://ww2.kqed.org/app/uploads/sites/24/2017/08/IMG_0193-new-1180x787.jpg 1180w, https://ww2.kqed.org/app/uploads/sites/24/2017/08/IMG_0193-new-960x640.jpg 960w, https://ww2.kqed.org/app/uploads/sites/24/2017/08/IMG_0193-new-240x160.jpg 240w, https://ww2.kqed.org/app/uploads/sites/24/2017/08/IMG_0193-new-375x250.jpg 375w, https://ww2.kqed.org/app/uploads/sites/24/2017/08/IMG_0193-new-520x347.jpg 520w\" sizes=\"(max-width: 1920px) 100vw, 1920px\">\u003cfigcaption class=\"wp-caption-text\">Medium-rare hanger steak with fingerling potatoes and a baby arugula salad. \u003ccite>(Wendy Goodfriend)\u003c/cite>\u003c/figcaption>\u003c/figure>\n\u003cp>The one dessert on the menu offered something for everyone. Large enough for all six of us to snag a few bites, the polenta cake was topped with ricotta cream, summer fruit, and a surprising and wonderful garnish of kettle corn.\u003c/p>\n\u003cfigure id=\"attachment_120150\" class=\"wp-caption aligncenter\" style=\"max-width: 1920px\">\u003cimg src=\"https://ww2.kqed.org/bayareabites/wp-content/uploads/sites/24/2017/08/IMG_0216-new.jpg\" alt=\"Polenta cake topped with ricotta cream, summer fruit, and a surprising and wonderful garnish of kettle corn.\" width=\"1920\" height=\"1280\" class=\"size-full wp-image-120150\" srcset=\"https://ww2.kqed.org/app/uploads/sites/24/2017/08/IMG_0216-new.jpg 1920w, https://ww2.kqed.org/app/uploads/sites/24/2017/08/IMG_0216-new-160x107.jpg 160w, https://ww2.kqed.org/app/uploads/sites/24/2017/08/IMG_0216-new-800x533.jpg 800w, https://ww2.kqed.org/app/uploads/sites/24/2017/08/IMG_0216-new-768x512.jpg 768w, https://ww2.kqed.org/app/uploads/sites/24/2017/08/IMG_0216-new-1020x680.jpg 1020w, https://ww2.kqed.org/app/uploads/sites/24/2017/08/IMG_0216-new-1180x787.jpg 1180w, https://ww2.kqed.org/app/uploads/sites/24/2017/08/IMG_0216-new-960x640.jpg 960w, https://ww2.kqed.org/app/uploads/sites/24/2017/08/IMG_0216-new-240x160.jpg 240w, https://ww2.kqed.org/app/uploads/sites/24/2017/08/IMG_0216-new-375x250.jpg 375w, https://ww2.kqed.org/app/uploads/sites/24/2017/08/IMG_0216-new-520x347.jpg 520w\" sizes=\"(max-width: 1920px) 100vw, 1920px\">\u003cfigcaption class=\"wp-caption-text\">Polenta cake topped with ricotta cream, summer fruit, and a surprising and wonderful garnish of kettle corn. \u003ccite>(Wendy Goodfriend)\u003c/cite>\u003c/figcaption>\u003c/figure>\n\u003cp>\u003cstrong>Pro tip:\u003c/strong> If you peak behind the mystery door made of olive oil cans (which doubles as an art piece on view for guests in the main dining room), you’ll find a little museum of the old Giovanni’s space, a dimly lit private dining area with movies, a loungey feel, and full menu service.\u003c/p>\n\u003cfigure id=\"attachment_120134\" class=\"wp-caption aligncenter\" style=\"max-width: 600px\">\u003cimg src=\"https://ww2.kqed.org/bayareabites/wp-content/uploads/sites/24/2017/08/IMG_0007-new.jpg\" alt=\"Olive oil cans doorway to private dining room\" width=\"600\" class=\"size-full wp-image-120134\" srcset=\"https://ww2.kqed.org/app/uploads/sites/24/2017/08/IMG_0007-new.jpg 1000w, https://ww2.kqed.org/app/uploads/sites/24/2017/08/IMG_0007-new-160x240.jpg 160w, https://ww2.kqed.org/app/uploads/sites/24/2017/08/IMG_0007-new-800x1200.jpg 800w, https://ww2.kqed.org/app/uploads/sites/24/2017/08/IMG_0007-new-768x1152.jpg 768w, https://ww2.kqed.org/app/uploads/sites/24/2017/08/IMG_0007-new-960x1440.jpg 960w, https://ww2.kqed.org/app/uploads/sites/24/2017/08/IMG_0007-new-240x360.jpg 240w, https://ww2.kqed.org/app/uploads/sites/24/2017/08/IMG_0007-new-375x563.jpg 375w, https://ww2.kqed.org/app/uploads/sites/24/2017/08/IMG_0007-new-520x780.jpg 520w\" sizes=\"(max-width: 1000px) 100vw, 1000px\">\u003cfigcaption class=\"wp-caption-text\">Olive oil cans doorway to private dining room \u003ccite>(Wendy Goodfriend)\u003c/cite>\u003c/figcaption>\u003c/figure>\n\u003cp>\u003c/p>\u003c/div>","attributes":{"named":{},"numeric":[]}},{"type":"component","content":"","name":"gallery","attributes":{"named":{"columns":"2","link":"none","size":"full","ids":"120135,120152","label":""},"numeric":[]}},{"type":"contentString","content":"\u003cdiv class=\"post-body\">\u003cp>\u003c/p>\n\u003cp>Gio’s is a fun downtown-Berkeley destination, nicely situated near movie theaters and BAMPFA, and with bocce to boot!\u003c/p>\n\u003cfigure id=\"attachment_120153\" class=\"wp-caption aligncenter\" style=\"max-width: 1920px\">\u003cimg src=\"https://ww2.kqed.org/bayareabites/wp-content/uploads/sites/24/2017/08/IMG_0264-new.jpg\" alt=\"Gio's Pizza & Bocce exterior at night.\" width=\"1920\" height=\"1280\" class=\"size-full wp-image-120153\" srcset=\"https://ww2.kqed.org/app/uploads/sites/24/2017/08/IMG_0264-new.jpg 1920w, https://ww2.kqed.org/app/uploads/sites/24/2017/08/IMG_0264-new-160x107.jpg 160w, https://ww2.kqed.org/app/uploads/sites/24/2017/08/IMG_0264-new-800x533.jpg 800w, https://ww2.kqed.org/app/uploads/sites/24/2017/08/IMG_0264-new-768x512.jpg 768w, https://ww2.kqed.org/app/uploads/sites/24/2017/08/IMG_0264-new-1020x680.jpg 1020w, https://ww2.kqed.org/app/uploads/sites/24/2017/08/IMG_0264-new-1180x787.jpg 1180w, https://ww2.kqed.org/app/uploads/sites/24/2017/08/IMG_0264-new-960x640.jpg 960w, https://ww2.kqed.org/app/uploads/sites/24/2017/08/IMG_0264-new-240x160.jpg 240w, https://ww2.kqed.org/app/uploads/sites/24/2017/08/IMG_0264-new-375x250.jpg 375w, https://ww2.kqed.org/app/uploads/sites/24/2017/08/IMG_0264-new-520x347.jpg 520w\" sizes=\"(max-width: 1920px) 100vw, 1920px\">\u003cfigcaption class=\"wp-caption-text\">Gio's Pizza & Bocce exterior at night. \u003ccite>(Wendy Goodfriend)\u003c/cite>\u003c/figcaption>\u003c/figure>\n\u003cp>\u003ca href=\"http://giosberkeley.com/\">\u003cstrong>Gio’s Pizza & Bocce\u003c/strong>\u003c/a>\u003cbr>\n2420 Shattuck Ave.\u003cbr>\nBerkeley, CA 94704 [ \u003ca href=\"https://goo.gl/p9CUXn\">Map\u003c/a> ]\u003cbr>\nPh: (510) 647-9963\u003cbr>\nHours: Wed-Sun, 5-10pm; closed Mon-Tue\u003cbr>\nPrice Range: $$-$$$ ($12-$25)\u003cbr>\nFacebook: \u003ca href=\"https://www.facebook.com/giosberkeley/\">@giosberkeley\u003c/a>\u003cbr>\nInstagram: \u003ca href=\"https://www.instagram.com/giosberkeley/\">@giosberkeley\u003c/a> \u003c/p>\n\u003cp>\u003c/p>\u003c/div>","attributes":{"named":{},"numeric":[]}},{"type":"component","content":"","name":"ad","attributes":{"named":{"label":"fullwidth"},"numeric":["fullwidth"]}},{"type":"contentString","content":"\u003cdiv class=\"post-body\">\u003cp>\u003c/p>\u003cp>\u003c/p>\n\u003c/div>\u003c/p>","attributes":{"named":{},"numeric":[]}}],"link":"/bayareabites/120126/gios-pizza-bocce-opens-in-downtown-berkeley-after-complete-remodel-of-former-giovanni-space","authors":["5575","5014"],"categories":["bayareabites_109","bayareabites_264","bayareabites_8770","bayareabites_11028","bayareabites_10028","bayareabites_1875","bayareabites_1807","bayareabites_10"],"tags":["bayareabites_15952","bayareabites_766","bayareabites_755","bayareabites_443"],"featImg":"bayareabites_120159","label":"source_bayareabites_120126"},"bayareabites_119881":{"type":"posts","id":"bayareabites_119881","meta":{"index":"posts_1591205157","site":"bayareabites","id":"119881","score":null,"sort":[1502904261000]},"guestAuthors":[],"slug":"belotti-ristorante-the-east-bays-best-homemade-pasta-is-in-oaklands-rockridge-neighborhood","title":"Belotti Ristorante: The East Bay’s Best Homemade Pasta is in Oakland’s Rockridge Neighborhood","publishDate":1502904261,"format":"standard","headTitle":"Bay Area Bites | KQED Food","labelTerm":{"site":"bayareabites"},"content":"\u003cp>Michele Belotti, the young chef/owner who runs the show at his namesake restaurant, is one of the most unpretentious folks in the business of cooking—and one of the most talented. Not even two-years-old, \u003ca href=\"http://belottirb.com/\">Belotti Ristorante\u003c/a> (soon to be Belotti Ristorante & Bottega, as plans to open a shop on Piedmont Avenue continue to unfold) has become a Bay Area destination for traditional northern Italian dining. Pastas from Lombardy and the Piedmont region form the heart of the menu, and there are a handful of home-style \u003cem>secondi\u003c/em>, or main courses, as well.\u003c/p>\n\u003cfigure id=\"attachment_119911\" class=\"wp-caption aligncenter\" style=\"max-width: 1920px\">\u003cimg class=\"size-full wp-image-119911\" src=\"https://ww2.kqed.org/bayareabites/wp-content/uploads/sites/24/2017/08/IMG_0394-new.jpg\" alt=\"Chef Michele Belotti in his restaurant’s kitchen.\" width=\"1920\" height=\"1440\" srcset=\"https://ww2.kqed.org/app/uploads/sites/24/2017/08/IMG_0394-new.jpg 1920w, https://ww2.kqed.org/app/uploads/sites/24/2017/08/IMG_0394-new-160x120.jpg 160w, https://ww2.kqed.org/app/uploads/sites/24/2017/08/IMG_0394-new-800x600.jpg 800w, https://ww2.kqed.org/app/uploads/sites/24/2017/08/IMG_0394-new-768x576.jpg 768w, https://ww2.kqed.org/app/uploads/sites/24/2017/08/IMG_0394-new-1020x765.jpg 1020w, https://ww2.kqed.org/app/uploads/sites/24/2017/08/IMG_0394-new-1180x885.jpg 1180w, https://ww2.kqed.org/app/uploads/sites/24/2017/08/IMG_0394-new-960x720.jpg 960w, https://ww2.kqed.org/app/uploads/sites/24/2017/08/IMG_0394-new-240x180.jpg 240w, https://ww2.kqed.org/app/uploads/sites/24/2017/08/IMG_0394-new-375x281.jpg 375w, https://ww2.kqed.org/app/uploads/sites/24/2017/08/IMG_0394-new-520x390.jpg 520w\" sizes=\"(max-width: 1920px) 100vw, 1920px\">\u003cfigcaption class=\"wp-caption-text\">Chef Michele Belotti in his restaurant’s kitchen. \u003ccite>(Kim Westerman)\u003c/cite>\u003c/figcaption>\u003c/figure>\n\u003cp>When I say “traditional,” I mean it in the most literal sense, and apply the term both to the food here and the style of dining. With the exception of several stellar locally sourced products, such as \u003ca href=\"http://www.sekahills.com/\">Séka Hills olive oil\u003c/a>, Belotti imports its favorite products from regional producers in Italy, many of which it plans to sell in its shop. And the recipes are not light, as we’re accustomed to in our temperate climate and health-conscious food scene; they’re a hearty, meaty, buttery, and divinely carbohydrate affair. The food is also not trendy in the least; you’ll find no avocado toast in sight. So, if you walk in on a hot Thursday afternoon for lunch, you shouldn’t expect to see a menu that reflects the weather. You’ll find traditional, lovingly prepared, and hearty food, and you’ll want to order a big red wine to go with it, no matter the temperature outside. And then you’ll want a nap.\u003c/p>\n\u003cfigure id=\"attachment_119901\" class=\"wp-caption aligncenter\" style=\"max-width: 1920px\">\u003cimg class=\"size-full wp-image-119901\" src=\"https://ww2.kqed.org/bayareabites/wp-content/uploads/sites/24/2017/08/IMG_0180-new.jpg\" alt=\"The cozy dining room at Belotti Ristorante & Bottega, in Oakland’s Rockridge neighborhood.\" width=\"1920\" height=\"1440\" srcset=\"https://ww2.kqed.org/app/uploads/sites/24/2017/08/IMG_0180-new.jpg 1920w, https://ww2.kqed.org/app/uploads/sites/24/2017/08/IMG_0180-new-160x120.jpg 160w, https://ww2.kqed.org/app/uploads/sites/24/2017/08/IMG_0180-new-800x600.jpg 800w, https://ww2.kqed.org/app/uploads/sites/24/2017/08/IMG_0180-new-768x576.jpg 768w, https://ww2.kqed.org/app/uploads/sites/24/2017/08/IMG_0180-new-1020x765.jpg 1020w, https://ww2.kqed.org/app/uploads/sites/24/2017/08/IMG_0180-new-1180x885.jpg 1180w, https://ww2.kqed.org/app/uploads/sites/24/2017/08/IMG_0180-new-960x720.jpg 960w, https://ww2.kqed.org/app/uploads/sites/24/2017/08/IMG_0180-new-240x180.jpg 240w, https://ww2.kqed.org/app/uploads/sites/24/2017/08/IMG_0180-new-375x281.jpg 375w, https://ww2.kqed.org/app/uploads/sites/24/2017/08/IMG_0180-new-520x390.jpg 520w\" sizes=\"(max-width: 1920px) 100vw, 1920px\">\u003cfigcaption class=\"wp-caption-text\">The cozy dining room at Belotti Ristorante & Bottega, in Oakland’s Rockridge neighborhood. \u003ccite>(Kim Westerman)\u003c/cite>\u003c/figcaption>\u003c/figure>\n\u003cfigure id=\"attachment_119907\" class=\"wp-caption aligncenter\" style=\"max-width: 1920px\">\u003cimg class=\"size-full wp-image-119907\" src=\"https://ww2.kqed.org/bayareabites/wp-content/uploads/sites/24/2017/08/IMG_0374-new.jpg\" alt=\"Bread service with Séka Hills olive oil.\" width=\"1920\" height=\"2560\" srcset=\"https://ww2.kqed.org/app/uploads/sites/24/2017/08/IMG_0374-new.jpg 1920w, https://ww2.kqed.org/app/uploads/sites/24/2017/08/IMG_0374-new-160x213.jpg 160w, https://ww2.kqed.org/app/uploads/sites/24/2017/08/IMG_0374-new-800x1067.jpg 800w, https://ww2.kqed.org/app/uploads/sites/24/2017/08/IMG_0374-new-768x1024.jpg 768w, https://ww2.kqed.org/app/uploads/sites/24/2017/08/IMG_0374-new-1020x1360.jpg 1020w, https://ww2.kqed.org/app/uploads/sites/24/2017/08/IMG_0374-new-1180x1573.jpg 1180w, https://ww2.kqed.org/app/uploads/sites/24/2017/08/IMG_0374-new-960x1280.jpg 960w, https://ww2.kqed.org/app/uploads/sites/24/2017/08/IMG_0374-new-240x320.jpg 240w, https://ww2.kqed.org/app/uploads/sites/24/2017/08/IMG_0374-new-375x500.jpg 375w, https://ww2.kqed.org/app/uploads/sites/24/2017/08/IMG_0374-new-520x693.jpg 520w\" sizes=\"(max-width: 1920px) 100vw, 1920px\">\u003cfigcaption class=\"wp-caption-text\">Bread service with Séka Hills olive oil. \u003ccite>(Kim Westerman)\u003c/cite>\u003c/figcaption>\u003c/figure>\n\u003cp>The only thing about the restaurant that isn’t traditional, in the Italian sense, is its open hours. As per American custom, Belotti doesn’t close between lunch and dinner, and that’s a good thing because it’s hard to get a reservation unless you want to dine at 3:30pm. But the food is so good, I’ll take that time-slot any day of the week.\u003c/p>\n\u003cp>You could do worse than to order multiple pasta courses, and share, but the menu is designed around the idea of three courses—\u003cem>antipasti\u003c/em>, \u003cem>primi\u003c/em> (mostly pastas, with one risotto dish), and \u003cem>secondi\u003c/em>—plus vegetable side dishes and dessert. Nonetheless, what shines here are the northern Italian pastas that Chef Belotti learned to make from his mother: labor-intensive shapes and cuts, all handmade (with the exception of a dried spaghetti meant to be served \u003cem>al dente\u003c/em>), and all served with equally complex sauces, often meat reductions cooked for days.\u003c/p>\n\u003cp>On our first visit, we ordered a salad, two pastas, and one meat dish to share, and portions were more than ample. The salad was among the simplest and most delightful I’ve had in ages: living butter lettuce with lemon dressing, grated Grana Padano cheese and roasted pine nuts, exuding the simplicity that the entire menu embraces. It was plated as if still a whole head of lettuce, so basically deconstructed and reconstructed in what seemed like an effortless gesture that I’m sure isn’t.\u003c/p>\n\u003cfigure id=\"attachment_119903\" class=\"wp-caption aligncenter\" style=\"max-width: 1920px\">\u003cimg class=\"size-full wp-image-119903\" src=\"https://ww2.kqed.org/bayareabites/wp-content/uploads/sites/24/2017/08/IMG_0188-new.jpg\" alt=\"Butter lettuce salad with lemon dressing, grated Grana Padano cheese and roasted pine nuts.\" width=\"1920\" height=\"2560\" srcset=\"https://ww2.kqed.org/app/uploads/sites/24/2017/08/IMG_0188-new.jpg 1920w, https://ww2.kqed.org/app/uploads/sites/24/2017/08/IMG_0188-new-160x213.jpg 160w, https://ww2.kqed.org/app/uploads/sites/24/2017/08/IMG_0188-new-800x1067.jpg 800w, https://ww2.kqed.org/app/uploads/sites/24/2017/08/IMG_0188-new-768x1024.jpg 768w, https://ww2.kqed.org/app/uploads/sites/24/2017/08/IMG_0188-new-1020x1360.jpg 1020w, https://ww2.kqed.org/app/uploads/sites/24/2017/08/IMG_0188-new-1180x1573.jpg 1180w, https://ww2.kqed.org/app/uploads/sites/24/2017/08/IMG_0188-new-960x1280.jpg 960w, https://ww2.kqed.org/app/uploads/sites/24/2017/08/IMG_0188-new-240x320.jpg 240w, https://ww2.kqed.org/app/uploads/sites/24/2017/08/IMG_0188-new-375x500.jpg 375w, https://ww2.kqed.org/app/uploads/sites/24/2017/08/IMG_0188-new-520x693.jpg 520w\" sizes=\"(max-width: 1920px) 100vw, 1920px\">\u003cfigcaption class=\"wp-caption-text\">Butter lettuce salad with lemon dressing, grated Grana Padano cheese and roasted pine nuts. \u003ccite>(Kim Westerman)\u003c/cite>\u003c/figcaption>\u003c/figure>\n\u003cp>Our two pastas were a study in contrasts. The tagliatelle with wild boar sugo, pecorino di Rosso Toscano and liberal turns of black pepper was rich and toothsome, the narrow-width, flat pasta noodles tossed in the tomato-based boar sauce. (I thought the dish was over-sauced, but my wife did not, so that remains a matter of personal preference.) The casoncelli, on the other hand, somewhat gyoza-shaped dumplings stuffed with beef, prosciutto, pork shoulder, grana, smoked pancetta and sage, was an instant hit and an example of the kitchen’s classic bent. This is a traditional dish of Lombardy, where chef Belotti grew up, and he counts the dish as among his favorite of his mother’s recipes. The beautiful hand-formed dumplings are coated in butter and pecorino and punctuated by little cubes of pancetta.\u003c/p>\n\u003cfigure id=\"attachment_119905\" class=\"wp-caption aligncenter\" style=\"max-width: 4032px\">\u003cimg class=\"size-full wp-image-119905\" src=\"https://ww2.kqed.org/bayareabites/wp-content/uploads/sites/24/2017/08/IMG_0198-new.jpg\" alt=\"Homemade tagliatelle with wild boar sugo and pecorino.\" width=\"4032\" height=\"3024\" srcset=\"https://ww2.kqed.org/app/uploads/sites/24/2017/08/IMG_0198-new.jpg 4032w, https://ww2.kqed.org/app/uploads/sites/24/2017/08/IMG_0198-new-160x120.jpg 160w, https://ww2.kqed.org/app/uploads/sites/24/2017/08/IMG_0198-new-800x600.jpg 800w, https://ww2.kqed.org/app/uploads/sites/24/2017/08/IMG_0198-new-768x576.jpg 768w, https://ww2.kqed.org/app/uploads/sites/24/2017/08/IMG_0198-new-1020x765.jpg 1020w, https://ww2.kqed.org/app/uploads/sites/24/2017/08/IMG_0198-new-1180x885.jpg 1180w, https://ww2.kqed.org/app/uploads/sites/24/2017/08/IMG_0198-new-960x720.jpg 960w, https://ww2.kqed.org/app/uploads/sites/24/2017/08/IMG_0198-new-240x180.jpg 240w, https://ww2.kqed.org/app/uploads/sites/24/2017/08/IMG_0198-new-375x281.jpg 375w, https://ww2.kqed.org/app/uploads/sites/24/2017/08/IMG_0198-new-520x390.jpg 520w\" sizes=\"(max-width: 4032px) 100vw, 4032px\">\u003cfigcaption class=\"wp-caption-text\">Homemade tagliatelle with wild boar sugo and pecorino. \u003ccite>(Kim Westerman)\u003c/cite>\u003c/figcaption>\u003c/figure>\n\u003cfigure id=\"attachment_119904\" class=\"wp-caption aligncenter\" style=\"max-width: 4032px\">\u003cimg class=\"size-full wp-image-119904\" src=\"https://ww2.kqed.org/bayareabites/wp-content/uploads/sites/24/2017/08/IMG_0192-new.jpg\" alt=\"Casconcelli: homemade dumplings stuffed with beef, prosciutto, pork shoulder, grana, smoked pancetta and sage.\" width=\"4032\" height=\"3024\" srcset=\"https://ww2.kqed.org/app/uploads/sites/24/2017/08/IMG_0192-new.jpg 4032w, https://ww2.kqed.org/app/uploads/sites/24/2017/08/IMG_0192-new-160x120.jpg 160w, https://ww2.kqed.org/app/uploads/sites/24/2017/08/IMG_0192-new-800x600.jpg 800w, https://ww2.kqed.org/app/uploads/sites/24/2017/08/IMG_0192-new-768x576.jpg 768w, https://ww2.kqed.org/app/uploads/sites/24/2017/08/IMG_0192-new-1020x765.jpg 1020w, https://ww2.kqed.org/app/uploads/sites/24/2017/08/IMG_0192-new-1180x885.jpg 1180w, https://ww2.kqed.org/app/uploads/sites/24/2017/08/IMG_0192-new-960x720.jpg 960w, https://ww2.kqed.org/app/uploads/sites/24/2017/08/IMG_0192-new-240x180.jpg 240w, https://ww2.kqed.org/app/uploads/sites/24/2017/08/IMG_0192-new-375x281.jpg 375w, https://ww2.kqed.org/app/uploads/sites/24/2017/08/IMG_0192-new-520x390.jpg 520w\" sizes=\"(max-width: 4032px) 100vw, 4032px\">\u003cfigcaption class=\"wp-caption-text\">Casconcelli: homemade dumplings stuffed with beef, prosciutto, pork shoulder, grana, smoked pancetta and sage. \u003ccite>(Kim Westerman)\u003c/cite>\u003c/figcaption>\u003c/figure>\n\u003cp>We chose the \u003cem>maialino\u003c/em> as our main course: suckling pig from Stone Valley Farm, slow-cooked for 13 hours and served with caramelized apricots, lollipop kale, and green onions, topped with a balsamic reduction. While it was a splendid dish, it didn’t go well with the bottle of gorgeous Gaja Langhe we’d splurged on; the dish had too much fruit-sweetness to play nicely with the elegantly structured Piedmont red wine. The pork dish was better suited to a crisp white.\u003c/p>\n\u003cfigure id=\"attachment_119906\" class=\"wp-caption aligncenter\" style=\"max-width: 4032px\">\u003cimg class=\"size-full wp-image-119906\" src=\"https://ww2.kqed.org/bayareabites/wp-content/uploads/sites/24/2017/08/IMG_0202-new.jpg\" alt=\"Maialino: slow-cooked suckling pig.\" width=\"4032\" height=\"3024\" srcset=\"https://ww2.kqed.org/app/uploads/sites/24/2017/08/IMG_0202-new.jpg 4032w, https://ww2.kqed.org/app/uploads/sites/24/2017/08/IMG_0202-new-160x120.jpg 160w, https://ww2.kqed.org/app/uploads/sites/24/2017/08/IMG_0202-new-800x600.jpg 800w, https://ww2.kqed.org/app/uploads/sites/24/2017/08/IMG_0202-new-768x576.jpg 768w, https://ww2.kqed.org/app/uploads/sites/24/2017/08/IMG_0202-new-1020x765.jpg 1020w, https://ww2.kqed.org/app/uploads/sites/24/2017/08/IMG_0202-new-1180x885.jpg 1180w, https://ww2.kqed.org/app/uploads/sites/24/2017/08/IMG_0202-new-960x720.jpg 960w, https://ww2.kqed.org/app/uploads/sites/24/2017/08/IMG_0202-new-240x180.jpg 240w, https://ww2.kqed.org/app/uploads/sites/24/2017/08/IMG_0202-new-375x281.jpg 375w, https://ww2.kqed.org/app/uploads/sites/24/2017/08/IMG_0202-new-520x390.jpg 520w\" sizes=\"(max-width: 4032px) 100vw, 4032px\">\u003cfigcaption class=\"wp-caption-text\">Maialino: slow-cooked suckling pig. \u003ccite>(Kim Westerman)\u003c/cite>\u003c/figcaption>\u003c/figure>\n\u003cfigure id=\"attachment_119902\" class=\"wp-caption aligncenter\" style=\"max-width: 1000px\">\u003cimg class=\"size-full wp-image-119902\" src=\"https://ww2.kqed.org/bayareabites/wp-content/uploads/sites/24/2017/08/IMG_0184-new.jpg\" alt=\"A Gaja Langhe from the well-selected list of Italian red wines.\" width=\"1000\" height=\"1333\" srcset=\"https://ww2.kqed.org/app/uploads/sites/24/2017/08/IMG_0184-new.jpg 1000w, https://ww2.kqed.org/app/uploads/sites/24/2017/08/IMG_0184-new-160x213.jpg 160w, https://ww2.kqed.org/app/uploads/sites/24/2017/08/IMG_0184-new-800x1066.jpg 800w, https://ww2.kqed.org/app/uploads/sites/24/2017/08/IMG_0184-new-768x1024.jpg 768w, https://ww2.kqed.org/app/uploads/sites/24/2017/08/IMG_0184-new-960x1280.jpg 960w, https://ww2.kqed.org/app/uploads/sites/24/2017/08/IMG_0184-new-240x320.jpg 240w, https://ww2.kqed.org/app/uploads/sites/24/2017/08/IMG_0184-new-375x500.jpg 375w, https://ww2.kqed.org/app/uploads/sites/24/2017/08/IMG_0184-new-520x693.jpg 520w\" sizes=\"(max-width: 1000px) 100vw, 1000px\">\u003cfigcaption class=\"wp-caption-text\">A Gaja Langhe from the well-selected list of Italian red wines. \u003ccite>(Kim Westerman)\u003c/cite>\u003c/figcaption>\u003c/figure>\n\u003cp>On a second visit, we tried two more homemade stuffed pastas, equally delightful. The only way to really choose between them is to base your decision on ingredients. The agnolotti di Lidia has a blend of meats: beef shank, flat-iron steak, pork loin and sausage, with escarole, spinach, and grana, served in a silky-smooth beef reduction sauce. The tortelli di polenta, on the other hand, is filled with fine-ground yellow polenta (an odd-sounding filling for egg pasta, but it works) topped with rabbit sugo garnished with thyme and grana. They are both rich and hearty, so if you’re sharing, you might consider getting two styles of pasta more different from each other.\u003c/p>\n\u003cfigure id=\"attachment_119912\" class=\"wp-caption aligncenter\" style=\"max-width: 4032px\">\u003cimg class=\"size-full wp-image-119912\" src=\"https://ww2.kqed.org/bayareabites/wp-content/uploads/sites/24/2017/08/IMG_0400-new.jpg\" alt=\"Agnolotti di Lidia, stuffed with a blend of meats in a rich beef reduction sauce.\" width=\"4032\" height=\"3024\" srcset=\"https://ww2.kqed.org/app/uploads/sites/24/2017/08/IMG_0400-new.jpg 4032w, https://ww2.kqed.org/app/uploads/sites/24/2017/08/IMG_0400-new-160x120.jpg 160w, https://ww2.kqed.org/app/uploads/sites/24/2017/08/IMG_0400-new-800x600.jpg 800w, https://ww2.kqed.org/app/uploads/sites/24/2017/08/IMG_0400-new-768x576.jpg 768w, https://ww2.kqed.org/app/uploads/sites/24/2017/08/IMG_0400-new-1020x765.jpg 1020w, https://ww2.kqed.org/app/uploads/sites/24/2017/08/IMG_0400-new-1180x885.jpg 1180w, https://ww2.kqed.org/app/uploads/sites/24/2017/08/IMG_0400-new-960x720.jpg 960w, https://ww2.kqed.org/app/uploads/sites/24/2017/08/IMG_0400-new-240x180.jpg 240w, https://ww2.kqed.org/app/uploads/sites/24/2017/08/IMG_0400-new-375x281.jpg 375w, https://ww2.kqed.org/app/uploads/sites/24/2017/08/IMG_0400-new-520x390.jpg 520w\" sizes=\"(max-width: 4032px) 100vw, 4032px\">\u003cfigcaption class=\"wp-caption-text\">Agnolotti di Lidia, stuffed with a blend of meats in a rich beef reduction sauce. \u003ccite>(Kim Westerman)\u003c/cite>\u003c/figcaption>\u003c/figure>\n\u003cfigure id=\"attachment_119909\" class=\"wp-caption aligncenter\" style=\"max-width: 1920px\">\u003cimg class=\"size-full wp-image-119909\" src=\"https://ww2.kqed.org/bayareabites/wp-content/uploads/sites/24/2017/08/IMG_0386-new.jpg\" alt=\"Tortelli di polenta with rabbit sugo.\" width=\"1920\" height=\"1440\" srcset=\"https://ww2.kqed.org/app/uploads/sites/24/2017/08/IMG_0386-new.jpg 1920w, https://ww2.kqed.org/app/uploads/sites/24/2017/08/IMG_0386-new-160x120.jpg 160w, https://ww2.kqed.org/app/uploads/sites/24/2017/08/IMG_0386-new-800x600.jpg 800w, https://ww2.kqed.org/app/uploads/sites/24/2017/08/IMG_0386-new-768x576.jpg 768w, https://ww2.kqed.org/app/uploads/sites/24/2017/08/IMG_0386-new-1020x765.jpg 1020w, https://ww2.kqed.org/app/uploads/sites/24/2017/08/IMG_0386-new-1180x885.jpg 1180w, https://ww2.kqed.org/app/uploads/sites/24/2017/08/IMG_0386-new-960x720.jpg 960w, https://ww2.kqed.org/app/uploads/sites/24/2017/08/IMG_0386-new-240x180.jpg 240w, https://ww2.kqed.org/app/uploads/sites/24/2017/08/IMG_0386-new-375x281.jpg 375w, https://ww2.kqed.org/app/uploads/sites/24/2017/08/IMG_0386-new-520x390.jpg 520w\" sizes=\"(max-width: 1920px) 100vw, 1920px\">\u003cfigcaption class=\"wp-caption-text\">Tortelli di polenta with rabbit sugo. \u003ccite>(Kim Westerman)\u003c/cite>\u003c/figcaption>\u003c/figure>\n\u003cp>In contrast, the tagliolini with yellow peaches, tomatoes and porcini mushrooms, was a wonderful seasonal riff on local bounty, and not too sweet for the red wines on the list.\u003c/p>\n\u003cfigure id=\"attachment_119908\" class=\"wp-caption aligncenter\" style=\"max-width: 1920px\">\u003cimg class=\"size-full wp-image-119908\" src=\"https://ww2.kqed.org/bayareabites/wp-content/uploads/sites/24/2017/08/IMG_0381-new.jpg\" alt=\"Homemade tagliolini with yellow peaches, tomatoes and porcini mushrooms.\" width=\"1920\" height=\"1440\" srcset=\"https://ww2.kqed.org/app/uploads/sites/24/2017/08/IMG_0381-new.jpg 1920w, https://ww2.kqed.org/app/uploads/sites/24/2017/08/IMG_0381-new-160x120.jpg 160w, https://ww2.kqed.org/app/uploads/sites/24/2017/08/IMG_0381-new-800x600.jpg 800w, https://ww2.kqed.org/app/uploads/sites/24/2017/08/IMG_0381-new-768x576.jpg 768w, https://ww2.kqed.org/app/uploads/sites/24/2017/08/IMG_0381-new-1020x765.jpg 1020w, https://ww2.kqed.org/app/uploads/sites/24/2017/08/IMG_0381-new-1180x885.jpg 1180w, https://ww2.kqed.org/app/uploads/sites/24/2017/08/IMG_0381-new-960x720.jpg 960w, https://ww2.kqed.org/app/uploads/sites/24/2017/08/IMG_0381-new-240x180.jpg 240w, https://ww2.kqed.org/app/uploads/sites/24/2017/08/IMG_0381-new-375x281.jpg 375w, https://ww2.kqed.org/app/uploads/sites/24/2017/08/IMG_0381-new-520x390.jpg 520w\" sizes=\"(max-width: 1920px) 100vw, 1920px\">\u003cfigcaption class=\"wp-caption-text\">Homemade tagliolini with yellow peaches, tomatoes and porcini mushrooms. \u003ccite>(Kim Westerman)\u003c/cite>\u003c/figcaption>\u003c/figure>\n\u003cp>We also felt compelled to try the brasato: long-braised certified Piemontese flat-iron steak, cooked to meltingly tender and served atop polenta with hen of the woods mushrooms and a Nebbiolo reduction. Perfect with any of the Nebbiolos on the wine list. And if it’s this good at the height of summer, imagine the winter pleasures of this dish!\u003c/p>\n\u003cfigure id=\"attachment_119913\" class=\"wp-caption aligncenter\" style=\"max-width: 1920px\">\u003cimg class=\"size-full wp-image-119913\" src=\"https://ww2.kqed.org/bayareabites/wp-content/uploads/sites/24/2017/08/IMG_0402-new.jpg\" alt=\"Long-braised certified Piemontese flat-iron steak, served over polenta.\" width=\"1920\" height=\"1440\" srcset=\"https://ww2.kqed.org/app/uploads/sites/24/2017/08/IMG_0402-new.jpg 1920w, https://ww2.kqed.org/app/uploads/sites/24/2017/08/IMG_0402-new-160x120.jpg 160w, https://ww2.kqed.org/app/uploads/sites/24/2017/08/IMG_0402-new-800x600.jpg 800w, https://ww2.kqed.org/app/uploads/sites/24/2017/08/IMG_0402-new-768x576.jpg 768w, https://ww2.kqed.org/app/uploads/sites/24/2017/08/IMG_0402-new-1020x765.jpg 1020w, https://ww2.kqed.org/app/uploads/sites/24/2017/08/IMG_0402-new-1180x885.jpg 1180w, https://ww2.kqed.org/app/uploads/sites/24/2017/08/IMG_0402-new-960x720.jpg 960w, https://ww2.kqed.org/app/uploads/sites/24/2017/08/IMG_0402-new-240x180.jpg 240w, https://ww2.kqed.org/app/uploads/sites/24/2017/08/IMG_0402-new-375x281.jpg 375w, https://ww2.kqed.org/app/uploads/sites/24/2017/08/IMG_0402-new-520x390.jpg 520w\" sizes=\"(max-width: 1920px) 100vw, 1920px\">\u003cfigcaption class=\"wp-caption-text\">Long-braised certified Piemontese flat-iron steak, served over polenta. \u003ccite>(Kim Westerman)\u003c/cite>\u003c/figcaption>\u003c/figure>\n\u003cp>In a meal of excesses, what’s one more? We closed down the house by lingering longer over the best affogato I’ve had in the bay area. Homemade vanilla gelato with a perfectly pulled espresso poured on top. Semplice e squisito (simple and exquisite).\u003c/p>\n\u003cfigure id=\"attachment_119914\" class=\"wp-caption aligncenter\" style=\"max-width: 1920px\">\u003cimg class=\"size-full wp-image-119914\" src=\"https://ww2.kqed.org/bayareabites/wp-content/uploads/sites/24/2017/08/IMG_0410-new.jpg\" alt=\"Homemade vanilla gelato with a perfectly pulled espresso poured on top. \" width=\"1920\" height=\"1440\" srcset=\"https://ww2.kqed.org/app/uploads/sites/24/2017/08/IMG_0410-new.jpg 1920w, https://ww2.kqed.org/app/uploads/sites/24/2017/08/IMG_0410-new-160x120.jpg 160w, https://ww2.kqed.org/app/uploads/sites/24/2017/08/IMG_0410-new-800x600.jpg 800w, https://ww2.kqed.org/app/uploads/sites/24/2017/08/IMG_0410-new-768x576.jpg 768w, https://ww2.kqed.org/app/uploads/sites/24/2017/08/IMG_0410-new-1020x765.jpg 1020w, https://ww2.kqed.org/app/uploads/sites/24/2017/08/IMG_0410-new-1180x885.jpg 1180w, https://ww2.kqed.org/app/uploads/sites/24/2017/08/IMG_0410-new-960x720.jpg 960w, https://ww2.kqed.org/app/uploads/sites/24/2017/08/IMG_0410-new-240x180.jpg 240w, https://ww2.kqed.org/app/uploads/sites/24/2017/08/IMG_0410-new-375x281.jpg 375w, https://ww2.kqed.org/app/uploads/sites/24/2017/08/IMG_0410-new-520x390.jpg 520w\" sizes=\"(max-width: 1920px) 100vw, 1920px\">\u003cfigcaption class=\"wp-caption-text\">Homemade vanilla gelato with a perfectly pulled espresso poured on top. \u003ccite>(Kim Westerman)\u003c/cite>\u003c/figcaption>\u003c/figure>\n\u003cp>Look for the bottega to open in the coming months on Piedmont Avenue.\u003c/p>\n\u003cp>[ad fullwidth]\u003c/p>\n\u003cp>[ad floatright]\u003c/p>\n\u003cp>\u003ca href=\"http://belottirb.com/\">\u003cstrong>Belotti\u003c/strong>\u003c/a>\u003cbr>\n5403 College Ave.\u003cbr>\nOakland, CA 94618 [ \u003ca href=\"https://goo.gl/vVe8G2\">Map\u003c/a> ]\u003cbr>\nPh: (510) 788-7890\u003cbr>\nHours: Wed-Thu, 11:30am-10pm; Fri, 11:30am-11pm; Sat, 10am-11pm; Sun, 10am-9pm; closed Tue\u003cbr>\nPrice Range: $$-$$$ ($14.95-$17.50 pastas; $26.75-$29.75 entrees)\u003cbr>\nFacebook: \u003ca href=\"https://www.facebook.com/BelottiRB/\">@BelottiRB\u003c/a>\u003cbr>\nTwitter: \u003ca href=\"https://twitter.com/BelottiRB\">@BelottiRB\u003c/a>\u003cbr>\nInstagram: \u003ca href=\"https://www.instagram.com/belottirb/\">@belottirb\u003c/a>\u003c/p>\n\n","blocks":[],"excerpt":"Pastas from Lombardy and the Piedmont region of Italy form the heart of the menu at Belotti Ristorante in Oakland's Rockridge neighborhood.\r\n","status":"publish","parent":0,"modified":1502988997,"stats":{"hasAudio":false,"hasVideo":false,"hasChartOrMap":false,"iframeSrcs":[],"hasGoogleForm":false,"hasGallery":false,"hasHearkenModule":false,"hasPolis":false,"paragraphCount":15,"wordCount":1242},"headData":{"title":"Belotti Ristorante: The East Bay’s Best Homemade Pasta is in Oakland’s Rockridge Neighborhood | KQED","description":"Pastas from Lombardy and the Piedmont region of Italy form the heart of the menu at Belotti Ristorante in Oakland's Rockridge neighborhood.\r\n","ogTitle":"","ogDescription":"","ogImgId":"","twTitle":"","twDescription":"","twImgId":"","schema":{"@context":"http://schema.org","@type":"Article","headline":"Belotti Ristorante: The East Bay’s Best Homemade Pasta is in Oakland’s Rockridge Neighborhood","datePublished":"2017-08-16T17:24:21.000Z","dateModified":"2017-08-17T16:56:37.000Z","image":"https://cdn.kqed.org/wp-content/uploads/2020/02/KQED-OG-Image@1x.png"}},"disqusIdentifier":"119881 https://ww2.kqed.org/bayareabites/?p=119881","disqusUrl":"https://ww2.kqed.org/bayareabites/2017/08/16/belotti-ristorante-the-east-bays-best-homemade-pasta-is-in-oaklands-rockridge-neighborhood/","disqusTitle":"Belotti Ristorante: The East Bay’s Best Homemade Pasta is in Oakland’s Rockridge Neighborhood","path":"/bayareabites/119881/belotti-ristorante-the-east-bays-best-homemade-pasta-is-in-oaklands-rockridge-neighborhood","audioTrackLength":null,"parsedContent":[{"type":"contentString","content":"\u003cdiv class=\"post-body\">\u003cp>\u003cp>Michele Belotti, the young chef/owner who runs the show at his namesake restaurant, is one of the most unpretentious folks in the business of cooking—and one of the most talented. Not even two-years-old, \u003ca href=\"http://belottirb.com/\">Belotti Ristorante\u003c/a> (soon to be Belotti Ristorante & Bottega, as plans to open a shop on Piedmont Avenue continue to unfold) has become a Bay Area destination for traditional northern Italian dining. Pastas from Lombardy and the Piedmont region form the heart of the menu, and there are a handful of home-style \u003cem>secondi\u003c/em>, or main courses, as well.\u003c/p>\n\u003cfigure id=\"attachment_119911\" class=\"wp-caption aligncenter\" style=\"max-width: 1920px\">\u003cimg class=\"size-full wp-image-119911\" src=\"https://ww2.kqed.org/bayareabites/wp-content/uploads/sites/24/2017/08/IMG_0394-new.jpg\" alt=\"Chef Michele Belotti in his restaurant’s kitchen.\" width=\"1920\" height=\"1440\" srcset=\"https://ww2.kqed.org/app/uploads/sites/24/2017/08/IMG_0394-new.jpg 1920w, https://ww2.kqed.org/app/uploads/sites/24/2017/08/IMG_0394-new-160x120.jpg 160w, https://ww2.kqed.org/app/uploads/sites/24/2017/08/IMG_0394-new-800x600.jpg 800w, https://ww2.kqed.org/app/uploads/sites/24/2017/08/IMG_0394-new-768x576.jpg 768w, https://ww2.kqed.org/app/uploads/sites/24/2017/08/IMG_0394-new-1020x765.jpg 1020w, https://ww2.kqed.org/app/uploads/sites/24/2017/08/IMG_0394-new-1180x885.jpg 1180w, https://ww2.kqed.org/app/uploads/sites/24/2017/08/IMG_0394-new-960x720.jpg 960w, https://ww2.kqed.org/app/uploads/sites/24/2017/08/IMG_0394-new-240x180.jpg 240w, https://ww2.kqed.org/app/uploads/sites/24/2017/08/IMG_0394-new-375x281.jpg 375w, https://ww2.kqed.org/app/uploads/sites/24/2017/08/IMG_0394-new-520x390.jpg 520w\" sizes=\"(max-width: 1920px) 100vw, 1920px\">\u003cfigcaption class=\"wp-caption-text\">Chef Michele Belotti in his restaurant’s kitchen. \u003ccite>(Kim Westerman)\u003c/cite>\u003c/figcaption>\u003c/figure>\n\u003cp>When I say “traditional,” I mean it in the most literal sense, and apply the term both to the food here and the style of dining. With the exception of several stellar locally sourced products, such as \u003ca href=\"http://www.sekahills.com/\">Séka Hills olive oil\u003c/a>, Belotti imports its favorite products from regional producers in Italy, many of which it plans to sell in its shop. And the recipes are not light, as we’re accustomed to in our temperate climate and health-conscious food scene; they’re a hearty, meaty, buttery, and divinely carbohydrate affair. The food is also not trendy in the least; you’ll find no avocado toast in sight. So, if you walk in on a hot Thursday afternoon for lunch, you shouldn’t expect to see a menu that reflects the weather. You’ll find traditional, lovingly prepared, and hearty food, and you’ll want to order a big red wine to go with it, no matter the temperature outside. And then you’ll want a nap.\u003c/p>\n\u003cfigure id=\"attachment_119901\" class=\"wp-caption aligncenter\" style=\"max-width: 1920px\">\u003cimg class=\"size-full wp-image-119901\" src=\"https://ww2.kqed.org/bayareabites/wp-content/uploads/sites/24/2017/08/IMG_0180-new.jpg\" alt=\"The cozy dining room at Belotti Ristorante & Bottega, in Oakland’s Rockridge neighborhood.\" width=\"1920\" height=\"1440\" srcset=\"https://ww2.kqed.org/app/uploads/sites/24/2017/08/IMG_0180-new.jpg 1920w, https://ww2.kqed.org/app/uploads/sites/24/2017/08/IMG_0180-new-160x120.jpg 160w, https://ww2.kqed.org/app/uploads/sites/24/2017/08/IMG_0180-new-800x600.jpg 800w, https://ww2.kqed.org/app/uploads/sites/24/2017/08/IMG_0180-new-768x576.jpg 768w, https://ww2.kqed.org/app/uploads/sites/24/2017/08/IMG_0180-new-1020x765.jpg 1020w, https://ww2.kqed.org/app/uploads/sites/24/2017/08/IMG_0180-new-1180x885.jpg 1180w, https://ww2.kqed.org/app/uploads/sites/24/2017/08/IMG_0180-new-960x720.jpg 960w, https://ww2.kqed.org/app/uploads/sites/24/2017/08/IMG_0180-new-240x180.jpg 240w, https://ww2.kqed.org/app/uploads/sites/24/2017/08/IMG_0180-new-375x281.jpg 375w, https://ww2.kqed.org/app/uploads/sites/24/2017/08/IMG_0180-new-520x390.jpg 520w\" sizes=\"(max-width: 1920px) 100vw, 1920px\">\u003cfigcaption class=\"wp-caption-text\">The cozy dining room at Belotti Ristorante & Bottega, in Oakland’s Rockridge neighborhood. \u003ccite>(Kim Westerman)\u003c/cite>\u003c/figcaption>\u003c/figure>\n\u003cfigure id=\"attachment_119907\" class=\"wp-caption aligncenter\" style=\"max-width: 1920px\">\u003cimg class=\"size-full wp-image-119907\" src=\"https://ww2.kqed.org/bayareabites/wp-content/uploads/sites/24/2017/08/IMG_0374-new.jpg\" alt=\"Bread service with Séka Hills olive oil.\" width=\"1920\" height=\"2560\" srcset=\"https://ww2.kqed.org/app/uploads/sites/24/2017/08/IMG_0374-new.jpg 1920w, https://ww2.kqed.org/app/uploads/sites/24/2017/08/IMG_0374-new-160x213.jpg 160w, https://ww2.kqed.org/app/uploads/sites/24/2017/08/IMG_0374-new-800x1067.jpg 800w, https://ww2.kqed.org/app/uploads/sites/24/2017/08/IMG_0374-new-768x1024.jpg 768w, https://ww2.kqed.org/app/uploads/sites/24/2017/08/IMG_0374-new-1020x1360.jpg 1020w, https://ww2.kqed.org/app/uploads/sites/24/2017/08/IMG_0374-new-1180x1573.jpg 1180w, https://ww2.kqed.org/app/uploads/sites/24/2017/08/IMG_0374-new-960x1280.jpg 960w, https://ww2.kqed.org/app/uploads/sites/24/2017/08/IMG_0374-new-240x320.jpg 240w, https://ww2.kqed.org/app/uploads/sites/24/2017/08/IMG_0374-new-375x500.jpg 375w, https://ww2.kqed.org/app/uploads/sites/24/2017/08/IMG_0374-new-520x693.jpg 520w\" sizes=\"(max-width: 1920px) 100vw, 1920px\">\u003cfigcaption class=\"wp-caption-text\">Bread service with Séka Hills olive oil. \u003ccite>(Kim Westerman)\u003c/cite>\u003c/figcaption>\u003c/figure>\n\u003cp>The only thing about the restaurant that isn’t traditional, in the Italian sense, is its open hours. As per American custom, Belotti doesn’t close between lunch and dinner, and that’s a good thing because it’s hard to get a reservation unless you want to dine at 3:30pm. But the food is so good, I’ll take that time-slot any day of the week.\u003c/p>\n\u003cp>You could do worse than to order multiple pasta courses, and share, but the menu is designed around the idea of three courses—\u003cem>antipasti\u003c/em>, \u003cem>primi\u003c/em> (mostly pastas, with one risotto dish), and \u003cem>secondi\u003c/em>—plus vegetable side dishes and dessert. Nonetheless, what shines here are the northern Italian pastas that Chef Belotti learned to make from his mother: labor-intensive shapes and cuts, all handmade (with the exception of a dried spaghetti meant to be served \u003cem>al dente\u003c/em>), and all served with equally complex sauces, often meat reductions cooked for days.\u003c/p>\n\u003cp>On our first visit, we ordered a salad, two pastas, and one meat dish to share, and portions were more than ample. The salad was among the simplest and most delightful I’ve had in ages: living butter lettuce with lemon dressing, grated Grana Padano cheese and roasted pine nuts, exuding the simplicity that the entire menu embraces. It was plated as if still a whole head of lettuce, so basically deconstructed and reconstructed in what seemed like an effortless gesture that I’m sure isn’t.\u003c/p>\n\u003cfigure id=\"attachment_119903\" class=\"wp-caption aligncenter\" style=\"max-width: 1920px\">\u003cimg class=\"size-full wp-image-119903\" src=\"https://ww2.kqed.org/bayareabites/wp-content/uploads/sites/24/2017/08/IMG_0188-new.jpg\" alt=\"Butter lettuce salad with lemon dressing, grated Grana Padano cheese and roasted pine nuts.\" width=\"1920\" height=\"2560\" srcset=\"https://ww2.kqed.org/app/uploads/sites/24/2017/08/IMG_0188-new.jpg 1920w, https://ww2.kqed.org/app/uploads/sites/24/2017/08/IMG_0188-new-160x213.jpg 160w, https://ww2.kqed.org/app/uploads/sites/24/2017/08/IMG_0188-new-800x1067.jpg 800w, https://ww2.kqed.org/app/uploads/sites/24/2017/08/IMG_0188-new-768x1024.jpg 768w, https://ww2.kqed.org/app/uploads/sites/24/2017/08/IMG_0188-new-1020x1360.jpg 1020w, https://ww2.kqed.org/app/uploads/sites/24/2017/08/IMG_0188-new-1180x1573.jpg 1180w, https://ww2.kqed.org/app/uploads/sites/24/2017/08/IMG_0188-new-960x1280.jpg 960w, https://ww2.kqed.org/app/uploads/sites/24/2017/08/IMG_0188-new-240x320.jpg 240w, https://ww2.kqed.org/app/uploads/sites/24/2017/08/IMG_0188-new-375x500.jpg 375w, https://ww2.kqed.org/app/uploads/sites/24/2017/08/IMG_0188-new-520x693.jpg 520w\" sizes=\"(max-width: 1920px) 100vw, 1920px\">\u003cfigcaption class=\"wp-caption-text\">Butter lettuce salad with lemon dressing, grated Grana Padano cheese and roasted pine nuts. \u003ccite>(Kim Westerman)\u003c/cite>\u003c/figcaption>\u003c/figure>\n\u003cp>Our two pastas were a study in contrasts. The tagliatelle with wild boar sugo, pecorino di Rosso Toscano and liberal turns of black pepper was rich and toothsome, the narrow-width, flat pasta noodles tossed in the tomato-based boar sauce. (I thought the dish was over-sauced, but my wife did not, so that remains a matter of personal preference.) The casoncelli, on the other hand, somewhat gyoza-shaped dumplings stuffed with beef, prosciutto, pork shoulder, grana, smoked pancetta and sage, was an instant hit and an example of the kitchen’s classic bent. This is a traditional dish of Lombardy, where chef Belotti grew up, and he counts the dish as among his favorite of his mother’s recipes. The beautiful hand-formed dumplings are coated in butter and pecorino and punctuated by little cubes of pancetta.\u003c/p>\n\u003cfigure id=\"attachment_119905\" class=\"wp-caption aligncenter\" style=\"max-width: 4032px\">\u003cimg class=\"size-full wp-image-119905\" src=\"https://ww2.kqed.org/bayareabites/wp-content/uploads/sites/24/2017/08/IMG_0198-new.jpg\" alt=\"Homemade tagliatelle with wild boar sugo and pecorino.\" width=\"4032\" height=\"3024\" srcset=\"https://ww2.kqed.org/app/uploads/sites/24/2017/08/IMG_0198-new.jpg 4032w, https://ww2.kqed.org/app/uploads/sites/24/2017/08/IMG_0198-new-160x120.jpg 160w, https://ww2.kqed.org/app/uploads/sites/24/2017/08/IMG_0198-new-800x600.jpg 800w, https://ww2.kqed.org/app/uploads/sites/24/2017/08/IMG_0198-new-768x576.jpg 768w, https://ww2.kqed.org/app/uploads/sites/24/2017/08/IMG_0198-new-1020x765.jpg 1020w, https://ww2.kqed.org/app/uploads/sites/24/2017/08/IMG_0198-new-1180x885.jpg 1180w, https://ww2.kqed.org/app/uploads/sites/24/2017/08/IMG_0198-new-960x720.jpg 960w, https://ww2.kqed.org/app/uploads/sites/24/2017/08/IMG_0198-new-240x180.jpg 240w, https://ww2.kqed.org/app/uploads/sites/24/2017/08/IMG_0198-new-375x281.jpg 375w, https://ww2.kqed.org/app/uploads/sites/24/2017/08/IMG_0198-new-520x390.jpg 520w\" sizes=\"(max-width: 4032px) 100vw, 4032px\">\u003cfigcaption class=\"wp-caption-text\">Homemade tagliatelle with wild boar sugo and pecorino. \u003ccite>(Kim Westerman)\u003c/cite>\u003c/figcaption>\u003c/figure>\n\u003cfigure id=\"attachment_119904\" class=\"wp-caption aligncenter\" style=\"max-width: 4032px\">\u003cimg class=\"size-full wp-image-119904\" src=\"https://ww2.kqed.org/bayareabites/wp-content/uploads/sites/24/2017/08/IMG_0192-new.jpg\" alt=\"Casconcelli: homemade dumplings stuffed with beef, prosciutto, pork shoulder, grana, smoked pancetta and sage.\" width=\"4032\" height=\"3024\" srcset=\"https://ww2.kqed.org/app/uploads/sites/24/2017/08/IMG_0192-new.jpg 4032w, https://ww2.kqed.org/app/uploads/sites/24/2017/08/IMG_0192-new-160x120.jpg 160w, https://ww2.kqed.org/app/uploads/sites/24/2017/08/IMG_0192-new-800x600.jpg 800w, https://ww2.kqed.org/app/uploads/sites/24/2017/08/IMG_0192-new-768x576.jpg 768w, https://ww2.kqed.org/app/uploads/sites/24/2017/08/IMG_0192-new-1020x765.jpg 1020w, https://ww2.kqed.org/app/uploads/sites/24/2017/08/IMG_0192-new-1180x885.jpg 1180w, https://ww2.kqed.org/app/uploads/sites/24/2017/08/IMG_0192-new-960x720.jpg 960w, https://ww2.kqed.org/app/uploads/sites/24/2017/08/IMG_0192-new-240x180.jpg 240w, https://ww2.kqed.org/app/uploads/sites/24/2017/08/IMG_0192-new-375x281.jpg 375w, https://ww2.kqed.org/app/uploads/sites/24/2017/08/IMG_0192-new-520x390.jpg 520w\" sizes=\"(max-width: 4032px) 100vw, 4032px\">\u003cfigcaption class=\"wp-caption-text\">Casconcelli: homemade dumplings stuffed with beef, prosciutto, pork shoulder, grana, smoked pancetta and sage. \u003ccite>(Kim Westerman)\u003c/cite>\u003c/figcaption>\u003c/figure>\n\u003cp>We chose the \u003cem>maialino\u003c/em> as our main course: suckling pig from Stone Valley Farm, slow-cooked for 13 hours and served with caramelized apricots, lollipop kale, and green onions, topped with a balsamic reduction. While it was a splendid dish, it didn’t go well with the bottle of gorgeous Gaja Langhe we’d splurged on; the dish had too much fruit-sweetness to play nicely with the elegantly structured Piedmont red wine. The pork dish was better suited to a crisp white.\u003c/p>\n\u003cfigure id=\"attachment_119906\" class=\"wp-caption aligncenter\" style=\"max-width: 4032px\">\u003cimg class=\"size-full wp-image-119906\" src=\"https://ww2.kqed.org/bayareabites/wp-content/uploads/sites/24/2017/08/IMG_0202-new.jpg\" alt=\"Maialino: slow-cooked suckling pig.\" width=\"4032\" height=\"3024\" srcset=\"https://ww2.kqed.org/app/uploads/sites/24/2017/08/IMG_0202-new.jpg 4032w, https://ww2.kqed.org/app/uploads/sites/24/2017/08/IMG_0202-new-160x120.jpg 160w, https://ww2.kqed.org/app/uploads/sites/24/2017/08/IMG_0202-new-800x600.jpg 800w, https://ww2.kqed.org/app/uploads/sites/24/2017/08/IMG_0202-new-768x576.jpg 768w, https://ww2.kqed.org/app/uploads/sites/24/2017/08/IMG_0202-new-1020x765.jpg 1020w, https://ww2.kqed.org/app/uploads/sites/24/2017/08/IMG_0202-new-1180x885.jpg 1180w, https://ww2.kqed.org/app/uploads/sites/24/2017/08/IMG_0202-new-960x720.jpg 960w, https://ww2.kqed.org/app/uploads/sites/24/2017/08/IMG_0202-new-240x180.jpg 240w, https://ww2.kqed.org/app/uploads/sites/24/2017/08/IMG_0202-new-375x281.jpg 375w, https://ww2.kqed.org/app/uploads/sites/24/2017/08/IMG_0202-new-520x390.jpg 520w\" sizes=\"(max-width: 4032px) 100vw, 4032px\">\u003cfigcaption class=\"wp-caption-text\">Maialino: slow-cooked suckling pig. \u003ccite>(Kim Westerman)\u003c/cite>\u003c/figcaption>\u003c/figure>\n\u003cfigure id=\"attachment_119902\" class=\"wp-caption aligncenter\" style=\"max-width: 1000px\">\u003cimg class=\"size-full wp-image-119902\" src=\"https://ww2.kqed.org/bayareabites/wp-content/uploads/sites/24/2017/08/IMG_0184-new.jpg\" alt=\"A Gaja Langhe from the well-selected list of Italian red wines.\" width=\"1000\" height=\"1333\" srcset=\"https://ww2.kqed.org/app/uploads/sites/24/2017/08/IMG_0184-new.jpg 1000w, https://ww2.kqed.org/app/uploads/sites/24/2017/08/IMG_0184-new-160x213.jpg 160w, https://ww2.kqed.org/app/uploads/sites/24/2017/08/IMG_0184-new-800x1066.jpg 800w, https://ww2.kqed.org/app/uploads/sites/24/2017/08/IMG_0184-new-768x1024.jpg 768w, https://ww2.kqed.org/app/uploads/sites/24/2017/08/IMG_0184-new-960x1280.jpg 960w, https://ww2.kqed.org/app/uploads/sites/24/2017/08/IMG_0184-new-240x320.jpg 240w, https://ww2.kqed.org/app/uploads/sites/24/2017/08/IMG_0184-new-375x500.jpg 375w, https://ww2.kqed.org/app/uploads/sites/24/2017/08/IMG_0184-new-520x693.jpg 520w\" sizes=\"(max-width: 1000px) 100vw, 1000px\">\u003cfigcaption class=\"wp-caption-text\">A Gaja Langhe from the well-selected list of Italian red wines. \u003ccite>(Kim Westerman)\u003c/cite>\u003c/figcaption>\u003c/figure>\n\u003cp>On a second visit, we tried two more homemade stuffed pastas, equally delightful. The only way to really choose between them is to base your decision on ingredients. The agnolotti di Lidia has a blend of meats: beef shank, flat-iron steak, pork loin and sausage, with escarole, spinach, and grana, served in a silky-smooth beef reduction sauce. The tortelli di polenta, on the other hand, is filled with fine-ground yellow polenta (an odd-sounding filling for egg pasta, but it works) topped with rabbit sugo garnished with thyme and grana. They are both rich and hearty, so if you’re sharing, you might consider getting two styles of pasta more different from each other.\u003c/p>\n\u003cfigure id=\"attachment_119912\" class=\"wp-caption aligncenter\" style=\"max-width: 4032px\">\u003cimg class=\"size-full wp-image-119912\" src=\"https://ww2.kqed.org/bayareabites/wp-content/uploads/sites/24/2017/08/IMG_0400-new.jpg\" alt=\"Agnolotti di Lidia, stuffed with a blend of meats in a rich beef reduction sauce.\" width=\"4032\" height=\"3024\" srcset=\"https://ww2.kqed.org/app/uploads/sites/24/2017/08/IMG_0400-new.jpg 4032w, https://ww2.kqed.org/app/uploads/sites/24/2017/08/IMG_0400-new-160x120.jpg 160w, https://ww2.kqed.org/app/uploads/sites/24/2017/08/IMG_0400-new-800x600.jpg 800w, https://ww2.kqed.org/app/uploads/sites/24/2017/08/IMG_0400-new-768x576.jpg 768w, https://ww2.kqed.org/app/uploads/sites/24/2017/08/IMG_0400-new-1020x765.jpg 1020w, https://ww2.kqed.org/app/uploads/sites/24/2017/08/IMG_0400-new-1180x885.jpg 1180w, https://ww2.kqed.org/app/uploads/sites/24/2017/08/IMG_0400-new-960x720.jpg 960w, https://ww2.kqed.org/app/uploads/sites/24/2017/08/IMG_0400-new-240x180.jpg 240w, https://ww2.kqed.org/app/uploads/sites/24/2017/08/IMG_0400-new-375x281.jpg 375w, https://ww2.kqed.org/app/uploads/sites/24/2017/08/IMG_0400-new-520x390.jpg 520w\" sizes=\"(max-width: 4032px) 100vw, 4032px\">\u003cfigcaption class=\"wp-caption-text\">Agnolotti di Lidia, stuffed with a blend of meats in a rich beef reduction sauce. \u003ccite>(Kim Westerman)\u003c/cite>\u003c/figcaption>\u003c/figure>\n\u003cfigure id=\"attachment_119909\" class=\"wp-caption aligncenter\" style=\"max-width: 1920px\">\u003cimg class=\"size-full wp-image-119909\" src=\"https://ww2.kqed.org/bayareabites/wp-content/uploads/sites/24/2017/08/IMG_0386-new.jpg\" alt=\"Tortelli di polenta with rabbit sugo.\" width=\"1920\" height=\"1440\" srcset=\"https://ww2.kqed.org/app/uploads/sites/24/2017/08/IMG_0386-new.jpg 1920w, https://ww2.kqed.org/app/uploads/sites/24/2017/08/IMG_0386-new-160x120.jpg 160w, https://ww2.kqed.org/app/uploads/sites/24/2017/08/IMG_0386-new-800x600.jpg 800w, https://ww2.kqed.org/app/uploads/sites/24/2017/08/IMG_0386-new-768x576.jpg 768w, https://ww2.kqed.org/app/uploads/sites/24/2017/08/IMG_0386-new-1020x765.jpg 1020w, https://ww2.kqed.org/app/uploads/sites/24/2017/08/IMG_0386-new-1180x885.jpg 1180w, https://ww2.kqed.org/app/uploads/sites/24/2017/08/IMG_0386-new-960x720.jpg 960w, https://ww2.kqed.org/app/uploads/sites/24/2017/08/IMG_0386-new-240x180.jpg 240w, https://ww2.kqed.org/app/uploads/sites/24/2017/08/IMG_0386-new-375x281.jpg 375w, https://ww2.kqed.org/app/uploads/sites/24/2017/08/IMG_0386-new-520x390.jpg 520w\" sizes=\"(max-width: 1920px) 100vw, 1920px\">\u003cfigcaption class=\"wp-caption-text\">Tortelli di polenta with rabbit sugo. \u003ccite>(Kim Westerman)\u003c/cite>\u003c/figcaption>\u003c/figure>\n\u003cp>In contrast, the tagliolini with yellow peaches, tomatoes and porcini mushrooms, was a wonderful seasonal riff on local bounty, and not too sweet for the red wines on the list.\u003c/p>\n\u003cfigure id=\"attachment_119908\" class=\"wp-caption aligncenter\" style=\"max-width: 1920px\">\u003cimg class=\"size-full wp-image-119908\" src=\"https://ww2.kqed.org/bayareabites/wp-content/uploads/sites/24/2017/08/IMG_0381-new.jpg\" alt=\"Homemade tagliolini with yellow peaches, tomatoes and porcini mushrooms.\" width=\"1920\" height=\"1440\" srcset=\"https://ww2.kqed.org/app/uploads/sites/24/2017/08/IMG_0381-new.jpg 1920w, https://ww2.kqed.org/app/uploads/sites/24/2017/08/IMG_0381-new-160x120.jpg 160w, https://ww2.kqed.org/app/uploads/sites/24/2017/08/IMG_0381-new-800x600.jpg 800w, https://ww2.kqed.org/app/uploads/sites/24/2017/08/IMG_0381-new-768x576.jpg 768w, https://ww2.kqed.org/app/uploads/sites/24/2017/08/IMG_0381-new-1020x765.jpg 1020w, https://ww2.kqed.org/app/uploads/sites/24/2017/08/IMG_0381-new-1180x885.jpg 1180w, https://ww2.kqed.org/app/uploads/sites/24/2017/08/IMG_0381-new-960x720.jpg 960w, https://ww2.kqed.org/app/uploads/sites/24/2017/08/IMG_0381-new-240x180.jpg 240w, https://ww2.kqed.org/app/uploads/sites/24/2017/08/IMG_0381-new-375x281.jpg 375w, https://ww2.kqed.org/app/uploads/sites/24/2017/08/IMG_0381-new-520x390.jpg 520w\" sizes=\"(max-width: 1920px) 100vw, 1920px\">\u003cfigcaption class=\"wp-caption-text\">Homemade tagliolini with yellow peaches, tomatoes and porcini mushrooms. \u003ccite>(Kim Westerman)\u003c/cite>\u003c/figcaption>\u003c/figure>\n\u003cp>We also felt compelled to try the brasato: long-braised certified Piemontese flat-iron steak, cooked to meltingly tender and served atop polenta with hen of the woods mushrooms and a Nebbiolo reduction. Perfect with any of the Nebbiolos on the wine list. And if it’s this good at the height of summer, imagine the winter pleasures of this dish!\u003c/p>\n\u003cfigure id=\"attachment_119913\" class=\"wp-caption aligncenter\" style=\"max-width: 1920px\">\u003cimg class=\"size-full wp-image-119913\" src=\"https://ww2.kqed.org/bayareabites/wp-content/uploads/sites/24/2017/08/IMG_0402-new.jpg\" alt=\"Long-braised certified Piemontese flat-iron steak, served over polenta.\" width=\"1920\" height=\"1440\" srcset=\"https://ww2.kqed.org/app/uploads/sites/24/2017/08/IMG_0402-new.jpg 1920w, https://ww2.kqed.org/app/uploads/sites/24/2017/08/IMG_0402-new-160x120.jpg 160w, https://ww2.kqed.org/app/uploads/sites/24/2017/08/IMG_0402-new-800x600.jpg 800w, https://ww2.kqed.org/app/uploads/sites/24/2017/08/IMG_0402-new-768x576.jpg 768w, https://ww2.kqed.org/app/uploads/sites/24/2017/08/IMG_0402-new-1020x765.jpg 1020w, https://ww2.kqed.org/app/uploads/sites/24/2017/08/IMG_0402-new-1180x885.jpg 1180w, https://ww2.kqed.org/app/uploads/sites/24/2017/08/IMG_0402-new-960x720.jpg 960w, https://ww2.kqed.org/app/uploads/sites/24/2017/08/IMG_0402-new-240x180.jpg 240w, https://ww2.kqed.org/app/uploads/sites/24/2017/08/IMG_0402-new-375x281.jpg 375w, https://ww2.kqed.org/app/uploads/sites/24/2017/08/IMG_0402-new-520x390.jpg 520w\" sizes=\"(max-width: 1920px) 100vw, 1920px\">\u003cfigcaption class=\"wp-caption-text\">Long-braised certified Piemontese flat-iron steak, served over polenta. \u003ccite>(Kim Westerman)\u003c/cite>\u003c/figcaption>\u003c/figure>\n\u003cp>In a meal of excesses, what’s one more? We closed down the house by lingering longer over the best affogato I’ve had in the bay area. Homemade vanilla gelato with a perfectly pulled espresso poured on top. Semplice e squisito (simple and exquisite).\u003c/p>\n\u003cfigure id=\"attachment_119914\" class=\"wp-caption aligncenter\" style=\"max-width: 1920px\">\u003cimg class=\"size-full wp-image-119914\" src=\"https://ww2.kqed.org/bayareabites/wp-content/uploads/sites/24/2017/08/IMG_0410-new.jpg\" alt=\"Homemade vanilla gelato with a perfectly pulled espresso poured on top. \" width=\"1920\" height=\"1440\" srcset=\"https://ww2.kqed.org/app/uploads/sites/24/2017/08/IMG_0410-new.jpg 1920w, https://ww2.kqed.org/app/uploads/sites/24/2017/08/IMG_0410-new-160x120.jpg 160w, https://ww2.kqed.org/app/uploads/sites/24/2017/08/IMG_0410-new-800x600.jpg 800w, https://ww2.kqed.org/app/uploads/sites/24/2017/08/IMG_0410-new-768x576.jpg 768w, https://ww2.kqed.org/app/uploads/sites/24/2017/08/IMG_0410-new-1020x765.jpg 1020w, https://ww2.kqed.org/app/uploads/sites/24/2017/08/IMG_0410-new-1180x885.jpg 1180w, https://ww2.kqed.org/app/uploads/sites/24/2017/08/IMG_0410-new-960x720.jpg 960w, https://ww2.kqed.org/app/uploads/sites/24/2017/08/IMG_0410-new-240x180.jpg 240w, https://ww2.kqed.org/app/uploads/sites/24/2017/08/IMG_0410-new-375x281.jpg 375w, https://ww2.kqed.org/app/uploads/sites/24/2017/08/IMG_0410-new-520x390.jpg 520w\" sizes=\"(max-width: 1920px) 100vw, 1920px\">\u003cfigcaption class=\"wp-caption-text\">Homemade vanilla gelato with a perfectly pulled espresso poured on top. \u003ccite>(Kim Westerman)\u003c/cite>\u003c/figcaption>\u003c/figure>\n\u003cp>Look for the bottega to open in the coming months on Piedmont Avenue.\u003c/p>\n\u003cp>\u003c/p>\u003c/div>","attributes":{"named":{},"numeric":[]}},{"type":"component","content":"","name":"ad","attributes":{"named":{"label":"fullwidth"},"numeric":["fullwidth"]}},{"type":"contentString","content":"\u003cdiv class=\"post-body\">\u003cp>\u003c/p>\n\u003cp>\u003c/p>\u003c/div>","attributes":{"named":{},"numeric":[]}},{"type":"component","content":"","name":"ad","attributes":{"named":{"label":"floatright"},"numeric":["floatright"]}},{"type":"contentString","content":"\u003cdiv class=\"post-body\">\u003cp>\u003c/p>\n\u003cp>\u003ca href=\"http://belottirb.com/\">\u003cstrong>Belotti\u003c/strong>\u003c/a>\u003cbr>\n5403 College Ave.\u003cbr>\nOakland, CA 94618 [ \u003ca href=\"https://goo.gl/vVe8G2\">Map\u003c/a> ]\u003cbr>\nPh: (510) 788-7890\u003cbr>\nHours: Wed-Thu, 11:30am-10pm; Fri, 11:30am-11pm; Sat, 10am-11pm; Sun, 10am-9pm; closed Tue\u003cbr>\nPrice Range: $$-$$$ ($14.95-$17.50 pastas; $26.75-$29.75 entrees)\u003cbr>\nFacebook: \u003ca href=\"https://www.facebook.com/BelottiRB/\">@BelottiRB\u003c/a>\u003cbr>\nTwitter: \u003ca href=\"https://twitter.com/BelottiRB\">@BelottiRB\u003c/a>\u003cbr>\nInstagram: \u003ca href=\"https://www.instagram.com/belottirb/\">@belottirb\u003c/a>\u003c/p>\n\n\u003c/div>\u003c/p>","attributes":{"named":{},"numeric":[]}}],"link":"/bayareabites/119881/belotti-ristorante-the-east-bays-best-homemade-pasta-is-in-oaklands-rockridge-neighborhood","authors":["5575"],"categories":["bayareabites_8770","bayareabites_366","bayareabites_1807","bayareabites_10"],"tags":["bayareabites_15940","bayareabites_15502","bayareabites_755","bayareabites_1419"],"featImg":"bayareabites_119912","label":"bayareabites"}},"programsReducer":{"possible":{"id":"possible","title":"Possible","info":"Possible is hosted by entrepreneur Reid Hoffman and writer Aria Finger. Together in Possible, Hoffman and Finger lead enlightening discussions about building a brighter collective future. The show features interviews with visionary guests like Trevor Noah, Sam Altman and Janette Sadik-Khan. Possible paints an optimistic portrait of the world we can create through science, policy, business, art and our shared humanity. It asks: What if everything goes right for once? How can we get there? Each episode also includes a short fiction story generated by advanced AI GPT-4, serving as a thought-provoking springboard to speculate how humanity could leverage technology for good.","airtime":"SUN 2pm","imageSrc":"https://cdn.kqed.org/wp-content/uploads/2024/04/Possible-Podcast-Tile-360x360-1.jpg","officialWebsiteLink":"https://www.possible.fm/","meta":{"site":"news","source":"Possible"},"link":"/radio/program/possible","subscribe":{"apple":"https://podcasts.apple.com/us/podcast/possible/id1677184070","spotify":"https://open.spotify.com/show/730YpdUSNlMyPQwNnyjp4k"}},"1a":{"id":"1a","title":"1A","info":"1A is home to the national conversation. 1A brings on great guests and frames the best debate in ways that make you think, share and engage.","airtime":"MON-THU 11pm-12am","imageSrc":"https://ww2.kqed.org/radio/wp-content/uploads/sites/50/2018/04/1a.jpg","officialWebsiteLink":"https://the1a.org/","meta":{"site":"news","source":"npr"},"link":"/radio/program/1a","subscribe":{"npr":"https://rpb3r.app.goo.gl/RBrW","apple":"https://itunes.apple.com/WebObjects/MZStore.woa/wa/viewPodcast?s=143441&mt=2&id=1188724250&at=11l79Y&ct=nprdirectory","tuneIn":"https://tunein.com/radio/1A-p947376/","rss":"https://feeds.npr.org/510316/podcast.xml"}},"all-things-considered":{"id":"all-things-considered","title":"All Things Considered","info":"Every weekday, \u003cem>All Things Considered\u003c/em> hosts Robert Siegel, Audie Cornish, Ari Shapiro, and Kelly McEvers present the program's trademark mix of news, interviews, commentaries, reviews, and offbeat features. Michel Martin hosts on the weekends.","airtime":"MON-FRI 1pm-2pm, 4:30pm-6:30pm\u003cbr />SAT-SUN 5pm-6pm","imageSrc":"https://cdn.kqed.org/wp-content/uploads/2024/04/All-Things-Considered-Podcast-Tile-360x360-1.jpg","officialWebsiteLink":"https://www.npr.org/programs/all-things-considered/","meta":{"site":"news","source":"npr"},"link":"/radio/program/all-things-considered"},"american-suburb-podcast":{"id":"american-suburb-podcast","title":"American Suburb: The Podcast","tagline":"The flip side of gentrification, told through one town","info":"Gentrification is changing cities across America, forcing people from neighborhoods they have long called home. Call them the displaced. Now those priced out of the Bay Area are looking for a better life in an unlikely place. American Suburb follows this migration to one California town along the Delta, 45 miles from San Francisco. But is this once sleepy suburb ready for them?","imageSrc":"https://cdn.kqed.org/wp-content/uploads/2024/04/American-Suburb-Podcast-Tile-703x703-1.jpg","officialWebsiteLink":"/news/series/american-suburb-podcast","meta":{"site":"news","source":"kqed","order":"13"},"link":"/news/series/american-suburb-podcast/","subscribe":{"npr":"https://rpb3r.app.goo.gl/RBrW","apple":"https://itunes.apple.com/WebObjects/MZStore.woa/wa/viewPodcast?mt=2&id=1287748328","tuneIn":"https://tunein.com/radio/American-Suburb-p1086805/","rss":"https://ww2.kqed.org/news/series/american-suburb-podcast/feed/podcast","google":"https://podcasts.google.com/feed/aHR0cHM6Ly9mZWVkcy5tZWdhcGhvbmUuZm0vS1FJTkMzMDExODgxNjA5"}},"baycurious":{"id":"baycurious","title":"Bay Curious","tagline":"Exploring the Bay Area, one question at a time","info":"KQED’s new podcast, Bay Curious, gets to the bottom of the mysteries — both profound and peculiar — that give the Bay Area its unique identity. And we’ll do it with your help! You ask the questions. You decide what Bay Curious investigates. And you join us on the journey to find the answers.","imageSrc":"https://cdn.kqed.org/wp-content/uploads/2024/04/Bay-Curious-Podcast-Tile-703x703-1.jpg","imageAlt":"\"KQED Bay Curious","officialWebsiteLink":"/news/series/baycurious","meta":{"site":"news","source":"kqed","order":"4"},"link":"/podcasts/baycurious","subscribe":{"apple":"https://podcasts.apple.com/us/podcast/bay-curious/id1172473406","npr":"https://www.npr.org/podcasts/500557090/bay-curious","rss":"https://ww2.kqed.org/news/category/bay-curious-podcast/feed/podcast","google":"https://podcasts.google.com/feed/aHR0cHM6Ly93dzIua3FlZC5vcmcvbmV3cy9jYXRlZ29yeS9iYXktY3VyaW91cy1wb2RjYXN0L2ZlZWQvcG9kY2FzdA","stitcher":"https://www.stitcher.com/podcast/kqed/bay-curious","spotify":"https://open.spotify.com/show/6O76IdmhixfijmhTZLIJ8k"}},"bbc-world-service":{"id":"bbc-world-service","title":"BBC World Service","info":"The day's top stories from BBC News compiled twice daily in the week, once at weekends.","airtime":"MON-FRI 9pm-10pm, TUE-FRI 1am-2am","imageSrc":"https://cdn.kqed.org/wp-content/uploads/2024/04/BBC-World-Service-Podcast-Tile-360x360-1.jpg","officialWebsiteLink":"https://www.bbc.co.uk/sounds/play/live:bbc_world_service","meta":{"site":"news","source":"BBC World Service"},"link":"/radio/program/bbc-world-service","subscribe":{"apple":"https://itunes.apple.com/us/podcast/global-news-podcast/id135067274?mt=2","tuneIn":"https://tunein.com/radio/BBC-World-Service-p455581/","rss":"https://podcasts.files.bbci.co.uk/p02nq0gn.rss"}},"code-switch-life-kit":{"id":"code-switch-life-kit","title":"Code Switch / Life Kit","info":"\u003cem>Code Switch\u003c/em>, which listeners will hear in the first part of the hour, has fearless and much-needed conversations about race. Hosted by journalists of color, the show tackles the subject of race head-on, exploring how it impacts every part of society — from politics and pop culture to history, sports and more.\u003cbr />\u003cbr />\u003cem>Life Kit\u003c/em>, which will be in the second part of the hour, guides you through spaces and feelings no one prepares you for — from finances to mental health, from workplace microaggressions to imposter syndrome, from relationships to parenting. The show features experts with real world experience and shares their knowledge. Because everyone needs a little help being human.\u003cbr />\u003cbr />\u003ca href=\"https://www.npr.org/podcasts/510312/codeswitch\">\u003cem>Code Switch\u003c/em> offical site and podcast\u003c/a>\u003cbr />\u003ca href=\"https://www.npr.org/lifekit\">\u003cem>Life Kit\u003c/em> offical site and podcast\u003c/a>\u003cbr />","airtime":"SUN 9pm-10pm","imageSrc":"https://cdn.kqed.org/wp-content/uploads/2024/04/Code-Switch-Life-Kit-Podcast-Tile-360x360-1.jpg","meta":{"site":"radio","source":"npr"},"link":"/radio/program/code-switch-life-kit","subscribe":{"apple":"https://podcasts.apple.com/podcast/1112190608?mt=2&at=11l79Y&ct=nprdirectory","google":"https://podcasts.google.com/feed/aHR0cHM6Ly93d3cubnByLm9yZy9yc3MvcG9kY2FzdC5waHA_aWQ9NTEwMzEy","spotify":"https://open.spotify.com/show/3bExJ9JQpkwNhoHvaIIuyV","rss":"https://feeds.npr.org/510312/podcast.xml"}},"commonwealth-club":{"id":"commonwealth-club","title":"Commonwealth Club of California Podcast","info":"The Commonwealth Club of California is the nation's oldest and largest public affairs forum. As a non-partisan forum, The Club brings to the public airwaves diverse viewpoints on important topics. The Club's weekly radio broadcast - the oldest in the U.S., dating back to 1924 - is carried across the nation on public radio stations and is now podcasting. Our website archive features audio of our recent programs, as well as selected speeches from our long and distinguished history. This podcast feed is usually updated twice a week and is always un-edited.","airtime":"THU 10pm, FRI 1am","imageSrc":"https://cdn.kqed.org/wp-content/uploads/2024/04/Commonwealth-Club-Podcast-Tile-360x360-1.jpg","officialWebsiteLink":"https://www.commonwealthclub.org/podcasts","meta":{"site":"news","source":"Commonwealth Club of California"},"link":"/radio/program/commonwealth-club","subscribe":{"apple":"https://itunes.apple.com/us/podcast/commonwealth-club-of-california-podcast/id976334034?mt=2","google":"https://podcasts.google.com/feed/aHR0cDovL3d3dy5jb21tb253ZWFsdGhjbHViLm9yZy9hdWRpby9wb2RjYXN0L3dlZWtseS54bWw","tuneIn":"https://tunein.com/radio/Commonwealth-Club-of-California-p1060/"}},"considerthis":{"id":"considerthis","title":"Consider This","tagline":"Make sense of the day","info":"Make sense of the day. Every weekday afternoon, Consider This helps you consider the major stories of the day in less than 15 minutes, featuring the reporting and storytelling resources of NPR. Plus, KQED’s Bianca Taylor brings you the local KQED news you need to know.","imageSrc":"https://cdn.kqed.org/wp-content/uploads/2024/04/Consider-This-Podcast-Tile-703x703-1.jpg","imageAlt":"Consider This from NPR and KQED","officialWebsiteLink":"/podcasts/considerthis","meta":{"site":"news","source":"kqed","order":"7"},"link":"/podcasts/considerthis","subscribe":{"apple":"https://podcasts.apple.com/podcast/id1503226625?mt=2&at=11l79Y&ct=nprdirectory","npr":"https://rpb3r.app.goo.gl/coronavirusdaily","google":"https://podcasts.google.com/feed/aHR0cHM6Ly9mZWVkcy5ucHIub3JnLzUxMDM1NS9wb2RjYXN0LnhtbA","spotify":"https://open.spotify.com/show/3Z6JdCS2d0eFEpXHKI6WqH"}},"forum":{"id":"forum","title":"Forum","tagline":"The conversation starts here","info":"KQED’s live call-in program discussing local, state, national and international issues, as well as in-depth interviews.","airtime":"MON-FRI 9am-11am, 10pm-11pm","imageSrc":"https://cdn.kqed.org/wp-content/uploads/2024/04/Forum-Podcast-Tile-703x703-1.jpg","imageAlt":"KQED Forum with Mina Kim and Alexis Madrigal","officialWebsiteLink":"/forum","meta":{"site":"news","source":"kqed","order":"8"},"link":"/forum","subscribe":{"apple":"https://podcasts.apple.com/us/podcast/kqeds-forum/id73329719","google":"https://podcasts.google.com/feed/aHR0cHM6Ly9mZWVkcy5tZWdhcGhvbmUuZm0vS1FJTkM5NTU3MzgxNjMz","npr":"https://www.npr.org/podcasts/432307980/forum","stitcher":"https://www.stitcher.com/podcast/kqedfm-kqeds-forum-podcast","rss":"https://feeds.megaphone.fm/KQINC9557381633"}},"freakonomics-radio":{"id":"freakonomics-radio","title":"Freakonomics Radio","info":"Freakonomics Radio is a one-hour award-winning podcast and public-radio project hosted by Stephen Dubner, with co-author Steve Levitt as a regular guest. It is produced in partnership with WNYC.","imageSrc":"https://ww2.kqed.org/news/wp-content/uploads/sites/10/2018/05/freakonomicsRadio.png","officialWebsiteLink":"http://freakonomics.com/","airtime":"SUN 1am-2am, SAT 3pm-4pm","meta":{"site":"radio","source":"WNYC"},"link":"/radio/program/freakonomics-radio","subscribe":{"npr":"https://rpb3r.app.goo.gl/4s8b","apple":"https://itunes.apple.com/us/podcast/freakonomics-radio/id354668519","tuneIn":"https://tunein.com/podcasts/WNYC-Podcasts/Freakonomics-Radio-p272293/","rss":"https://feeds.feedburner.com/freakonomicsradio"}},"fresh-air":{"id":"fresh-air","title":"Fresh Air","info":"Hosted by Terry Gross, \u003cem>Fresh Air from WHYY\u003c/em> is the Peabody Award-winning weekday magazine of contemporary arts and issues. One of public radio's most popular programs, Fresh Air features intimate conversations with today's biggest luminaries.","airtime":"MON-FRI 7pm-8pm","imageSrc":"https://cdn.kqed.org/wp-content/uploads/2024/04/Fresh-Air-Podcast-Tile-360x360-1.jpg","officialWebsiteLink":"https://www.npr.org/programs/fresh-air/","meta":{"site":"radio","source":"npr"},"link":"/radio/program/fresh-air","subscribe":{"npr":"https://rpb3r.app.goo.gl/4s8b","apple":"https://itunes.apple.com/WebObjects/MZStore.woa/wa/viewPodcast?s=143441&mt=2&id=214089682&at=11l79Y&ct=nprdirectory","tuneIn":"https://tunein.com/radio/Fresh-Air-p17/","rss":"https://feeds.npr.org/381444908/podcast.xml"}},"here-and-now":{"id":"here-and-now","title":"Here & Now","info":"A live production of NPR and WBUR Boston, in collaboration with stations across the country, Here & Now reflects the fluid world of news as it's happening in the middle of the day, with timely, in-depth news, interviews and conversation. Hosted by Robin Young, Jeremy Hobson and Tonya Mosley.","airtime":"MON-THU 11am-12pm","imageSrc":"https://cdn.kqed.org/wp-content/uploads/2024/04/Here-And-Now-Podcast-Tile-360x360-1.jpg","officialWebsiteLink":"http://www.wbur.org/hereandnow","meta":{"site":"news","source":"npr"},"link":"/radio/program/here-and-now","subsdcribe":{"apple":"https://itunes.apple.com/WebObjects/MZStore.woa/wa/viewPodcast?mt=2&id=426698661","tuneIn":"https://tunein.com/radio/Here--Now-p211/","rss":"https://feeds.npr.org/510051/podcast.xml"}},"how-i-built-this":{"id":"how-i-built-this","title":"How I Built This with Guy Raz","info":"Guy Raz dives into the stories behind some of the world's best known companies. How I Built This weaves a narrative journey about innovators, entrepreneurs and idealists—and the movements they built.","imageSrc":"https://ww2.kqed.org/news/wp-content/uploads/sites/10/2018/05/howIBuiltThis.png","officialWebsiteLink":"https://www.npr.org/podcasts/510313/how-i-built-this","airtime":"SUN 7:30pm-8pm","meta":{"site":"news","source":"npr"},"link":"/radio/program/how-i-built-this","subscribe":{"npr":"https://rpb3r.app.goo.gl/3zxy","apple":"https://itunes.apple.com/us/podcast/how-i-built-this-with-guy-raz/id1150510297?mt=2","tuneIn":"https://tunein.com/podcasts/Arts--Culture-Podcasts/How-I-Built-This-p910896/","rss":"https://feeds.npr.org/510313/podcast.xml"}},"inside-europe":{"id":"inside-europe","title":"Inside Europe","info":"Inside Europe, a one-hour weekly news magazine hosted by Helen Seeney and Keith Walker, explores the topical issues shaping the continent. No other part of the globe has experienced such dynamic political and social change in recent years.","airtime":"SAT 3am-4am","imageSrc":"https://cdn.kqed.org/wp-content/uploads/2024/04/Inside-Europe-Podcast-Tile-300x300-1.jpg","meta":{"site":"news","source":"Deutsche Welle"},"link":"/radio/program/inside-europe","subscribe":{"apple":"https://itunes.apple.com/us/podcast/inside-europe/id80106806?mt=2","tuneIn":"https://tunein.com/radio/Inside-Europe-p731/","rss":"https://partner.dw.com/xml/podcast_inside-europe"}},"latino-usa":{"id":"latino-usa","title":"Latino USA","airtime":"MON 1am-2am, SUN 6pm-7pm","info":"Latino USA, the radio journal of news and culture, is the only national, English-language radio program produced from a Latino perspective.","imageSrc":"https://ww2.kqed.org/radio/wp-content/uploads/sites/50/2018/04/latinoUsa.jpg","officialWebsiteLink":"http://latinousa.org/","meta":{"site":"news","source":"npr"},"link":"/radio/program/latino-usa","subscribe":{"npr":"https://rpb3r.app.goo.gl/xtTd","apple":"https://itunes.apple.com/WebObjects/MZStore.woa/wa/viewPodcast?s=143441&mt=2&id=79681317&at=11l79Y&ct=nprdirectory","tuneIn":"https://tunein.com/radio/Latino-USA-p621/","rss":"https://feeds.npr.org/510016/podcast.xml"}},"live-from-here-highlights":{"id":"live-from-here-highlights","title":"Live from Here Highlights","info":"Chris Thile steps to the mic as the host of Live from Here (formerly A Prairie Home Companion), a live public radio variety show. Download Chris’s Song of the Week plus other highlights from the broadcast. Produced by American Public Media.","airtime":"SAT 6pm-8pm, SUN 11am-1pm","imageSrc":"https://cdn.kqed.org/wp-content/uploads/2024/04/Live-From-Here-Podcast-Tile-360x360-1.jpg","officialWebsiteLink":"https://www.livefromhere.org/","meta":{"site":"arts","source":"american public media"},"link":"/radio/program/live-from-here-highlights","subscribe":{"apple":"https://itunes.apple.com/us/podcast/id1167173941","tuneIn":"https://tunein.com/radio/Live-from-Here-Highlights-p921744/","rss":"https://feeds.publicradio.org/public_feeds/a-prairie-home-companion-highlights/rss/rss"}},"marketplace":{"id":"marketplace","title":"Marketplace","info":"Our flagship program, helmed by Kai Ryssdal, examines what the day in money delivered, through stories, conversations, newsworthy numbers and more. Updated Monday through Friday at about 3:30 p.m. PT.","airtime":"MON-FRI 4pm-4:30pm, MON-WED 6:30pm-7pm","imageSrc":"https://cdn.kqed.org/wp-content/uploads/2024/04/Marketplace-Podcast-Tile-360x360-1.jpg","officialWebsiteLink":"https://www.marketplace.org/","meta":{"site":"news","source":"American Public Media"},"link":"/radio/program/marketplace","subscribe":{"apple":"https://itunes.apple.com/WebObjects/MZStore.woa/wa/viewPodcast?s=143441&mt=2&id=201853034&at=11l79Y&ct=nprdirectory","tuneIn":"https://tunein.com/radio/APM-Marketplace-p88/","rss":"https://feeds.publicradio.org/public_feeds/marketplace-pm/rss/rss"}},"mindshift":{"id":"mindshift","title":"MindShift","tagline":"A podcast about the future of learning and how we raise our kids","info":"The MindShift podcast explores the innovations in education that are shaping how kids learn. Hosts Ki Sung and Katrina Schwartz introduce listeners to educators, researchers, parents and students who are developing effective ways to improve how kids learn. We cover topics like how fed-up administrators are developing surprising tactics to deal with classroom disruptions; how listening to podcasts are helping kids develop reading skills; the consequences of overparenting; and why interdisciplinary learning can engage students on all ends of the traditional achievement spectrum. This podcast is part of the MindShift education site, a division of KQED News. KQED is an NPR/PBS member station based in San Francisco. You can also visit the MindShift website for episodes and supplemental blog posts or tweet us \u003ca href=\"https://twitter.com/MindShiftKQED\">@MindShiftKQED\u003c/a> or visit us at \u003ca href=\"/mindshift\">MindShift.KQED.org\u003c/a>","imageSrc":"https://cdn.kqed.org/wp-content/uploads/2024/04/Mindshift-Podcast-Tile-703x703-1.jpg","imageAlt":"KQED MindShift: How We Will Learn","officialWebsiteLink":"/mindshift/","meta":{"site":"news","source":"kqed","order":"2"},"link":"/podcasts/mindshift","subscribe":{"apple":"https://podcasts.apple.com/us/podcast/mindshift-podcast/id1078765985","google":"https://podcasts.google.com/feed/aHR0cHM6Ly9mZWVkcy5tZWdhcGhvbmUuZm0vS1FJTkM1NzY0NjAwNDI5","npr":"https://www.npr.org/podcasts/464615685/mind-shift-podcast","stitcher":"https://www.stitcher.com/podcast/kqed/stories-teachers-share","spotify":"https://open.spotify.com/show/0MxSpNYZKNprFLCl7eEtyx"}},"morning-edition":{"id":"morning-edition","title":"Morning Edition","info":"\u003cem>Morning Edition\u003c/em> takes listeners around the country and the world with multi-faceted stories and commentaries every weekday. Hosts Steve Inskeep, David Greene and Rachel Martin bring you the latest breaking news and features to prepare you for the day.","airtime":"MON-FRI 3am-9am","imageSrc":"https://cdn.kqed.org/wp-content/uploads/2024/04/Morning-Edition-Podcast-Tile-360x360-1.jpg","officialWebsiteLink":"https://www.npr.org/programs/morning-edition/","meta":{"site":"news","source":"npr"},"link":"/radio/program/morning-edition"},"onourwatch":{"id":"onourwatch","title":"On Our Watch","tagline":"Police secrets, unsealed","info":"For decades, the process for how police police themselves has been inconsistent – if not opaque. In some states, like California, these proceedings were completely hidden. After a new police transparency law unsealed scores of internal affairs files, our reporters set out to examine these cases and the shadow world of police discipline. On Our Watch brings listeners into the rooms where officers are questioned and witnesses are interrogated to find out who this system is really protecting. Is it the officers, or the public they've sworn to serve?","imageSrc":"https://cdn.kqed.org/wp-content/uploads/2024/04/On-Our-Watch-Podcast-Tile-703x703-1.jpg","imageAlt":"On Our Watch from NPR and KQED","officialWebsiteLink":"/podcasts/onourwatch","meta":{"site":"news","source":"kqed","order":"1"},"link":"/podcasts/onourwatch","subscribe":{"apple":"https://podcasts.apple.com/podcast/id1567098962","google":"https://podcasts.google.com/feed/aHR0cHM6Ly9mZWVkcy5ucHIub3JnLzUxMDM2MC9wb2RjYXN0LnhtbD9zYz1nb29nbGVwb2RjYXN0cw","npr":"https://rpb3r.app.goo.gl/onourwatch","spotify":"https://open.spotify.com/show/0OLWoyizopu6tY1XiuX70x","tuneIn":"https://tunein.com/radio/On-Our-Watch-p1436229/","stitcher":"https://www.stitcher.com/show/on-our-watch","rss":"https://feeds.npr.org/510360/podcast.xml"}},"on-the-media":{"id":"on-the-media","title":"On The Media","info":"Our weekly podcast explores how the media 'sausage' is made, casts an incisive eye on fluctuations in the marketplace of ideas, and examines threats to the freedom of information and expression in America and abroad. For one hour a week, the show tries to lift the veil from the process of \"making media,\" especially news media, because it's through that lens that we see the world and the world sees us","airtime":"SUN 2pm-3pm, MON 12am-1am","imageSrc":"https://ww2.kqed.org/radio/wp-content/uploads/sites/50/2018/04/onTheMedia.png","officialWebsiteLink":"https://www.wnycstudios.org/shows/otm","meta":{"site":"news","source":"wnyc"},"link":"/radio/program/on-the-media","subscribe":{"apple":"https://itunes.apple.com/us/podcast/on-the-media/id73330715?mt=2","tuneIn":"https://tunein.com/radio/On-the-Media-p69/","rss":"http://feeds.wnyc.org/onthemedia"}},"our-body-politic":{"id":"our-body-politic","title":"Our Body Politic","info":"Presented by KQED, KCRW and KPCC, and created and hosted by award-winning journalist Farai Chideya, Our Body Politic is unapologetically centered on reporting on not just how women of color experience the major political events of today, but how they’re impacting those very issues.","airtime":"SAT 6pm-7pm, SUN 1am-2am","imageSrc":"https://cdn.kqed.org/wp-content/uploads/2024/04/Our-Body-Politic-Podcast-Tile-360x360-1.jpg","officialWebsiteLink":"https://our-body-politic.simplecast.com/","meta":{"site":"news","source":"kcrw"},"link":"/radio/program/our-body-politic","subscribe":{"apple":"https://podcasts.apple.com/us/podcast/our-body-politic/id1533069868","google":"https://podcasts.google.com/feed/aHR0cHM6Ly9mZWVkcy5zaW1wbGVjYXN0LmNvbS9feGFQaHMxcw","spotify":"https://open.spotify.com/show/4ApAiLT1kV153TttWAmqmc","rss":"https://feeds.simplecast.com/_xaPhs1s","tuneIn":"https://tunein.com/podcasts/News--Politics-Podcasts/Our-Body-Politic-p1369211/"}},"pbs-newshour":{"id":"pbs-newshour","title":"PBS NewsHour","info":"Analysis, background reports and updates from the PBS NewsHour putting today's news in context.","airtime":"MON-FRI 3pm-4pm","imageSrc":"https://cdn.kqed.org/wp-content/uploads/2024/04/PBS-News-Hour-Podcast-Tile-360x360-1.jpg","officialWebsiteLink":"https://www.pbs.org/newshour/","meta":{"site":"news","source":"pbs"},"link":"/radio/program/pbs-newshour","subscribe":{"apple":"https://itunes.apple.com/us/podcast/pbs-newshour-full-show/id394432287?mt=2","tuneIn":"https://tunein.com/radio/PBS-NewsHour---Full-Show-p425698/","rss":"https://www.pbs.org/newshour/feeds/rss/podcasts/show"}},"perspectives":{"id":"perspectives","title":"Perspectives","tagline":"KQED's series of of daily listener commentaries since 1991","info":"KQED's series of of daily listener commentaries since 1991.","imageSrc":"https://cdn.kqed.org/wp-content/uploads/2024/04/Perspectives-Podcast-Tile-703x703-1.jpg","officialWebsiteLink":"/perspectives/","meta":{"site":"radio","source":"kqed","order":"15"},"link":"/perspectives","subscribe":{"apple":"https://podcasts.apple.com/us/podcast/id73801135","npr":"https://www.npr.org/podcasts/432309616/perspectives","rss":"https://ww2.kqed.org/perspectives/category/perspectives/feed/","google":"https://podcasts.google.com/feed/aHR0cHM6Ly93dzIua3FlZC5vcmcvcGVyc3BlY3RpdmVzL2NhdGVnb3J5L3BlcnNwZWN0aXZlcy9mZWVkLw"}},"planet-money":{"id":"planet-money","title":"Planet Money","info":"The economy explained. Imagine you could call up a friend and say, Meet me at the bar and tell me what's going on with the economy. Now imagine that's actually a fun evening.","airtime":"SUN 3pm-4pm","imageSrc":"https://ww2.kqed.org/radio/wp-content/uploads/sites/50/2018/04/planetmoney.jpg","officialWebsiteLink":"https://www.npr.org/sections/money/","meta":{"site":"news","source":"npr"},"link":"/radio/program/planet-money","subscribe":{"npr":"https://rpb3r.app.goo.gl/M4f5","apple":"https://itunes.apple.com/us/podcast/planet-money/id290783428?mt=2","tuneIn":"https://tunein.com/podcasts/Business--Economics-Podcasts/Planet-Money-p164680/","rss":"https://feeds.npr.org/510289/podcast.xml"}},"politicalbreakdown":{"id":"politicalbreakdown","title":"Political Breakdown","tagline":"Politics from a personal perspective","info":"Political Breakdown is a new series that explores the political intersection of California and the nation. Each week hosts Scott Shafer and Marisa Lagos are joined with a new special guest to unpack politics -- with personality — and offer an insider’s glimpse at how politics happens.","airtime":"THU 6:30pm-7pm","imageSrc":"https://cdn.kqed.org/wp-content/uploads/2024/04/Political-Breakdown-2024-Podcast-Tile-703x703-1.jpg","imageAlt":"KQED Political Breakdown","officialWebsiteLink":"/podcasts/politicalbreakdown","meta":{"site":"radio","source":"kqed","order":"11"},"link":"/podcasts/politicalbreakdown","subscribe":{"apple":"https://podcasts.apple.com/us/podcast/political-breakdown/id1327641087","google":"https://podcasts.google.com/feed/aHR0cHM6Ly9mZWVkcy5tZWdhcGhvbmUuZm0vS1FJTkM5Nzk2MzI2MTEx","npr":"https://www.npr.org/podcasts/572155894/political-breakdown","stitcher":"https://www.stitcher.com/podcast/kqed/political-breakdown","spotify":"https://open.spotify.com/show/07RVyIjIdk2WDuVehvBMoN","rss":"https://ww2.kqed.org/news/tag/political-breakdown/feed/podcast"}},"pri-the-world":{"id":"pri-the-world","title":"PRI's The World: Latest Edition","info":"Each weekday, host Marco Werman and his team of producers bring you the world's most interesting stories in an hour of radio that reminds us just how small our planet really is.","airtime":"MON-FRI 2pm-3pm","imageSrc":"https://cdn.kqed.org/wp-content/uploads/2024/04/The-World-Podcast-Tile-360x360-1.jpg","officialWebsiteLink":"https://www.pri.org/programs/the-world","meta":{"site":"news","source":"PRI"},"link":"/radio/program/pri-the-world","subscribe":{"apple":"https://itunes.apple.com/us/podcast/pris-the-world-latest-edition/id278196007?mt=2","tuneIn":"https://tunein.com/podcasts/News--Politics-Podcasts/PRIs-The-World-p24/","rss":"http://feeds.feedburner.com/pri/theworld"}},"radiolab":{"id":"radiolab","title":"Radiolab","info":"A two-time Peabody Award-winner, Radiolab is an investigation told through sounds and stories, and centered around one big idea. In the Radiolab world, information sounds like music and science and culture collide. Hosted by Jad Abumrad and Robert Krulwich, the show is designed for listeners who demand skepticism, but appreciate wonder. WNYC Studios is the producer of other leading podcasts including Freakonomics Radio, Death, Sex & Money, On the Media and many more.","airtime":"SUN 12am-1am, SAT 2pm-3pm","imageSrc":"https://ww2.kqed.org/radio/wp-content/uploads/sites/50/2018/04/radiolab1400.png","officialWebsiteLink":"https://www.wnycstudios.org/shows/radiolab/","meta":{"site":"science","source":"WNYC"},"link":"/radio/program/radiolab","subscribe":{"apple":"https://itunes.apple.com/us/podcast/radiolab/id152249110?mt=2","tuneIn":"https://tunein.com/radio/RadioLab-p68032/","rss":"https://feeds.wnyc.org/radiolab"}},"reveal":{"id":"reveal","title":"Reveal","info":"Created by The Center for Investigative Reporting and PRX, Reveal is public radios first one-hour weekly radio show and podcast dedicated to investigative reporting. Credible, fact based and without a partisan agenda, Reveal combines the power and artistry of driveway moment storytelling with data-rich reporting on critically important issues. The result is stories that inform and inspire, arming our listeners with information to right injustices, hold the powerful accountable and improve lives.Reveal is hosted by Al Letson and showcases the award-winning work of CIR and newsrooms large and small across the nation. In a radio and podcast market crowded with choices, Reveal focuses on important and often surprising stories that illuminate the world for our listeners.","airtime":"SAT 4pm-5pm","imageSrc":"https://ww2.kqed.org/radio/wp-content/uploads/sites/50/2018/04/reveal300px.png","officialWebsiteLink":"https://www.revealnews.org/episodes/","meta":{"site":"news","source":"npr"},"link":"/radio/program/reveal","subscribe":{"apple":"https://itunes.apple.com/us/podcast/reveal/id886009669","tuneIn":"https://tunein.com/radio/Reveal-p679597/","rss":"http://feeds.revealradio.org/revealpodcast"}},"says-you":{"id":"says-you","title":"Says You!","info":"Public radio's game show of bluff and bluster, words and whimsy. The warmest, wittiest cocktail party - it's spirited and civil, brainy and boisterous, peppered with musical interludes. Fast paced and playful, it's the most fun you can have with language without getting your mouth washed out with soap. Our motto: It's not important to know the answers, it's important to like the answers!","airtime":"SUN 4pm-5pm","imageSrc":"https://cdn.kqed.org/wp-content/uploads/2024/04/Says-You-Podcast-Tile-360x360-1.jpg","officialWebsiteLink":"http://www.saysyouradio.com/","meta":{"site":"comedy","source":"Pipit and Finch"},"link":"/radio/program/says-you","subscribe":{"apple":"https://itunes.apple.com/us/podcast/says-you!/id1050199826","tuneIn":"https://tunein.com/radio/Says-You-p480/","rss":"https://saysyou.libsyn.com/rss"}},"science-friday":{"id":"science-friday","title":"Science Friday","info":"Science Friday is a weekly science talk show, broadcast live over public radio stations nationwide. Each week, the show focuses on science topics that are in the news and tries to bring an educated, balanced discussion to bear on the scientific issues at hand. Panels of expert guests join host Ira Flatow, a veteran science journalist, to discuss science and to take questions from listeners during the call-in portion of the program.","airtime":"FRI 11am-1pm","imageSrc":"https://cdn.kqed.org/wp-content/uploads/2024/04/Science-Friday-Podcast-Tile-360x360-1.jpg","officialWebsiteLink":"https://www.wnycstudios.org/shows/science-friday","meta":{"site":"news","source":"npr"},"link":"/radio/program/science-friday","subscribe":{"apple":"https://itunes.apple.com/WebObjects/MZStore.woa/wa/viewPodcast?s=143441&mt=2&id=73329284&at=11l79Y&ct=nprdirectory","tuneIn":"https://tunein.com/radio/Science-Friday-p394/","rss":"http://feeds.wnyc.org/science-friday"}},"science-podcast":{"id":"science-podcast","title":"KQED Science News","tagline":"From the lab, to your ears","info":"KQED Science explores science and environment news, trends, and events from the Bay Area and beyond.","imageSrc":"https://cdn.kqed.org/wp-content/uploads/2024/04/Science-News-Podcast-Tile-703x703-1.jpg","officialWebsiteLink":"https://ww2.kqed.org/science/category/science-podcast/","meta":{"site":"science","source":"kqed","order":"17"},"link":"/science/category/science-podcast","subscribe":{"apple":"https://podcasts.apple.com/us/podcast/kqed-science-news/id214663465","google":"https://podcasts.google.com/feed/aHR0cDovL2Jsb2dzLmtxZWQub3JnL3NjaWVuY2UvZmVlZC8","stitcher":"https://www.stitcher.com/podcast/kqed-science-news","rss":"https://ww2.kqed.org/science/category/science-podcast/feed/podcast"}},"selected-shorts":{"id":"selected-shorts","title":"Selected Shorts","info":"Spellbinding short stories by established and emerging writers take on a new life when they are performed by stars of the stage and screen.","airtime":"SAT 8pm-9pm","imageSrc":"https://cdn.kqed.org/wp-content/uploads/2024/04/Selected-Shorts-Podcast-Tile-360x360-1.jpg","officialWebsiteLink":"https://www.pri.org/programs/selected-shorts","meta":{"site":"arts","source":"pri"},"link":"/radio/program/selected-shorts","subscribe":{"apple":"https://itunes.apple.com/WebObjects/MZStore.woa/wa/viewPodcast?s=143441&mt=2&id=253191824&at=11l79Y&ct=nprdirectory","tuneIn":"https://tunein.com/radio/Selected-Shorts-p31792/","rss":"https://feeds.megaphone.fm/selectedshorts"}},"snap-judgment":{"id":"snap-judgment","title":"Snap Judgment","info":"Snap Judgment (Storytelling, with a BEAT) mixes real stories with killer beats to produce cinematic, dramatic, kick-ass radio. Snap’s raw, musical brand of storytelling dares listeners to see the world through the eyes of another. WNYC studios is the producer of leading podcasts including Radiolab, Freakonomics Radio, Note To Self, Here’s The Thing With Alec Baldwin, and more.","airtime":"SAT 1pm-2pm, 9pm-10pm","imageSrc":"https://ww2.kqed.org/radio/wp-content/uploads/sites/50/2018/04/snapJudgement.jpg","officialWebsiteLink":"https://snapjudgment.org","meta":{"site":"arts","source":"WNYC"},"link":"/radio/program/snap-judgment","subscribe":{"apple":"https://itunes.apple.com/WebObjects/MZStore.woa/wa/viewPodcast?s=143441&mt=2&id=283657561&at=11l79Y&ct=nprdirectory","tuneIn":"https://tunein.com/radio/Snap-Judgment-p243817/","rss":"https://feeds.feedburner.com/snapjudgment-wnyc"}},"soldout":{"id":"soldout","title":"SOLD OUT: Rethinking Housing in America","tagline":"A new future for housing","info":"Sold Out: Rethinking Housing in America","imageSrc":"https://cdn.kqed.org/wp-content/uploads/2024/04/Sold-Out-Podcast-Tile-703x703-1.jpg","imageAlt":"KQED Sold Out: Rethinking Housing in America","officialWebsiteLink":"/podcasts/soldout","meta":{"site":"news","source":"kqed","order":3},"link":"/podcasts/soldout","subscribe":{"npr":"https://www.npr.org/podcasts/911586047/s-o-l-d-o-u-t-a-new-future-for-housing","apple":"https://podcasts.apple.com/us/podcast/introducing-sold-out-rethinking-housing-in-america/id1531354937","rss":"https://feeds.megaphone.fm/soldout","spotify":"https://open.spotify.com/show/38dTBSk2ISFoPiyYNoKn1X","stitcher":"https://www.stitcher.com/podcast/kqed/sold-out-rethinking-housing-in-america","tunein":"https://tunein.com/radio/SOLD-OUT-Rethinking-Housing-in-America-p1365871/","google":"https://podcasts.google.com/feed/aHR0cHM6Ly9mZWVkcy5tZWdhcGhvbmUuZm0vc29sZG91dA"}},"ted-radio-hour":{"id":"ted-radio-hour","title":"TED Radio Hour","info":"The TED Radio Hour is a journey through fascinating ideas, astonishing inventions, fresh approaches to old problems, and new ways to think and create.","airtime":"SUN 3pm-4pm, SAT 10pm-11pm","imageSrc":"https://ww2.kqed.org/radio/wp-content/uploads/sites/50/2018/04/tedRadioHour.jpg","officialWebsiteLink":"https://www.npr.org/programs/ted-radio-hour/?showDate=2018-06-22","meta":{"site":"news","source":"npr"},"link":"/radio/program/ted-radio-hour","subscribe":{"npr":"https://rpb3r.app.goo.gl/8vsS","apple":"https://itunes.apple.com/WebObjects/MZStore.woa/wa/viewPodcast?s=143441&mt=2&id=523121474&at=11l79Y&ct=nprdirectory","tuneIn":"https://tunein.com/radio/TED-Radio-Hour-p418021/","rss":"https://feeds.npr.org/510298/podcast.xml"}},"tech-nation":{"id":"tech-nation","title":"Tech Nation Radio Podcast","info":"Tech Nation is a weekly public radio program, hosted by Dr. Moira Gunn. Founded in 1993, it has grown from a simple interview show to a multi-faceted production, featuring conversations with noted technology and science leaders, and a weekly science and technology-related commentary.","airtime":"FRI 10pm","imageSrc":"https://cdn.kqed.org/wp-content/uploads/2024/04/Tech-Nation-Radio-Podcast-Tile-360x360-1.jpg","officialWebsiteLink":"http://technation.podomatic.com/","meta":{"site":"science","source":"Tech Nation Media"},"link":"/radio/program/tech-nation","subscribe":{"rss":"https://technation.podomatic.com/rss2.xml"}},"thebay":{"id":"thebay","title":"The Bay","tagline":"Local news to keep you rooted","info":"Host Devin Katayama walks you through the biggest story of the day with reporters and newsmakers.","imageSrc":"https://cdn.kqed.org/wp-content/uploads/2024/04/The-Bay-Podcast-Tile-703x703-1.jpg","imageAlt":"\"KQED The Bay","officialWebsiteLink":"/podcasts/thebay","meta":{"site":"radio","source":"kqed","order":"6"},"link":"/podcasts/thebay","subscribe":{"apple":"https://podcasts.apple.com/us/podcast/the-bay/id1350043452","google":"https://podcasts.google.com/feed/aHR0cHM6Ly9mZWVkcy5tZWdhcGhvbmUuZm0vS1FJTkM4MjU5Nzg2MzI3","npr":"https://www.npr.org/podcasts/586725995/the-bay","stitcher":"https://www.stitcher.com/podcast/kqed/the-bay","spotify":"https://open.spotify.com/show/4BIKBKIujizLHlIlBNaAqQ","rss":"https://feeds.megaphone.fm/KQINC8259786327"}},"californiareport":{"id":"californiareport","title":"The California Report","tagline":"California, day by day","info":"KQED’s statewide radio news program providing daily coverage of issues, trends and public policy decisions.","imageSrc":"https://cdn.kqed.org/wp-content/uploads/2024/04/The-California-Report-Podcast-Tile-703x703-1.jpg","imageAlt":"KQED The California Report","officialWebsiteLink":"/californiareport","meta":{"site":"news","source":"kqed","order":"9"},"link":"/californiareport","subscribe":{"apple":"https://podcasts.apple.com/us/podcast/kqeds-the-california-report/id79681292","google":"https://podcasts.google.com/feed/aHR0cHM6Ly9mZWVkcy5tZWdhcGhvbmUuZm0vS1FJTkM1MDAyODE4NTgz","npr":"https://www.npr.org/podcasts/432285393/the-california-report","stitcher":"https://www.stitcher.com/podcast/kqedfm-kqeds-the-california-report-podcast-8838","rss":"https://ww2.kqed.org/news/tag/tcram/feed/podcast"}},"californiareportmagazine":{"id":"californiareportmagazine","title":"The California Report Magazine","tagline":"Your state, your stories","info":"Every week, The California Report Magazine takes you on a road trip for the ears: to visit the places and meet the people who make California unique. The in-depth storytelling podcast from the California Report.","airtime":"FRI 4:30pm-5pm, 6:30pm-7pm, 11pm-11:30pm","imageSrc":"https://cdn.kqed.org/wp-content/uploads/2024/04/The-California-Report-Magazine-Podcast-Tile-703x703-1.jpg","officialWebsiteLink":"/californiareportmagazine","meta":{"site":"news","source":"kqed","order":"10"},"link":"/californiareportmagazine","subscribe":{"apple":"https://podcasts.apple.com/us/podcast/the-california-report-magazine/id1314750545","google":"https://podcasts.google.com/feed/aHR0cHM6Ly9mZWVkcy5tZWdhcGhvbmUuZm0vS1FJTkM3NjkwNjk1OTAz","npr":"https://www.npr.org/podcasts/564733126/the-california-report-magazine","stitcher":"https://www.stitcher.com/podcast/kqed/the-california-report-magazine","rss":"https://ww2.kqed.org/news/tag/tcrmag/feed/podcast"}},"theleap":{"id":"theleap","title":"The Leap","tagline":"What if you closed your eyes, and jumped?","info":"Stories about people making dramatic, risky changes, told by award-winning public radio reporter Judy Campbell.","imageSrc":"https://cdn.kqed.org/wp-content/uploads/2024/04/The-Leap-Podcast-Tile-703x703-1.jpg","imageAlt":"KQED The Leap","officialWebsiteLink":"/podcasts/theleap","meta":{"site":"news","source":"kqed","order":"14"},"link":"/podcasts/theleap","subscribe":{"apple":"https://podcasts.apple.com/us/podcast/the-leap/id1046668171","google":"https://podcasts.google.com/feed/aHR0cHM6Ly9mZWVkcy5tZWdhcGhvbmUuZm0vS1FJTkM0NTcwODQ2MjY2","npr":"https://www.npr.org/podcasts/447248267/the-leap","stitcher":"https://www.stitcher.com/podcast/kqed/the-leap","spotify":"https://open.spotify.com/show/3sSlVHHzU0ytLwuGs1SD1U","rss":"https://ww2.kqed.org/news/programs/the-leap/feed/podcast"}},"masters-of-scale":{"id":"masters-of-scale","title":"Masters of Scale","info":"Masters of Scale is an original podcast in which LinkedIn co-founder and Greylock Partner Reid Hoffman sets out to describe and prove theories that explain how great entrepreneurs take their companies from zero to a gazillion in ingenious fashion.","airtime":"Every other Wednesday June 12 through October 16 at 8pm (repeats Thursdays at 2am)","imageSrc":"https://cdn.kqed.org/wp-content/uploads/2024/04/Masters-of-Scale-Podcast-Tile-360x360-1.jpg","officialWebsiteLink":"https://mastersofscale.com/","meta":{"site":"radio","source":"WaitWhat"},"link":"/radio/program/masters-of-scale","subscribe":{"apple":"http://mastersofscale.app.link/","rss":"https://rss.art19.com/masters-of-scale"}},"the-moth-radio-hour":{"id":"the-moth-radio-hour","title":"The Moth Radio Hour","info":"Since its launch in 1997, The Moth has presented thousands of true stories, told live and without notes, to standing-room-only crowds worldwide. Moth storytellers stand alone, under a spotlight, with only a microphone and a roomful of strangers. The storyteller and the audience embark on a high-wire act of shared experience which is both terrifying and exhilarating. Since 2008, The Moth podcast has featured many of our favorite stories told live on Moth stages around the country. For information on all of our programs and live events, visit themoth.org.","airtime":"SAT 8pm-9pm and SUN 11am-12pm","imageSrc":"https://ww2.kqed.org/radio/wp-content/uploads/sites/50/2018/04/theMoth.jpg","officialWebsiteLink":"https://themoth.org/","meta":{"site":"arts","source":"prx"},"link":"/radio/program/the-moth-radio-hour","subscribe":{"apple":"https://itunes.apple.com/us/podcast/the-moth-podcast/id275699983?mt=2","tuneIn":"https://tunein.com/radio/The-Moth-p273888/","rss":"http://feeds.themoth.org/themothpodcast"}},"the-new-yorker-radio-hour":{"id":"the-new-yorker-radio-hour","title":"The New Yorker Radio Hour","info":"The New Yorker Radio Hour is a weekly program presented by the magazine's editor, David Remnick, and produced by WNYC Studios and The New Yorker. Each episode features a diverse mix of interviews, profiles, storytelling, and an occasional burst of humor inspired by the magazine, and shaped by its writers, artists, and editors. This isn't a radio version of a magazine, but something all its own, reflecting the rich possibilities of audio storytelling and conversation. Theme music for the show was composed and performed by Merrill Garbus of tUnE-YArDs.","airtime":"SAT 10am-11am","imageSrc":"https://cdn.kqed.org/wp-content/uploads/2024/04/The-New-Yorker-Podcast-Tile-360x360-1.jpg","officialWebsiteLink":"https://www.wnycstudios.org/shows/tnyradiohour","meta":{"site":"arts","source":"WNYC"},"link":"/radio/program/the-new-yorker-radio-hour","subscribe":{"apple":"https://itunes.apple.com/us/podcast/id1050430296","tuneIn":"https://tunein.com/podcasts/WNYC-Podcasts/New-Yorker-Radio-Hour-p803804/","rss":"https://feeds.feedburner.com/newyorkerradiohour"}},"the-takeaway":{"id":"the-takeaway","title":"The Takeaway","info":"The Takeaway is produced in partnership with its national audience. It delivers perspective and analysis to help us better understand the day’s news. Be a part of the American conversation on-air and online.","airtime":"MON-THU 12pm-1pm","imageSrc":"https://cdn.kqed.org/wp-content/uploads/2024/04/The-Takeaway-Podcast-Tile-360x360-1.jpg","officialWebsiteLink":"https://www.wnycstudios.org/shows/takeaway","meta":{"site":"news","source":"WNYC"},"link":"/radio/program/the-takeaway","subscribe":{"apple":"https://itunes.apple.com/us/podcast/the-takeaway/id363143310?mt=2","tuneIn":"http://tunein.com/radio/The-Takeaway-p150731/","rss":"https://feeds.feedburner.com/takeawaypodcast"}},"this-american-life":{"id":"this-american-life","title":"This American Life","info":"This American Life is a weekly public radio show, heard by 2.2 million people on more than 500 stations. Another 2.5 million people download the weekly podcast. It is hosted by Ira Glass, produced in collaboration with Chicago Public Media, delivered to stations by PRX The Public Radio Exchange, and has won all of the major broadcasting awards.","airtime":"SAT 12pm-1pm, 7pm-8pm","imageSrc":"https://ww2.kqed.org/radio/wp-content/uploads/sites/50/2018/04/thisAmericanLife.png","officialWebsiteLink":"https://www.thisamericanlife.org/","meta":{"site":"news","source":"wbez"},"link":"/radio/program/this-american-life","subscribe":{"apple":"https://itunes.apple.com/WebObjects/MZStore.woa/wa/viewPodcast?s=143441&mt=2&id=201671138&at=11l79Y&ct=nprdirectory","rss":"https://www.thisamericanlife.org/podcast/rss.xml"}},"truthbetold":{"id":"truthbetold","title":"Truth Be Told","tagline":"Advice by and for people of color","info":"We’re the friend you call after a long day, the one who gets it. Through wisdom from some of the greatest thinkers of our time, host Tonya Mosley explores what it means to grow and thrive as a Black person in America, while discovering new ways of being that serve as a portal to more love, more healing, and more joy.","airtime":"","imageSrc":"https://cdn.kqed.org/wp-content/uploads/2024/04/Truth-Be-Told-Podcast-Tile-360x360-1.jpg","imageAlt":"KQED Truth Be Told with Tonya Mosley","officialWebsiteLink":"https://www.kqed.ord/podcasts/truthbetold","meta":{"site":"news","source":"npr","order":"12"},"link":"/podcasts/truthbetold","subscribe":{"apple":"https://podcasts.apple.com/us/podcast/truth-be-told/id1462216572","google":"https://podcasts.google.com/feed/aHR0cHM6Ly93dzIua3FlZC5vcmcvbmV3cy9jYXRlZ29yeS90cnV0aC1iZS10b2xkLXBvZGNhc3QvZmVlZA","npr":"https://www.npr.org/podcasts/719210818/truth-be-told","stitcher":"https://www.stitcher.com/s?fid=398170&refid=stpr","spotify":"https://open.spotify.com/show/587DhwTBxke6uvfwDfaV5N"}},"wait-wait-dont-tell-me":{"id":"wait-wait-dont-tell-me","title":"Wait Wait... Don't Tell Me!","info":"Peter Sagal and Bill Kurtis host the weekly NPR News quiz show alongside some of the best and brightest news and entertainment personalities.","airtime":"SUN 10am-11am, SAT 11am-12pm, SAT 6pm-7pm","imageSrc":"https://cdn.kqed.org/wp-content/uploads/2024/04/Wait-Wait-Podcast-Tile-300x300-1.jpg","officialWebsiteLink":"https://www.npr.org/programs/wait-wait-dont-tell-me/","meta":{"site":"news","source":"npr"},"link":"/radio/program/wait-wait-dont-tell-me","subscribe":{"npr":"https://rpb3r.app.goo.gl/Xogv","apple":"https://itunes.apple.com/WebObjects/MZStore.woa/wa/viewPodcast?s=143441&mt=2&id=121493804&at=11l79Y&ct=nprdirectory","tuneIn":"https://tunein.com/radio/Wait-Wait-Dont-Tell-Me-p46/","rss":"https://feeds.npr.org/344098539/podcast.xml"}},"washington-week":{"id":"washington-week","title":"Washington Week","info":"For 50 years, Washington Week has been the most intelligent and up to date conversation about the most important news stories of the week. Washington Week is the longest-running news and public affairs program on PBS and features journalists -- not pundits -- lending insight and perspective to the week's important news stories.","airtime":"SAT 1:30am-2am","imageSrc":"https://ww2.kqed.org/radio/wp-content/uploads/sites/50/2018/04/washington-week.jpg","officialWebsiteLink":"http://www.pbs.org/weta/washingtonweek/","meta":{"site":"news","source":"pbs"},"link":"/radio/program/washington-week","subscribe":{"apple":"https://itunes.apple.com/us/podcast/washington-week-audio-pbs/id83324702?mt=2","tuneIn":"https://tunein.com/podcasts/Current-Affairs/Washington-Week-p693/","rss":"http://feeds.pbs.org/pbs/weta/washingtonweek-audio"}},"weekend-edition-saturday":{"id":"weekend-edition-saturday","title":"Weekend Edition Saturday","info":"Weekend Edition Saturday wraps up the week's news and offers a mix of analysis and features on a wide range of topics, including arts, sports, entertainment, and human interest stories. The two-hour program is hosted by NPR's Peabody Award-winning Scott Simon.","airtime":"SAT 5am-10am","imageSrc":"https://cdn.kqed.org/wp-content/uploads/2024/04/Weekend-Edition-Podcast-Tile-360x360-1.jpg","officialWebsiteLink":"https://www.npr.org/programs/weekend-edition-saturday/","meta":{"site":"news","source":"npr"},"link":"/radio/program/weekend-edition-saturday"},"weekend-edition-sunday":{"id":"weekend-edition-sunday","title":"Weekend Edition Sunday","info":"Weekend Edition Sunday features interviews with newsmakers, artists, scientists, politicians, musicians, writers, theologians and historians. The program has covered news events from Nelson Mandela's 1990 release from a South African prison to the capture of Saddam Hussein.","airtime":"SUN 5am-10am","imageSrc":"https://cdn.kqed.org/wp-content/uploads/2024/04/Weekend-Edition-Podcast-Tile-360x360-1.jpg","officialWebsiteLink":"https://www.npr.org/programs/weekend-edition-sunday/","meta":{"site":"news","source":"npr"},"link":"/radio/program/weekend-edition-sunday"},"world-affairs":{"id":"world-affairs","title":"World Affairs","info":"The world as we knew it is undergoing a rapid transformation…so what's next? Welcome to WorldAffairs, your guide to a changing world. We give you the context you need to navigate across borders and ideologies. Through sound-rich stories and in-depth interviews, we break down what it means to be a global citizen on a hot, crowded planet. Our hosts, Ray Suarez, Teresa Cotsirilos and Philip Yun help you make sense of an uncertain world, one story at a time.","airtime":"MON 10pm, TUE 1am, SAT 3am","imageSrc":"https://cdn.kqed.org/wp-content/uploads/2024/04/World-Affairs-Podcast-Tile-360x360-1.jpg ","officialWebsiteLink":"https://www.worldaffairs.org/","meta":{"site":"news","source":"World Affairs"},"link":"/radio/program/world-affairs","subscribe":{"apple":"https://itunes.apple.com/us/podcast/world-affairs/id101215657?mt=2","tuneIn":"https://tunein.com/radio/WorldAffairs-p1665/","rss":"https://worldaffairs.libsyn.com/rss"}},"on-shifting-ground":{"id":"on-shifting-ground","title":"On Shifting Ground with Ray Suarez","info":"Geopolitical turmoil. A warming planet. Authoritarians on the rise. We live in a chaotic world that’s rapidly shifting around us. “On Shifting Ground with Ray Suarez” explores international fault lines and how they impact us all. Each week, NPR veteran Ray Suarez hosts conversations with journalists, leaders and policy experts to help us read between the headlines – and give us hope for human resilience.","airtime":"MON 10pm, TUE 1am, SAT 3am","imageSrc":"https://ww2.kqed.org/app/uploads/2022/12/onshiftingground-600x600-1.png","officialWebsiteLink":"https://worldaffairs.org/radio-podcast/","meta":{"site":"news","source":"On Shifting Ground"},"link":"/radio/program/on-shifting-ground","subscribe":{"apple":"https://podcasts.apple.com/ie/podcast/on-shifting-ground/id101215657","rss":"https://feeds.libsyn.com/36668/rss"}},"hidden-brain":{"id":"hidden-brain","title":"Hidden Brain","info":"Shankar Vedantam uses science and storytelling to reveal the unconscious patterns that drive human behavior, shape our choices and direct our relationships.","imageSrc":"https://ww2.kqed.org/radio/wp-content/uploads/sites/50/2018/05/hiddenbrain.jpg","officialWebsiteLink":"https://www.npr.org/series/423302056/hidden-brain","airtime":"SUN 7pm-8pm","meta":{"site":"news","source":"NPR"},"link":"/radio/program/hidden-brain","subscribe":{"apple":"https://itunes.apple.com/us/podcast/hidden-brain/id1028908750?mt=2","tuneIn":"https://tunein.com/podcasts/Science-Podcasts/Hidden-Brain-p787503/","rss":"https://feeds.npr.org/510308/podcast.xml"}},"city-arts":{"id":"city-arts","title":"City Arts & Lectures","info":"A one-hour radio program to hear celebrated writers, artists and thinkers address contemporary ideas and values, often discussing the creative process. Please note: tapes or transcripts are not available","imageSrc":"https://ww2.kqed.org/radio/wp-content/uploads/sites/50/2018/05/cityartsandlecture-300x300.jpg","officialWebsiteLink":"https://www.cityarts.net/","airtime":"SUN 1pm-2pm, TUE 10pm, WED 1am","meta":{"site":"news","source":"City Arts & Lectures"},"link":"https://www.cityarts.net","subscribe":{"tuneIn":"https://tunein.com/radio/City-Arts-and-Lectures-p692/","rss":"https://www.cityarts.net/feed/"}},"white-lies":{"id":"white-lies","title":"White Lies","info":"In 1965, Rev. James Reeb was murdered in Selma, Alabama. Three men were tried and acquitted, but no one was ever held to account. Fifty years later, two journalists from Alabama return to the city where it happened, expose the lies that kept the murder from being solved and uncover a story about guilt and memory that says as much about America today as it does about the past.","imageSrc":"https://cdn.kqed.org/wp-content/uploads/2024/04/White-Lies-Podcast-Tile-360x360-1.jpg","officialWebsiteLink":"https://www.npr.org/podcasts/510343/white-lies","meta":{"site":"news","source":"npr"},"link":"/radio/program/white-lies","subscribe":{"npr":"https://rpb3r.app.goo.gl/whitelies","apple":"https://podcasts.apple.com/podcast/id1462650519?mt=2&at=11l79Y&ct=nprdirectory","google":"https://podcasts.google.com/feed/aHR0cHM6Ly9mZWVkcy5ucHIub3JnLzUxMDM0My9wb2RjYXN0LnhtbA","spotify":"https://open.spotify.com/show/12yZ2j8vxqhc0QZyRES3ft?si=LfWYEK6URA63hueKVxRLAw","rss":"https://feeds.npr.org/510343/podcast.xml"}},"rightnowish":{"id":"rightnowish","title":"Rightnowish","tagline":"Art is where you find it","info":"Rightnowish digs into life in the Bay Area right now… ish. Journalist Pendarvis Harshaw takes us to galleries painted on the sides of liquor stores in West Oakland. We'll dance in warehouses in the Bayview, make smoothies with kids in South Berkeley, and listen to classical music in a 1984 Cutlass Supreme in Richmond. Every week, Pen talks to movers and shakers about how the Bay Area shapes what they create, and how they shape the place we call home.","imageSrc":"https://cdn.kqed.org/wp-content/uploads/2024/04/Rightnowish-Podcast-Tile-500x500-1.jpg","imageAlt":"KQED Rightnowish with Pendarvis Harshaw","officialWebsiteLink":"/podcasts/rightnowish","meta":{"site":"arts","source":"kqed","order":"5"},"link":"/podcasts/rightnowish","subscribe":{"npr":"https://www.npr.org/podcasts/721590300/rightnowish","rss":"https://ww2.kqed.org/arts/programs/rightnowish/feed/podcast","apple":"https://podcasts.apple.com/us/podcast/rightnowish/id1482187648","stitcher":"https://www.stitcher.com/podcast/kqed/rightnowish","google":"https://podcasts.google.com/feed/aHR0cHM6Ly9mZWVkcy5tZWdhcGhvbmUuZm0vS1FJTkMxMjU5MTY3NDc4","spotify":"https://open.spotify.com/show/7kEJuafTzTVan7B78ttz1I"}},"jerrybrown":{"id":"jerrybrown","title":"The Political Mind of Jerry Brown","tagline":"Lessons from a lifetime in politics","info":"The Political Mind of Jerry Brown brings listeners the wisdom of the former Governor, Mayor, and presidential candidate. Scott Shafer interviewed Brown for more than 40 hours, covering the former governor's life and half-century in the political game – and Brown has some lessons he'd like to share. ","imageSrc":"https://cdn.kqed.org/wp-content/uploads/2024/04/The-Political-Mind-of-Jerry-Brown-Podcast-Tile-703x703-1.jpg","imageAlt":"KQED The Political Mind of Jerry Brown","officialWebsiteLink":"/podcasts/jerrybrown","meta":{"site":"news","source":"kqed","order":"16"},"link":"/podcasts/jerrybrown","subscribe":{"npr":"https://www.npr.org/podcasts/790253322/the-political-mind-of-jerry-brown","apple":"https://itunes.apple.com/us/podcast/id1492194549","rss":"https://ww2.kqed.org/news/series/jerrybrown/feed/podcast/","tuneIn":"http://tun.in/pjGcK","stitcher":"https://www.stitcher.com/podcast/kqed/the-political-mind-of-jerry-brown","spotify":"https://open.spotify.com/show/54C1dmuyFyKMFttY6X2j6r?si=K8SgRCoISNK6ZbjpXrX5-w","google":"https://podcasts.google.com/feed/aHR0cHM6Ly93dzIua3FlZC5vcmcvbmV3cy9zZXJpZXMvamVycnlicm93bi9mZWVkL3BvZGNhc3Qv"}},"the-splendid-table":{"id":"the-splendid-table","title":"The Splendid Table","info":"\u003cem>The Splendid Table\u003c/em> hosts our nation's conversations about cooking, sustainability and food culture.","imageSrc":"https://cdn.kqed.org/wp-content/uploads/2024/04/The-Splendid-Table-Podcast-Tile-360x360-1.jpg","officialWebsiteLink":"https://www.splendidtable.org/","airtime":"SUN 10-11 pm","meta":{"site":"radio","source":"npr"},"link":"/radio/program/the-splendid-table"}},"racesReducer":{"5921":{"id":"5921","type":"apRace","location":"State of California","raceName":"U.S. House of Representatives, District 7","raceDescription":"Top candidate wins seat.","raceType":"top2","totalVotes":158422,"precinctsReportPercentage":98.97,"eevp":99,"tabulationStatus":"Tabulation Paused","dateUpdated":"March 22, 2024","timeUpdated":"4:48 PM","source":"AP","candidates":[{"candidateName":"Doris Matsui","candidateIncumbent":true,"candidateParty":"D","voteCount":89456,"isWinner":true},{"candidateName":"Tom Silva","candidateIncumbent":false,"candidateParty":"R","voteCount":48920,"isWinner":true},{"candidateName":"David Mandel","candidateIncumbent":false,"candidateParty":"D","voteCount":20046,"isWinner":false}],"winnerDateTime":"2024-03-09T01:00:38.194Z"},"5922":{"id":"5922","type":"apRace","location":"State of California","raceName":"U.S. House of Representatives, District 8","raceDescription":"Top candidate wins seat.","raceType":"top2","totalVotes":0,"uncontested":true,"precinctsReportPercentage":0,"eevp":0,"tabulationStatus":"Tabulation Paused","dateUpdated":"March 22, 2024","timeUpdated":"4:20 PM","source":"AP","candidates":[{"candidateName":"Rudy Recile","candidateIncumbent":false,"candidateParty":"R","voteCount":0,"isWinner":true},{"candidateName":"John Garamendi","candidateIncumbent":true,"candidateParty":"D","voteCount":0,"isWinner":true}],"winnerDateTime":"2024-03-06T04:00:30.000Z"},"5924":{"id":"5924","type":"apRace","location":"State of California","raceName":"U.S. House of Representatives, District 10","raceDescription":"Top candidate wins seat.","raceType":"top2","totalVotes":185034,"precinctsReportPercentage":99.07,"eevp":99,"tabulationStatus":"Tabulation Paused","dateUpdated":"March 22, 2024","timeUpdated":"4:48 PM","source":"AP","candidates":[{"candidateName":"Mark DeSaulnier","candidateIncumbent":true,"candidateParty":"D","voteCount":121265,"isWinner":true},{"candidateName":"Katherine Piccinini","candidateIncumbent":false,"candidateParty":"R","voteCount":34883,"isWinner":true},{"candidateName":"Nolan Chen","candidateIncumbent":false,"candidateParty":"R","voteCount":19459,"isWinner":false},{"candidateName":"Joe Sweeney","candidateIncumbent":false,"candidateParty":"NPP","voteCount":7606,"isWinner":false},{"candidateName":"Mohamed Elsherbini","candidateIncumbent":false,"candidateParty":"NPP","voteCount":1821,"isWinner":false}],"winnerDateTime":"2024-03-09T01:02:32.415Z"},"5926":{"id":"5926","type":"apRace","location":"State of California","raceName":"U.S. House of Representatives, District 12","raceDescription":"Top candidate wins seat.","raceType":"top2","totalVotes":153801,"precinctsReportPercentage":98.88,"eevp":99,"tabulationStatus":"Tabulation Paused","dateUpdated":"March 20, 2024","timeUpdated":"4:41 PM","source":"AP","candidates":[{"candidateName":"Lateefah Simon","candidateIncumbent":false,"candidateParty":"D","voteCount":85905,"isWinner":true},{"candidateName":"Jennifer Tran","candidateIncumbent":false,"candidateParty":"D","voteCount":22964,"isWinner":true},{"candidateName":"Tony Daysog","candidateIncumbent":false,"candidateParty":"D","voteCount":17197,"isWinner":false},{"candidateName":"Stephen Slauson","candidateIncumbent":false,"candidateParty":"R","voteCount":9699,"isWinner":false},{"candidateName":"Glenn Kaplan","candidateIncumbent":false,"candidateParty":"D","voteCount":6785,"isWinner":false},{"candidateName":"Eric Wilson","candidateIncumbent":false,"candidateParty":"D","voteCount":4243,"isWinner":false},{"candidateName":"Abdur Sikder","candidateIncumbent":false,"candidateParty":"D","voteCount":2847,"isWinner":false},{"candidateName":"Ned Nuerge","candidateIncumbent":false,"candidateParty":"R","voteCount":2532,"isWinner":false},{"candidateName":"Andre Todd","candidateIncumbent":false,"candidateParty":"D","voteCount":1629,"isWinner":false}],"winnerDateTime":"2024-03-16T00:22:36.062Z"},"5928":{"id":"5928","type":"apRace","location":"State of California","raceName":"U.S. House of Representatives, District 14","raceDescription":"Top candidate wins seat.","raceType":"top2","totalVotes":125831,"precinctsReportPercentage":99.14,"eevp":99,"tabulationStatus":"Tabulation Paused","dateUpdated":"March 20, 2024","timeUpdated":"4:41 PM","source":"AP","candidates":[{"candidateName":"Eric Swalwell","candidateIncumbent":true,"candidateParty":"D","voteCount":83989,"isWinner":true},{"candidateName":"Vin Kruttiventi","candidateIncumbent":false,"candidateParty":"R","voteCount":22106,"isWinner":true},{"candidateName":"Alison Hayden","candidateIncumbent":false,"candidateParty":"R","voteCount":11928,"isWinner":false},{"candidateName":"Luis Reynoso","candidateIncumbent":false,"candidateParty":"R","voteCount":7808,"isWinner":false}],"winnerDateTime":"2024-03-12T00:51:36.366Z"},"5930":{"id":"5930","type":"apRace","location":"State of California","raceName":"U.S. House of Representatives, District 16","raceDescription":"Top candidate wins seat.","raceType":"top2","totalVotes":182135,"precinctsReportPercentage":98.91,"eevp":99,"tabulationStatus":"Tabulation Paused","dateUpdated":"April 3, 2024","timeUpdated":"3:04 PM","source":"AP","candidates":[{"candidateName":"Sam Liccardo","candidateIncumbent":false,"candidateParty":"D","voteCount":38489,"isWinner":true},{"candidateName":"Evan Low","candidateIncumbent":false,"candidateParty":"D","voteCount":30249,"isWinner":false},{"candidateName":"Joe Simitian","candidateIncumbent":false,"candidateParty":"D","voteCount":30249,"isWinner":false},{"candidateName":"Peter Ohtaki","candidateIncumbent":false,"candidateParty":"R","voteCount":23275,"isWinner":false},{"candidateName":"Peter Dixon","candidateIncumbent":false,"candidateParty":"D","voteCount":14673,"isWinner":false},{"candidateName":"Rishi Kumar","candidateIncumbent":false,"candidateParty":"D","voteCount":12377,"isWinner":false},{"candidateName":"Karl Ryan","candidateIncumbent":false,"candidateParty":"R","voteCount":11557,"isWinner":false},{"candidateName":"Julie Lythcott-Haims","candidateIncumbent":false,"candidateParty":"D","voteCount":11383,"isWinner":false},{"candidateName":"Ahmed Mostafa","candidateIncumbent":false,"candidateParty":"D","voteCount":5811,"isWinner":false},{"candidateName":"Greg Tanaka","candidateIncumbent":false,"candidateParty":"D","voteCount":2421,"isWinner":false},{"candidateName":"Joby Bernstein","candidateIncumbent":false,"candidateParty":"D","voteCount":1651,"isWinner":false}],"winnerDateTime":"2024-03-12T00:32:05.002Z"},"5931":{"id":"5931","type":"apRace","location":"State of California","raceName":"U.S. House of Representatives, District 17","raceDescription":"Top candidate wins seat.","raceType":"top2","totalVotes":117534,"precinctsReportPercentage":98.92,"eevp":99,"tabulationStatus":"Tabulation Paused","dateUpdated":"March 22, 2024","timeUpdated":"4:20 PM","source":"AP","candidates":[{"candidateName":"Ro Khanna","candidateIncumbent":true,"candidateParty":"D","voteCount":73941,"isWinner":true},{"candidateName":"Anita Chen","candidateIncumbent":false,"candidateParty":"R","voteCount":31539,"isWinner":true},{"candidateName":"Ritesh Tandon","candidateIncumbent":false,"candidateParty":"D","voteCount":5728,"isWinner":false},{"candidateName":"Mario Ramirez","candidateIncumbent":false,"candidateParty":"D","voteCount":4491,"isWinner":false},{"candidateName":"Joe Dehn","candidateIncumbent":false,"candidateParty":"Lib","voteCount":1835,"isWinner":false}],"winnerDateTime":"2024-03-08T01:50:53.956Z"},"5932":{"id":"5932","type":"apRace","location":"State of California","raceName":"U.S. House of Representatives, District 18","raceDescription":"Top candidate wins seat.","raceType":"top2","totalVotes":96302,"precinctsReportPercentage":98.93,"eevp":98.83,"tabulationStatus":"Tabulation Paused","dateUpdated":"March 25, 2024","timeUpdated":"5:47 AM","source":"AP","candidates":[{"candidateName":"Zoe Lofgren","candidateIncumbent":true,"candidateParty":"D","voteCount":49323,"isWinner":true},{"candidateName":"Peter Hernandez","candidateIncumbent":false,"candidateParty":"R","voteCount":31622,"isWinner":true},{"candidateName":"Charlene Nijmeh","candidateIncumbent":false,"candidateParty":"D","voteCount":10614,"isWinner":false},{"candidateName":"Lawrence Milan","candidateIncumbent":false,"candidateParty":"D","voteCount":2712,"isWinner":false},{"candidateName":"Luele Kifle","candidateIncumbent":false,"candidateParty":"D","voteCount":2031,"isWinner":false}],"winnerDateTime":"2024-03-12T00:26:02.706Z"},"5963":{"id":"5963","type":"apRace","location":"State of California","raceName":"State House, District 2","raceDescription":"Top candidate wins seat.","raceType":"top2","totalVotes":139085,"precinctsReportPercentage":98.62,"eevp":98.6,"tabulationStatus":"Tabulation Paused","dateUpdated":"March 22, 2024","timeUpdated":"4:20 PM","source":"AP","candidates":[{"candidateName":"Michael Greer","candidateIncumbent":false,"candidateParty":"R","voteCount":38079,"isWinner":true},{"candidateName":"Chris Rogers","candidateIncumbent":false,"candidateParty":"D","voteCount":27126,"isWinner":true},{"candidateName":"Rusty Hicks","candidateIncumbent":false,"candidateParty":"D","voteCount":25615,"isWinner":false},{"candidateName":"Ariel Kelley","candidateIncumbent":false,"candidateParty":"D","voteCount":19483,"isWinner":false},{"candidateName":"Frankie Myers","candidateIncumbent":false,"candidateParty":"D","voteCount":17694,"isWinner":false},{"candidateName":"Ted Williams","candidateIncumbent":false,"candidateParty":"D","voteCount":9550,"isWinner":false},{"candidateName":"Cynthia Click","candidateIncumbent":false,"candidateParty":"D","voteCount":1538,"isWinner":false}],"winnerDateTime":"2024-03-22T21:38:36.711Z"},"5972":{"id":"5972","type":"apRace","location":"State of California","raceName":"State House, District 11","raceDescription":"Top candidate wins seat.","raceType":"top2","totalVotes":99775,"precinctsReportPercentage":99,"eevp":99,"tabulationStatus":"Tabulation Paused","dateUpdated":"March 22, 2024","timeUpdated":"4:48 PM","source":"AP","candidates":[{"candidateName":"Lori Wilson","candidateIncumbent":true,"candidateParty":"D","voteCount":50085,"isWinner":true},{"candidateName":"Dave Ennis","candidateIncumbent":false,"candidateParty":"R","voteCount":26074,"isWinner":true},{"candidateName":"Wanda Wallis","candidateIncumbent":false,"candidateParty":"R","voteCount":14638,"isWinner":false},{"candidateName":"Jeffrey Flack","candidateIncumbent":false,"candidateParty":"D","voteCount":8978,"isWinner":false}],"winnerDateTime":"2024-03-08T02:01:24.524Z"},"5973":{"id":"5973","type":"apRace","location":"State of California","raceName":"State House, District 12","raceDescription":"Top candidate wins seat.","raceType":"top2","totalVotes":143532,"precinctsReportPercentage":99.19,"eevp":99,"tabulationStatus":"Tabulation Paused","dateUpdated":"March 22, 2024","timeUpdated":"4:38 PM","source":"AP","candidates":[{"candidateName":"Damon Connolly","candidateIncumbent":true,"candidateParty":"D","voteCount":111275,"isWinner":true},{"candidateName":"Andy Podshadley","candidateIncumbent":false,"candidateParty":"R","voteCount":17240,"isWinner":true},{"candidateName":"Eryn Cervantes","candidateIncumbent":false,"candidateParty":"R","voteCount":15017,"isWinner":false}],"winnerDateTime":"2024-03-21T00:25:32.262Z"},"5975":{"id":"5975","type":"apRace","location":"State of California","raceName":"State House, District 14","raceDescription":"Top candidate wins seat.","raceType":"top2","totalVotes":106997,"precinctsReportPercentage":99.06,"eevp":99,"tabulationStatus":"Tabulation Paused","dateUpdated":"March 22, 2024","timeUpdated":"4:48 PM","source":"AP","candidates":[{"candidateName":"Buffy Wicks","candidateIncumbent":true,"candidateParty":"D","voteCount":78678,"isWinner":true},{"candidateName":"Margot Smith","candidateIncumbent":false,"candidateParty":"D","voteCount":18251,"isWinner":true},{"candidateName":"Utkarsh Jain","candidateIncumbent":false,"candidateParty":"R","voteCount":10068,"isWinner":false}],"winnerDateTime":"2024-03-15T01:30:34.539Z"},"5976":{"id":"5976","type":"apRace","location":"State of California","raceName":"State House, District 15","raceDescription":"Top candidate wins seat.","raceType":"top2","totalVotes":97144,"precinctsReportPercentage":98.98,"eevp":99,"tabulationStatus":"Tabulation Paused","dateUpdated":"March 22, 2024","timeUpdated":"4:48 PM","source":"AP","candidates":[{"candidateName":"Sonia Ledo","candidateIncumbent":false,"candidateParty":"R","voteCount":30946,"isWinner":true},{"candidateName":"Anamarie Farias","candidateIncumbent":false,"candidateParty":"D","voteCount":29512,"isWinner":true},{"candidateName":"Monica Wilson","candidateIncumbent":false,"candidateParty":"D","voteCount":24775,"isWinner":false},{"candidateName":"Karen Mitchoff","candidateIncumbent":false,"candidateParty":"D","voteCount":11911,"isWinner":false}],"winnerDateTime":"2024-03-14T00:19:38.858Z"},"5977":{"id":"5977","type":"apRace","location":"State of California","raceName":"State House, District 16","raceDescription":"Top candidate wins seat.","raceType":"top2","totalVotes":0,"uncontested":true,"precinctsReportPercentage":0,"eevp":0,"tabulationStatus":"Tabulation Paused","dateUpdated":"March 22, 2024","timeUpdated":"4:20 PM","source":"AP","candidates":[{"candidateName":"Joseph Rubay","candidateIncumbent":false,"candidateParty":"R","voteCount":0,"isWinner":true},{"candidateName":"Rebecca Bauer-Kahan","candidateIncumbent":true,"candidateParty":"D","voteCount":0,"isWinner":true}],"winnerDateTime":"2024-03-06T04:00:30.000Z"},"5978":{"id":"5978","type":"apRace","location":"State of California","raceName":"State House, District 17","raceDescription":"Top candidate wins seat.","raceType":"top2","totalVotes":111003,"precinctsReportPercentage":98.99,"eevp":99,"tabulationStatus":"Tabulation Paused","dateUpdated":"March 22, 2024","timeUpdated":"8:25 AM","source":"AP","candidates":[{"candidateName":"Matt Haney","candidateIncumbent":true,"candidateParty":"D","voteCount":90915,"isWinner":true},{"candidateName":"Manuel Noris-Barrera","candidateIncumbent":false,"candidateParty":"R","voteCount":13843,"isWinner":true},{"candidateName":"Otto Duke","candidateIncumbent":false,"candidateParty":"D","voteCount":6245,"isWinner":false}],"winnerDateTime":"2024-03-12T00:36:19.697Z"},"5979":{"id":"5979","type":"apRace","location":"State of California","raceName":"State House, District 18","raceDescription":"Top candidate wins seat.","raceType":"top2","totalVotes":86008,"precinctsReportPercentage":99.1,"eevp":99,"tabulationStatus":"Tabulation Paused","dateUpdated":"March 20, 2024","timeUpdated":"4:41 PM","source":"AP","candidates":[{"candidateName":"Mia Bonta","candidateIncumbent":true,"candidateParty":"D","voteCount":73040,"isWinner":true},{"candidateName":"Andre Sandford","candidateIncumbent":false,"candidateParty":"AIP","voteCount":4575,"isWinner":false},{"candidateName":"Mindy Pechenuk","candidateIncumbent":false,"candidateParty":"R","voteCount":4389,"isWinner":false},{"candidateName":"Cheyenne Kenney","candidateIncumbent":false,"candidateParty":"R","voteCount":4004,"isWinner":false}],"winnerDateTime":"2024-03-06T08:03:23.729Z"},"5980":{"id":"5980","type":"apRace","location":"State of California","raceName":"State House, District 19","raceDescription":"Top candidate wins seat.","raceType":"top2","totalVotes":113959,"precinctsReportPercentage":98.8,"eevp":99,"tabulationStatus":"Tabulation Paused","dateUpdated":"March 22, 2024","timeUpdated":"4:20 PM","source":"AP","candidates":[{"candidateName":"Catherine Stefani","candidateIncumbent":false,"candidateParty":"D","voteCount":64960,"isWinner":true},{"candidateName":"David Lee","candidateIncumbent":false,"candidateParty":"D","voteCount":33035,"isWinner":true},{"candidateName":"Nadia Flamenco","candidateIncumbent":false,"candidateParty":"R","voteCount":8335,"isWinner":false},{"candidateName":"Arjun Sodhani","candidateIncumbent":false,"candidateParty":"R","voteCount":7629,"isWinner":false}],"winnerDateTime":"2024-03-11T23:50:23.109Z"},"5981":{"id":"5981","type":"apRace","location":"State of California","raceName":"State House, District 20","raceDescription":"Top candidate wins seat.","raceType":"top2","totalVotes":0,"uncontested":true,"precinctsReportPercentage":0,"eevp":0,"tabulationStatus":"Tabulation Paused","dateUpdated":"March 20, 2024","timeUpdated":"4:36 PM","source":"AP","candidates":[{"candidateName":"Liz Ortega","candidateIncumbent":true,"candidateParty":"D","voteCount":0,"isWinner":true}],"winnerDateTime":"2024-03-06T04:00:30.000Z"},"5982":{"id":"5982","type":"apRace","location":"State of California","raceName":"State House, District 21","raceDescription":"Top candidate wins seat.","raceType":"top2","totalVotes":0,"uncontested":true,"precinctsReportPercentage":0,"eevp":0,"tabulationStatus":"Tabulation Paused","dateUpdated":"March 22, 2024","timeUpdated":"4:20 PM","source":"AP","candidates":[{"candidateName":"Mark Gilham","candidateIncumbent":false,"candidateParty":"R","voteCount":0,"isWinner":true},{"candidateName":"Diane Papan","candidateIncumbent":true,"candidateParty":"D","voteCount":0,"isWinner":true}],"winnerDateTime":"2024-03-06T04:00:30.000Z"},"5984":{"id":"5984","type":"apRace","location":"State of California","raceName":"State House, District 23","raceDescription":"Top candidate wins seat.","raceType":"top2","totalVotes":116963,"precinctsReportPercentage":98.91,"eevp":99,"tabulationStatus":"Tabulation Paused","dateUpdated":"March 22, 2024","timeUpdated":"4:20 PM","source":"AP","candidates":[{"candidateName":"Marc Berman","candidateIncumbent":true,"candidateParty":"D","voteCount":67106,"isWinner":true},{"candidateName":"Lydia Kou","candidateIncumbent":false,"candidateParty":"D","voteCount":23699,"isWinner":true},{"candidateName":"Gus Mattammal","candidateIncumbent":false,"candidateParty":"R","voteCount":13277,"isWinner":false},{"candidateName":"Allan Marson","candidateIncumbent":false,"candidateParty":"R","voteCount":12881,"isWinner":false}],"winnerDateTime":"2024-03-12T01:13:06.280Z"},"5987":{"id":"5987","type":"apRace","location":"State of California","raceName":"State House, District 26","raceDescription":"Top candidate wins seat.","raceType":"top2","totalVotes":72753,"precinctsReportPercentage":99.19,"eevp":99,"tabulationStatus":"Tabulation Paused","dateUpdated":"March 22, 2024","timeUpdated":"4:20 PM","source":"AP","candidates":[{"candidateName":"Patrick Ahrens","candidateIncumbent":false,"candidateParty":"D","voteCount":25036,"isWinner":true},{"candidateName":"Tara Sreekrishnan","candidateIncumbent":false,"candidateParty":"D","voteCount":19600,"isWinner":true},{"candidateName":"Sophie Song","candidateIncumbent":false,"candidateParty":"R","voteCount":15954,"isWinner":false},{"candidateName":"Omar Din","candidateIncumbent":false,"candidateParty":"D","voteCount":8772,"isWinner":false},{"candidateName":"Bob Goodwyn","candidateIncumbent":false,"candidateParty":"Lib","voteCount":2170,"isWinner":false},{"candidateName":"Ashish Garg","candidateIncumbent":false,"candidateParty":"NPP","voteCount":1221,"isWinner":false}],"winnerDateTime":"2024-03-13T21:06:29.070Z"},"5989":{"id":"5989","type":"apRace","location":"State of California","raceName":"State House, District 28","raceDescription":"Top candidate wins seat.","raceType":"top2","totalVotes":0,"uncontested":true,"precinctsReportPercentage":0,"eevp":0,"tabulationStatus":"Tabulation Paused","dateUpdated":"March 22, 2024","timeUpdated":"5:10 PM","source":"AP","candidates":[{"candidateName":"Gail Pellerin","candidateIncumbent":true,"candidateParty":"D","voteCount":0,"isWinner":true},{"candidateName":"Liz Lawler","candidateIncumbent":false,"candidateParty":"R","voteCount":0,"isWinner":true}],"winnerDateTime":"2024-03-06T04:00:30.000Z"},"6010":{"id":"6010","type":"apRace","location":"State of California","raceName":"State House, District 49","raceDescription":"Top candidate wins seat.","raceType":"top2","totalVotes":0,"uncontested":true,"precinctsReportPercentage":0,"eevp":0,"tabulationStatus":"Tabulation Paused","dateUpdated":"March 22, 2024","timeUpdated":"4:36 PM","source":"AP","candidates":[{"candidateName":"Mike Fong","candidateIncumbent":true,"candidateParty":"D","voteCount":0,"isWinner":true},{"candidateName":"Long Liu","candidateIncumbent":false,"candidateParty":"R","voteCount":0,"isWinner":true}],"winnerDateTime":"2024-03-06T04:00:30.000Z"},"6018":{"id":"6018","type":"apRace","location":"State of California","raceName":"U.S. House of Representatives, District 2","raceDescription":"Top candidate wins seat.","raceType":"top2","totalVotes":229348,"precinctsReportPercentage":99.05,"eevp":99,"tabulationStatus":"Tabulation Paused","dateUpdated":"March 22, 2024","timeUpdated":"4:38 PM","source":"AP","candidates":[{"candidateName":"Jared Huffman","candidateIncumbent":true,"candidateParty":"D","voteCount":169005,"isWinner":true},{"candidateName":"Chris Coulombe","candidateIncumbent":false,"candidateParty":"R","voteCount":37372,"isWinner":true},{"candidateName":"Tief Gibbs","candidateIncumbent":false,"candidateParty":"R","voteCount":18437,"isWinner":false},{"candidateName":"Jolian Kangas","candidateIncumbent":false,"candidateParty":"NPP","voteCount":3166,"isWinner":false},{"candidateName":"Jason Brisendine","candidateIncumbent":false,"candidateParty":"NPP","voteCount":1368,"isWinner":false}],"winnerDateTime":"2024-03-12T00:46:10.103Z"},"6020":{"id":"6020","type":"apRace","location":"State of California","raceName":"U.S. House of Representatives, District 4","raceDescription":"Top candidate wins seat.","raceType":"top2","totalVotes":187640,"precinctsReportPercentage":96.32,"eevp":96.36,"tabulationStatus":"Tabulation Paused","dateUpdated":"March 22, 2024","timeUpdated":"4:20 PM","source":"AP","candidates":[{"candidateName":"Mike Thompson","candidateIncumbent":true,"candidateParty":"D","voteCount":118147,"isWinner":true},{"candidateName":"John Munn","candidateIncumbent":false,"candidateParty":"R","voteCount":56232,"isWinner":true},{"candidateName":"Andrew Engdahl","candidateIncumbent":false,"candidateParty":"D","voteCount":11202,"isWinner":false},{"candidateName":"Niket Patwardhan","candidateIncumbent":false,"candidateParty":"NPP","voteCount":2059,"isWinner":false}],"winnerDateTime":"2024-03-07T00:30:57.980Z"},"6025":{"id":"6025","type":"apRace","location":"State of California","raceName":"U.S. House of Representatives, District 9","raceDescription":"Top candidate wins seat.","raceType":"top2","totalVotes":121271,"precinctsReportPercentage":99.17,"eevp":99,"tabulationStatus":"Tabulation Paused","dateUpdated":"March 22, 2024","timeUpdated":"5:10 PM","source":"AP","candidates":[{"candidateName":"Josh Harder","candidateIncumbent":true,"candidateParty":"D","voteCount":60396,"isWinner":true},{"candidateName":"Kevin Lincoln","candidateIncumbent":false,"candidateParty":"R","voteCount":36346,"isWinner":true},{"candidateName":"John McBride","candidateIncumbent":false,"candidateParty":"R","voteCount":15525,"isWinner":false},{"candidateName":"Khalid Jafri","candidateIncumbent":false,"candidateParty":"R","voteCount":9004,"isWinner":false}],"winnerDateTime":"2024-03-12T00:49:44.113Z"},"6031":{"id":"6031","type":"apRace","location":"State of California","raceName":"U.S. House of Representatives, District 15","raceDescription":"Top candidate wins seat.","raceType":"top2","totalVotes":0,"uncontested":true,"precinctsReportPercentage":0,"eevp":0,"tabulationStatus":"Tabulation Paused","dateUpdated":"March 22, 2024","timeUpdated":"4:20 PM","source":"AP","candidates":[{"candidateName":"Anna Kramer","candidateIncumbent":false,"candidateParty":"R","voteCount":0,"isWinner":true},{"candidateName":"Kevin Mullin","candidateIncumbent":true,"candidateParty":"D","voteCount":0,"isWinner":true}],"winnerDateTime":"2024-03-06T04:00:30.000Z"},"6035":{"id":"6035","type":"apRace","location":"State of California","raceName":"U.S. House of Representatives, District 19","raceDescription":"Top candidate wins seat.","raceType":"top2","totalVotes":203670,"precinctsReportPercentage":99.11,"eevp":99,"tabulationStatus":"Tabulation Paused","dateUpdated":"March 25, 2024","timeUpdated":"5:47 AM","source":"AP","candidates":[{"candidateName":"Jimmy Panetta","candidateIncumbent":true,"candidateParty":"D","voteCount":132540,"isWinner":true},{"candidateName":"Jason Anderson","candidateIncumbent":false,"candidateParty":"R","voteCount":58120,"isWinner":true},{"candidateName":"Sean Dougherty","candidateIncumbent":false,"candidateParty":"Grn","voteCount":13010,"isWinner":false}],"winnerDateTime":"2024-03-07T00:23:46.779Z"},"6066":{"id":"6066","type":"apRace","location":"State of California","raceName":"State House, District 3","raceDescription":"Top candidate wins seat.","raceType":"top2","totalVotes":0,"uncontested":true,"precinctsReportPercentage":0,"eevp":0,"tabulationStatus":"Tabulation Paused","dateUpdated":"March 22, 2024","timeUpdated":"5:10 PM","source":"AP","candidates":[{"candidateName":"Jamie Gallagher","candidateIncumbent":true,"candidateParty":"R","voteCount":0,"isWinner":true},{"candidateName":"Aaron Draper","candidateIncumbent":false,"candidateParty":"D","voteCount":0,"isWinner":true}],"winnerDateTime":"2024-03-06T04:00:30.000Z"},"6067":{"id":"6067","type":"apRace","location":"State of California","raceName":"State House, District 4","raceDescription":"Top candidate wins seat.","raceType":"top2","totalVotes":0,"uncontested":true,"precinctsReportPercentage":0,"eevp":0,"tabulationStatus":"Tabulation Paused","dateUpdated":"March 22, 2024","timeUpdated":"4:20 PM","source":"AP","candidates":[{"candidateName":"Cecilia Aguiar-Curry","candidateIncumbent":true,"candidateParty":"D","voteCount":0,"isWinner":true}],"winnerDateTime":"2024-03-06T04:00:30.000Z"},"6087":{"id":"6087","type":"apRace","location":"State of California","raceName":"State House, District 24","raceDescription":"Top candidate wins seat.","raceType":"top2","totalVotes":66643,"precinctsReportPercentage":99.19,"eevp":99,"tabulationStatus":"Tabulation Paused","dateUpdated":"March 22, 2024","timeUpdated":"4:20 PM","source":"AP","candidates":[{"candidateName":"Alex Lee","candidateIncumbent":true,"candidateParty":"D","voteCount":45544,"isWinner":true},{"candidateName":"Bob Brunton","candidateIncumbent":false,"candidateParty":"R","voteCount":14951,"isWinner":true},{"candidateName":"Marti Souza","candidateIncumbent":false,"candidateParty":"R","voteCount":6148,"isWinner":false}],"winnerDateTime":"2024-03-14T23:23:49.770Z"},"6088":{"id":"6088","type":"apRace","location":"State of California","raceName":"State House, District 25","raceDescription":"Top candidate wins seat.","raceType":"top2","totalVotes":69560,"precinctsReportPercentage":99.31,"eevp":99,"tabulationStatus":"Tabulation Paused","dateUpdated":"March 22, 2024","timeUpdated":"4:20 PM","source":"AP","candidates":[{"candidateName":"Ash Kalra","candidateIncumbent":true,"candidateParty":"D","voteCount":35821,"isWinner":true},{"candidateName":"Ted Stroll","candidateIncumbent":false,"candidateParty":"R","voteCount":18255,"isWinner":true},{"candidateName":"Lan Ngo","candidateIncumbent":false,"candidateParty":"D","voteCount":15484,"isWinner":false}],"winnerDateTime":"2024-03-14T02:40:57.200Z"},"6092":{"id":"6092","type":"apRace","location":"State of California","raceName":"State House, District 29","raceDescription":"Top candidate wins seat.","raceType":"top2","totalVotes":0,"uncontested":true,"precinctsReportPercentage":0,"eevp":0,"tabulationStatus":"Tabulation Paused","dateUpdated":"March 25, 2024","timeUpdated":"5:47 AM","source":"AP","candidates":[{"candidateName":"Robert Rivas","candidateIncumbent":true,"candidateParty":"D","voteCount":0,"isWinner":true},{"candidateName":"J.W. Paine","candidateIncumbent":false,"candidateParty":"R","voteCount":0,"isWinner":true}],"winnerDateTime":"2024-03-06T04:00:30.000Z"},"6223":{"id":"6223","type":"apRace","location":"State of California","raceName":"U.S. House of Representatives, District 46","raceDescription":"Top candidate wins seat.","raceType":"top2","totalVotes":0,"uncontested":true,"precinctsReportPercentage":0,"eevp":0,"tabulationStatus":"Tabulation Paused","dateUpdated":"March 22, 2024","timeUpdated":"5:16 PM","source":"AP","candidates":[{"candidateName":"Lou Correa","candidateIncumbent":true,"candidateParty":"D","voteCount":0,"isWinner":true},{"candidateName":"David Pan","candidateIncumbent":false,"candidateParty":"R","voteCount":0,"isWinner":true}],"winnerDateTime":"2024-03-06T04:00:30.000Z"},"6530":{"id":"6530","type":"apRace","location":"State of California","raceName":"State Senate, District 3","raceDescription":"Top candidate wins seat.","raceType":"top2","totalVotes":222193,"precinctsReportPercentage":98.99,"eevp":99,"tabulationStatus":"Tabulation Paused","dateUpdated":"March 22, 2024","timeUpdated":"4:48 PM","source":"AP","candidates":[{"candidateName":"Thom Bogue","candidateIncumbent":false,"candidateParty":"R","voteCount":61776,"isWinner":true},{"candidateName":"Christopher Cabaldon","candidateIncumbent":false,"candidateParty":"D","voteCount":59041,"isWinner":true},{"candidateName":"Rozzana Verder-Aliga","candidateIncumbent":false,"candidateParty":"D","voteCount":45546,"isWinner":false},{"candidateName":"Jackie Elward","candidateIncumbent":false,"candidateParty":"D","voteCount":41127,"isWinner":false},{"candidateName":"Jimih Jones","candidateIncumbent":false,"candidateParty":"R","voteCount":14703,"isWinner":false}],"winnerDateTime":"2024-03-15T01:24:31.539Z"},"6531":{"id":"6531","type":"apRace","location":"State of California","raceName":"State Senate, District 5","raceDescription":"Top candidate wins seat.","raceType":"top2","totalVotes":171623,"precinctsReportPercentage":99.09,"eevp":99,"tabulationStatus":"Tabulation Paused","dateUpdated":"March 22, 2024","timeUpdated":"5:10 PM","source":"AP","candidates":[{"candidateName":"Jim Shoemaker","candidateIncumbent":false,"candidateParty":"R","voteCount":74935,"isWinner":true},{"candidateName":"Jerry McNerney","candidateIncumbent":false,"candidateParty":"D","voteCount":57040,"isWinner":true},{"candidateName":"Carlos Villapudua","candidateIncumbent":false,"candidateParty":"D","voteCount":39648,"isWinner":false}],"winnerDateTime":"2024-03-13T20:07:46.382Z"},"6532":{"id":"6532","type":"apRace","location":"State of California","raceName":"State Senate, District 7","raceDescription":"Top candidate wins seat.","raceType":"top2","totalVotes":192446,"precinctsReportPercentage":98.72,"eevp":98.78,"tabulationStatus":"Tabulation Paused","dateUpdated":"March 22, 2024","timeUpdated":"4:48 PM","source":"AP","candidates":[{"candidateName":"Jesse Arreguín","candidateIncumbent":false,"candidateParty":"D","voteCount":61837,"isWinner":true},{"candidateName":"Jovanka Beckles","candidateIncumbent":false,"candidateParty":"D","voteCount":34025,"isWinner":true},{"candidateName":"Dan Kalb","candidateIncumbent":false,"candidateParty":"D","voteCount":28842,"isWinner":false},{"candidateName":"Kathryn Lybarger","candidateIncumbent":false,"candidateParty":"D","voteCount":28041,"isWinner":false},{"candidateName":"Sandre Swanson","candidateIncumbent":false,"candidateParty":"D","voteCount":22862,"isWinner":false},{"candidateName":"Jeanne Solnordal","candidateIncumbent":false,"candidateParty":"R","voteCount":16839,"isWinner":false}],"winnerDateTime":"2024-03-16T00:58:11.533Z"},"6533":{"id":"6533","type":"apRace","location":"State of California","raceName":"State Senate, District 9","raceDescription":"Top candidate wins seat.","raceType":"top2","totalVotes":0,"uncontested":true,"precinctsReportPercentage":0,"eevp":0,"tabulationStatus":"Tabulation Paused","dateUpdated":"March 22, 2024","timeUpdated":"4:20 PM","source":"AP","candidates":[{"candidateName":"Tim Grayson","candidateIncumbent":false,"candidateParty":"D","voteCount":0,"isWinner":true},{"candidateName":"Marisol Rubio","candidateIncumbent":false,"candidateParty":"D","voteCount":0,"isWinner":true}],"winnerDateTime":"2024-03-06T04:00:30.000Z"},"6534":{"id":"6534","type":"apRace","location":"State of California","raceName":"State Senate, District 11","raceDescription":"Top candidate wins seat.","raceType":"top2","totalVotes":228260,"precinctsReportPercentage":99.09,"eevp":99,"tabulationStatus":"Tabulation Paused","dateUpdated":"March 22, 2024","timeUpdated":"4:20 PM","source":"AP","candidates":[{"candidateName":"Scott Wiener","candidateIncumbent":true,"candidateParty":"D","voteCount":166592,"isWinner":true},{"candidateName":"Yvette Corkrean","candidateIncumbent":false,"candidateParty":"R","voteCount":34438,"isWinner":true},{"candidateName":"Cynthia Cravens","candidateIncumbent":false,"candidateParty":"D","voteCount":18513,"isWinner":false},{"candidateName":"Jing Xiong","candidateIncumbent":false,"candidateParty":"NPP","voteCount":8717,"isWinner":false}],"winnerDateTime":"2024-03-12T02:01:51.597Z"},"6535":{"id":"6535","type":"apRace","location":"State of California","raceName":"State Senate, District 13","raceDescription":"Top candidate wins seat.","raceType":"top2","totalVotes":227191,"precinctsReportPercentage":98.88,"eevp":99,"tabulationStatus":"Tabulation Paused","dateUpdated":"March 22, 2024","timeUpdated":"4:20 PM","source":"AP","candidates":[{"candidateName":"Josh Becker","candidateIncumbent":true,"candidateParty":"D","voteCount":167127,"isWinner":true},{"candidateName":"Alexander Glew","candidateIncumbent":false,"candidateParty":"R","voteCount":42788,"isWinner":true},{"candidateName":"Christina Laskowski","candidateIncumbent":false,"candidateParty":"R","voteCount":17276,"isWinner":false}],"winnerDateTime":"2024-03-12T01:56:24.964Z"},"6536":{"id":"6536","type":"apRace","location":"State of California","raceName":"State Senate, District 15","raceDescription":"Top candidate wins seat.","raceType":"top2","totalVotes":180231,"precinctsReportPercentage":98.81,"eevp":98.95,"tabulationStatus":"Tabulation Paused","dateUpdated":"March 22, 2024","timeUpdated":"4:20 PM","source":"AP","candidates":[{"candidateName":"Dave Cortese","candidateIncumbent":true,"candidateParty":"D","voteCount":124440,"isWinner":true},{"candidateName":"Robert Howell","candidateIncumbent":false,"candidateParty":"R","voteCount":34173,"isWinner":true},{"candidateName":"Tony Loaiza","candidateIncumbent":false,"candidateParty":"R","voteCount":21618,"isWinner":false}],"winnerDateTime":"2024-03-13T01:15:45.365Z"},"6548":{"id":"6548","type":"apRace","location":"State of California","raceName":"State Senate, District 39","raceDescription":"Top candidate wins seat.","raceType":"top2","totalVotes":0,"uncontested":true,"precinctsReportPercentage":0,"eevp":0,"tabulationStatus":"Tabulation Paused","dateUpdated":"March 20, 2024","timeUpdated":"4:55 PM","source":"AP","candidates":[{"candidateName":"Akilah Weber","candidateIncumbent":false,"candidateParty":"D","voteCount":0,"isWinner":true},{"candidateName":"Bob Divine","candidateIncumbent":false,"candidateParty":"R","voteCount":0,"isWinner":true}],"winnerDateTime":"2024-03-06T04:00:30.000Z"},"6611":{"id":"6611","type":"apRace","location":"State of California","raceName":"U.S. House of Representatives, District 11","raceDescription":"Top candidate wins seat.","raceType":"top2","totalVotes":188732,"precinctsReportPercentage":98.89,"eevp":99,"tabulationStatus":"Tabulation Paused","dateUpdated":"March 22, 2024","timeUpdated":"8:25 AM","source":"AP","candidates":[{"candidateName":"Nancy Pelosi","candidateIncumbent":true,"candidateParty":"D","voteCount":138285,"isWinner":true},{"candidateName":"Bruce Lou","candidateIncumbent":false,"candidateParty":"R","voteCount":16285,"isWinner":true},{"candidateName":"Marjorie Mikels","candidateIncumbent":false,"candidateParty":"D","voteCount":9363,"isWinner":false},{"candidateName":"Bianca Von Krieg","candidateIncumbent":false,"candidateParty":"D","voteCount":7634,"isWinner":false},{"candidateName":"Jason Zeng","candidateIncumbent":false,"candidateParty":"R","voteCount":6607,"isWinner":false},{"candidateName":"Jason Boyce","candidateIncumbent":false,"candidateParty":"D","voteCount":4325,"isWinner":false},{"candidateName":"Larry Nichelson","candidateIncumbent":false,"candidateParty":"R","voteCount":3482,"isWinner":false},{"candidateName":"Eve Del Castello","candidateIncumbent":false,"candidateParty":"R","voteCount":2751,"isWinner":false}],"winnerDateTime":"2024-03-12T00:31:55.445Z"},"8589":{"id":"8589","type":"apRace","location":"State of California","raceName":"U.S. Senate, Class I","raceDescription":"Top candidate wins seat.","raceType":"top2","totalVotes":7276537,"precinctsReportPercentage":99,"eevp":99,"tabulationStatus":"Tabulation Paused","dateUpdated":"March 25, 2024","timeUpdated":"5:47 AM","source":"AP","candidates":[{"candidateName":"Adam Schiff","candidateIncumbent":false,"candidateParty":"D","voteCount":2299507,"isWinner":true},{"candidateName":"Steve Garvey","candidateIncumbent":false,"candidateParty":"R","voteCount":2292414,"isWinner":true},{"candidateName":"Katie Porter","candidateIncumbent":false,"candidateParty":"D","voteCount":1115606,"isWinner":false},{"candidateName":"Barbara Lee","candidateIncumbent":false,"candidateParty":"D","voteCount":714408,"isWinner":false},{"candidateName":"Eric Early","candidateIncumbent":false,"candidateParty":"R","voteCount":240723,"isWinner":false},{"candidateName":"James Bradley","candidateIncumbent":false,"candidateParty":"R","voteCount":98180,"isWinner":false},{"candidateName":"Christina Pascucci","candidateIncumbent":false,"candidateParty":"D","voteCount":61755,"isWinner":false},{"candidateName":"Sharleta Bassett","candidateIncumbent":false,"candidateParty":"R","voteCount":54422,"isWinner":false},{"candidateName":"Sarah Liew","candidateIncumbent":false,"candidateParty":"R","voteCount":38483,"isWinner":false},{"candidateName":"Laura Garza ","candidateIncumbent":false,"candidateParty":"NPP","voteCount":34320,"isWinner":false},{"candidateName":"Jonathan Reiss","candidateIncumbent":false,"candidateParty":"R","voteCount":34283,"isWinner":false},{"candidateName":"Sepi Gilani","candidateIncumbent":false,"candidateParty":"D","voteCount":34056,"isWinner":false},{"candidateName":"Gail Lightfoot","candidateIncumbent":false,"candidateParty":"Lib","voteCount":33046,"isWinner":false},{"candidateName":"Denice Gary-Pandol","candidateIncumbent":false,"candidateParty":"R","voteCount":25494,"isWinner":false},{"candidateName":"James Macauley","candidateIncumbent":false,"candidateParty":"R","voteCount":23168,"isWinner":false},{"candidateName":"Harmesh Kumar","candidateIncumbent":false,"candidateParty":"D","voteCount":21522,"isWinner":false},{"candidateName":"David Peterson","candidateIncumbent":false,"candidateParty":"D","voteCount":21076,"isWinner":false},{"candidateName":"Douglas Pierce","candidateIncumbent":false,"candidateParty":"D","voteCount":19371,"isWinner":false},{"candidateName":"Major Singh","candidateIncumbent":false,"candidateParty":"NPP","voteCount":16965,"isWinner":false},{"candidateName":"John Rose","candidateIncumbent":false,"candidateParty":"D","voteCount":14577,"isWinner":false},{"candidateName":"Perry Pound","candidateIncumbent":false,"candidateParty":"D","voteCount":14134,"isWinner":false},{"candidateName":"Raji Rab","candidateIncumbent":false,"candidateParty":"D","voteCount":13558,"isWinner":false},{"candidateName":"Mark Ruzon","candidateIncumbent":false,"candidateParty":"NPP","voteCount":13429,"isWinner":false},{"candidateName":"Forrest Jones","candidateIncumbent":false,"candidateParty":"AIP","voteCount":13027,"isWinner":false},{"candidateName":"Stefan Simchowitz","candidateIncumbent":false,"candidateParty":"R","voteCount":12717,"isWinner":false},{"candidateName":"Martin Veprauskas","candidateIncumbent":false,"candidateParty":"R","voteCount":9714,"isWinner":false},{"candidateName":"Don Grundmann","candidateIncumbent":false,"candidateParty":"NPP","voteCount":6582,"isWinner":false}],"winnerDateTime":"2024-03-06T05:01:46.589Z"},"8686":{"id":"8686","type":"apRace","location":"State of California","raceName":"President,","raceDescription":"Top candidate wins seat.","raceType":"top1","totalVotes":3589127,"precinctsReportPercentage":99,"eevp":99,"tabulationStatus":"Tabulation Paused","dateUpdated":"March 25, 2024","timeUpdated":"5:48 AM","source":"AP","candidates":[{"candidateName":"Joe Biden","candidateIncumbent":true,"candidateParty":"D","voteCount":3200188,"isWinner":true},{"candidateName":"Marianne Williamson","candidateIncumbent":false,"candidateParty":"D","voteCount":145690,"isWinner":false},{"candidateName":"Dean Phillips","candidateIncumbent":false,"candidateParty":"D","voteCount":99981,"isWinner":false},{"candidateName":"Armando Perez-Serrato","candidateIncumbent":false,"candidateParty":"D","voteCount":42925,"isWinner":false},{"candidateName":"Gabriel Cornejo","candidateIncumbent":false,"candidateParty":"D","voteCount":41261,"isWinner":false},{"candidateName":"President Boddie","candidateIncumbent":false,"candidateParty":"D","voteCount":25373,"isWinner":false},{"candidateName":"Stephen Lyons","candidateIncumbent":false,"candidateParty":"D","voteCount":21008,"isWinner":false},{"candidateName":"Eban Cambridge","candidateIncumbent":false,"candidateParty":"D","voteCount":12701,"isWinner":false}],"winnerDateTime":"2024-03-06T04:12:27.559Z"},"8688":{"id":"8688","type":"apRace","location":"State of California","raceName":"President,","raceDescription":"Top candidate wins seat.","raceType":"top1","totalVotes":2466569,"precinctsReportPercentage":99,"eevp":99,"tabulationStatus":"Tabulation Paused","dateUpdated":"March 25, 2024","timeUpdated":"5:47 AM","source":"AP","candidates":[{"candidateName":"Donald Trump","candidateIncumbent":false,"candidateParty":"R","voteCount":1953947,"isWinner":true},{"candidateName":"Nikki Haley","candidateIncumbent":false,"candidateParty":"R","voteCount":430792,"isWinner":false},{"candidateName":"Ron DeSantis","candidateIncumbent":false,"candidateParty":"R","voteCount":35581,"isWinner":false},{"candidateName":"Chris Christie","candidateIncumbent":false,"candidateParty":"R","voteCount":20164,"isWinner":false},{"candidateName":"Vivek Ramaswamy","candidateIncumbent":false,"candidateParty":"R","voteCount":11069,"isWinner":false},{"candidateName":"Rachel Swift","candidateIncumbent":false,"candidateParty":"R","voteCount":4231,"isWinner":false},{"candidateName":"David Stuckenberg","candidateIncumbent":false,"candidateParty":"R","voteCount":3895,"isWinner":false},{"candidateName":"Ryan Binkley","candidateIncumbent":false,"candidateParty":"R","voteCount":3563,"isWinner":false},{"candidateName":"Asa Hutchinson","candidateIncumbent":false,"candidateParty":"R","voteCount":3327,"isWinner":false}],"winnerDateTime":"2024-03-06T04:13:19.766Z"},"81993":{"id":"81993","type":"apRace","location":"State of California","raceName":"U.S. Senate, Class I Unexpired Term","raceDescription":"Top candidate wins seat.","raceType":"top2","totalVotes":7358837,"precinctsReportPercentage":99,"eevp":99,"tabulationStatus":"Tabulation Paused","dateUpdated":"March 25, 2024","timeUpdated":"5:47 AM","source":"AP","candidates":[{"candidateName":"Steve Garvey","candidateIncumbent":false,"candidateParty":"R","voteCount":2444940,"isWinner":true},{"candidateName":"Adam Schiff","candidateIncumbent":false,"candidateParty":"D","voteCount":2155146,"isWinner":true},{"candidateName":"Katie Porter","candidateIncumbent":false,"candidateParty":"D","voteCount":1269194,"isWinner":false},{"candidateName":"Barbara Lee","candidateIncumbent":false,"candidateParty":"D","voteCount":863278,"isWinner":false},{"candidateName":"Eric Early","candidateIncumbent":false,"candidateParty":"R","voteCount":448788,"isWinner":false},{"candidateName":"Christina Pascucci","candidateIncumbent":false,"candidateParty":"D","voteCount":109421,"isWinner":false},{"candidateName":"Sepi Gilani","candidateIncumbent":false,"candidateParty":"D","voteCount":68070,"isWinner":false}],"winnerDateTime":"2024-03-06T04:31:08.186Z"},"82014":{"id":"82014","type":"apRace","location":"State of California","raceName":"Proposition, 1 - Behavioral Health Services Program","raceDescription":"Top candidate wins seat.","raceType":"top1","totalVotes":7221972,"precinctsReportPercentage":99,"eevp":99,"tabulationStatus":"Tabulation Paused","dateUpdated":"March 25, 2024","timeUpdated":"5:47 AM","source":"AP","candidates":[{"candidateName":"Yes","candidateIncumbent":false,"candidateParty":null,"voteCount":3624998,"isWinner":true},{"candidateName":"No","candidateIncumbent":false,"candidateParty":null,"voteCount":3596974,"isWinner":false}],"winnerDateTime":"2024-03-21T00:11:06.265Z"},"timeLoaded":"April 26, 2024 4:29 PM","nationalRacesLoaded":true,"localRacesLoaded":true,"overrides":[{"id":"5921","raceName":"U.S. House of Representatives, District 7","raceDescription":"Top two candidates advance to general election.","raceReadTheStory":""},{"id":"5922","raceName":"U.S. House of Representatives, District 8","raceDescription":"Top two candidates advance to general election.","raceReadTheStory":""},{"id":"5924","raceName":"U.S. House of Representatives, District 10","raceDescription":"Top two candidates advance to general election.","raceReadTheStory":""},{"id":"5926","raceName":"U.S. House of Representatives, District 12","raceDescription":"Top two candidates advance to general election.","raceReadTheStory":"https://www.kqed.org/elections/results/alameda/congress-12th-district"},{"id":"5928","raceName":"U.S. House of Representatives, District 14","raceDescription":"Top two candidates advance to general election.","raceReadTheStory":""},{"id":"5930","raceName":"U.S. House of Representatives, District 16","raceDescription":"Top two candidates advance to general election.","raceReadTheStory":"https://www.kqed.org/elections/results/california/congress-16th-district"},{"id":"5931","raceName":"U.S. House of Representatives, District 17","raceDescription":"Top two candidates advance to general election.","raceReadTheStory":""},{"id":"5932","raceName":"U.S. House of Representatives, District 18","raceDescription":"Top two candidates advance to general election.","raceReadTheStory":""},{"id":"5963","raceName":"State Assembly, District 2","raceDescription":"Top two candidates advance to general election.","raceReadTheStory":""},{"id":"5972","raceName":"State Assembly, District 11","raceDescription":"Top two candidates advance to general election.","raceReadTheStory":""},{"id":"5973","raceName":"State Assembly, District 12","raceDescription":"Top two candidates advance to general election.","raceReadTheStory":""},{"id":"5975","raceName":"State Assembly, District 14","raceDescription":"Top two candidates advance to general election.","raceReadTheStory":""},{"id":"5976","raceName":"State Assembly, District 15","raceDescription":"Top two candidates advance to general election.","raceReadTheStory":"https://www.kqed.org/elections/results/contracosta/state-assembly"},{"id":"5977","raceName":"State Assembly, District 16","raceDescription":"Top two candidates advance to general election.","raceReadTheStory":""},{"id":"5978","raceName":"State Assembly, District 17","raceDescription":"Top two candidates advance to general election.","raceReadTheStory":""},{"id":"5979","raceName":"State Assembly, District 18","raceDescription":"Top two candidates advance to general election.","raceReadTheStory":""},{"id":"5980","raceName":"State Assembly, District 19","raceDescription":"Top two candidates advance to general election.","raceReadTheStory":""},{"id":"5981","raceName":"State Assembly, District 20","raceDescription":"Top two candidates advance to general election.","raceReadTheStory":""},{"id":"5982","raceName":"State Assembly, District 21","raceDescription":"Top two candidates advance to general election.","raceReadTheStory":""},{"id":"5984","raceName":"State Assembly, District 23","raceDescription":"Top two candidates advance to general election.","raceReadTheStory":"https://www.kqed.org/elections/results/california/state-assembly-23rd-district"},{"id":"5987","raceName":"State Assembly, District 26","raceDescription":"Top two candidates advance to general election.","raceReadTheStory":"https://www.kqed.org/elections/results/santaclara/state-assembly-26th-district"},{"id":"5989","raceName":"State Assembly, District 28","raceDescription":"Top two candidates advance to general election.","raceReadTheStory":""},{"id":"6010","raceName":"State Assembly, District 4","raceDescription":"Top two candidates advance to general election.","raceReadTheStory":""},{"id":"6018","raceName":"U.S. House of Representatives, District 2","raceDescription":"Top two candidates advance to general election.","raceReadTheStory":""},{"id":"6020","raceName":"U.S. House of Representatives, District 4","raceDescription":"Top two candidates advance to general election.","raceReadTheStory":""},{"id":"6025","raceName":"U.S. House of Representatives, District 9","raceDescription":"Top two candidates advance to general election.","raceReadTheStory":""},{"id":"6031","raceName":"U.S. House of Representatives, District 15","raceDescription":"Top two candidates advance to general election.","raceReadTheStory":""},{"id":"6035","raceName":"U.S. House of Representatives, District 19","raceDescription":"Top two candidates advance to general election.","raceReadTheStory":""},{"id":"6067","raceName":"State Assembly, District 4","raceDescription":"Top two candidates advance to general election.","raceReadTheStory":""},{"id":"6087","raceName":"State Assembly, District 24","raceDescription":"Top two candidates advance to general election.","raceReadTheStory":""},{"id":"6088","raceName":"State Assembly, District 25","raceDescription":"Top two candidates advance to general election.","raceReadTheStory":""},{"id":"6092","raceName":"State Assembly, District 29","raceDescription":"Top two candidates advance to general election.","raceReadTheStory":""},{"id":"6223","raceName":"U.S. House of Representatives, District 4","raceDescription":"Top two candidates advance to general election.","raceReadTheStory":""},{"id":"6530","raceName":"State Senate, District 3","raceDescription":"Top two candidates advance to general election.","raceReadTheStory":"https://www.kqed.org/elections/results/california/state-senate-3rd-district"},{"id":"6531","raceName":"State Senate, District 5","raceDescription":"Top two candidates advance to general election.","raceReadTheStory":""},{"id":"6532","raceName":"State Senate, District 7","raceDescription":"Top two candidates advance to general election.","raceReadTheStory":"https://www.kqed.org/elections/results/california/state-senate-7th-district"},{"id":"6533","raceName":"State Senate, District 9","raceDescription":"Top two candidates advance to general election.","raceReadTheStory":""},{"id":"6534","raceName":"State Senate, District 11","raceDescription":"Top two candidates advance to general election.","raceReadTheStory":""},{"id":"6535","raceName":"State Senate, District 13","raceDescription":"Top two candidates advance to general election.","raceReadTheStory":""},{"id":"6536","raceName":"State Senate, District 15","raceDescription":"Top two candidates advance to general election.","raceReadTheStory":""},{"id":"6611","raceName":"U.S. House of Representatives, District 11","raceDescription":"Top two candidates advance to general election.","raceReadTheStory":""},{"id":"8589","raceName":"U.S. Senate (Full Term)","raceDescription":"Top two candidates advance to general election.","raceReadTheStory":"https://www.kqed.org/elections/results/california/senator"},{"id":"8686","raceName":"California Democratic Presidential Primary","raceDescription":"Candidates are competing for 496 delegates.","raceReadTheStory":"https://www.kqed.org/elections/results/president/democrat"},{"id":"8688","raceName":"California Republican Presidential Primary","raceDescription":"Candidates are competing for 169 delegates.","raceReadTheStory":"https://kqed.org/elections/results/president/republican"},{"id":"81993","raceName":"U.S. Senate (Partial/Unexpired Term)","raceDescription":"Top two candidates advance to general election."},{"id":"82014","raceName":"Proposition 1","raceDescription":"Bond and mental health reforms. Passes with majority vote.","raceReadTheStory":"https://www.kqed.org/elections/results/california/proposition-1"}],"AlamedaJudge5":{"id":"AlamedaJudge5","type":"localRace","location":"Alameda","raceName":"Superior Court Judge, Office 5","raceDescription":"Top candidate wins seat.","raceReadTheStory":"","raceType":"top1","timeUpdated":"7:02 PM","dateUpdated":"April 1, 2024","totalVotes":200601,"candidates":[{"candidateName":"Terry Wiley","candidateIncumbent":true,"candidateParty":"","voteCount":200601}]},"AlamedaJudge12":{"id":"AlamedaJudge12","type":"localRace","location":"Alameda","raceName":"Superior Court Judge, Office 12","raceDescription":"Top candidate wins seat.","raceReadTheStory":"","raceType":"top1","timeUpdated":"7:02 PM","dateUpdated":"April 1, 2024","totalVotes":240853,"candidates":[{"candidateName":"Mark Fickes","candidateIncumbent":false,"candidateParty":"","voteCount":133009},{"candidateName":"Michael P. Johnson","candidateIncumbent":false,"candidateParty":"","voteCount":107844}]},"AlamedaBoard2":{"id":"AlamedaBoard2","type":"localRace","location":"Alameda","raceName":"Board of Education, Trustee Area 2","raceDescription":"Top candidate wins seat.","raceReadTheStory":"","raceType":"top1","timeUpdated":"7:02 PM","dateUpdated":"April 1, 2024","totalVotes":33580,"candidates":[{"candidateName":"John Lewis","candidateIncumbent":false,"candidateParty":"","voteCount":6943},{"candidateName":"Angela Normand","candidateIncumbent":true,"candidateParty":"","voteCount":26637}]},"AlamedaBoard5":{"id":"AlamedaBoard5","type":"localRace","location":"Alameda","raceName":"Board of Education, Trustee Area 5","raceDescription":"Top candidate wins seat.","raceReadTheStory":"","raceType":"top1","timeUpdated":"7:02 PM","dateUpdated":"April 1, 2024","totalVotes":26072,"candidates":[{"candidateName":"Guadalupe \"Lupe\" Angulo","candidateIncumbent":false,"candidateParty":"","voteCount":7521},{"candidateName":"Janevette Cole","candidateIncumbent":true,"candidateParty":"","voteCount":13338},{"candidateName":"Joe Orlando Ramos","candidateIncumbent":false,"candidateParty":"","voteCount":5213}]},"AlamedaBoard6":{"id":"AlamedaBoard6","type":"localRace","location":"Alameda","raceName":"Board of Education, Trustee Area 6","raceDescription":"Top candidate wins seat.","raceReadTheStory":"","raceType":"top1","timeUpdated":"7:02 PM","dateUpdated":"April 1, 2024","totalVotes":30864,"candidates":[{"candidateName":"John Guerrero","candidateIncumbent":false,"candidateParty":"","voteCount":9989},{"candidateName":"Eileen McDonald","candidateIncumbent":true,"candidateParty":"","voteCount":20875}]},"AlamedaSup1":{"id":"AlamedaSup1","type":"localRace","location":"Alameda","raceName":"Board of Supervisors, District 1","raceDescription":"Candidate with majority vote wins seat. If no candidate reaches majority, top two candidates advance to runoff in general election.","raceReadTheStory":"","raceType":"top1","timeUpdated":"7:02 PM","dateUpdated":"April 1, 2024","totalVotes":41038,"candidates":[{"candidateName":"David Haubert","candidateIncumbent":true,"candidateParty":"","voteCount":41038}]},"AlamedaSup2":{"id":"AlamedaSup2","type":"localRace","location":"Alameda","raceName":"Board of Supervisors, District 2","raceDescription":"Candidate with majority vote wins seat. If no candidate reaches majority, top two candidates advance to runoff in general election.","raceReadTheStory":"","raceType":"top2","timeUpdated":"7:02 PM","dateUpdated":"April 1, 2024","totalVotes":31034,"candidates":[{"candidateName":"Elisa Márquez","candidateIncumbent":true,"candidateParty":"","voteCount":31034}]},"AlamedaSup4":{"id":"AlamedaSup4","type":"localRace","location":"Alameda","raceName":"Board of Supervisors, District 4","raceDescription":"Candidate with majority vote wins seat. If no candidate reaches majority, top two candidates advance to runoff in general election.","raceReadTheStory":"https://www.kqed.org/elections/results/alameda/supervisor-4th-district","raceType":"top2","timeUpdated":"7:02 PM","dateUpdated":"April 1, 2024","totalVotes":57007,"candidates":[{"candidateName":"Jennifer Esteen","candidateIncumbent":false,"candidateParty":"","voteCount":22400},{"candidateName":"Nate Miley","candidateIncumbent":true,"candidateParty":"","voteCount":34607}]},"AlamedaSup5":{"id":"AlamedaSup5","type":"localRace","location":"Alameda","raceName":"Board of Supervisors, District 5","raceDescription":"Candidate with majority vote wins seat. If no candidate reaches majority, top two candidates advance to runoff in general election.","raceReadTheStory":"https://www.kqed.org/elections/results/alameda/supervisor-5th-district","raceType":"top2","timeUpdated":"7:02 PM","dateUpdated":"April 1, 2024","totalVotes":81059,"candidates":[{"candidateName":"Ben Bartlett","candidateIncumbent":false,"candidateParty":"","voteCount":13518},{"candidateName":"Nikki Fortunato Bas","candidateIncumbent":false,"candidateParty":"","voteCount":27597},{"candidateName":"John J. Bauters","candidateIncumbent":false,"candidateParty":"","voteCount":16783},{"candidateName":"Ken Berrick","candidateIncumbent":false,"candidateParty":"","voteCount":7520},{"candidateName":"Omar Farmer","candidateIncumbent":false,"candidateParty":"","voteCount":1240},{"candidateName":"Gregory Hodge","candidateIncumbent":false,"candidateParty":"","voteCount":3419},{"candidateName":"Chris Moore","candidateIncumbent":false,"candidateParty":"","voteCount":7428},{"candidateName":"Gerald Pechenuk","candidateIncumbent":false,"candidateParty":"","voteCount":305},{"candidateName":"Lorrel Plimier","candidateIncumbent":false,"candidateParty":"","voteCount":3249}]},"AlamedaBoard7":{"id":"AlamedaBoard7","type":"localRace","location":"Alameda","raceName":"Flood Control & Water Conservation District Director, Zone 7, Full Term","raceDescription":"Top three candidates win seat.","raceReadTheStory":"","raceType":"top3","timeUpdated":"7:02 PM","dateUpdated":"April 1, 2024","totalVotes":134340,"candidates":[{"candidateName":"Alan Burnham","candidateIncumbent":false,"candidateParty":"","voteCount":15723},{"candidateName":"Sandy Figuers","candidateIncumbent":false,"candidateParty":"","voteCount":22454},{"candidateName":"Laurene K. Green","candidateIncumbent":false,"candidateParty":"","voteCount":30343},{"candidateName":"Kathy Narum","candidateIncumbent":true,"candidateParty":"","voteCount":23833},{"candidateName":"Seema Badar","candidateIncumbent":false,"candidateParty":"","voteCount":7468},{"candidateName":"Catherine Brown","candidateIncumbent":false,"candidateParty":"","voteCount":34519}]},"AlamedaAuditor":{"id":"AlamedaAuditor","type":"localRace","location":"Alameda","raceName":"Oakland Auditor","raceDescription":"Top candidate wins seat.","raceReadTheStory":"","raceType":"top1","timeUpdated":"7:02 PM","dateUpdated":"April 1, 2024","totalVotes":59227,"candidates":[{"candidateName":"Michael Houston","candidateIncumbent":true,"candidateParty":"","voteCount":59227}]},"AlamedaMeasureA":{"id":"AlamedaMeasureA","type":"localRace","location":"Alameda","raceName":"Measure A","raceDescription":"Alameda County. Civil service. Passes with majority vote.","raceReadTheStory":"","raceType":"yesNo","timeUpdated":"7:02 PM","dateUpdated":"April 1, 2024","totalVotes":282335,"candidates":[{"candidateName":"Yes","candidateIncumbent":false,"candidateParty":"","voteCount":167903},{"candidateName":"No","candidateIncumbent":false,"candidateParty":"","voteCount":114432}]},"AlamedaMeasureB":{"id":"AlamedaMeasureB","type":"localRace","location":"Alameda","raceName":"Measure B","raceDescription":"Alameda County. Recall rules. Passes with majority vote.","raceReadTheStory":"https://www.kqed.org/elections/results/alameda/measure-b","raceType":"yesNo","timeUpdated":"7:02 PM","dateUpdated":"April 1, 2024","totalVotes":282683,"candidates":[{"candidateName":"Yes","candidateIncumbent":false,"candidateParty":"","voteCount":182200},{"candidateName":"No","candidateIncumbent":false,"candidateParty":"","voteCount":100483}]},"AlamedaMeasureD":{"id":"AlamedaMeasureD","type":"localRace","location":"Alameda","raceName":"Measure D","raceDescription":"Oakland. Appropriations limit. Passes with majority vote.","raceReadTheStory":"","raceType":"yesNo","timeUpdated":"7:02 PM","dateUpdated":"April 1, 2024","totalVotes":79797,"candidates":[{"candidateName":"Yes","candidateIncumbent":false,"candidateParty":"","voteCount":59852},{"candidateName":"No","candidateIncumbent":false,"candidateParty":"","voteCount":19945}]},"AlamedaMeasureE":{"id":"AlamedaMeasureE","type":"localRace","location":"Alameda","raceName":"Measure E","raceDescription":"Alameda Unified School District. Parcel tax. Passes with 2/3 vote.","raceReadTheStory":"","raceType":"yesNo","timeUpdated":"7:02 PM","dateUpdated":"April 1, 2024","totalVotes":22692,"candidates":[{"candidateName":"Yes","candidateIncumbent":false,"candidateParty":"","voteCount":17280},{"candidateName":"No","candidateIncumbent":false,"candidateParty":"","voteCount":5412}]},"AlamedaMeasureF":{"id":"AlamedaMeasureF","type":"localRace","location":"Alameda","raceName":"Measure F","raceDescription":"Piedmont. Parcel tax. Passes with 2/3 vote.","raceReadTheStory":"","raceType":"yesNo","timeUpdated":"7:02 PM","dateUpdated":"April 1, 2024","totalVotes":4855,"candidates":[{"candidateName":"Yes","candidateIncumbent":false,"candidateParty":"","voteCount":3673},{"candidateName":"No","candidateIncumbent":false,"candidateParty":"","voteCount":1182}]},"AlamedaMeasureG":{"id":"AlamedaMeasureG","type":"localRace","location":"Alameda","raceName":"Measure G","raceDescription":"Albany Unified School District. Parcel tax. Passes with 2/3 vote. ","raceReadTheStory":"","raceType":"yesNo","timeUpdated":"7:02 PM","dateUpdated":"April 1, 2024","totalVotes":5898,"candidates":[{"candidateName":"Yes","candidateIncumbent":false,"candidateParty":"","voteCount":4651},{"candidateName":"No","candidateIncumbent":false,"candidateParty":"","voteCount":1247}]},"AlamedaMeasureH":{"id":"AlamedaMeasureH","type":"localRace","location":"Alameda","raceName":"Measure H","raceDescription":"Berkeley Unified School District. Parcel tax. Passes with 2/3 vote.","raceReadTheStory":"","raceType":"yesNo","timeUpdated":"7:02 PM","dateUpdated":"April 1, 2024","totalVotes":33331,"candidates":[{"candidateName":"Yes","candidateIncumbent":false,"candidateParty":"","voteCount":29418},{"candidateName":"No","candidateIncumbent":false,"candidateParty":"","voteCount":3913}]},"AlamedaMeasureI":{"id":"AlamedaMeasureI","type":"localRace","location":"Alameda","raceName":"Measure I","raceDescription":"Hayward Unified School District. School bond. Passes with 55% vote.","raceReadTheStory":"","raceType":"yesNo","timeUpdated":"7:02 PM","dateUpdated":"April 1, 2024","totalVotes":21929,"candidates":[{"candidateName":"Yes","candidateIncumbent":false,"candidateParty":"","voteCount":14151},{"candidateName":"No","candidateIncumbent":false,"candidateParty":"","voteCount":7778}]},"AlamedaMeasureJ":{"id":"AlamedaMeasureJ","type":"localRace","location":"Alameda","raceName":"Measure J","raceDescription":"San Leandro Unified School District. School bond. Passes with 55% vote.","raceReadTheStory":"","raceType":"yesNo","timeUpdated":"7:02 PM","dateUpdated":"April 1, 2024","totalVotes":12338,"candidates":[{"candidateName":"Yes","candidateIncumbent":false,"candidateParty":"","voteCount":7784},{"candidateName":"No","candidateIncumbent":false,"candidateParty":"","voteCount":4554}]},"CCD2":{"id":"CCD2","type":"localRace","location":"Contra Costa","raceName":"Board of Supervisors, District 2","raceDescription":"Candidate with majority vote wins seat. If no candidate reaches majority, top two candidates advance to runoff in general election.","raceReadTheStory":"","raceType":"yesNo","timeUpdated":"6:45 PM","dateUpdated":"March 28, 2024","totalVotes":45776,"candidates":[{"candidateName":"Candace Andersen","candidateIncumbent":true,"candidateParty":"","voteCount":45776}]},"CCD3":{"id":"CCD3","type":"localRace","location":"Contra Costa","raceName":"Board of Supervisors, District 3","raceDescription":"Candidate with majority vote wins seat. If no candidate reaches majority, top two candidates advance to runoff in general election.","raceReadTheStory":"","raceType":"top1","timeUpdated":"6:45 PM","dateUpdated":"March 28, 2024","totalVotes":25120,"candidates":[{"candidateName":"Diane Burgis","candidateIncumbent":true,"candidateParty":"","voteCount":25120}]},"CCD5":{"id":"CCD5","type":"localRace","location":"Contra Costa","raceName":"Board of Supervisors, District 5","raceDescription":"Candidate with majority vote wins seat. If no candidate reaches majority, top two candidates advance to runoff in general election.","raceReadTheStory":"https://www.kqed.org/elections/results/contracosta/supervisor-5th-district","raceType":"top2","timeUpdated":"6:45 PM","dateUpdated":"March 28, 2024","totalVotes":37045,"candidates":[{"candidateName":"Mike Barbanica","candidateIncumbent":false,"candidateParty":"","voteCount":14338},{"candidateName":"Jelani Killings","candidateIncumbent":false,"candidateParty":"","voteCount":5683},{"candidateName":"Shanelle Scales-Preston","candidateIncumbent":false,"candidateParty":"","voteCount":12993},{"candidateName":"Iztaccuauhtli Hector Gonzalez","candidateIncumbent":false,"candidateParty":"","voteCount":4031}]},"CCMeasureA":{"id":"CCMeasureA","type":"localRace","location":"Contra Costa","raceName":"Measure A","raceDescription":"Martinez. Appoint City Clerk. Passes with a majority vote.","raceReadTheStory":"","raceType":"yesNo","timeUpdated":"6:45 PM","dateUpdated":"March 28, 2024","totalVotes":11513,"candidates":[{"candidateName":"Yes","candidateIncumbent":false,"candidateParty":"","voteCount":7554},{"candidateName":"No","candidateIncumbent":false,"candidateParty":"","voteCount":3959}]},"CCMeasureB":{"id":"CCMeasureB","type":"localRace","location":"Contra Costa","raceName":"Measure B","raceDescription":"Antioch Unified School District. School bond. Passes with 55% vote.","raceReadTheStory":"","raceType":"yesNo","timeUpdated":"6:45 PM","dateUpdated":"March 28, 2024","totalVotes":17971,"candidates":[{"candidateName":"Yes","candidateIncumbent":false,"candidateParty":"","voteCount":10397},{"candidateName":"No","candidateIncumbent":false,"candidateParty":"","voteCount":7574}]},"CCMeasureC":{"id":"CCMeasureC","type":"localRace","location":"Contra Costa","raceName":"Measure C","raceDescription":"Martinez Unified School District. Parcel tax. Passes with 2/3 vote.","raceReadTheStory":"","raceType":"yesNo","timeUpdated":"6:45 PM","dateUpdated":"March 28, 2024","totalVotes":9230,"candidates":[{"candidateName":"Yes","candidateIncumbent":false,"candidateParty":"","voteCount":6917},{"candidateName":"No","candidateIncumbent":false,"candidateParty":"","voteCount":2313}]},"CCMeasureD":{"id":"CCMeasureD","type":"localRace","location":"Contra Costa","raceName":"Measure D","raceDescription":"Moraga School District. School bond. Passes with 55% vote.","raceReadTheStory":"","raceType":"yesNo","timeUpdated":"6:45 PM","dateUpdated":"March 28, 2024","totalVotes":6007,"candidates":[{"candidateName":"Yes","candidateIncumbent":false,"candidateParty":"","voteCount":4052},{"candidateName":"No","candidateIncumbent":false,"candidateParty":"","voteCount":1955}]},"MarinD2":{"id":"MarinD2","type":"localRace","location":"Marin","raceName":"Board of Supervisors, District 2","raceDescription":"Candidate with majority vote wins seat. If no candidate reaches majority, top two candidates advance to runoff in general election.","raceReadTheStory":"https://www.kqed.org/elections/results/marin/supervisor-2nd-district","raceType":"top2","timeUpdated":"6:54 PM","dateUpdated":"March 27, 2024","totalVotes":18466,"candidates":[{"candidateName":"Brian Colbert","candidateIncumbent":false,"candidateParty":"","voteCount":7971},{"candidateName":"Heather McPhail Sridharan","candidateIncumbent":false,"candidateParty":"","voteCount":4851},{"candidateName":"Ryan O'Neil","candidateIncumbent":false,"candidateParty":"","voteCount":2647},{"candidateName":"Gabe Paulson","candidateIncumbent":false,"candidateParty":"","voteCount":2997}]},"MarinD3":{"id":"MarinD3","type":"localRace","location":"Marin","raceName":"Board of Supervisors, District 3","raceDescription":"Candidate with majority vote wins seat. If no candidate reaches majority, top two candidates advance to runoff in general election.","raceReadTheStory":"","raceType":"top1","timeUpdated":"6:54 PM","dateUpdated":"March 27, 2024","totalVotes":13274,"candidates":[{"candidateName":"Stephanie Moulton-Peters","candidateIncumbent":true,"candidateParty":"","voteCount":13274}]},"MarinD4":{"id":"MarinD4","type":"localRace","location":"Marin","raceName":"Board of Supervisors, District 4","raceDescription":"Candidate with majority vote wins seat. If no candidate reaches majority, top two candidates advance to runoff in general election.","raceReadTheStory":"","raceType":"top1","timeUpdated":"6:54 PM","dateUpdated":"March 27, 2024","totalVotes":12986,"candidates":[{"candidateName":"Dennis Rodoni","candidateIncumbent":true,"candidateParty":"","voteCount":10086},{"candidateName":"Francis Drouillard","candidateIncumbent":false,"candidateParty":"","voteCount":2900}]},"MarinLarkspurCC":{"id":"MarinLarkspurCC","type":"localRace","location":"Marin","raceName":"Larkspur City Council (Short Term)","raceDescription":"Top candidate wins seat.","raceReadTheStory":"","raceType":"top1","timeUpdated":"6:54 PM","dateUpdated":"March 27, 2024","totalVotes":4176,"candidates":[{"candidateName":"Stephanie Andre","candidateIncumbent":false,"candidateParty":"","voteCount":2514},{"candidateName":"Claire Paquette","candidateIncumbent":false,"candidateParty":"","voteCount":1008},{"candidateName":"Lana Scott","candidateIncumbent":false,"candidateParty":"","voteCount":654}]},"MarinRossCouncil":{"id":"MarinRossCouncil","type":"localRace","location":"Marin","raceName":"Ross Town Council","raceDescription":"Top three candidates win seat.","raceReadTheStory":"","raceType":"top3","timeUpdated":"6:54 PM","dateUpdated":"March 27, 2024","totalVotes":1740,"candidates":[{"candidateName":"Charles William \"Bill\" Kircher, Jr.","candidateIncumbent":false,"candidateParty":"","voteCount":536},{"candidateName":"Mathew Salter","candidateIncumbent":false,"candidateParty":"","voteCount":502},{"candidateName":"Shadi Aboukhater","candidateIncumbent":false,"candidateParty":"","voteCount":187},{"candidateName":"Teri Dowling","candidateIncumbent":false,"candidateParty":"","voteCount":515}]},"MarinMeasureA":{"id":"MarinMeasureA","type":"localRace","location":"Marin","raceName":"Measure A","raceDescription":"Tamalpais Union High School District. School bond. Passes with 55% vote.","raceReadTheStory":"","raceType":"yesNo","timeUpdated":"6:54 PM","dateUpdated":"March 27, 2024","totalVotes":45345,"candidates":[{"candidateName":"Yes","candidateIncumbent":false,"candidateParty":"","voteCount":24376},{"candidateName":"No","candidateIncumbent":false,"candidateParty":"","voteCount":20969}]},"MarinMeasureB":{"id":"MarinMeasureB","type":"localRace","location":"Marin","raceName":"Measure B","raceDescription":"Petaluma Joint Union High School District. Parcel tax. Passes with 2/3 vote.","raceReadTheStory":"","raceType":"yesNo","timeUpdated":"6:54 PM","dateUpdated":"March 27, 2024","totalVotes":132,"candidates":[{"candidateName":"Yes","candidateIncumbent":false,"candidateParty":"","voteCount":62},{"candidateName":"No","candidateIncumbent":false,"candidateParty":"","voteCount":70}]},"MarinMeasureC":{"id":"MarinMeasureC","type":"localRace","location":"Marin","raceName":"Measure C","raceDescription":"Belvedere. Appropriation limit. Passes with majority vote.","raceReadTheStory":"","raceType":"yesNo","timeUpdated":"6:54 PM","dateUpdated":"March 27, 2024","totalVotes":870,"candidates":[{"candidateName":"Yes","candidateIncumbent":false,"candidateParty":"","voteCount":679},{"candidateName":"No","candidateIncumbent":false,"candidateParty":"","voteCount":191}]},"MarinMeasureD":{"id":"MarinMeasureD","type":"localRace","location":"Marin","raceName":"Measure D","raceDescription":"Larkspur. Rent stabilization. Passes with majority vote.","raceReadTheStory":"https://www.kqed.org/elections/results/marin/measure-d","raceType":"yesNo","timeUpdated":"6:54 PM","dateUpdated":"March 27, 2024","totalVotes":4955,"candidates":[{"candidateName":"Yes","candidateIncumbent":false,"candidateParty":"","voteCount":2573},{"candidateName":"No","candidateIncumbent":false,"candidateParty":"","voteCount":2382}]},"MarinMeasureE":{"id":"MarinMeasureE","type":"localRace","location":"Marin","raceName":"Measure E","raceDescription":"Ross. Special tax. Passes with 2/3 vote.","raceReadTheStory":"https://www.kqed.org/elections/results/marin/measure-e","raceType":"yesNo","timeUpdated":"6:54 PM","dateUpdated":"March 27, 2024","totalVotes":874,"candidates":[{"candidateName":"Yes","candidateIncumbent":false,"candidateParty":"","voteCount":683},{"candidateName":"No","candidateIncumbent":false,"candidateParty":"","voteCount":191}]},"MarinMeasureF":{"id":"MarinMeasureF","type":"localRace","location":"Marin","raceName":"Measure F","raceDescription":"San Anselmo. Flood Control and Water Conservation District. Passes with majority vote.","raceReadTheStory":"","raceType":"yesNo","timeUpdated":"6:54 PM","dateUpdated":"March 27, 2024","totalVotes":5193,"candidates":[{"candidateName":"Yes","candidateIncumbent":false,"candidateParty":"","voteCount":3083},{"candidateName":"No","candidateIncumbent":false,"candidateParty":"","voteCount":2110}]},"MarinMeasureG":{"id":"MarinMeasureG","type":"localRace","location":"Marin","raceName":"Measure G","raceDescription":"Bel Marin Keys Community Services District. Special tax. Passes with 2/3 vote.","raceReadTheStory":"","raceType":"yesNo","timeUpdated":"6:54 PM","dateUpdated":"March 27, 2024","totalVotes":830,"candidates":[{"candidateName":"Yes","candidateIncumbent":false,"candidateParty":"","voteCount":661},{"candidateName":"No","candidateIncumbent":false,"candidateParty":"","voteCount":169}]},"MarinMeasureH":{"id":"MarinMeasureH","type":"localRace","location":"Marin","raceName":"Measure H","raceDescription":"Marinwood Community Services District. Appropriations limit, fire protection. Passes with a majority vote.","raceReadTheStory":"","raceType":"yesNo","timeUpdated":"6:54 PM","dateUpdated":"March 27, 2024","totalVotes":1738,"candidates":[{"candidateName":"Yes","candidateIncumbent":false,"candidateParty":"","voteCount":1369},{"candidateName":"No","candidateIncumbent":false,"candidateParty":"","voteCount":369}]},"MarinMeasureI":{"id":"MarinMeasureI","type":"localRace","location":"Marin","raceName":"Measure I","raceDescription":"Marinwood Community Services District. Appropriations limit, parks. Passes with a majority vote.","raceReadTheStory":"","raceType":"yesNo","timeUpdated":"6:54 PM","dateUpdated":"March 27, 2024","totalVotes":1735,"candidates":[{"candidateName":"Yes","candidateIncumbent":false,"candidateParty":"","voteCount":1336},{"candidateName":"No","candidateIncumbent":false,"candidateParty":"","voteCount":399}]},"NapaD2":{"id":"NapaD2","type":"localRace","location":"Napa","raceName":"Board of Supervisors, District 2","raceDescription":"Candidate with majority vote wins seat. If no candidate reaches majority, top two candidates advance to runoff in general election.","raceReadTheStory":"","raceType":"top1","timeUpdated":"6:50 PM","dateUpdated":"April 3, 2024","totalVotes":8351,"candidates":[{"candidateName":"Liz Alessio","candidateIncumbent":false,"candidateParty":"","voteCount":6340},{"candidateName":"Doris Gentry","candidateIncumbent":false,"candidateParty":"","voteCount":2011}]},"NapaD4":{"id":"NapaD4","type":"localRace","location":"Napa","raceName":"Board of Supervisors, District 4","raceDescription":"Candidate with majority vote wins seat. If no candidate reaches majority, top two candidates advance to runoff in general election.","raceReadTheStory":"https://www.kqed.org/elections/results/napa/supervisor-4th-district","raceType":"top1","timeUpdated":"6:50 PM","dateUpdated":"April 3, 2024","totalVotes":7306,"candidates":[{"candidateName":"Amber Manfree","candidateIncumbent":false,"candidateParty":"","voteCount":3913},{"candidateName":"Pete Mott","candidateIncumbent":false,"candidateParty":"","voteCount":3393}]},"NapaD5":{"id":"NapaD5","type":"localRace","location":"Napa","raceName":"Board of Supervisors, District 5","raceDescription":"Candidate with majority vote wins seat. If no candidate reaches majority, top two candidates advance to runoff in general election.","raceReadTheStory":"https://www.kqed.org/elections/results/napa/supervisor-5th-district","raceType":"top1","timeUpdated":"6:50 PM","dateUpdated":"April 3, 2024","totalVotes":5356,"candidates":[{"candidateName":"Mariam Aboudamous","candidateIncumbent":false,"candidateParty":"","voteCount":2379},{"candidateName":"Belia Ramos","candidateIncumbent":true,"candidateParty":"","voteCount":2977}]},"NapaMeasureD":{"id":"NapaMeasureD","type":"localRace","location":"Napa","raceName":"Measure D","raceDescription":"Howell Mountain Elementary School District. School bond. Passes with 55% vote.","raceReadTheStory":"","raceType":"yesNo","timeUpdated":"6:50 PM","dateUpdated":"April 3, 2024","totalVotes":741,"candidates":[{"candidateName":"Yes","candidateIncumbent":false,"candidateParty":"","voteCount":367},{"candidateName":"No","candidateIncumbent":false,"candidateParty":"","voteCount":374}]},"NapaMeasureU":{"id":"NapaMeasureU","type":"localRace","location":"Napa","raceName":"Measure U","raceDescription":"Lake Berryessa Resort Improvement District. Appropriations limit. Passes with majority vote. ","raceReadTheStory":"","raceType":"yesNo","timeUpdated":"6:50 PM","dateUpdated":"April 3, 2024","totalVotes":86,"candidates":[{"candidateName":"Yes","candidateIncumbent":false,"candidateParty":"","voteCount":63},{"candidateName":"No","candidateIncumbent":false,"candidateParty":"","voteCount":23}]},"NapaMeasureU1":{"id":"NapaMeasureU1","type":"localRace","location":"Napa","raceName":"Measure U","raceDescription":"Yountville. Appropriations limit. Passes with majority vote. ","raceReadTheStory":"","raceType":"yesNo","timeUpdated":"6:50 PM","dateUpdated":"April 3, 2024","totalVotes":925,"candidates":[{"candidateName":"Yes","candidateIncumbent":false,"candidateParty":"","voteCount":793},{"candidateName":"No","candidateIncumbent":false,"candidateParty":"","voteCount":132}]},"SFJudge1":{"id":"SFJudge1","type":"localRace","location":"San Francisco","raceName":"Superior Court Judge, Seat 1","raceDescription":"Candidate with majority vote wins seat. If no candidate reaches majority, top two candidates advance to runoff in general election.","raceReadTheStory":"https://www.kqed.org/elections/results/sanfrancisco/superior-court-seat-1","raceType":"top1","timeUpdated":"6:50 PM","dateUpdated":"March 21, 2024","totalVotes":202960,"candidates":[{"candidateName":"Michael Begert","candidateIncumbent":true,"candidateParty":"","voteCount":124943},{"candidateName":"Chip Zecher","candidateIncumbent":false,"candidateParty":"","voteCount":78017}]},"SFJudge13":{"id":"SFJudge13","type":"localRace","location":"San Francisco","raceName":"Superior Court Judge, Seat 13","raceDescription":"Candidate with majority vote wins seat. If no candidate reaches majority, top two candidates advance to runoff in general election.","raceReadTheStory":"https://www.kqed.org/elections/results/sanfrancisco/superior-court-seat-13","raceType":"top1","timeUpdated":"6:50 PM","dateUpdated":"March 21, 2024","totalVotes":202386,"candidates":[{"candidateName":"Jean Myungjin Roland","candidateIncumbent":false,"candidateParty":"","voteCount":90012},{"candidateName":"Patrick S. Thompson","candidateIncumbent":true,"candidateParty":"","voteCount":112374}]},"SFPropA":{"id":"SFPropA","type":"localRace","location":"San Francisco","raceName":"Proposition A","raceDescription":"Housing bond. Passes with 2/3 vote.","raceReadTheStory":"https://www.kqed.org/elections/results/sanfrancisco/proposition-a","raceType":"yesNo","timeUpdated":"6:50 PM","dateUpdated":"March 21, 2024","totalVotes":225187,"candidates":[{"candidateName":"Yes","candidateIncumbent":false,"candidateParty":"","voteCount":158497},{"candidateName":"No","candidateIncumbent":false,"candidateParty":"","voteCount":66690}]},"SFPropB":{"id":"SFPropB","type":"localRace","location":"San Francisco","raceName":"Proposition B","raceDescription":"Police staffing. Passes with majority vote.","raceReadTheStory":"","raceType":"yesNo","timeUpdated":"6:50 PM","dateUpdated":"March 21, 2024","totalVotes":222954,"candidates":[{"candidateName":"Yes","candidateIncumbent":false,"candidateParty":"","voteCount":61580},{"candidateName":"No","candidateIncumbent":false,"candidateParty":"","voteCount":161374}]},"SFPropC":{"id":"SFPropC","type":"localRace","location":"San Francisco","raceName":"Proposition C","raceDescription":"Transfer tax exemption. Passes with majority vote.","raceReadTheStory":"","raceType":"yesNo","timeUpdated":"6:50 PM","dateUpdated":"March 21, 2024","totalVotes":220349,"candidates":[{"candidateName":"Yes","candidateIncumbent":false,"candidateParty":"","voteCount":116311},{"candidateName":"No","candidateIncumbent":false,"candidateParty":"","voteCount":104038}]},"SFPropD":{"id":"SFPropD","type":"localRace","location":"San Francisco","raceName":"Proposition D","raceDescription":"Ethics laws. Passes with majority vote.","raceReadTheStory":"","raceType":"yesNo","timeUpdated":"6:50 PM","dateUpdated":"March 21, 2024","totalVotes":222615,"candidates":[{"candidateName":"Yes","candidateIncumbent":false,"candidateParty":"","voteCount":198584},{"candidateName":"No","candidateIncumbent":false,"candidateParty":"","voteCount":24031}]},"SFPropE":{"id":"SFPropE","type":"localRace","location":"San Francisco","raceName":"Proposition E","raceDescription":"Police policies. Passes with majority vote.","raceReadTheStory":"https://www.kqed.org/elections/results/sanfrancisco/proposition-e","raceType":"yesNo","timeUpdated":"6:50 PM","dateUpdated":"March 21, 2024","totalVotes":222817,"candidates":[{"candidateName":"Yes","candidateIncumbent":false,"candidateParty":"","voteCount":120529},{"candidateName":"No","candidateIncumbent":false,"candidateParty":"","voteCount":102288}]},"SFPropF":{"id":"SFPropF","type":"localRace","location":"San Francisco","raceName":"Proposition F","raceDescription":"Drug screening. Passes with majority vote.","raceReadTheStory":"https://www.kqed.org/elections/results/sanfrancisco/proposition-f","raceType":"yesNo","timeUpdated":"6:50 PM","dateUpdated":"March 21, 2024","totalVotes":224004,"candidates":[{"candidateName":"Yes","candidateIncumbent":false,"candidateParty":"","voteCount":130214},{"candidateName":"No","candidateIncumbent":false,"candidateParty":"","voteCount":93790}]},"SFPropG":{"id":"SFPropG","type":"localRace","location":"San Francisco","raceName":"Proposition G","raceDescription":"Eighth-grade algebra. Passes with majority vote.","raceReadTheStory":"","raceType":"yesNo","timeUpdated":"6:50 PM","dateUpdated":"March 21, 2024","totalVotes":222704,"candidates":[{"candidateName":"Yes","candidateIncumbent":false,"candidateParty":"","voteCount":182066},{"candidateName":"No","candidateIncumbent":false,"candidateParty":"","voteCount":40638}]},"SMJudge4":{"id":"SMJudge4","type":"localRace","location":"San Mateo","raceName":"Superior Court Judge, Office 4","raceDescription":"Candidate with majority vote wins seat. If no candidate reaches majority, top two candidates advance to runoff in general election.","raceReadTheStory":"","raceType":"top1","timeUpdated":"6:56 PM","dateUpdated":"April 4, 2024","totalVotes":108919,"candidates":[{"candidateName":"Sarah Burdick","candidateIncumbent":false,"candidateParty":"","voteCount":108919}]},"SMD1":{"id":"SMD1","type":"localRace","location":"San Mateo","raceName":"Board of Supervisors, District 1","raceDescription":"Candidate with majority vote wins seat. If no candidate reaches majority, top two candidates advance to runoff in general election.","raceReadTheStory":"https://www.kqed.org/elections/results/sanmateo/supervisor-1st-district","raceType":"top1","timeUpdated":"6:56 PM","dateUpdated":"April 4, 2024","totalVotes":29650,"candidates":[{"candidateName":"Jackie Speier","candidateIncumbent":false,"candidateParty":"","voteCount":20353},{"candidateName":"Ann Schneider","candidateIncumbent":false,"candidateParty":"","voteCount":9297}]},"SMD4":{"id":"SMD4","type":"localRace","location":"San Mateo","raceName":"Board of Supervisors, District 4","raceDescription":"Candidate with majority vote wins seat. If no candidate reaches majority, top two candidates advance to runoff in general election.","raceReadTheStory":"https://www.kqed.org/elections/results/sanmateo/supervisor-4th-district","raceType":"top2","timeUpdated":"6:56 PM","dateUpdated":"April 4, 2024","totalVotes":22725,"candidates":[{"candidateName":"Antonio Lopez","candidateIncumbent":false,"candidateParty":"","voteCount":5730},{"candidateName":"Lisa Gauthier","candidateIncumbent":false,"candidateParty":"","voteCount":10358},{"candidateName":"Celeste Brevard","candidateIncumbent":false,"candidateParty":"","voteCount":1268},{"candidateName":"Paul Bocanegra","candidateIncumbent":false,"candidateParty":"","voteCount":1909},{"candidateName":"Maggie Cornejo","candidateIncumbent":false,"candidateParty":"","voteCount":3460}]},"SMD5":{"id":"SMD5","type":"localRace","location":"San Mateo","raceName":"Board of Supervisors, District 5","raceDescription":"Candidate with majority vote wins seat. If no candidate reaches majority, top two candidates advance to runoff in general election.","raceReadTheStory":"","raceType":"top1","timeUpdated":"6:56 PM","dateUpdated":"April 4, 2024","totalVotes":19937,"candidates":[{"candidateName":"David Canepa","candidateIncumbent":true,"candidateParty":"","voteCount":19937}]},"SMMeasureB":{"id":"SMMeasureB","type":"localRace","location":"San Mateo","raceName":"Measure B","raceDescription":"County Service Area #1 (Highlands). Special tax. Passes with 2/3 vote.","raceReadTheStory":"","raceType":"yesNo","timeUpdated":"6:56 PM","dateUpdated":"April 4, 2024","totalVotes":1549,"candidates":[{"candidateName":"Yes","candidateIncumbent":false,"candidateParty":"","voteCount":1360},{"candidateName":"No","candidateIncumbent":false,"candidateParty":"","voteCount":189}]},"SMMeasureC":{"id":"SMMeasureC","type":"localRace","location":"San Mateo","raceName":"Measure C","raceDescription":"Jefferson Elementary School District. Parcel tax. Passes with 2/3 vote","raceReadTheStory":"","raceType":"yesNo","timeUpdated":"6:56 PM","dateUpdated":"April 4, 2024","totalVotes":12234,"candidates":[{"candidateName":"Yes","candidateIncumbent":false,"candidateParty":"","voteCount":8543},{"candidateName":"No","candidateIncumbent":false,"candidateParty":"","voteCount":3691}]},"SMMeasureE":{"id":"SMMeasureE","type":"localRace","location":"San Mateo","raceName":"Measure E","raceDescription":"Woodside Elementary School District. School bond. Passes with 55% vote.","raceReadTheStory":"","raceType":"yesNo","timeUpdated":"6:56 PM","dateUpdated":"April 4, 2024","totalVotes":1392,"candidates":[{"candidateName":"Yes","candidateIncumbent":false,"candidateParty":"","voteCount":910},{"candidateName":"No","candidateIncumbent":false,"candidateParty":"","voteCount":482}]},"SMMeasureG":{"id":"SMMeasureG","type":"localRace","location":"San Mateo","raceName":"Measure G","raceDescription":"Pacifica School District. School bond. Passes with 55% vote.","raceReadTheStory":"","raceType":"yesNo","timeUpdated":"6:56 PM","dateUpdated":"April 4, 2024","totalVotes":11548,"candidates":[{"candidateName":"Yes","candidateIncumbent":false,"candidateParty":"","voteCount":7067},{"candidateName":"No","candidateIncumbent":false,"candidateParty":"","voteCount":4481}]},"SMMeasureH":{"id":"SMMeasureH","type":"localRace","location":"San Mateo","raceName":"Measure H","raceDescription":"San Carlos School District. School bond. Passes with 55% vote.","raceReadTheStory":"","raceType":"yesNo","timeUpdated":"6:56 PM","dateUpdated":"April 4, 2024","totalVotes":9938,"candidates":[{"candidateName":"Yes","candidateIncumbent":false,"candidateParty":"","voteCount":6283},{"candidateName":"No","candidateIncumbent":false,"candidateParty":"","voteCount":3655}]},"SCJudge5":{"id":"SCJudge5","type":"localRace","location":"Santa Clara","raceName":"Superior Court Judge, Office 5","raceDescription":"Candidate with majority vote wins seat. If no candidate reaches majority, top two candidates advance to runoff in general election.","raceReadTheStory":"","raceType":"top1","timeUpdated":"7:05 PM","dateUpdated":"April 4, 2024","totalVotes":301953,"candidates":[{"candidateName":"Jay Boyarsky","candidateIncumbent":false,"candidateParty":"","voteCount":142549},{"candidateName":"Nicole M. Ford","candidateIncumbent":false,"candidateParty":"","voteCount":52147},{"candidateName":"Johnene Linda Stebbins","candidateIncumbent":false,"candidateParty":"","voteCount":107257}]},"SCD2":{"id":"SCD2","type":"localRace","location":"Santa Clara","raceName":"Board of Supervisors, District 2","raceDescription":"Candidate with majority vote wins seat. If no candidate reaches majority, top two candidates advance to runoff in general election.","raceReadTheStory":"https://www.kqed.org/elections/results/santaclara/supervisor-2nd-district","raceType":"top2","timeUpdated":"7:05 PM","dateUpdated":"April 4, 2024","totalVotes":44059,"candidates":[{"candidateName":"Corina Herrera-Loera","candidateIncumbent":false,"candidateParty":"","voteCount":10519},{"candidateName":"Jennifer Margaret Celaya","candidateIncumbent":false,"candidateParty":"","voteCount":2394},{"candidateName":"Madison Nguyen","candidateIncumbent":false,"candidateParty":"","voteCount":12794},{"candidateName":"Betty Duong","candidateIncumbent":false,"candidateParty":"","voteCount":14031},{"candidateName":"Nelson McElmurry","candidateIncumbent":false,"candidateParty":"","voteCount":4321}]},"SCD3":{"id":"SCD3","type":"localRace","location":"Santa Clara","raceName":"Board of Supervisors, District 3","raceDescription":"Candidate with majority vote wins seat. If no candidate reaches majority, top two candidates advance to runoff in general election.","raceReadTheStory":"","raceType":"top1","timeUpdated":"7:05 PM","dateUpdated":"April 4, 2024","totalVotes":42549,"candidates":[{"candidateName":"Otto Lee","candidateIncumbent":true,"candidateParty":"","voteCount":42549}]},"SCD5":{"id":"SCD5","type":"localRace","location":"Santa Clara","raceName":"Board of Supervisors, District 5","raceDescription":"Candidate with majority vote wins seat. If no candidate reaches majority, top two candidates advance to runoff in general election.","raceReadTheStory":"https://www.kqed.org/elections/results/santaclara/supervisor-5th-district","raceType":"top2","timeUpdated":"7:05 PM","dateUpdated":"April 4, 2024","totalVotes":88712,"candidates":[{"candidateName":"Margaret Abe-Koga","candidateIncumbent":false,"candidateParty":"","voteCount":37172},{"candidateName":"Sally J. Lieber","candidateIncumbent":false,"candidateParty":"","voteCount":21962},{"candidateName":"Barry Chang","candidateIncumbent":false,"candidateParty":"","voteCount":6164},{"candidateName":"Peter C. Fung","candidateIncumbent":false,"candidateParty":"","voteCount":17892},{"candidateName":"Sandy Sans","candidateIncumbent":false,"candidateParty":"","voteCount":5522}]},"SCSJMayor":{"id":"SCSJMayor","type":"localRace","location":"Santa Clara","raceName":"San José Mayor","raceDescription":"Candidate with majority vote wins seat. If no candidate reaches majority, top two candidates advance to runoff in general election.","raceReadTheStory":"","raceType":"top1","timeUpdated":"7:05 PM","dateUpdated":"April 4, 2024","totalVotes":167064,"candidates":[{"candidateName":"Matt Mahan","candidateIncumbent":true,"candidateParty":"","voteCount":144701},{"candidateName":"Tyrone Wade","candidateIncumbent":false,"candidateParty":"","voteCount":22363}]},"SCSJD2":{"id":"SCSJD2","type":"localRace","location":"Santa Clara","raceName":"San José City Council, District 2","raceDescription":"Candidate with majority vote wins seat. If no candidate reaches majority, top two candidates advance to runoff in general election.","raceReadTheStory":"","raceType":"top2","timeUpdated":"7:05 PM","dateUpdated":"April 4, 2024","totalVotes":14131,"candidates":[{"candidateName":"Joe Lopez","candidateIncumbent":false,"candidateParty":"","voteCount":4950},{"candidateName":"Pamela Campos","candidateIncumbent":false,"candidateParty":"","voteCount":3436},{"candidateName":"Vanessa Sandoval","candidateIncumbent":false,"candidateParty":"","voteCount":2719},{"candidateName":"Babu Prasad","candidateIncumbent":false,"candidateParty":"","voteCount":3026}]},"SCSJD4":{"id":"SCSJD4","type":"localRace","location":"Santa Clara","raceName":"San José City Council, District 4","raceDescription":"Candidate with majority vote wins seat. If no candidate reaches majority, top two candidates advance to runoff in general election.","raceReadTheStory":"","raceType":"top1","timeUpdated":"7:05 PM","dateUpdated":"April 4, 2024","totalVotes":14322,"candidates":[{"candidateName":"Kansen Chu","candidateIncumbent":false,"candidateParty":"","voteCount":5931},{"candidateName":"David Cohen","candidateIncumbent":true,"candidateParty":"","voteCount":8391}]},"SCSJD6":{"id":"SCSJD6","type":"localRace","location":"Santa Clara","raceName":"San José City Council, District 6","raceDescription":"Candidate with majority vote wins seat. If no candidate reaches majority, top two candidates advance to runoff in general election.","raceReadTheStory":"","raceType":"top2","timeUpdated":"7:05 PM","dateUpdated":"April 4, 2024","totalVotes":25108,"candidates":[{"candidateName":"David Cohen","candidateIncumbent":false,"candidateParty":"","voteCount":9875},{"candidateName":"Alex Shoor","candidateIncumbent":false,"candidateParty":"","voteCount":3850},{"candidateName":"Angelo \"A.J.\" Pasciuti","candidateIncumbent":false,"candidateParty":"","voteCount":2688},{"candidateName":"Michael Mulcahy","candidateIncumbent":false,"candidateParty":"","voteCount":8695}]},"SCSJD8":{"id":"SCSJD8","type":"localRace","location":"Santa Clara","raceName":"San José City Council, District 8","raceDescription":"Candidate with majority vote wins seat. If no candidate reaches majority, top two candidates advance to runoff in general election.","raceReadTheStory":"","raceType":"top2","timeUpdated":"7:05 PM","dateUpdated":"April 4, 2024","totalVotes":21462,"candidates":[{"candidateName":"Tam Truong","candidateIncumbent":false,"candidateParty":"","voteCount":6982},{"candidateName":"Domingo Candelas","candidateIncumbent":true,"candidateParty":"","voteCount":8466},{"candidateName":"Sukhdev Singh Bainiwal","candidateIncumbent":false,"candidateParty":"","voteCount":5513},{"candidateName":"Surinder Kaur Dhaliwal","candidateIncumbent":false,"candidateParty":"","voteCount":501}]},"SCSJD10":{"id":"SCSJD10","type":"localRace","location":"Santa Clara","raceName":"San José City Council, District 10","raceDescription":"Candidate with majority vote wins seat. If no candidate reaches majority, top two candidates advance to runoff in general election.","raceReadTheStory":"","raceType":"top2","timeUpdated":"7:05 PM","dateUpdated":"April 4, 2024","totalVotes":22799,"candidates":[{"candidateName":"George Casey","candidateIncumbent":false,"candidateParty":"","voteCount":8805},{"candidateName":"Arjun Batra","candidateIncumbent":true,"candidateParty":"","voteCount":8354},{"candidateName":"Lenka Wright","candidateIncumbent":false,"candidateParty":"","voteCount":5640}]},"SCMeasureA":{"id":"SCMeasureA","type":"localRace","location":"Santa Clara","raceName":"Measure A","raceDescription":"Santa Clara. Appointed city clerk. Passes with majority vote.","raceReadTheStory":"","raceType":"yesNo","timeUpdated":"7:05 PM","dateUpdated":"April 4, 2024","totalVotes":20315,"candidates":[{"candidateName":"Yes","candidateIncumbent":false,"candidateParty":"","voteCount":6580},{"candidateName":"No","candidateIncumbent":false,"candidateParty":"","voteCount":13735}]},"SCMeasureB":{"id":"SCMeasureB","type":"localRace","location":"Santa Clara","raceName":"Measure B","raceDescription":"Santa Clara. Appointed police chief. Passes with majority vote.","raceReadTheStory":"","raceType":"yesNo","timeUpdated":"7:05 PM","dateUpdated":"April 4, 2024","totalVotes":20567,"candidates":[{"candidateName":"Yes","candidateIncumbent":false,"candidateParty":"","voteCount":5680},{"candidateName":"No","candidateIncumbent":false,"candidateParty":"","voteCount":14887}]},"SCMeasureC":{"id":"SCMeasureC","type":"localRace","location":"Santa Clara","raceName":"Measure C","raceDescription":"Sunnyvale School District. School bond. Passes with 55% vote.","raceReadTheStory":"","raceType":"yesNo","timeUpdated":"7:05 PM","dateUpdated":"April 4, 2024","totalVotes":14656,"candidates":[{"candidateName":"Yes","candidateIncumbent":false,"candidateParty":"","voteCount":10261},{"candidateName":"No","candidateIncumbent":false,"candidateParty":"","voteCount":4395}]},"SolanoD15":{"id":"SolanoD15","type":"localRace","location":"Solano","raceName":"Superior Court Judge, Department 15","raceDescription":"Candidate with majority vote wins seat. If no candidate reaches majority, top two candidates advance to runoff in general election.","raceReadTheStory":"","raceType":"","timeUpdated":"7:08 PM","dateUpdated":"March 28, 2024","totalVotes":81709,"candidates":[{"candidateName":"Mike Thompson","candidateIncumbent":false,"candidateParty":"","voteCount":36844},{"candidateName":"Bryan J. Kim","candidateIncumbent":false,"candidateParty":"","voteCount":44865}]},"SolanoD1":{"id":"SolanoD1","type":"localRace","location":"Solano","raceName":"Board of Supervisors, District 1","raceDescription":"Candidate with majority vote wins seat. If no candidate reaches majority, top two candidates advance to runoff in general election.","raceReadTheStory":"https://www.kqed.org/elections/results/solano/supervisor-1st-district","raceType":"","timeUpdated":"7:08 PM","dateUpdated":"March 28, 2024","totalVotes":13786,"candidates":[{"candidateName":"Michael Wilson","candidateIncumbent":false,"candidateParty":"","voteCount":6401},{"candidateName":"Cassandra James","candidateIncumbent":false,"candidateParty":"","voteCount":7385}]},"SolanoD2":{"id":"SolanoD2","type":"localRace","location":"Solano","raceName":"Board of Supervisors, District 2","raceDescription":"Candidate with majority vote wins seat. If no candidate reaches majority, top two candidates advance to runoff in general election.","raceReadTheStory":"","raceType":"","timeUpdated":"7:08 PM","dateUpdated":"March 28, 2024","totalVotes":19903,"candidates":[{"candidateName":"Monica Brown","candidateIncumbent":true,"candidateParty":"","voteCount":10951},{"candidateName":"Nora Dizon","candidateIncumbent":false,"candidateParty":"","voteCount":3135},{"candidateName":"Rochelle Sherlock","candidateIncumbent":false,"candidateParty":"","voteCount":5817}]},"SolanoD5":{"id":"SolanoD5","type":"localRace","location":"Solano","raceName":"Board of Supervisors, District 5","raceDescription":"Candidate with majority vote wins seat. If no candidate reaches majority, top two candidates advance to runoff in general election.","raceReadTheStory":"","raceType":"","timeUpdated":"7:08 PM","dateUpdated":"March 28, 2024","totalVotes":17888,"candidates":[{"candidateName":"Mitch Mashburn","candidateIncumbent":true,"candidateParty":"","voteCount":11210},{"candidateName":"Chadwick J. Ledoux","candidateIncumbent":false,"candidateParty":"","voteCount":6678}]},"SolanoEducation":{"id":"SolanoEducation","type":"localRace","location":"Solano","raceName":"Sacramento County Board of Education","raceDescription":"Candidate with majority vote wins seat. If no candidate reaches majority, top two candidates advance to runoff in general election.","raceReadTheStory":"","raceType":"","timeUpdated":"7:08 PM","dateUpdated":"March 28, 2024","totalVotes":3650,"candidates":[{"candidateName":"Heather Davis","candidateIncumbent":true,"candidateParty":"","voteCount":2960},{"candidateName":"Shazleen Khan","candidateIncumbent":false,"candidateParty":"","voteCount":690}]},"SolanoMeasureA":{"id":"SolanoMeasureA","type":"localRace","location":"Solano","raceName":"Measure A","raceDescription":"Benicia. Hotel tax. Passes with majority vote.","raceReadTheStory":"https://www.kqed.org/elections/results/solano/measure-a","raceType":"yesNo","timeUpdated":"7:08 PM","dateUpdated":"March 28, 2024","totalVotes":10136,"candidates":[{"candidateName":"Yes","candidateIncumbent":false,"candidateParty":"","voteCount":7869},{"candidateName":"No","candidateIncumbent":false,"candidateParty":"","voteCount":2267}]},"SolanoMeasureB":{"id":"SolanoMeasureB","type":"localRace","location":"Solano","raceName":"Measure B","raceDescription":"Benicia. Sales tax. Passes with majority vote.","raceReadTheStory":"https://www.kqed.org/elections/results/solano/measure-b","raceType":"yesNo","timeUpdated":"7:08 PM","dateUpdated":"March 28, 2024","totalVotes":10164,"candidates":[{"candidateName":"Yes","candidateIncumbent":false,"candidateParty":"","voteCount":7335},{"candidateName":"No","candidateIncumbent":false,"candidateParty":"","voteCount":2829}]},"SolanoMeasureC":{"id":"SolanoMeasureC","type":"localRace","location":"Solano","raceName":"Measure C","raceDescription":"Benicia Unified School District. School bond. Passes with 55% vote.","raceReadTheStory":"","raceType":"yesNo","timeUpdated":"7:08 PM","dateUpdated":"March 28, 2024","totalVotes":10112,"candidates":[{"candidateName":"Yes","candidateIncumbent":false,"candidateParty":"","voteCount":6316},{"candidateName":"No","candidateIncumbent":false,"candidateParty":"","voteCount":3796}]},"SolanoMeasureN":{"id":"SolanoMeasureN","type":"localRace","location":"Solano","raceName":"Measure N","raceDescription":"Davis Joint Unified School District. Parcel tax. Passes with 2/3 vote.","raceReadTheStory":"","raceType":"yesNo","timeUpdated":"7:08 PM","dateUpdated":"March 28, 2024","totalVotes":15,"candidates":[{"candidateName":"Yes","candidateIncumbent":false,"candidateParty":"","voteCount":5},{"candidateName":"No","candidateIncumbent":false,"candidateParty":"","voteCount":10}]},"SonomaJudge3":{"id":"SonomaJudge3","type":"localRace","location":"Sonoma","raceName":"Superior Court Judge, Office 3","raceDescription":"Candidate with majority vote wins seat. If no candidate reaches majority, top two candidates advance to runoff in general election.","raceReadTheStory":"","raceType":"top1","timeUpdated":"6:51 PM","dateUpdated":"March 29, 2024","totalVotes":115405,"candidates":[{"candidateName":"Kristine M. Burk","candidateIncumbent":false,"candidateParty":"","voteCount":79498},{"candidateName":"Beki Berrey","candidateIncumbent":false,"candidateParty":"","voteCount":35907}]},"SonomaJudge4":{"id":"SonomaJudge4","type":"localRace","location":"Sonoma","raceName":"Superior Court Judge, Office 4","raceDescription":"Candidate with majority vote wins seat. If no candidate reaches majority, top two candidates advance to runoff in general election.","raceReadTheStory":"","raceType":"top1","timeUpdated":"6:51 PM","dateUpdated":"March 29, 2024","totalVotes":86789,"candidates":[{"candidateName":"Paul J. Lozada","candidateIncumbent":false,"candidateParty":"","voteCount":86789}]},"SonomaJudge6":{"id":"SonomaJudge6","type":"localRace","location":"Sonoma","raceName":"Superior Court Judge, Office 6","raceDescription":"Candidate with majority vote wins seat. If no candidate reaches majority, top two candidates advance to runoff in general election.","raceReadTheStory":"","raceType":"top1","timeUpdated":"6:51 PM","dateUpdated":"March 29, 2024","totalVotes":117990,"candidates":[{"candidateName":"Omar Figueroa","candidateIncumbent":false,"candidateParty":"","voteCount":42236},{"candidateName":"Kenneth English","candidateIncumbent":false,"candidateParty":"","voteCount":75754}]},"SonomaD1":{"id":"SonomaD1","type":"localRace","location":"Sonoma","raceName":"Board of Supervisors, District 1","raceDescription":"Candidate with majority vote wins seat. If no candidate reaches majority, top two candidates advance to runoff in general election.","raceReadTheStory":"","raceType":"top1","timeUpdated":"6:51 PM","dateUpdated":"March 29, 2024","totalVotes":30348,"candidates":[{"candidateName":"Rebecca Hermosillo","candidateIncumbent":false,"candidateParty":"","voteCount":23958},{"candidateName":"Jonathan Mathieu","candidateIncumbent":false,"candidateParty":"","voteCount":6390}]},"SonomaD3":{"id":"SonomaD3","type":"localRace","location":"Sonoma","raceName":"Board of Supervisors, District 3","raceDescription":"Candidate with majority vote wins seat. If no candidate reaches majority, top two candidates advance to runoff in general election.","raceReadTheStory":"https://www.kqed.org/elections/results/sonoma/supervisor-3rd-district","raceType":"top1","timeUpdated":"6:51 PM","dateUpdated":"March 29, 2024","totalVotes":16312,"candidates":[{"candidateName":"Chris Coursey","candidateIncumbent":true,"candidateParty":"","voteCount":11346},{"candidateName":"Omar Medina","candidateIncumbent":false,"candidateParty":"","voteCount":4966}]},"SonomaD5":{"id":"SonomaD5","type":"localRace","location":"Sonoma","raceName":"Board of Supervisors, District 5","raceDescription":"Candidate with majority vote wins seat. If no candidate reaches majority, top two candidates advance to runoff in general election.","raceReadTheStory":"","raceType":"top1","timeUpdated":"6:51 PM","dateUpdated":"March 29, 2024","totalVotes":23356,"candidates":[{"candidateName":"Lynda Hopkins","candidateIncumbent":true,"candidateParty":"","voteCount":23356}]},"SonomaMeasureA":{"id":"SonomaMeasureA","type":"localRace","location":"Sonoma","raceName":"Measure A","raceDescription":"Cotati-Rohnert Park Unified School District. Parcel tax. Passes with 2/3 vote.","raceReadTheStory":"","raceType":"yesNo","timeUpdated":"6:51 PM","dateUpdated":"March 29, 2024","totalVotes":13756,"candidates":[{"candidateName":"Yes","candidateIncumbent":false,"candidateParty":"","voteCount":10320},{"candidateName":"No","candidateIncumbent":false,"candidateParty":"","voteCount":3436}]},"SonomaMeasureB":{"id":"SonomaMeasureB","type":"localRace","location":"Sonoma","raceName":"Measure B","raceDescription":"Petaluma Joint Union High School District. Parcel tax. Passes with 2/3 vote.","raceReadTheStory":"","raceType":"yesNo","timeUpdated":"6:51 PM","dateUpdated":"March 29, 2024","totalVotes":24877,"candidates":[{"candidateName":"Yes","candidateIncumbent":false,"candidateParty":"","voteCount":15795},{"candidateName":"No","candidateIncumbent":false,"candidateParty":"","voteCount":9082}]},"SonomaMeasureC":{"id":"SonomaMeasureC","type":"localRace","location":"Sonoma","raceName":"Measure C","raceDescription":"Fort Ross School District. School bond. Passes with 55% vote.","raceReadTheStory":"","raceType":"yesNo","timeUpdated":"6:51 PM","dateUpdated":"March 29, 2024","totalVotes":286,"candidates":[{"candidateName":"Yes","candidateIncumbent":false,"candidateParty":"","voteCount":159},{"candidateName":"No","candidateIncumbent":false,"candidateParty":"","voteCount":127}]},"SonomaMeasureD":{"id":"SonomaMeasureD","type":"localRace","location":"Sonoma","raceName":"Measure D","raceDescription":"Harmony Union School District. School bond. Passes with 55% vote.","raceReadTheStory":"","raceType":"yesNo","timeUpdated":"6:51 PM","dateUpdated":"March 29, 2024","totalVotes":1925,"candidates":[{"candidateName":"Yes","candidateIncumbent":false,"candidateParty":"","voteCount":1089},{"candidateName":"No","candidateIncumbent":false,"candidateParty":"","voteCount":836}]},"SonomaMeasureE":{"id":"SonomaMeasureE","type":"localRace","location":"Sonoma","raceName":"Measure E","raceDescription":"Petaluma City (Elementary) School District. Parcel tax. Passes with 2/3 vote.","raceReadTheStory":"","raceType":"yesNo","timeUpdated":"6:51 PM","dateUpdated":"March 29, 2024","totalVotes":11133,"candidates":[{"candidateName":"Yes","candidateIncumbent":false,"candidateParty":"","voteCount":7622},{"candidateName":"No","candidateIncumbent":false,"candidateParty":"","voteCount":3511}]},"SonomaMeasureG":{"id":"SonomaMeasureG","type":"localRace","location":"Sonoma","raceName":"Measure G","raceDescription":"Rincon Valley Union School District. School bond. Passes with 55% vote.","raceReadTheStory":"","raceType":"yesNo","timeUpdated":"6:51 PM","dateUpdated":"March 29, 2024","totalVotes":14577,"candidates":[{"candidateName":"Yes","candidateIncumbent":false,"candidateParty":"","voteCount":8668},{"candidateName":"No","candidateIncumbent":false,"candidateParty":"","voteCount":5909}]},"SonomaMeasureH":{"id":"SonomaMeasureH","type":"localRace","location":"Sonoma","raceName":"Measure H","raceDescription":"Sonoma County. Sales tax. Passes with majority vote.","raceReadTheStory":"https://www.kqed.org/elections/results/sonoma/measure-h","raceType":"yesNo","timeUpdated":"6:51 PM","dateUpdated":"March 29, 2024","totalVotes":145261,"candidates":[{"candidateName":"Yes","candidateIncumbent":false,"candidateParty":"","voteCount":89646},{"candidateName":"No","candidateIncumbent":false,"candidateParty":"","voteCount":55615}]}},"radioSchedulesReducer":{},"listsReducer":{"posts/bayareabites?tag=pasta":{"isFetching":false,"latestQuery":{"from":0,"postsToRender":9},"tag":null,"vitalsOnly":true,"totalRequested":9,"isLoading":false,"isLoadingMore":true,"total":32,"items":["bayareabites_139616","bayareabites_138982","bayareabites_139003","bayareabites_137157","bayareabites_137009","bayareabites_135820","bayareabites_126313","bayareabites_120126","bayareabites_119881"]}},"recallGuideReducer":{"intros":{},"policy":{},"candidates":{}},"savedPostsReducer":{},"pfsSessionReducer":{},"siteSettingsReducer":{},"subscriptionsReducer":{},"termsReducer":{"about":{"name":"About","type":"terms","id":"about","slug":"about","link":"/about","taxonomy":"site"},"arts":{"name":"Arts & Culture","grouping":["arts","pop","trulyca"],"description":"KQED Arts provides daily in-depth coverage of the Bay Area's music, art, film, performing arts, literature and arts news, as well as cultural commentary and criticism.","type":"terms","id":"arts","slug":"arts","link":"/arts","taxonomy":"site"},"artschool":{"name":"Art School","parent":"arts","type":"terms","id":"artschool","slug":"artschool","link":"/artschool","taxonomy":"site"},"bayareabites":{"name":"KQED food","grouping":["food","bayareabites","checkplease"],"parent":"food","type":"terms","id":"bayareabites","slug":"bayareabites","link":"/food","taxonomy":"site"},"bayareahiphop":{"name":"Bay Area Hiphop","type":"terms","id":"bayareahiphop","slug":"bayareahiphop","link":"/bayareahiphop","taxonomy":"site"},"campaign21":{"name":"Campaign 21","type":"terms","id":"campaign21","slug":"campaign21","link":"/campaign21","taxonomy":"site"},"checkplease":{"name":"KQED food","grouping":["food","bayareabites","checkplease"],"parent":"food","type":"terms","id":"checkplease","slug":"checkplease","link":"/food","taxonomy":"site"},"education":{"name":"Education","grouping":["education"],"type":"terms","id":"education","slug":"education","link":"/education","taxonomy":"site"},"elections":{"name":"Elections","type":"terms","id":"elections","slug":"elections","link":"/elections","taxonomy":"site"},"events":{"name":"Events","type":"terms","id":"events","slug":"events","link":"/events","taxonomy":"site"},"event":{"name":"Event","alias":"events","type":"terms","id":"event","slug":"event","link":"/event","taxonomy":"site"},"filmschoolshorts":{"name":"Film School Shorts","type":"terms","id":"filmschoolshorts","slug":"filmschoolshorts","link":"/filmschoolshorts","taxonomy":"site"},"food":{"name":"KQED food","grouping":["food","bayareabites","checkplease"],"type":"terms","id":"food","slug":"food","link":"/food","taxonomy":"site"},"forum":{"name":"Forum","relatedContentQuery":"posts/forum?","parent":"news","type":"terms","id":"forum","slug":"forum","link":"/forum","taxonomy":"site"},"futureofyou":{"name":"Future of You","grouping":["science","futureofyou"],"parent":"science","type":"terms","id":"futureofyou","slug":"futureofyou","link":"/futureofyou","taxonomy":"site"},"jpepinheart":{"name":"KQED food","relatedContentQuery":"trending/food,bayareabites,checkplease","parent":"food","type":"terms","id":"jpepinheart","slug":"jpepinheart","link":"/food","taxonomy":"site"},"liveblog":{"name":"Live Blog","type":"terms","id":"liveblog","slug":"liveblog","link":"/liveblog","taxonomy":"site"},"livetv":{"name":"Live TV","parent":"tv","type":"terms","id":"livetv","slug":"livetv","link":"/livetv","taxonomy":"site"},"lowdown":{"name":"The Lowdown","relatedContentQuery":"posts/lowdown?","parent":"news","type":"terms","id":"lowdown","slug":"lowdown","link":"/lowdown","taxonomy":"site"},"mindshift":{"name":"Mindshift","parent":"news","description":"MindShift explores the future of education by highlighting the innovative – and sometimes counterintuitive – ways educators and parents are helping all children succeed.","type":"terms","id":"mindshift","slug":"mindshift","link":"/mindshift","taxonomy":"site"},"news":{"name":"News","grouping":["news","forum"],"type":"terms","id":"news","slug":"news","link":"/news","taxonomy":"site"},"perspectives":{"name":"Perspectives","parent":"radio","type":"terms","id":"perspectives","slug":"perspectives","link":"/perspectives","taxonomy":"site"},"podcasts":{"name":"Podcasts","type":"terms","id":"podcasts","slug":"podcasts","link":"/podcasts","taxonomy":"site"},"pop":{"name":"Pop","parent":"arts","type":"terms","id":"pop","slug":"pop","link":"/pop","taxonomy":"site"},"pressroom":{"name":"Pressroom","type":"terms","id":"pressroom","slug":"pressroom","link":"/pressroom","taxonomy":"site"},"quest":{"name":"Quest","parent":"science","type":"terms","id":"quest","slug":"quest","link":"/quest","taxonomy":"site"},"radio":{"name":"Radio","grouping":["forum","perspectives"],"description":"Listen to KQED Public Radio – home of Forum and The California Report – on 88.5 FM in San Francisco, 89.3 FM in Sacramento, 88.3 FM in Santa Rosa and 88.1 FM in Martinez.","type":"terms","id":"radio","slug":"radio","link":"/radio","taxonomy":"site"},"root":{"name":"KQED","image":"https://ww2.kqed.org/app/uploads/2020/02/KQED-OG-Image@1x.png","imageWidth":1200,"imageHeight":630,"headData":{"title":"KQED | News, Radio, Podcasts, TV | Public Media for Northern California","description":"KQED provides public radio, television, and independent reporting on issues that matter to the Bay Area. We’re the NPR and PBS member station for Northern California."},"type":"terms","id":"root","slug":"root","link":"/root","taxonomy":"site"},"science":{"name":"Science","grouping":["science","futureofyou"],"description":"KQED Science brings you award-winning science and environment coverage from the Bay Area and beyond.","type":"terms","id":"science","slug":"science","link":"/science","taxonomy":"site"},"stateofhealth":{"name":"State of Health","parent":"science","type":"terms","id":"stateofhealth","slug":"stateofhealth","link":"/stateofhealth","taxonomy":"site"},"support":{"name":"Support","type":"terms","id":"support","slug":"support","link":"/support","taxonomy":"site"},"thedolist":{"name":"The Do List","parent":"arts","type":"terms","id":"thedolist","slug":"thedolist","link":"/thedolist","taxonomy":"site"},"trulyca":{"name":"Truly CA","grouping":["arts","pop","trulyca"],"parent":"arts","type":"terms","id":"trulyca","slug":"trulyca","link":"/trulyca","taxonomy":"site"},"tv":{"name":"TV","type":"terms","id":"tv","slug":"tv","link":"/tv","taxonomy":"site"},"voterguide":{"name":"Voter Guide","parent":"elections","alias":"elections","type":"terms","id":"voterguide","slug":"voterguide","link":"/voterguide","taxonomy":"site"},"bayareabites_755":{"type":"terms","id":"bayareabites_755","meta":{"index":"terms_1591234321","site":"bayareabites","id":"755","found":true},"relationships":{},"included":{},"name":"pasta","slug":"pasta","taxonomy":"tag","description":null,"featImg":null,"headData":{"title":"pasta Archives | KQED Bay Area Bites","description":null,"ogTitle":null,"ogDescription":null,"ogImgId":null,"twTitle":null,"twDescription":null,"twImgId":null,"imageData":{"ogImageSize":{"file":"https://cdn.kqed.org/wp-content/uploads/2020/02/KQED-OG-Image@1x.png","width":1200,"height":630},"twImageSize":{"file":"https://cdn.kqed.org/wp-content/uploads/2020/02/KQED-OG-Image@1x.png"},"twitterCard":"summary_large_image"}},"ttid":896,"isLoading":false,"link":"/bayareabites/tag/pasta"},"source_bayareabites_139616":{"type":"terms","id":"source_bayareabites_139616","meta":{"override":true},"name":"Food","link":"/food/","isLoading":false},"source_bayareabites_138982":{"type":"terms","id":"source_bayareabites_138982","meta":{"override":true},"name":"KQED Noodle Week","link":"https://www.kqed.org/noodles","isLoading":false},"source_bayareabites_139003":{"type":"terms","id":"source_bayareabites_139003","meta":{"override":true},"name":"KQED Noodle Week","link":"https://www.kqed.org/noodles","isLoading":false},"source_bayareabites_120126":{"type":"terms","id":"source_bayareabites_120126","meta":{"override":true},"name":"Restaurants, Bars, Cafes, Pop-Ups","link":"https://ww2.kqed.org/bayareabites/category/restaurants-and-bars/","isLoading":false},"bayareabites_16558":{"type":"terms","id":"bayareabites_16558","meta":{"index":"terms_1591234321","site":"bayareabites","id":"16558","found":true},"relationships":{},"included":{},"name":"Arts","slug":"arts","taxonomy":"category","description":null,"featImg":null,"headData":{"title":"Arts Archives | KQED Bay Area Bites","description":null,"ogTitle":null,"ogDescription":null,"ogImgId":null,"twTitle":null,"twDescription":null,"twImgId":null},"ttid":100888,"isLoading":false,"link":"/bayareabites/category/arts"},"bayareabites_17082":{"type":"terms","id":"bayareabites_17082","meta":{"index":"terms_1591234321","site":"bayareabites","id":"17082","found":true},"relationships":{},"included":{},"name":"Food","slug":"food","taxonomy":"category","description":null,"featImg":null,"headData":{"title":"Food Archives | KQED Bay Area Bites","description":null,"ogTitle":null,"ogDescription":null,"ogImgId":null,"twTitle":null,"twDescription":null,"twImgId":null},"ttid":101412,"isLoading":false,"link":"/bayareabites/category/food"},"bayareabites_15155":{"type":"terms","id":"bayareabites_15155","meta":{"index":"terms_1591234321","site":"bayareabites","id":"15155","found":true},"relationships":{},"included":{},"name":"north bay","slug":"north-bay","taxonomy":"category","description":null,"featImg":null,"headData":{"title":"north bay Archives | KQED Bay Area Bites","description":null,"ogTitle":null,"ogDescription":null,"ogImgId":null,"twTitle":null,"twDescription":null,"twImgId":null},"ttid":99485,"isLoading":false,"link":"/bayareabites/category/north-bay"},"bayareabites_16794":{"type":"terms","id":"bayareabites_16794","meta":{"index":"terms_1591234321","site":"bayareabites","id":"16794","found":true},"relationships":{},"included":{},"name":"pasta","slug":"pasta","taxonomy":"category","description":null,"featImg":null,"headData":{"title":"pasta Archives | KQED Bay Area Bites","description":null,"ogTitle":null,"ogDescription":null,"ogImgId":null,"twTitle":null,"twDescription":null,"twImgId":null},"ttid":101124,"isLoading":false,"link":"/bayareabites/category/pasta"},"bayareabites_15156":{"type":"terms","id":"bayareabites_15156","meta":{"index":"terms_1591234321","site":"bayareabites","id":"15156","found":true},"relationships":{},"included":{},"name":"sonoma","slug":"sonoma","taxonomy":"category","description":null,"featImg":null,"headData":{"title":"sonoma Archives | KQED Bay Area Bites","description":null,"ogTitle":null,"ogDescription":null,"ogImgId":null,"twTitle":null,"twDescription":null,"twImgId":null},"ttid":99486,"isLoading":false,"link":"/bayareabites/category/sonoma"},"bayareabites_17045":{"type":"terms","id":"bayareabites_17045","meta":{"index":"terms_1591234321","site":"bayareabites","id":"17045","found":true},"relationships":{},"included":{},"name":"art ibleto","slug":"art-ibleto","taxonomy":"tag","description":null,"featImg":null,"headData":{"title":"art ibleto Archives | KQED Bay Area Bites","description":null,"ogTitle":null,"ogDescription":null,"ogImgId":null,"twTitle":null,"twDescription":null,"twImgId":null},"ttid":101375,"isLoading":false,"link":"/bayareabites/tag/art-ibleto"},"bayareabites_17048":{"type":"terms","id":"bayareabites_17048","meta":{"index":"terms_1591234321","site":"bayareabites","id":"17048","found":true},"relationships":{},"included":{},"name":"art ibleto dead","slug":"art-ibleto-dead","taxonomy":"tag","description":null,"featImg":null,"headData":{"title":"art ibleto dead Archives | KQED Bay Area Bites","description":null,"ogTitle":null,"ogDescription":null,"ogImgId":null,"twTitle":null,"twDescription":null,"twImgId":null},"ttid":101378,"isLoading":false,"link":"/bayareabites/tag/art-ibleto-dead"},"bayareabites_17044":{"type":"terms","id":"bayareabites_17044","meta":{"index":"terms_1591234321","site":"bayareabites","id":"17044","found":true},"relationships":{},"included":{},"name":"cotati","slug":"cotati","taxonomy":"tag","description":null,"featImg":null,"headData":{"title":"cotati Archives | KQED Bay Area Bites","description":null,"ogTitle":null,"ogDescription":null,"ogImgId":null,"twTitle":null,"twDescription":null,"twImgId":null},"ttid":101374,"isLoading":false,"link":"/bayareabites/tag/cotati"},"bayareabites_16575":{"type":"terms","id":"bayareabites_16575","meta":{"index":"terms_1591234321","site":"bayareabites","id":"16575","found":true},"relationships":{},"included":{},"name":"featured-arts","slug":"featured-arts","taxonomy":"tag","description":null,"featImg":null,"headData":{"title":"featured-arts Archives | KQED Bay Area Bites","description":null,"ogTitle":null,"ogDescription":null,"ogImgId":null,"twTitle":null,"twDescription":null,"twImgId":null},"ttid":100905,"isLoading":false,"link":"/bayareabites/tag/featured-arts"},"bayareabites_14177":{"type":"terms","id":"bayareabites_14177","meta":{"index":"terms_1591234321","site":"bayareabites","id":"14177","found":true},"relationships":{},"included":{},"name":"immigration","slug":"immigration","taxonomy":"tag","description":null,"featImg":null,"headData":{"title":"immigration Archives | KQED Bay Area Bites","description":null,"ogTitle":null,"ogDescription":null,"ogImgId":null,"twTitle":null,"twDescription":null,"twImgId":null},"ttid":8653,"isLoading":false,"link":"/bayareabites/tag/immigration"},"bayareabites_17046":{"type":"terms","id":"bayareabites_17046","meta":{"index":"terms_1591234321","site":"bayareabites","id":"17046","found":true},"relationships":{},"included":{},"name":"obit","slug":"obit","taxonomy":"tag","description":null,"featImg":null,"headData":{"title":"obit Archives | KQED Bay Area Bites","description":null,"ogTitle":null,"ogDescription":null,"ogImgId":null,"twTitle":null,"twDescription":null,"twImgId":null},"ttid":101376,"isLoading":false,"link":"/bayareabites/tag/obit"},"bayareabites_17043":{"type":"terms","id":"bayareabites_17043","meta":{"index":"terms_1591234321","site":"bayareabites","id":"17043","found":true},"relationships":{},"included":{},"name":"pasta king","slug":"pasta-king","taxonomy":"tag","description":null,"featImg":null,"headData":{"title":"pasta king Archives | KQED Bay Area Bites","description":null,"ogTitle":null,"ogDescription":null,"ogImgId":null,"twTitle":null,"twDescription":null,"twImgId":null},"ttid":101373,"isLoading":false,"link":"/bayareabites/tag/pasta-king"},"bayareabites_17049":{"type":"terms","id":"bayareabites_17049","meta":{"index":"terms_1591234321","site":"bayareabites","id":"17049","found":true},"relationships":{},"included":{},"name":"pasta king dead","slug":"pasta-king-dead","taxonomy":"tag","description":null,"featImg":null,"headData":{"title":"pasta king dead Archives | KQED Bay Area Bites","description":null,"ogTitle":null,"ogDescription":null,"ogImgId":null,"twTitle":null,"twDescription":null,"twImgId":null},"ttid":101379,"isLoading":false,"link":"/bayareabites/tag/pasta-king-dead"},"bayareabites_17047":{"type":"terms","id":"bayareabites_17047","meta":{"index":"terms_1591234321","site":"bayareabites","id":"17047","found":true},"relationships":{},"included":{},"name":"rememberance","slug":"rememberance","taxonomy":"tag","description":null,"featImg":null,"headData":{"title":"rememberance Archives | KQED Bay Area Bites","description":null,"ogTitle":null,"ogDescription":null,"ogImgId":null,"twTitle":null,"twDescription":null,"twImgId":null},"ttid":101377,"isLoading":false,"link":"/bayareabites/tag/rememberance"},"bayareabites_14869":{"type":"terms","id":"bayareabites_14869","meta":{"index":"terms_1591234321","site":"bayareabites","id":"14869","found":true},"relationships":{},"included":{},"name":"Sonoma County","slug":"sonoma-county","taxonomy":"tag","description":null,"featImg":null,"headData":{"title":"Sonoma County Archives | KQED Bay Area Bites","description":null,"ogTitle":null,"ogDescription":null,"ogImgId":null,"twTitle":null,"twDescription":null,"twImgId":null},"ttid":99199,"isLoading":false,"link":"/bayareabites/tag/sonoma-county"},"bayareabites_752":{"type":"terms","id":"bayareabites_752","meta":{"index":"terms_1591234321","site":"bayareabites","id":"752","found":true},"relationships":{},"included":{},"name":"Bay Area Bites Food + Drink","slug":"food-and-drink","taxonomy":"category","description":null,"featImg":null,"headData":{"title":"Bay Area Bites Food + Drink Archives | KQED Bay Area Bites","description":null,"ogTitle":null,"ogDescription":null,"ogImgId":null,"twTitle":null,"twDescription":null,"twImgId":null},"ttid":1,"isLoading":false,"link":"/bayareabites/category/food-and-drink"},"bayareabites_16557":{"type":"terms","id":"bayareabites_16557","meta":{"index":"terms_1591234321","site":"bayareabites","id":"16557","found":true},"relationships":{},"included":{},"name":"featured-food","slug":"featured-food","taxonomy":"tag","description":null,"featImg":null,"headData":{"title":"featured-food Archives | KQED Bay Area Bites","description":null,"ogTitle":null,"ogDescription":null,"ogImgId":null,"twTitle":null,"twDescription":null,"twImgId":null},"ttid":100887,"isLoading":false,"link":"/bayareabites/tag/featured-food"},"bayareabites_16941":{"type":"terms","id":"bayareabites_16941","meta":{"index":"terms_1591234321","site":"bayareabites","id":"16941","found":true},"relationships":{},"included":{},"name":"food and colonialism","slug":"food-and-colonialism","taxonomy":"tag","description":null,"featImg":null,"headData":{"title":"food and colonialism Archives | KQED Bay Area Bites","description":null,"ogTitle":null,"ogDescription":null,"ogImgId":null,"twTitle":null,"twDescription":null,"twImgId":null},"ttid":101271,"isLoading":false,"link":"/bayareabites/tag/food-and-colonialism"},"bayareabites_377":{"type":"terms","id":"bayareabites_377","meta":{"index":"terms_1591234321","site":"bayareabites","id":"377","found":true},"relationships":{},"included":{},"name":"noodles","slug":"noodles","taxonomy":"tag","description":null,"featImg":null,"headData":{"title":"noodles Archives | KQED Bay Area Bites","description":null,"ogTitle":null,"ogDescription":null,"ogImgId":null,"twTitle":null,"twDescription":null,"twImgId":null},"ttid":342,"isLoading":false,"link":"/bayareabites/tag/noodles"},"bayareabites_16940":{"type":"terms","id":"bayareabites_16940","meta":{"index":"terms_1591234321","site":"bayareabites","id":"16940","found":true},"relationships":{},"included":{},"name":"noodles2020","slug":"noodles2020","taxonomy":"tag","description":null,"featImg":null,"headData":{"title":"noodles2020 Archives | KQED Bay Area Bites","description":null,"ogTitle":null,"ogDescription":null,"ogImgId":null,"twTitle":null,"twDescription":null,"twImgId":null},"ttid":101270,"isLoading":false,"link":"/bayareabites/tag/noodles2020"},"bayareabites_1280":{"type":"terms","id":"bayareabites_1280","meta":{"index":"terms_1591234321","site":"bayareabites","id":"1280","found":true},"relationships":{},"included":{},"name":"spaghetti","slug":"spaghetti","taxonomy":"tag","description":null,"featImg":null,"headData":{"title":"spaghetti Archives | KQED Bay Area Bites","description":null,"ogTitle":null,"ogDescription":null,"ogImgId":null,"twTitle":null,"twDescription":null,"twImgId":null},"ttid":1121,"isLoading":false,"link":"/bayareabites/tag/spaghetti"},"bayareabites_569":{"type":"terms","id":"bayareabites_569","meta":{"index":"terms_1591234321","site":"bayareabites","id":"569","found":true},"relationships":{},"included":{},"name":"cooking","slug":"cooking","taxonomy":"tag","description":null,"featImg":null,"headData":{"title":"cooking Archives | KQED Bay Area Bites","description":null,"ogTitle":null,"ogDescription":null,"ogImgId":null,"twTitle":null,"twDescription":null,"twImgId":null},"ttid":534,"isLoading":false,"link":"/bayareabites/tag/cooking"},"bayareabites_16946":{"type":"terms","id":"bayareabites_16946","meta":{"index":"terms_1591234321","site":"bayareabites","id":"16946","found":true},"relationships":{},"included":{},"name":"egg noodles","slug":"egg-noodles","taxonomy":"tag","description":null,"featImg":null,"headData":{"title":"egg noodles Archives | KQED Bay Area Bites","description":null,"ogTitle":null,"ogDescription":null,"ogImgId":null,"twTitle":null,"twDescription":null,"twImgId":null},"ttid":101276,"isLoading":false,"link":"/bayareabites/tag/egg-noodles"},"bayareabites_13504":{"type":"terms","id":"bayareabites_13504","meta":{"index":"terms_1591234321","site":"bayareabites","id":"13504","found":true},"relationships":{},"included":{},"name":"food science","slug":"food-science","taxonomy":"tag","description":null,"featImg":null,"headData":{"title":"food science Archives | KQED Bay Area Bites","description":null,"ogTitle":null,"ogDescription":null,"ogImgId":null,"twTitle":null,"twDescription":null,"twImgId":null},"ttid":7974,"isLoading":false,"link":"/bayareabites/tag/food-science"},"bayareabites_16945":{"type":"terms","id":"bayareabites_16945","meta":{"index":"terms_1591234321","site":"bayareabites","id":"16945","found":true},"relationships":{},"included":{},"name":"homecooking","slug":"homecooking","taxonomy":"tag","description":null,"featImg":null,"headData":{"title":"homecooking Archives | KQED Bay Area Bites","description":null,"ogTitle":null,"ogDescription":null,"ogImgId":null,"twTitle":null,"twDescription":null,"twImgId":null},"ttid":101275,"isLoading":false,"link":"/bayareabites/tag/homecooking"},"bayareabites_14756":{"type":"terms","id":"bayareabites_14756","meta":{"index":"terms_1591234321","site":"bayareabites","id":"14756","found":true},"relationships":{},"included":{},"name":"science","slug":"science","taxonomy":"tag","description":null,"featImg":null,"headData":{"title":"science Archives | KQED Bay Area Bites","description":null,"ogTitle":null,"ogDescription":null,"ogImgId":null,"twTitle":null,"twDescription":null,"twImgId":null},"ttid":323,"isLoading":false,"link":"/bayareabites/tag/science"},"bayareabites_16944":{"type":"terms","id":"bayareabites_16944","meta":{"index":"terms_1591234321","site":"bayareabites","id":"16944","found":true},"relationships":{},"included":{},"name":"science of pasta","slug":"science-of-pasta","taxonomy":"tag","description":null,"featImg":null,"headData":{"title":"science of pasta Archives | KQED Bay Area Bites","description":null,"ogTitle":null,"ogDescription":null,"ogImgId":null,"twTitle":null,"twDescription":null,"twImgId":null},"ttid":101274,"isLoading":false,"link":"/bayareabites/tag/science-of-pasta"},"bayareabites_109":{"type":"terms","id":"bayareabites_109","meta":{"index":"terms_1591234321","site":"bayareabites","id":"109","found":true},"relationships":{},"included":{},"name":"bay area","slug":"bay-area","taxonomy":"category","description":null,"featImg":null,"headData":{"title":"bay area Archives | KQED Bay Area Bites","description":null,"ogTitle":null,"ogDescription":null,"ogImgId":null,"twTitle":null,"twDescription":null,"twImgId":null},"ttid":73,"isLoading":false,"link":"/bayareabites/category/bay-area"},"bayareabites_2695":{"type":"terms","id":"bayareabites_2695","meta":{"index":"terms_1591234321","site":"bayareabites","id":"2695","found":true},"relationships":{},"included":{},"name":"cooking techniques and tips","slug":"cooking-techniques-and-tips","taxonomy":"category","description":null,"featImg":null,"headData":{"title":"cooking techniques and tips Archives | KQED Bay Area Bites","description":null,"ogTitle":null,"ogDescription":null,"ogImgId":null,"twTitle":null,"twDescription":null,"twImgId":null},"ttid":1905,"isLoading":false,"link":"/bayareabites/category/cooking-techniques-and-tips"},"bayareabites_1246":{"type":"terms","id":"bayareabites_1246","meta":{"index":"terms_1591234321","site":"bayareabites","id":"1246","found":true},"relationships":{},"included":{},"name":"kids and family","slug":"kids-and-family","taxonomy":"category","description":null,"featImg":null,"headData":{"title":"kids and family Archives | KQED Bay Area Bites","description":null,"ogTitle":null,"ogDescription":null,"ogImgId":null,"twTitle":null,"twDescription":null,"twImgId":null},"ttid":1085,"isLoading":false,"link":"/bayareabites/category/kids-and-family"},"bayareabites_1875":{"type":"terms","id":"bayareabites_1875","meta":{"index":"terms_1591234321","site":"bayareabites","id":"1875","found":true},"relationships":{},"included":{},"name":"local food businesses","slug":"local-food-businesses","taxonomy":"category","description":null,"featImg":null,"headData":{"title":"local food businesses Archives | KQED Bay Area Bites","description":null,"ogTitle":null,"ogDescription":null,"ogImgId":null,"twTitle":null,"twDescription":null,"twImgId":null},"ttid":1453,"isLoading":false,"link":"/bayareabites/category/local-food-businesses"},"bayareabites_12":{"type":"terms","id":"bayareabites_12","meta":{"index":"terms_1591234321","site":"bayareabites","id":"12","found":true},"relationships":{},"included":{},"name":"recipes","slug":"recipes","taxonomy":"category","description":null,"featImg":null,"headData":{"title":"recipes Archives | KQED Bay Area Bites","description":null,"ogTitle":null,"ogDescription":null,"ogImgId":null,"twTitle":null,"twDescription":null,"twImgId":null},"ttid":10,"isLoading":false,"link":"/bayareabites/category/recipes"},"bayareabites_1807":{"type":"terms","id":"bayareabites_1807","meta":{"index":"terms_1591234321","site":"bayareabites","id":"1807","found":true},"relationships":{},"included":{},"name":"restaurants, bars, cafes, pop-ups","slug":"restaurants-and-bars","taxonomy":"category","description":null,"featImg":null,"headData":{"title":"restaurants, bars, cafes, pop-ups Archives | KQED Bay Area Bites","description":null,"ogTitle":null,"ogDescription":null,"ogImgId":null,"twTitle":null,"twDescription":null,"twImgId":null},"ttid":56,"isLoading":false,"link":"/bayareabites/category/restaurants-and-bars"},"bayareabites_90":{"type":"terms","id":"bayareabites_90","meta":{"index":"terms_1591234321","site":"bayareabites","id":"90","found":true},"relationships":{},"included":{},"name":"san francisco","slug":"san-francisco","taxonomy":"category","description":null,"featImg":null,"headData":{"title":"san francisco Archives | KQED Bay Area Bites","description":null,"ogTitle":null,"ogDescription":null,"ogImgId":null,"twTitle":null,"twDescription":null,"twImgId":null},"ttid":54,"isLoading":false,"link":"/bayareabites/category/san-francisco"},"bayareabites_757":{"type":"terms","id":"bayareabites_757","meta":{"index":"terms_1591234321","site":"bayareabites","id":"757","found":true},"relationships":{},"included":{},"name":"check please","slug":"check-please","taxonomy":"tag","description":null,"featImg":null,"headData":{"title":"check please Archives | KQED Bay Area Bites","description":null,"ogTitle":null,"ogDescription":null,"ogImgId":null,"twTitle":null,"twDescription":null,"twImgId":null},"ttid":1361,"isLoading":false,"link":"/bayareabites/tag/check-please"},"bayareabites_763":{"type":"terms","id":"bayareabites_763","meta":{"index":"terms_1591234321","site":"bayareabites","id":"763","found":true},"relationships":{},"included":{},"name":"check please bay area","slug":"check-please-bay-area","taxonomy":"tag","description":null,"featImg":null,"headData":{"title":"check please bay area Archives | KQED Bay Area Bites","description":null,"ogTitle":null,"ogDescription":null,"ogImgId":null,"twTitle":null,"twDescription":null,"twImgId":null},"ttid":2241,"isLoading":false,"link":"/bayareabites/tag/check-please-bay-area"},"bayareabites_16580":{"type":"terms","id":"bayareabites_16580","meta":{"index":"terms_1591234321","site":"bayareabites","id":"16580","found":true},"relationships":{},"included":{},"name":"handmade","slug":"handmade","taxonomy":"tag","description":null,"featImg":null,"headData":{"title":"handmade Archives | KQED Bay Area Bites","description":null,"ogTitle":null,"ogDescription":null,"ogImgId":null,"twTitle":null,"twDescription":null,"twImgId":null},"ttid":100910,"isLoading":false,"link":"/bayareabites/tag/handmade"},"bayareabites_766":{"type":"terms","id":"bayareabites_766","meta":{"index":"terms_1591234321","site":"bayareabites","id":"766","found":true},"relationships":{},"included":{},"name":"Italian","slug":"italian","taxonomy":"tag","description":null,"featImg":null,"headData":{"title":"Italian Archives | KQED Bay Area Bites","description":null,"ogTitle":null,"ogDescription":null,"ogImgId":null,"twTitle":null,"twDescription":null,"twImgId":null},"ttid":849,"isLoading":false,"link":"/bayareabites/tag/italian"},"bayareabites_14738":{"type":"terms","id":"bayareabites_14738","meta":{"index":"terms_1591234321","site":"bayareabites","id":"14738","found":true},"relationships":{},"included":{},"name":"recipes","slug":"recipes","taxonomy":"tag","description":null,"featImg":null,"headData":{"title":"recipes Archives | KQED Bay Area Bites","description":null,"ogTitle":null,"ogDescription":null,"ogImgId":null,"twTitle":null,"twDescription":null,"twImgId":null},"ttid":831,"isLoading":false,"link":"/bayareabites/tag/recipes"},"bayareabites_14745":{"type":"terms","id":"bayareabites_14745","meta":{"index":"terms_1591234321","site":"bayareabites","id":"14745","found":true},"relationships":{},"included":{},"name":"san francisco","slug":"san-francisco","taxonomy":"tag","description":null,"featImg":null,"headData":{"title":"san francisco Archives | KQED Bay Area Bites","description":null,"ogTitle":null,"ogDescription":null,"ogImgId":null,"twTitle":null,"twDescription":null,"twImgId":null},"ttid":817,"isLoading":false,"link":"/bayareabites/tag/san-francisco"},"bayareabites_264":{"type":"terms","id":"bayareabites_264","meta":{"index":"terms_1591234321","site":"bayareabites","id":"264","found":true},"relationships":{},"included":{},"name":"berkeley","slug":"berkeley","taxonomy":"category","description":null,"featImg":null,"headData":{"title":"berkeley Archives | KQED Bay Area Bites","description":null,"ogTitle":null,"ogDescription":null,"ogImgId":null,"twTitle":null,"twDescription":null,"twImgId":null},"ttid":7636,"isLoading":false,"link":"/bayareabites/category/berkeley"},"bayareabites_188":{"type":"terms","id":"bayareabites_188","meta":{"index":"terms_1591234321","site":"bayareabites","id":"188","found":true},"relationships":{},"included":{},"name":"cheese","slug":"cheese","taxonomy":"category","description":null,"featImg":null,"headData":{"title":"cheese Archives | KQED Bay Area Bites","description":null,"ogTitle":null,"ogDescription":null,"ogImgId":null,"twTitle":null,"twDescription":null,"twImgId":null},"ttid":5989,"isLoading":false,"link":"/bayareabites/category/cheese"},"bayareabites_8770":{"type":"terms","id":"bayareabites_8770","meta":{"index":"terms_1591234321","site":"bayareabites","id":"8770","found":true},"relationships":{},"included":{},"name":"east bay","slug":"east-bay","taxonomy":"category","description":null,"featImg":null,"headData":{"title":"east bay Archives | KQED Bay Area Bites","description":null,"ogTitle":null,"ogDescription":null,"ogImgId":null,"twTitle":null,"twDescription":null,"twImgId":null},"ttid":7634,"isLoading":false,"link":"/bayareabites/category/east-bay"},"bayareabites_16577":{"type":"terms","id":"bayareabites_16577","meta":{"index":"terms_1591234321","site":"bayareabites","id":"16577","found":true},"relationships":{},"included":{},"name":"Agrodolce Osteria","slug":"agrodolce-osteria","taxonomy":"tag","description":null,"featImg":null,"headData":{"title":"Agrodolce Osteria Archives | KQED Bay Area Bites","description":null,"ogTitle":null,"ogDescription":null,"ogImgId":null,"twTitle":null,"twDescription":null,"twImgId":null},"ttid":100907,"isLoading":false,"link":"/bayareabites/tag/agrodolce-osteria"},"bayareabites_14751":{"type":"terms","id":"bayareabites_14751","meta":{"index":"terms_1591234321","site":"bayareabites","id":"14751","found":true},"relationships":{},"included":{},"name":"berkeley","slug":"berkeley","taxonomy":"tag","description":null,"featImg":null,"headData":{"title":"berkeley Archives | KQED Bay Area Bites","description":null,"ogTitle":null,"ogDescription":null,"ogImgId":null,"twTitle":null,"twDescription":null,"twImgId":null},"ttid":229,"isLoading":false,"link":"/bayareabites/tag/berkeley"},"bayareabites_15290":{"type":"terms","id":"bayareabites_15290","meta":{"index":"terms_1591234321","site":"bayareabites","id":"15290","found":true},"relationships":{},"included":{},"name":"family","slug":"family","taxonomy":"tag","description":null,"featImg":null,"headData":{"title":"family Archives | KQED Bay Area Bites","description":null,"ogTitle":null,"ogDescription":null,"ogImgId":null,"twTitle":null,"twDescription":null,"twImgId":null},"ttid":99620,"isLoading":false,"link":"/bayareabites/tag/family"},"bayareabites_14436":{"type":"terms","id":"bayareabites_14436","meta":{"index":"terms_1591234321","site":"bayareabites","id":"14436","found":true},"relationships":{},"included":{},"name":"Sicilian Food","slug":"sicilian-food","taxonomy":"tag","description":null,"featImg":null,"headData":{"title":"Sicilian Food Archives | KQED Bay Area Bites","description":null,"ogTitle":null,"ogDescription":null,"ogImgId":null,"twTitle":null,"twDescription":null,"twImgId":null},"ttid":98812,"isLoading":false,"link":"/bayareabites/tag/sicilian-food"},"bayareabites_2998":{"type":"terms","id":"bayareabites_2998","meta":{"index":"terms_1591234321","site":"bayareabites","id":"2998","found":true},"relationships":{},"included":{},"name":"asian food and drink","slug":"asian-food-and-drink","taxonomy":"category","description":null,"featImg":null,"headData":{"title":"asian food and drink Archives | KQED Bay Area Bites","description":null,"ogTitle":null,"ogDescription":null,"ogImgId":null,"twTitle":null,"twDescription":null,"twImgId":null},"ttid":58,"isLoading":false,"link":"/bayareabites/category/asian-food-and-drink"},"bayareabites_1516":{"type":"terms","id":"bayareabites_1516","meta":{"index":"terms_1591234321","site":"bayareabites","id":"1516","found":true},"relationships":{},"included":{},"name":"baking and bakeries","slug":"baking-and-bakeries","taxonomy":"category","description":null,"featImg":null,"headData":{"title":"baking and bakeries Archives | KQED Bay Area Bites","description":null,"ogTitle":null,"ogDescription":null,"ogImgId":null,"twTitle":null,"twDescription":null,"twImgId":null},"ttid":1253,"isLoading":false,"link":"/bayareabites/category/baking-and-bakeries"},"bayareabites_1653":{"type":"terms","id":"bayareabites_1653","meta":{"index":"terms_1591234321","site":"bayareabites","id":"1653","found":true},"relationships":{},"included":{},"name":"dessert and chocolate","slug":"dessert-and-chocolate","taxonomy":"category","description":null,"featImg":null,"headData":{"title":"dessert and chocolate Archives | KQED Bay Area Bites","description":null,"ogTitle":null,"ogDescription":null,"ogImgId":null,"twTitle":null,"twDescription":null,"twImgId":null},"ttid":12,"isLoading":false,"link":"/bayareabites/category/dessert-and-chocolate"},"bayareabites_1763":{"type":"terms","id":"bayareabites_1763","meta":{"index":"terms_1591234321","site":"bayareabites","id":"1763","found":true},"relationships":{},"included":{},"name":"holidays and traditions","slug":"holidays-and-traditions","taxonomy":"category","description":null,"featImg":null,"headData":{"title":"holidays and traditions Archives | KQED Bay Area Bites","description":null,"ogTitle":null,"ogDescription":null,"ogImgId":null,"twTitle":null,"twDescription":null,"twImgId":null},"ttid":1254,"isLoading":false,"link":"/bayareabites/category/holidays-and-traditions"},"bayareabites_366":{"type":"terms","id":"bayareabites_366","meta":{"index":"terms_1591234321","site":"bayareabites","id":"366","found":true},"relationships":{},"included":{},"name":"oakland","slug":"oakland","taxonomy":"category","description":null,"featImg":null,"headData":{"title":"oakland Archives | KQED Bay Area Bites","description":null,"ogTitle":null,"ogDescription":null,"ogImgId":null,"twTitle":null,"twDescription":null,"twImgId":null},"ttid":7635,"isLoading":false,"link":"/bayareabites/category/oakland"},"bayareabites_1873":{"type":"terms","id":"bayareabites_1873","meta":{"index":"terms_1591234321","site":"bayareabites","id":"1873","found":true},"relationships":{},"included":{},"name":"vegetarian and vegan","slug":"vegetarian-and-vegan","taxonomy":"category","description":null,"featImg":null,"headData":{"title":"vegetarian and vegan Archives | KQED Bay Area Bites","description":null,"ogTitle":null,"ogDescription":null,"ogImgId":null,"twTitle":null,"twDescription":null,"twImgId":null},"ttid":1451,"isLoading":false,"link":"/bayareabites/category/vegetarian-and-vegan"},"bayareabites_16243":{"type":"terms","id":"bayareabites_16243","meta":{"index":"terms_1591234321","site":"bayareabites","id":"16243","found":true},"relationships":{},"included":{},"name":"asian food","slug":"asian-food","taxonomy":"tag","description":null,"featImg":null,"headData":{"title":"asian food Archives | KQED Bay Area Bites","description":null,"ogTitle":null,"ogDescription":null,"ogImgId":null,"twTitle":null,"twDescription":null,"twImgId":null},"ttid":100573,"isLoading":false,"link":"/bayareabites/tag/asian-food"},"bayareabites_9710":{"type":"terms","id":"bayareabites_9710","meta":{"index":"terms_1591234321","site":"bayareabites","id":"9710","found":true},"relationships":{},"included":{},"name":"featured","slug":"featured","taxonomy":"tag","description":null,"featImg":null,"headData":{"title":"featured Archives | KQED Bay Area Bites","description":null,"ogTitle":null,"ogDescription":null,"ogImgId":null,"twTitle":null,"twDescription":null,"twImgId":null},"ttid":4164,"isLoading":false,"link":"/bayareabites/tag/featured"},"bayareabites_16515":{"type":"terms","id":"bayareabites_16515","meta":{"index":"terms_1591234321","site":"bayareabites","id":"16515","found":true},"relationships":{},"included":{},"name":"filipino food","slug":"filipino-food","taxonomy":"tag","description":null,"featImg":null,"headData":{"title":"filipino food Archives | KQED Bay Area Bites","description":null,"ogTitle":null,"ogDescription":null,"ogImgId":null,"twTitle":null,"twDescription":null,"twImgId":null},"ttid":100845,"isLoading":false,"link":"/bayareabites/tag/filipino-food"},"bayareabites_330":{"type":"terms","id":"bayareabites_330","meta":{"index":"terms_1591234321","site":"bayareabites","id":"330","found":true},"relationships":{},"included":{},"name":"fried chicken","slug":"fried-chicken","taxonomy":"tag","description":null,"featImg":null,"headData":{"title":"fried chicken Archives | KQED Bay Area Bites","description":null,"ogTitle":null,"ogDescription":null,"ogImgId":null,"twTitle":null,"twDescription":null,"twImgId":null},"ttid":295,"isLoading":false,"link":"/bayareabites/tag/fried-chicken"},"bayareabites_725":{"type":"terms","id":"bayareabites_725","meta":{"index":"terms_1591234321","site":"bayareabites","id":"725","found":true},"relationships":{},"included":{},"name":"italian food","slug":"italian-food","taxonomy":"tag","description":null,"featImg":null,"headData":{"title":"italian food Archives | KQED Bay Area Bites","description":null,"ogTitle":null,"ogDescription":null,"ogImgId":null,"twTitle":null,"twDescription":null,"twImgId":null},"ttid":690,"isLoading":false,"link":"/bayareabites/tag/italian-food"},"bayareabites_16252":{"type":"terms","id":"bayareabites_16252","meta":{"index":"terms_1591234321","site":"bayareabites","id":"16252","found":true},"relationships":{},"included":{},"name":"russian food","slug":"russian-food","taxonomy":"tag","description":null,"featImg":null,"headData":{"title":"russian food Archives | KQED Bay Area Bites","description":null,"ogTitle":null,"ogDescription":null,"ogImgId":null,"twTitle":null,"twDescription":null,"twImgId":null},"ttid":100582,"isLoading":false,"link":"/bayareabites/tag/russian-food"},"bayareabites_16516":{"type":"terms","id":"bayareabites_16516","meta":{"index":"terms_1591234321","site":"bayareabites","id":"16516","found":true},"relationships":{},"included":{},"name":"silog","slug":"silog","taxonomy":"tag","description":null,"featImg":null,"headData":{"title":"silog Archives | KQED Bay Area Bites","description":null,"ogTitle":null,"ogDescription":null,"ogImgId":null,"twTitle":null,"twDescription":null,"twImgId":null},"ttid":100846,"isLoading":false,"link":"/bayareabites/tag/silog"},"bayareabites_16196":{"type":"terms","id":"bayareabites_16196","meta":{"index":"terms_1591234321","site":"bayareabites","id":"16196","found":true},"relationships":{},"included":{},"name":"New Restaurants 2018","slug":"new-restaurants-2018","taxonomy":"series","description":null,"featImg":null,"headData":{"title":"New Restaurants 2018 Archives | KQED Bay Area Bites","description":null,"ogTitle":null,"ogDescription":null,"ogImgId":null,"twTitle":null,"twDescription":null,"twImgId":null},"ttid":100526,"isLoading":false,"link":"/bayareabites/series/new-restaurants-2018"},"bayareabites_63":{"type":"terms","id":"bayareabites_63","meta":{"index":"terms_1591234321","site":"bayareabites","id":"63","found":true},"relationships":{},"included":{},"name":"chefs","slug":"chefs","taxonomy":"category","description":null,"featImg":null,"headData":{"title":"chefs Archives | KQED Bay Area Bites","description":null,"ogTitle":null,"ogDescription":null,"ogImgId":null,"twTitle":null,"twDescription":null,"twImgId":null},"ttid":27,"isLoading":false,"link":"/bayareabites/category/chefs"},"bayareabites_11028":{"type":"terms","id":"bayareabites_11028","meta":{"index":"terms_1591234321","site":"bayareabites","id":"11028","found":true},"relationships":{},"included":{},"name":"food art","slug":"food-art","taxonomy":"category","description":null,"featImg":null,"headData":{"title":"food art Archives | KQED Bay Area Bites","description":null,"ogTitle":null,"ogDescription":null,"ogImgId":null,"twTitle":null,"twDescription":null,"twImgId":null},"ttid":7736,"isLoading":false,"link":"/bayareabites/category/food-art"},"bayareabites_10028":{"type":"terms","id":"bayareabites_10028","meta":{"index":"terms_1591234321","site":"bayareabites","id":"10028","found":true},"relationships":{},"included":{},"name":"food news","slug":"food-news","taxonomy":"category","description":null,"featImg":null,"headData":{"title":"food news Archives | KQED Bay Area Bites","description":null,"ogTitle":null,"ogDescription":null,"ogImgId":null,"twTitle":null,"twDescription":null,"twImgId":null},"ttid":8301,"isLoading":false,"link":"/bayareabites/category/food-news"},"bayareabites_16087":{"type":"terms","id":"bayareabites_16087","meta":{"index":"terms_1591234321","site":"bayareabites","id":"16087","found":true},"relationships":{},"included":{},"name":"Che Fico","slug":"che-fico","taxonomy":"tag","description":null,"featImg":null,"headData":{"title":"Che Fico Archives | KQED Bay Area Bites","description":null,"ogTitle":null,"ogDescription":null,"ogImgId":null,"twTitle":null,"twDescription":null,"twImgId":null},"ttid":100417,"isLoading":false,"link":"/bayareabites/tag/che-fico"},"bayareabites_16088":{"type":"terms","id":"bayareabites_16088","meta":{"index":"terms_1591234321","site":"bayareabites","id":"16088","found":true},"relationships":{},"included":{},"name":"Christopher Longoria","slug":"christopher-longoria","taxonomy":"tag","description":null,"featImg":null,"headData":{"title":"Christopher Longoria Archives | KQED Bay Area Bites","description":null,"ogTitle":null,"ogDescription":null,"ogImgId":null,"twTitle":null,"twDescription":null,"twImgId":null},"ttid":100418,"isLoading":false,"link":"/bayareabites/tag/christopher-longoria"},"bayareabites_9087":{"type":"terms","id":"bayareabites_9087","meta":{"index":"terms_1591234321","site":"bayareabites","id":"9087","found":true},"relationships":{},"included":{},"name":"david chang","slug":"david-chang","taxonomy":"tag","description":null,"featImg":null,"headData":{"title":"david chang Archives | KQED Bay Area Bites","description":null,"ogTitle":null,"ogDescription":null,"ogImgId":null,"twTitle":null,"twDescription":null,"twImgId":null},"ttid":3541,"isLoading":false,"link":"/bayareabites/tag/david-chang"},"bayareabites_16089":{"type":"terms","id":"bayareabites_16089","meta":{"index":"terms_1591234321","site":"bayareabites","id":"16089","found":true},"relationships":{},"included":{},"name":"David Nayfeld","slug":"david-nayfeld","taxonomy":"tag","description":null,"featImg":null,"headData":{"title":"David Nayfeld Archives | KQED Bay Area Bites","description":null,"ogTitle":null,"ogDescription":null,"ogImgId":null,"twTitle":null,"twDescription":null,"twImgId":null},"ttid":100419,"isLoading":false,"link":"/bayareabites/tag/david-nayfeld"},"bayareabites_71":{"type":"terms","id":"bayareabites_71","meta":{"index":"terms_1591234321","site":"bayareabites","id":"71","found":true},"relationships":{},"included":{},"name":"Jewish","slug":"jewish","taxonomy":"tag","description":null,"featImg":null,"headData":{"title":"Jewish Archives | KQED Bay Area Bites","description":null,"ogTitle":null,"ogDescription":null,"ogImgId":null,"twTitle":null,"twDescription":null,"twImgId":null},"ttid":35,"isLoading":false,"link":"/bayareabites/tag/jewish"},"bayareabites_443":{"type":"terms","id":"bayareabites_443","meta":{"index":"terms_1591234321","site":"bayareabites","id":"443","found":true},"relationships":{},"included":{},"name":"pizza","slug":"pizza","taxonomy":"tag","description":null,"featImg":null,"headData":{"title":"pizza Archives | KQED Bay Area Bites","description":null,"ogTitle":null,"ogDescription":null,"ogImgId":null,"twTitle":null,"twDescription":null,"twImgId":null},"ttid":408,"isLoading":false,"link":"/bayareabites/tag/pizza"},"bayareabites_10":{"type":"terms","id":"bayareabites_10","meta":{"index":"terms_1591234321","site":"bayareabites","id":"10","found":true},"relationships":{},"included":{},"name":"reviews","slug":"reviews","taxonomy":"category","description":null,"featImg":null,"headData":{"title":"reviews Archives | KQED Bay Area Bites","description":null,"ogTitle":null,"ogDescription":null,"ogImgId":null,"twTitle":null,"twDescription":null,"twImgId":null},"ttid":24,"isLoading":false,"link":"/bayareabites/category/reviews"},"bayareabites_15952":{"type":"terms","id":"bayareabites_15952","meta":{"index":"terms_1591234321","site":"bayareabites","id":"15952","found":true},"relationships":{},"included":{},"name":"Gio's","slug":"gios","taxonomy":"tag","description":null,"featImg":null,"headData":{"title":"Gio's Archives | KQED Bay Area Bites","description":null,"ogTitle":null,"ogDescription":null,"ogImgId":null,"twTitle":null,"twDescription":null,"twImgId":null},"ttid":100282,"isLoading":false,"link":"/bayareabites/tag/gios"},"bayareabites_15940":{"type":"terms","id":"bayareabites_15940","meta":{"index":"terms_1591234321","site":"bayareabites","id":"15940","found":true},"relationships":{},"included":{},"name":"Belotti","slug":"belotti","taxonomy":"tag","description":null,"featImg":null,"headData":{"title":"Belotti Archives | KQED Bay Area Bites","description":null,"ogTitle":null,"ogDescription":null,"ogImgId":null,"twTitle":null,"twDescription":null,"twImgId":null},"ttid":100270,"isLoading":false,"link":"/bayareabites/tag/belotti"},"bayareabites_15502":{"type":"terms","id":"bayareabites_15502","meta":{"index":"terms_1591234321","site":"bayareabites","id":"15502","found":true},"relationships":{},"included":{},"name":"fresh pasta","slug":"fresh-pasta","taxonomy":"tag","description":null,"featImg":null,"headData":{"title":"fresh pasta Archives | KQED Bay Area Bites","description":null,"ogTitle":null,"ogDescription":null,"ogImgId":null,"twTitle":null,"twDescription":null,"twImgId":null},"ttid":99832,"isLoading":false,"link":"/bayareabites/tag/fresh-pasta"},"bayareabites_1419":{"type":"terms","id":"bayareabites_1419","meta":{"index":"terms_1591234321","site":"bayareabites","id":"1419","found":true},"relationships":{},"included":{},"name":"rockridge","slug":"rockridge","taxonomy":"tag","description":null,"featImg":null,"headData":{"title":"rockridge Archives | KQED Bay Area Bites","description":null,"ogTitle":null,"ogDescription":null,"ogImgId":null,"twTitle":null,"twDescription":null,"twImgId":null},"ttid":1211,"isLoading":false,"link":"/bayareabites/tag/rockridge"}},"userAgentReducer":{"userAgent":"Mozilla/5.0 AppleWebKit/537.36 (KHTML, like Gecko; compatible; ClaudeBot/1.0; +claudebot@anthropic.com)","isBot":true},"userPermissionsReducer":{"wpLoggedIn":false},"localStorageReducer":{},"browserHistoryReducer":[],"eventsReducer":{},"fssReducer":{},"tvDailyScheduleReducer":{},"tvWeeklyScheduleReducer":{},"tvPrimetimeScheduleReducer":{},"tvMonthlyScheduleReducer":{},"userAccountReducer":{"routeTo":"","showDeleteConfirmModal":false,"user":{"userId":"","isFound":false,"firstName":"","lastName":"","phoneNumber":"","email":"","articles":[]}},"youthMediaReducer":{},"checkPleaseReducer":{"filterData":{},"restaurantData":[]},"reframeReducer":{"attendee":null},"location":{"pathname":"/bayareabites/tag/pasta/","previousPathname":"/"}}