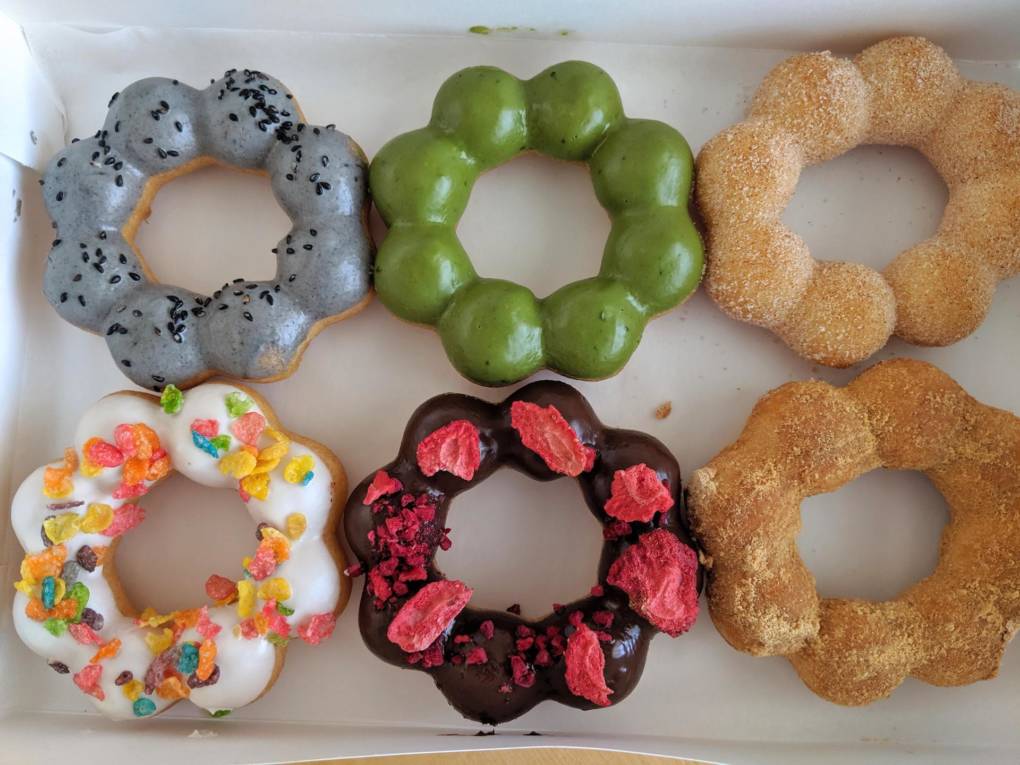
International Flavor, Local Ingredients: Get Your Mochi Donut Fix in the Bay
Pennies, Meet Pride! 5 Establishments Where Your Check Supports LGBTQ+ Communities
5 Places in the Bay Area to Find the Perfect Donut
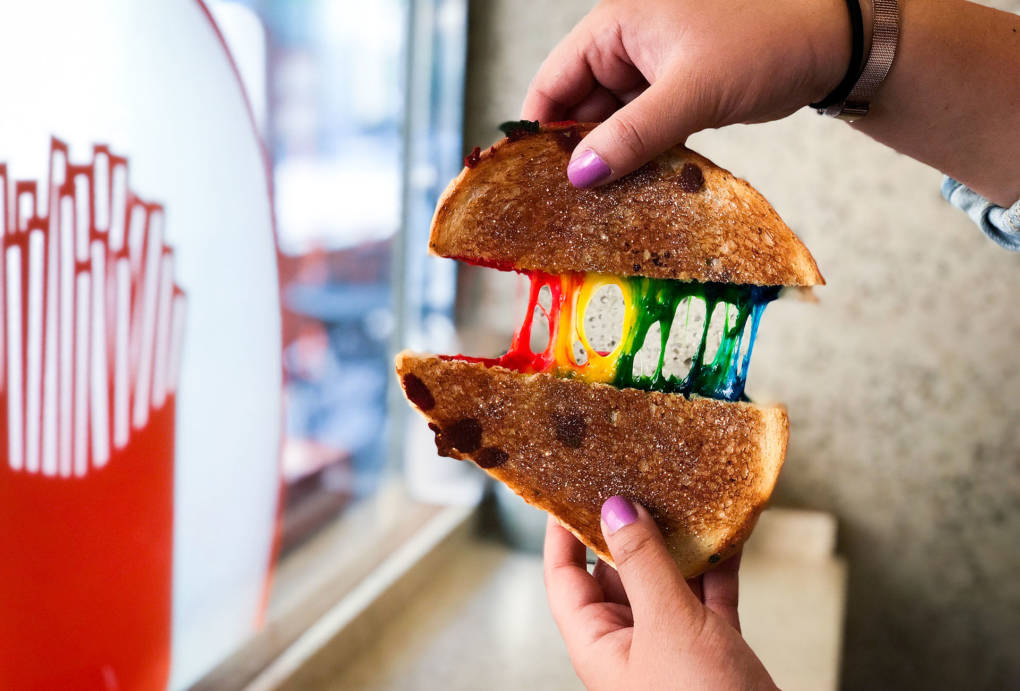
Food Trends: Actually Tasty or Just Instagram Fodder?
5 Alcohol-Free Alternatives For Your Dry January
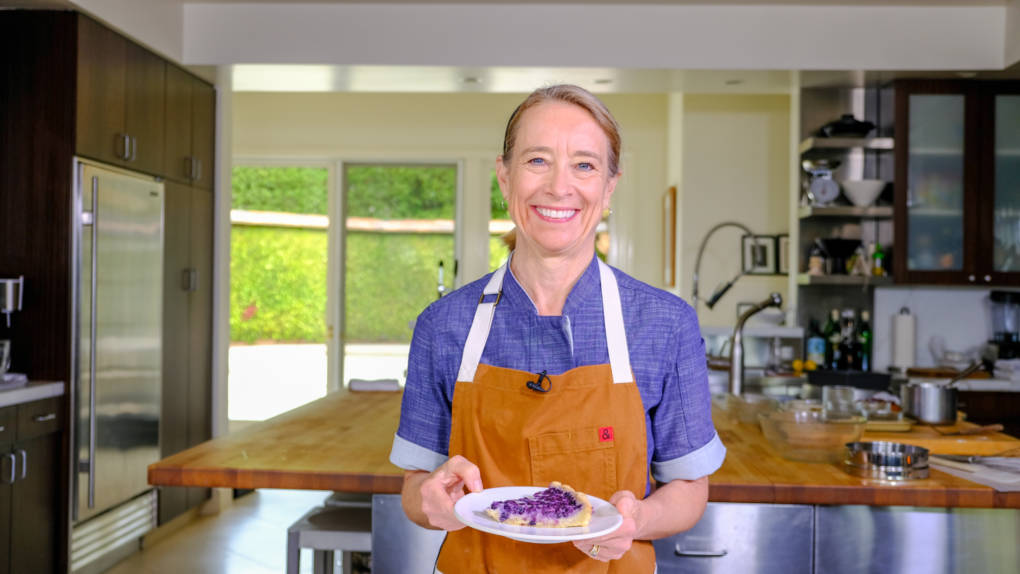
Celebrity Chefs Recipes: Emily Luchetti's Wild Blueberry Lemon Tart
Sponsored
window.__IS_SSR__=true
window.__INITIAL_STATE__={"attachmentsReducer":{"audio_0":{"type":"attachments","id":"audio_0","imgSizes":{"kqedFullSize":{"file":"https://ww2.kqed.org/news/wp-content/themes/KQED-unified/img/audio_bgs/background0.jpg"}}},"audio_1":{"type":"attachments","id":"audio_1","imgSizes":{"kqedFullSize":{"file":"https://ww2.kqed.org/news/wp-content/themes/KQED-unified/img/audio_bgs/background1.jpg"}}},"audio_2":{"type":"attachments","id":"audio_2","imgSizes":{"kqedFullSize":{"file":"https://ww2.kqed.org/news/wp-content/themes/KQED-unified/img/audio_bgs/background2.jpg"}}},"audio_3":{"type":"attachments","id":"audio_3","imgSizes":{"kqedFullSize":{"file":"https://ww2.kqed.org/news/wp-content/themes/KQED-unified/img/audio_bgs/background3.jpg"}}},"audio_4":{"type":"attachments","id":"audio_4","imgSizes":{"kqedFullSize":{"file":"https://ww2.kqed.org/news/wp-content/themes/KQED-unified/img/audio_bgs/background4.jpg"}}},"placeholder":{"type":"attachments","id":"placeholder","imgSizes":{"thumbnail":{"file":"https://ww2.kqed.org/wp-content/uploads/sites/10/2018/01/GettyImages-896326950-160x96.jpg","width":160,"height":96,"mimeType":"image/jpeg"},"medium":{"file":"https://ww2.kqed.org/wp-content/uploads/sites/10/2018/01/GettyImages-896326950-800x478.jpg","width":800,"height":478,"mimeType":"image/jpeg"},"large":{"file":"https://ww2.kqed.org/wp-content/uploads/sites/10/2018/01/GettyImages-896326950-1020x610.jpg","width":1020,"height":610,"mimeType":"image/jpeg"},"fd-lrg":{"file":"https://ww2.kqed.org/wp-content/uploads/sites/10/2018/01/GettyImages-896326950-1920x1148.jpg","width":1920,"height":1148,"mimeType":"image/jpeg"},"fd-med":{"file":"https://ww2.kqed.org/wp-content/uploads/sites/10/2018/01/GettyImages-896326950-1180x705.jpg","width":1180,"height":705,"mimeType":"image/jpeg"},"fd-sm":{"file":"https://ww2.kqed.org/wp-content/uploads/sites/10/2018/01/GettyImages-896326950-960x574.jpg","width":960,"height":574,"mimeType":"image/jpeg"},"post-thumbnail":{"file":"https://ww2.kqed.org/wp-content/uploads/sites/10/2018/01/GettyImages-896326950-672x372.jpg","width":672,"height":372,"mimeType":"image/jpeg"},"twentyfourteen-full-width":{"file":"https://ww2.kqed.org/wp-content/uploads/sites/10/2018/01/GettyImages-896326950-1038x576.jpg","width":1038,"height":576,"mimeType":"image/jpeg"},"xxsmall":{"file":"https://ww2.kqed.org/wp-content/uploads/sites/10/2018/01/GettyImages-896326950-240x143.jpg","width":240,"height":143,"mimeType":"image/jpeg"},"xsmall":{"file":"https://ww2.kqed.org/wp-content/uploads/sites/10/2018/01/GettyImages-896326950-375x224.jpg","width":375,"height":224,"mimeType":"image/jpeg"},"small":{"file":"https://ww2.kqed.org/wp-content/uploads/sites/10/2018/01/GettyImages-896326950-520x311.jpg","width":520,"height":311,"mimeType":"image/jpeg"},"xlarge":{"file":"https://ww2.kqed.org/wp-content/uploads/sites/10/2018/01/GettyImages-896326950-1180x705.jpg","width":1180,"height":705,"mimeType":"image/jpeg"},"full-width":{"file":"https://ww2.kqed.org/wp-content/uploads/sites/10/2018/01/GettyImages-896326950-1920x1148.jpg","width":1920,"height":1148,"mimeType":"image/jpeg"},"guest-author-32":{"file":"https://ww2.kqed.org/wp-content/uploads/sites/10/2018/01/GettyImages-896326950-32x32.jpg","width":32,"height":32,"mimeType":"image/jpeg"},"guest-author-50":{"file":"https://ww2.kqed.org/wp-content/uploads/sites/10/2018/01/GettyImages-896326950-50x50.jpg","width":50,"height":50,"mimeType":"image/jpeg"},"guest-author-64":{"file":"https://ww2.kqed.org/wp-content/uploads/sites/10/2018/01/GettyImages-896326950-64x64.jpg","width":64,"height":64,"mimeType":"image/jpeg"},"guest-author-96":{"file":"https://ww2.kqed.org/wp-content/uploads/sites/10/2018/01/GettyImages-896326950-96x96.jpg","width":96,"height":96,"mimeType":"image/jpeg"},"guest-author-128":{"file":"https://ww2.kqed.org/wp-content/uploads/sites/10/2018/01/GettyImages-896326950-128x128.jpg","width":128,"height":128,"mimeType":"image/jpeg"},"detail":{"file":"https://ww2.kqed.org/wp-content/uploads/sites/10/2018/01/GettyImages-896326950-150x150.jpg","width":150,"height":150,"mimeType":"image/jpeg"},"kqedFullSize":{"file":"https://ww2.kqed.org/wp-content/uploads/sites/10/2018/01/GettyImages-896326950-e1514998105161.jpg","width":1920,"height":1148}}},"bayareabites_138289":{"type":"attachments","id":"bayareabites_138289","meta":{"index":"attachments_1591205162","site":"bayareabites","id":"138289","found":true},"title":"IMG_1212","publishDate":1595360489,"status":"inherit","parent":138286,"modified":1595360531,"caption":"A recipe, at the end of the day, is a set of guidelines. It's up to you to follow or stray from them. ","credit":"Urmila Ramakrishnan / KQED","description":null,"imgSizes":{"medium":{"file":"https://ww2.kqed.org/app/uploads/sites/24/2020/07/IMG_1212-800x450.jpg","width":800,"height":450,"mimeType":"image/jpeg"},"large":{"file":"https://ww2.kqed.org/app/uploads/sites/24/2020/07/IMG_1212-1020x574.jpg","width":1020,"height":574,"mimeType":"image/jpeg"},"thumbnail":{"file":"https://ww2.kqed.org/app/uploads/sites/24/2020/07/IMG_1212-160x90.jpg","width":160,"height":90,"mimeType":"image/jpeg"},"medium_large":{"file":"https://ww2.kqed.org/app/uploads/sites/24/2020/07/IMG_1212-768x432.jpg","width":768,"height":432,"mimeType":"image/jpeg"},"post-thumbnail":{"file":"https://ww2.kqed.org/app/uploads/sites/24/2020/07/IMG_1212-672x372.jpg","width":672,"height":372,"mimeType":"image/jpeg"},"twentyfourteen-full-width":{"file":"https://ww2.kqed.org/app/uploads/sites/24/2020/07/IMG_1212-1038x576.jpg","width":1038,"height":576,"mimeType":"image/jpeg"},"kqedFullSize":{"file":"https://ww2.kqed.org/app/uploads/sites/24/2020/07/IMG_1212.jpg","width":1200,"height":675}},"fetchFailed":false,"isLoading":false},"bayareabites_138082":{"type":"attachments","id":"bayareabites_138082","meta":{"index":"attachments_1591205162","site":"bayareabites","id":"138082","found":true},"title":"Various varieties of ice cream in cones isolated","publishDate":1594846943,"status":"inherit","parent":138065,"modified":1594846964,"caption":"AlexRaths / iStock ","credit":null,"description":null,"imgSizes":{"medium":{"file":"https://ww2.kqed.org/app/uploads/sites/24/2020/07/iStock-1173571515-800x450.jpg","width":800,"height":450,"mimeType":"image/jpeg"},"large":{"file":"https://ww2.kqed.org/app/uploads/sites/24/2020/07/iStock-1173571515-1020x574.jpg","width":1020,"height":574,"mimeType":"image/jpeg"},"thumbnail":{"file":"https://ww2.kqed.org/app/uploads/sites/24/2020/07/iStock-1173571515-160x90.jpg","width":160,"height":90,"mimeType":"image/jpeg"},"medium_large":{"file":"https://ww2.kqed.org/app/uploads/sites/24/2020/07/iStock-1173571515-768x432.jpg","width":768,"height":432,"mimeType":"image/jpeg"},"post-thumbnail":{"file":"https://ww2.kqed.org/app/uploads/sites/24/2020/07/iStock-1173571515-672x372.jpg","width":672,"height":372,"mimeType":"image/jpeg"},"twentyfourteen-full-width":{"file":"https://ww2.kqed.org/app/uploads/sites/24/2020/07/iStock-1173571515-1038x576.jpg","width":1038,"height":576,"mimeType":"image/jpeg"},"kqedFullSize":{"file":"https://ww2.kqed.org/app/uploads/sites/24/2020/07/iStock-1173571515.jpg","width":1200,"height":675}},"fetchFailed":false,"isLoading":false},"bayareabites_135577":{"type":"attachments","id":"bayareabites_135577","meta":{"index":"attachments_1591205162","site":"bayareabites","id":"135577","found":true},"title":"Oolong Tea Cake-6","publishDate":1574281504,"status":"inherit","parent":135574,"modified":1574281547,"caption":"The rich and earthy oolong tea flavor running through this cake is infused into the butter.","credit":"Kristina Cho/KQED","description":"The rich and earthy oolong tea flavor running through this cake is infused into the butter.","imgSizes":{"thumbnail":{"file":"https://ww2.kqed.org/app/uploads/sites/24/2019/11/Oolong-Tea-Cake-6-160x114.jpg","width":160,"height":114,"mimeType":"image/jpeg"},"medium":{"file":"https://ww2.kqed.org/app/uploads/sites/24/2019/11/Oolong-Tea-Cake-6-800x571.jpg","width":800,"height":571,"mimeType":"image/jpeg"},"medium_large":{"file":"https://ww2.kqed.org/app/uploads/sites/24/2019/11/Oolong-Tea-Cake-6-768x548.jpg","width":768,"height":548,"mimeType":"image/jpeg"},"large":{"file":"https://ww2.kqed.org/app/uploads/sites/24/2019/11/Oolong-Tea-Cake-6-1020x728.jpg","width":1020,"height":728,"mimeType":"image/jpeg"},"complete_open_graph":{"file":"https://ww2.kqed.org/app/uploads/sites/24/2019/11/Oolong-Tea-Cake-6-1200x857.jpg","width":1200,"height":857,"mimeType":"image/jpeg"},"post-thumbnail":{"file":"https://ww2.kqed.org/app/uploads/sites/24/2019/11/Oolong-Tea-Cake-6-672x372.jpg","width":672,"height":372,"mimeType":"image/jpeg"},"twentyfourteen-full-width":{"file":"https://ww2.kqed.org/app/uploads/sites/24/2019/11/Oolong-Tea-Cake-6-1038x576.jpg","width":1038,"height":576,"mimeType":"image/jpeg"},"full-width":{"file":"https://ww2.kqed.org/app/uploads/sites/24/2019/11/Oolong-Tea-Cake-6-1920x1371.jpg","width":1920,"height":1371,"mimeType":"image/jpeg"},"kqedFullSize":{"file":"https://ww2.kqed.org/app/uploads/sites/24/2019/11/Oolong-Tea-Cake-6.jpg","width":1920,"height":1371}},"fetchFailed":false,"isLoading":false},"bayareabites_134803":{"type":"attachments","id":"bayareabites_134803","meta":{"index":"attachments_1591205162","site":"bayareabites","id":"134803","found":true},"title":"mochill-seasonal-mochi-donuts","publishDate":1569356352,"status":"inherit","parent":134758,"modified":1569356417,"caption":"Pon de Ring style Mochi Donuts from Mochill. Clockwise from left: Black Sesame, Matcha, Cinnamon Sugar, Fruity Pebbles, Chocolate with Dried Strawberries, Kanako (soy bean powder)","credit":"Elaine Wu/KQED","description":"Pon de Ring style Mochi Donuts from Mochill. Clockwise from left: Black Sesame, Matcha, Cinnamon Sugar, Fruity Pebbles, Chocolate with Dried Strawberries, Kanako (soy bean powder)","imgSizes":{"thumbnail":{"file":"https://ww2.kqed.org/app/uploads/sites/24/2019/09/Donuts-1-160x120.jpg","width":160,"height":120,"mimeType":"image/jpeg"},"medium":{"file":"https://ww2.kqed.org/app/uploads/sites/24/2019/09/Donuts-1-800x600.jpg","width":800,"height":600,"mimeType":"image/jpeg"},"medium_large":{"file":"https://ww2.kqed.org/app/uploads/sites/24/2019/09/Donuts-1-768x576.jpg","width":768,"height":576,"mimeType":"image/jpeg"},"large":{"file":"https://ww2.kqed.org/app/uploads/sites/24/2019/09/Donuts-1-1020x765.jpg","width":1020,"height":765,"mimeType":"image/jpeg"},"complete_open_graph":{"file":"https://ww2.kqed.org/app/uploads/sites/24/2019/09/Donuts-1-1200x900.jpg","width":1200,"height":900,"mimeType":"image/jpeg"},"post-thumbnail":{"file":"https://ww2.kqed.org/app/uploads/sites/24/2019/09/Donuts-1-672x372.jpg","width":672,"height":372,"mimeType":"image/jpeg"},"twentyfourteen-full-width":{"file":"https://ww2.kqed.org/app/uploads/sites/24/2019/09/Donuts-1-1038x576.jpg","width":1038,"height":576,"mimeType":"image/jpeg"},"full-width":{"file":"https://ww2.kqed.org/app/uploads/sites/24/2019/09/Donuts-1-1920x1440.jpg","width":1920,"height":1440,"mimeType":"image/jpeg"},"kqedFullSize":{"file":"https://ww2.kqed.org/app/uploads/sites/24/2019/09/Donuts-1.jpg","width":1920,"height":1440}},"fetchFailed":false,"isLoading":false},"bayareabites_129009":{"type":"attachments","id":"bayareabites_129009","meta":{"index":"attachments_1591205162","site":"bayareabites","id":"129009","found":true},"title":"The Magic Melt from the Melt is a mixtue of muenster, cheddar, and fontina cheese","publishDate":1528868609,"status":"inherit","parent":128908,"modified":1528868961,"caption":"The Magic Melt from the Melt is a mixtue of muenster, cheddar, and fontina cheese.","credit":"Patrick Wong","description":null,"imgSizes":{"thumbnail":{"file":"https://ww2.kqed.org/app/uploads/sites/24/2018/06/The-Magic-Melt-from-the-Melt-is-a-mixtue-of-muenster-cheddar-and-fontina-cheese-160x108.jpg","width":160,"height":108,"mimeType":"image/jpeg"},"medium":{"file":"https://ww2.kqed.org/app/uploads/sites/24/2018/06/The-Magic-Melt-from-the-Melt-is-a-mixtue-of-muenster-cheddar-and-fontina-cheese-800x542.jpg","width":800,"height":542,"mimeType":"image/jpeg"},"medium_large":{"file":"https://ww2.kqed.org/app/uploads/sites/24/2018/06/The-Magic-Melt-from-the-Melt-is-a-mixtue-of-muenster-cheddar-and-fontina-cheese-768x520.jpg","width":768,"height":520,"mimeType":"image/jpeg"},"large":{"file":"https://ww2.kqed.org/app/uploads/sites/24/2018/06/The-Magic-Melt-from-the-Melt-is-a-mixtue-of-muenster-cheddar-and-fontina-cheese-1020x691.jpg","width":1020,"height":691,"mimeType":"image/jpeg"},"complete_open_graph":{"file":"https://ww2.kqed.org/app/uploads/sites/24/2018/06/The-Magic-Melt-from-the-Melt-is-a-mixtue-of-muenster-cheddar-and-fontina-cheese-1200x813.jpg","width":1200,"height":813,"mimeType":"image/jpeg"},"fd-lrg":{"file":"https://ww2.kqed.org/app/uploads/sites/24/2018/06/The-Magic-Melt-from-the-Melt-is-a-mixtue-of-muenster-cheddar-and-fontina-cheese-1920x1300.jpg","width":1920,"height":1300,"mimeType":"image/jpeg"},"fd-med":{"file":"https://ww2.kqed.org/app/uploads/sites/24/2018/06/The-Magic-Melt-from-the-Melt-is-a-mixtue-of-muenster-cheddar-and-fontina-cheese-1180x799.jpg","width":1180,"height":799,"mimeType":"image/jpeg"},"fd-sm":{"file":"https://ww2.kqed.org/app/uploads/sites/24/2018/06/The-Magic-Melt-from-the-Melt-is-a-mixtue-of-muenster-cheddar-and-fontina-cheese-960x650.jpg","width":960,"height":650,"mimeType":"image/jpeg"},"post-thumbnail":{"file":"https://ww2.kqed.org/app/uploads/sites/24/2018/06/The-Magic-Melt-from-the-Melt-is-a-mixtue-of-muenster-cheddar-and-fontina-cheese-672x372.jpg","width":672,"height":372,"mimeType":"image/jpeg"},"twentyfourteen-full-width":{"file":"https://ww2.kqed.org/app/uploads/sites/24/2018/06/The-Magic-Melt-from-the-Melt-is-a-mixtue-of-muenster-cheddar-and-fontina-cheese-1038x576.jpg","width":1038,"height":576,"mimeType":"image/jpeg"},"xxsmall":{"file":"https://ww2.kqed.org/app/uploads/sites/24/2018/06/The-Magic-Melt-from-the-Melt-is-a-mixtue-of-muenster-cheddar-and-fontina-cheese-240x163.jpg","width":240,"height":163,"mimeType":"image/jpeg"},"xsmall":{"file":"https://ww2.kqed.org/app/uploads/sites/24/2018/06/The-Magic-Melt-from-the-Melt-is-a-mixtue-of-muenster-cheddar-and-fontina-cheese-375x254.jpg","width":375,"height":254,"mimeType":"image/jpeg"},"small":{"file":"https://ww2.kqed.org/app/uploads/sites/24/2018/06/The-Magic-Melt-from-the-Melt-is-a-mixtue-of-muenster-cheddar-and-fontina-cheese-520x352.jpg","width":520,"height":352,"mimeType":"image/jpeg"},"xlarge":{"file":"https://ww2.kqed.org/app/uploads/sites/24/2018/06/The-Magic-Melt-from-the-Melt-is-a-mixtue-of-muenster-cheddar-and-fontina-cheese-1180x799.jpg","width":1180,"height":799,"mimeType":"image/jpeg"},"full-width":{"file":"https://ww2.kqed.org/app/uploads/sites/24/2018/06/The-Magic-Melt-from-the-Melt-is-a-mixtue-of-muenster-cheddar-and-fontina-cheese-1920x1300.jpg","width":1920,"height":1300,"mimeType":"image/jpeg"},"guest-author-32":{"file":"https://ww2.kqed.org/app/uploads/sites/24/2018/06/The-Magic-Melt-from-the-Melt-is-a-mixtue-of-muenster-cheddar-and-fontina-cheese-32x32.jpg","width":32,"height":32,"mimeType":"image/jpeg"},"guest-author-50":{"file":"https://ww2.kqed.org/app/uploads/sites/24/2018/06/The-Magic-Melt-from-the-Melt-is-a-mixtue-of-muenster-cheddar-and-fontina-cheese-50x50.jpg","width":50,"height":50,"mimeType":"image/jpeg"},"guest-author-64":{"file":"https://ww2.kqed.org/app/uploads/sites/24/2018/06/The-Magic-Melt-from-the-Melt-is-a-mixtue-of-muenster-cheddar-and-fontina-cheese-64x64.jpg","width":64,"height":64,"mimeType":"image/jpeg"},"guest-author-96":{"file":"https://ww2.kqed.org/app/uploads/sites/24/2018/06/The-Magic-Melt-from-the-Melt-is-a-mixtue-of-muenster-cheddar-and-fontina-cheese-96x96.jpg","width":96,"height":96,"mimeType":"image/jpeg"},"guest-author-128":{"file":"https://ww2.kqed.org/app/uploads/sites/24/2018/06/The-Magic-Melt-from-the-Melt-is-a-mixtue-of-muenster-cheddar-and-fontina-cheese-128x128.jpg","width":128,"height":128,"mimeType":"image/jpeg"},"detail":{"file":"https://ww2.kqed.org/app/uploads/sites/24/2018/06/The-Magic-Melt-from-the-Melt-is-a-mixtue-of-muenster-cheddar-and-fontina-cheese-150x150.jpg","width":150,"height":150,"mimeType":"image/jpeg"},"kqedFullSize":{"file":"https://ww2.kqed.org/app/uploads/sites/24/2018/06/The-Magic-Melt-from-the-Melt-is-a-mixtue-of-muenster-cheddar-and-fontina-cheese.jpg","width":1920,"height":1300}},"fetchFailed":false,"isLoading":false},"bayareabites_130751":{"type":"attachments","id":"bayareabites_130751","meta":{"index":"attachments_1591205162","site":"bayareabites","id":"130751","found":true},"title":"IMG_2242","publishDate":1539122231,"status":"inherit","parent":130740,"modified":1539122250,"caption":"Inside Sweet Belly Desserts, where you can get made-to-order mini donuts.\n","credit":null,"description":null,"imgSizes":{"thumbnail":{"file":"https://ww2.kqed.org/app/uploads/sites/24/2018/10/IMG_2242-160x120.jpg","width":160,"height":120,"mimeType":"image/jpeg"},"medium":{"file":"https://ww2.kqed.org/app/uploads/sites/24/2018/10/IMG_2242-800x600.jpg","width":800,"height":600,"mimeType":"image/jpeg"},"medium_large":{"file":"https://ww2.kqed.org/app/uploads/sites/24/2018/10/IMG_2242-768x576.jpg","width":768,"height":576,"mimeType":"image/jpeg"},"large":{"file":"https://ww2.kqed.org/app/uploads/sites/24/2018/10/IMG_2242-1020x765.jpg","width":1020,"height":765,"mimeType":"image/jpeg"},"complete_open_graph":{"file":"https://ww2.kqed.org/app/uploads/sites/24/2018/10/IMG_2242-1200x900.jpg","width":1200,"height":900,"mimeType":"image/jpeg"},"fd-lrg":{"file":"https://ww2.kqed.org/app/uploads/sites/24/2018/10/IMG_2242-1920x1440.jpg","width":1920,"height":1440,"mimeType":"image/jpeg"},"fd-med":{"file":"https://ww2.kqed.org/app/uploads/sites/24/2018/10/IMG_2242-1180x885.jpg","width":1180,"height":885,"mimeType":"image/jpeg"},"fd-sm":{"file":"https://ww2.kqed.org/app/uploads/sites/24/2018/10/IMG_2242-960x720.jpg","width":960,"height":720,"mimeType":"image/jpeg"},"post-thumbnail":{"file":"https://ww2.kqed.org/app/uploads/sites/24/2018/10/IMG_2242-672x372.jpg","width":672,"height":372,"mimeType":"image/jpeg"},"twentyfourteen-full-width":{"file":"https://ww2.kqed.org/app/uploads/sites/24/2018/10/IMG_2242-1038x576.jpg","width":1038,"height":576,"mimeType":"image/jpeg"},"xxsmall":{"file":"https://ww2.kqed.org/app/uploads/sites/24/2018/10/IMG_2242-240x180.jpg","width":240,"height":180,"mimeType":"image/jpeg"},"xsmall":{"file":"https://ww2.kqed.org/app/uploads/sites/24/2018/10/IMG_2242-375x281.jpg","width":375,"height":281,"mimeType":"image/jpeg"},"small":{"file":"https://ww2.kqed.org/app/uploads/sites/24/2018/10/IMG_2242-520x390.jpg","width":520,"height":390,"mimeType":"image/jpeg"},"xlarge":{"file":"https://ww2.kqed.org/app/uploads/sites/24/2018/10/IMG_2242-1180x885.jpg","width":1180,"height":885,"mimeType":"image/jpeg"},"full-width":{"file":"https://ww2.kqed.org/app/uploads/sites/24/2018/10/IMG_2242-1920x1440.jpg","width":1920,"height":1440,"mimeType":"image/jpeg"},"guest-author-32":{"file":"https://ww2.kqed.org/app/uploads/sites/24/2018/10/IMG_2242-32x32.jpg","width":32,"height":32,"mimeType":"image/jpeg"},"guest-author-50":{"file":"https://ww2.kqed.org/app/uploads/sites/24/2018/10/IMG_2242-50x50.jpg","width":50,"height":50,"mimeType":"image/jpeg"},"guest-author-64":{"file":"https://ww2.kqed.org/app/uploads/sites/24/2018/10/IMG_2242-64x64.jpg","width":64,"height":64,"mimeType":"image/jpeg"},"guest-author-96":{"file":"https://ww2.kqed.org/app/uploads/sites/24/2018/10/IMG_2242-96x96.jpg","width":96,"height":96,"mimeType":"image/jpeg"},"guest-author-128":{"file":"https://ww2.kqed.org/app/uploads/sites/24/2018/10/IMG_2242-128x128.jpg","width":128,"height":128,"mimeType":"image/jpeg"},"detail":{"file":"https://ww2.kqed.org/app/uploads/sites/24/2018/10/IMG_2242-150x150.jpg","width":150,"height":150,"mimeType":"image/jpeg"},"kqedFullSize":{"file":"https://ww2.kqed.org/app/uploads/sites/24/2018/10/IMG_2242.jpg","width":4032,"height":3024}},"fetchFailed":false,"isLoading":false},"bayareabites_132131":{"type":"attachments","id":"bayareabites_132131","meta":{"index":"attachments_1591205162","site":"bayareabites","id":"132131","found":true},"title":"\"Unicorn\" tuna tartare from Comstock Saloon","publishDate":1547487687,"status":"inherit","parent":131884,"modified":1547487743,"caption":"\"Unicorn\" tuna tartare from Comstock Saloon","credit":"Grace Cheung","description":"\"Unicorn\" tuna tartare from Comstock Saloon","imgSizes":{"thumbnail":{"file":"https://ww2.kqed.org/app/uploads/sites/24/2019/01/LRG_DSC01173-160x107.jpg","width":160,"height":107,"mimeType":"image/jpeg"},"medium":{"file":"https://ww2.kqed.org/app/uploads/sites/24/2019/01/LRG_DSC01173-800x535.jpg","width":800,"height":535,"mimeType":"image/jpeg"},"medium_large":{"file":"https://ww2.kqed.org/app/uploads/sites/24/2019/01/LRG_DSC01173-768x513.jpg","width":768,"height":513,"mimeType":"image/jpeg"},"large":{"file":"https://ww2.kqed.org/app/uploads/sites/24/2019/01/LRG_DSC01173-1020x682.jpg","width":1020,"height":682,"mimeType":"image/jpeg"},"complete_open_graph":{"file":"https://ww2.kqed.org/app/uploads/sites/24/2019/01/LRG_DSC01173-1200x802.jpg","width":1200,"height":802,"mimeType":"image/jpeg"},"fd-med":{"file":"https://ww2.kqed.org/app/uploads/sites/24/2019/01/LRG_DSC01173-1180x789.jpg","width":1180,"height":789,"mimeType":"image/jpeg"},"fd-sm":{"file":"https://ww2.kqed.org/app/uploads/sites/24/2019/01/LRG_DSC01173-960x642.jpg","width":960,"height":642,"mimeType":"image/jpeg"},"post-thumbnail":{"file":"https://ww2.kqed.org/app/uploads/sites/24/2019/01/LRG_DSC01173-672x372.jpg","width":672,"height":372,"mimeType":"image/jpeg"},"twentyfourteen-full-width":{"file":"https://ww2.kqed.org/app/uploads/sites/24/2019/01/LRG_DSC01173-1038x576.jpg","width":1038,"height":576,"mimeType":"image/jpeg"},"xxsmall":{"file":"https://ww2.kqed.org/app/uploads/sites/24/2019/01/LRG_DSC01173-240x160.jpg","width":240,"height":160,"mimeType":"image/jpeg"},"xsmall":{"file":"https://ww2.kqed.org/app/uploads/sites/24/2019/01/LRG_DSC01173-375x251.jpg","width":375,"height":251,"mimeType":"image/jpeg"},"small":{"file":"https://ww2.kqed.org/app/uploads/sites/24/2019/01/LRG_DSC01173-520x348.jpg","width":520,"height":348,"mimeType":"image/jpeg"},"xlarge":{"file":"https://ww2.kqed.org/app/uploads/sites/24/2019/01/LRG_DSC01173-1180x789.jpg","width":1180,"height":789,"mimeType":"image/jpeg"},"guest-author-32":{"file":"https://ww2.kqed.org/app/uploads/sites/24/2019/01/LRG_DSC01173-32x32.jpg","width":32,"height":32,"mimeType":"image/jpeg"},"guest-author-50":{"file":"https://ww2.kqed.org/app/uploads/sites/24/2019/01/LRG_DSC01173-50x50.jpg","width":50,"height":50,"mimeType":"image/jpeg"},"guest-author-64":{"file":"https://ww2.kqed.org/app/uploads/sites/24/2019/01/LRG_DSC01173-64x64.jpg","width":64,"height":64,"mimeType":"image/jpeg"},"guest-author-96":{"file":"https://ww2.kqed.org/app/uploads/sites/24/2019/01/LRG_DSC01173-96x96.jpg","width":96,"height":96,"mimeType":"image/jpeg"},"guest-author-128":{"file":"https://ww2.kqed.org/app/uploads/sites/24/2019/01/LRG_DSC01173-128x128.jpg","width":128,"height":128,"mimeType":"image/jpeg"},"detail":{"file":"https://ww2.kqed.org/app/uploads/sites/24/2019/01/LRG_DSC01173-150x150.jpg","width":150,"height":150,"mimeType":"image/jpeg"},"kqedFullSize":{"file":"https://ww2.kqed.org/app/uploads/sites/24/2019/01/LRG_DSC01173.jpg","width":1616,"height":1080}},"fetchFailed":false,"isLoading":false},"bayareabites_131981":{"type":"attachments","id":"bayareabites_131981","meta":{"index":"attachments_1591205162","site":"bayareabites","id":"131981","found":true},"title":"A uniquely modern light fixture hangs above the counter at Teance Fine Teas.","publishDate":1546971368,"status":"inherit","parent":131942,"modified":1547226673,"caption":"A uniquely modern light fixture hangs above the counter at Teance Fine Teas. ","credit":"Melanie Burke","description":"A uniquely modern light fixture hangs above the counter at Teance Fine Teas. ","imgSizes":{"thumbnail":{"file":"https://ww2.kqed.org/app/uploads/sites/24/2019/01/IMG_3399-160x120.jpg","width":160,"height":120,"mimeType":"image/jpeg"},"medium":{"file":"https://ww2.kqed.org/app/uploads/sites/24/2019/01/IMG_3399-800x600.jpg","width":800,"height":600,"mimeType":"image/jpeg"},"medium_large":{"file":"https://ww2.kqed.org/app/uploads/sites/24/2019/01/IMG_3399-768x576.jpg","width":768,"height":576,"mimeType":"image/jpeg"},"large":{"file":"https://ww2.kqed.org/app/uploads/sites/24/2019/01/IMG_3399-1020x765.jpg","width":1020,"height":765,"mimeType":"image/jpeg"},"complete_open_graph":{"file":"https://ww2.kqed.org/app/uploads/sites/24/2019/01/IMG_3399-1200x900.jpg","width":1200,"height":900,"mimeType":"image/jpeg"},"fd-lrg":{"file":"https://ww2.kqed.org/app/uploads/sites/24/2019/01/IMG_3399-1920x1440.jpg","width":1920,"height":1440,"mimeType":"image/jpeg"},"fd-med":{"file":"https://ww2.kqed.org/app/uploads/sites/24/2019/01/IMG_3399-1180x885.jpg","width":1180,"height":885,"mimeType":"image/jpeg"},"fd-sm":{"file":"https://ww2.kqed.org/app/uploads/sites/24/2019/01/IMG_3399-960x720.jpg","width":960,"height":720,"mimeType":"image/jpeg"},"post-thumbnail":{"file":"https://ww2.kqed.org/app/uploads/sites/24/2019/01/IMG_3399-672x372.jpg","width":672,"height":372,"mimeType":"image/jpeg"},"twentyfourteen-full-width":{"file":"https://ww2.kqed.org/app/uploads/sites/24/2019/01/IMG_3399-1038x576.jpg","width":1038,"height":576,"mimeType":"image/jpeg"},"xxsmall":{"file":"https://ww2.kqed.org/app/uploads/sites/24/2019/01/IMG_3399-240x180.jpg","width":240,"height":180,"mimeType":"image/jpeg"},"xsmall":{"file":"https://ww2.kqed.org/app/uploads/sites/24/2019/01/IMG_3399-375x281.jpg","width":375,"height":281,"mimeType":"image/jpeg"},"small":{"file":"https://ww2.kqed.org/app/uploads/sites/24/2019/01/IMG_3399-520x390.jpg","width":520,"height":390,"mimeType":"image/jpeg"},"xlarge":{"file":"https://ww2.kqed.org/app/uploads/sites/24/2019/01/IMG_3399-1180x885.jpg","width":1180,"height":885,"mimeType":"image/jpeg"},"full-width":{"file":"https://ww2.kqed.org/app/uploads/sites/24/2019/01/IMG_3399-1920x1440.jpg","width":1920,"height":1440,"mimeType":"image/jpeg"},"guest-author-32":{"file":"https://ww2.kqed.org/app/uploads/sites/24/2019/01/IMG_3399-32x32.jpg","width":32,"height":32,"mimeType":"image/jpeg"},"guest-author-50":{"file":"https://ww2.kqed.org/app/uploads/sites/24/2019/01/IMG_3399-50x50.jpg","width":50,"height":50,"mimeType":"image/jpeg"},"guest-author-64":{"file":"https://ww2.kqed.org/app/uploads/sites/24/2019/01/IMG_3399-64x64.jpg","width":64,"height":64,"mimeType":"image/jpeg"},"guest-author-96":{"file":"https://ww2.kqed.org/app/uploads/sites/24/2019/01/IMG_3399-96x96.jpg","width":96,"height":96,"mimeType":"image/jpeg"},"guest-author-128":{"file":"https://ww2.kqed.org/app/uploads/sites/24/2019/01/IMG_3399-128x128.jpg","width":128,"height":128,"mimeType":"image/jpeg"},"detail":{"file":"https://ww2.kqed.org/app/uploads/sites/24/2019/01/IMG_3399-150x150.jpg","width":150,"height":150,"mimeType":"image/jpeg"},"kqedFullSize":{"file":"https://ww2.kqed.org/app/uploads/sites/24/2019/01/IMG_3399-e1547167781716.jpg","width":1920,"height":1440}},"fetchFailed":false,"isLoading":false},"bayareabites_131973":{"type":"attachments","id":"bayareabites_131973","meta":{"index":"attachments_1591205162","site":"bayareabites","id":"131973","found":true},"title":"Emily Luchetti with a slice of her Wild Blueberry Lemon Tart.","publishDate":1546967368,"status":"inherit","parent":131944,"modified":1546967412,"caption":"Emily Luchetti with a slice of her Wild Blueberry Lemon Tart.","credit":"Vic Chin","description":"Emily Luchetti with a slice of her Wild Blueberry Lemon Tart.","imgSizes":{"thumbnail":{"file":"https://ww2.kqed.org/app/uploads/sites/24/2019/01/DSCF4629-160x90.jpg","width":160,"height":90,"mimeType":"image/jpeg"},"medium":{"file":"https://ww2.kqed.org/app/uploads/sites/24/2019/01/DSCF4629-800x450.jpg","width":800,"height":450,"mimeType":"image/jpeg"},"medium_large":{"file":"https://ww2.kqed.org/app/uploads/sites/24/2019/01/DSCF4629-768x432.jpg","width":768,"height":432,"mimeType":"image/jpeg"},"large":{"file":"https://ww2.kqed.org/app/uploads/sites/24/2019/01/DSCF4629-1020x574.jpg","width":1020,"height":574,"mimeType":"image/jpeg"},"complete_open_graph":{"file":"https://ww2.kqed.org/app/uploads/sites/24/2019/01/DSCF4629-1200x675.jpg","width":1200,"height":675,"mimeType":"image/jpeg"},"fd-lrg":{"file":"https://ww2.kqed.org/app/uploads/sites/24/2019/01/DSCF4629-1920x1080.jpg","width":1920,"height":1080,"mimeType":"image/jpeg"},"fd-med":{"file":"https://ww2.kqed.org/app/uploads/sites/24/2019/01/DSCF4629-1180x663.jpg","width":1180,"height":663,"mimeType":"image/jpeg"},"fd-sm":{"file":"https://ww2.kqed.org/app/uploads/sites/24/2019/01/DSCF4629-960x540.jpg","width":960,"height":540,"mimeType":"image/jpeg"},"post-thumbnail":{"file":"https://ww2.kqed.org/app/uploads/sites/24/2019/01/DSCF4629-672x372.jpg","width":672,"height":372,"mimeType":"image/jpeg"},"twentyfourteen-full-width":{"file":"https://ww2.kqed.org/app/uploads/sites/24/2019/01/DSCF4629-1038x576.jpg","width":1038,"height":576,"mimeType":"image/jpeg"},"xxsmall":{"file":"https://ww2.kqed.org/app/uploads/sites/24/2019/01/DSCF4629-240x135.jpg","width":240,"height":135,"mimeType":"image/jpeg"},"xsmall":{"file":"https://ww2.kqed.org/app/uploads/sites/24/2019/01/DSCF4629-375x211.jpg","width":375,"height":211,"mimeType":"image/jpeg"},"small":{"file":"https://ww2.kqed.org/app/uploads/sites/24/2019/01/DSCF4629-520x292.jpg","width":520,"height":292,"mimeType":"image/jpeg"},"xlarge":{"file":"https://ww2.kqed.org/app/uploads/sites/24/2019/01/DSCF4629-1180x663.jpg","width":1180,"height":663,"mimeType":"image/jpeg"},"full-width":{"file":"https://ww2.kqed.org/app/uploads/sites/24/2019/01/DSCF4629-1920x1080.jpg","width":1920,"height":1080,"mimeType":"image/jpeg"},"guest-author-32":{"file":"https://ww2.kqed.org/app/uploads/sites/24/2019/01/DSCF4629-32x32.jpg","width":32,"height":32,"mimeType":"image/jpeg"},"guest-author-50":{"file":"https://ww2.kqed.org/app/uploads/sites/24/2019/01/DSCF4629-50x50.jpg","width":50,"height":50,"mimeType":"image/jpeg"},"guest-author-64":{"file":"https://ww2.kqed.org/app/uploads/sites/24/2019/01/DSCF4629-64x64.jpg","width":64,"height":64,"mimeType":"image/jpeg"},"guest-author-96":{"file":"https://ww2.kqed.org/app/uploads/sites/24/2019/01/DSCF4629-96x96.jpg","width":96,"height":96,"mimeType":"image/jpeg"},"guest-author-128":{"file":"https://ww2.kqed.org/app/uploads/sites/24/2019/01/DSCF4629-128x128.jpg","width":128,"height":128,"mimeType":"image/jpeg"},"detail":{"file":"https://ww2.kqed.org/app/uploads/sites/24/2019/01/DSCF4629-150x150.jpg","width":150,"height":150,"mimeType":"image/jpeg"},"kqedFullSize":{"file":"https://ww2.kqed.org/app/uploads/sites/24/2019/01/DSCF4629-e1546967418248.jpg","width":1920,"height":1080}},"fetchFailed":false,"isLoading":false}},"audioPlayerReducer":{"postId":"stream_live"},"authorsReducer":{"elainewu":{"type":"authors","id":"5127","meta":{"index":"authors_1591205172","id":"5127","found":true},"name":"Elaine Wu","firstName":"Elaine","lastName":"Wu","slug":"elainewu","email":"virgoblueproductions@gmail.com","display_author_email":false,"staff_mastheads":[],"title":null,"bio":"Elaine spent 12 years as a producer, writer, and correspondent for television and radio both in the Bay Area (KPIX/CBS 5, KSAN FM, KTCT AM) and in Asia (Metro Radio, MTV Asia). She has been nominated for three Emmy Award nominations for her work on the program “Evening Magazine.” She then moved on to Silicon Valley where she managed social media, public relations, and event planning for various tech companies such as Intuit, BlogHer, Rocket Fuel, and Vocera.\r\n\r\n \r\n\r\nIn 2007, Elaine started her own blog (then called “VirgoBlue”) highlighting some of her favorite restaurants around the Bay Area. These days, her blog “\u003ca href=\"http://www.virgoinwonderland.wordpress.com\">Virgo in Wonderland\u003c/a>” still reflects her love of food, as well as travel, fascinating people she’s met, and her family’s Disneyland adventures. Her food dislikes include okra, lamb, sweet potatoes, and yellow cheese on pizza. Follow her on Instagram @virgoinwonderland","avatar":"https://secure.gravatar.com/avatar/2cd3b96be5e7a29bf2c745e3f33cc74b?s=600&d=blank&r=g","twitter":null,"facebook":null,"instagram":null,"linkedin":null,"sites":[{"site":"bayareabites","roles":["contributor"]}],"headData":{"title":"Elaine Wu | KQED","description":null,"ogImgSrc":"https://secure.gravatar.com/avatar/2cd3b96be5e7a29bf2c745e3f33cc74b?s=600&d=blank&r=g","twImgSrc":"https://secure.gravatar.com/avatar/2cd3b96be5e7a29bf2c745e3f33cc74b?s=600&d=blank&r=g"},"isLoading":false,"link":"/author/elainewu"},"vicchin":{"type":"authors","id":"11350","meta":{"index":"authors_1591205172","id":"11350","found":true},"name":"Vic Chin","firstName":"Vic","lastName":"Chin","slug":"vicchin","email":"vchin@kqed.org","display_author_email":false,"staff_mastheads":[],"title":null,"bio":"Vic Chin is the Coordinating Producer for KQED's award-winning television show Check, Please! Bay Area, as well as a Video Producer for KQED's Bay Area Bites.","avatar":"https://secure.gravatar.com/avatar/8e8092694194f9d7be8a943f9ccd20b6?s=600&d=blank&r=g","twitter":null,"facebook":null,"instagram":null,"linkedin":null,"sites":[{"site":"bayareabites","roles":["administrator"]},{"site":"checkplease","roles":["administrator"]},{"site":"food","roles":["administrator"]}],"headData":{"title":"Vic Chin | KQED","description":null,"ogImgSrc":"https://secure.gravatar.com/avatar/8e8092694194f9d7be8a943f9ccd20b6?s=600&d=blank&r=g","twImgSrc":"https://secure.gravatar.com/avatar/8e8092694194f9d7be8a943f9ccd20b6?s=600&d=blank&r=g"},"isLoading":false,"link":"/author/vicchin"},"gcheung":{"type":"authors","id":"11404","meta":{"index":"authors_1591205172","id":"11404","found":true},"name":"Grace Cheung","firstName":"Grace","lastName":"Cheung","slug":"gcheung","email":"gcheung@kqed.org","display_author_email":false,"staff_mastheads":[],"title":"KQED Contributor","bio":"Grace was a social media and digital producer at KQED, and her love of food keeps her busy! As an amateur photographer and chef, she documents her recipes, restaurant adventures, and more on her blog, \u003ca href=\"https://put-an-egg-on-it.com/\">Put An Egg On It\u003c/a>. You can mostly follow her eating adventures on Instagram at \u003ca href=\"https://www.instagram.com/gcheung28/\">@gcheung28\u003c/a>.","avatar":"https://secure.gravatar.com/avatar/9d5b5595007c3709533a8959e3eda091?s=600&d=blank&r=g","twitter":null,"facebook":null,"instagram":null,"linkedin":null,"sites":[{"site":"arts","roles":["editor"]},{"site":"jpepinheart","roles":["editor"]},{"site":"about","roles":["author"]},{"site":"bayareabites","roles":["contributor"]},{"site":"checkplease","roles":["subscriber"]},{"site":"food","roles":["administrator"]},{"site":"essentialpepin","roles":["administrator"]}],"headData":{"title":"Grace Cheung | KQED","description":"KQED Contributor","ogImgSrc":"https://secure.gravatar.com/avatar/9d5b5595007c3709533a8959e3eda091?s=600&d=blank&r=g","twImgSrc":"https://secure.gravatar.com/avatar/9d5b5595007c3709533a8959e3eda091?s=600&d=blank&r=g"},"isLoading":false,"link":"/author/gcheung"},"mburke":{"type":"authors","id":"11546","meta":{"index":"authors_1591205172","id":"11546","found":true},"name":"Mel Burke","firstName":"Mel","lastName":"Burke","slug":"mburke","email":"melanienburke@gmail.com","display_author_email":false,"staff_mastheads":[],"title":null,"bio":"When Mel Burke isn't singing 80's love songs to her dog, she writes about books, food, dating, travel, and the constantly weird adventure that is living in California. Find her online everywhere @melburkewrites.","avatar":"https://secure.gravatar.com/avatar/c2168c7a31c95a402c2a4d70d565881b?s=600&d=blank&r=g","twitter":null,"facebook":null,"instagram":null,"linkedin":null,"sites":[{"site":"bayareabites","roles":["author"]}],"headData":{"title":"Mel Burke | KQED","description":null,"ogImgSrc":"https://secure.gravatar.com/avatar/c2168c7a31c95a402c2a4d70d565881b?s=600&d=blank&r=g","twImgSrc":"https://secure.gravatar.com/avatar/c2168c7a31c95a402c2a4d70d565881b?s=600&d=blank&r=g"},"isLoading":false,"link":"/author/mburke"},"emilyluchetti":{"type":"authors","id":"11572","meta":{"index":"authors_1591205172","id":"11572","found":true},"name":"Emily Luchetti","firstName":"Emily","lastName":"Luchetti","slug":"emilyluchetti","email":"emilyluchetti@icloud.com","display_author_email":false,"staff_mastheads":[],"title":null,"bio":"Emily Luchetti has helped to define what great pastry in America means. After attending culinary school and working within New York restaurants and Jeremiah Tower’s legendary Stars in San Francisco, Emily switched to the sweet side of the kitchen and didn’t look back. She was the pastry chef at Stars for eight years and also co-owned the retail bakery \u003cem>StarBake\u003c/em>.\r\n\r\nEmily was then Executive Pastry Chef at San Francisco’s \u003cem>Farallon\u003c/em> from 1997-2014 and Waterbar from 2008-2014. In 2014, she joined the dynamic and creative team at Big Night Restaurant Group (\u003cem>The Cavalier, Marlowe, Park Tavern, Leo’s Oyster Bar\u003c/em>).\r\n\r\nEmily’s pastry style is focused – she creates simple, elegant desserts that are full of flavor. “My goal in creating desserts is to make them fun, straightforward and flavorful – desserts designed to please, delight and just make life rosier,” she said.\r\n\r\nEmily has authored many books on the subject of pastry. Among them are \u003cem>Stars Desserts\u003c/em> (HarperCollins, 1991), \u003cem>Four Star Desserts\u003c/em> (HarperCollins, 1995), \u003cem>A Passion for Desserts\u003c/em>(Chronicle Books, 2003), \u003cem>A Passion for Ice Cream\u003c/em> (Chronicle Books, 2006) and \u003cem>The Fearless Baker\u003c/em> (Little, Brown and Company, 2011). Her first two books were re-released as\u003cem>Classic Stars Desserts\u003c/em> (Chronicle Books, 2007).\r\n\r\nEmily’s honors include the 1998 San Francisco \u003cem>Focus Magazine\u003c/em> Pastry Chef of the Year, the 2001 Women Chefs & Restaurateurs Golden Whisk Award, the 2003 \u003cem>Food Arts Magazine\u003c/em> Silver Spoon Award and the 2004 James Beard Foundation award for Outstanding Pastry Chef. In 2009 the \u003cem>San Francisco Chronicle\u003c/em> chose Emily as one of the 20 Visionary Chefs in the Bay Area, and she was inducted into the Culinary Pioneers of America. In 2012, she was inducted into the James Beard Foundation Who’s Who of Food & Beverage in America.\r\n\r\nEmily is passionate about teaching and mentoring chefs and restaurateurs, serving as a Dean at The International Culinary Center in New York. She is the founder of\u003cstrong>\u003ca href=\"http://www.emilyluchetti.com/dessertworthy\">dessertworthy\u003c/a>\u003c/strong> a movement to empower people to be more mindful of their sugar and fat indulgences.\r\n\r\nFrom 1994 to 1999, she served as Chairperson of Women Chefs & Restaurateurs. Emily has served on the James Beard Foundation Board of Trustees for the past 10 years, four years as the Chair of the James Beard Awards Committee and five years as the Chairperson for the Board of Trustees. She also serves as an Oxfam Sister of the Planet.","avatar":"https://secure.gravatar.com/avatar/fffc375e4b7ec1ee51f1e17feb056562?s=600&d=blank&r=g","twitter":null,"facebook":null,"instagram":null,"linkedin":null,"sites":[{"site":"bayareabites","roles":["author"]}],"headData":{"title":"Emily Luchetti | KQED","description":null,"ogImgSrc":"https://secure.gravatar.com/avatar/fffc375e4b7ec1ee51f1e17feb056562?s=600&d=blank&r=g","twImgSrc":"https://secure.gravatar.com/avatar/fffc375e4b7ec1ee51f1e17feb056562?s=600&d=blank&r=g"},"isLoading":false,"link":"/author/emilyluchetti"},"kristinacho":{"type":"authors","id":"11641","meta":{"index":"authors_1591205172","id":"11641","found":true},"name":"Kristina Cho","firstName":"Kristina","lastName":"Cho","slug":"kristinacho","email":"heykcho@gmail.com","display_author_email":false,"staff_mastheads":[],"title":null,"bio":"\u003cdiv class=\"x-el x-el-div c2-1u c2-25 c2-26 c2-27 c2-1a c2-28 c2-29 c2-2a c2-2b c2-4l c2-1 c2-2 c2-4m c2-4n c2-2f c2-2g c2-2h c2-2i x-d-ux\" data-ux=\"GridCell\">\r\n\u003cdiv class=\"x-el x-el-div c2-1 c2-2 x-d-ux x-d-aid\" data-ux=\"Block\" data-aid=\"CALENDAR_DESC\">\r\n\u003cdiv class=\"x-el x-el-p c2-6 c2-7 c2-44 c2-45 c2-2 c2-v c2-1l c2-1z c2-1 c2-36 c2-37 x-d-ux x-d-route x-d-aid x-rt\" data-ux=\"Text\" data-route=\"events/0/desc\" data-aid=\"CALENDAR_DESC_TEXT\">\r\n\r\n\u003cspan class=\"x-el x-el-span c2-1 c2-2 c2-4o c2-4p x-d-ux\">Kristina Cho is a San Francisco based food blogger. The blog \u003ca class=\"x-el x-el-a c2-46 c2-3 c2-4a c2-49 c2-6 c2-7 c2-4q c2-9 c2-1 c2-h c2-i c2-4d c2-4e x-d-ux\" href=\"https://eatchofood.com/\" target=\"_blank\" rel=\"nofollow noopener noreferrer\">\u003cspan class=\"x-el x-el-span c2-46 c2-1 c2-47 x-d-ux\">Eat Cho Food\u003c/span>\u003c/a> showcases her love of dumplings, noodles, and artful bakes. Her joyful recipes are inspired by growing up in her family's restaurant, her background in design, the seasons, and a strong love for feeding people.\u003c/span>\r\n\r\n\u003c/div>\r\n\u003c/div>\r\n\u003c/div>\r\n\u003cdiv class=\"x-el x-el-div c2-1u c2-25 c2-26 c2-27 c2-1a c2-28 c2-4r c2-2a c2-2b c2-4s c2-1 c2-2 c2-4j c2-4k c2-2f c2-2g c2-2h c2-2i x-d-ux\" data-ux=\"GridCell\">\r\n\u003ch4 class=\"x-el x-el-h4 c2-6 c2-7 c2-40 c2-43 c2-17 c2-v c2-g c2-3v c2-1x c2-1z c2-1 c2-36 c2-37 x-d-ux x-d-aid\" data-ux=\"HeadingMinor\" data-aid=\"CALENDAR_EVENT_TIME\">\u003c/h4>\r\n\u003c/div>","avatar":"https://secure.gravatar.com/avatar/99270fad706f948822fc4ac074e17c49?s=600&d=blank&r=g","twitter":null,"facebook":null,"instagram":null,"linkedin":null,"sites":[{"site":"bayareabites","roles":["contributor"]}],"headData":{"title":"Kristina Cho | KQED","description":null,"ogImgSrc":"https://secure.gravatar.com/avatar/99270fad706f948822fc4ac074e17c49?s=600&d=blank&r=g","twImgSrc":"https://secure.gravatar.com/avatar/99270fad706f948822fc4ac074e17c49?s=600&d=blank&r=g"},"isLoading":false,"link":"/author/kristinacho"},"uramakrishnan":{"type":"authors","id":"11689","meta":{"index":"authors_1591205172","id":"11689","found":true},"name":"Urmila Ramakrishnan","firstName":"Urmila","lastName":"Ramakrishnan","slug":"uramakrishnan","email":"uramakrishnan@kqed.org","display_author_email":false,"staff_mastheads":[],"title":"KQED Food Editor","bio":"Urmila Ramakrishnan is KQED Arts & Culture’s food editor and an award-winning food journalist based in the Bay Area. Her multi-platform work has been featured in \u003ci>The New York Times\u003c/i>, \u003ci>Edible\u003c/i>, \u003ci>The San Francisco Chronicle\u003c/i>, among other publications. She’s a kitchen gadget enthusiast who also loves food puns. Keep up with her cooking adventures on Instagram at \u003ca href=\"https://www.instagram.com/urmilamakes/\" rel=\"noopener noreferrer\">@urmilamakes\u003c/a> and join the food discussion \u003ca href=\"https://twitter.com/U_Ramakrishnan\" rel=\"noopener noreferrer\">@U_Ramakrishnan\u003c/a>.","avatar":"https://secure.gravatar.com/avatar/d014718b767c29f78f33117b5b75eb6d?s=600&d=blank&r=g","twitter":"U_Ramakrishnan","facebook":null,"instagram":null,"linkedin":null,"sites":[{"site":"arts","roles":["subscriber"]},{"site":"bayareabites","roles":["subscriber"]},{"site":"checkplease","roles":["editor"]},{"site":"food","roles":["editor"]}],"headData":{"title":"Urmila Ramakrishnan | KQED","description":"KQED Food Editor","ogImgSrc":"https://secure.gravatar.com/avatar/d014718b767c29f78f33117b5b75eb6d?s=600&d=blank&r=g","twImgSrc":"https://secure.gravatar.com/avatar/d014718b767c29f78f33117b5b75eb6d?s=600&d=blank&r=g"},"isLoading":false,"link":"/author/uramakrishnan"}},"breakingNewsReducer":{},"campaignFinanceReducer":{},"firebase":{"requesting":{},"requested":{},"timestamps":{},"data":{},"ordered":{},"auth":{"isLoaded":false,"isEmpty":true},"authError":null,"profile":{"isLoaded":false,"isEmpty":true},"listeners":{"byId":{},"allIds":[]},"isInitializing":false,"errors":[]},"navBarReducer":{"navBarId":"arts","fullView":true,"showPlayer":false},"navMenuReducer":{"menus":[{"key":"menu1","items":[{"name":"News","link":"/","type":"title"},{"name":"Politics","link":"/politics"},{"name":"Science","link":"/science"},{"name":"Education","link":"/educationnews"},{"name":"Housing","link":"/housing"},{"name":"Immigration","link":"/immigration"},{"name":"Criminal Justice","link":"/criminaljustice"},{"name":"Silicon Valley","link":"/siliconvalley"},{"name":"Forum","link":"/forum"},{"name":"The California Report","link":"/californiareport"}]},{"key":"menu2","items":[{"name":"Arts & Culture","link":"/arts","type":"title"},{"name":"Critics’ Picks","link":"/thedolist"},{"name":"Cultural Commentary","link":"/artscommentary"},{"name":"Food & Drink","link":"/food"},{"name":"Bay Area Hip-Hop","link":"/bayareahiphop"},{"name":"Rebel Girls","link":"/rebelgirls"},{"name":"Arts Video","link":"/artsvideos"}]},{"key":"menu3","items":[{"name":"Podcasts","link":"/podcasts","type":"title"},{"name":"Bay Curious","link":"/podcasts/baycurious"},{"name":"Rightnowish","link":"/podcasts/rightnowish"},{"name":"The Bay","link":"/podcasts/thebay"},{"name":"On Our Watch","link":"/podcasts/onourwatch"},{"name":"Mindshift","link":"/podcasts/mindshift"},{"name":"Consider This","link":"/podcasts/considerthis"},{"name":"Political Breakdown","link":"/podcasts/politicalbreakdown"}]},{"key":"menu4","items":[{"name":"Live Radio","link":"/radio","type":"title"},{"name":"TV","link":"/tv","type":"title"},{"name":"Events","link":"/events","type":"title"},{"name":"For Educators","link":"/education","type":"title"},{"name":"Support KQED","link":"/support","type":"title"},{"name":"About","link":"/about","type":"title"},{"name":"Help Center","link":"https://kqed-helpcenter.kqed.org/s","type":"title"}]}]},"pagesReducer":{},"postsReducer":{"stream_live":{"type":"live","id":"stream_live","audioUrl":"https://streams.kqed.org/kqedradio","title":"Live Stream","excerpt":"Live Stream information currently unavailable.","link":"/radio","featImg":"","label":{"name":"KQED Live","link":"/"}},"stream_kqedNewscast":{"type":"posts","id":"stream_kqedNewscast","audioUrl":"https://www.kqed.org/.stream/anon/radio/RDnews/newscast.mp3?_=1","title":"KQED Newscast","featImg":"","label":{"name":"88.5 FM","link":"/"}},"bayareabites_138286":{"type":"posts","id":"bayareabites_138286","meta":{"index":"posts_1591205157","site":"bayareabites","id":"138286","score":null,"sort":[1595547121000]},"guestAuthors":[],"slug":"flavors-at-home-an-apple-crisp-bends-the-recipe-and-health-rules","title":"An Apple Crisp Bends the Recipe and Health Rules","publishDate":1595547121,"format":"standard","headTitle":"Bay Area Bites | KQED Food","labelTerm":{},"content":"\u003cp>\u003ci>In light of the shelter-in-place order, many of us have resorted to cooking at home, revisiting old recipes and getting creative with our pantries. Instead of our usual Flavors Worth Finding column with recommendations from restaurants, KQED staffers are sharing the meals they’ve been making at home to find some comfort and grounding during uncertain times.\u003c/i>\u003c/p>\n\u003cp>The beauty of a recipe is understanding when and where you can break it. Recipes, as helpful as they are, aren’t rules but guidelines—steps so you don’t lose your way. It’s up to you to follow or stray from them. Where are the swaps? What can be added? The trick is knowing when and how to do that without the potential of ruining whatever food you’re making. This is much easier to do with cooking than with baking, but it has never stopped me from trying, sometimes with great successes and sometimes with abysmal failures.\u003c/p>\n\u003cp>An apple crisp was my latest foray into recipe dalliance. With an ever-present sweet tooth and a sudden urge to eat a little bit healthier, I settled on cleaning out the pantry with an oat apple crisp that was sweet, a little salty and had the feeling of being a better option than cake (even if it wasn’t). I went searching for a recipe that would be less fatty and sugar-rich, use ingredients I already had on hand and wasn’t fussy.\u003c/p>\n\u003cp>One recipe was super healthy, but I didn't have half of the ingredients. Another was simple, but didn't use oats. Yet another used raisins and was way too fussy (I don't have time or patience to make pastry dough, thank you).\u003c/p>\n\u003cp>After looking through at least a dozen apple crisp variations, I took \u003ca href=\"https://thecleaneatingcouple.com/healthy-apple-crisp/\">this one from The Clean Eating Couple\u003c/a> and ran with it. But, perhaps in defiance, I didn't peel the apples, added a little butter instead of coconut oil and seasoned the apples with nutmeg, allspice and a little chili. For the crisp topping, I swapped pecans for mixed nuts I had on hand, used ghee instead of coconut oil and added smoked maple syrup and a little jaggery for the topping.\u003c/p>\n\u003cp>[ad fullwidth]\u003c/p>\n\u003cp>The result was a personalized version of the original. At what point does a recipe transform into something else? As long as it’s still an apple crisp, does it matter? I portioned it off for the week and thoroughly enjoyed.\u003c/p>\n\u003ch2>Healthy Apple Crisp recipe:\u003c/h2>\n\u003cul>\n\u003cli>4 medium sized apples, sliced into 1/4 inch pieces\u003c/li>\n\u003cli>1 tablespoon butter\u003c/li>\n\u003cli>1/2 teaspoon cinnamon\u003c/li>\n\u003cli>1/2 teaspoon nutmeg\u003c/li>\n\u003cli>1/2 teaspoon all spice\u003c/li>\n\u003cli>1/2 teaspoon aleppo pepper or mild paprika or mild chili powder\u003c/li>\n\u003cli>1 lime, juiced\u003c/li>\n\u003cli>jaggery or brown sugar, to taste\u003c/li>\n\u003c/ul>\n\u003cp>\u003cstrong>Crisp Topping\u003c/strong>\u003c/p>\n\u003cul>\n\u003cli>1 1/2 cup oats\u003c/li>\n\u003cli>1/2 teaspoon cinnamon\u003c/li>\n\u003cli>1/4 teaspoon fresh ginger, peeled and grated\u003c/li>\n\u003cli>1/4 teaspoon nutmeg\u003c/li>\n\u003cli>1/4 teaspoon all spice\u003c/li>\n\u003cli>1/3 cup mixed nuts, chopped\u003c/li>\n\u003cli>2 tablespoons melted butter or ghee\u003c/li>\n\u003cli>1 tablespoon smoked maple syrup OR 1 tablespoon maple syrup + 1 teaspoon smoked paprika\u003c/li>\n\u003c/ul>\n\u003cp>\u003cstrong>Instructions:\u003c/strong>\u003c/p>\n\u003cp>\u003c/p>\n\u003cp>Preheat oven to 350 degrees; grease a 9x11 baking sheet with cooking spray or a little oil. Toss apples, butter, spices, lime juice and sugar together in a bowl and set aside. In a separate bowl, combine crisp topping ingredients and mix well. Place apple mixture evenly on the baking sheet and follow with the topping. If you want to add sweetness, drizzle with maple syrup. Cover with foil and bake for 25 minutes. Uncover and bake for another 10-20 minutes, until the apples are fork-tender and the oats are golden brown. Serve with a dollop of yogurt and a light drizzle of maple syrup.\u003c/p>\n\n","blocks":[],"excerpt":null,"status":"publish","parent":0,"modified":1621633797,"stats":{"hasAudio":false,"hasVideo":false,"hasChartOrMap":false,"iframeSrcs":[],"hasGoogleForm":false,"hasGallery":false,"hasHearkenModule":false,"hasPolis":false,"paragraphCount":11,"wordCount":637},"headData":{"title":"An Apple Crisp Bends the Recipe and Health Rules | KQED","description":"In light of the shelter-in-place order, many of us have resorted to cooking at home, revisiting old recipes and getting creative with our pantries. Instead of our usual Flavors Worth Finding column with recommendations from restaurants, KQED staffers are sharing the meals they’ve been making at home to find some comfort and grounding during uncertain","ogTitle":"","ogDescription":"","ogImgId":"","twTitle":"","twDescription":"","twImgId":"","schema":{"@context":"http://schema.org","@type":"Article","headline":"An Apple Crisp Bends the Recipe and Health Rules","datePublished":"2020-07-23T23:32:01.000Z","dateModified":"2021-05-21T21:49:57.000Z","image":"https://cdn.kqed.org/wp-content/uploads/2020/02/KQED-OG-Image@1x.png"}},"disqusIdentifier":"138286 https://ww2.kqed.org/bayareabites/?p=138286","disqusUrl":"https://ww2.kqed.org/bayareabites/2020/07/23/flavors-at-home-an-apple-crisp-bends-the-recipe-and-health-rules/","disqusTitle":"An Apple Crisp Bends the Recipe and Health Rules","source":"Flavors at Home","templateType":"standard","featuredImageType":"standard","path":"/bayareabites/138286/flavors-at-home-an-apple-crisp-bends-the-recipe-and-health-rules","audioTrackLength":null,"parsedContent":[{"type":"contentString","content":"\u003cdiv class=\"post-body\">\u003cp>\u003cp>\u003ci>In light of the shelter-in-place order, many of us have resorted to cooking at home, revisiting old recipes and getting creative with our pantries. Instead of our usual Flavors Worth Finding column with recommendations from restaurants, KQED staffers are sharing the meals they’ve been making at home to find some comfort and grounding during uncertain times.\u003c/i>\u003c/p>\n\u003cp>The beauty of a recipe is understanding when and where you can break it. Recipes, as helpful as they are, aren’t rules but guidelines—steps so you don’t lose your way. It’s up to you to follow or stray from them. Where are the swaps? What can be added? The trick is knowing when and how to do that without the potential of ruining whatever food you’re making. This is much easier to do with cooking than with baking, but it has never stopped me from trying, sometimes with great successes and sometimes with abysmal failures.\u003c/p>\n\u003cp>An apple crisp was my latest foray into recipe dalliance. With an ever-present sweet tooth and a sudden urge to eat a little bit healthier, I settled on cleaning out the pantry with an oat apple crisp that was sweet, a little salty and had the feeling of being a better option than cake (even if it wasn’t). I went searching for a recipe that would be less fatty and sugar-rich, use ingredients I already had on hand and wasn’t fussy.\u003c/p>\n\u003cp>One recipe was super healthy, but I didn't have half of the ingredients. Another was simple, but didn't use oats. Yet another used raisins and was way too fussy (I don't have time or patience to make pastry dough, thank you).\u003c/p>\n\u003cp>After looking through at least a dozen apple crisp variations, I took \u003ca href=\"https://thecleaneatingcouple.com/healthy-apple-crisp/\">this one from The Clean Eating Couple\u003c/a> and ran with it. But, perhaps in defiance, I didn't peel the apples, added a little butter instead of coconut oil and seasoned the apples with nutmeg, allspice and a little chili. For the crisp topping, I swapped pecans for mixed nuts I had on hand, used ghee instead of coconut oil and added smoked maple syrup and a little jaggery for the topping.\u003c/p>\n\u003cp>\u003c/p>\u003c/div>","attributes":{"named":{},"numeric":[]}},{"type":"component","content":"","name":"ad","attributes":{"named":{"label":"fullwidth"},"numeric":["fullwidth"]}},{"type":"contentString","content":"\u003cdiv class=\"post-body\">\u003cp>\u003c/p>\n\u003cp>The result was a personalized version of the original. At what point does a recipe transform into something else? As long as it’s still an apple crisp, does it matter? I portioned it off for the week and thoroughly enjoyed.\u003c/p>\n\u003ch2>Healthy Apple Crisp recipe:\u003c/h2>\n\u003cul>\n\u003cli>4 medium sized apples, sliced into 1/4 inch pieces\u003c/li>\n\u003cli>1 tablespoon butter\u003c/li>\n\u003cli>1/2 teaspoon cinnamon\u003c/li>\n\u003cli>1/2 teaspoon nutmeg\u003c/li>\n\u003cli>1/2 teaspoon all spice\u003c/li>\n\u003cli>1/2 teaspoon aleppo pepper or mild paprika or mild chili powder\u003c/li>\n\u003cli>1 lime, juiced\u003c/li>\n\u003cli>jaggery or brown sugar, to taste\u003c/li>\n\u003c/ul>\n\u003cp>\u003cstrong>Crisp Topping\u003c/strong>\u003c/p>\n\u003cul>\n\u003cli>1 1/2 cup oats\u003c/li>\n\u003cli>1/2 teaspoon cinnamon\u003c/li>\n\u003cli>1/4 teaspoon fresh ginger, peeled and grated\u003c/li>\n\u003cli>1/4 teaspoon nutmeg\u003c/li>\n\u003cli>1/4 teaspoon all spice\u003c/li>\n\u003cli>1/3 cup mixed nuts, chopped\u003c/li>\n\u003cli>2 tablespoons melted butter or ghee\u003c/li>\n\u003cli>1 tablespoon smoked maple syrup OR 1 tablespoon maple syrup + 1 teaspoon smoked paprika\u003c/li>\n\u003c/ul>\n\u003cp>\u003cstrong>Instructions:\u003c/strong>\u003c/p>\n\u003cp>\u003c/p>\n\u003cp>Preheat oven to 350 degrees; grease a 9x11 baking sheet with cooking spray or a little oil. Toss apples, butter, spices, lime juice and sugar together in a bowl and set aside. In a separate bowl, combine crisp topping ingredients and mix well. Place apple mixture evenly on the baking sheet and follow with the topping. If you want to add sweetness, drizzle with maple syrup. Cover with foil and bake for 25 minutes. Uncover and bake for another 10-20 minutes, until the apples are fork-tender and the oats are golden brown. Serve with a dollop of yogurt and a light drizzle of maple syrup.\u003c/p>\n\n\u003c/div>\u003c/p>","attributes":{"named":{},"numeric":[]}}],"link":"/bayareabites/138286/flavors-at-home-an-apple-crisp-bends-the-recipe-and-health-rules","authors":["11689"],"categories":["bayareabites_109","bayareabites_752","bayareabites_17082"],"tags":["bayareabites_16870","bayareabites_49","bayareabites_16869","bayareabites_16622","bayareabites_16576","bayareabites_744","bayareabites_16871","bayareabites_16872","bayareabites_16742"],"featImg":"bayareabites_138289","label":"source_bayareabites_138286"},"bayareabites_138065":{"type":"posts","id":"bayareabites_138065","meta":{"index":"posts_1591205157","site":"bayareabites","id":"138065","score":null,"sort":[1594862774000]},"guestAuthors":[],"slug":"your-ultimate-2020-summer-ice-cream-guide","title":"Your Ultimate 2020 Summer Ice Cream Guide","publishDate":1594862774,"format":"standard","headTitle":"Bay Area Bites | KQED Food","labelTerm":{"site":"bayareabites"},"content":"\u003cp>At this point in shelter-in-place, we're solidly in month five of the pandemic in the Bay Area. Maybe all of your kitchen gadgets have been used to make bread, desserts and sweet treats. Maybe kitchen apathy has you craving without wanting to put in the effort.\u003c/p>\n\u003cp>We have good news: Many ice cream spots around the Bay Area are open, with a variety of options for delivery.\u003c/p>\n\u003cp>Here’s how to get a pint delivered while sheltering in place. Guidelines and restrictions are constantly changing, so it’s best to check social media or websites before ordering. (And if you still want to make ice cream yourself? Jump to our \u003ca href=\"#recipes\">home recipes\u003c/a>.)\u003c/p>\n\u003ch2>Delivery\u003c/h2>\n\u003cp>\u003ca href=\"https://www.thebakedbear.com/sanfrancisco/\">\u003cb>Baked Bear\u003c/b>\u003c/a>\u003c/p>\n\u003cp>\u003cspan style=\"font-weight: 400\">This chain best known for its create-your-own ice cream sandwich offers delivery via third-party apps in both of its Bay Area locations. The Fisherman’s Wharf location offers delivery through Uber Eats, while the Columbus Avenue location offers delivery via Uber Eats, Postmates, DoorDash and GrubHub. \u003c/span>\u003c/p>\n\u003cp>[ad fullwidth]\u003c/p>\n\u003cp>https://www.instagram.com/p/CCpVyIxJnXN/\u003c/p>\n\u003cp>\u003ca href=\"https://creamnation.com/locations/\">\u003cb>CREAM\u003c/b>\u003c/a>\u003c/p>\n\u003cp>\u003cspan style=\"font-weight: 400\">Similar to Baked Bear, CREAM also offers its cookies and ice cream for build-your-own sandwich kits via delivery from DoorDash, Postmates, Uber Eats and ezCater at all of its Bay Area locations. \u003c/span>\u003c/p>\n\u003cp>https://www.instagram.com/p/B_8a1ULhA3f/\u003c/p>\n\u003cp>\u003ca href=\"https://www.curbsideoakland.com/\">\u003cb>Curbside Creamery\u003c/b>\u003c/a>\u003c/p>\n\u003cp>\u003cspan style=\"font-weight: 400\">Though this Oakland soft serve shop’s preferred method of purchase is in-store pickup, it offers delivery via Caviar. \u003c/span>\u003c/p>\n\u003cp>https://www.instagram.com/p/CCo72SFBakl/\u003c/p>\n\u003cp>\u003ca href=\"https://www.humphryslocombe.com/\">\u003cb>Humphry Slocombe\u003c/b>\u003c/a>\u003c/p>\n\u003cp>The high-end ice cream known for unique flavor combinations is available at grocery stores, but it's also available via Caviar, Postmates, DoorDash and Goldbelly (with $20 off your first purchase if ordering via Goldbelly). The Mission District and Berkeley locations have ice cream cakes and pies available with a 72-hour notice for that birthday or other celebration.\u003c/p>\n\u003cp>https://www.instagram.com/p/CCZv1fpANnR/\u003c/p>\n\u003cp>\u003ca href=\"https://www.itsiticecream.com/local-delivery\">\u003cb>It’s-It\u003c/b>\u003c/a>\u003c/p>\n\u003cp>\u003cspan style=\"font-weight: 400\">Want to stock up or host a socially distant ice cream party? With a minimum order requirement of five cases (120 It’s-Its) for same-day delivery, the iconic San Francisco dessert can be delivered to San Francisco, San Mateo, Marin, Santa Clara, Alameda, Contra Costa and Solano, Monday through Friday. It’s-It also offers online ordering without the five-case minimum, but delivery is overnight, not same-day. \u003c/span>\u003c/p>\n\u003cp>https://www.instagram.com/p/CCZveyWBEvC/\u003c/p>\n\u003cp>\u003ca href=\"https://koolficreamery.com/find-us/\">\u003cb>KoolFi Creamery\u003c/b>\u003c/a>\u003c/p>\n\u003cp>\u003cspan style=\"font-weight: 400\">This Indian-inspired spot offers delivery with a four-pint minimum through its website. Featuring flavors ranging from Blueberry Goat Cheese to Jackfruit Pudding, the San Leandro scoop shop from Priti Narayan and Madhuri Anji has complex flavors that go beyond what is traditionally perceived as “Indian flavors.” \u003c/span>\u003c/p>\n\u003cp>https://www.instagram.com/p/CCpfuElhb6S/\u003c/p>\n\u003cp>\u003ca href=\"https://littlegianticecream.square.site/?location=11ea93489efc406292260cc47a2ae124\">\u003cb>Little Giant\u003c/b>\u003c/a>\u003c/p>\n\u003cp>\u003cspan style=\"font-weight: 400\">This Telegraph Avenue local creamery offers delivery with a $30 minimum. Options include pints, mini pints, floats, cookies, brownies and cones. \u003c/span>\u003c/p>\n\u003cp>https://www.instagram.com/p/CA_U3ahhBdM/\u003c/p>\n\u003cp>\u003ca href=\"https://mitchellsicecream.com/\">\u003cb>Mitchell’s Ice Cream\u003c/b>\u003c/a>\u003c/p>\n\u003cp>\u003cspan style=\"font-weight: 400\">The iconic San Francisco scoop shop on San Jose Avenue offers delivery via Postmates. Online ordering of cakes is available for pickup. \u003c/span>\u003c/p>\n\u003cp>https://www.instagram.com/p/CB90wFRD6QD/\u003c/p>\n\u003cp>\u003cb>\u003ca href=\"https://www.instagram.com/explore/locations/2451918/miyako-old-fashioned-ice-cream/?utm_source=ig_embed\" target=\"_blank\" rel=\"noopener noreferrer\">Miyako\u003c/a>\u003c/b>\u003c/p>\n\u003cp>The old-fashioned ice cream shop at 1470 Fillmore St. in San Francisco has been a staple of the neighborhood for the last 28 years, with a loyal clientele. After a \u003ca href=\"https://www.sfgate.com/food/slideshow/Miyako-ice-cream-shop-Fillmore-San-Francisco-NCLF-204946.php\" target=\"_blank\" rel=\"noopener noreferrer\">break-in this past April\u003c/a> during which cash and stock were stolen, a GoFundMe campaign organized by the New Community Leadership Foundation raised $20,000 to help recover damages and keep the business afloat. Delivery is available via Grubhub and Seamless within San Francisco.\u003c/p>\n\u003cp>https://www.instagram.com/p/CCZT6C1Bz1P/\u003c/p>\n\u003cp>\u003ca href=\"https://www.facebook.com/Mr-and-Mrs-Miscellaneous-126193770733086/\">\u003cb>Mr. & Mrs. Miscellaneous\u003c/b>\u003c/a>\u003c/p>\n\u003cp>With flavors ranging from Chicory Coffee to Sloe Gin, this San Francisco ice cream parlor changes their hours and days of operation often, so it's best to call ahead before ordering via Postmates or Grubhub.\u003c/p>\n\u003cp>https://www.instagram.com/p/BbpXVZonDE4/\u003c/p>\n\u003cp>\u003ca href=\"http://www.sfhometowncreamery.com/\">\u003cb>San Francisco Hometown Creamery\u003c/b>\u003c/a>\u003c/p>\n\u003cp>\u003cspan style=\"font-weight: 400\">“From farm to cone” is the motto, and it claims to be the first creamery in San Francisco to make small-batch ice cream from scratch on-site. The 9th Avenue shop takes online orders via Grubhub. \u003c/span>\u003c/p>\n\u003cp>https://www.instagram.com/p/BVfeKkIA_qB/\u003c/p>\n\u003cp>\u003ca href=\"https://direct.chownow.com/order/21425/locations/31031\">\u003cb>Salt & Straw\u003c/b>\u003c/a>\u003c/p>\n\u003cp>\u003cspan style=\"font-weight: 400\">All three locations (Pacific Heights, Hayes Valley and Burlingame) are open for pickup or delivery via online ordering. Scoops, cones and pints are all available. \u003c/span>\u003c/p>\n\u003cp>https://www.instagram.com/p/CCOlAkjFX-9/\u003c/p>\n\u003cp>\u003ca href=\"https://www.smittenicecream.com/blog/a-note-to-our-community-robyn-sue-fisher/\">\u003cb>Smitten Ice Cream\u003c/b>\u003c/a>\u003c/p>\n\u003cp>\u003cspan style=\"font-weight: 400\">Known for an almost theatrical made-on-the-spot creamery, Smitten offers pickup, delivery and shippable pints at the Hayes Valley, Mission District, Rockridge and Santana Row locations. Delivery is available via Caviar, DoorDash, Postmates and UberEats. \u003c/span>\u003c/p>\n\u003cp>https://www.instagram.com/p/CChPuLXD3Rg/\u003c/p>\n\u003cp>\u003ca href=\"https://www.steepsf.com/\">\u003cb>Steep Creamery & Tea\u003c/b>\u003c/a>\u003c/p>\n\u003cp>\u003cspan style=\"font-weight: 400\">Known for its rolled ice cream, this Brannan Street spot offers order-ahead and limited delivery options within San Francisco (usually on Sundays). Contact ahead via their website. \u003c/span>\u003c/p>\n\u003cp>https://www.instagram.com/p/CCAmUkcgZ2R/\u003c/p>\n\u003cp>\u003ca href=\"https://ujitimedessert.square.site/s/order?location=11ea6af73e1379809fa50cc47a2ae330\">\u003cb>Uji Time\u003c/b>\u003c/a>\u003cb> \u003c/b>\u003c/p>\n\u003cp>\u003cspan style=\"font-weight: 400\">Known for its Taiyaki cones and soft cream, Uji Time charges a modest $5 delivery fee with no minimum order. The menu includes “Comfort In Place” kits that include quarts of ice cream, toppings, waffle cones and mochi (in one option). Mochi ice cream is also available for delivery. \u003c/span>\u003c/p>\n\u003cp>https://www.instagram.com/p/CBJqndthKAH/\u003c/p>\n\u003cp> \u003cbr>\n\u003ca id=\"recipes\">\u003c/a>\u003c/p>\n\u003ch2>Recipe Inspiration\u003c/h2>\n\u003cp>For those still on the DIY train, here’s some recipe inspiration to try at home. Most of these recipes from KQED are for ice cream that's fairly easy to churn without an ice cream maker.\u003c/p>\n\u003cp>\u003ca href=\"https://www.kqed.org/bayareabites/1070/homemade-strawberry-ice-cream\">\u003cb>Strawberry Ice Cream\u003c/b>\u003c/a>\u003c/p>\n\u003cfigure id=\"attachment_26803\" class=\"wp-caption alignnone\" style=\"max-width: 500px\">\u003cimg class=\"wp-image-26803 size-full\" src=\"https://ww2.kqed.org/app/uploads/sites/24/2011/04/strawberry-ice-cream.jpg\" alt=\"strawberry ice cream\" width=\"500\" height=\"375\">\u003cfigcaption class=\"wp-caption-text\">Denise Santoro Lincoln\u003c/figcaption>\u003c/figure>\n\u003cp>\u003cspan style=\"font-weight: 400\">With strawberries in season, this recipe is the perfect answer to summer. Load in the fresh strawberries and use more for toppings. There are three main ice cream bases: the custard (cooked ice cream base), eggless (may or may not involve cooked ice cream base) or the no-churn (read: don’t cook). This follows the custard style. It is generally recommended to use an ice cream maker with this method, but similar results can be achieved without a machine. \u003c/span>\u003c/p>\n\u003cp>\u003ca href=\"https://www.kqed.org/bayareabites/86628/ignore-the-fog-and-make-your-own-ice-cream-cones-and-sprinkles\">\u003cb>Ice Cream Cones\u003c/b>\u003c/a>\u003c/p>\n\u003cfigure id=\"attachment_138081\" class=\"wp-caption alignnone\" style=\"max-width: 800px\">\u003cimg class=\"size-medium wp-image-138081\" src=\"https://ww2.kqed.org/app/uploads/sites/24/2020/07/iStock-1009098306-800x534.jpg\" alt=\"\" width=\"800\" height=\"534\" srcset=\"https://ww2.kqed.org/app/uploads/sites/24/2020/07/iStock-1009098306-800x534.jpg 800w, https://ww2.kqed.org/app/uploads/sites/24/2020/07/iStock-1009098306-1020x681.jpg 1020w, https://ww2.kqed.org/app/uploads/sites/24/2020/07/iStock-1009098306-160x107.jpg 160w, https://ww2.kqed.org/app/uploads/sites/24/2020/07/iStock-1009098306-768x513.jpg 768w, https://ww2.kqed.org/app/uploads/sites/24/2020/07/iStock-1009098306.jpg 1500w\" sizes=\"(max-width: 800px) 100vw, 800px\">\u003cfigcaption class=\"wp-caption-text\">iStock\u003c/figcaption>\u003c/figure>\n\u003cp>\u003cspan style=\"font-weight: 400\">If you've got time, this recipe makes cones \u003cem>and\u003c/em> sprinkles, and keeps the kids occupied with a weekend project. Pro tip: A zip-top bag can be used as a substitute for piping bags. \u003c/span>\u003c/p>\n\u003cp>\u003ca href=\"https://www.kqed.org/bayareabites/62904/ice-cream-recipes-summer\">\u003cb>Blueberry Cheesecake Ice Cream\u003c/b>\u003c/a>\u003c/p>\n\u003cfigure id=\"attachment_62920\" class=\"wp-caption alignnone\" style=\"max-width: 624px\">\u003cimg class=\"size-full wp-image-62920\" src=\"https://ww2.kqed.org/app/uploads/sites/24/2013/06/icecreamblueberry.jpg\" alt=\"Blueberry Cheesecake Ice Cream. Photo: Michele Kayal for NPR\" width=\"624\" height=\"467\">\u003cfigcaption class=\"wp-caption-text\">Blueberry Cheesecake Ice Cream. Photo: Michele Kayal for NPR\u003c/figcaption>\u003c/figure>\n\u003cp>\u003cspan style=\"font-weight: 400\">This is a quick and easy one, and the blueberries can be swapped for any fruit on hand. Top with crumbled graham crackers or cookies for an extra sweet kick and texture. \u003c/span>\u003c/p>\n\u003cp>\u003ca href=\"https://www.kqed.org/bayareabites/26798/vegan-almond-milk-ice-cream-3-recipes\">\u003cb>Dairy-Free\u003c/b>\u003c/a>\u003c/p>\n\u003cfigure id=\"attachment_26801\" class=\"wp-caption alignnone\" style=\"max-width: 375px\">\u003cimg class=\"size-full wp-image-26801\" src=\"https://ww2.kqed.org/app/uploads/sites/24/2011/04/chocolate-ice-cream-cone.jpg\" alt=\"\" width=\"375\" height=\"500\">\u003cfigcaption class=\"wp-caption-text\">Denise Santoro Lincoln\u003c/figcaption>\u003c/figure>\n\u003cp>\u003cspan style=\"font-weight: 400\">Using almond milk, these three dairy-free options pack in flavor and richness without the use of animal-based milk. \u003c/span>\u003c/p>\n\u003cp>\u003cb>Make your own extracts for ice cream\u003c/b>\u003c/p>\n\u003cp>[ad floatright]\u003c/p>\n\u003cp>Extracts are simple to make at home. They're also an easy and potent way to flavor ice cream with the no-churn method (whip heavy whipping cream until stiff peaks form, add in flavoring, place in air-tight container and freeze). The key ingredients are time, a high-proof alcohol, and a good amount of mint, vanilla bean or any other flavoring. Vodka and bourbon make good starts. Essentially, take the mint (or whichever flavoring ingredient you prefer), put it into a sealable container, add alcohol and seal and wait six weeks. Strain and save the liquid.\u003c/p>\n\n","blocks":[],"excerpt":"Summer is in full swing amidst the pandemic. These 15 local creameries offer delivery services. ","status":"publish","parent":0,"modified":1621633864,"stats":{"hasAudio":false,"hasVideo":false,"hasChartOrMap":false,"iframeSrcs":[],"hasGoogleForm":false,"hasGallery":false,"hasHearkenModule":false,"hasPolis":false,"paragraphCount":46,"wordCount":1235},"headData":{"title":"Your Ultimate 2020 Summer Ice Cream Guide | KQED","description":"Summer is in full swing amidst the pandemic. These 15 local creameries offer delivery services. ","ogTitle":"","ogDescription":"","ogImgId":"","twTitle":"","twDescription":"","twImgId":"","schema":{"@context":"http://schema.org","@type":"Article","headline":"Your Ultimate 2020 Summer Ice Cream Guide","datePublished":"2020-07-16T01:26:14.000Z","dateModified":"2021-05-21T21:51:04.000Z","image":"https://cdn.kqed.org/wp-content/uploads/2020/02/KQED-OG-Image@1x.png"}},"disqusIdentifier":"138065 https://ww2.kqed.org/bayareabites/?p=138065","disqusUrl":"https://ww2.kqed.org/bayareabites/2020/07/15/your-ultimate-2020-summer-ice-cream-guide/","disqusTitle":"Your Ultimate 2020 Summer Ice Cream Guide","templateType":"standard","featuredImageType":"standard","path":"/bayareabites/138065/your-ultimate-2020-summer-ice-cream-guide","audioTrackLength":null,"parsedContent":[{"type":"contentString","content":"\u003cdiv class=\"post-body\">\u003cp>\u003cp>At this point in shelter-in-place, we're solidly in month five of the pandemic in the Bay Area. Maybe all of your kitchen gadgets have been used to make bread, desserts and sweet treats. Maybe kitchen apathy has you craving without wanting to put in the effort.\u003c/p>\n\u003cp>We have good news: Many ice cream spots around the Bay Area are open, with a variety of options for delivery.\u003c/p>\n\u003cp>Here’s how to get a pint delivered while sheltering in place. Guidelines and restrictions are constantly changing, so it’s best to check social media or websites before ordering. (And if you still want to make ice cream yourself? Jump to our \u003ca href=\"#recipes\">home recipes\u003c/a>.)\u003c/p>\n\u003ch2>Delivery\u003c/h2>\n\u003cp>\u003ca href=\"https://www.thebakedbear.com/sanfrancisco/\">\u003cb>Baked Bear\u003c/b>\u003c/a>\u003c/p>\n\u003cp>\u003cspan style=\"font-weight: 400\">This chain best known for its create-your-own ice cream sandwich offers delivery via third-party apps in both of its Bay Area locations. The Fisherman’s Wharf location offers delivery through Uber Eats, while the Columbus Avenue location offers delivery via Uber Eats, Postmates, DoorDash and GrubHub. \u003c/span>\u003c/p>\n\u003cp>\u003c/p>\u003c/div>","attributes":{"named":{},"numeric":[]}},{"type":"component","content":"","name":"ad","attributes":{"named":{"label":"fullwidth"},"numeric":["fullwidth"]}},{"type":"contentString","content":"\u003cdiv class=\"post-body\">\u003cp>\u003c/p>\u003c/p>\u003c/div>","attributes":{"named":{},"numeric":[]}},{"type":"component","content":"","name":"instagramLink","attributes":{"named":{"instagramId":"CCpVyIxJnXN"},"numeric":[]}},{"type":"contentString","content":"\u003cdiv class=\"post-body\">\u003cp>\u003cp>\u003ca href=\"https://creamnation.com/locations/\">\u003cb>CREAM\u003c/b>\u003c/a>\u003c/p>\n\u003cp>\u003cspan style=\"font-weight: 400\">Similar to Baked Bear, CREAM also offers its cookies and ice cream for build-your-own sandwich kits via delivery from DoorDash, Postmates, Uber Eats and ezCater at all of its Bay Area locations. \u003c/span>\u003c/p>\u003c/p>\u003c/div>","attributes":{"named":{},"numeric":[]}},{"type":"component","content":"","name":"instagramLink","attributes":{"named":{"instagramId":"B_8a1ULhA3f"},"numeric":[]}},{"type":"contentString","content":"\u003cdiv class=\"post-body\">\u003cp>\u003cp>\u003ca href=\"https://www.curbsideoakland.com/\">\u003cb>Curbside Creamery\u003c/b>\u003c/a>\u003c/p>\n\u003cp>\u003cspan style=\"font-weight: 400\">Though this Oakland soft serve shop’s preferred method of purchase is in-store pickup, it offers delivery via Caviar. \u003c/span>\u003c/p>\u003c/p>\u003c/div>","attributes":{"named":{},"numeric":[]}},{"type":"component","content":"","name":"instagramLink","attributes":{"named":{"instagramId":"CCo72SFBakl"},"numeric":[]}},{"type":"contentString","content":"\u003cdiv class=\"post-body\">\u003cp>\u003cp>\u003ca href=\"https://www.humphryslocombe.com/\">\u003cb>Humphry Slocombe\u003c/b>\u003c/a>\u003c/p>\n\u003cp>The high-end ice cream known for unique flavor combinations is available at grocery stores, but it's also available via Caviar, Postmates, DoorDash and Goldbelly (with $20 off your first purchase if ordering via Goldbelly). The Mission District and Berkeley locations have ice cream cakes and pies available with a 72-hour notice for that birthday or other celebration.\u003c/p>\u003c/p>\u003c/div>","attributes":{"named":{},"numeric":[]}},{"type":"component","content":"","name":"instagramLink","attributes":{"named":{"instagramId":"CCZv1fpANnR"},"numeric":[]}},{"type":"contentString","content":"\u003cdiv class=\"post-body\">\u003cp>\u003cp>\u003ca href=\"https://www.itsiticecream.com/local-delivery\">\u003cb>It’s-It\u003c/b>\u003c/a>\u003c/p>\n\u003cp>\u003cspan style=\"font-weight: 400\">Want to stock up or host a socially distant ice cream party? With a minimum order requirement of five cases (120 It’s-Its) for same-day delivery, the iconic San Francisco dessert can be delivered to San Francisco, San Mateo, Marin, Santa Clara, Alameda, Contra Costa and Solano, Monday through Friday. It’s-It also offers online ordering without the five-case minimum, but delivery is overnight, not same-day. \u003c/span>\u003c/p>\u003c/p>\u003c/div>","attributes":{"named":{},"numeric":[]}},{"type":"component","content":"","name":"instagramLink","attributes":{"named":{"instagramId":"CCZveyWBEvC"},"numeric":[]}},{"type":"contentString","content":"\u003cdiv class=\"post-body\">\u003cp>\u003cp>\u003ca href=\"https://koolficreamery.com/find-us/\">\u003cb>KoolFi Creamery\u003c/b>\u003c/a>\u003c/p>\n\u003cp>\u003cspan style=\"font-weight: 400\">This Indian-inspired spot offers delivery with a four-pint minimum through its website. Featuring flavors ranging from Blueberry Goat Cheese to Jackfruit Pudding, the San Leandro scoop shop from Priti Narayan and Madhuri Anji has complex flavors that go beyond what is traditionally perceived as “Indian flavors.” \u003c/span>\u003c/p>\u003c/p>\u003c/div>","attributes":{"named":{},"numeric":[]}},{"type":"component","content":"","name":"instagramLink","attributes":{"named":{"instagramId":"CCpfuElhb6S"},"numeric":[]}},{"type":"contentString","content":"\u003cdiv class=\"post-body\">\u003cp>\u003cp>\u003ca href=\"https://littlegianticecream.square.site/?location=11ea93489efc406292260cc47a2ae124\">\u003cb>Little Giant\u003c/b>\u003c/a>\u003c/p>\n\u003cp>\u003cspan style=\"font-weight: 400\">This Telegraph Avenue local creamery offers delivery with a $30 minimum. Options include pints, mini pints, floats, cookies, brownies and cones. \u003c/span>\u003c/p>\u003c/p>\u003c/div>","attributes":{"named":{},"numeric":[]}},{"type":"component","content":"","name":"instagramLink","attributes":{"named":{"instagramId":"CA_U3ahhBdM"},"numeric":[]}},{"type":"contentString","content":"\u003cdiv class=\"post-body\">\u003cp>\u003cp>\u003ca href=\"https://mitchellsicecream.com/\">\u003cb>Mitchell’s Ice Cream\u003c/b>\u003c/a>\u003c/p>\n\u003cp>\u003cspan style=\"font-weight: 400\">The iconic San Francisco scoop shop on San Jose Avenue offers delivery via Postmates. Online ordering of cakes is available for pickup. \u003c/span>\u003c/p>\u003c/p>\u003c/div>","attributes":{"named":{},"numeric":[]}},{"type":"component","content":"","name":"instagramLink","attributes":{"named":{"instagramId":"CB90wFRD6QD"},"numeric":[]}},{"type":"contentString","content":"\u003cdiv class=\"post-body\">\u003cp>\u003cp>\u003cb>\u003ca href=\"https://www.instagram.com/explore/locations/2451918/miyako-old-fashioned-ice-cream/?utm_source=ig_embed\" target=\"_blank\" rel=\"noopener noreferrer\">Miyako\u003c/a>\u003c/b>\u003c/p>\n\u003cp>The old-fashioned ice cream shop at 1470 Fillmore St. in San Francisco has been a staple of the neighborhood for the last 28 years, with a loyal clientele. After a \u003ca href=\"https://www.sfgate.com/food/slideshow/Miyako-ice-cream-shop-Fillmore-San-Francisco-NCLF-204946.php\" target=\"_blank\" rel=\"noopener noreferrer\">break-in this past April\u003c/a> during which cash and stock were stolen, a GoFundMe campaign organized by the New Community Leadership Foundation raised $20,000 to help recover damages and keep the business afloat. Delivery is available via Grubhub and Seamless within San Francisco.\u003c/p>\u003c/p>\u003c/div>","attributes":{"named":{},"numeric":[]}},{"type":"component","content":"","name":"instagramLink","attributes":{"named":{"instagramId":"CCZT6C1Bz1P"},"numeric":[]}},{"type":"contentString","content":"\u003cdiv class=\"post-body\">\u003cp>\u003cp>\u003ca href=\"https://www.facebook.com/Mr-and-Mrs-Miscellaneous-126193770733086/\">\u003cb>Mr. & Mrs. Miscellaneous\u003c/b>\u003c/a>\u003c/p>\n\u003cp>With flavors ranging from Chicory Coffee to Sloe Gin, this San Francisco ice cream parlor changes their hours and days of operation often, so it's best to call ahead before ordering via Postmates or Grubhub.\u003c/p>\u003c/p>\u003c/div>","attributes":{"named":{},"numeric":[]}},{"type":"component","content":"","name":"instagramLink","attributes":{"named":{"instagramId":"BbpXVZonDE4"},"numeric":[]}},{"type":"contentString","content":"\u003cdiv class=\"post-body\">\u003cp>\u003cp>\u003ca href=\"http://www.sfhometowncreamery.com/\">\u003cb>San Francisco Hometown Creamery\u003c/b>\u003c/a>\u003c/p>\n\u003cp>\u003cspan style=\"font-weight: 400\">“From farm to cone” is the motto, and it claims to be the first creamery in San Francisco to make small-batch ice cream from scratch on-site. The 9th Avenue shop takes online orders via Grubhub. \u003c/span>\u003c/p>\u003c/p>\u003c/div>","attributes":{"named":{},"numeric":[]}},{"type":"component","content":"","name":"instagramLink","attributes":{"named":{"instagramId":"BVfeKkIA_qB"},"numeric":[]}},{"type":"contentString","content":"\u003cdiv class=\"post-body\">\u003cp>\u003cp>\u003ca href=\"https://direct.chownow.com/order/21425/locations/31031\">\u003cb>Salt & Straw\u003c/b>\u003c/a>\u003c/p>\n\u003cp>\u003cspan style=\"font-weight: 400\">All three locations (Pacific Heights, Hayes Valley and Burlingame) are open for pickup or delivery via online ordering. Scoops, cones and pints are all available. \u003c/span>\u003c/p>\u003c/p>\u003c/div>","attributes":{"named":{},"numeric":[]}},{"type":"component","content":"","name":"instagramLink","attributes":{"named":{"instagramId":"CCOlAkjFX-9"},"numeric":[]}},{"type":"contentString","content":"\u003cdiv class=\"post-body\">\u003cp>\u003cp>\u003ca href=\"https://www.smittenicecream.com/blog/a-note-to-our-community-robyn-sue-fisher/\">\u003cb>Smitten Ice Cream\u003c/b>\u003c/a>\u003c/p>\n\u003cp>\u003cspan style=\"font-weight: 400\">Known for an almost theatrical made-on-the-spot creamery, Smitten offers pickup, delivery and shippable pints at the Hayes Valley, Mission District, Rockridge and Santana Row locations. Delivery is available via Caviar, DoorDash, Postmates and UberEats. \u003c/span>\u003c/p>\u003c/p>\u003c/div>","attributes":{"named":{},"numeric":[]}},{"type":"component","content":"","name":"instagramLink","attributes":{"named":{"instagramId":"CChPuLXD3Rg"},"numeric":[]}},{"type":"contentString","content":"\u003cdiv class=\"post-body\">\u003cp>\u003cp>\u003ca href=\"https://www.steepsf.com/\">\u003cb>Steep Creamery & Tea\u003c/b>\u003c/a>\u003c/p>\n\u003cp>\u003cspan style=\"font-weight: 400\">Known for its rolled ice cream, this Brannan Street spot offers order-ahead and limited delivery options within San Francisco (usually on Sundays). Contact ahead via their website. \u003c/span>\u003c/p>\u003c/p>\u003c/div>","attributes":{"named":{},"numeric":[]}},{"type":"component","content":"","name":"instagramLink","attributes":{"named":{"instagramId":"CCAmUkcgZ2R"},"numeric":[]}},{"type":"contentString","content":"\u003cdiv class=\"post-body\">\u003cp>\u003cp>\u003ca href=\"https://ujitimedessert.square.site/s/order?location=11ea6af73e1379809fa50cc47a2ae330\">\u003cb>Uji Time\u003c/b>\u003c/a>\u003cb> \u003c/b>\u003c/p>\n\u003cp>\u003cspan style=\"font-weight: 400\">Known for its Taiyaki cones and soft cream, Uji Time charges a modest $5 delivery fee with no minimum order. The menu includes “Comfort In Place” kits that include quarts of ice cream, toppings, waffle cones and mochi (in one option). Mochi ice cream is also available for delivery. \u003c/span>\u003c/p>\u003c/p>\u003c/div>","attributes":{"named":{},"numeric":[]}},{"type":"component","content":"","name":"instagramLink","attributes":{"named":{"instagramId":"CBJqndthKAH"},"numeric":[]}},{"type":"contentString","content":"\u003cdiv class=\"post-body\">\u003cp>\u003cp> \u003cbr>\n\u003ca id=\"recipes\">\u003c/a>\u003c/p>\n\u003ch2>Recipe Inspiration\u003c/h2>\n\u003cp>For those still on the DIY train, here’s some recipe inspiration to try at home. Most of these recipes from KQED are for ice cream that's fairly easy to churn without an ice cream maker.\u003c/p>\n\u003cp>\u003ca href=\"https://www.kqed.org/bayareabites/1070/homemade-strawberry-ice-cream\">\u003cb>Strawberry Ice Cream\u003c/b>\u003c/a>\u003c/p>\n\u003cfigure id=\"attachment_26803\" class=\"wp-caption alignnone\" style=\"max-width: 500px\">\u003cimg class=\"wp-image-26803 size-full\" src=\"https://ww2.kqed.org/app/uploads/sites/24/2011/04/strawberry-ice-cream.jpg\" alt=\"strawberry ice cream\" width=\"500\" height=\"375\">\u003cfigcaption class=\"wp-caption-text\">Denise Santoro Lincoln\u003c/figcaption>\u003c/figure>\n\u003cp>\u003cspan style=\"font-weight: 400\">With strawberries in season, this recipe is the perfect answer to summer. Load in the fresh strawberries and use more for toppings. There are three main ice cream bases: the custard (cooked ice cream base), eggless (may or may not involve cooked ice cream base) or the no-churn (read: don’t cook). This follows the custard style. It is generally recommended to use an ice cream maker with this method, but similar results can be achieved without a machine. \u003c/span>\u003c/p>\n\u003cp>\u003ca href=\"https://www.kqed.org/bayareabites/86628/ignore-the-fog-and-make-your-own-ice-cream-cones-and-sprinkles\">\u003cb>Ice Cream Cones\u003c/b>\u003c/a>\u003c/p>\n\u003cfigure id=\"attachment_138081\" class=\"wp-caption alignnone\" style=\"max-width: 800px\">\u003cimg class=\"size-medium wp-image-138081\" src=\"https://ww2.kqed.org/app/uploads/sites/24/2020/07/iStock-1009098306-800x534.jpg\" alt=\"\" width=\"800\" height=\"534\" srcset=\"https://ww2.kqed.org/app/uploads/sites/24/2020/07/iStock-1009098306-800x534.jpg 800w, https://ww2.kqed.org/app/uploads/sites/24/2020/07/iStock-1009098306-1020x681.jpg 1020w, https://ww2.kqed.org/app/uploads/sites/24/2020/07/iStock-1009098306-160x107.jpg 160w, https://ww2.kqed.org/app/uploads/sites/24/2020/07/iStock-1009098306-768x513.jpg 768w, https://ww2.kqed.org/app/uploads/sites/24/2020/07/iStock-1009098306.jpg 1500w\" sizes=\"(max-width: 800px) 100vw, 800px\">\u003cfigcaption class=\"wp-caption-text\">iStock\u003c/figcaption>\u003c/figure>\n\u003cp>\u003cspan style=\"font-weight: 400\">If you've got time, this recipe makes cones \u003cem>and\u003c/em> sprinkles, and keeps the kids occupied with a weekend project. Pro tip: A zip-top bag can be used as a substitute for piping bags. \u003c/span>\u003c/p>\n\u003cp>\u003ca href=\"https://www.kqed.org/bayareabites/62904/ice-cream-recipes-summer\">\u003cb>Blueberry Cheesecake Ice Cream\u003c/b>\u003c/a>\u003c/p>\n\u003cfigure id=\"attachment_62920\" class=\"wp-caption alignnone\" style=\"max-width: 624px\">\u003cimg class=\"size-full wp-image-62920\" src=\"https://ww2.kqed.org/app/uploads/sites/24/2013/06/icecreamblueberry.jpg\" alt=\"Blueberry Cheesecake Ice Cream. Photo: Michele Kayal for NPR\" width=\"624\" height=\"467\">\u003cfigcaption class=\"wp-caption-text\">Blueberry Cheesecake Ice Cream. Photo: Michele Kayal for NPR\u003c/figcaption>\u003c/figure>\n\u003cp>\u003cspan style=\"font-weight: 400\">This is a quick and easy one, and the blueberries can be swapped for any fruit on hand. Top with crumbled graham crackers or cookies for an extra sweet kick and texture. \u003c/span>\u003c/p>\n\u003cp>\u003ca href=\"https://www.kqed.org/bayareabites/26798/vegan-almond-milk-ice-cream-3-recipes\">\u003cb>Dairy-Free\u003c/b>\u003c/a>\u003c/p>\n\u003cfigure id=\"attachment_26801\" class=\"wp-caption alignnone\" style=\"max-width: 375px\">\u003cimg class=\"size-full wp-image-26801\" src=\"https://ww2.kqed.org/app/uploads/sites/24/2011/04/chocolate-ice-cream-cone.jpg\" alt=\"\" width=\"375\" height=\"500\">\u003cfigcaption class=\"wp-caption-text\">Denise Santoro Lincoln\u003c/figcaption>\u003c/figure>\n\u003cp>\u003cspan style=\"font-weight: 400\">Using almond milk, these three dairy-free options pack in flavor and richness without the use of animal-based milk. \u003c/span>\u003c/p>\n\u003cp>\u003cb>Make your own extracts for ice cream\u003c/b>\u003c/p>\n\u003cp>\u003c/p>\u003c/div>","attributes":{"named":{},"numeric":[]}},{"type":"component","content":"","name":"ad","attributes":{"named":{"label":"floatright"},"numeric":["floatright"]}},{"type":"contentString","content":"\u003cdiv class=\"post-body\">\u003cp>\u003c/p>\n\u003cp>Extracts are simple to make at home. They're also an easy and potent way to flavor ice cream with the no-churn method (whip heavy whipping cream until stiff peaks form, add in flavoring, place in air-tight container and freeze). The key ingredients are time, a high-proof alcohol, and a good amount of mint, vanilla bean or any other flavoring. Vodka and bourbon make good starts. Essentially, take the mint (or whichever flavoring ingredient you prefer), put it into a sealable container, add alcohol and seal and wait six weeks. Strain and save the liquid.\u003c/p>\n\n\u003c/div>\u003c/p>","attributes":{"named":{},"numeric":[]}}],"link":"/bayareabites/138065/your-ultimate-2020-summer-ice-cream-guide","authors":["11689"],"categories":["bayareabites_109","bayareabites_752","bayareabites_17082"],"tags":["bayareabites_14453","bayareabites_9037","bayareabites_16750","bayareabites_16748","bayareabites_49","bayareabites_16557","bayareabites_312","bayareabites_16747","bayareabites_16749","bayareabites_14745","bayareabites_16751"],"featImg":"bayareabites_138082","label":"bayareabites"},"bayareabites_135574":{"type":"posts","id":"bayareabites_135574","meta":{"index":"posts_1591205157","site":"bayareabites","id":"135574","score":null,"sort":[1574788204000]},"guestAuthors":[],"slug":"oolong-tea-snack-cake","title":"Oolong Tea Snack Cake","publishDate":1574788204,"format":"standard","headTitle":"Thanksgiving Recipes | Bay Area Bites | KQED Food","labelTerm":{"term":15012,"site":"bayareabites"},"content":"\u003cp>The beauty of a snack cake is that you don’t have to cover it in buttercream and you can eat it in the morning with a cup of tea, as an afternoon snack, or as a post-dinner treat. You can enjoy it any time of day!\u003cbr>\n[aside postID='bayareabites_131685,bayareabites_123197' label='More Dessert Recipes']\u003cbr>\nThe rich and earthy oolong tea flavor running through this cake is infused into the butter. All you do is melt butter and simmer loose tea leaves in the butter to extract all that tea flavor. You can use this same method with any other type of tea for other bakes. Just allow the butter to chill until it resembles the texture of softened butter and then it’s ready to get baking. This cake’s texture and flavor are boosted by buttermilk and brown sugar — the latter also gives the cake a deeply brown color and caramelized flavor that’s not too sweet. \u003c/p>\n\u003cp>This recipe calls for the cake to be baked in an 8” round cake pan for 45-50 minutes. However, the cake recipe can be baked in a variety of forms. If baking in a loaf pan, bake for 60-70 minutes. If baking in muffin tins for mini cakes, bake for 25-28 minutes. \u003c/p>\n\u003cp>Always test for doneness using the toothpick test. If the toothpick comes out clean from the center of the cake then it is fully cooked. Once the cake has cooled slightly, dust the cake with a bit of powdered sugar and enjoy with your favorite warm and cozy drink.\u003c/p>\n\u003ch2>Oolong Tea Snack Cake\u003c/h2>\n\u003cp>\u003ci>Makes 1 8” cake\u003c/i>\u003c/p>\n\u003cfigure id=\"attachment_135578\" class=\"wp-caption aligncenter\" style=\"max-width: 2688px\">\u003cimg src=\"https://ww2.kqed.org/app/uploads/sites/24/2019/11/Oolong-Tea-Cake-8.jpg\" alt=\"Overhead shot of Oolong Tea Cake\" width=\"2688\" height=\"1920\" class=\"size-full wp-image-135578\" srcset=\"https://ww2.kqed.org/app/uploads/sites/24/2019/11/Oolong-Tea-Cake-8.jpg 2688w, https://ww2.kqed.org/app/uploads/sites/24/2019/11/Oolong-Tea-Cake-8-160x114.jpg 160w, https://ww2.kqed.org/app/uploads/sites/24/2019/11/Oolong-Tea-Cake-8-800x571.jpg 800w, https://ww2.kqed.org/app/uploads/sites/24/2019/11/Oolong-Tea-Cake-8-768x549.jpg 768w, https://ww2.kqed.org/app/uploads/sites/24/2019/11/Oolong-Tea-Cake-8-1020x729.jpg 1020w, https://ww2.kqed.org/app/uploads/sites/24/2019/11/Oolong-Tea-Cake-8-1200x857.jpg 1200w\" sizes=\"(max-width: 2688px) 100vw, 2688px\">\u003cfigcaption class=\"wp-caption-text\">The beauty of a snack cake is that it can be enjoyed any time of the day. \u003ccite>(Kristina Cho/KQED)\u003c/cite>\u003c/figcaption>\u003c/figure>\n\u003cp>\u003cstrong>Ingredients:\u003c/strong>\u003c/p>\n\u003cul>\n\u003cli>2 sticks unsalted butter\u003c/li>\n\u003cli>½ cup loose leaf oolong tea\u003c/li>\n\u003cli>1 cup brown sugar\u003c/li>\n\u003cli>3 eggs\u003c/li>\n\u003cli>½ tsp vanilla\u003c/li>\n\u003cli>2 cups all-purpose flour\u003c/li>\n\u003cli>1 tsp baking powder\u003c/li>\n\u003cli>1 tsp baking soda\u003c/li>\n\u003cli>½ tsp salt\u003c/li>\n\u003cli>1 tsp cinnamon\u003c/li>\n\u003cli>¼ tsp cloves\u003c/li>\n\u003cli>¼ tsp nutmeg\u003c/li>\n\u003cli>1 cup buttermilk \u003c/li>\n\u003c/ul>\n\u003cp>\u003cstrong>Instructions:\u003c/strong>\u003c/p>\n\u003col>\n\u003cli>Preheat oven to 350 degrees. Prepare an 8” cake pan with nonstick spray and line the bottom with parchment paper.\u003c/li>\n\u003cli>Melt butter in a saucepan. Add oolong tea to the butter and simmer for 5-7 minutes. Turn off the heat and allow the butter and tea mixture to cool for 5 minutes. Strain out the butter from tea leaves through a fine-mesh sieve. Discard the tea leaves. \u003c/li>\n\u003cli>Place the butter in the freezer or the refrigerator for 20-25 minutes, or until the texture resembles softened butter.\u003c/li>\n\u003cli>Place the softened butter in the bowl of a stand mixer fitted with a paddle attachment. Mix at medium speed for 2 minutes until light and fluffy. \u003c/li>\n\u003cli>Add the brown sugar and mix at medium speed for another 2 minutes. Add eggs and mix until combined.\u003c/li>\n\u003cli>In a large bowl, combine flour, baking powder, baking soda, salt, cinnamon, cloves, and nutmeg. Mix to evenly combine. \u003c/li>\n\u003cli>Reduce speed to low and add flour in 3 additions, alternating each addition with the addition of buttermilk. The cake batter should be thick but light and airy.\u003c/li>\n\u003cli>Add the cake batter to the cake pan. Using a knife or offset spatula, smooth out the top of the cake batter so it’s leveled. \u003c/li>\n\u003cli>Bake for 45-50 minutes. Test for doneness sticking in a toothpick, if the toothpick comes out clean the cake is baked. \u003c/li>\n\u003cli>Remove cake from the oven and allow to cool in the pan for 10 minutes. Remove the cake from the pan and allow to cool on a wire rack.\u003c/li>\n\u003cli>Before serving, dust the cake with powdered sugar and serve with tea or coffee. \u003c/li>\n\u003c/ol>\n\u003cp>[ad fullwidth]\u003c/p>\u003cp>\u003c/p>\n","blocks":[],"excerpt":"The rich and earthy oolong tea flavor running through this snack cake makes it enjoyable for any time of day! ","status":"publish","parent":0,"modified":1574788104,"stats":{"hasAudio":false,"hasVideo":false,"hasChartOrMap":false,"iframeSrcs":[],"hasGoogleForm":false,"hasGallery":false,"hasHearkenModule":false,"hasPolis":false,"paragraphCount":8,"wordCount":625},"headData":{"title":"Oolong Tea Snack Cake | KQED","description":"The rich and earthy oolong tea flavor running through this snack cake makes it enjoyable for any time of day! ","ogTitle":"","ogDescription":"","ogImgId":"","twTitle":"","twDescription":"","twImgId":"","schema":{"@context":"http://schema.org","@type":"Article","headline":"Oolong Tea Snack Cake","datePublished":"2019-11-26T17:10:04.000Z","dateModified":"2019-11-26T17:08:24.000Z","image":"https://cdn.kqed.org/wp-content/uploads/2020/02/KQED-OG-Image@1x.png"}},"disqusIdentifier":"135574 https://ww2.kqed.org/bayareabites/?p=135574","disqusUrl":"https://ww2.kqed.org/bayareabites/2019/11/26/oolong-tea-snack-cake/","disqusTitle":"Oolong Tea Snack Cake","path":"/bayareabites/135574/oolong-tea-snack-cake","audioTrackLength":null,"parsedContent":[{"type":"contentString","content":"\u003cdiv class=\"post-body\">\u003cp>\u003cp>The beauty of a snack cake is that you don’t have to cover it in buttercream and you can eat it in the morning with a cup of tea, as an afternoon snack, or as a post-dinner treat. You can enjoy it any time of day!\u003cbr>\n\u003c/p>\u003c/div>","attributes":{"named":{},"numeric":[]}},{"type":"component","content":"","name":"aside","attributes":{"named":{"postid":"bayareabites_131685,bayareabites_123197","label":"More Dessert Recipes "},"numeric":[]}},{"type":"contentString","content":"\u003cdiv class=\"post-body\">\u003cp>\u003cbr>\nThe rich and earthy oolong tea flavor running through this cake is infused into the butter. All you do is melt butter and simmer loose tea leaves in the butter to extract all that tea flavor. You can use this same method with any other type of tea for other bakes. Just allow the butter to chill until it resembles the texture of softened butter and then it’s ready to get baking. This cake’s texture and flavor are boosted by buttermilk and brown sugar — the latter also gives the cake a deeply brown color and caramelized flavor that’s not too sweet. \u003c/p>\n\u003cp>This recipe calls for the cake to be baked in an 8” round cake pan for 45-50 minutes. However, the cake recipe can be baked in a variety of forms. If baking in a loaf pan, bake for 60-70 minutes. If baking in muffin tins for mini cakes, bake for 25-28 minutes. \u003c/p>\n\u003cp>Always test for doneness using the toothpick test. If the toothpick comes out clean from the center of the cake then it is fully cooked. Once the cake has cooled slightly, dust the cake with a bit of powdered sugar and enjoy with your favorite warm and cozy drink.\u003c/p>\n\u003ch2>Oolong Tea Snack Cake\u003c/h2>\n\u003cp>\u003ci>Makes 1 8” cake\u003c/i>\u003c/p>\n\u003cfigure id=\"attachment_135578\" class=\"wp-caption aligncenter\" style=\"max-width: 2688px\">\u003cimg src=\"https://ww2.kqed.org/app/uploads/sites/24/2019/11/Oolong-Tea-Cake-8.jpg\" alt=\"Overhead shot of Oolong Tea Cake\" width=\"2688\" height=\"1920\" class=\"size-full wp-image-135578\" srcset=\"https://ww2.kqed.org/app/uploads/sites/24/2019/11/Oolong-Tea-Cake-8.jpg 2688w, https://ww2.kqed.org/app/uploads/sites/24/2019/11/Oolong-Tea-Cake-8-160x114.jpg 160w, https://ww2.kqed.org/app/uploads/sites/24/2019/11/Oolong-Tea-Cake-8-800x571.jpg 800w, https://ww2.kqed.org/app/uploads/sites/24/2019/11/Oolong-Tea-Cake-8-768x549.jpg 768w, https://ww2.kqed.org/app/uploads/sites/24/2019/11/Oolong-Tea-Cake-8-1020x729.jpg 1020w, https://ww2.kqed.org/app/uploads/sites/24/2019/11/Oolong-Tea-Cake-8-1200x857.jpg 1200w\" sizes=\"(max-width: 2688px) 100vw, 2688px\">\u003cfigcaption class=\"wp-caption-text\">The beauty of a snack cake is that it can be enjoyed any time of the day. \u003ccite>(Kristina Cho/KQED)\u003c/cite>\u003c/figcaption>\u003c/figure>\n\u003cp>\u003cstrong>Ingredients:\u003c/strong>\u003c/p>\n\u003cul>\n\u003cli>2 sticks unsalted butter\u003c/li>\n\u003cli>½ cup loose leaf oolong tea\u003c/li>\n\u003cli>1 cup brown sugar\u003c/li>\n\u003cli>3 eggs\u003c/li>\n\u003cli>½ tsp vanilla\u003c/li>\n\u003cli>2 cups all-purpose flour\u003c/li>\n\u003cli>1 tsp baking powder\u003c/li>\n\u003cli>1 tsp baking soda\u003c/li>\n\u003cli>½ tsp salt\u003c/li>\n\u003cli>1 tsp cinnamon\u003c/li>\n\u003cli>¼ tsp cloves\u003c/li>\n\u003cli>¼ tsp nutmeg\u003c/li>\n\u003cli>1 cup buttermilk \u003c/li>\n\u003c/ul>\n\u003cp>\u003cstrong>Instructions:\u003c/strong>\u003c/p>\n\u003col>\n\u003cli>Preheat oven to 350 degrees. Prepare an 8” cake pan with nonstick spray and line the bottom with parchment paper.\u003c/li>\n\u003cli>Melt butter in a saucepan. Add oolong tea to the butter and simmer for 5-7 minutes. Turn off the heat and allow the butter and tea mixture to cool for 5 minutes. Strain out the butter from tea leaves through a fine-mesh sieve. Discard the tea leaves. \u003c/li>\n\u003cli>Place the butter in the freezer or the refrigerator for 20-25 minutes, or until the texture resembles softened butter.\u003c/li>\n\u003cli>Place the softened butter in the bowl of a stand mixer fitted with a paddle attachment. Mix at medium speed for 2 minutes until light and fluffy. \u003c/li>\n\u003cli>Add the brown sugar and mix at medium speed for another 2 minutes. Add eggs and mix until combined.\u003c/li>\n\u003cli>In a large bowl, combine flour, baking powder, baking soda, salt, cinnamon, cloves, and nutmeg. Mix to evenly combine. \u003c/li>\n\u003cli>Reduce speed to low and add flour in 3 additions, alternating each addition with the addition of buttermilk. The cake batter should be thick but light and airy.\u003c/li>\n\u003cli>Add the cake batter to the cake pan. Using a knife or offset spatula, smooth out the top of the cake batter so it’s leveled. \u003c/li>\n\u003cli>Bake for 45-50 minutes. Test for doneness sticking in a toothpick, if the toothpick comes out clean the cake is baked. \u003c/li>\n\u003cli>Remove cake from the oven and allow to cool in the pan for 10 minutes. Remove the cake from the pan and allow to cool on a wire rack.\u003c/li>\n\u003cli>Before serving, dust the cake with powdered sugar and serve with tea or coffee. \u003c/li>\n\u003c/ol>\n\u003cp>\u003c/p>\u003c/div>","attributes":{"named":{},"numeric":[]}},{"type":"component","content":"","name":"ad","attributes":{"named":{"label":"fullwidth"},"numeric":["fullwidth"]}},{"type":"contentString","content":"\u003cdiv class=\"post-body\">\u003cp>\u003c/p>\u003cp>\u003c/p>\n\u003c/div>\u003c/p>","attributes":{"named":{},"numeric":[]}}],"link":"/bayareabites/135574/oolong-tea-snack-cake","authors":["11641"],"series":["bayareabites_15122","bayareabites_15012"],"categories":["bayareabites_2998","bayareabites_1516","bayareabites_12744","bayareabites_12550","bayareabites_12"],"tags":["bayareabites_16497","bayareabites_49","bayareabites_9710","bayareabites_16317","bayareabites_14738"],"featImg":"bayareabites_135577","label":"bayareabites_15012"},"bayareabites_134758":{"type":"posts","id":"bayareabites_134758","meta":{"index":"posts_1591205157","site":"bayareabites","id":"134758","score":null,"sort":[1569431740000]},"guestAuthors":[],"slug":"international-flavor-local-ingredients-get-your-mochi-donut-fix-in-the-bay","title":"International Flavor, Local Ingredients: Get Your Mochi Donut Fix in the Bay","publishDate":1569431740,"format":"standard","headTitle":"Bay Area Bites | KQED Food","labelTerm":{"site":"bayareabites"},"content":"\u003cp>[aside postID='bayareabites_45322,bayareabites_83526' label='More Mochi to Munch On' target=_blank]\u003c/p>\n\u003cp>Cupcakes, cake pops, and cronuts have all had their 15 minutes of fame in the food world. But these days, social media is filled with images and mentions of the mochi donut. \u003c/p>\n\u003cp>The combination of the American donut and Japanese mochi, a traditional rice cake made of sweet glutinous rice flour, makes a food trend that is both yummy AND photogenic. The mochi rice flour adds a chewy, almost bouncy texture to a normally dense, cakey donut. And its eye-catching appearance comes from several donut balls stuck together to form a circular ring shape, making it look more like a bracelet than a snack.\u003c/p>\n\u003cp>\u003ca href=\"http://www.mister-donut.com/\">Mister Donut\u003c/a> in Japan is credited with first selling this donut hybrid in 2003, where they call them “Pon de Rings.” Seeing how popular they were in Japan, second-generation baker, Chris Watanabe decided to start his own mochi donut shop in Honolulu called \u003ca href=\"http://modohawaii.com/\">MoDo Donuts\u003c/a> in 2017 and added signature glazes like lilikoi (passionfruit), matcha and black sesame.\u003c/p>\n\u003cp>By the time MoDo set up their first temporary pop-up shop in San Jose’s \u003ca href=\"https://mitsuwa.com/sj/\">Mitsuwa Marketplace\u003c/a> in April of 2018, Bay Area foodies waited upwards of 90 minutes just to get their hands on one of these donuts. Since then, MoDo’s pop-up shop has made appearances every few months in the South Bay, and their popularity hasn’t waned judging by continued long wait times.\u003c/p>\n\u003cfigure id=\"attachment_134805\" class=\"wp-caption aligncenter\" style=\"max-width: 1920px\">\u003cimg class=\"size-full wp-image-134805\" src=\"https://ww2.kqed.org/bayareabites/wp-content/uploads/sites/24/2019/09/Donuts-2.jpg\" alt=\"Shared storefront between Yama-chan and Mochill\" width=\"1920\" height=\"1440\" srcset=\"https://ww2.kqed.org/app/uploads/sites/24/2019/09/Donuts-2.jpg 1920w, https://ww2.kqed.org/app/uploads/sites/24/2019/09/Donuts-2-160x120.jpg 160w, https://ww2.kqed.org/app/uploads/sites/24/2019/09/Donuts-2-800x600.jpg 800w, https://ww2.kqed.org/app/uploads/sites/24/2019/09/Donuts-2-768x576.jpg 768w, https://ww2.kqed.org/app/uploads/sites/24/2019/09/Donuts-2-1020x765.jpg 1020w, https://ww2.kqed.org/app/uploads/sites/24/2019/09/Donuts-2-1200x900.jpg 1200w\" sizes=\"(max-width: 1920px) 100vw, 1920px\">\u003cfigcaption class=\"wp-caption-text\">Shared storefront between Yama-chan and Mochill \u003ccite>(Elaine Wu/KQED)\u003c/cite>\u003c/figcaption>\u003c/figure>\n\u003cp>To be a recognizable part of any trend, timing is everything, and Mochill knew they wanted to be the first ones out of the gate in San Francisco. Their family business is more accustomed to making takoyaki (fried octopus puffs) in Honolulu where they have made a name for themselves with their restaurant, Yama-chan. When they decided to open a takoyaki in Japantown, they wanted to add a separate brand that would focus instead on a sweet snack. Enter \u003ca href=\"https://www.instagram.com/mochill_sf/\">Mochill\u003c/a>.\u003c/p>\n\u003cp>[ad fullwidth]\u003c/p>\n\u003cp>Their mochi donuts don’t stray from the currently popular Pon de Ring style, but the owner’s son Taisuke Yamamoto says that Mochill’s main differentiator is their flavors and the addition of toppings like dried fruits, macadamia nuts, and cereal. “We have Fruity Pebbles, White Chocolate, Kinako (a soybean powder that’s a popular flavor in Japan), and we’re working on a peanut butter and jelly, and a Nutella flavor,” he says. They offer six flavors every day, three of which change every few days.\u003c/p>\n\u003cfigure id=\"attachment_134806\" class=\"wp-caption aligncenter\" style=\"max-width: 1920px\">\u003cimg class=\"size-full wp-image-134806\" src=\"https://ww2.kqed.org/bayareabites/wp-content/uploads/sites/24/2019/09/Donuts-3.jpg\" alt=\"Flavors of the day displayed at Mochill\" width=\"1920\" height=\"1080\" srcset=\"https://ww2.kqed.org/app/uploads/sites/24/2019/09/Donuts-3.jpg 1920w, https://ww2.kqed.org/app/uploads/sites/24/2019/09/Donuts-3-160x90.jpg 160w, https://ww2.kqed.org/app/uploads/sites/24/2019/09/Donuts-3-800x450.jpg 800w, https://ww2.kqed.org/app/uploads/sites/24/2019/09/Donuts-3-768x432.jpg 768w, https://ww2.kqed.org/app/uploads/sites/24/2019/09/Donuts-3-1020x574.jpg 1020w, https://ww2.kqed.org/app/uploads/sites/24/2019/09/Donuts-3-1200x675.jpg 1200w\" sizes=\"(max-width: 1920px) 100vw, 1920px\">\u003cfigcaption class=\"wp-caption-text\">Flavors of the day displayed at Mochill \u003ccite>(Elaine Wu/KQED)\u003c/cite>\u003c/figcaption>\u003c/figure>\n\u003cp>Since opening in July earlier this year, they’ve been selling out daily. “We sell-out an hour before we close every day. Weekends are pretty crazy. But I don’t think customers wait more than an hour.”\u003c/p>\n\u003cp>There’s no doubt that Mochill’s business is built on a trend, but Yamamoto believes their longevity is secure because of a flexible business model. “We’re trying to focus on mochi desserts, so we can do anything mochi. They don’t have to be donuts.” They plan on expanding the menu with other non-donut items and beverages in the future. Yamamoto says they’re also hoping to add more Bay Area locations and even expand to Southern California and Texas. “Our company mission is to spread the greatness of Japanese food culture.”\u003c/p>\n\u003cfigure id=\"attachment_134807\" class=\"wp-caption aligncenter\" style=\"max-width: 1920px\">\u003cimg class=\"size-full wp-image-134807\" src=\"https://ww2.kqed.org/bayareabites/wp-content/uploads/sites/24/2019/09/Donuts-4.jpg\" alt=\"Third Culture Bakery owners, Sam Butarbutar and Wenter Shyu\" width=\"1920\" height=\"1440\" srcset=\"https://ww2.kqed.org/app/uploads/sites/24/2019/09/Donuts-4.jpg 1920w, https://ww2.kqed.org/app/uploads/sites/24/2019/09/Donuts-4-160x120.jpg 160w, https://ww2.kqed.org/app/uploads/sites/24/2019/09/Donuts-4-800x600.jpg 800w, https://ww2.kqed.org/app/uploads/sites/24/2019/09/Donuts-4-768x576.jpg 768w, https://ww2.kqed.org/app/uploads/sites/24/2019/09/Donuts-4-1020x765.jpg 1020w, https://ww2.kqed.org/app/uploads/sites/24/2019/09/Donuts-4-1200x900.jpg 1200w\" sizes=\"(max-width: 1920px) 100vw, 1920px\">\u003cfigcaption class=\"wp-caption-text\">Third Culture Bakery owners, Sam Butarbutar and Wenter Shyu \u003ccite>(Elaine Wu/KQED)\u003c/cite>\u003c/figcaption>\u003c/figure>\n\u003cp>However, not all mochi donuts follow the same formula. At \u003ca href=\"https://thirdculturebakery.com/\">Third Culture Bakery\u003c/a> in Berkeley, partners in business and in life, Chef Sam Butarbutar and Wenter Shyu started their wholesale business with their now famous mochi muffin back in 2016. But these days, their mochi donuts have become just as popular.\u003c/p>\n\u003cp>Butarbutar used to make an Indonesian sweet steamed rice cake with his Mom called Kueh Lapis, so using rice flour was something he was used to. The combination of his classic French pastry expertise along with his desire to create something that would be true to his heritage lead to the mochi muffin.\u003c/p>\n\u003cp>But it was Shyu who suggested trying the same idea with making a donut. At first, Butarbutar resisted. “After months of pestering him, he finally made one,” says Shyu, and that’s when his partner agreed to try selling it. In the Spring of 2018, they made four dozen the first day and sold out within an hour.\u003c/p>\n\u003cfigure id=\"attachment_134808\" class=\"wp-caption aligncenter\" style=\"max-width: 1920px\">\u003cimg class=\"size-full wp-image-134808\" src=\"https://ww2.kqed.org/bayareabites/wp-content/uploads/sites/24/2019/09/Donuts-5.jpg\" alt=\"Display case of mochi muffins and donuts at Third Culture Bakery\" width=\"1920\" height=\"1386\" srcset=\"https://ww2.kqed.org/app/uploads/sites/24/2019/09/Donuts-5.jpg 1920w, https://ww2.kqed.org/app/uploads/sites/24/2019/09/Donuts-5-160x116.jpg 160w, https://ww2.kqed.org/app/uploads/sites/24/2019/09/Donuts-5-800x578.jpg 800w, https://ww2.kqed.org/app/uploads/sites/24/2019/09/Donuts-5-768x554.jpg 768w, https://ww2.kqed.org/app/uploads/sites/24/2019/09/Donuts-5-1020x736.jpg 1020w, https://ww2.kqed.org/app/uploads/sites/24/2019/09/Donuts-5-1200x866.jpg 1200w\" sizes=\"(max-width: 1920px) 100vw, 1920px\">\u003cfigcaption class=\"wp-caption-text\">Display case of mochi muffins and donuts at Third Culture Bakery \u003ccite>(Elaine Wu/KQED)\u003c/cite>\u003c/figcaption>\u003c/figure>\n\u003cp>“I think people are just obsessed with donuts. This is just a different iteration of that,” says Shyu. “And the texture of a mochi donut is just incredible!”\u003c/p>\n\u003cp>Though they still have that signature chewy texture, Third Culture Bakery’s mochi donuts are not made in the pon de ring style, and they are also gluten-free, unlike most other mochi donuts. Butarbutar’s recipe is made solely with rice flour and not a rice/wheat flour blend like most others.\u003c/p>\n\u003cp>“Ours is a true butter mochi donut,” says Shyu “You get that velvety buttery texture with the chewiness of the mochi and it makes it slightly denser. And it’s baked, we don’t fry them. We use quality ingredients like Koda Farms rice flour from California. All the vibrant colors of our donuts come from the ingredients we use. We actually puree down fresh mangoes and passionfruit for our glaze.”\u003c/p>\n\u003cfigure id=\"attachment_134809\" class=\"wp-caption aligncenter\" style=\"max-width: 1920px\">\u003cimg class=\"size-full wp-image-134809\" src=\"https://ww2.kqed.org/bayareabites/wp-content/uploads/sites/24/2019/09/Donuts-6.jpg\" alt=\"\" width=\"1920\" height=\"2562\" srcset=\"https://ww2.kqed.org/app/uploads/sites/24/2019/09/Donuts-6.jpg 1920w, https://ww2.kqed.org/app/uploads/sites/24/2019/09/Donuts-6-160x214.jpg 160w, https://ww2.kqed.org/app/uploads/sites/24/2019/09/Donuts-6-800x1068.jpg 800w, https://ww2.kqed.org/app/uploads/sites/24/2019/09/Donuts-6-768x1025.jpg 768w, https://ww2.kqed.org/app/uploads/sites/24/2019/09/Donuts-6-1020x1361.jpg 1020w, https://ww2.kqed.org/app/uploads/sites/24/2019/09/Donuts-6-899x1200.jpg 899w\" sizes=\"(max-width: 1920px) 100vw, 1920px\">\u003cfigcaption class=\"wp-caption-text\">Third Culture Bakery mochi donuts. Top to bottom: Mango Passionfruit with Cocoa Nibs, Yuzu Lemon, Chocolate \u003ccite>(Elaine Wu/KQED)\u003c/cite>\u003c/figcaption>\u003c/figure>\n\u003cp>They’re hoping their efforts to be different will also work well in other markets. Plans are underway to open a Third Culture bakery/showroom as well as a matcha cafe in Denver by the end of the year, and another in Los Angeles next year. “Some people say that we’re not a ‘real’ mochi donut, but we’re not trying to take away from any other donuts out there,” says Shyu. “We’re just trying to add a different option. I think there’s room for everybody.”\u003c/p>\n\u003cp>[ad floatright]\u003c/p>\n\u003cp>The success of both Third Culture and Mochill in such a short amount of time proves that even within a food trend, there’s room for more than one iteration. And if public demand is any indication, there’s still plenty of time left in the mochi donut’s 15 minutes of fame.\u003c/p>\n\n","blocks":[],"excerpt":"Originally found in Japan and Hawaii, the combination of the American donut and Japanese mochi makes a food trend that is both yummy AND photogenic.","status":"publish","parent":0,"modified":1569457196,"stats":{"hasAudio":false,"hasVideo":false,"hasChartOrMap":false,"iframeSrcs":[],"hasGoogleForm":false,"hasGallery":false,"hasHearkenModule":false,"hasPolis":false,"paragraphCount":19,"wordCount":1126},"headData":{"title":"International Flavor, Local Ingredients: Get Your Mochi Donut Fix in the Bay | KQED","description":"Originally found in Japan and Hawaii, the combination of the American donut and Japanese mochi makes a food trend that is both yummy AND photogenic.","ogTitle":"","ogDescription":"","ogImgId":"","twTitle":"","twDescription":"","twImgId":"","schema":{"@context":"http://schema.org","@type":"Article","headline":"International Flavor, Local Ingredients: Get Your Mochi Donut Fix in the Bay","datePublished":"2019-09-25T17:15:40.000Z","dateModified":"2019-09-26T00:19:56.000Z","image":"https://cdn.kqed.org/wp-content/uploads/2020/02/KQED-OG-Image@1x.png"}},"disqusIdentifier":"134758 https://ww2.kqed.org/bayareabites/?p=134758","disqusUrl":"https://ww2.kqed.org/bayareabites/2019/09/25/international-flavor-local-ingredients-get-your-mochi-donut-fix-in-the-bay/","disqusTitle":"International Flavor, Local Ingredients: Get Your Mochi Donut Fix in the Bay","path":"/bayareabites/134758/international-flavor-local-ingredients-get-your-mochi-donut-fix-in-the-bay","audioTrackLength":null,"parsedContent":[{"type":"contentString","content":"\u003cdiv class=\"post-body\">\u003cp>\u003cp>\u003c/p>\u003c/div>","attributes":{"named":{},"numeric":[]}},{"type":"component","content":"","name":"aside","attributes":{"named":{"postid":"bayareabites_45322,bayareabites_83526","label":"More Mochi to Munch On ","target":"_blank"},"numeric":[]}},{"type":"contentString","content":"\u003cdiv class=\"post-body\">\u003cp>\u003c/p>\n\u003cp>Cupcakes, cake pops, and cronuts have all had their 15 minutes of fame in the food world. But these days, social media is filled with images and mentions of the mochi donut. \u003c/p>\n\u003cp>The combination of the American donut and Japanese mochi, a traditional rice cake made of sweet glutinous rice flour, makes a food trend that is both yummy AND photogenic. The mochi rice flour adds a chewy, almost bouncy texture to a normally dense, cakey donut. And its eye-catching appearance comes from several donut balls stuck together to form a circular ring shape, making it look more like a bracelet than a snack.\u003c/p>\n\u003cp>\u003ca href=\"http://www.mister-donut.com/\">Mister Donut\u003c/a> in Japan is credited with first selling this donut hybrid in 2003, where they call them “Pon de Rings.” Seeing how popular they were in Japan, second-generation baker, Chris Watanabe decided to start his own mochi donut shop in Honolulu called \u003ca href=\"http://modohawaii.com/\">MoDo Donuts\u003c/a> in 2017 and added signature glazes like lilikoi (passionfruit), matcha and black sesame.\u003c/p>\n\u003cp>By the time MoDo set up their first temporary pop-up shop in San Jose’s \u003ca href=\"https://mitsuwa.com/sj/\">Mitsuwa Marketplace\u003c/a> in April of 2018, Bay Area foodies waited upwards of 90 minutes just to get their hands on one of these donuts. Since then, MoDo’s pop-up shop has made appearances every few months in the South Bay, and their popularity hasn’t waned judging by continued long wait times.\u003c/p>\n\u003cfigure id=\"attachment_134805\" class=\"wp-caption aligncenter\" style=\"max-width: 1920px\">\u003cimg class=\"size-full wp-image-134805\" src=\"https://ww2.kqed.org/bayareabites/wp-content/uploads/sites/24/2019/09/Donuts-2.jpg\" alt=\"Shared storefront between Yama-chan and Mochill\" width=\"1920\" height=\"1440\" srcset=\"https://ww2.kqed.org/app/uploads/sites/24/2019/09/Donuts-2.jpg 1920w, https://ww2.kqed.org/app/uploads/sites/24/2019/09/Donuts-2-160x120.jpg 160w, https://ww2.kqed.org/app/uploads/sites/24/2019/09/Donuts-2-800x600.jpg 800w, https://ww2.kqed.org/app/uploads/sites/24/2019/09/Donuts-2-768x576.jpg 768w, https://ww2.kqed.org/app/uploads/sites/24/2019/09/Donuts-2-1020x765.jpg 1020w, https://ww2.kqed.org/app/uploads/sites/24/2019/09/Donuts-2-1200x900.jpg 1200w\" sizes=\"(max-width: 1920px) 100vw, 1920px\">\u003cfigcaption class=\"wp-caption-text\">Shared storefront between Yama-chan and Mochill \u003ccite>(Elaine Wu/KQED)\u003c/cite>\u003c/figcaption>\u003c/figure>\n\u003cp>To be a recognizable part of any trend, timing is everything, and Mochill knew they wanted to be the first ones out of the gate in San Francisco. Their family business is more accustomed to making takoyaki (fried octopus puffs) in Honolulu where they have made a name for themselves with their restaurant, Yama-chan. When they decided to open a takoyaki in Japantown, they wanted to add a separate brand that would focus instead on a sweet snack. Enter \u003ca href=\"https://www.instagram.com/mochill_sf/\">Mochill\u003c/a>.\u003c/p>\n\u003cp>\u003c/p>\u003c/div>","attributes":{"named":{},"numeric":[]}},{"type":"component","content":"","name":"ad","attributes":{"named":{"label":"fullwidth"},"numeric":["fullwidth"]}},{"type":"contentString","content":"\u003cdiv class=\"post-body\">\u003cp>\u003c/p>\n\u003cp>Their mochi donuts don’t stray from the currently popular Pon de Ring style, but the owner’s son Taisuke Yamamoto says that Mochill’s main differentiator is their flavors and the addition of toppings like dried fruits, macadamia nuts, and cereal. “We have Fruity Pebbles, White Chocolate, Kinako (a soybean powder that’s a popular flavor in Japan), and we’re working on a peanut butter and jelly, and a Nutella flavor,” he says. They offer six flavors every day, three of which change every few days.\u003c/p>\n\u003cfigure id=\"attachment_134806\" class=\"wp-caption aligncenter\" style=\"max-width: 1920px\">\u003cimg class=\"size-full wp-image-134806\" src=\"https://ww2.kqed.org/bayareabites/wp-content/uploads/sites/24/2019/09/Donuts-3.jpg\" alt=\"Flavors of the day displayed at Mochill\" width=\"1920\" height=\"1080\" srcset=\"https://ww2.kqed.org/app/uploads/sites/24/2019/09/Donuts-3.jpg 1920w, https://ww2.kqed.org/app/uploads/sites/24/2019/09/Donuts-3-160x90.jpg 160w, https://ww2.kqed.org/app/uploads/sites/24/2019/09/Donuts-3-800x450.jpg 800w, https://ww2.kqed.org/app/uploads/sites/24/2019/09/Donuts-3-768x432.jpg 768w, https://ww2.kqed.org/app/uploads/sites/24/2019/09/Donuts-3-1020x574.jpg 1020w, https://ww2.kqed.org/app/uploads/sites/24/2019/09/Donuts-3-1200x675.jpg 1200w\" sizes=\"(max-width: 1920px) 100vw, 1920px\">\u003cfigcaption class=\"wp-caption-text\">Flavors of the day displayed at Mochill \u003ccite>(Elaine Wu/KQED)\u003c/cite>\u003c/figcaption>\u003c/figure>\n\u003cp>Since opening in July earlier this year, they’ve been selling out daily. “We sell-out an hour before we close every day. Weekends are pretty crazy. But I don’t think customers wait more than an hour.”\u003c/p>\n\u003cp>There’s no doubt that Mochill’s business is built on a trend, but Yamamoto believes their longevity is secure because of a flexible business model. “We’re trying to focus on mochi desserts, so we can do anything mochi. They don’t have to be donuts.” They plan on expanding the menu with other non-donut items and beverages in the future. Yamamoto says they’re also hoping to add more Bay Area locations and even expand to Southern California and Texas. “Our company mission is to spread the greatness of Japanese food culture.”\u003c/p>\n\u003cfigure id=\"attachment_134807\" class=\"wp-caption aligncenter\" style=\"max-width: 1920px\">\u003cimg class=\"size-full wp-image-134807\" src=\"https://ww2.kqed.org/bayareabites/wp-content/uploads/sites/24/2019/09/Donuts-4.jpg\" alt=\"Third Culture Bakery owners, Sam Butarbutar and Wenter Shyu\" width=\"1920\" height=\"1440\" srcset=\"https://ww2.kqed.org/app/uploads/sites/24/2019/09/Donuts-4.jpg 1920w, https://ww2.kqed.org/app/uploads/sites/24/2019/09/Donuts-4-160x120.jpg 160w, https://ww2.kqed.org/app/uploads/sites/24/2019/09/Donuts-4-800x600.jpg 800w, https://ww2.kqed.org/app/uploads/sites/24/2019/09/Donuts-4-768x576.jpg 768w, https://ww2.kqed.org/app/uploads/sites/24/2019/09/Donuts-4-1020x765.jpg 1020w, https://ww2.kqed.org/app/uploads/sites/24/2019/09/Donuts-4-1200x900.jpg 1200w\" sizes=\"(max-width: 1920px) 100vw, 1920px\">\u003cfigcaption class=\"wp-caption-text\">Third Culture Bakery owners, Sam Butarbutar and Wenter Shyu \u003ccite>(Elaine Wu/KQED)\u003c/cite>\u003c/figcaption>\u003c/figure>\n\u003cp>However, not all mochi donuts follow the same formula. At \u003ca href=\"https://thirdculturebakery.com/\">Third Culture Bakery\u003c/a> in Berkeley, partners in business and in life, Chef Sam Butarbutar and Wenter Shyu started their wholesale business with their now famous mochi muffin back in 2016. But these days, their mochi donuts have become just as popular.\u003c/p>\n\u003cp>Butarbutar used to make an Indonesian sweet steamed rice cake with his Mom called Kueh Lapis, so using rice flour was something he was used to. The combination of his classic French pastry expertise along with his desire to create something that would be true to his heritage lead to the mochi muffin.\u003c/p>\n\u003cp>But it was Shyu who suggested trying the same idea with making a donut. At first, Butarbutar resisted. “After months of pestering him, he finally made one,” says Shyu, and that’s when his partner agreed to try selling it. In the Spring of 2018, they made four dozen the first day and sold out within an hour.\u003c/p>\n\u003cfigure id=\"attachment_134808\" class=\"wp-caption aligncenter\" style=\"max-width: 1920px\">\u003cimg class=\"size-full wp-image-134808\" src=\"https://ww2.kqed.org/bayareabites/wp-content/uploads/sites/24/2019/09/Donuts-5.jpg\" alt=\"Display case of mochi muffins and donuts at Third Culture Bakery\" width=\"1920\" height=\"1386\" srcset=\"https://ww2.kqed.org/app/uploads/sites/24/2019/09/Donuts-5.jpg 1920w, https://ww2.kqed.org/app/uploads/sites/24/2019/09/Donuts-5-160x116.jpg 160w, https://ww2.kqed.org/app/uploads/sites/24/2019/09/Donuts-5-800x578.jpg 800w, https://ww2.kqed.org/app/uploads/sites/24/2019/09/Donuts-5-768x554.jpg 768w, https://ww2.kqed.org/app/uploads/sites/24/2019/09/Donuts-5-1020x736.jpg 1020w, https://ww2.kqed.org/app/uploads/sites/24/2019/09/Donuts-5-1200x866.jpg 1200w\" sizes=\"(max-width: 1920px) 100vw, 1920px\">\u003cfigcaption class=\"wp-caption-text\">Display case of mochi muffins and donuts at Third Culture Bakery \u003ccite>(Elaine Wu/KQED)\u003c/cite>\u003c/figcaption>\u003c/figure>\n\u003cp>“I think people are just obsessed with donuts. This is just a different iteration of that,” says Shyu. “And the texture of a mochi donut is just incredible!”\u003c/p>\n\u003cp>Though they still have that signature chewy texture, Third Culture Bakery’s mochi donuts are not made in the pon de ring style, and they are also gluten-free, unlike most other mochi donuts. Butarbutar’s recipe is made solely with rice flour and not a rice/wheat flour blend like most others.\u003c/p>\n\u003cp>“Ours is a true butter mochi donut,” says Shyu “You get that velvety buttery texture with the chewiness of the mochi and it makes it slightly denser. And it’s baked, we don’t fry them. We use quality ingredients like Koda Farms rice flour from California. All the vibrant colors of our donuts come from the ingredients we use. We actually puree down fresh mangoes and passionfruit for our glaze.”\u003c/p>\n\u003cfigure id=\"attachment_134809\" class=\"wp-caption aligncenter\" style=\"max-width: 1920px\">\u003cimg class=\"size-full wp-image-134809\" src=\"https://ww2.kqed.org/bayareabites/wp-content/uploads/sites/24/2019/09/Donuts-6.jpg\" alt=\"\" width=\"1920\" height=\"2562\" srcset=\"https://ww2.kqed.org/app/uploads/sites/24/2019/09/Donuts-6.jpg 1920w, https://ww2.kqed.org/app/uploads/sites/24/2019/09/Donuts-6-160x214.jpg 160w, https://ww2.kqed.org/app/uploads/sites/24/2019/09/Donuts-6-800x1068.jpg 800w, https://ww2.kqed.org/app/uploads/sites/24/2019/09/Donuts-6-768x1025.jpg 768w, https://ww2.kqed.org/app/uploads/sites/24/2019/09/Donuts-6-1020x1361.jpg 1020w, https://ww2.kqed.org/app/uploads/sites/24/2019/09/Donuts-6-899x1200.jpg 899w\" sizes=\"(max-width: 1920px) 100vw, 1920px\">\u003cfigcaption class=\"wp-caption-text\">Third Culture Bakery mochi donuts. Top to bottom: Mango Passionfruit with Cocoa Nibs, Yuzu Lemon, Chocolate \u003ccite>(Elaine Wu/KQED)\u003c/cite>\u003c/figcaption>\u003c/figure>\n\u003cp>They’re hoping their efforts to be different will also work well in other markets. Plans are underway to open a Third Culture bakery/showroom as well as a matcha cafe in Denver by the end of the year, and another in Los Angeles next year. “Some people say that we’re not a ‘real’ mochi donut, but we’re not trying to take away from any other donuts out there,” says Shyu. “We’re just trying to add a different option. I think there’s room for everybody.”\u003c/p>\n\u003cp>\u003c/p>\u003c/div>","attributes":{"named":{},"numeric":[]}},{"type":"component","content":"","name":"ad","attributes":{"named":{"label":"floatright"},"numeric":["floatright"]}},{"type":"contentString","content":"\u003cdiv class=\"post-body\">\u003cp>\u003c/p>\n\u003cp>The success of both Third Culture and Mochill in such a short amount of time proves that even within a food trend, there’s room for more than one iteration. And if public demand is any indication, there’s still plenty of time left in the mochi donut’s 15 minutes of fame.\u003c/p>\n\n\u003c/div>\u003c/p>","attributes":{"named":{},"numeric":[]}}],"link":"/bayareabites/134758/international-flavor-local-ingredients-get-your-mochi-donut-fix-in-the-bay","authors":["5127"],"categories":["bayareabites_2998","bayareabites_1516","bayareabites_1653","bayareabites_4084","bayareabites_1807","bayareabites_90","bayareabites_265","bayareabites_91"],"tags":["bayareabites_49","bayareabites_12011","bayareabites_9710","bayareabites_10052"],"featImg":"bayareabites_134803","label":"bayareabites"},"bayareabites_133973":{"type":"posts","id":"bayareabites_133973","meta":{"index":"posts_1591205157","site":"bayareabites","id":"133973","score":null,"sort":[1561050900000]},"guestAuthors":[],"slug":"pennies-meet-pride-5-establishments-where-your-check-supports-lgbtq-communities","title":"Pennies, Meet Pride! 5 Establishments Where Your Check Supports LGBTQ+ Communities","publishDate":1561050900,"format":"standard","headTitle":"Bay Area Bites | KQED Food","labelTerm":{"site":"bayareabites"},"content":"\u003cp>[aside tag='pride' label='More on Pride Around KQED']\u003c/p>\n\u003cp>It's that time of year again: Pride month! Chefs and restaurant owners all over the Bay are celebrating the month through food and drink, so this is an update to \u003ca href=\"https://www.kqed.org/bayareabites/128908/5-ways-to-celebrate-pride-month-with-food-and-drink\">last year's list\u003c/a> to help you find the perfect bite or cocktail (while also supporting the local community in some way in the process). As you'd expect, rainbows make a strong showing among the available items, but there are a few spots doing some other specials with cultural or historical meanings.\u003c/p>\n\u003cp>Traveling soon and want to support queer establishments no matter where you are? \u003ca href=\"http://www.jarrymag.com/\">Jarry Mag\u003c/a> recently released \"\u003ca href=\"https://www.eatqueer.com/\">a community-driven directory of queer food & drink establishments\u003c/a>\" called \u003ci>Eat Queer\u003c/i>! Best of all, it's free and always open for submissions. \u003c/p>\n\u003ch2>Humphry Slocombe\u003c/h2>\n\u003cp>\u003ca href=\"https://www.google.com/maps/place/Humphry+Slocombe/@37.7528202,-122.414347,17z/data=!3m1!4b1!4m5!3m4!1s0x808580668cc92aa9:0x357a2b27e252227!8m2!3d37.752816!4d-122.4121583\">2790a Harrison St\u003c/a>\u003cbr>\nSan Francisco\u003c/p>\n\u003cfigure id=\"attachment_128930\" class=\"wp-caption aligncenter\" style=\"max-width: 1920px\">\u003cimg class=\"size-full wp-image-128930\" src=\"https://ww2.kqed.org/bayareabites/wp-content/uploads/sites/24/2018/06/The-Whos-Your-Daddy-Sundae-made-with-beer-ice-cream-house-made-frosted-peanuts-and-bourbon-caramel-sauce.jpg\" alt=\"The Whos Your Daddy Sundae, made with beer ice cream, house-made frosted peanuts and bourbon caramel sauce.\" width=\"1920\" height=\"1300\" srcset=\"https://ww2.kqed.org/app/uploads/sites/24/2018/06/The-Whos-Your-Daddy-Sundae-made-with-beer-ice-cream-house-made-frosted-peanuts-and-bourbon-caramel-sauce.jpg 1920w, https://ww2.kqed.org/app/uploads/sites/24/2018/06/The-Whos-Your-Daddy-Sundae-made-with-beer-ice-cream-house-made-frosted-peanuts-and-bourbon-caramel-sauce-160x108.jpg 160w, https://ww2.kqed.org/app/uploads/sites/24/2018/06/The-Whos-Your-Daddy-Sundae-made-with-beer-ice-cream-house-made-frosted-peanuts-and-bourbon-caramel-sauce-800x542.jpg 800w, https://ww2.kqed.org/app/uploads/sites/24/2018/06/The-Whos-Your-Daddy-Sundae-made-with-beer-ice-cream-house-made-frosted-peanuts-and-bourbon-caramel-sauce-768x520.jpg 768w, https://ww2.kqed.org/app/uploads/sites/24/2018/06/The-Whos-Your-Daddy-Sundae-made-with-beer-ice-cream-house-made-frosted-peanuts-and-bourbon-caramel-sauce-1020x691.jpg 1020w, https://ww2.kqed.org/app/uploads/sites/24/2018/06/The-Whos-Your-Daddy-Sundae-made-with-beer-ice-cream-house-made-frosted-peanuts-and-bourbon-caramel-sauce-1200x813.jpg 1200w, https://ww2.kqed.org/app/uploads/sites/24/2018/06/The-Whos-Your-Daddy-Sundae-made-with-beer-ice-cream-house-made-frosted-peanuts-and-bourbon-caramel-sauce-1180x799.jpg 1180w, https://ww2.kqed.org/app/uploads/sites/24/2018/06/The-Whos-Your-Daddy-Sundae-made-with-beer-ice-cream-house-made-frosted-peanuts-and-bourbon-caramel-sauce-960x650.jpg 960w, https://ww2.kqed.org/app/uploads/sites/24/2018/06/The-Whos-Your-Daddy-Sundae-made-with-beer-ice-cream-house-made-frosted-peanuts-and-bourbon-caramel-sauce-240x163.jpg 240w, https://ww2.kqed.org/app/uploads/sites/24/2018/06/The-Whos-Your-Daddy-Sundae-made-with-beer-ice-cream-house-made-frosted-peanuts-and-bourbon-caramel-sauce-375x254.jpg 375w, https://ww2.kqed.org/app/uploads/sites/24/2018/06/The-Whos-Your-Daddy-Sundae-made-with-beer-ice-cream-house-made-frosted-peanuts-and-bourbon-caramel-sauce-520x352.jpg 520w\" sizes=\"(max-width: 1920px) 100vw, 1920px\">\u003cfigcaption class=\"wp-caption-text\">The Who's Your Daddy Sundae, made with beer ice cream, house-made frosted peanuts and bourbon caramel sauce. \u003ccite>(Patrick Wong)\u003c/cite>\u003c/figcaption>\u003c/figure>\n\u003cp>All month long, ice cream lovers can expect fun flavors to celebrate Pride Month at \u003ca href=\"http://www.humphryslocombe.com/\">Humphry Slocombe\u003c/a>! Grab a Who’s Your Daddy sundae (made with beer ice cream, house-made frosted peanuts and bourbon caramel sauce), a Make it Gay Sundae (two scoops of Tahitian Vanilla topped with pink fluff and Fruit Loops) or the Harvey Milk and Honey Graham that is available year-round (raw blackberry honey ice cream with house-made graham crackers).\u003c/p>\n\u003cfigure id=\"attachment_133559\" class=\"wp-caption aligncenter\" style=\"max-width: 1920px\">\u003cimg class=\"size-full wp-image-133559\" src=\"https://ww2.kqed.org/bayareabites/wp-content/uploads/sites/24/2019/05/juanita-more-ice-cream-flavor.jpg\" alt=\"The Juanita MORE! ice cream flavor features blackberry, ginger and whiskey.\" width=\"1920\" height=\"1280\" srcset=\"https://ww2.kqed.org/app/uploads/sites/24/2019/05/juanita-more-ice-cream-flavor.jpg 1920w, https://ww2.kqed.org/app/uploads/sites/24/2019/05/juanita-more-ice-cream-flavor-160x107.jpg 160w, https://ww2.kqed.org/app/uploads/sites/24/2019/05/juanita-more-ice-cream-flavor-800x533.jpg 800w, https://ww2.kqed.org/app/uploads/sites/24/2019/05/juanita-more-ice-cream-flavor-768x512.jpg 768w, https://ww2.kqed.org/app/uploads/sites/24/2019/05/juanita-more-ice-cream-flavor-1020x680.jpg 1020w, https://ww2.kqed.org/app/uploads/sites/24/2019/05/juanita-more-ice-cream-flavor-1200x800.jpg 1200w\" sizes=\"(max-width: 1920px) 100vw, 1920px\">\u003cfigcaption class=\"wp-caption-text\">The Juanita MORE! ice cream flavor features blackberry, ginger and whiskey. \u003ccite>(Cole Church)\u003c/cite>\u003c/figcaption>\u003c/figure>\n\u003cp>You could also get a scoop of either of their two tasty collaborations that launched this year: the \u003ca href=\"https://www.kqed.org/bayareabites/132870/can-you-believe-humphry-slocombe-x-queer-eye-collaboration-now-available\">Queer Eye Cookies & Graham\u003c/a> (olive oil ice cream with chocolate cookies and graham crackers) and the \u003ca href=\"https://www.kqed.org/bayareabites/133544/drag-legend-juanita-more-now-has-her-own-humphry-slocombe-ice-cream\">Juanita MORE!\u003c/a> (blackberry ice cream with ginger and whiskey, inspired by the iconic SF-based drag queen, Juanita MORE!). You can also get the Queer Eye flavor in a sundae form with the Queer Eye S’mores: one scoop Cookies & Graham topped with hot fudge and torched fluff.\u003c/p>\n\u003cp>[ad fullwidth]\u003c/p>\n\u003cp>In all five Humphry Slocombe scoop shops, $1 from the sales of the Juanita MORE! flavor will be donated to the \u003ca href=\"https://www.glbthistory.org/\">GLBT Historical Society\u003c/a>. For friends not in the Bay: $5 from the sales of the Humphry Slocombe Pride Pack on Goldbelly nationwide will go to the Los Angeles based \u003ca href=\"https://aidsmonument.org/\">STORIES: The AIDS Monument\u003c/a> ($3 will go to them from local LA delivery sales of any pint ordered through Caviar).\u003c/p>\n\u003ch2>Bi-Rite\u003c/h2>\n\u003cp>\u003ca href=\"https://goo.gl/maps/k5otqUZ7ggXN7ERR7\">3639 18th St\u003c/a>\u003cbr>\nSan Francisco\u003cbr>\n\u003ca href=\"https://goo.gl/maps/qU5Zpbi8dkFX8kL49\">550 Divisadero St\u003c/a>\u003cbr>\nSan Francisco\u003cbr>\n\u003ca href=\"https://goo.gl/maps/empJnZF1h3bZcLAWA\">3692 18th St\u003c/a>\u003cbr>\nSan Francisco\u003c/p>\n\u003cp>https://www.instagram.com/p/ByabSQllprM/\u003c/p>\n\u003cp>If you're going to be out and about during the weekend to watch the parade, drop by Bi-Rite! 5% of sales from both Markets and Bi-Rite Creamery over Pride weekend will be donated to \u003ca href=\"https://www.projecthomelessconnect.org/\">Project Homeless Connect\u003c/a>, \u003ca href=\"https://www.sfcenter.org/\">SF LGBT Center\u003c/a>, and the \u003ca href=\"http://theqfoundation.org/\">Q Foundation\u003c/a>.\u003c/p>\n\u003ch2>Ferry Building\u003c/h2>\n\u003cp>\u003ca href=\"https://goo.gl/maps/DL5MGbPPa2XE9eYA6\">1 The Embarcadero\u003c/a>\u003cbr>\nSan Francisco\u003c/p>\n\u003cfigure id=\"attachment_134009\" class=\"wp-caption aligncenter\" style=\"max-width: 1920px\">\u003cimg class=\"size-full wp-image-134009\" src=\"https://ww2.kqed.org/bayareabites/wp-content/uploads/sites/24/2019/06/FARMERS_MARKET_PRIDE_LOVE_IPA.jpeg\" alt=\"Beertender Mike Almason with Almanac Beer Co's LOVE Hazy IPA.\" width=\"1920\" height=\"2560\" srcset=\"https://ww2.kqed.org/app/uploads/sites/24/2019/06/FARMERS_MARKET_PRIDE_LOVE_IPA.jpeg 1920w, https://ww2.kqed.org/app/uploads/sites/24/2019/06/FARMERS_MARKET_PRIDE_LOVE_IPA-160x213.jpeg 160w, https://ww2.kqed.org/app/uploads/sites/24/2019/06/FARMERS_MARKET_PRIDE_LOVE_IPA-800x1067.jpeg 800w, https://ww2.kqed.org/app/uploads/sites/24/2019/06/FARMERS_MARKET_PRIDE_LOVE_IPA-768x1024.jpeg 768w, https://ww2.kqed.org/app/uploads/sites/24/2019/06/FARMERS_MARKET_PRIDE_LOVE_IPA-1020x1360.jpeg 1020w, https://ww2.kqed.org/app/uploads/sites/24/2019/06/FARMERS_MARKET_PRIDE_LOVE_IPA-900x1200.jpeg 900w\" sizes=\"(max-width: 1920px) 100vw, 1920px\">\u003cfigcaption class=\"wp-caption-text\">Beertender Mike Almason with Almanac Beer Co's LOVE Hazy IPA. \u003ccite>(Almanac Beer Co.)\u003c/cite>\u003c/figcaption>\u003c/figure>\n\u003cp>Humphry Slocombe's Ferry Building location will celebrate Pride like its other shops with the Make It Gay sundae, but you can hop around the building to get specials from a variety of shops.\u003c/p>\n\u003cp>\u003ca href=\"https://www.miette.com/\">Miette\u003c/a> has a variety of rainbow treats available the whole month, \u003ca href=\"http://www.biscuitbender.com/\">Biscuit Bender\u003c/a> has created a special English biscuit called the \"Gay Cookie\" that will actually be available until the end of July for just $1 and \u003ca href=\"https://almanacbeer.com/\">Almanac Beer Co.\u003c/a> released a special-edition LOVE Hazy IPA for sale at the Ferry Plaza Farmers Market.\u003c/p>\n\u003cp>15% of sales from the beer go to support the \u003ca href=\"https://www.oaklandlgbtqcenter.org/\">Oakland LGBTQ Community Center\u003c/a>.\u003c/p>\n\u003ch2>The Melt\u003c/h2>\n\u003cp>\u003ca href=\"https://goo.gl/maps/PP9PLZnTWsiNEDvv5\">925 Market St\u003c/a>\u003cbr>\nSan Francisco\u003c/p>\n\u003cfigure id=\"attachment_129010\" class=\"wp-caption aligncenter\" style=\"max-width: 1920px\">\u003cimg class=\"size-full wp-image-129010\" src=\"https://ww2.kqed.org/bayareabites/wp-content/uploads/sites/24/2018/06/The-Melt-will-donate-a-dollar-per-Magic-Melt-sold-during-Pride-Month-to-Equality-California.jpg\" alt=\"The Melt will donate a dollar per Magic Melt sold during Pride Month to Equality California.\" width=\"1920\" height=\"1300\" srcset=\"https://ww2.kqed.org/app/uploads/sites/24/2018/06/The-Melt-will-donate-a-dollar-per-Magic-Melt-sold-during-Pride-Month-to-Equality-California.jpg 1920w, https://ww2.kqed.org/app/uploads/sites/24/2018/06/The-Melt-will-donate-a-dollar-per-Magic-Melt-sold-during-Pride-Month-to-Equality-California-160x108.jpg 160w, https://ww2.kqed.org/app/uploads/sites/24/2018/06/The-Melt-will-donate-a-dollar-per-Magic-Melt-sold-during-Pride-Month-to-Equality-California-800x542.jpg 800w, https://ww2.kqed.org/app/uploads/sites/24/2018/06/The-Melt-will-donate-a-dollar-per-Magic-Melt-sold-during-Pride-Month-to-Equality-California-768x520.jpg 768w, https://ww2.kqed.org/app/uploads/sites/24/2018/06/The-Melt-will-donate-a-dollar-per-Magic-Melt-sold-during-Pride-Month-to-Equality-California-1020x691.jpg 1020w, https://ww2.kqed.org/app/uploads/sites/24/2018/06/The-Melt-will-donate-a-dollar-per-Magic-Melt-sold-during-Pride-Month-to-Equality-California-1200x813.jpg 1200w, https://ww2.kqed.org/app/uploads/sites/24/2018/06/The-Melt-will-donate-a-dollar-per-Magic-Melt-sold-during-Pride-Month-to-Equality-California-1180x799.jpg 1180w, https://ww2.kqed.org/app/uploads/sites/24/2018/06/The-Melt-will-donate-a-dollar-per-Magic-Melt-sold-during-Pride-Month-to-Equality-California-960x650.jpg 960w, https://ww2.kqed.org/app/uploads/sites/24/2018/06/The-Melt-will-donate-a-dollar-per-Magic-Melt-sold-during-Pride-Month-to-Equality-California-240x163.jpg 240w, https://ww2.kqed.org/app/uploads/sites/24/2018/06/The-Melt-will-donate-a-dollar-per-Magic-Melt-sold-during-Pride-Month-to-Equality-California-375x254.jpg 375w, https://ww2.kqed.org/app/uploads/sites/24/2018/06/The-Melt-will-donate-a-dollar-per-Magic-Melt-sold-during-Pride-Month-to-Equality-California-520x352.jpg 520w\" sizes=\"(max-width: 1920px) 100vw, 1920px\">\u003cfigcaption class=\"wp-caption-text\">The Melt will donate a dollar per Magic Melt sold during Pride Month to Equality California. \u003ccite>(Patrick Wong)\u003c/cite>\u003c/figcaption>\u003c/figure>\n\u003cp>The \"Magic Melt\", a grilled cheese sandwich stuffed with a delectable blend of cheddar, fontina, and muenster cheeses that have been transformed into a very ooey-gooey rainbow, is available again this year. For every Magic Melt sandwich that \u003ca href=\"https://www.themelt.com/\">The Melt\u003c/a> sells, $1 will be donated to \u003ca href=\"https://www.eqca.org/\">Equality California\u003c/a>, an activism and advocacy group that fights for more LGBTQ rights and visibility.\u003c/p>\n\u003cp>The Magic Melt will be available all of Pride month.\u003c/p>\n\u003ch2>Bluestem Brasserie\u003c/h2>\n\u003cp>\u003ca href=\"https://goo.gl/maps/mVXNvWXRPqeffhk49\">1 Yerba Buena Ln\u003c/a>\u003cbr>\nSan Francisco\u003c/p>\n\u003cp>https://www.instagram.com/p/BynafrXhjA8/\u003c/p>\n\u003cp>On Sunday, June 30th from 10am-3pm, \u003ca href=\"https://www.bluestembrasserie.com/\">Bluestem Brasserie\u003c/a> is hosting their annual Pride Parade Brunch and Viewing Party. To celebrate, grab their special rainbow cocktail—all proceeds will go to \u003ca href=\"https://sf.aidswalk.net/\">AIDS Walk SF\u003c/a>.\u003c/p>\n\u003cp>\u003c/p>\n\u003cp>\u003cb>For more Pride specials around the Bay, see what we've gathered below (and let us know if someone near you has created something noteworthy to eat or drink for Pride):\u003c/b>\u003c/p>\n\u003cul>\n\u003cli>\u003ca href=\"https://onemarket.com/\">\u003cstrong>One Market\u003c/strong>\u003c/a>: One Market is offering a Pride milkshake called the Harvey Milkshake, and a portion of proceeds will be donated to the \u003ca href=\"https://www.reaf-sf.org/\">Richmond Ermet AIDS Foundation (REAF)\u003c/a>.\u003c/li>\n\u003cli>\u003ca href=\"https://onemarket.com/\">\u003cstrong>Kahnfections\u003c/strong>\u003c/a>: Pride-themed macarons are once again available in boozy and non-boozy varieties. The boozy flavors include Strawberry Daiquiri, Bellini, Pina Colada, Midori Sour, Blue Moon Cocktail and Purple Haze. Virgin flavors include strawberry, peach, citrus, pistachio, earl grey, and cassis.\u003c/li>\n\u003cli>\u003cstrong>\u003ca href=\"https://finntownsf.com/\">Finn Town Tavern\u003c/a>:\u003c/strong> This year, Finn Town Tavern will be hosting Pride Week Events from Tuesday, June 25th-Sunday, 30th featuring celebratory new cocktails. Throughout the week, you can order the “rather naughty ‘Down Low’ cocktail,” the “Over the Rainbow” cocktail and more.\u003c/li>\n\u003cli>\u003cstrong>\u003ca href=\"https://www.facebook.com/3rdculturebakery/\">Third Culture Bakery\u003c/a>:\u003c/strong> All proceeds of waffle sales this month will be donated to LGBTQ+ nonprofits in the Bay Area. For June, their waffle special is a Triple Strawberry Mochi Waffle topped with house-made Chantilly whipped cream.\u003c/li>\n\u003cli>\u003cstrong>\u003ca href=\"https://www.cookshoppesf.com/\">Cook Shoppe\u003c/a>:\u003c/strong> Their giant Slice of Pride cake is available all month long and they are donating $3 from every slice to the SF LGBT Center.\u003c/li>\n\u003cli>\u003cstrong>\u003ca href=\"https://dynamodonut.com/\">Dynamo Donut + Coffee\u003c/a>:\u003c/strong> Available during Pride weekend, their Very Berry donut is filled with blueberries and strawberries, and it's all topped off with a champagne glaze and rainbow confetti.\u003c/li>\n\u003cli>\u003cstrong>\u003ca href=\"http://www.chouxsf.com/\">CHOUX\u003c/a>:\u003c/strong> In honor of Pride month, CHOUX created a colorful rainbow box of French cream puffs—even a Fruity Pebbles puff makes an appearance.\u003c/li>\n\u003c/ul>\n\n","blocks":[],"excerpt":"Celebrate Pride month with food and drink specials that are fun, pretty and will support LGBTQ+ communities in some way.","status":"publish","parent":0,"modified":1561581266,"stats":{"hasAudio":false,"hasVideo":false,"hasChartOrMap":false,"iframeSrcs":[],"hasGoogleForm":false,"hasGallery":false,"hasHearkenModule":false,"hasPolis":false,"paragraphCount":21,"wordCount":1018},"headData":{"title":"Pennies, Meet Pride! 5 Establishments Where Your Check Supports LGBTQ+ Communities | KQED","description":"Celebrate Pride month with food and drink specials that are fun, pretty and will support LGBTQ+ communities in some way.","ogTitle":"","ogDescription":"","ogImgId":"","twTitle":"","twDescription":"","twImgId":"","schema":{"@context":"http://schema.org","@type":"Article","headline":"Pennies, Meet Pride! 5 Establishments Where Your Check Supports LGBTQ+ Communities","datePublished":"2019-06-20T17:15:00.000Z","dateModified":"2019-06-26T20:34:26.000Z","image":"https://cdn.kqed.org/wp-content/uploads/2020/02/KQED-OG-Image@1x.png"}},"disqusIdentifier":"133973 https://ww2.kqed.org/bayareabites/?p=133973","disqusUrl":"https://ww2.kqed.org/bayareabites/2019/06/20/pennies-meet-pride-5-establishments-where-your-check-supports-lgbtq-communities/","disqusTitle":"Pennies, Meet Pride! 5 Establishments Where Your Check Supports LGBTQ+ Communities","path":"/bayareabites/133973/pennies-meet-pride-5-establishments-where-your-check-supports-lgbtq-communities","audioTrackLength":null,"parsedContent":[{"type":"contentString","content":"\u003cdiv class=\"post-body\">\u003cp>\u003cp>\u003c/p>\u003c/div>","attributes":{"named":{},"numeric":[]}},{"type":"component","content":"","name":"aside","attributes":{"named":{"tag":"pride","label":"More on Pride Around KQED "},"numeric":[]}},{"type":"contentString","content":"\u003cdiv class=\"post-body\">\u003cp>\u003c/p>\n\u003cp>It's that time of year again: Pride month! Chefs and restaurant owners all over the Bay are celebrating the month through food and drink, so this is an update to \u003ca href=\"https://www.kqed.org/bayareabites/128908/5-ways-to-celebrate-pride-month-with-food-and-drink\">last year's list\u003c/a> to help you find the perfect bite or cocktail (while also supporting the local community in some way in the process). As you'd expect, rainbows make a strong showing among the available items, but there are a few spots doing some other specials with cultural or historical meanings.\u003c/p>\n\u003cp>Traveling soon and want to support queer establishments no matter where you are? \u003ca href=\"http://www.jarrymag.com/\">Jarry Mag\u003c/a> recently released \"\u003ca href=\"https://www.eatqueer.com/\">a community-driven directory of queer food & drink establishments\u003c/a>\" called \u003ci>Eat Queer\u003c/i>! Best of all, it's free and always open for submissions. \u003c/p>\n\u003ch2>Humphry Slocombe\u003c/h2>\n\u003cp>\u003ca href=\"https://www.google.com/maps/place/Humphry+Slocombe/@37.7528202,-122.414347,17z/data=!3m1!4b1!4m5!3m4!1s0x808580668cc92aa9:0x357a2b27e252227!8m2!3d37.752816!4d-122.4121583\">2790a Harrison St\u003c/a>\u003cbr>\nSan Francisco\u003c/p>\n\u003cfigure id=\"attachment_128930\" class=\"wp-caption aligncenter\" style=\"max-width: 1920px\">\u003cimg class=\"size-full wp-image-128930\" src=\"https://ww2.kqed.org/bayareabites/wp-content/uploads/sites/24/2018/06/The-Whos-Your-Daddy-Sundae-made-with-beer-ice-cream-house-made-frosted-peanuts-and-bourbon-caramel-sauce.jpg\" alt=\"The Whos Your Daddy Sundae, made with beer ice cream, house-made frosted peanuts and bourbon caramel sauce.\" width=\"1920\" height=\"1300\" srcset=\"https://ww2.kqed.org/app/uploads/sites/24/2018/06/The-Whos-Your-Daddy-Sundae-made-with-beer-ice-cream-house-made-frosted-peanuts-and-bourbon-caramel-sauce.jpg 1920w, https://ww2.kqed.org/app/uploads/sites/24/2018/06/The-Whos-Your-Daddy-Sundae-made-with-beer-ice-cream-house-made-frosted-peanuts-and-bourbon-caramel-sauce-160x108.jpg 160w, https://ww2.kqed.org/app/uploads/sites/24/2018/06/The-Whos-Your-Daddy-Sundae-made-with-beer-ice-cream-house-made-frosted-peanuts-and-bourbon-caramel-sauce-800x542.jpg 800w, https://ww2.kqed.org/app/uploads/sites/24/2018/06/The-Whos-Your-Daddy-Sundae-made-with-beer-ice-cream-house-made-frosted-peanuts-and-bourbon-caramel-sauce-768x520.jpg 768w, https://ww2.kqed.org/app/uploads/sites/24/2018/06/The-Whos-Your-Daddy-Sundae-made-with-beer-ice-cream-house-made-frosted-peanuts-and-bourbon-caramel-sauce-1020x691.jpg 1020w, https://ww2.kqed.org/app/uploads/sites/24/2018/06/The-Whos-Your-Daddy-Sundae-made-with-beer-ice-cream-house-made-frosted-peanuts-and-bourbon-caramel-sauce-1200x813.jpg 1200w, https://ww2.kqed.org/app/uploads/sites/24/2018/06/The-Whos-Your-Daddy-Sundae-made-with-beer-ice-cream-house-made-frosted-peanuts-and-bourbon-caramel-sauce-1180x799.jpg 1180w, https://ww2.kqed.org/app/uploads/sites/24/2018/06/The-Whos-Your-Daddy-Sundae-made-with-beer-ice-cream-house-made-frosted-peanuts-and-bourbon-caramel-sauce-960x650.jpg 960w, https://ww2.kqed.org/app/uploads/sites/24/2018/06/The-Whos-Your-Daddy-Sundae-made-with-beer-ice-cream-house-made-frosted-peanuts-and-bourbon-caramel-sauce-240x163.jpg 240w, https://ww2.kqed.org/app/uploads/sites/24/2018/06/The-Whos-Your-Daddy-Sundae-made-with-beer-ice-cream-house-made-frosted-peanuts-and-bourbon-caramel-sauce-375x254.jpg 375w, https://ww2.kqed.org/app/uploads/sites/24/2018/06/The-Whos-Your-Daddy-Sundae-made-with-beer-ice-cream-house-made-frosted-peanuts-and-bourbon-caramel-sauce-520x352.jpg 520w\" sizes=\"(max-width: 1920px) 100vw, 1920px\">\u003cfigcaption class=\"wp-caption-text\">The Who's Your Daddy Sundae, made with beer ice cream, house-made frosted peanuts and bourbon caramel sauce. \u003ccite>(Patrick Wong)\u003c/cite>\u003c/figcaption>\u003c/figure>\n\u003cp>All month long, ice cream lovers can expect fun flavors to celebrate Pride Month at \u003ca href=\"http://www.humphryslocombe.com/\">Humphry Slocombe\u003c/a>! Grab a Who’s Your Daddy sundae (made with beer ice cream, house-made frosted peanuts and bourbon caramel sauce), a Make it Gay Sundae (two scoops of Tahitian Vanilla topped with pink fluff and Fruit Loops) or the Harvey Milk and Honey Graham that is available year-round (raw blackberry honey ice cream with house-made graham crackers).\u003c/p>\n\u003cfigure id=\"attachment_133559\" class=\"wp-caption aligncenter\" style=\"max-width: 1920px\">\u003cimg class=\"size-full wp-image-133559\" src=\"https://ww2.kqed.org/bayareabites/wp-content/uploads/sites/24/2019/05/juanita-more-ice-cream-flavor.jpg\" alt=\"The Juanita MORE! ice cream flavor features blackberry, ginger and whiskey.\" width=\"1920\" height=\"1280\" srcset=\"https://ww2.kqed.org/app/uploads/sites/24/2019/05/juanita-more-ice-cream-flavor.jpg 1920w, https://ww2.kqed.org/app/uploads/sites/24/2019/05/juanita-more-ice-cream-flavor-160x107.jpg 160w, https://ww2.kqed.org/app/uploads/sites/24/2019/05/juanita-more-ice-cream-flavor-800x533.jpg 800w, https://ww2.kqed.org/app/uploads/sites/24/2019/05/juanita-more-ice-cream-flavor-768x512.jpg 768w, https://ww2.kqed.org/app/uploads/sites/24/2019/05/juanita-more-ice-cream-flavor-1020x680.jpg 1020w, https://ww2.kqed.org/app/uploads/sites/24/2019/05/juanita-more-ice-cream-flavor-1200x800.jpg 1200w\" sizes=\"(max-width: 1920px) 100vw, 1920px\">\u003cfigcaption class=\"wp-caption-text\">The Juanita MORE! ice cream flavor features blackberry, ginger and whiskey. \u003ccite>(Cole Church)\u003c/cite>\u003c/figcaption>\u003c/figure>\n\u003cp>You could also get a scoop of either of their two tasty collaborations that launched this year: the \u003ca href=\"https://www.kqed.org/bayareabites/132870/can-you-believe-humphry-slocombe-x-queer-eye-collaboration-now-available\">Queer Eye Cookies & Graham\u003c/a> (olive oil ice cream with chocolate cookies and graham crackers) and the \u003ca href=\"https://www.kqed.org/bayareabites/133544/drag-legend-juanita-more-now-has-her-own-humphry-slocombe-ice-cream\">Juanita MORE!\u003c/a> (blackberry ice cream with ginger and whiskey, inspired by the iconic SF-based drag queen, Juanita MORE!). You can also get the Queer Eye flavor in a sundae form with the Queer Eye S’mores: one scoop Cookies & Graham topped with hot fudge and torched fluff.\u003c/p>\n\u003cp>\u003c/p>\u003c/div>","attributes":{"named":{},"numeric":[]}},{"type":"component","content":"","name":"ad","attributes":{"named":{"label":"fullwidth"},"numeric":["fullwidth"]}},{"type":"contentString","content":"\u003cdiv class=\"post-body\">\u003cp>\u003c/p>\n\u003cp>In all five Humphry Slocombe scoop shops, $1 from the sales of the Juanita MORE! flavor will be donated to the \u003ca href=\"https://www.glbthistory.org/\">GLBT Historical Society\u003c/a>. For friends not in the Bay: $5 from the sales of the Humphry Slocombe Pride Pack on Goldbelly nationwide will go to the Los Angeles based \u003ca href=\"https://aidsmonument.org/\">STORIES: The AIDS Monument\u003c/a> ($3 will go to them from local LA delivery sales of any pint ordered through Caviar).\u003c/p>\n\u003ch2>Bi-Rite\u003c/h2>\n\u003cp>\u003ca href=\"https://goo.gl/maps/k5otqUZ7ggXN7ERR7\">3639 18th St\u003c/a>\u003cbr>\nSan Francisco\u003cbr>\n\u003ca href=\"https://goo.gl/maps/qU5Zpbi8dkFX8kL49\">550 Divisadero St\u003c/a>\u003cbr>\nSan Francisco\u003cbr>\n\u003ca href=\"https://goo.gl/maps/empJnZF1h3bZcLAWA\">3692 18th St\u003c/a>\u003cbr>\nSan Francisco\u003c/p>\u003c/p>\u003c/div>","attributes":{"named":{},"numeric":[]}},{"type":"component","content":"","name":"instagramLink","attributes":{"named":{"instagramId":"ByabSQllprM"},"numeric":[]}},{"type":"contentString","content":"\u003cdiv class=\"post-body\">\u003cp>\u003cp>If you're going to be out and about during the weekend to watch the parade, drop by Bi-Rite! 5% of sales from both Markets and Bi-Rite Creamery over Pride weekend will be donated to \u003ca href=\"https://www.projecthomelessconnect.org/\">Project Homeless Connect\u003c/a>, \u003ca href=\"https://www.sfcenter.org/\">SF LGBT Center\u003c/a>, and the \u003ca href=\"http://theqfoundation.org/\">Q Foundation\u003c/a>.\u003c/p>\n\u003ch2>Ferry Building\u003c/h2>\n\u003cp>\u003ca href=\"https://goo.gl/maps/DL5MGbPPa2XE9eYA6\">1 The Embarcadero\u003c/a>\u003cbr>\nSan Francisco\u003c/p>\n\u003cfigure id=\"attachment_134009\" class=\"wp-caption aligncenter\" style=\"max-width: 1920px\">\u003cimg class=\"size-full wp-image-134009\" src=\"https://ww2.kqed.org/bayareabites/wp-content/uploads/sites/24/2019/06/FARMERS_MARKET_PRIDE_LOVE_IPA.jpeg\" alt=\"Beertender Mike Almason with Almanac Beer Co's LOVE Hazy IPA.\" width=\"1920\" height=\"2560\" srcset=\"https://ww2.kqed.org/app/uploads/sites/24/2019/06/FARMERS_MARKET_PRIDE_LOVE_IPA.jpeg 1920w, https://ww2.kqed.org/app/uploads/sites/24/2019/06/FARMERS_MARKET_PRIDE_LOVE_IPA-160x213.jpeg 160w, https://ww2.kqed.org/app/uploads/sites/24/2019/06/FARMERS_MARKET_PRIDE_LOVE_IPA-800x1067.jpeg 800w, https://ww2.kqed.org/app/uploads/sites/24/2019/06/FARMERS_MARKET_PRIDE_LOVE_IPA-768x1024.jpeg 768w, https://ww2.kqed.org/app/uploads/sites/24/2019/06/FARMERS_MARKET_PRIDE_LOVE_IPA-1020x1360.jpeg 1020w, https://ww2.kqed.org/app/uploads/sites/24/2019/06/FARMERS_MARKET_PRIDE_LOVE_IPA-900x1200.jpeg 900w\" sizes=\"(max-width: 1920px) 100vw, 1920px\">\u003cfigcaption class=\"wp-caption-text\">Beertender Mike Almason with Almanac Beer Co's LOVE Hazy IPA. \u003ccite>(Almanac Beer Co.)\u003c/cite>\u003c/figcaption>\u003c/figure>\n\u003cp>Humphry Slocombe's Ferry Building location will celebrate Pride like its other shops with the Make It Gay sundae, but you can hop around the building to get specials from a variety of shops.\u003c/p>\n\u003cp>\u003ca href=\"https://www.miette.com/\">Miette\u003c/a> has a variety of rainbow treats available the whole month, \u003ca href=\"http://www.biscuitbender.com/\">Biscuit Bender\u003c/a> has created a special English biscuit called the \"Gay Cookie\" that will actually be available until the end of July for just $1 and \u003ca href=\"https://almanacbeer.com/\">Almanac Beer Co.\u003c/a> released a special-edition LOVE Hazy IPA for sale at the Ferry Plaza Farmers Market.\u003c/p>\n\u003cp>15% of sales from the beer go to support the \u003ca href=\"https://www.oaklandlgbtqcenter.org/\">Oakland LGBTQ Community Center\u003c/a>.\u003c/p>\n\u003ch2>The Melt\u003c/h2>\n\u003cp>\u003ca href=\"https://goo.gl/maps/PP9PLZnTWsiNEDvv5\">925 Market St\u003c/a>\u003cbr>\nSan Francisco\u003c/p>\n\u003cfigure id=\"attachment_129010\" class=\"wp-caption aligncenter\" style=\"max-width: 1920px\">\u003cimg class=\"size-full wp-image-129010\" src=\"https://ww2.kqed.org/bayareabites/wp-content/uploads/sites/24/2018/06/The-Melt-will-donate-a-dollar-per-Magic-Melt-sold-during-Pride-Month-to-Equality-California.jpg\" alt=\"The Melt will donate a dollar per Magic Melt sold during Pride Month to Equality California.\" width=\"1920\" height=\"1300\" srcset=\"https://ww2.kqed.org/app/uploads/sites/24/2018/06/The-Melt-will-donate-a-dollar-per-Magic-Melt-sold-during-Pride-Month-to-Equality-California.jpg 1920w, https://ww2.kqed.org/app/uploads/sites/24/2018/06/The-Melt-will-donate-a-dollar-per-Magic-Melt-sold-during-Pride-Month-to-Equality-California-160x108.jpg 160w, https://ww2.kqed.org/app/uploads/sites/24/2018/06/The-Melt-will-donate-a-dollar-per-Magic-Melt-sold-during-Pride-Month-to-Equality-California-800x542.jpg 800w, https://ww2.kqed.org/app/uploads/sites/24/2018/06/The-Melt-will-donate-a-dollar-per-Magic-Melt-sold-during-Pride-Month-to-Equality-California-768x520.jpg 768w, https://ww2.kqed.org/app/uploads/sites/24/2018/06/The-Melt-will-donate-a-dollar-per-Magic-Melt-sold-during-Pride-Month-to-Equality-California-1020x691.jpg 1020w, https://ww2.kqed.org/app/uploads/sites/24/2018/06/The-Melt-will-donate-a-dollar-per-Magic-Melt-sold-during-Pride-Month-to-Equality-California-1200x813.jpg 1200w, https://ww2.kqed.org/app/uploads/sites/24/2018/06/The-Melt-will-donate-a-dollar-per-Magic-Melt-sold-during-Pride-Month-to-Equality-California-1180x799.jpg 1180w, https://ww2.kqed.org/app/uploads/sites/24/2018/06/The-Melt-will-donate-a-dollar-per-Magic-Melt-sold-during-Pride-Month-to-Equality-California-960x650.jpg 960w, https://ww2.kqed.org/app/uploads/sites/24/2018/06/The-Melt-will-donate-a-dollar-per-Magic-Melt-sold-during-Pride-Month-to-Equality-California-240x163.jpg 240w, https://ww2.kqed.org/app/uploads/sites/24/2018/06/The-Melt-will-donate-a-dollar-per-Magic-Melt-sold-during-Pride-Month-to-Equality-California-375x254.jpg 375w, https://ww2.kqed.org/app/uploads/sites/24/2018/06/The-Melt-will-donate-a-dollar-per-Magic-Melt-sold-during-Pride-Month-to-Equality-California-520x352.jpg 520w\" sizes=\"(max-width: 1920px) 100vw, 1920px\">\u003cfigcaption class=\"wp-caption-text\">The Melt will donate a dollar per Magic Melt sold during Pride Month to Equality California. \u003ccite>(Patrick Wong)\u003c/cite>\u003c/figcaption>\u003c/figure>\n\u003cp>The \"Magic Melt\", a grilled cheese sandwich stuffed with a delectable blend of cheddar, fontina, and muenster cheeses that have been transformed into a very ooey-gooey rainbow, is available again this year. For every Magic Melt sandwich that \u003ca href=\"https://www.themelt.com/\">The Melt\u003c/a> sells, $1 will be donated to \u003ca href=\"https://www.eqca.org/\">Equality California\u003c/a>, an activism and advocacy group that fights for more LGBTQ rights and visibility.\u003c/p>\n\u003cp>The Magic Melt will be available all of Pride month.\u003c/p>\n\u003ch2>Bluestem Brasserie\u003c/h2>\n\u003cp>\u003ca href=\"https://goo.gl/maps/mVXNvWXRPqeffhk49\">1 Yerba Buena Ln\u003c/a>\u003cbr>\nSan Francisco\u003c/p>\u003c/p>\u003c/div>","attributes":{"named":{},"numeric":[]}},{"type":"component","content":"","name":"instagramLink","attributes":{"named":{"instagramId":"BynafrXhjA8"},"numeric":[]}},{"type":"contentString","content":"\u003cdiv class=\"post-body\">\u003cp>\u003cp>On Sunday, June 30th from 10am-3pm, \u003ca href=\"https://www.bluestembrasserie.com/\">Bluestem Brasserie\u003c/a> is hosting their annual Pride Parade Brunch and Viewing Party. To celebrate, grab their special rainbow cocktail—all proceeds will go to \u003ca href=\"https://sf.aidswalk.net/\">AIDS Walk SF\u003c/a>.\u003c/p>\n\u003cp>\u003c/p>\n\u003cp>\u003cb>For more Pride specials around the Bay, see what we've gathered below (and let us know if someone near you has created something noteworthy to eat or drink for Pride):\u003c/b>\u003c/p>\n\u003cul>\n\u003cli>\u003ca href=\"https://onemarket.com/\">\u003cstrong>One Market\u003c/strong>\u003c/a>: One Market is offering a Pride milkshake called the Harvey Milkshake, and a portion of proceeds will be donated to the \u003ca href=\"https://www.reaf-sf.org/\">Richmond Ermet AIDS Foundation (REAF)\u003c/a>.\u003c/li>\n\u003cli>\u003ca href=\"https://onemarket.com/\">\u003cstrong>Kahnfections\u003c/strong>\u003c/a>: Pride-themed macarons are once again available in boozy and non-boozy varieties. The boozy flavors include Strawberry Daiquiri, Bellini, Pina Colada, Midori Sour, Blue Moon Cocktail and Purple Haze. Virgin flavors include strawberry, peach, citrus, pistachio, earl grey, and cassis.\u003c/li>\n\u003cli>\u003cstrong>\u003ca href=\"https://finntownsf.com/\">Finn Town Tavern\u003c/a>:\u003c/strong> This year, Finn Town Tavern will be hosting Pride Week Events from Tuesday, June 25th-Sunday, 30th featuring celebratory new cocktails. Throughout the week, you can order the “rather naughty ‘Down Low’ cocktail,” the “Over the Rainbow” cocktail and more.\u003c/li>\n\u003cli>\u003cstrong>\u003ca href=\"https://www.facebook.com/3rdculturebakery/\">Third Culture Bakery\u003c/a>:\u003c/strong> All proceeds of waffle sales this month will be donated to LGBTQ+ nonprofits in the Bay Area. For June, their waffle special is a Triple Strawberry Mochi Waffle topped with house-made Chantilly whipped cream.\u003c/li>\n\u003cli>\u003cstrong>\u003ca href=\"https://www.cookshoppesf.com/\">Cook Shoppe\u003c/a>:\u003c/strong> Their giant Slice of Pride cake is available all month long and they are donating $3 from every slice to the SF LGBT Center.\u003c/li>\n\u003cli>\u003cstrong>\u003ca href=\"https://dynamodonut.com/\">Dynamo Donut + Coffee\u003c/a>:\u003c/strong> Available during Pride weekend, their Very Berry donut is filled with blueberries and strawberries, and it's all topped off with a champagne glaze and rainbow confetti.\u003c/li>\n\u003cli>\u003cstrong>\u003ca href=\"http://www.chouxsf.com/\">CHOUX\u003c/a>:\u003c/strong> In honor of Pride month, CHOUX created a colorful rainbow box of French cream puffs—even a Fruity Pebbles puff makes an appearance.\u003c/li>\n\u003c/ul>\n\n\u003c/div>\u003c/p>","attributes":{"named":{},"numeric":[]}}],"link":"/bayareabites/133973/pennies-meet-pride-5-establishments-where-your-check-supports-lgbtq-communities","authors":["11404"],"categories":["bayareabites_1516","bayareabites_13306","bayareabites_1244","bayareabites_1653","bayareabites_50","bayareabites_11028","bayareabites_10028","bayareabites_13746","bayareabites_1763","bayareabites_1807","bayareabites_90","bayareabites_181"],"tags":["bayareabites_49","bayareabites_9710","bayareabites_13419","bayareabites_2327","bayareabites_14745"],"featImg":"bayareabites_129009","label":"bayareabites"},"bayareabites_130740":{"type":"posts","id":"bayareabites_130740","meta":{"index":"posts_1591205157","site":"bayareabites","id":"130740","score":null,"sort":[1548436208000]},"guestAuthors":[],"slug":"5-places-in-the-bay-area-to-find-the-perfect-donut","title":"5 Places in the Bay Area to Find the Perfect Donut","publishDate":1548436208,"format":"standard","headTitle":"Bay Area Bites | KQED Food","labelTerm":{"site":"bayareabites"},"content":"\u003cp>\u003cspan style=\"font-weight: 400\">When it comes to a simple morning indulgence, few things beat a cup of coffee and a warm donut—except maybe \u003c/span>\u003ci>\u003cspan style=\"font-weight: 400\">two \u003c/span>\u003c/i>\u003cspan style=\"font-weight: 400\">donuts. Luckily, like with most foodie favorites, the Bay Area has a plethora of donut spots for you to try. Maybe you’re looking for the best classic donut, or you want to try a bunch of different flavors without committing to an entire donut. Maybe you’re on the hunt for an understated yet satisfying vegan option. \u003c/span>\u003c/p>\n\u003cp>\u003cspan style=\"font-weight: 400\">For this Bay Area Bites Guide, we have you covered. We’ve rounded up some classic favorites and exciting newcomers to the donut scenes in San Francisco and Oakland, taking you on a tasty tour from one side of the Bay bridge to the other. It’s worth noting, however, that this list is \u003c/span>\u003ci>\u003cspan style=\"font-weight: 400\">not \u003c/span>\u003c/i>\u003cspan style=\"font-weight: 400\">exhaustive. There are always new sweet spots to be discovered—even if you haven’t had your coffee yet.\u003c/span>\u003c/p>\n\u003ch2>Twisted Donuts\u003c/h2>\n\u003cp>\u003ca href=\"https://goo.gl/maps/GPiRYaorxGy\">1243 Noriega St\u003c/a>\u003cbr>\nSan Francisco, CA 94122\u003c/p>\n\u003cfigure id=\"attachment_130743\" class=\"wp-caption alignnone\" style=\"max-width: 800px\">\u003cimg class=\"size-medium wp-image-130743\" src=\"https://ww2.kqed.org/bayareabites/wp-content/uploads/sites/24/2018/10/IMG_2225-800x506.jpg\" alt=\"\" width=\"800\" height=\"506\" srcset=\"https://ww2.kqed.org/app/uploads/sites/24/2018/10/IMG_2225-800x506.jpg 800w, https://ww2.kqed.org/app/uploads/sites/24/2018/10/IMG_2225-160x101.jpg 160w, https://ww2.kqed.org/app/uploads/sites/24/2018/10/IMG_2225-768x485.jpg 768w, https://ww2.kqed.org/app/uploads/sites/24/2018/10/IMG_2225-1020x645.jpg 1020w, https://ww2.kqed.org/app/uploads/sites/24/2018/10/IMG_2225-1200x759.jpg 1200w, https://ww2.kqed.org/app/uploads/sites/24/2018/10/IMG_2225-1180x746.jpg 1180w, https://ww2.kqed.org/app/uploads/sites/24/2018/10/IMG_2225-960x607.jpg 960w, https://ww2.kqed.org/app/uploads/sites/24/2018/10/IMG_2225-240x152.jpg 240w, https://ww2.kqed.org/app/uploads/sites/24/2018/10/IMG_2225-375x237.jpg 375w, https://ww2.kqed.org/app/uploads/sites/24/2018/10/IMG_2225-520x329.jpg 520w\" sizes=\"(max-width: 800px) 100vw, 800px\">\u003cfigcaption class=\"wp-caption-text\">A cup of coffee and a Fruirrito at Twisted Donuts in San Francisco.\u003c/figcaption>\u003c/figure>\n\u003cp>Located smack in the middle of the Sunset district in San Francisco (just between the Inner and the Outer), \u003ca href=\"http://twisteddonutsf.com\">Twisted Donuts\u003c/a> is a small shop with a lot to offer. Open since 2014, Twisted specializes in nailing the classics during the week, like their old-fashioned cake or bavarian cream-filled donuts. But on the weekends, you can expand your palate to something a little more adventurous—like a “Fruirrito.”\u003c/p>\n\u003cp>A Fruirrito is a deep-fried wrapped confection filled with something sweet and it is absolutely a two-person undertaking. For example, the Nutella Fruirrito is layers of flakey pastry wrapped burrito-style around Nutella filling. The outside is glazed with sugar and topped with walnuts. It’s delicious, ridiculous, and unique to Twisted’s weekend menu.\u003c/p>\n\u003cp>[ad fullwidth]\u003c/p>\n\u003cp>Like many donut shops around the Bay, Twisted Donuts asks for a $5 minimum when using your card for purchases, so either bring cash or plan to grab a cup of coffee to go with your donuts. If the latter, then be prepared for choice paralysis as the brew offerings range from several flavors, blends, and roasts so you can pair your cup with your bite. Once you’re ready, you can hike up the Mosaic Stairs on 16th, just a short walk away from Twisted. It’s a great view of the Bay and the perfect way to walk off your breakfast.\u003c/p>\n\u003ch2>Dynamo Donut + Coffee\u003c/h2>\n\u003cp>\u003ca href=\"https://goo.gl/maps/S1o6A3JACfH2\">2760 24th St\u003c/a>\u003cbr>\nSan Francisco, CA 94110\u003c/p>\n\u003cfigure id=\"attachment_130744\" class=\"wp-caption alignnone\" style=\"max-width: 800px\">\u003cimg class=\"size-medium wp-image-130744\" src=\"https://ww2.kqed.org/bayareabites/wp-content/uploads/sites/24/2018/10/IMG_2236-800x1044.jpg\" alt=\"\" width=\"800\" height=\"1044\" srcset=\"https://ww2.kqed.org/app/uploads/sites/24/2018/10/IMG_2236-800x1044.jpg 800w, https://ww2.kqed.org/app/uploads/sites/24/2018/10/IMG_2236-160x209.jpg 160w, https://ww2.kqed.org/app/uploads/sites/24/2018/10/IMG_2236-768x1002.jpg 768w, https://ww2.kqed.org/app/uploads/sites/24/2018/10/IMG_2236-1020x1330.jpg 1020w, https://ww2.kqed.org/app/uploads/sites/24/2018/10/IMG_2236-920x1200.jpg 920w, https://ww2.kqed.org/app/uploads/sites/24/2018/10/IMG_2236-1180x1539.jpg 1180w, https://ww2.kqed.org/app/uploads/sites/24/2018/10/IMG_2236-960x1252.jpg 960w, https://ww2.kqed.org/app/uploads/sites/24/2018/10/IMG_2236-240x313.jpg 240w, https://ww2.kqed.org/app/uploads/sites/24/2018/10/IMG_2236-375x489.jpg 375w, https://ww2.kqed.org/app/uploads/sites/24/2018/10/IMG_2236-520x678.jpg 520w\" sizes=\"(max-width: 800px) 100vw, 800px\">\u003cfigcaption class=\"wp-caption-text\">Artwork by Camila Valdez on the roof of Dynamo Donut + Coffee.\u003c/figcaption>\u003c/figure>\n\u003cp>One of the first things you’ll notice walking up to \u003ca href=\"https://dynamodonut.com/\">Dynamo Donut + Coffee\u003c/a> on 24th street in the Mission is the original \u003ca href=\"http://www.camilavaldez.com/\">Camila Valdez\u003c/a> sculpture on the roof. Even though you have to crane your neck to see it, the pink donut with a pair of women’s legs attached is hard to miss. Luckily, Dynamo’s donuts are attention-grabbing, so between the art and the snacks there’s plenty to see.\u003c/p>\n\u003cp>Dynamo has an impressive list of regular offerings, including some gluten-free options, that are anything but “everyday donuts.” Flavors like Passionfruit Milk Chocolate and Maple Bacon Apple are on the board every day, or you can try a seasonal offering Pumpkin Chocolate Chip in October, or Persimmon in November. For the gluten-intolerant donut-lover there’s monthly options like carrot cake or lemon poppyseed, but as a heads up to those with especially sensitive allergies, “I Am Not a Glutens” donuts are fried in the same oil as their more gluteny counterparts.\u003c/p>\n\u003cp>While the Mission location is a walk-up window, they also have a few tables inside their retro-inspired space. The open kitchen layout makes it so you can watch the donut making process while you enjoy your breakfast. If you’d like to munch and walk, you can take in the murals at \u003ca href=\"https://goo.gl/maps/NUNeN1vxBuS2\">Balmy Alley\u003c/a> just a few blocks away.\u003c/p>\n\u003ch2>Donut Savant\u003c/h2>\n\u003cp>\u003ca href=\"https://goo.gl/maps/Mas7k6T6k792\">1934 Broadway\u003c/a>\u003cbr>\nOakland, CA 94612\u003c/p>\n\u003cfigure id=\"attachment_130746\" class=\"wp-caption alignnone\" style=\"max-width: 800px\">\u003cimg class=\"size-medium wp-image-130746\" src=\"https://ww2.kqed.org/bayareabites/wp-content/uploads/sites/24/2018/10/IMG_2241-800x600.jpg\" alt=\"\" width=\"800\" height=\"600\" srcset=\"https://ww2.kqed.org/app/uploads/sites/24/2018/10/IMG_2241-800x600.jpg 800w, https://ww2.kqed.org/app/uploads/sites/24/2018/10/IMG_2241-160x120.jpg 160w, https://ww2.kqed.org/app/uploads/sites/24/2018/10/IMG_2241-768x576.jpg 768w, https://ww2.kqed.org/app/uploads/sites/24/2018/10/IMG_2241-1020x765.jpg 1020w, https://ww2.kqed.org/app/uploads/sites/24/2018/10/IMG_2241-1200x900.jpg 1200w, https://ww2.kqed.org/app/uploads/sites/24/2018/10/IMG_2241-1180x885.jpg 1180w, https://ww2.kqed.org/app/uploads/sites/24/2018/10/IMG_2241-960x720.jpg 960w, https://ww2.kqed.org/app/uploads/sites/24/2018/10/IMG_2241-240x180.jpg 240w, https://ww2.kqed.org/app/uploads/sites/24/2018/10/IMG_2241-375x281.jpg 375w, https://ww2.kqed.org/app/uploads/sites/24/2018/10/IMG_2241-520x390.jpg 520w\" sizes=\"(max-width: 800px) 100vw, 800px\">\u003cfigcaption class=\"wp-caption-text\">A couple of donut holes and a fresh pour-over at Donut Savant in Oakland.\u003c/figcaption>\u003c/figure>\n\u003cp>Jumping across the Bay Bridge lands you at \u003ca href=\"http://www.donutsavant.com/\">Donut Savant\u003c/a> in downtown Oakland, just outside the 19th street BART station. If you’re looking for a way to try a lot of different types of donuts without having to commit to a full dozen, then the wide variety of donut holes and bite-size pastries will be the perfect fit for you.\u003c/p>\n\u003cp>You may be familiar with the traditional donut hole—a small, bite-sized ball of donut meant to symbolize the middle of the donut that’s usually absent. In this case, however, you can get cronut holes and cinnamon roll holes in addition to more traditional glazed and cinnamon sugar donut holes. The cronut holes in particular are impressive as they manage to take all the flakey, sugary goodness of a cronut and make it bite-size without losing anything from the larger version. Of course, if you fall in love with a bite and want the full version, that’s always available as well.\u003c/p>\n\u003cp>If you’d like to order a pour-over and stay awhile with your donut samplings, then Donut Savant’s sleek and comfortable space has several tables for you to perch at. Otherwise, you can take a box to go and have a donut picnic at Lake Merritt, which is walking distance from the shop.\u003c/p>\n\u003ch2>Sweet Belly Desserts [CLOSED]\u003c/h2>\n\u003cp>\u003ca href=\"https://goo.gl/maps/MK8jMxzxtYN2\">435 19th St\u003c/a>\u003cbr>\nOakland, CA 94612\u003c/p>\n\u003cfigure id=\"attachment_130747\" class=\"wp-caption alignnone\" style=\"max-width: 800px\">\u003cimg class=\"size-medium wp-image-130747\" src=\"https://ww2.kqed.org/bayareabites/wp-content/uploads/sites/24/2018/10/IMG_2244-800x600.jpg\" alt=\"\" width=\"800\" height=\"600\" srcset=\"https://ww2.kqed.org/app/uploads/sites/24/2018/10/IMG_2244-800x600.jpg 800w, https://ww2.kqed.org/app/uploads/sites/24/2018/10/IMG_2244-160x120.jpg 160w, https://ww2.kqed.org/app/uploads/sites/24/2018/10/IMG_2244-768x576.jpg 768w, https://ww2.kqed.org/app/uploads/sites/24/2018/10/IMG_2244-1020x765.jpg 1020w, https://ww2.kqed.org/app/uploads/sites/24/2018/10/IMG_2244-1200x900.jpg 1200w, https://ww2.kqed.org/app/uploads/sites/24/2018/10/IMG_2244-1180x885.jpg 1180w, https://ww2.kqed.org/app/uploads/sites/24/2018/10/IMG_2244-960x720.jpg 960w, https://ww2.kqed.org/app/uploads/sites/24/2018/10/IMG_2244-240x180.jpg 240w, https://ww2.kqed.org/app/uploads/sites/24/2018/10/IMG_2244-375x281.jpg 375w, https://ww2.kqed.org/app/uploads/sites/24/2018/10/IMG_2244-520x390.jpg 520w\" sizes=\"(max-width: 800px) 100vw, 800px\">\u003cfigcaption class=\"wp-caption-text\">Two boxes of fresh donuts and dip at Sweet Belly Desserts.\u003c/figcaption>\u003c/figure>\n\u003cp>If you’d like to make a day of your donut tour, \u003ca href=\"https://www.sweetbellydesserts.com/\">Sweet Belly Desserts\u003c/a> is just around the corner from Donut Savant in downtown Oakland. The sugary answer to Uptown’s wildly popular \u003ca href=\"http://www.bellyuptown.com/\">Belly\u003c/a>, Sweet Belly offers handcrafted ice cream creations and other desserts. It’s the made-to-order mini donuts, however, that steal the show.\u003c/p>\n\u003cp>Much like its bright and immediately Instagrammable interior, ordering mini donuts at Sweet Belly is an experience. First, you decide the type of sugar your donuts will be tossed in—plain, cinnamon, and several exciting fruit options like citrus and strawberry. Then you choose a drizzle, which is a sweet syrup topping, and the dip, which can be a flavored whipped cream or a fruit sauce. It’s not until you’ve completed your order that the donuts are fried, making them fresh and still warm upon arrival.\u003c/p>\n\u003cp>Sweet Belly’s mini donuts come in boxes of six or twelve, and the packaging is lovely, with small designed desserts surrounding embossed lettering. You can take them as a gift or simply indulge in a few #foodie posts for your social media (we won’t blame you).\u003c/p>\n\u003cp>For those looking to satisfy a particularly intense sweet tooth, you can combine Sweet Belly’s handcrafted soft serve with a mini donut. It’s about $5 and it’s everything your daydream cravings have ever wanted.\u003c/p>\n\u003ch2>Pepples Donut Farm\u003c/h2>\n\u003cp>\u003ca href=\"https://goo.gl/maps/781GhxyGYMH2\">6037 San Pablo Ave.\u003c/a>\u003cbr>\nOakland, CA 94608\u003c/p>\n\u003cfigure id=\"attachment_130749\" class=\"wp-caption alignnone\" style=\"max-width: 800px\">\u003cimg class=\"size-medium wp-image-130749\" src=\"https://ww2.kqed.org/bayareabites/wp-content/uploads/sites/24/2018/10/IMG_2253-800x600.jpg\" alt=\"\" width=\"800\" height=\"600\" srcset=\"https://ww2.kqed.org/app/uploads/sites/24/2018/10/IMG_2253-800x600.jpg 800w, https://ww2.kqed.org/app/uploads/sites/24/2018/10/IMG_2253-160x120.jpg 160w, https://ww2.kqed.org/app/uploads/sites/24/2018/10/IMG_2253-768x576.jpg 768w, https://ww2.kqed.org/app/uploads/sites/24/2018/10/IMG_2253-1020x765.jpg 1020w, https://ww2.kqed.org/app/uploads/sites/24/2018/10/IMG_2253-1200x900.jpg 1200w, https://ww2.kqed.org/app/uploads/sites/24/2018/10/IMG_2253-1180x885.jpg 1180w, https://ww2.kqed.org/app/uploads/sites/24/2018/10/IMG_2253-960x720.jpg 960w, https://ww2.kqed.org/app/uploads/sites/24/2018/10/IMG_2253-240x180.jpg 240w, https://ww2.kqed.org/app/uploads/sites/24/2018/10/IMG_2253-375x281.jpg 375w, https://ww2.kqed.org/app/uploads/sites/24/2018/10/IMG_2253-520x390.jpg 520w\" sizes=\"(max-width: 800px) 100vw, 800px\">\u003cfigcaption class=\"wp-caption-text\">Outside of Pepples Donut Farm in Oakland.\u003c/figcaption>\u003c/figure>\n\u003cp>With multiple locations all across the Bay, \u003ca href=\"https://www.vegandonut.farm/\">Pepples Donut Farm\u003c/a> is a favorite spot for vegan donuts—and just about vegan anything. Monday through Friday you can pick up donuts and coffee from 7am to 3pm, or you can settle in for a full vegan breakfast 9am to 230pm. If you’re more of a brunch person, then you can grab a table on Saturday or Sunday for Donut Farm’s full menu.\u003c/p>\n\u003cp>There are some skeptical parties that aren’t sure what to make of vegan baked goods. Generally, it’s clear that those skeptics simply haven’t tried them yet, and Donut Farm’s donuts are a great place to start. The plain cake donut, for example, is moist and springy, with the crunch of sugar on the outside that makes it a real “regular donut” imitator in every way. For the donut connoisseurs, the top shelf offerings range from Salted Caramel to Whiskey Tangerine Fig to Sweet Curry (if you can catch it on rotation).\u003c/p>\n\u003cp>[ad floatright]\u003c/p>\n\u003cp>If you’re more interested in weekend donuts than a full brunch event, then Donut Farm has a special roster of donuts only available on Saturday and Sunday. You can snag a Banana Fritter, Cinnamon Swirl Twist or a Jelly-Filled, for example.\u003c/p>\n\n","blocks":[],"excerpt":"Whether you prefer a classic, sugar-coated snack or you’re a little more adventurous in your donut life, the Bay Area has a treat for you. ","status":"publish","parent":0,"modified":1558727380,"stats":{"hasAudio":false,"hasVideo":false,"hasChartOrMap":false,"iframeSrcs":[],"hasGoogleForm":false,"hasGallery":false,"hasHearkenModule":false,"hasPolis":false,"paragraphCount":25,"wordCount":1435},"headData":{"title":"5 Places in the Bay Area to Find the Perfect Donut | KQED","description":"Whether you prefer a classic, sugar-coated snack or you’re a little more adventurous in your donut life, the Bay Area has a treat for you. ","ogTitle":"","ogDescription":"","ogImgId":"","twTitle":"","twDescription":"","twImgId":"","schema":{"@context":"http://schema.org","@type":"Article","headline":"5 Places in the Bay Area to Find the Perfect Donut","datePublished":"2019-01-25T17:10:08.000Z","dateModified":"2019-05-24T19:49:40.000Z","image":"https://cdn.kqed.org/wp-content/uploads/2020/02/KQED-OG-Image@1x.png"}},"disqusIdentifier":"130740 https://ww2.kqed.org/bayareabites/?p=130740","disqusUrl":"https://ww2.kqed.org/bayareabites/2019/01/25/5-places-in-the-bay-area-to-find-the-perfect-donut/","disqusTitle":"5 Places in the Bay Area to Find the Perfect Donut","path":"/bayareabites/130740/5-places-in-the-bay-area-to-find-the-perfect-donut","audioTrackLength":null,"parsedContent":[{"type":"contentString","content":"\u003cdiv class=\"post-body\">\u003cp>\u003cp>\u003cspan style=\"font-weight: 400\">When it comes to a simple morning indulgence, few things beat a cup of coffee and a warm donut—except maybe \u003c/span>\u003ci>\u003cspan style=\"font-weight: 400\">two \u003c/span>\u003c/i>\u003cspan style=\"font-weight: 400\">donuts. Luckily, like with most foodie favorites, the Bay Area has a plethora of donut spots for you to try. Maybe you’re looking for the best classic donut, or you want to try a bunch of different flavors without committing to an entire donut. Maybe you’re on the hunt for an understated yet satisfying vegan option. \u003c/span>\u003c/p>\n\u003cp>\u003cspan style=\"font-weight: 400\">For this Bay Area Bites Guide, we have you covered. We’ve rounded up some classic favorites and exciting newcomers to the donut scenes in San Francisco and Oakland, taking you on a tasty tour from one side of the Bay bridge to the other. It’s worth noting, however, that this list is \u003c/span>\u003ci>\u003cspan style=\"font-weight: 400\">not \u003c/span>\u003c/i>\u003cspan style=\"font-weight: 400\">exhaustive. There are always new sweet spots to be discovered—even if you haven’t had your coffee yet.\u003c/span>\u003c/p>\n\u003ch2>Twisted Donuts\u003c/h2>\n\u003cp>\u003ca href=\"https://goo.gl/maps/GPiRYaorxGy\">1243 Noriega St\u003c/a>\u003cbr>\nSan Francisco, CA 94122\u003c/p>\n\u003cfigure id=\"attachment_130743\" class=\"wp-caption alignnone\" style=\"max-width: 800px\">\u003cimg class=\"size-medium wp-image-130743\" src=\"https://ww2.kqed.org/bayareabites/wp-content/uploads/sites/24/2018/10/IMG_2225-800x506.jpg\" alt=\"\" width=\"800\" height=\"506\" srcset=\"https://ww2.kqed.org/app/uploads/sites/24/2018/10/IMG_2225-800x506.jpg 800w, https://ww2.kqed.org/app/uploads/sites/24/2018/10/IMG_2225-160x101.jpg 160w, https://ww2.kqed.org/app/uploads/sites/24/2018/10/IMG_2225-768x485.jpg 768w, https://ww2.kqed.org/app/uploads/sites/24/2018/10/IMG_2225-1020x645.jpg 1020w, https://ww2.kqed.org/app/uploads/sites/24/2018/10/IMG_2225-1200x759.jpg 1200w, https://ww2.kqed.org/app/uploads/sites/24/2018/10/IMG_2225-1180x746.jpg 1180w, https://ww2.kqed.org/app/uploads/sites/24/2018/10/IMG_2225-960x607.jpg 960w, https://ww2.kqed.org/app/uploads/sites/24/2018/10/IMG_2225-240x152.jpg 240w, https://ww2.kqed.org/app/uploads/sites/24/2018/10/IMG_2225-375x237.jpg 375w, https://ww2.kqed.org/app/uploads/sites/24/2018/10/IMG_2225-520x329.jpg 520w\" sizes=\"(max-width: 800px) 100vw, 800px\">\u003cfigcaption class=\"wp-caption-text\">A cup of coffee and a Fruirrito at Twisted Donuts in San Francisco.\u003c/figcaption>\u003c/figure>\n\u003cp>Located smack in the middle of the Sunset district in San Francisco (just between the Inner and the Outer), \u003ca href=\"http://twisteddonutsf.com\">Twisted Donuts\u003c/a> is a small shop with a lot to offer. Open since 2014, Twisted specializes in nailing the classics during the week, like their old-fashioned cake or bavarian cream-filled donuts. But on the weekends, you can expand your palate to something a little more adventurous—like a “Fruirrito.”\u003c/p>\n\u003cp>A Fruirrito is a deep-fried wrapped confection filled with something sweet and it is absolutely a two-person undertaking. For example, the Nutella Fruirrito is layers of flakey pastry wrapped burrito-style around Nutella filling. The outside is glazed with sugar and topped with walnuts. It’s delicious, ridiculous, and unique to Twisted’s weekend menu.\u003c/p>\n\u003cp>\u003c/p>\u003c/div>","attributes":{"named":{},"numeric":[]}},{"type":"component","content":"","name":"ad","attributes":{"named":{"label":"fullwidth"},"numeric":["fullwidth"]}},{"type":"contentString","content":"\u003cdiv class=\"post-body\">\u003cp>\u003c/p>\n\u003cp>Like many donut shops around the Bay, Twisted Donuts asks for a $5 minimum when using your card for purchases, so either bring cash or plan to grab a cup of coffee to go with your donuts. If the latter, then be prepared for choice paralysis as the brew offerings range from several flavors, blends, and roasts so you can pair your cup with your bite. Once you’re ready, you can hike up the Mosaic Stairs on 16th, just a short walk away from Twisted. It’s a great view of the Bay and the perfect way to walk off your breakfast.\u003c/p>\n\u003ch2>Dynamo Donut + Coffee\u003c/h2>\n\u003cp>\u003ca href=\"https://goo.gl/maps/S1o6A3JACfH2\">2760 24th St\u003c/a>\u003cbr>\nSan Francisco, CA 94110\u003c/p>\n\u003cfigure id=\"attachment_130744\" class=\"wp-caption alignnone\" style=\"max-width: 800px\">\u003cimg class=\"size-medium wp-image-130744\" src=\"https://ww2.kqed.org/bayareabites/wp-content/uploads/sites/24/2018/10/IMG_2236-800x1044.jpg\" alt=\"\" width=\"800\" height=\"1044\" srcset=\"https://ww2.kqed.org/app/uploads/sites/24/2018/10/IMG_2236-800x1044.jpg 800w, https://ww2.kqed.org/app/uploads/sites/24/2018/10/IMG_2236-160x209.jpg 160w, https://ww2.kqed.org/app/uploads/sites/24/2018/10/IMG_2236-768x1002.jpg 768w, https://ww2.kqed.org/app/uploads/sites/24/2018/10/IMG_2236-1020x1330.jpg 1020w, https://ww2.kqed.org/app/uploads/sites/24/2018/10/IMG_2236-920x1200.jpg 920w, https://ww2.kqed.org/app/uploads/sites/24/2018/10/IMG_2236-1180x1539.jpg 1180w, https://ww2.kqed.org/app/uploads/sites/24/2018/10/IMG_2236-960x1252.jpg 960w, https://ww2.kqed.org/app/uploads/sites/24/2018/10/IMG_2236-240x313.jpg 240w, https://ww2.kqed.org/app/uploads/sites/24/2018/10/IMG_2236-375x489.jpg 375w, https://ww2.kqed.org/app/uploads/sites/24/2018/10/IMG_2236-520x678.jpg 520w\" sizes=\"(max-width: 800px) 100vw, 800px\">\u003cfigcaption class=\"wp-caption-text\">Artwork by Camila Valdez on the roof of Dynamo Donut + Coffee.\u003c/figcaption>\u003c/figure>\n\u003cp>One of the first things you’ll notice walking up to \u003ca href=\"https://dynamodonut.com/\">Dynamo Donut + Coffee\u003c/a> on 24th street in the Mission is the original \u003ca href=\"http://www.camilavaldez.com/\">Camila Valdez\u003c/a> sculpture on the roof. Even though you have to crane your neck to see it, the pink donut with a pair of women’s legs attached is hard to miss. Luckily, Dynamo’s donuts are attention-grabbing, so between the art and the snacks there’s plenty to see.\u003c/p>\n\u003cp>Dynamo has an impressive list of regular offerings, including some gluten-free options, that are anything but “everyday donuts.” Flavors like Passionfruit Milk Chocolate and Maple Bacon Apple are on the board every day, or you can try a seasonal offering Pumpkin Chocolate Chip in October, or Persimmon in November. For the gluten-intolerant donut-lover there’s monthly options like carrot cake or lemon poppyseed, but as a heads up to those with especially sensitive allergies, “I Am Not a Glutens” donuts are fried in the same oil as their more gluteny counterparts.\u003c/p>\n\u003cp>While the Mission location is a walk-up window, they also have a few tables inside their retro-inspired space. The open kitchen layout makes it so you can watch the donut making process while you enjoy your breakfast. If you’d like to munch and walk, you can take in the murals at \u003ca href=\"https://goo.gl/maps/NUNeN1vxBuS2\">Balmy Alley\u003c/a> just a few blocks away.\u003c/p>\n\u003ch2>Donut Savant\u003c/h2>\n\u003cp>\u003ca href=\"https://goo.gl/maps/Mas7k6T6k792\">1934 Broadway\u003c/a>\u003cbr>\nOakland, CA 94612\u003c/p>\n\u003cfigure id=\"attachment_130746\" class=\"wp-caption alignnone\" style=\"max-width: 800px\">\u003cimg class=\"size-medium wp-image-130746\" src=\"https://ww2.kqed.org/bayareabites/wp-content/uploads/sites/24/2018/10/IMG_2241-800x600.jpg\" alt=\"\" width=\"800\" height=\"600\" srcset=\"https://ww2.kqed.org/app/uploads/sites/24/2018/10/IMG_2241-800x600.jpg 800w, https://ww2.kqed.org/app/uploads/sites/24/2018/10/IMG_2241-160x120.jpg 160w, https://ww2.kqed.org/app/uploads/sites/24/2018/10/IMG_2241-768x576.jpg 768w, https://ww2.kqed.org/app/uploads/sites/24/2018/10/IMG_2241-1020x765.jpg 1020w, https://ww2.kqed.org/app/uploads/sites/24/2018/10/IMG_2241-1200x900.jpg 1200w, https://ww2.kqed.org/app/uploads/sites/24/2018/10/IMG_2241-1180x885.jpg 1180w, https://ww2.kqed.org/app/uploads/sites/24/2018/10/IMG_2241-960x720.jpg 960w, https://ww2.kqed.org/app/uploads/sites/24/2018/10/IMG_2241-240x180.jpg 240w, https://ww2.kqed.org/app/uploads/sites/24/2018/10/IMG_2241-375x281.jpg 375w, https://ww2.kqed.org/app/uploads/sites/24/2018/10/IMG_2241-520x390.jpg 520w\" sizes=\"(max-width: 800px) 100vw, 800px\">\u003cfigcaption class=\"wp-caption-text\">A couple of donut holes and a fresh pour-over at Donut Savant in Oakland.\u003c/figcaption>\u003c/figure>\n\u003cp>Jumping across the Bay Bridge lands you at \u003ca href=\"http://www.donutsavant.com/\">Donut Savant\u003c/a> in downtown Oakland, just outside the 19th street BART station. If you’re looking for a way to try a lot of different types of donuts without having to commit to a full dozen, then the wide variety of donut holes and bite-size pastries will be the perfect fit for you.\u003c/p>\n\u003cp>You may be familiar with the traditional donut hole—a small, bite-sized ball of donut meant to symbolize the middle of the donut that’s usually absent. In this case, however, you can get cronut holes and cinnamon roll holes in addition to more traditional glazed and cinnamon sugar donut holes. The cronut holes in particular are impressive as they manage to take all the flakey, sugary goodness of a cronut and make it bite-size without losing anything from the larger version. Of course, if you fall in love with a bite and want the full version, that’s always available as well.\u003c/p>\n\u003cp>If you’d like to order a pour-over and stay awhile with your donut samplings, then Donut Savant’s sleek and comfortable space has several tables for you to perch at. Otherwise, you can take a box to go and have a donut picnic at Lake Merritt, which is walking distance from the shop.\u003c/p>\n\u003ch2>Sweet Belly Desserts [CLOSED]\u003c/h2>\n\u003cp>\u003ca href=\"https://goo.gl/maps/MK8jMxzxtYN2\">435 19th St\u003c/a>\u003cbr>\nOakland, CA 94612\u003c/p>\n\u003cfigure id=\"attachment_130747\" class=\"wp-caption alignnone\" style=\"max-width: 800px\">\u003cimg class=\"size-medium wp-image-130747\" src=\"https://ww2.kqed.org/bayareabites/wp-content/uploads/sites/24/2018/10/IMG_2244-800x600.jpg\" alt=\"\" width=\"800\" height=\"600\" srcset=\"https://ww2.kqed.org/app/uploads/sites/24/2018/10/IMG_2244-800x600.jpg 800w, https://ww2.kqed.org/app/uploads/sites/24/2018/10/IMG_2244-160x120.jpg 160w, https://ww2.kqed.org/app/uploads/sites/24/2018/10/IMG_2244-768x576.jpg 768w, https://ww2.kqed.org/app/uploads/sites/24/2018/10/IMG_2244-1020x765.jpg 1020w, https://ww2.kqed.org/app/uploads/sites/24/2018/10/IMG_2244-1200x900.jpg 1200w, https://ww2.kqed.org/app/uploads/sites/24/2018/10/IMG_2244-1180x885.jpg 1180w, https://ww2.kqed.org/app/uploads/sites/24/2018/10/IMG_2244-960x720.jpg 960w, https://ww2.kqed.org/app/uploads/sites/24/2018/10/IMG_2244-240x180.jpg 240w, https://ww2.kqed.org/app/uploads/sites/24/2018/10/IMG_2244-375x281.jpg 375w, https://ww2.kqed.org/app/uploads/sites/24/2018/10/IMG_2244-520x390.jpg 520w\" sizes=\"(max-width: 800px) 100vw, 800px\">\u003cfigcaption class=\"wp-caption-text\">Two boxes of fresh donuts and dip at Sweet Belly Desserts.\u003c/figcaption>\u003c/figure>\n\u003cp>If you’d like to make a day of your donut tour, \u003ca href=\"https://www.sweetbellydesserts.com/\">Sweet Belly Desserts\u003c/a> is just around the corner from Donut Savant in downtown Oakland. The sugary answer to Uptown’s wildly popular \u003ca href=\"http://www.bellyuptown.com/\">Belly\u003c/a>, Sweet Belly offers handcrafted ice cream creations and other desserts. It’s the made-to-order mini donuts, however, that steal the show.\u003c/p>\n\u003cp>Much like its bright and immediately Instagrammable interior, ordering mini donuts at Sweet Belly is an experience. First, you decide the type of sugar your donuts will be tossed in—plain, cinnamon, and several exciting fruit options like citrus and strawberry. Then you choose a drizzle, which is a sweet syrup topping, and the dip, which can be a flavored whipped cream or a fruit sauce. It’s not until you’ve completed your order that the donuts are fried, making them fresh and still warm upon arrival.\u003c/p>\n\u003cp>Sweet Belly’s mini donuts come in boxes of six or twelve, and the packaging is lovely, with small designed desserts surrounding embossed lettering. You can take them as a gift or simply indulge in a few #foodie posts for your social media (we won’t blame you).\u003c/p>\n\u003cp>For those looking to satisfy a particularly intense sweet tooth, you can combine Sweet Belly’s handcrafted soft serve with a mini donut. It’s about $5 and it’s everything your daydream cravings have ever wanted.\u003c/p>\n\u003ch2>Pepples Donut Farm\u003c/h2>\n\u003cp>\u003ca href=\"https://goo.gl/maps/781GhxyGYMH2\">6037 San Pablo Ave.\u003c/a>\u003cbr>\nOakland, CA 94608\u003c/p>\n\u003cfigure id=\"attachment_130749\" class=\"wp-caption alignnone\" style=\"max-width: 800px\">\u003cimg class=\"size-medium wp-image-130749\" src=\"https://ww2.kqed.org/bayareabites/wp-content/uploads/sites/24/2018/10/IMG_2253-800x600.jpg\" alt=\"\" width=\"800\" height=\"600\" srcset=\"https://ww2.kqed.org/app/uploads/sites/24/2018/10/IMG_2253-800x600.jpg 800w, https://ww2.kqed.org/app/uploads/sites/24/2018/10/IMG_2253-160x120.jpg 160w, https://ww2.kqed.org/app/uploads/sites/24/2018/10/IMG_2253-768x576.jpg 768w, https://ww2.kqed.org/app/uploads/sites/24/2018/10/IMG_2253-1020x765.jpg 1020w, https://ww2.kqed.org/app/uploads/sites/24/2018/10/IMG_2253-1200x900.jpg 1200w, https://ww2.kqed.org/app/uploads/sites/24/2018/10/IMG_2253-1180x885.jpg 1180w, https://ww2.kqed.org/app/uploads/sites/24/2018/10/IMG_2253-960x720.jpg 960w, https://ww2.kqed.org/app/uploads/sites/24/2018/10/IMG_2253-240x180.jpg 240w, https://ww2.kqed.org/app/uploads/sites/24/2018/10/IMG_2253-375x281.jpg 375w, https://ww2.kqed.org/app/uploads/sites/24/2018/10/IMG_2253-520x390.jpg 520w\" sizes=\"(max-width: 800px) 100vw, 800px\">\u003cfigcaption class=\"wp-caption-text\">Outside of Pepples Donut Farm in Oakland.\u003c/figcaption>\u003c/figure>\n\u003cp>With multiple locations all across the Bay, \u003ca href=\"https://www.vegandonut.farm/\">Pepples Donut Farm\u003c/a> is a favorite spot for vegan donuts—and just about vegan anything. Monday through Friday you can pick up donuts and coffee from 7am to 3pm, or you can settle in for a full vegan breakfast 9am to 230pm. If you’re more of a brunch person, then you can grab a table on Saturday or Sunday for Donut Farm’s full menu.\u003c/p>\n\u003cp>There are some skeptical parties that aren’t sure what to make of vegan baked goods. Generally, it’s clear that those skeptics simply haven’t tried them yet, and Donut Farm’s donuts are a great place to start. The plain cake donut, for example, is moist and springy, with the crunch of sugar on the outside that makes it a real “regular donut” imitator in every way. For the donut connoisseurs, the top shelf offerings range from Salted Caramel to Whiskey Tangerine Fig to Sweet Curry (if you can catch it on rotation).\u003c/p>\n\u003cp>\u003c/p>\u003c/div>","attributes":{"named":{},"numeric":[]}},{"type":"component","content":"","name":"ad","attributes":{"named":{"label":"floatright"},"numeric":["floatright"]}},{"type":"contentString","content":"\u003cdiv class=\"post-body\">\u003cp>\u003c/p>\n\u003cp>If you’re more interested in weekend donuts than a full brunch event, then Donut Farm has a special roster of donuts only available on Saturday and Sunday. You can snag a Banana Fritter, Cinnamon Swirl Twist or a Jelly-Filled, for example.\u003c/p>\n\n\u003c/div>\u003c/p>","attributes":{"named":{},"numeric":[]}}],"link":"/bayareabites/130740/5-places-in-the-bay-area-to-find-the-perfect-donut","authors":["11546"],"categories":["bayareabites_1516","bayareabites_1653","bayareabites_8770","bayareabites_11028","bayareabites_10028","bayareabites_1807","bayareabites_90"],"tags":["bayareabites_14453","bayareabites_477","bayareabites_125","bayareabites_49","bayareabites_2889","bayareabites_14757","bayareabites_14745","bayareabites_9359"],"featImg":"bayareabites_130751","label":"bayareabites"},"bayareabites_131884":{"type":"posts","id":"bayareabites_131884","meta":{"index":"posts_1591205157","site":"bayareabites","id":"131884","score":null,"sort":[1547658036000]},"guestAuthors":[],"slug":"food-trends-actually-tasty-or-just-instagram-fodder","title":"Food Trends: Actually Tasty or Just Instagram Fodder?","publishDate":1547658036,"format":"video","headTitle":"Bay Area Bites | KQED Food","labelTerm":{"site":"bayareabites"},"content":"\u003cp style=\"text-align: center\">\u003cem>Video by \u003ca href=\"https://www.kqed.org/author/vicchin\">Vic Chin\u003c/a>, Photos and Words by \u003ca href=\"https://www.kqed.org/author/gcheung\">Grace Cheung\u003c/a>, Animation by \u003ca href=\"https://www.headexplodie.co/contact/\">Annie Wong\u003c/a>\u003c/em>\u003c/p>\n\u003cp>Are unicorn foods, edible gold, the Instant Pot, and other food trends actually tasty or just Instagram-friendly foods? People on the streets and in KQED weigh in on camera, and we share where you can get your own \"Instagram-friendly\" treats around the Bay below.\u003c/p>\n\u003cp>How many of these have you tried?\u003c/p>\n\u003ch2>Unicorn Foods\u003c/h2>\n\u003cp>[contextly_sidebar id=\"H76wOzs3A3bH2A5GDbgwflm6tDvyxth4\"]\u003c/p>\n\u003cp>You might remember this little old trend from 2017, but it made a comeback in 2018 to cover pretty much anything that was a vibrant color explosion (and \"super cute\"). In fact, the #1 Google search for food in 2018 was the term \u003ca href=\"https://trends.google.com/trends/yis/2018/US/\">\"unicorn cake.\"\u003c/a> What's the appeal? We'll have to assume it's for the gram!\u003c/p>\n\u003cfigure id=\"attachment_132132\" class=\"wp-caption aligncenter\" style=\"max-width: 1920px\">\u003cimg class=\"size-full wp-image-132132\" src=\"https://ww2.kqed.org/bayareabites/wp-content/uploads/sites/24/2019/01/IMG_0317-e1547487812208.jpg\" alt='A \"unicorn\" birthday cake latte from Home Cafe' width=\"1920\" height=\"2560\">\u003cfigcaption class=\"wp-caption-text\">A \"unicorn\" birthday cake latte from Home Cafe \u003ccite>(Grace Cheung)\u003c/cite>\u003c/figcaption>\u003c/figure>\n\u003cp>The term \"unicorn\" covers a lot, but it's generally going to be anything very colorful with a lot of blues, pinks, and purples for a whimsical fairy tale feel. If you're not over the unicorn craze, try \u003ca href=\"https://comstocksaloon.com/\">\u003cstrong>Comstock Saloon\u003c/strong>\u003c/a> or \u003ca href=\"http://homecoffeesf.com/menu/\">\u003cstrong>Home Cafe\u003c/strong>\u003c/a> for bursts of color on your table and in your latte.\u003c/p>\n\u003ch2>Plant-Based Burgers\u003c/h2>\n\u003cfigure id=\"attachment_132133\" class=\"wp-caption aligncenter\" style=\"max-width: 1920px\">\u003cimg class=\"size-full wp-image-132133\" src=\"https://ww2.kqed.org/bayareabites/wp-content/uploads/sites/24/2019/01/429A5522-E692-42CA-BD35-E1E8C8E2BB5E-e1547487888490.jpg\" alt=\"The Impossible Burger can be found at restaurants like Umami Burger\" width=\"1920\" height=\"2560\">\u003cfigcaption class=\"wp-caption-text\">The Impossible Burger can be found at restaurants like Umami Burger \u003ccite>(Grace Cheung)\u003c/cite>\u003c/figcaption>\u003c/figure>\n\u003cp>If Beyonce and Jay-Z recommend going vegan, we're doing it. Just kidding, but the plant-based diet craze has really boomed in the last few years and the most recognized name in the game (or the news) was probably the Impossible Burger. This company promised their scientifically-engineered patty would do the impossible: replace meat with you barely noticing the difference.\u003c/p>\n\u003cfigure id=\"attachment_132159\" class=\"wp-caption aligncenter\" style=\"max-width: 1920px\">\u003cimg class=\"size-full wp-image-132159\" src=\"https://ww2.kqed.org/bayareabites/wp-content/uploads/sites/24/2019/01/impossible-burger-bleed.jpg\" alt=\"The Impossible Burger even bleeds like a real meat patty.\" width=\"1920\" height=\"1080\" srcset=\"https://ww2.kqed.org/app/uploads/sites/24/2019/01/impossible-burger-bleed.jpg 1920w, https://ww2.kqed.org/app/uploads/sites/24/2019/01/impossible-burger-bleed-160x90.jpg 160w, https://ww2.kqed.org/app/uploads/sites/24/2019/01/impossible-burger-bleed-800x450.jpg 800w, https://ww2.kqed.org/app/uploads/sites/24/2019/01/impossible-burger-bleed-768x432.jpg 768w, https://ww2.kqed.org/app/uploads/sites/24/2019/01/impossible-burger-bleed-1020x574.jpg 1020w, https://ww2.kqed.org/app/uploads/sites/24/2019/01/impossible-burger-bleed-1200x675.jpg 1200w, https://ww2.kqed.org/app/uploads/sites/24/2019/01/impossible-burger-bleed-1180x664.jpg 1180w, https://ww2.kqed.org/app/uploads/sites/24/2019/01/impossible-burger-bleed-960x540.jpg 960w, https://ww2.kqed.org/app/uploads/sites/24/2019/01/impossible-burger-bleed-240x135.jpg 240w, https://ww2.kqed.org/app/uploads/sites/24/2019/01/impossible-burger-bleed-375x211.jpg 375w, https://ww2.kqed.org/app/uploads/sites/24/2019/01/impossible-burger-bleed-520x293.jpg 520w\" sizes=\"(max-width: 1920px) 100vw, 1920px\">\u003cfigcaption class=\"wp-caption-text\">The Impossible Burger even bleeds like a real meat patty. \u003ccite>(Vic Chin)\u003c/cite>\u003c/figcaption>\u003c/figure>\n\u003cp>Surprisingly, they didn't land too far off from this promise, and, despite a long stand-off with the FDA, their patty was widely adopted by many restaurants around the country! They even appeared in fast-food restaurants like White Castle, Hopdoddy's and Umami, and are making moves to be sold in grocery stores.\u003c/p>\n\u003cp>[ad fullwidth]\u003c/p>\n\u003cp>If you're craving it or just want to try one, hit up \u003ca href=\"https://www.umamiburger.com/\">\u003cstrong>Umami Burger\u003c/strong>\u003c/a>, \u003ca href=\"http://cockscombsf.com/\">\u003cstrong>Cockscomb\u003c/strong>\u003c/a>, or the robot burger-making restaurant \u003ca href=\"http://creator.rest/\">\u003cstrong>Creator\u003c/strong>\u003c/a>!\u003c/p>\n\u003ch2>Cheese Tea\u003c/h2>\n\u003cfigure id=\"attachment_132134\" class=\"wp-caption aligncenter\" style=\"max-width: 1920px\">\u003cimg class=\"size-full wp-image-132134\" src=\"https://ww2.kqed.org/bayareabites/wp-content/uploads/sites/24/2019/01/IMG_0307-e1547487952647.jpg\" alt=\"At Tancca, you have cheese foam, puff cream, and other topping options.\" width=\"1920\" height=\"2560\">\u003cfigcaption class=\"wp-caption-text\">At Tancca, you have cheese foam, puff cream, and other topping options. \u003ccite>(Grace Cheung)\u003c/cite>\u003c/figcaption>\u003c/figure>\n\u003cp>Cheese foam might sound off-putting, but it's actually quite tasty! The foam is a topping for your tea (milk or not) and has a sweet and savory taste — almost like a cream cheese foam (does that sound any better?). It adds a savory finish to your tea, and can give you that lovely white mustache that you envied in Got Milk? commercials.\u003c/p>\n\u003cp>Eater wrote that cheese tea \u003ca href=\"https://www.eater.com/2018/9/21/17846630/cheese-tea-trend-explained\">\"is still waiting to achieve widespread popularity,\"\u003c/a> but we think the trend has already hit the Bay Area. In a place where boba is entrenched in daily life, the taste and visual appeal of cheese tea make it a popular beverage for a lot of people!\u003c/p>\n\u003cp>If you want cheese tea, a few places we've found them are \u003cb>\u003ca href=\"https://www.yelp.com/search?find_desc=tancca&find_loc=San+Francisco%2C+CA&ns=1\">Tancca\u003c/a>\u003c/b>, \u003cb>\u003ca href=\"https://www.steapteabar.com/\">Steap\u003c/a>\u003c/b>, and \u003cb>\u003ca href=\"http://www.happy-lemon.com/en/\">Happy Lemon\u003c/a>\u003c/b>.\u003c/p>\n\u003ch2>Instant Pot\u003c/h2>\n\u003cfigure id=\"attachment_132157\" class=\"wp-caption aligncenter\" style=\"max-width: 640px\">\u003cimg class=\"size-full wp-image-132157\" src=\"https://ww2.kqed.org/bayareabites/wp-content/uploads/sites/24/2019/01/instant-pot-chili.gif\" alt=\"All the ingredients for chili thrown into an Instant Pot.\" width=\"640\" height=\"360\">\u003cfigcaption class=\"wp-caption-text\">All the ingredients for chili thrown into an Instant Pot. \u003ccite>(Vic Chin)\u003c/cite>\u003c/figcaption>\u003c/figure>\n\u003cp>Oh, the instant pot. Home cooks are obsessed with it because it can speed up your cooking by an insane percentage — even taking into consideration all the prep work and how long it takes the pot to reach full pressure. But wait, it's not \u003ci>just\u003c/i> a pressure cooker! It's a multi-use tool for steaming, baking, heating up leftovers AND high-pressure cooking. Want some beef stew but all you have is frozen beef in the freezer and hungry kids at the table? Throw it all in the Instant Pot and your meal is ready in minutes.\u003c/p>\n\u003cp>[contextly_sidebar id=\"Pumau2vxH3umPLW4lRUxUs7DrSj3ny9t\"]\u003c/p>\n\u003cp>A hop and a skip away, there is even a community of megafans on Facebook (at the time this was written, the \u003ca href=\"https://www.facebook.com/groups/InstantPotCommunity/\">Instant Pot Community group\u003c/a> was at 1,808,894 members) sharing their successes, failures, favorite recipes and advice with each other. When asked about favorite features, one member said, \"It [the Instant Pot] warms food too; it’s not JUST for cooking! I use my IP to reheat leftovers ALL THE TIME anymore. We don’t microwave. Our toaster oven works but takes forever. Stovetop takes too much minding. I just set it for 0 minutes and high pressure, quick release and enjoy the effortless hot food!\" It's not magic, guys, it's the power of technology that was developed by some geniuses in Canada.\u003c/p>\n\u003cp>Maybe there are some professional kitchens around the Bay using the Instant Pot, but it's most likely that you own one or have a friend/family member that swears by it and has one (or more) at home.\u003c/p>\n\u003ch2>Edible Gold\u003c/h2>\n\u003cfigure id=\"attachment_132135\" class=\"wp-caption aligncenter\" style=\"max-width: 1920px\">\u003cimg class=\"size-full wp-image-132135\" src=\"https://ww2.kqed.org/bayareabites/wp-content/uploads/sites/24/2019/01/IMG_9848-e1547488031584.jpg\" alt=\"A hojicha ice cream cone at Matcha Cafe Maiko can be adorned with a gold sheet for a few extra bucks.\" width=\"1920\" height=\"2560\">\u003cfigcaption class=\"wp-caption-text\">A hojicha ice cream cone at Matcha Cafe Maiko can be adorned with a gold sheet for a few extra bucks. \u003ccite>(Grace Cheung)\u003c/cite>\u003c/figcaption>\u003c/figure>\n\u003cp>Treat. your. self. That seemed to be the mantra in 2018, which is why we might have seen the explosion of gold-covered food and drink last year. Do they have any nutritional value? No. Do they add anything taste-wise? Nope. Does the gold make you feel like you're worth millions of dollars when you see it garnishing or sometimes completely covering what you're about to eat? Maybe just a little.\u003c/p>\n\u003cp>Those shiny treats make great Instagram fodder and make you feel a little richer (without the cost of getting actual gold jewelry). You can even get the gold leaf in flake or sheet form to put on your homemade food! The sheets are extremely delicate and can rip easily, so be careful when handling them.\u003c/p>\n\u003cp>We spotted gold-adorned foods at \u003ca href=\"http://www.matchacafe-maiko.com/eng/\">\u003cb>Matcha Cafe Maiko\u003c/b>\u003c/a>, \u003ca href=\"http://www.maruyasf.org/\">\u003cstrong>Maruya\u003c/strong>\u003c/a> and \u003ca href=\"https://www.theshotasf.com/\">\u003cstrong>The Shota\u003c/strong>\u003c/a> to name a few, but there are plenty of spots around the Bay dipping into this trend.\u003c/p>\n\u003cp>\u003c/p>\n\u003cp>What are the food trends you're predicting for 2019? Is it more alternative milks? Maybe a twist on cannabis cuisine? Tag us on \u003ca href=\"https://www.facebook.com/bayareabites/\">Facebook\u003c/a>, \u003ca href=\"https://www.instagram.com/kqedbayareabites/\">Instagram\u003c/a>, or \u003ca href=\"https://twitter.com/bayareabites\">Twitter\u003c/a> with your guesses.\u003c/p>\n\n","blocks":[],"excerpt":"Cheese foam, unicorn foods, and, yes, the instant pot. Are food trends even good (or are they just good for Instagram)?","status":"publish","parent":0,"modified":1548188802,"stats":{"hasAudio":false,"hasVideo":false,"hasChartOrMap":false,"iframeSrcs":[],"hasGoogleForm":false,"hasGallery":false,"hasHearkenModule":false,"hasPolis":false,"paragraphCount":21,"wordCount":1017},"headData":{"title":"Food Trends: Actually Tasty or Just Instagram Fodder? | KQED","description":"Cheese foam, unicorn foods, and, yes, the instant pot. Are food trends even good (or are they just good for Instagram)?","ogTitle":"","ogDescription":"","ogImgId":"","twTitle":"","twDescription":"","twImgId":"","schema":{"@context":"http://schema.org","@type":"Article","headline":"Food Trends: Actually Tasty or Just Instagram Fodder?","datePublished":"2019-01-16T17:00:36.000Z","dateModified":"2019-01-22T20:26:42.000Z","image":"https://cdn.kqed.org/wp-content/uploads/2020/02/KQED-OG-Image@1x.png"}},"disqusIdentifier":"131884 https://ww2.kqed.org/bayareabites/?p=131884","disqusUrl":"https://ww2.kqed.org/bayareabites/2019/01/16/food-trends-actually-tasty-or-just-instagram-fodder/","disqusTitle":"Food Trends: Actually Tasty or Just Instagram Fodder?","videoEmbed":"https://youtu.be/PiQun7BQdSo","path":"/bayareabites/131884/food-trends-actually-tasty-or-just-instagram-fodder","audioTrackLength":null,"parsedContent":[{"type":"contentString","content":"\u003cdiv class=\"post-body\">\u003cp>\u003cp style=\"text-align: center\">\u003cem>Video by \u003ca href=\"https://www.kqed.org/author/vicchin\">Vic Chin\u003c/a>, Photos and Words by \u003ca href=\"https://www.kqed.org/author/gcheung\">Grace Cheung\u003c/a>, Animation by \u003ca href=\"https://www.headexplodie.co/contact/\">Annie Wong\u003c/a>\u003c/em>\u003c/p>\n\u003cp>Are unicorn foods, edible gold, the Instant Pot, and other food trends actually tasty or just Instagram-friendly foods? People on the streets and in KQED weigh in on camera, and we share where you can get your own \"Instagram-friendly\" treats around the Bay below.\u003c/p>\n\u003cp>How many of these have you tried?\u003c/p>\n\u003ch2>Unicorn Foods\u003c/h2>\n\u003cp>\u003c/p>\u003cp>\u003c/p>\u003cp>\u003c/p>\n\u003cp>You might remember this little old trend from 2017, but it made a comeback in 2018 to cover pretty much anything that was a vibrant color explosion (and \"super cute\"). In fact, the #1 Google search for food in 2018 was the term \u003ca href=\"https://trends.google.com/trends/yis/2018/US/\">\"unicorn cake.\"\u003c/a> What's the appeal? We'll have to assume it's for the gram!\u003c/p>\n\u003cfigure id=\"attachment_132132\" class=\"wp-caption aligncenter\" style=\"max-width: 1920px\">\u003cimg class=\"size-full wp-image-132132\" src=\"https://ww2.kqed.org/bayareabites/wp-content/uploads/sites/24/2019/01/IMG_0317-e1547487812208.jpg\" alt='A \"unicorn\" birthday cake latte from Home Cafe' width=\"1920\" height=\"2560\">\u003cfigcaption class=\"wp-caption-text\">A \"unicorn\" birthday cake latte from Home Cafe \u003ccite>(Grace Cheung)\u003c/cite>\u003c/figcaption>\u003c/figure>\n\u003cp>The term \"unicorn\" covers a lot, but it's generally going to be anything very colorful with a lot of blues, pinks, and purples for a whimsical fairy tale feel. If you're not over the unicorn craze, try \u003ca href=\"https://comstocksaloon.com/\">\u003cstrong>Comstock Saloon\u003c/strong>\u003c/a> or \u003ca href=\"http://homecoffeesf.com/menu/\">\u003cstrong>Home Cafe\u003c/strong>\u003c/a> for bursts of color on your table and in your latte.\u003c/p>\n\u003ch2>Plant-Based Burgers\u003c/h2>\n\u003cfigure id=\"attachment_132133\" class=\"wp-caption aligncenter\" style=\"max-width: 1920px\">\u003cimg class=\"size-full wp-image-132133\" src=\"https://ww2.kqed.org/bayareabites/wp-content/uploads/sites/24/2019/01/429A5522-E692-42CA-BD35-E1E8C8E2BB5E-e1547487888490.jpg\" alt=\"The Impossible Burger can be found at restaurants like Umami Burger\" width=\"1920\" height=\"2560\">\u003cfigcaption class=\"wp-caption-text\">The Impossible Burger can be found at restaurants like Umami Burger \u003ccite>(Grace Cheung)\u003c/cite>\u003c/figcaption>\u003c/figure>\n\u003cp>If Beyonce and Jay-Z recommend going vegan, we're doing it. Just kidding, but the plant-based diet craze has really boomed in the last few years and the most recognized name in the game (or the news) was probably the Impossible Burger. This company promised their scientifically-engineered patty would do the impossible: replace meat with you barely noticing the difference.\u003c/p>\n\u003cfigure id=\"attachment_132159\" class=\"wp-caption aligncenter\" style=\"max-width: 1920px\">\u003cimg class=\"size-full wp-image-132159\" src=\"https://ww2.kqed.org/bayareabites/wp-content/uploads/sites/24/2019/01/impossible-burger-bleed.jpg\" alt=\"The Impossible Burger even bleeds like a real meat patty.\" width=\"1920\" height=\"1080\" srcset=\"https://ww2.kqed.org/app/uploads/sites/24/2019/01/impossible-burger-bleed.jpg 1920w, https://ww2.kqed.org/app/uploads/sites/24/2019/01/impossible-burger-bleed-160x90.jpg 160w, https://ww2.kqed.org/app/uploads/sites/24/2019/01/impossible-burger-bleed-800x450.jpg 800w, https://ww2.kqed.org/app/uploads/sites/24/2019/01/impossible-burger-bleed-768x432.jpg 768w, https://ww2.kqed.org/app/uploads/sites/24/2019/01/impossible-burger-bleed-1020x574.jpg 1020w, https://ww2.kqed.org/app/uploads/sites/24/2019/01/impossible-burger-bleed-1200x675.jpg 1200w, https://ww2.kqed.org/app/uploads/sites/24/2019/01/impossible-burger-bleed-1180x664.jpg 1180w, https://ww2.kqed.org/app/uploads/sites/24/2019/01/impossible-burger-bleed-960x540.jpg 960w, https://ww2.kqed.org/app/uploads/sites/24/2019/01/impossible-burger-bleed-240x135.jpg 240w, https://ww2.kqed.org/app/uploads/sites/24/2019/01/impossible-burger-bleed-375x211.jpg 375w, https://ww2.kqed.org/app/uploads/sites/24/2019/01/impossible-burger-bleed-520x293.jpg 520w\" sizes=\"(max-width: 1920px) 100vw, 1920px\">\u003cfigcaption class=\"wp-caption-text\">The Impossible Burger even bleeds like a real meat patty. \u003ccite>(Vic Chin)\u003c/cite>\u003c/figcaption>\u003c/figure>\n\u003cp>Surprisingly, they didn't land too far off from this promise, and, despite a long stand-off with the FDA, their patty was widely adopted by many restaurants around the country! They even appeared in fast-food restaurants like White Castle, Hopdoddy's and Umami, and are making moves to be sold in grocery stores.\u003c/p>\n\u003cp>\u003c/p>\u003c/div>","attributes":{"named":{},"numeric":[]}},{"type":"component","content":"","name":"ad","attributes":{"named":{"label":"fullwidth"},"numeric":["fullwidth"]}},{"type":"contentString","content":"\u003cdiv class=\"post-body\">\u003cp>\u003c/p>\n\u003cp>If you're craving it or just want to try one, hit up \u003ca href=\"https://www.umamiburger.com/\">\u003cstrong>Umami Burger\u003c/strong>\u003c/a>, \u003ca href=\"http://cockscombsf.com/\">\u003cstrong>Cockscomb\u003c/strong>\u003c/a>, or the robot burger-making restaurant \u003ca href=\"http://creator.rest/\">\u003cstrong>Creator\u003c/strong>\u003c/a>!\u003c/p>\n\u003ch2>Cheese Tea\u003c/h2>\n\u003cfigure id=\"attachment_132134\" class=\"wp-caption aligncenter\" style=\"max-width: 1920px\">\u003cimg class=\"size-full wp-image-132134\" src=\"https://ww2.kqed.org/bayareabites/wp-content/uploads/sites/24/2019/01/IMG_0307-e1547487952647.jpg\" alt=\"At Tancca, you have cheese foam, puff cream, and other topping options.\" width=\"1920\" height=\"2560\">\u003cfigcaption class=\"wp-caption-text\">At Tancca, you have cheese foam, puff cream, and other topping options. \u003ccite>(Grace Cheung)\u003c/cite>\u003c/figcaption>\u003c/figure>\n\u003cp>Cheese foam might sound off-putting, but it's actually quite tasty! The foam is a topping for your tea (milk or not) and has a sweet and savory taste — almost like a cream cheese foam (does that sound any better?). It adds a savory finish to your tea, and can give you that lovely white mustache that you envied in Got Milk? commercials.\u003c/p>\n\u003cp>Eater wrote that cheese tea \u003ca href=\"https://www.eater.com/2018/9/21/17846630/cheese-tea-trend-explained\">\"is still waiting to achieve widespread popularity,\"\u003c/a> but we think the trend has already hit the Bay Area. In a place where boba is entrenched in daily life, the taste and visual appeal of cheese tea make it a popular beverage for a lot of people!\u003c/p>\n\u003cp>If you want cheese tea, a few places we've found them are \u003cb>\u003ca href=\"https://www.yelp.com/search?find_desc=tancca&find_loc=San+Francisco%2C+CA&ns=1\">Tancca\u003c/a>\u003c/b>, \u003cb>\u003ca href=\"https://www.steapteabar.com/\">Steap\u003c/a>\u003c/b>, and \u003cb>\u003ca href=\"http://www.happy-lemon.com/en/\">Happy Lemon\u003c/a>\u003c/b>.\u003c/p>\n\u003ch2>Instant Pot\u003c/h2>\n\u003cfigure id=\"attachment_132157\" class=\"wp-caption aligncenter\" style=\"max-width: 640px\">\u003cimg class=\"size-full wp-image-132157\" src=\"https://ww2.kqed.org/bayareabites/wp-content/uploads/sites/24/2019/01/instant-pot-chili.gif\" alt=\"All the ingredients for chili thrown into an Instant Pot.\" width=\"640\" height=\"360\">\u003cfigcaption class=\"wp-caption-text\">All the ingredients for chili thrown into an Instant Pot. \u003ccite>(Vic Chin)\u003c/cite>\u003c/figcaption>\u003c/figure>\n\u003cp>Oh, the instant pot. Home cooks are obsessed with it because it can speed up your cooking by an insane percentage — even taking into consideration all the prep work and how long it takes the pot to reach full pressure. But wait, it's not \u003ci>just\u003c/i> a pressure cooker! It's a multi-use tool for steaming, baking, heating up leftovers AND high-pressure cooking. Want some beef stew but all you have is frozen beef in the freezer and hungry kids at the table? Throw it all in the Instant Pot and your meal is ready in minutes.\u003c/p>\n\u003cp>\u003c/p>\u003cp>\u003c/p>\u003cp>\u003c/p>\n\u003cp>A hop and a skip away, there is even a community of megafans on Facebook (at the time this was written, the \u003ca href=\"https://www.facebook.com/groups/InstantPotCommunity/\">Instant Pot Community group\u003c/a> was at 1,808,894 members) sharing their successes, failures, favorite recipes and advice with each other. When asked about favorite features, one member said, \"It [the Instant Pot] warms food too; it’s not JUST for cooking! I use my IP to reheat leftovers ALL THE TIME anymore. We don’t microwave. Our toaster oven works but takes forever. Stovetop takes too much minding. I just set it for 0 minutes and high pressure, quick release and enjoy the effortless hot food!\" It's not magic, guys, it's the power of technology that was developed by some geniuses in Canada.\u003c/p>\n\u003cp>Maybe there are some professional kitchens around the Bay using the Instant Pot, but it's most likely that you own one or have a friend/family member that swears by it and has one (or more) at home.\u003c/p>\n\u003ch2>Edible Gold\u003c/h2>\n\u003cfigure id=\"attachment_132135\" class=\"wp-caption aligncenter\" style=\"max-width: 1920px\">\u003cimg class=\"size-full wp-image-132135\" src=\"https://ww2.kqed.org/bayareabites/wp-content/uploads/sites/24/2019/01/IMG_9848-e1547488031584.jpg\" alt=\"A hojicha ice cream cone at Matcha Cafe Maiko can be adorned with a gold sheet for a few extra bucks.\" width=\"1920\" height=\"2560\">\u003cfigcaption class=\"wp-caption-text\">A hojicha ice cream cone at Matcha Cafe Maiko can be adorned with a gold sheet for a few extra bucks. \u003ccite>(Grace Cheung)\u003c/cite>\u003c/figcaption>\u003c/figure>\n\u003cp>Treat. your. self. That seemed to be the mantra in 2018, which is why we might have seen the explosion of gold-covered food and drink last year. Do they have any nutritional value? No. Do they add anything taste-wise? Nope. Does the gold make you feel like you're worth millions of dollars when you see it garnishing or sometimes completely covering what you're about to eat? Maybe just a little.\u003c/p>\n\u003cp>Those shiny treats make great Instagram fodder and make you feel a little richer (without the cost of getting actual gold jewelry). You can even get the gold leaf in flake or sheet form to put on your homemade food! The sheets are extremely delicate and can rip easily, so be careful when handling them.\u003c/p>\n\u003cp>We spotted gold-adorned foods at \u003ca href=\"http://www.matchacafe-maiko.com/eng/\">\u003cb>Matcha Cafe Maiko\u003c/b>\u003c/a>, \u003ca href=\"http://www.maruyasf.org/\">\u003cstrong>Maruya\u003c/strong>\u003c/a> and \u003ca href=\"https://www.theshotasf.com/\">\u003cstrong>The Shota\u003c/strong>\u003c/a> to name a few, but there are plenty of spots around the Bay dipping into this trend.\u003c/p>\n\u003cp>\u003c/p>\n\u003cp>What are the food trends you're predicting for 2019? Is it more alternative milks? Maybe a twist on cannabis cuisine? Tag us on \u003ca href=\"https://www.facebook.com/bayareabites/\">Facebook\u003c/a>, \u003ca href=\"https://www.instagram.com/kqedbayareabites/\">Instagram\u003c/a>, or \u003ca href=\"https://twitter.com/bayareabites\">Twitter\u003c/a> with your guesses.\u003c/p>\n\n\u003c/div>\u003c/p>","attributes":{"named":{},"numeric":[]}}],"link":"/bayareabites/131884/food-trends-actually-tasty-or-just-instagram-fodder","authors":["11404","11350"],"categories":["bayareabites_2998","bayareabites_1516","bayareabites_1653","bayareabites_11028","bayareabites_10028","bayareabites_4084","bayareabites_13746"],"tags":["bayareabites_49","bayareabites_14780","bayareabites_2256","bayareabites_15718","bayareabites_336"],"featImg":"bayareabites_132131","label":"bayareabites"},"bayareabites_131942":{"type":"posts","id":"bayareabites_131942","meta":{"index":"posts_1591205157","site":"bayareabites","id":"131942","score":null,"sort":[1547226813000]},"guestAuthors":[],"slug":"5-alcohol-free-alternatives-for-your-dry-january","title":"5 Alcohol-Free Alternatives For Your Dry January","publishDate":1547226813,"format":"standard","headTitle":"Bay Area Bites | KQED Food","labelTerm":{"site":"bayareabites"},"content":"\u003cp>Freshly motivated to accomplish New Year’s resolutions after the excess of the holidays, a lot of people choose to scale back drinking alcohol during January. A “dry January” looks different for each person, depending on what they’re trying to accomplish — maybe they keep the glass of wine with dinner but skip the bar outings on Friday night. Or maybe they limit themselves to one drink only at the company happy hour.\u003c/p>\n\u003cp>Regardless, skipping drinking can sometimes feel like it's costing you your social life. Whether you’re suffering FOMO seeing your friends at the newest wine bar or compromising your goal for a second beer at game night, finding ways to stick to your guns when everyone around you is drinking can be rough. But, it can be a positive to stick it out according to life coach and speaker \u003ca href=\"http://alliestarkwellness.com/\">Allie Stark.\u003c/a>\u003c/p>\n\u003cp>“Deciding to cut back or stop consuming alcohol after the excess of the holiday season is an active change in a behavior that will inherently influence your thoughts and your feelings,” says Stark. “This can have a large impact on your relationships, your motivation at work, your internal confidence, and so much more.”\u003c/p>\n\u003cp>Stark suggests communicating your goals clearly and openly with friends and family, then stick to the folk who understand why you’re choosing not to drink — at least for a little bit. “Actively choose to surround yourself with friends and family that respect your decision to not drink for the time being, as it will allow for an easier and more enjoyable experience while it is taking place,” says Stark.\u003c/p>\n\u003cp>Luckily, there is an endless combination of places to meet friends and enjoy one another in the Bay Area that don’t involve alcohol. Here are just a few to get you started:\u003c/p>\n\u003ch2>Church of Eight Wheels\u003c/h2>\n\u003cp>\u003ca href=\"https://goo.gl/maps/x6VZ6bZjWCr\">554 Fillmore St\u003c/a>\u003cbr>\nSan Francisco, CA 94117\u003c/p>\n\u003cfigure id=\"attachment_131947\" class=\"wp-caption aligncenter\" style=\"max-width: 828px\">\u003cimg src=\"https://ww2.kqed.org/bayareabites/wp-content/uploads/sites/24/2019/01/IMG_5307.jpg\" alt=\"Skaters zip by the DJ booth at the Church of Eight Wheels.\" width=\"828\" height=\"1472\" class=\"size-full wp-image-131947\" srcset=\"https://ww2.kqed.org/app/uploads/sites/24/2019/01/IMG_5307.jpg 828w, https://ww2.kqed.org/app/uploads/sites/24/2019/01/IMG_5307-160x284.jpg 160w, https://ww2.kqed.org/app/uploads/sites/24/2019/01/IMG_5307-800x1422.jpg 800w, https://ww2.kqed.org/app/uploads/sites/24/2019/01/IMG_5307-768x1365.jpg 768w, https://ww2.kqed.org/app/uploads/sites/24/2019/01/IMG_5307-675x1200.jpg 675w, https://ww2.kqed.org/app/uploads/sites/24/2019/01/IMG_5307-240x427.jpg 240w, https://ww2.kqed.org/app/uploads/sites/24/2019/01/IMG_5307-375x667.jpg 375w, https://ww2.kqed.org/app/uploads/sites/24/2019/01/IMG_5307-520x924.jpg 520w\" sizes=\"(max-width: 828px) 100vw, 828px\">\u003cfigcaption class=\"wp-caption-text\">Skaters zip by the DJ booth at the Church of Eight Wheels. \u003ccite>(Melanie Burke)\u003c/cite>\u003c/figcaption>\u003c/figure>\n\u003cp>\u003cspan style=\"font-weight: 400\">For more than 40 years, The Church of 8 Wheels has operated a lively roller disco in a former Catholic church on Fillmore street. Friday and Saturday nights are 18+ skates, and for $15 cash (entrance and skate rental) you can join fellow roller enthusiasts underneath the stained glass and disco ball. Whether you’re a seasoned pro or this is your first time strapping on skates, you’ll fit right in the circular flow, and you don’t have to worry about falling. Not only does \u003c/span>\u003ci>\u003cspan style=\"font-weight: 400\">everyone \u003c/span>\u003c/i>\u003cspan style=\"font-weight: 400\">do it, but safety staff will scoot to your side in no time to keep you from getting run over and help you back on your wheels. \u003c/span>\u003c/p>\n\u003cp>[ad fullwidth]\u003c/p>\n\u003cp>\u003cspan style=\"font-weight: 400\">Aside from satisfying that internal whimsy we all have — who doesn’t look at a massive open space like a church and think, “dang, I could roller skate in here?” — a Friday night at The Church of 8 Wheels hits more than a couple of the usual New Year’s resolution marks. You’ll be exercising, trying something new, and because there’s no alcohol on the premises, you’ll be swapping a beer for a Gatorade or Coca-cola. If you like to be resolute as a family, The Church offers a family skate on Saturdays, 3-5 pm.\u003c/span>\u003c/p>\n\u003ch2>Grand Lake Theatre\u003c/h2>\n\u003cp>\u003ca href=\"https://goo.gl/maps/M6huXmqKdUv\">\u003cspan style=\"font-weight: 400\">3200 Grand Ave\u003c/span>\u003c/a>\u003cbr>\n\u003cspan style=\"font-weight: 400\">Oakland, CA 94610\u003c/span>\u003c/p>\n\u003cfigure id=\"attachment_131976\" class=\"wp-caption aligncenter\" style=\"max-width: 1920px\">\u003cimg src=\"https://ww2.kqed.org/bayareabites/wp-content/uploads/sites/24/2019/01/IMG_3086-e1547226104993.jpg\" alt=\"The Grand Lake Theatre has been a community staple for moviegoers in Oakland since 1926. Photo courtesy the author.\" width=\"1920\" height=\"1440\" class=\"size-full wp-image-131976\">\u003cfigcaption class=\"wp-caption-text\">The Grand Lake Theatre has been a community staple for moviegoers in Oakland since 1926. Photo courtesy the author. \u003ccite>(Melanie Burke)\u003c/cite>\u003c/figcaption>\u003c/figure>\n\u003cp>\u003cspan style=\"font-weight: 400\">Opened in 1926, the \u003c/span>\u003ca href=\"http://www.renaissancerialto.com/\">\u003cspan style=\"font-weight: 400\">Grand Lake Theatre\u003c/span>\u003c/a>\u003cspan style=\"font-weight: 400\"> has been showing movies in Oakland for more than 90 years. Nestled between Lakeshore and Grand Ave, the theatre’s long-standing presence and declarative marquee messages have made it a community staple. While their matinee prices are a draw on their own at $6 (and $5 all day Tuesday!), the theatre itself makes seeing a movie at Grand Lake a full-on experience. \u003c/span>\u003c/p>\n\u003cp>\u003cspan style=\"font-weight: 400\">Upon entering, you’re greeted by a chandelier and plush, dark antique carpeting that winds up a stunning grand staircase. The original main screen has maintained its jazz-age glam with greek columns and ceiling filigree. The additional screens were added and redesigned in the 80’s, pulling inspiration from the theatre’s decade of origin — one is “Egyptian,” the other “Moorish.” \u003c/span>\u003c/p>\n\u003cp>\u003cspan style=\"font-weight: 400\">So far as snacks go, Grand Lake offers standard fare like popcorn, soda, and favorite movie sweets all at the expected movie prices. There don’t seem to be designs to add in pizza or beer like at other independent movie theatres in the bay — and that’s okay. In pursuit of supporting a local institution, however, the few extra dollars for a snack are worth it, meaning your potential resolution to skip alcohol and do more in your neighborhood will hit the mark.\u003c/span>\u003c/p>\n\u003ch2>Teance Fine Teas\u003c/h2>\n\u003cp>\u003ca href=\"https://goo.gl/maps/5ju5xf5Cnq32\">\u003cspan style=\"font-weight: 400\">1780 Fourth St \u003c/span>\u003c/a>\u003cbr>\n\u003cspan style=\"font-weight: 400\">Berkeley, CA 94710\u003c/span>\u003c/p>\n\u003cfigure id=\"attachment_131977\" class=\"wp-caption aligncenter\" style=\"max-width: 1920px\">\u003cimg src=\"https://ww2.kqed.org/bayareabites/wp-content/uploads/sites/24/2019/01/IMG_3401-e1547226032835.jpg\" alt=\"Experience new teas from around the world with a tea flight at Teance Fine Teas.\" width=\"1920\" height=\"1440\" class=\"size-full wp-image-131977\">\u003cfigcaption class=\"wp-caption-text\">Experience new teas from around the world with a tea flight at Teance Fine Teas. \u003ccite>(Melanie Burke)\u003c/cite>\u003c/figcaption>\u003c/figure>\n\u003cp>\u003cspan style=\"font-weight: 400\">Grabbing a coffee together is always a popular alternative to going for a drink, but not everyone enjoys pour-overs or lattes. For the discerning tea drinker, \u003c/span>\u003ca href=\"https://www.teance.com/\">\u003cspan style=\"font-weight: 400\">Teance Fine Teas\u003c/span>\u003c/a>\u003cspan style=\"font-weight: 400\"> offers an inviting and tranquil place to enjoy a seemingly endless variety of loose leaf teas. \u003c/span>\u003c/p>\n\u003cp>\u003cspan style=\"font-weight: 400\">Pronounced “tee-ahnce,” (think “ambiance” and “tea” together) the tea shop has been in Berkeley for more than a decade, expanding into its current space on the popular fourth street. While customers can come in and pick up a favorite tea to take home, they’re also more than welcome to share a pot of house tea ($5) or a fine tea blend ($7) together in the upstairs seating area. The space is quiet, with sleek modern lines and a fountain in the center of the store with real live koi.\u003c/span>\u003c/p>\n\u003cp>\u003cspan style=\"font-weight: 400\">For a full experience beyond simply having a cuppa, you can do a tea flight at the downstairs counter. Each flight is three types of tea of your choice ($27) and a staff member will guide you through each, offering samples of different steeps, talking through the history of the tea, and answering your questions. Tea varieties include white, green (Chinese and Japanese), oolong (Chinese and Taiwanese), red, and pu-erh, the last of which comes in a tightly compacted disc and requires a knife to break off for steeping, which puts a little excitement into an otherwise soothing experience. \u003c/span>\u003c/p>\n\u003cp>\u003cspan style=\"font-weight: 400\">The specially designed counter features space for small groups to experience a tea flight together and one flight is absolutely shareable with two people. For groups of four or more, however, you should call ahead to book an appointment as space is limited.\u003c/span>\u003c/p>\n\u003ch2>Creme Brewlee Bistro\u003c/h2>\n\u003cp>\u003ca href=\"https://goo.gl/maps/y4giUqqUsM32\">\u003cspan style=\"font-weight: 400\">2948 S Norfolk St\u003c/span>\u003c/a>\u003cbr>\n\u003cspan style=\"font-weight: 400\">San Mateo, CA 94403\u003c/span>\u003c/p>\n\u003cfigure id=\"attachment_131978\" class=\"wp-caption aligncenter\" style=\"max-width: 1920px\">\u003cimg src=\"https://ww2.kqed.org/bayareabites/wp-content/uploads/sites/24/2019/01/IMG_3159-e1547225989536.jpg\" alt=\"Friends with a meg-sweet tooth will love meeting up at Creme Brewlee for a shaved snow, pictured here.\" width=\"1920\" height=\"1440\" class=\"size-full wp-image-131978\">\u003cfigcaption class=\"wp-caption-text\">Friends with a meg-sweet tooth will love meeting up at Creme Brewlee for a shaved snow, pictured here. \u003ccite>(Melanie Burke)\u003c/cite>\u003c/figcaption>\u003c/figure>\n\u003cp>\u003cspan style=\"font-weight: 400\">Sometimes the best surprises are in unassuming places. \u003c/span>\u003ca href=\"https://www.yelp.com/biz/creme-brewlee-bistro-san-mateo\">\u003cspan style=\"font-weight: 400\">Creme Brewlee\u003c/span>\u003c/a>\u003cspan style=\"font-weight: 400\"> is one such adventure, a combination bistro and dessert spot in the Marina Plaza Shopping Center in San Mateo. The menu includes a diverse array of items that range halfway across the globe and back: coffee, lattes, gelato, hot pot, shaved snow, and of course, the titular creme brulee. \u003c/span>\u003c/p>\n\u003cp>\u003cspan style=\"font-weight: 400\">One of the most unique sweets is the shaved snow, a fluffy, layered take on its crunchier cousin of the icy variety. Snow at Creme Brewlee is $8 and includes your choice of snow flavor, syrup, and two toppings (with additional toppings for fifty cents apiece). It’s not overwhelmingly sweet despite being made entirely of frozen sugar, and the soft crunch on each bite is exactly like eating snow when you were a kid. Except, of course, this snow is \u003c/span>\u003ci>\u003cspan style=\"font-weight: 400\">meant \u003c/span>\u003c/i>\u003cspan style=\"font-weight: 400\">to be eaten. Bring a friend or a loved one for this snow pile, however, as your $8 buys you a literal mound of dessert.\u003c/span>\u003c/p>\n\u003cp>\u003cspan style=\"font-weight: 400\">Creme Brewlee doesn’t do much for your resolution to eat healthier, but you’ll be exploring a new neighborhood, a new dessert style, and most importantly, skipping sugary cocktails in favor of something super “cool.”\u003c/span>\u003c/p>\n\u003ch2>Albany Bowl\u003c/h2>\n\u003cp>\u003ca href=\"https://goo.gl/maps/724xFPMGttS2\">\u003cspan style=\"font-weight: 400\">540 San Pablo Ave\u003c/span>\u003cspan style=\"font-weight: 400\">\u003cbr>\n\u003c/span>\u003c/a>\u003cspan style=\"font-weight: 400\">Albany, CA 94706\u003c/span>\u003c/p>\n\u003cfigure id=\"attachment_131979\" class=\"wp-caption aligncenter\" style=\"max-width: 1920px\">\u003cimg src=\"https://ww2.kqed.org/bayareabites/wp-content/uploads/sites/24/2019/01/IMG_3151-e1547225952655.jpg\" alt=\"Albany Bowl is a great spot to share french fries and a few games with friends.\" width=\"1920\" height=\"1440\" class=\"size-full wp-image-131979\">\u003cfigcaption class=\"wp-caption-text\">Albany Bowl is a great spot to share french fries and a few games with friends. \u003ccite>(Melanie Burke)\u003c/cite>\u003c/figcaption>\u003c/figure>\n\u003cp>\u003cspan style=\"font-weight: 400\">Finally, what better way to enjoy a little sober fun with friends than bowling? You may be outraged at the very idea of entering a bowling alley without also purchasing a pitcher to split, but \u003c/span>\u003ca href=\"http://www.thealbanybowl.com/\">\u003cspan style=\"font-weight: 400\">Albany Bowl \u003c/span>\u003c/a>\u003cspan style=\"font-weight: 400\">has more than enough french fries, onion rings, and sweet pin knockdowns to make you forget you wanted a beer in the first place. \u003c/span>\u003c/p>\n\u003cp>\u003cspan style=\"font-weight: 400\">Located right on San Pablo Avenue in Albany, this retro bowling alley has been in operation since 1949. Regular rates run $6 per game per person, with a $4.50 flat shoe rental if you don’t already have your own. However, each day of the week brings its own discounts or specials, like $1.50 games on Monday and Tuesday nights or a killer 2 games-for-1 deal for groups of Cal-Berkeley students.\u003c/span>\u003c/p>\n\u003cp>[ad floatright]\u003c/p>\n\u003cp>\u003cspan style=\"font-weight: 400\">Little J’s Cafe attaches directly to Albany Bowl and offers American diner favorites like burgers and tater tots. If you’re hoping to order snacks while avoiding temptation, the bar is all the way in the back of the bowling alley far and away from Little J’s. Order your french fries and enjoy your resolute choices without ever having to think twice. \u003c/span>\u003c/p>\n\n","blocks":[],"excerpt":"Just because you’re scaling back doesn’t mean you have to stay home and miss out. Here are a few dry alternatives to your regular group outings. ","status":"publish","parent":0,"modified":1547659779,"stats":{"hasAudio":false,"hasVideo":false,"hasChartOrMap":false,"iframeSrcs":[],"hasGoogleForm":false,"hasGallery":false,"hasHearkenModule":false,"hasPolis":false,"paragraphCount":27,"wordCount":1616},"headData":{"title":"5 Alcohol-Free Alternatives For Your Dry January | KQED","description":"Just because you’re scaling back doesn’t mean you have to stay home and miss out. Here are a few dry alternatives to your regular group outings. ","ogTitle":"","ogDescription":"","ogImgId":"","twTitle":"","twDescription":"","twImgId":"","schema":{"@context":"http://schema.org","@type":"Article","headline":"5 Alcohol-Free Alternatives For Your Dry January","datePublished":"2019-01-11T17:13:33.000Z","dateModified":"2019-01-16T17:29:39.000Z","image":"https://cdn.kqed.org/wp-content/uploads/2020/02/KQED-OG-Image@1x.png"}},"disqusIdentifier":"131942 https://ww2.kqed.org/bayareabites/?p=131942","disqusUrl":"https://ww2.kqed.org/bayareabites/2019/01/11/5-alcohol-free-alternatives-for-your-dry-january/","disqusTitle":"5 Alcohol-Free Alternatives For Your Dry January","path":"/bayareabites/131942/5-alcohol-free-alternatives-for-your-dry-january","audioTrackLength":null,"parsedContent":[{"type":"contentString","content":"\u003cdiv class=\"post-body\">\u003cp>\u003cp>Freshly motivated to accomplish New Year’s resolutions after the excess of the holidays, a lot of people choose to scale back drinking alcohol during January. A “dry January” looks different for each person, depending on what they’re trying to accomplish — maybe they keep the glass of wine with dinner but skip the bar outings on Friday night. Or maybe they limit themselves to one drink only at the company happy hour.\u003c/p>\n\u003cp>Regardless, skipping drinking can sometimes feel like it's costing you your social life. Whether you’re suffering FOMO seeing your friends at the newest wine bar or compromising your goal for a second beer at game night, finding ways to stick to your guns when everyone around you is drinking can be rough. But, it can be a positive to stick it out according to life coach and speaker \u003ca href=\"http://alliestarkwellness.com/\">Allie Stark.\u003c/a>\u003c/p>\n\u003cp>“Deciding to cut back or stop consuming alcohol after the excess of the holiday season is an active change in a behavior that will inherently influence your thoughts and your feelings,” says Stark. “This can have a large impact on your relationships, your motivation at work, your internal confidence, and so much more.”\u003c/p>\n\u003cp>Stark suggests communicating your goals clearly and openly with friends and family, then stick to the folk who understand why you’re choosing not to drink — at least for a little bit. “Actively choose to surround yourself with friends and family that respect your decision to not drink for the time being, as it will allow for an easier and more enjoyable experience while it is taking place,” says Stark.\u003c/p>\n\u003cp>Luckily, there is an endless combination of places to meet friends and enjoy one another in the Bay Area that don’t involve alcohol. Here are just a few to get you started:\u003c/p>\n\u003ch2>Church of Eight Wheels\u003c/h2>\n\u003cp>\u003ca href=\"https://goo.gl/maps/x6VZ6bZjWCr\">554 Fillmore St\u003c/a>\u003cbr>\nSan Francisco, CA 94117\u003c/p>\n\u003cfigure id=\"attachment_131947\" class=\"wp-caption aligncenter\" style=\"max-width: 828px\">\u003cimg src=\"https://ww2.kqed.org/bayareabites/wp-content/uploads/sites/24/2019/01/IMG_5307.jpg\" alt=\"Skaters zip by the DJ booth at the Church of Eight Wheels.\" width=\"828\" height=\"1472\" class=\"size-full wp-image-131947\" srcset=\"https://ww2.kqed.org/app/uploads/sites/24/2019/01/IMG_5307.jpg 828w, https://ww2.kqed.org/app/uploads/sites/24/2019/01/IMG_5307-160x284.jpg 160w, https://ww2.kqed.org/app/uploads/sites/24/2019/01/IMG_5307-800x1422.jpg 800w, https://ww2.kqed.org/app/uploads/sites/24/2019/01/IMG_5307-768x1365.jpg 768w, https://ww2.kqed.org/app/uploads/sites/24/2019/01/IMG_5307-675x1200.jpg 675w, https://ww2.kqed.org/app/uploads/sites/24/2019/01/IMG_5307-240x427.jpg 240w, https://ww2.kqed.org/app/uploads/sites/24/2019/01/IMG_5307-375x667.jpg 375w, https://ww2.kqed.org/app/uploads/sites/24/2019/01/IMG_5307-520x924.jpg 520w\" sizes=\"(max-width: 828px) 100vw, 828px\">\u003cfigcaption class=\"wp-caption-text\">Skaters zip by the DJ booth at the Church of Eight Wheels. \u003ccite>(Melanie Burke)\u003c/cite>\u003c/figcaption>\u003c/figure>\n\u003cp>\u003cspan style=\"font-weight: 400\">For more than 40 years, The Church of 8 Wheels has operated a lively roller disco in a former Catholic church on Fillmore street. Friday and Saturday nights are 18+ skates, and for $15 cash (entrance and skate rental) you can join fellow roller enthusiasts underneath the stained glass and disco ball. Whether you’re a seasoned pro or this is your first time strapping on skates, you’ll fit right in the circular flow, and you don’t have to worry about falling. Not only does \u003c/span>\u003ci>\u003cspan style=\"font-weight: 400\">everyone \u003c/span>\u003c/i>\u003cspan style=\"font-weight: 400\">do it, but safety staff will scoot to your side in no time to keep you from getting run over and help you back on your wheels. \u003c/span>\u003c/p>\n\u003cp>\u003c/p>\u003c/div>","attributes":{"named":{},"numeric":[]}},{"type":"component","content":"","name":"ad","attributes":{"named":{"label":"fullwidth"},"numeric":["fullwidth"]}},{"type":"contentString","content":"\u003cdiv class=\"post-body\">\u003cp>\u003c/p>\n\u003cp>\u003cspan style=\"font-weight: 400\">Aside from satisfying that internal whimsy we all have — who doesn’t look at a massive open space like a church and think, “dang, I could roller skate in here?” — a Friday night at The Church of 8 Wheels hits more than a couple of the usual New Year’s resolution marks. You’ll be exercising, trying something new, and because there’s no alcohol on the premises, you’ll be swapping a beer for a Gatorade or Coca-cola. If you like to be resolute as a family, The Church offers a family skate on Saturdays, 3-5 pm.\u003c/span>\u003c/p>\n\u003ch2>Grand Lake Theatre\u003c/h2>\n\u003cp>\u003ca href=\"https://goo.gl/maps/M6huXmqKdUv\">\u003cspan style=\"font-weight: 400\">3200 Grand Ave\u003c/span>\u003c/a>\u003cbr>\n\u003cspan style=\"font-weight: 400\">Oakland, CA 94610\u003c/span>\u003c/p>\n\u003cfigure id=\"attachment_131976\" class=\"wp-caption aligncenter\" style=\"max-width: 1920px\">\u003cimg src=\"https://ww2.kqed.org/bayareabites/wp-content/uploads/sites/24/2019/01/IMG_3086-e1547226104993.jpg\" alt=\"The Grand Lake Theatre has been a community staple for moviegoers in Oakland since 1926. Photo courtesy the author.\" width=\"1920\" height=\"1440\" class=\"size-full wp-image-131976\">\u003cfigcaption class=\"wp-caption-text\">The Grand Lake Theatre has been a community staple for moviegoers in Oakland since 1926. Photo courtesy the author. \u003ccite>(Melanie Burke)\u003c/cite>\u003c/figcaption>\u003c/figure>\n\u003cp>\u003cspan style=\"font-weight: 400\">Opened in 1926, the \u003c/span>\u003ca href=\"http://www.renaissancerialto.com/\">\u003cspan style=\"font-weight: 400\">Grand Lake Theatre\u003c/span>\u003c/a>\u003cspan style=\"font-weight: 400\"> has been showing movies in Oakland for more than 90 years. Nestled between Lakeshore and Grand Ave, the theatre’s long-standing presence and declarative marquee messages have made it a community staple. While their matinee prices are a draw on their own at $6 (and $5 all day Tuesday!), the theatre itself makes seeing a movie at Grand Lake a full-on experience. \u003c/span>\u003c/p>\n\u003cp>\u003cspan style=\"font-weight: 400\">Upon entering, you’re greeted by a chandelier and plush, dark antique carpeting that winds up a stunning grand staircase. The original main screen has maintained its jazz-age glam with greek columns and ceiling filigree. The additional screens were added and redesigned in the 80’s, pulling inspiration from the theatre’s decade of origin — one is “Egyptian,” the other “Moorish.” \u003c/span>\u003c/p>\n\u003cp>\u003cspan style=\"font-weight: 400\">So far as snacks go, Grand Lake offers standard fare like popcorn, soda, and favorite movie sweets all at the expected movie prices. There don’t seem to be designs to add in pizza or beer like at other independent movie theatres in the bay — and that’s okay. In pursuit of supporting a local institution, however, the few extra dollars for a snack are worth it, meaning your potential resolution to skip alcohol and do more in your neighborhood will hit the mark.\u003c/span>\u003c/p>\n\u003ch2>Teance Fine Teas\u003c/h2>\n\u003cp>\u003ca href=\"https://goo.gl/maps/5ju5xf5Cnq32\">\u003cspan style=\"font-weight: 400\">1780 Fourth St \u003c/span>\u003c/a>\u003cbr>\n\u003cspan style=\"font-weight: 400\">Berkeley, CA 94710\u003c/span>\u003c/p>\n\u003cfigure id=\"attachment_131977\" class=\"wp-caption aligncenter\" style=\"max-width: 1920px\">\u003cimg src=\"https://ww2.kqed.org/bayareabites/wp-content/uploads/sites/24/2019/01/IMG_3401-e1547226032835.jpg\" alt=\"Experience new teas from around the world with a tea flight at Teance Fine Teas.\" width=\"1920\" height=\"1440\" class=\"size-full wp-image-131977\">\u003cfigcaption class=\"wp-caption-text\">Experience new teas from around the world with a tea flight at Teance Fine Teas. \u003ccite>(Melanie Burke)\u003c/cite>\u003c/figcaption>\u003c/figure>\n\u003cp>\u003cspan style=\"font-weight: 400\">Grabbing a coffee together is always a popular alternative to going for a drink, but not everyone enjoys pour-overs or lattes. For the discerning tea drinker, \u003c/span>\u003ca href=\"https://www.teance.com/\">\u003cspan style=\"font-weight: 400\">Teance Fine Teas\u003c/span>\u003c/a>\u003cspan style=\"font-weight: 400\"> offers an inviting and tranquil place to enjoy a seemingly endless variety of loose leaf teas. \u003c/span>\u003c/p>\n\u003cp>\u003cspan style=\"font-weight: 400\">Pronounced “tee-ahnce,” (think “ambiance” and “tea” together) the tea shop has been in Berkeley for more than a decade, expanding into its current space on the popular fourth street. While customers can come in and pick up a favorite tea to take home, they’re also more than welcome to share a pot of house tea ($5) or a fine tea blend ($7) together in the upstairs seating area. The space is quiet, with sleek modern lines and a fountain in the center of the store with real live koi.\u003c/span>\u003c/p>\n\u003cp>\u003cspan style=\"font-weight: 400\">For a full experience beyond simply having a cuppa, you can do a tea flight at the downstairs counter. Each flight is three types of tea of your choice ($27) and a staff member will guide you through each, offering samples of different steeps, talking through the history of the tea, and answering your questions. Tea varieties include white, green (Chinese and Japanese), oolong (Chinese and Taiwanese), red, and pu-erh, the last of which comes in a tightly compacted disc and requires a knife to break off for steeping, which puts a little excitement into an otherwise soothing experience. \u003c/span>\u003c/p>\n\u003cp>\u003cspan style=\"font-weight: 400\">The specially designed counter features space for small groups to experience a tea flight together and one flight is absolutely shareable with two people. For groups of four or more, however, you should call ahead to book an appointment as space is limited.\u003c/span>\u003c/p>\n\u003ch2>Creme Brewlee Bistro\u003c/h2>\n\u003cp>\u003ca href=\"https://goo.gl/maps/y4giUqqUsM32\">\u003cspan style=\"font-weight: 400\">2948 S Norfolk St\u003c/span>\u003c/a>\u003cbr>\n\u003cspan style=\"font-weight: 400\">San Mateo, CA 94403\u003c/span>\u003c/p>\n\u003cfigure id=\"attachment_131978\" class=\"wp-caption aligncenter\" style=\"max-width: 1920px\">\u003cimg src=\"https://ww2.kqed.org/bayareabites/wp-content/uploads/sites/24/2019/01/IMG_3159-e1547225989536.jpg\" alt=\"Friends with a meg-sweet tooth will love meeting up at Creme Brewlee for a shaved snow, pictured here.\" width=\"1920\" height=\"1440\" class=\"size-full wp-image-131978\">\u003cfigcaption class=\"wp-caption-text\">Friends with a meg-sweet tooth will love meeting up at Creme Brewlee for a shaved snow, pictured here. \u003ccite>(Melanie Burke)\u003c/cite>\u003c/figcaption>\u003c/figure>\n\u003cp>\u003cspan style=\"font-weight: 400\">Sometimes the best surprises are in unassuming places. \u003c/span>\u003ca href=\"https://www.yelp.com/biz/creme-brewlee-bistro-san-mateo\">\u003cspan style=\"font-weight: 400\">Creme Brewlee\u003c/span>\u003c/a>\u003cspan style=\"font-weight: 400\"> is one such adventure, a combination bistro and dessert spot in the Marina Plaza Shopping Center in San Mateo. The menu includes a diverse array of items that range halfway across the globe and back: coffee, lattes, gelato, hot pot, shaved snow, and of course, the titular creme brulee. \u003c/span>\u003c/p>\n\u003cp>\u003cspan style=\"font-weight: 400\">One of the most unique sweets is the shaved snow, a fluffy, layered take on its crunchier cousin of the icy variety. Snow at Creme Brewlee is $8 and includes your choice of snow flavor, syrup, and two toppings (with additional toppings for fifty cents apiece). It’s not overwhelmingly sweet despite being made entirely of frozen sugar, and the soft crunch on each bite is exactly like eating snow when you were a kid. Except, of course, this snow is \u003c/span>\u003ci>\u003cspan style=\"font-weight: 400\">meant \u003c/span>\u003c/i>\u003cspan style=\"font-weight: 400\">to be eaten. Bring a friend or a loved one for this snow pile, however, as your $8 buys you a literal mound of dessert.\u003c/span>\u003c/p>\n\u003cp>\u003cspan style=\"font-weight: 400\">Creme Brewlee doesn’t do much for your resolution to eat healthier, but you’ll be exploring a new neighborhood, a new dessert style, and most importantly, skipping sugary cocktails in favor of something super “cool.”\u003c/span>\u003c/p>\n\u003ch2>Albany Bowl\u003c/h2>\n\u003cp>\u003ca href=\"https://goo.gl/maps/724xFPMGttS2\">\u003cspan style=\"font-weight: 400\">540 San Pablo Ave\u003c/span>\u003cspan style=\"font-weight: 400\">\u003cbr>\n\u003c/span>\u003c/a>\u003cspan style=\"font-weight: 400\">Albany, CA 94706\u003c/span>\u003c/p>\n\u003cfigure id=\"attachment_131979\" class=\"wp-caption aligncenter\" style=\"max-width: 1920px\">\u003cimg src=\"https://ww2.kqed.org/bayareabites/wp-content/uploads/sites/24/2019/01/IMG_3151-e1547225952655.jpg\" alt=\"Albany Bowl is a great spot to share french fries and a few games with friends.\" width=\"1920\" height=\"1440\" class=\"size-full wp-image-131979\">\u003cfigcaption class=\"wp-caption-text\">Albany Bowl is a great spot to share french fries and a few games with friends. \u003ccite>(Melanie Burke)\u003c/cite>\u003c/figcaption>\u003c/figure>\n\u003cp>\u003cspan style=\"font-weight: 400\">Finally, what better way to enjoy a little sober fun with friends than bowling? You may be outraged at the very idea of entering a bowling alley without also purchasing a pitcher to split, but \u003c/span>\u003ca href=\"http://www.thealbanybowl.com/\">\u003cspan style=\"font-weight: 400\">Albany Bowl \u003c/span>\u003c/a>\u003cspan style=\"font-weight: 400\">has more than enough french fries, onion rings, and sweet pin knockdowns to make you forget you wanted a beer in the first place. \u003c/span>\u003c/p>\n\u003cp>\u003cspan style=\"font-weight: 400\">Located right on San Pablo Avenue in Albany, this retro bowling alley has been in operation since 1949. Regular rates run $6 per game per person, with a $4.50 flat shoe rental if you don’t already have your own. However, each day of the week brings its own discounts or specials, like $1.50 games on Monday and Tuesday nights or a killer 2 games-for-1 deal for groups of Cal-Berkeley students.\u003c/span>\u003c/p>\n\u003cp>\u003c/p>\u003c/div>","attributes":{"named":{},"numeric":[]}},{"type":"component","content":"","name":"ad","attributes":{"named":{"label":"floatright"},"numeric":["floatright"]}},{"type":"contentString","content":"\u003cdiv class=\"post-body\">\u003cp>\u003c/p>\n\u003cp>\u003cspan style=\"font-weight: 400\">Little J’s Cafe attaches directly to Albany Bowl and offers American diner favorites like burgers and tater tots. If you’re hoping to order snacks while avoiding temptation, the bar is all the way in the back of the bowling alley far and away from Little J’s. Order your french fries and enjoy your resolute choices without ever having to think twice. \u003c/span>\u003c/p>\n\n\u003c/div>\u003c/p>","attributes":{"named":{},"numeric":[]}}],"link":"/bayareabites/131942/5-alcohol-free-alternatives-for-your-dry-january","authors":["11546"],"categories":["bayareabites_2998","bayareabites_8770","bayareabites_50","bayareabites_11028","bayareabites_10028","bayareabites_13746","bayareabites_1245","bayareabites_15155","bayareabites_1807","bayareabites_90","bayareabites_358","bayareabites_91","bayareabites_1248"],"tags":["bayareabites_9995","bayareabites_14751","bayareabites_16274","bayareabites_49","bayareabites_13419","bayareabites_16267","bayareabites_14757","bayareabites_14745","bayareabites_9161"],"featImg":"bayareabites_131981","label":"bayareabites"},"bayareabites_131944":{"type":"posts","id":"bayareabites_131944","meta":{"index":"posts_1591205157","site":"bayareabites","id":"131944","score":null,"sort":[1546967590000]},"guestAuthors":[],"slug":"celebrity-chefs-recipes-emily-luchettis-wild-blueberry-lemon-tart","title":"Celebrity Chefs Recipes: Emily Luchetti's Wild Blueberry Lemon Tart","publishDate":1546967590,"format":"video","headTitle":"Celebrity Chefs Recipes | Bay Area Bites | KQED Food","labelTerm":{"term":16039,"site":"bayareabites"},"content":"\u003cp>\u003ci>Photos: \u003ca href=\"https://ww2.kqed.org/bayareabites/author/vicchin/\">Vic Chin\u003c/a>, Video: Vic Chin and Peter Ruocco\u003c/i>\u003c/p>\n\u003cp>I like wild blueberries as they are jam-packed with blueberry flavor. Even though they are much smaller than regular blueberries, they have twice the intensity. Plus, since 99 percent of the wild blueberry crop is frozen at harvest, they are available year-round. Their small size keeps their texture and flavor when frozen. I love the combination of lemon and blueberries, and I'd rate the flavors up there with the best.\u003c/p>\n\u003cp>[contextly_sidebar id=\"EF0R4zU6IpwtiufeIuKtxnPsUkZSb3gL\"]\u003c/p>\n\u003cp>As a pastry chef, I will often take shortcuts in the kitchen to save time, but buying tart dough is not one of them. It’s just not worth it. Making your own dough is so much better than store bought — even when you’re starting out and learning how to make it, it just tastes better. When you learn to make dough focus on the steps and keep everything cold...and practice a couple of times. Before you know it, you will be rolling out dough like a pro.\u003c/p>\n\u003ch2>Wild Blueberry Lemon Tart\u003c/h2>\n\u003cp>\u003ci>Makes one, 9-inch tart\u003c/i>\u003c/p>\n\u003cfigure id=\"attachment_131974\" class=\"wp-caption aligncenter\" style=\"max-width: 1920px\">\u003cimg src=\"https://ww2.kqed.org/bayareabites/wp-content/uploads/sites/24/2019/01/DSCF4625-e1546967517769.jpg\" alt=\"Wild blueberries and lemon make this tart a real treat.\" width=\"1920\" height=\"1080\" class=\"size-full wp-image-131974\">\u003cfigcaption class=\"wp-caption-text\">Wild blueberries and lemon make this tart a real treat. \u003ccite>(Vic Chin)\u003c/cite>\u003c/figcaption>\u003c/figure>\n\u003cp>\u003cb>Ingredients for the tart dough:\u003c/b>\u003c/p>\n\u003cul>\n\u003cli>2 ¼ cups all-purpose flour\u003c/li>\n\u003cli>1 ½ tablespoon granulated sugar\u003c/li>\n\u003cli>¼ teaspoon kosher salt\u003c/li>\n\u003cli>6 ounces cold unsalted butter, cut into small pieces\u003c/li>\n\u003cli>3-4 tablespoons ice water\u003c/li>\n\u003c/ul>\n\u003cp>\u003cb>Ingredients for the filling:\u003c/b>\u003c/p>\n\u003cul>\n\u003cli>1 ¼ cups wild blueberries, fresh or frozen\u003c/li>\n\u003cli>2 large eggs\u003c/li>\n\u003cli>⅔ cup granulated sugar\u003c/li>\n\u003cli>⅓ cup whole milk\u003c/li>\n\u003cli>3 tablespoons heavy cream\u003c/li>\n\u003cli>2 teaspoons lemon juice\u003c/li>\n\u003cli>3 tablespoons unsalted butter, melted\u003c/li>\n\u003cli>Grated zest of 2 lemons\u003c/li>\n\u003cli>2 tablespoons unbleached all-purpose flour\u003c/li>\n\u003c/ul>\n\u003cp>\u003cb>Instructions:\u003c/b>\u003c/p>\n\u003col>\n\u003cli>In the bowl of a food processor, combine the flour, sugar, salt, and butter. Using the pulse button, pulse the mixture until the butter is the size of small peas, 5 to 10 short pulses. This will happen very quickly, do not overmix it.\u003c/li>\n\u003cli>Add 3 tablespoons of ice water, then pulse just until the dough is crumbly. Stop the machine and gently squeeze about ⅓ cup of dough in your hand. If it comes together without any dry pieces, you’ve added enough water. If it’s still floury, add another tablespoon of water, pulse a couple more times, and test it again.\u003c/li>\n\u003cli>Continue to mix, using longer pulses, until the dough forms small clumps. Do not process it to the point where it forms a ball. Press the dough into a flat disk, wrap in plastic wrap, and refrigerate for at least 30 minutes.\u003c/li>\n\u003cli>On a lightly floured surface, roll the dough into an approximately 13-inch circle. Transfer carefully to a 9-inch tart pan with a removable bottom. Fold the approximately 1-inch overhang of dough into the pan and press against the sides of the pan. You will have a single thickness of dough on the bottom of the pan, and a double thickness on the sides. Trim the top edge even with the pan.\u003c/li>\n\u003cli>Refrigerate or freeze the tart shell for at least one hour.\u003c/li>\n\u003cli>Preheat the oven to 375°F. Line the tart shell with parchment paper and fill with pie weights, rice or beans. Bake the tart shell until the edges begin to brown, about 20 minutes. Remove the parchment and weights and continue to bake until the bottom is lightly browned, about 10 minutes more. Set aside.\u003c/li>\n\u003cli>Reduce the oven temperature to 350°F.\u003c/li>\n\u003cli>Scatter the blueberries in the baked tart shell.\u003c/li>\n\u003cli>In a medium bowl, whisk the eggs and sugar together until well blended. Whisk in the milk, cream, and lemon juice. Whisk in the melted butter, lemon zest, and flour until everything is evenly combined. Pour the filling over the blueberries.\u003c/li>\n\u003cli>Bake until the filling is set, 25-30 minutes.\u003c/li>\n\u003cli>Serve the tart warm or at room temperature (it's delicious with \u003ca href=\"https://www.kqed.org/bayareabites/131685/celebrity-chefs-recipes-emily-luchettis-pumpkin-upside-down-cake\">chantilly cream\u003c/a>). Keep at room temperature for a few hours or refrigerated overnight covered with plastic wrap. If refrigerating, bring to room temperature before serving.\u003c/li>\n\u003c/ol>\n\u003cfigure id=\"attachment_131973\" class=\"wp-caption aligncenter\" style=\"max-width: 1920px\">\u003cimg src=\"https://ww2.kqed.org/bayareabites/wp-content/uploads/sites/24/2019/01/DSCF4629-e1546967418248.jpg\" alt=\"Emily Luchetti with a slice of her Wild Blueberry Lemon Tart.\" width=\"1920\" height=\"1080\" class=\"size-full wp-image-131973\">\u003cfigcaption class=\"wp-caption-text\">Emily Luchetti with a slice of her Wild Blueberry Lemon Tart. \u003ccite>(Vic Chin)\u003c/cite>\u003c/figcaption>\u003c/figure>\n\u003cp>[ad fullwidth]\u003c/p>\u003cp>\u003c/p>\n","blocks":[],"excerpt":"Lemons and blueberries are a delicious combination, even better when put into this fantastic tart.","status":"publish","parent":0,"modified":1560200129,"stats":{"hasAudio":false,"hasVideo":false,"hasChartOrMap":false,"iframeSrcs":[],"hasGoogleForm":false,"hasGallery":false,"hasHearkenModule":false,"hasPolis":false,"paragraphCount":10,"wordCount":688},"headData":{"title":"Celebrity Chefs Recipes: Emily Luchetti's Wild Blueberry Lemon Tart | KQED","description":"Lemons and blueberries are a delicious combination, even better when put into this fantastic tart.","ogTitle":"","ogDescription":"","ogImgId":"","twTitle":"","twDescription":"","twImgId":"","schema":{"@context":"http://schema.org","@type":"Article","headline":"Celebrity Chefs Recipes: Emily Luchetti's Wild Blueberry Lemon Tart","datePublished":"2019-01-08T17:13:10.000Z","dateModified":"2019-06-10T20:55:29.000Z","image":"https://cdn.kqed.org/wp-content/uploads/2020/02/KQED-OG-Image@1x.png"}},"disqusIdentifier":"131944 https://ww2.kqed.org/bayareabites/?p=131944","disqusUrl":"https://ww2.kqed.org/bayareabites/2019/01/08/celebrity-chefs-recipes-emily-luchettis-wild-blueberry-lemon-tart/","disqusTitle":"Celebrity Chefs Recipes: Emily Luchetti's Wild Blueberry Lemon Tart","videoEmbed":"https://youtu.be/Z9P_Qvns8-Q","path":"/bayareabites/131944/celebrity-chefs-recipes-emily-luchettis-wild-blueberry-lemon-tart","audioTrackLength":null,"parsedContent":[{"type":"contentString","content":"\u003cdiv class=\"post-body\">\u003cp>\u003cp>\u003ci>Photos: \u003ca href=\"https://ww2.kqed.org/bayareabites/author/vicchin/\">Vic Chin\u003c/a>, Video: Vic Chin and Peter Ruocco\u003c/i>\u003c/p>\n\u003cp>I like wild blueberries as they are jam-packed with blueberry flavor. Even though they are much smaller than regular blueberries, they have twice the intensity. Plus, since 99 percent of the wild blueberry crop is frozen at harvest, they are available year-round. Their small size keeps their texture and flavor when frozen. I love the combination of lemon and blueberries, and I'd rate the flavors up there with the best.\u003c/p>\n\u003cp>\u003c/p>\u003cp>\u003c/p>\u003cp>\u003c/p>\n\u003cp>As a pastry chef, I will often take shortcuts in the kitchen to save time, but buying tart dough is not one of them. It’s just not worth it. Making your own dough is so much better than store bought — even when you’re starting out and learning how to make it, it just tastes better. When you learn to make dough focus on the steps and keep everything cold...and practice a couple of times. Before you know it, you will be rolling out dough like a pro.\u003c/p>\n\u003ch2>Wild Blueberry Lemon Tart\u003c/h2>\n\u003cp>\u003ci>Makes one, 9-inch tart\u003c/i>\u003c/p>\n\u003cfigure id=\"attachment_131974\" class=\"wp-caption aligncenter\" style=\"max-width: 1920px\">\u003cimg src=\"https://ww2.kqed.org/bayareabites/wp-content/uploads/sites/24/2019/01/DSCF4625-e1546967517769.jpg\" alt=\"Wild blueberries and lemon make this tart a real treat.\" width=\"1920\" height=\"1080\" class=\"size-full wp-image-131974\">\u003cfigcaption class=\"wp-caption-text\">Wild blueberries and lemon make this tart a real treat. \u003ccite>(Vic Chin)\u003c/cite>\u003c/figcaption>\u003c/figure>\n\u003cp>\u003cb>Ingredients for the tart dough:\u003c/b>\u003c/p>\n\u003cul>\n\u003cli>2 ¼ cups all-purpose flour\u003c/li>\n\u003cli>1 ½ tablespoon granulated sugar\u003c/li>\n\u003cli>¼ teaspoon kosher salt\u003c/li>\n\u003cli>6 ounces cold unsalted butter, cut into small pieces\u003c/li>\n\u003cli>3-4 tablespoons ice water\u003c/li>\n\u003c/ul>\n\u003cp>\u003cb>Ingredients for the filling:\u003c/b>\u003c/p>\n\u003cul>\n\u003cli>1 ¼ cups wild blueberries, fresh or frozen\u003c/li>\n\u003cli>2 large eggs\u003c/li>\n\u003cli>⅔ cup granulated sugar\u003c/li>\n\u003cli>⅓ cup whole milk\u003c/li>\n\u003cli>3 tablespoons heavy cream\u003c/li>\n\u003cli>2 teaspoons lemon juice\u003c/li>\n\u003cli>3 tablespoons unsalted butter, melted\u003c/li>\n\u003cli>Grated zest of 2 lemons\u003c/li>\n\u003cli>2 tablespoons unbleached all-purpose flour\u003c/li>\n\u003c/ul>\n\u003cp>\u003cb>Instructions:\u003c/b>\u003c/p>\n\u003col>\n\u003cli>In the bowl of a food processor, combine the flour, sugar, salt, and butter. Using the pulse button, pulse the mixture until the butter is the size of small peas, 5 to 10 short pulses. This will happen very quickly, do not overmix it.\u003c/li>\n\u003cli>Add 3 tablespoons of ice water, then pulse just until the dough is crumbly. Stop the machine and gently squeeze about ⅓ cup of dough in your hand. If it comes together without any dry pieces, you’ve added enough water. If it’s still floury, add another tablespoon of water, pulse a couple more times, and test it again.\u003c/li>\n\u003cli>Continue to mix, using longer pulses, until the dough forms small clumps. Do not process it to the point where it forms a ball. Press the dough into a flat disk, wrap in plastic wrap, and refrigerate for at least 30 minutes.\u003c/li>\n\u003cli>On a lightly floured surface, roll the dough into an approximately 13-inch circle. Transfer carefully to a 9-inch tart pan with a removable bottom. Fold the approximately 1-inch overhang of dough into the pan and press against the sides of the pan. You will have a single thickness of dough on the bottom of the pan, and a double thickness on the sides. Trim the top edge even with the pan.\u003c/li>\n\u003cli>Refrigerate or freeze the tart shell for at least one hour.\u003c/li>\n\u003cli>Preheat the oven to 375°F. Line the tart shell with parchment paper and fill with pie weights, rice or beans. Bake the tart shell until the edges begin to brown, about 20 minutes. Remove the parchment and weights and continue to bake until the bottom is lightly browned, about 10 minutes more. Set aside.\u003c/li>\n\u003cli>Reduce the oven temperature to 350°F.\u003c/li>\n\u003cli>Scatter the blueberries in the baked tart shell.\u003c/li>\n\u003cli>In a medium bowl, whisk the eggs and sugar together until well blended. Whisk in the milk, cream, and lemon juice. Whisk in the melted butter, lemon zest, and flour until everything is evenly combined. Pour the filling over the blueberries.\u003c/li>\n\u003cli>Bake until the filling is set, 25-30 minutes.\u003c/li>\n\u003cli>Serve the tart warm or at room temperature (it's delicious with \u003ca href=\"https://www.kqed.org/bayareabites/131685/celebrity-chefs-recipes-emily-luchettis-pumpkin-upside-down-cake\">chantilly cream\u003c/a>). Keep at room temperature for a few hours or refrigerated overnight covered with plastic wrap. If refrigerating, bring to room temperature before serving.\u003c/li>\n\u003c/ol>\n\u003cfigure id=\"attachment_131973\" class=\"wp-caption aligncenter\" style=\"max-width: 1920px\">\u003cimg src=\"https://ww2.kqed.org/bayareabites/wp-content/uploads/sites/24/2019/01/DSCF4629-e1546967418248.jpg\" alt=\"Emily Luchetti with a slice of her Wild Blueberry Lemon Tart.\" width=\"1920\" height=\"1080\" class=\"size-full wp-image-131973\">\u003cfigcaption class=\"wp-caption-text\">Emily Luchetti with a slice of her Wild Blueberry Lemon Tart. \u003ccite>(Vic Chin)\u003c/cite>\u003c/figcaption>\u003c/figure>\n\u003cp>\u003c/p>\u003c/div>","attributes":{"named":{},"numeric":[]}},{"type":"component","content":"","name":"ad","attributes":{"named":{"label":"fullwidth"},"numeric":["fullwidth"]}},{"type":"contentString","content":"\u003cdiv class=\"post-body\">\u003cp>\u003c/p>\u003cp>\u003c/p>\n\u003c/div>\u003c/p>","attributes":{"named":{},"numeric":[]}}],"link":"/bayareabites/131944/celebrity-chefs-recipes-emily-luchettis-wild-blueberry-lemon-tart","authors":["11572"],"series":["bayareabites_16039"],"categories":["bayareabites_1516","bayareabites_63","bayareabites_1653","bayareabites_11028","bayareabites_10028","bayareabites_12"],"tags":["bayareabites_16431","bayareabites_49","bayareabites_16261"],"featImg":"bayareabites_131973","label":"bayareabites_16039"}},"programsReducer":{"possible":{"id":"possible","title":"Possible","info":"Possible is hosted by entrepreneur Reid Hoffman and writer Aria Finger. Together in Possible, Hoffman and Finger lead enlightening discussions about building a brighter collective future. The show features interviews with visionary guests like Trevor Noah, Sam Altman and Janette Sadik-Khan. Possible paints an optimistic portrait of the world we can create through science, policy, business, art and our shared humanity. It asks: What if everything goes right for once? How can we get there? Each episode also includes a short fiction story generated by advanced AI GPT-4, serving as a thought-provoking springboard to speculate how humanity could leverage technology for good.","airtime":"SUN 2pm","imageSrc":"https://cdn.kqed.org/wp-content/uploads/2024/04/Possible-Podcast-Tile-360x360-1.jpg","officialWebsiteLink":"https://www.possible.fm/","meta":{"site":"news","source":"Possible"},"link":"/radio/program/possible","subscribe":{"apple":"https://podcasts.apple.com/us/podcast/possible/id1677184070","spotify":"https://open.spotify.com/show/730YpdUSNlMyPQwNnyjp4k"}},"1a":{"id":"1a","title":"1A","info":"1A is home to the national conversation. 1A brings on great guests and frames the best debate in ways that make you think, share and engage.","airtime":"MON-THU 11pm-12am","imageSrc":"https://ww2.kqed.org/radio/wp-content/uploads/sites/50/2018/04/1a.jpg","officialWebsiteLink":"https://the1a.org/","meta":{"site":"news","source":"npr"},"link":"/radio/program/1a","subscribe":{"npr":"https://rpb3r.app.goo.gl/RBrW","apple":"https://itunes.apple.com/WebObjects/MZStore.woa/wa/viewPodcast?s=143441&mt=2&id=1188724250&at=11l79Y&ct=nprdirectory","tuneIn":"https://tunein.com/radio/1A-p947376/","rss":"https://feeds.npr.org/510316/podcast.xml"}},"all-things-considered":{"id":"all-things-considered","title":"All Things Considered","info":"Every weekday, \u003cem>All Things Considered\u003c/em> hosts Robert Siegel, Audie Cornish, Ari Shapiro, and Kelly McEvers present the program's trademark mix of news, interviews, commentaries, reviews, and offbeat features. Michel Martin hosts on the weekends.","airtime":"MON-FRI 1pm-2pm, 4:30pm-6:30pm\u003cbr />SAT-SUN 5pm-6pm","imageSrc":"https://cdn.kqed.org/wp-content/uploads/2024/04/All-Things-Considered-Podcast-Tile-360x360-1.jpg","officialWebsiteLink":"https://www.npr.org/programs/all-things-considered/","meta":{"site":"news","source":"npr"},"link":"/radio/program/all-things-considered"},"american-suburb-podcast":{"id":"american-suburb-podcast","title":"American Suburb: The Podcast","tagline":"The flip side of gentrification, told through one town","info":"Gentrification is changing cities across America, forcing people from neighborhoods they have long called home. Call them the displaced. Now those priced out of the Bay Area are looking for a better life in an unlikely place. American Suburb follows this migration to one California town along the Delta, 45 miles from San Francisco. But is this once sleepy suburb ready for them?","imageSrc":"https://cdn.kqed.org/wp-content/uploads/2024/04/American-Suburb-Podcast-Tile-703x703-1.jpg","officialWebsiteLink":"/news/series/american-suburb-podcast","meta":{"site":"news","source":"kqed","order":"13"},"link":"/news/series/american-suburb-podcast/","subscribe":{"npr":"https://rpb3r.app.goo.gl/RBrW","apple":"https://itunes.apple.com/WebObjects/MZStore.woa/wa/viewPodcast?mt=2&id=1287748328","tuneIn":"https://tunein.com/radio/American-Suburb-p1086805/","rss":"https://ww2.kqed.org/news/series/american-suburb-podcast/feed/podcast","google":"https://podcasts.google.com/feed/aHR0cHM6Ly9mZWVkcy5tZWdhcGhvbmUuZm0vS1FJTkMzMDExODgxNjA5"}},"baycurious":{"id":"baycurious","title":"Bay Curious","tagline":"Exploring the Bay Area, one question at a time","info":"KQED’s new podcast, Bay Curious, gets to the bottom of the mysteries — both profound and peculiar — that give the Bay Area its unique identity. And we’ll do it with your help! You ask the questions. You decide what Bay Curious investigates. And you join us on the journey to find the answers.","imageSrc":"https://cdn.kqed.org/wp-content/uploads/2024/04/Bay-Curious-Podcast-Tile-703x703-1.jpg","imageAlt":"\"KQED Bay Curious","officialWebsiteLink":"/news/series/baycurious","meta":{"site":"news","source":"kqed","order":"4"},"link":"/podcasts/baycurious","subscribe":{"apple":"https://podcasts.apple.com/us/podcast/bay-curious/id1172473406","npr":"https://www.npr.org/podcasts/500557090/bay-curious","rss":"https://ww2.kqed.org/news/category/bay-curious-podcast/feed/podcast","google":"https://podcasts.google.com/feed/aHR0cHM6Ly93dzIua3FlZC5vcmcvbmV3cy9jYXRlZ29yeS9iYXktY3VyaW91cy1wb2RjYXN0L2ZlZWQvcG9kY2FzdA","stitcher":"https://www.stitcher.com/podcast/kqed/bay-curious","spotify":"https://open.spotify.com/show/6O76IdmhixfijmhTZLIJ8k"}},"bbc-world-service":{"id":"bbc-world-service","title":"BBC World Service","info":"The day's top stories from BBC News compiled twice daily in the week, once at weekends.","airtime":"MON-FRI 9pm-10pm, TUE-FRI 1am-2am","imageSrc":"https://cdn.kqed.org/wp-content/uploads/2024/04/BBC-World-Service-Podcast-Tile-360x360-1.jpg","officialWebsiteLink":"https://www.bbc.co.uk/sounds/play/live:bbc_world_service","meta":{"site":"news","source":"BBC World Service"},"link":"/radio/program/bbc-world-service","subscribe":{"apple":"https://itunes.apple.com/us/podcast/global-news-podcast/id135067274?mt=2","tuneIn":"https://tunein.com/radio/BBC-World-Service-p455581/","rss":"https://podcasts.files.bbci.co.uk/p02nq0gn.rss"}},"code-switch-life-kit":{"id":"code-switch-life-kit","title":"Code Switch / Life Kit","info":"\u003cem>Code Switch\u003c/em>, which listeners will hear in the first part of the hour, has fearless and much-needed conversations about race. Hosted by journalists of color, the show tackles the subject of race head-on, exploring how it impacts every part of society — from politics and pop culture to history, sports and more.\u003cbr />\u003cbr />\u003cem>Life Kit\u003c/em>, which will be in the second part of the hour, guides you through spaces and feelings no one prepares you for — from finances to mental health, from workplace microaggressions to imposter syndrome, from relationships to parenting. The show features experts with real world experience and shares their knowledge. Because everyone needs a little help being human.\u003cbr />\u003cbr />\u003ca href=\"https://www.npr.org/podcasts/510312/codeswitch\">\u003cem>Code Switch\u003c/em> offical site and podcast\u003c/a>\u003cbr />\u003ca href=\"https://www.npr.org/lifekit\">\u003cem>Life Kit\u003c/em> offical site and podcast\u003c/a>\u003cbr />","airtime":"SUN 9pm-10pm","imageSrc":"https://cdn.kqed.org/wp-content/uploads/2024/04/Code-Switch-Life-Kit-Podcast-Tile-360x360-1.jpg","meta":{"site":"radio","source":"npr"},"link":"/radio/program/code-switch-life-kit","subscribe":{"apple":"https://podcasts.apple.com/podcast/1112190608?mt=2&at=11l79Y&ct=nprdirectory","google":"https://podcasts.google.com/feed/aHR0cHM6Ly93d3cubnByLm9yZy9yc3MvcG9kY2FzdC5waHA_aWQ9NTEwMzEy","spotify":"https://open.spotify.com/show/3bExJ9JQpkwNhoHvaIIuyV","rss":"https://feeds.npr.org/510312/podcast.xml"}},"commonwealth-club":{"id":"commonwealth-club","title":"Commonwealth Club of California Podcast","info":"The Commonwealth Club of California is the nation's oldest and largest public affairs forum. As a non-partisan forum, The Club brings to the public airwaves diverse viewpoints on important topics. The Club's weekly radio broadcast - the oldest in the U.S., dating back to 1924 - is carried across the nation on public radio stations and is now podcasting. Our website archive features audio of our recent programs, as well as selected speeches from our long and distinguished history. This podcast feed is usually updated twice a week and is always un-edited.","airtime":"THU 10pm, FRI 1am","imageSrc":"https://cdn.kqed.org/wp-content/uploads/2024/04/Commonwealth-Club-Podcast-Tile-360x360-1.jpg","officialWebsiteLink":"https://www.commonwealthclub.org/podcasts","meta":{"site":"news","source":"Commonwealth Club of California"},"link":"/radio/program/commonwealth-club","subscribe":{"apple":"https://itunes.apple.com/us/podcast/commonwealth-club-of-california-podcast/id976334034?mt=2","google":"https://podcasts.google.com/feed/aHR0cDovL3d3dy5jb21tb253ZWFsdGhjbHViLm9yZy9hdWRpby9wb2RjYXN0L3dlZWtseS54bWw","tuneIn":"https://tunein.com/radio/Commonwealth-Club-of-California-p1060/"}},"considerthis":{"id":"considerthis","title":"Consider This","tagline":"Make sense of the day","info":"Make sense of the day. Every weekday afternoon, Consider This helps you consider the major stories of the day in less than 15 minutes, featuring the reporting and storytelling resources of NPR. Plus, KQED’s Bianca Taylor brings you the local KQED news you need to know.","imageSrc":"https://cdn.kqed.org/wp-content/uploads/2024/04/Consider-This-Podcast-Tile-703x703-1.jpg","imageAlt":"Consider This from NPR and KQED","officialWebsiteLink":"/podcasts/considerthis","meta":{"site":"news","source":"kqed","order":"7"},"link":"/podcasts/considerthis","subscribe":{"apple":"https://podcasts.apple.com/podcast/id1503226625?mt=2&at=11l79Y&ct=nprdirectory","npr":"https://rpb3r.app.goo.gl/coronavirusdaily","google":"https://podcasts.google.com/feed/aHR0cHM6Ly9mZWVkcy5ucHIub3JnLzUxMDM1NS9wb2RjYXN0LnhtbA","spotify":"https://open.spotify.com/show/3Z6JdCS2d0eFEpXHKI6WqH"}},"forum":{"id":"forum","title":"Forum","tagline":"The conversation starts here","info":"KQED’s live call-in program discussing local, state, national and international issues, as well as in-depth interviews.","airtime":"MON-FRI 9am-11am, 10pm-11pm","imageSrc":"https://cdn.kqed.org/wp-content/uploads/2024/04/Forum-Podcast-Tile-703x703-1.jpg","imageAlt":"KQED Forum with Mina Kim and Alexis Madrigal","officialWebsiteLink":"/forum","meta":{"site":"news","source":"kqed","order":"8"},"link":"/forum","subscribe":{"apple":"https://podcasts.apple.com/us/podcast/kqeds-forum/id73329719","google":"https://podcasts.google.com/feed/aHR0cHM6Ly9mZWVkcy5tZWdhcGhvbmUuZm0vS1FJTkM5NTU3MzgxNjMz","npr":"https://www.npr.org/podcasts/432307980/forum","stitcher":"https://www.stitcher.com/podcast/kqedfm-kqeds-forum-podcast","rss":"https://feeds.megaphone.fm/KQINC9557381633"}},"freakonomics-radio":{"id":"freakonomics-radio","title":"Freakonomics Radio","info":"Freakonomics Radio is a one-hour award-winning podcast and public-radio project hosted by Stephen Dubner, with co-author Steve Levitt as a regular guest. It is produced in partnership with WNYC.","imageSrc":"https://ww2.kqed.org/news/wp-content/uploads/sites/10/2018/05/freakonomicsRadio.png","officialWebsiteLink":"http://freakonomics.com/","airtime":"SUN 1am-2am, SAT 3pm-4pm","meta":{"site":"radio","source":"WNYC"},"link":"/radio/program/freakonomics-radio","subscribe":{"npr":"https://rpb3r.app.goo.gl/4s8b","apple":"https://itunes.apple.com/us/podcast/freakonomics-radio/id354668519","tuneIn":"https://tunein.com/podcasts/WNYC-Podcasts/Freakonomics-Radio-p272293/","rss":"https://feeds.feedburner.com/freakonomicsradio"}},"fresh-air":{"id":"fresh-air","title":"Fresh Air","info":"Hosted by Terry Gross, \u003cem>Fresh Air from WHYY\u003c/em> is the Peabody Award-winning weekday magazine of contemporary arts and issues. One of public radio's most popular programs, Fresh Air features intimate conversations with today's biggest luminaries.","airtime":"MON-FRI 7pm-8pm","imageSrc":"https://cdn.kqed.org/wp-content/uploads/2024/04/Fresh-Air-Podcast-Tile-360x360-1.jpg","officialWebsiteLink":"https://www.npr.org/programs/fresh-air/","meta":{"site":"radio","source":"npr"},"link":"/radio/program/fresh-air","subscribe":{"npr":"https://rpb3r.app.goo.gl/4s8b","apple":"https://itunes.apple.com/WebObjects/MZStore.woa/wa/viewPodcast?s=143441&mt=2&id=214089682&at=11l79Y&ct=nprdirectory","tuneIn":"https://tunein.com/radio/Fresh-Air-p17/","rss":"https://feeds.npr.org/381444908/podcast.xml"}},"here-and-now":{"id":"here-and-now","title":"Here & Now","info":"A live production of NPR and WBUR Boston, in collaboration with stations across the country, Here & Now reflects the fluid world of news as it's happening in the middle of the day, with timely, in-depth news, interviews and conversation. Hosted by Robin Young, Jeremy Hobson and Tonya Mosley.","airtime":"MON-THU 11am-12pm","imageSrc":"https://cdn.kqed.org/wp-content/uploads/2024/04/Here-And-Now-Podcast-Tile-360x360-1.jpg","officialWebsiteLink":"http://www.wbur.org/hereandnow","meta":{"site":"news","source":"npr"},"link":"/radio/program/here-and-now","subsdcribe":{"apple":"https://itunes.apple.com/WebObjects/MZStore.woa/wa/viewPodcast?mt=2&id=426698661","tuneIn":"https://tunein.com/radio/Here--Now-p211/","rss":"https://feeds.npr.org/510051/podcast.xml"}},"how-i-built-this":{"id":"how-i-built-this","title":"How I Built This with Guy Raz","info":"Guy Raz dives into the stories behind some of the world's best known companies. How I Built This weaves a narrative journey about innovators, entrepreneurs and idealists—and the movements they built.","imageSrc":"https://ww2.kqed.org/news/wp-content/uploads/sites/10/2018/05/howIBuiltThis.png","officialWebsiteLink":"https://www.npr.org/podcasts/510313/how-i-built-this","airtime":"SUN 7:30pm-8pm","meta":{"site":"news","source":"npr"},"link":"/radio/program/how-i-built-this","subscribe":{"npr":"https://rpb3r.app.goo.gl/3zxy","apple":"https://itunes.apple.com/us/podcast/how-i-built-this-with-guy-raz/id1150510297?mt=2","tuneIn":"https://tunein.com/podcasts/Arts--Culture-Podcasts/How-I-Built-This-p910896/","rss":"https://feeds.npr.org/510313/podcast.xml"}},"inside-europe":{"id":"inside-europe","title":"Inside Europe","info":"Inside Europe, a one-hour weekly news magazine hosted by Helen Seeney and Keith Walker, explores the topical issues shaping the continent. No other part of the globe has experienced such dynamic political and social change in recent years.","airtime":"SAT 3am-4am","imageSrc":"https://cdn.kqed.org/wp-content/uploads/2024/04/Inside-Europe-Podcast-Tile-300x300-1.jpg","meta":{"site":"news","source":"Deutsche Welle"},"link":"/radio/program/inside-europe","subscribe":{"apple":"https://itunes.apple.com/us/podcast/inside-europe/id80106806?mt=2","tuneIn":"https://tunein.com/radio/Inside-Europe-p731/","rss":"https://partner.dw.com/xml/podcast_inside-europe"}},"latino-usa":{"id":"latino-usa","title":"Latino USA","airtime":"MON 1am-2am, SUN 6pm-7pm","info":"Latino USA, the radio journal of news and culture, is the only national, English-language radio program produced from a Latino perspective.","imageSrc":"https://ww2.kqed.org/radio/wp-content/uploads/sites/50/2018/04/latinoUsa.jpg","officialWebsiteLink":"http://latinousa.org/","meta":{"site":"news","source":"npr"},"link":"/radio/program/latino-usa","subscribe":{"npr":"https://rpb3r.app.goo.gl/xtTd","apple":"https://itunes.apple.com/WebObjects/MZStore.woa/wa/viewPodcast?s=143441&mt=2&id=79681317&at=11l79Y&ct=nprdirectory","tuneIn":"https://tunein.com/radio/Latino-USA-p621/","rss":"https://feeds.npr.org/510016/podcast.xml"}},"live-from-here-highlights":{"id":"live-from-here-highlights","title":"Live from Here Highlights","info":"Chris Thile steps to the mic as the host of Live from Here (formerly A Prairie Home Companion), a live public radio variety show. Download Chris’s Song of the Week plus other highlights from the broadcast. Produced by American Public Media.","airtime":"SAT 6pm-8pm, SUN 11am-1pm","imageSrc":"https://cdn.kqed.org/wp-content/uploads/2024/04/Live-From-Here-Podcast-Tile-360x360-1.jpg","officialWebsiteLink":"https://www.livefromhere.org/","meta":{"site":"arts","source":"american public media"},"link":"/radio/program/live-from-here-highlights","subscribe":{"apple":"https://itunes.apple.com/us/podcast/id1167173941","tuneIn":"https://tunein.com/radio/Live-from-Here-Highlights-p921744/","rss":"https://feeds.publicradio.org/public_feeds/a-prairie-home-companion-highlights/rss/rss"}},"marketplace":{"id":"marketplace","title":"Marketplace","info":"Our flagship program, helmed by Kai Ryssdal, examines what the day in money delivered, through stories, conversations, newsworthy numbers and more. Updated Monday through Friday at about 3:30 p.m. PT.","airtime":"MON-FRI 4pm-4:30pm, MON-WED 6:30pm-7pm","imageSrc":"https://cdn.kqed.org/wp-content/uploads/2024/04/Marketplace-Podcast-Tile-360x360-1.jpg","officialWebsiteLink":"https://www.marketplace.org/","meta":{"site":"news","source":"American Public Media"},"link":"/radio/program/marketplace","subscribe":{"apple":"https://itunes.apple.com/WebObjects/MZStore.woa/wa/viewPodcast?s=143441&mt=2&id=201853034&at=11l79Y&ct=nprdirectory","tuneIn":"https://tunein.com/radio/APM-Marketplace-p88/","rss":"https://feeds.publicradio.org/public_feeds/marketplace-pm/rss/rss"}},"mindshift":{"id":"mindshift","title":"MindShift","tagline":"A podcast about the future of learning and how we raise our kids","info":"The MindShift podcast explores the innovations in education that are shaping how kids learn. Hosts Ki Sung and Katrina Schwartz introduce listeners to educators, researchers, parents and students who are developing effective ways to improve how kids learn. We cover topics like how fed-up administrators are developing surprising tactics to deal with classroom disruptions; how listening to podcasts are helping kids develop reading skills; the consequences of overparenting; and why interdisciplinary learning can engage students on all ends of the traditional achievement spectrum. This podcast is part of the MindShift education site, a division of KQED News. KQED is an NPR/PBS member station based in San Francisco. You can also visit the MindShift website for episodes and supplemental blog posts or tweet us \u003ca href=\"https://twitter.com/MindShiftKQED\">@MindShiftKQED\u003c/a> or visit us at \u003ca href=\"/mindshift\">MindShift.KQED.org\u003c/a>","imageSrc":"https://cdn.kqed.org/wp-content/uploads/2024/04/Mindshift-Podcast-Tile-703x703-1.jpg","imageAlt":"KQED MindShift: How We Will Learn","officialWebsiteLink":"/mindshift/","meta":{"site":"news","source":"kqed","order":"2"},"link":"/podcasts/mindshift","subscribe":{"apple":"https://podcasts.apple.com/us/podcast/mindshift-podcast/id1078765985","google":"https://podcasts.google.com/feed/aHR0cHM6Ly9mZWVkcy5tZWdhcGhvbmUuZm0vS1FJTkM1NzY0NjAwNDI5","npr":"https://www.npr.org/podcasts/464615685/mind-shift-podcast","stitcher":"https://www.stitcher.com/podcast/kqed/stories-teachers-share","spotify":"https://open.spotify.com/show/0MxSpNYZKNprFLCl7eEtyx"}},"morning-edition":{"id":"morning-edition","title":"Morning Edition","info":"\u003cem>Morning Edition\u003c/em> takes listeners around the country and the world with multi-faceted stories and commentaries every weekday. Hosts Steve Inskeep, David Greene and Rachel Martin bring you the latest breaking news and features to prepare you for the day.","airtime":"MON-FRI 3am-9am","imageSrc":"https://cdn.kqed.org/wp-content/uploads/2024/04/Morning-Edition-Podcast-Tile-360x360-1.jpg","officialWebsiteLink":"https://www.npr.org/programs/morning-edition/","meta":{"site":"news","source":"npr"},"link":"/radio/program/morning-edition"},"onourwatch":{"id":"onourwatch","title":"On Our Watch","tagline":"Police secrets, unsealed","info":"For decades, the process for how police police themselves has been inconsistent – if not opaque. In some states, like California, these proceedings were completely hidden. After a new police transparency law unsealed scores of internal affairs files, our reporters set out to examine these cases and the shadow world of police discipline. On Our Watch brings listeners into the rooms where officers are questioned and witnesses are interrogated to find out who this system is really protecting. Is it the officers, or the public they've sworn to serve?","imageSrc":"https://cdn.kqed.org/wp-content/uploads/2024/04/On-Our-Watch-Podcast-Tile-703x703-1.jpg","imageAlt":"On Our Watch from NPR and KQED","officialWebsiteLink":"/podcasts/onourwatch","meta":{"site":"news","source":"kqed","order":"1"},"link":"/podcasts/onourwatch","subscribe":{"apple":"https://podcasts.apple.com/podcast/id1567098962","google":"https://podcasts.google.com/feed/aHR0cHM6Ly9mZWVkcy5ucHIub3JnLzUxMDM2MC9wb2RjYXN0LnhtbD9zYz1nb29nbGVwb2RjYXN0cw","npr":"https://rpb3r.app.goo.gl/onourwatch","spotify":"https://open.spotify.com/show/0OLWoyizopu6tY1XiuX70x","tuneIn":"https://tunein.com/radio/On-Our-Watch-p1436229/","stitcher":"https://www.stitcher.com/show/on-our-watch","rss":"https://feeds.npr.org/510360/podcast.xml"}},"on-the-media":{"id":"on-the-media","title":"On The Media","info":"Our weekly podcast explores how the media 'sausage' is made, casts an incisive eye on fluctuations in the marketplace of ideas, and examines threats to the freedom of information and expression in America and abroad. For one hour a week, the show tries to lift the veil from the process of \"making media,\" especially news media, because it's through that lens that we see the world and the world sees us","airtime":"SUN 2pm-3pm, MON 12am-1am","imageSrc":"https://ww2.kqed.org/radio/wp-content/uploads/sites/50/2018/04/onTheMedia.png","officialWebsiteLink":"https://www.wnycstudios.org/shows/otm","meta":{"site":"news","source":"wnyc"},"link":"/radio/program/on-the-media","subscribe":{"apple":"https://itunes.apple.com/us/podcast/on-the-media/id73330715?mt=2","tuneIn":"https://tunein.com/radio/On-the-Media-p69/","rss":"http://feeds.wnyc.org/onthemedia"}},"our-body-politic":{"id":"our-body-politic","title":"Our Body Politic","info":"Presented by KQED, KCRW and KPCC, and created and hosted by award-winning journalist Farai Chideya, Our Body Politic is unapologetically centered on reporting on not just how women of color experience the major political events of today, but how they’re impacting those very issues.","airtime":"SAT 6pm-7pm, SUN 1am-2am","imageSrc":"https://cdn.kqed.org/wp-content/uploads/2024/04/Our-Body-Politic-Podcast-Tile-360x360-1.jpg","officialWebsiteLink":"https://our-body-politic.simplecast.com/","meta":{"site":"news","source":"kcrw"},"link":"/radio/program/our-body-politic","subscribe":{"apple":"https://podcasts.apple.com/us/podcast/our-body-politic/id1533069868","google":"https://podcasts.google.com/feed/aHR0cHM6Ly9mZWVkcy5zaW1wbGVjYXN0LmNvbS9feGFQaHMxcw","spotify":"https://open.spotify.com/show/4ApAiLT1kV153TttWAmqmc","rss":"https://feeds.simplecast.com/_xaPhs1s","tuneIn":"https://tunein.com/podcasts/News--Politics-Podcasts/Our-Body-Politic-p1369211/"}},"pbs-newshour":{"id":"pbs-newshour","title":"PBS NewsHour","info":"Analysis, background reports and updates from the PBS NewsHour putting today's news in context.","airtime":"MON-FRI 3pm-4pm","imageSrc":"https://cdn.kqed.org/wp-content/uploads/2024/04/PBS-News-Hour-Podcast-Tile-360x360-1.jpg","officialWebsiteLink":"https://www.pbs.org/newshour/","meta":{"site":"news","source":"pbs"},"link":"/radio/program/pbs-newshour","subscribe":{"apple":"https://itunes.apple.com/us/podcast/pbs-newshour-full-show/id394432287?mt=2","tuneIn":"https://tunein.com/radio/PBS-NewsHour---Full-Show-p425698/","rss":"https://www.pbs.org/newshour/feeds/rss/podcasts/show"}},"perspectives":{"id":"perspectives","title":"Perspectives","tagline":"KQED's series of of daily listener commentaries since 1991","info":"KQED's series of of daily listener commentaries since 1991.","imageSrc":"https://cdn.kqed.org/wp-content/uploads/2024/04/Perspectives-Podcast-Tile-703x703-1.jpg","officialWebsiteLink":"/perspectives/","meta":{"site":"radio","source":"kqed","order":"15"},"link":"/perspectives","subscribe":{"apple":"https://podcasts.apple.com/us/podcast/id73801135","npr":"https://www.npr.org/podcasts/432309616/perspectives","rss":"https://ww2.kqed.org/perspectives/category/perspectives/feed/","google":"https://podcasts.google.com/feed/aHR0cHM6Ly93dzIua3FlZC5vcmcvcGVyc3BlY3RpdmVzL2NhdGVnb3J5L3BlcnNwZWN0aXZlcy9mZWVkLw"}},"planet-money":{"id":"planet-money","title":"Planet Money","info":"The economy explained. Imagine you could call up a friend and say, Meet me at the bar and tell me what's going on with the economy. Now imagine that's actually a fun evening.","airtime":"SUN 3pm-4pm","imageSrc":"https://ww2.kqed.org/radio/wp-content/uploads/sites/50/2018/04/planetmoney.jpg","officialWebsiteLink":"https://www.npr.org/sections/money/","meta":{"site":"news","source":"npr"},"link":"/radio/program/planet-money","subscribe":{"npr":"https://rpb3r.app.goo.gl/M4f5","apple":"https://itunes.apple.com/us/podcast/planet-money/id290783428?mt=2","tuneIn":"https://tunein.com/podcasts/Business--Economics-Podcasts/Planet-Money-p164680/","rss":"https://feeds.npr.org/510289/podcast.xml"}},"politicalbreakdown":{"id":"politicalbreakdown","title":"Political Breakdown","tagline":"Politics from a personal perspective","info":"Political Breakdown is a new series that explores the political intersection of California and the nation. Each week hosts Scott Shafer and Marisa Lagos are joined with a new special guest to unpack politics -- with personality — and offer an insider’s glimpse at how politics happens.","airtime":"THU 6:30pm-7pm","imageSrc":"https://cdn.kqed.org/wp-content/uploads/2024/04/Political-Breakdown-2024-Podcast-Tile-703x703-1.jpg","imageAlt":"KQED Political Breakdown","officialWebsiteLink":"/podcasts/politicalbreakdown","meta":{"site":"radio","source":"kqed","order":"11"},"link":"/podcasts/politicalbreakdown","subscribe":{"apple":"https://podcasts.apple.com/us/podcast/political-breakdown/id1327641087","google":"https://podcasts.google.com/feed/aHR0cHM6Ly9mZWVkcy5tZWdhcGhvbmUuZm0vS1FJTkM5Nzk2MzI2MTEx","npr":"https://www.npr.org/podcasts/572155894/political-breakdown","stitcher":"https://www.stitcher.com/podcast/kqed/political-breakdown","spotify":"https://open.spotify.com/show/07RVyIjIdk2WDuVehvBMoN","rss":"https://ww2.kqed.org/news/tag/political-breakdown/feed/podcast"}},"pri-the-world":{"id":"pri-the-world","title":"PRI's The World: Latest Edition","info":"Each weekday, host Marco Werman and his team of producers bring you the world's most interesting stories in an hour of radio that reminds us just how small our planet really is.","airtime":"MON-FRI 2pm-3pm","imageSrc":"https://cdn.kqed.org/wp-content/uploads/2024/04/The-World-Podcast-Tile-360x360-1.jpg","officialWebsiteLink":"https://www.pri.org/programs/the-world","meta":{"site":"news","source":"PRI"},"link":"/radio/program/pri-the-world","subscribe":{"apple":"https://itunes.apple.com/us/podcast/pris-the-world-latest-edition/id278196007?mt=2","tuneIn":"https://tunein.com/podcasts/News--Politics-Podcasts/PRIs-The-World-p24/","rss":"http://feeds.feedburner.com/pri/theworld"}},"radiolab":{"id":"radiolab","title":"Radiolab","info":"A two-time Peabody Award-winner, Radiolab is an investigation told through sounds and stories, and centered around one big idea. In the Radiolab world, information sounds like music and science and culture collide. Hosted by Jad Abumrad and Robert Krulwich, the show is designed for listeners who demand skepticism, but appreciate wonder. WNYC Studios is the producer of other leading podcasts including Freakonomics Radio, Death, Sex & Money, On the Media and many more.","airtime":"SUN 12am-1am, SAT 2pm-3pm","imageSrc":"https://ww2.kqed.org/radio/wp-content/uploads/sites/50/2018/04/radiolab1400.png","officialWebsiteLink":"https://www.wnycstudios.org/shows/radiolab/","meta":{"site":"science","source":"WNYC"},"link":"/radio/program/radiolab","subscribe":{"apple":"https://itunes.apple.com/us/podcast/radiolab/id152249110?mt=2","tuneIn":"https://tunein.com/radio/RadioLab-p68032/","rss":"https://feeds.wnyc.org/radiolab"}},"reveal":{"id":"reveal","title":"Reveal","info":"Created by The Center for Investigative Reporting and PRX, Reveal is public radios first one-hour weekly radio show and podcast dedicated to investigative reporting. Credible, fact based and without a partisan agenda, Reveal combines the power and artistry of driveway moment storytelling with data-rich reporting on critically important issues. The result is stories that inform and inspire, arming our listeners with information to right injustices, hold the powerful accountable and improve lives.Reveal is hosted by Al Letson and showcases the award-winning work of CIR and newsrooms large and small across the nation. In a radio and podcast market crowded with choices, Reveal focuses on important and often surprising stories that illuminate the world for our listeners.","airtime":"SAT 4pm-5pm","imageSrc":"https://ww2.kqed.org/radio/wp-content/uploads/sites/50/2018/04/reveal300px.png","officialWebsiteLink":"https://www.revealnews.org/episodes/","meta":{"site":"news","source":"npr"},"link":"/radio/program/reveal","subscribe":{"apple":"https://itunes.apple.com/us/podcast/reveal/id886009669","tuneIn":"https://tunein.com/radio/Reveal-p679597/","rss":"http://feeds.revealradio.org/revealpodcast"}},"says-you":{"id":"says-you","title":"Says You!","info":"Public radio's game show of bluff and bluster, words and whimsy. The warmest, wittiest cocktail party - it's spirited and civil, brainy and boisterous, peppered with musical interludes. Fast paced and playful, it's the most fun you can have with language without getting your mouth washed out with soap. Our motto: It's not important to know the answers, it's important to like the answers!","airtime":"SUN 4pm-5pm","imageSrc":"https://cdn.kqed.org/wp-content/uploads/2024/04/Says-You-Podcast-Tile-360x360-1.jpg","officialWebsiteLink":"http://www.saysyouradio.com/","meta":{"site":"comedy","source":"Pipit and Finch"},"link":"/radio/program/says-you","subscribe":{"apple":"https://itunes.apple.com/us/podcast/says-you!/id1050199826","tuneIn":"https://tunein.com/radio/Says-You-p480/","rss":"https://saysyou.libsyn.com/rss"}},"science-friday":{"id":"science-friday","title":"Science Friday","info":"Science Friday is a weekly science talk show, broadcast live over public radio stations nationwide. Each week, the show focuses on science topics that are in the news and tries to bring an educated, balanced discussion to bear on the scientific issues at hand. Panels of expert guests join host Ira Flatow, a veteran science journalist, to discuss science and to take questions from listeners during the call-in portion of the program.","airtime":"FRI 11am-1pm","imageSrc":"https://cdn.kqed.org/wp-content/uploads/2024/04/Science-Friday-Podcast-Tile-360x360-1.jpg","officialWebsiteLink":"https://www.wnycstudios.org/shows/science-friday","meta":{"site":"news","source":"npr"},"link":"/radio/program/science-friday","subscribe":{"apple":"https://itunes.apple.com/WebObjects/MZStore.woa/wa/viewPodcast?s=143441&mt=2&id=73329284&at=11l79Y&ct=nprdirectory","tuneIn":"https://tunein.com/radio/Science-Friday-p394/","rss":"http://feeds.wnyc.org/science-friday"}},"science-podcast":{"id":"science-podcast","title":"KQED Science News","tagline":"From the lab, to your ears","info":"KQED Science explores science and environment news, trends, and events from the Bay Area and beyond.","imageSrc":"https://cdn.kqed.org/wp-content/uploads/2024/04/Science-News-Podcast-Tile-703x703-1.jpg","officialWebsiteLink":"https://ww2.kqed.org/science/category/science-podcast/","meta":{"site":"science","source":"kqed","order":"17"},"link":"/science/category/science-podcast","subscribe":{"apple":"https://podcasts.apple.com/us/podcast/kqed-science-news/id214663465","google":"https://podcasts.google.com/feed/aHR0cDovL2Jsb2dzLmtxZWQub3JnL3NjaWVuY2UvZmVlZC8","stitcher":"https://www.stitcher.com/podcast/kqed-science-news","rss":"https://ww2.kqed.org/science/category/science-podcast/feed/podcast"}},"selected-shorts":{"id":"selected-shorts","title":"Selected Shorts","info":"Spellbinding short stories by established and emerging writers take on a new life when they are performed by stars of the stage and screen.","airtime":"SAT 8pm-9pm","imageSrc":"https://cdn.kqed.org/wp-content/uploads/2024/04/Selected-Shorts-Podcast-Tile-360x360-1.jpg","officialWebsiteLink":"https://www.pri.org/programs/selected-shorts","meta":{"site":"arts","source":"pri"},"link":"/radio/program/selected-shorts","subscribe":{"apple":"https://itunes.apple.com/WebObjects/MZStore.woa/wa/viewPodcast?s=143441&mt=2&id=253191824&at=11l79Y&ct=nprdirectory","tuneIn":"https://tunein.com/radio/Selected-Shorts-p31792/","rss":"https://feeds.megaphone.fm/selectedshorts"}},"snap-judgment":{"id":"snap-judgment","title":"Snap Judgment","info":"Snap Judgment (Storytelling, with a BEAT) mixes real stories with killer beats to produce cinematic, dramatic, kick-ass radio. Snap’s raw, musical brand of storytelling dares listeners to see the world through the eyes of another. WNYC studios is the producer of leading podcasts including Radiolab, Freakonomics Radio, Note To Self, Here’s The Thing With Alec Baldwin, and more.","airtime":"SAT 1pm-2pm, 9pm-10pm","imageSrc":"https://ww2.kqed.org/radio/wp-content/uploads/sites/50/2018/04/snapJudgement.jpg","officialWebsiteLink":"https://snapjudgment.org","meta":{"site":"arts","source":"WNYC"},"link":"/radio/program/snap-judgment","subscribe":{"apple":"https://itunes.apple.com/WebObjects/MZStore.woa/wa/viewPodcast?s=143441&mt=2&id=283657561&at=11l79Y&ct=nprdirectory","tuneIn":"https://tunein.com/radio/Snap-Judgment-p243817/","rss":"https://feeds.feedburner.com/snapjudgment-wnyc"}},"soldout":{"id":"soldout","title":"SOLD OUT: Rethinking Housing in America","tagline":"A new future for housing","info":"Sold Out: Rethinking Housing in America","imageSrc":"https://cdn.kqed.org/wp-content/uploads/2024/04/Sold-Out-Podcast-Tile-703x703-1.jpg","imageAlt":"KQED Sold Out: Rethinking Housing in America","officialWebsiteLink":"/podcasts/soldout","meta":{"site":"news","source":"kqed","order":3},"link":"/podcasts/soldout","subscribe":{"npr":"https://www.npr.org/podcasts/911586047/s-o-l-d-o-u-t-a-new-future-for-housing","apple":"https://podcasts.apple.com/us/podcast/introducing-sold-out-rethinking-housing-in-america/id1531354937","rss":"https://feeds.megaphone.fm/soldout","spotify":"https://open.spotify.com/show/38dTBSk2ISFoPiyYNoKn1X","stitcher":"https://www.stitcher.com/podcast/kqed/sold-out-rethinking-housing-in-america","tunein":"https://tunein.com/radio/SOLD-OUT-Rethinking-Housing-in-America-p1365871/","google":"https://podcasts.google.com/feed/aHR0cHM6Ly9mZWVkcy5tZWdhcGhvbmUuZm0vc29sZG91dA"}},"ted-radio-hour":{"id":"ted-radio-hour","title":"TED Radio Hour","info":"The TED Radio Hour is a journey through fascinating ideas, astonishing inventions, fresh approaches to old problems, and new ways to think and create.","airtime":"SUN 3pm-4pm, SAT 10pm-11pm","imageSrc":"https://ww2.kqed.org/radio/wp-content/uploads/sites/50/2018/04/tedRadioHour.jpg","officialWebsiteLink":"https://www.npr.org/programs/ted-radio-hour/?showDate=2018-06-22","meta":{"site":"news","source":"npr"},"link":"/radio/program/ted-radio-hour","subscribe":{"npr":"https://rpb3r.app.goo.gl/8vsS","apple":"https://itunes.apple.com/WebObjects/MZStore.woa/wa/viewPodcast?s=143441&mt=2&id=523121474&at=11l79Y&ct=nprdirectory","tuneIn":"https://tunein.com/radio/TED-Radio-Hour-p418021/","rss":"https://feeds.npr.org/510298/podcast.xml"}},"tech-nation":{"id":"tech-nation","title":"Tech Nation Radio Podcast","info":"Tech Nation is a weekly public radio program, hosted by Dr. Moira Gunn. Founded in 1993, it has grown from a simple interview show to a multi-faceted production, featuring conversations with noted technology and science leaders, and a weekly science and technology-related commentary.","airtime":"FRI 10pm","imageSrc":"https://cdn.kqed.org/wp-content/uploads/2024/04/Tech-Nation-Radio-Podcast-Tile-360x360-1.jpg","officialWebsiteLink":"http://technation.podomatic.com/","meta":{"site":"science","source":"Tech Nation Media"},"link":"/radio/program/tech-nation","subscribe":{"rss":"https://technation.podomatic.com/rss2.xml"}},"thebay":{"id":"thebay","title":"The Bay","tagline":"Local news to keep you rooted","info":"Host Devin Katayama walks you through the biggest story of the day with reporters and newsmakers.","imageSrc":"https://cdn.kqed.org/wp-content/uploads/2024/04/The-Bay-Podcast-Tile-703x703-1.jpg","imageAlt":"\"KQED The Bay","officialWebsiteLink":"/podcasts/thebay","meta":{"site":"radio","source":"kqed","order":"6"},"link":"/podcasts/thebay","subscribe":{"apple":"https://podcasts.apple.com/us/podcast/the-bay/id1350043452","google":"https://podcasts.google.com/feed/aHR0cHM6Ly9mZWVkcy5tZWdhcGhvbmUuZm0vS1FJTkM4MjU5Nzg2MzI3","npr":"https://www.npr.org/podcasts/586725995/the-bay","stitcher":"https://www.stitcher.com/podcast/kqed/the-bay","spotify":"https://open.spotify.com/show/4BIKBKIujizLHlIlBNaAqQ","rss":"https://feeds.megaphone.fm/KQINC8259786327"}},"californiareport":{"id":"californiareport","title":"The California Report","tagline":"California, day by day","info":"KQED’s statewide radio news program providing daily coverage of issues, trends and public policy decisions.","imageSrc":"https://cdn.kqed.org/wp-content/uploads/2024/04/The-California-Report-Podcast-Tile-703x703-1.jpg","imageAlt":"KQED The California Report","officialWebsiteLink":"/californiareport","meta":{"site":"news","source":"kqed","order":"9"},"link":"/californiareport","subscribe":{"apple":"https://podcasts.apple.com/us/podcast/kqeds-the-california-report/id79681292","google":"https://podcasts.google.com/feed/aHR0cHM6Ly9mZWVkcy5tZWdhcGhvbmUuZm0vS1FJTkM1MDAyODE4NTgz","npr":"https://www.npr.org/podcasts/432285393/the-california-report","stitcher":"https://www.stitcher.com/podcast/kqedfm-kqeds-the-california-report-podcast-8838","rss":"https://ww2.kqed.org/news/tag/tcram/feed/podcast"}},"californiareportmagazine":{"id":"californiareportmagazine","title":"The California Report Magazine","tagline":"Your state, your stories","info":"Every week, The California Report Magazine takes you on a road trip for the ears: to visit the places and meet the people who make California unique. The in-depth storytelling podcast from the California Report.","airtime":"FRI 4:30pm-5pm, 6:30pm-7pm, 11pm-11:30pm","imageSrc":"https://cdn.kqed.org/wp-content/uploads/2024/04/The-California-Report-Magazine-Podcast-Tile-703x703-1.jpg","officialWebsiteLink":"/californiareportmagazine","meta":{"site":"news","source":"kqed","order":"10"},"link":"/californiareportmagazine","subscribe":{"apple":"https://podcasts.apple.com/us/podcast/the-california-report-magazine/id1314750545","google":"https://podcasts.google.com/feed/aHR0cHM6Ly9mZWVkcy5tZWdhcGhvbmUuZm0vS1FJTkM3NjkwNjk1OTAz","npr":"https://www.npr.org/podcasts/564733126/the-california-report-magazine","stitcher":"https://www.stitcher.com/podcast/kqed/the-california-report-magazine","rss":"https://ww2.kqed.org/news/tag/tcrmag/feed/podcast"}},"theleap":{"id":"theleap","title":"The Leap","tagline":"What if you closed your eyes, and jumped?","info":"Stories about people making dramatic, risky changes, told by award-winning public radio reporter Judy Campbell.","imageSrc":"https://cdn.kqed.org/wp-content/uploads/2024/04/The-Leap-Podcast-Tile-703x703-1.jpg","imageAlt":"KQED The Leap","officialWebsiteLink":"/podcasts/theleap","meta":{"site":"news","source":"kqed","order":"14"},"link":"/podcasts/theleap","subscribe":{"apple":"https://podcasts.apple.com/us/podcast/the-leap/id1046668171","google":"https://podcasts.google.com/feed/aHR0cHM6Ly9mZWVkcy5tZWdhcGhvbmUuZm0vS1FJTkM0NTcwODQ2MjY2","npr":"https://www.npr.org/podcasts/447248267/the-leap","stitcher":"https://www.stitcher.com/podcast/kqed/the-leap","spotify":"https://open.spotify.com/show/3sSlVHHzU0ytLwuGs1SD1U","rss":"https://ww2.kqed.org/news/programs/the-leap/feed/podcast"}},"masters-of-scale":{"id":"masters-of-scale","title":"Masters of Scale","info":"Masters of Scale is an original podcast in which LinkedIn co-founder and Greylock Partner Reid Hoffman sets out to describe and prove theories that explain how great entrepreneurs take their companies from zero to a gazillion in ingenious fashion.","airtime":"Every other Wednesday June 12 through October 16 at 8pm (repeats Thursdays at 2am)","imageSrc":"https://cdn.kqed.org/wp-content/uploads/2024/04/Masters-of-Scale-Podcast-Tile-360x360-1.jpg","officialWebsiteLink":"https://mastersofscale.com/","meta":{"site":"radio","source":"WaitWhat"},"link":"/radio/program/masters-of-scale","subscribe":{"apple":"http://mastersofscale.app.link/","rss":"https://rss.art19.com/masters-of-scale"}},"the-moth-radio-hour":{"id":"the-moth-radio-hour","title":"The Moth Radio Hour","info":"Since its launch in 1997, The Moth has presented thousands of true stories, told live and without notes, to standing-room-only crowds worldwide. Moth storytellers stand alone, under a spotlight, with only a microphone and a roomful of strangers. The storyteller and the audience embark on a high-wire act of shared experience which is both terrifying and exhilarating. Since 2008, The Moth podcast has featured many of our favorite stories told live on Moth stages around the country. For information on all of our programs and live events, visit themoth.org.","airtime":"SAT 8pm-9pm and SUN 11am-12pm","imageSrc":"https://ww2.kqed.org/radio/wp-content/uploads/sites/50/2018/04/theMoth.jpg","officialWebsiteLink":"https://themoth.org/","meta":{"site":"arts","source":"prx"},"link":"/radio/program/the-moth-radio-hour","subscribe":{"apple":"https://itunes.apple.com/us/podcast/the-moth-podcast/id275699983?mt=2","tuneIn":"https://tunein.com/radio/The-Moth-p273888/","rss":"http://feeds.themoth.org/themothpodcast"}},"the-new-yorker-radio-hour":{"id":"the-new-yorker-radio-hour","title":"The New Yorker Radio Hour","info":"The New Yorker Radio Hour is a weekly program presented by the magazine's editor, David Remnick, and produced by WNYC Studios and The New Yorker. Each episode features a diverse mix of interviews, profiles, storytelling, and an occasional burst of humor inspired by the magazine, and shaped by its writers, artists, and editors. This isn't a radio version of a magazine, but something all its own, reflecting the rich possibilities of audio storytelling and conversation. Theme music for the show was composed and performed by Merrill Garbus of tUnE-YArDs.","airtime":"SAT 10am-11am","imageSrc":"https://cdn.kqed.org/wp-content/uploads/2024/04/The-New-Yorker-Podcast-Tile-360x360-1.jpg","officialWebsiteLink":"https://www.wnycstudios.org/shows/tnyradiohour","meta":{"site":"arts","source":"WNYC"},"link":"/radio/program/the-new-yorker-radio-hour","subscribe":{"apple":"https://itunes.apple.com/us/podcast/id1050430296","tuneIn":"https://tunein.com/podcasts/WNYC-Podcasts/New-Yorker-Radio-Hour-p803804/","rss":"https://feeds.feedburner.com/newyorkerradiohour"}},"the-takeaway":{"id":"the-takeaway","title":"The Takeaway","info":"The Takeaway is produced in partnership with its national audience. It delivers perspective and analysis to help us better understand the day’s news. Be a part of the American conversation on-air and online.","airtime":"MON-THU 12pm-1pm","imageSrc":"https://cdn.kqed.org/wp-content/uploads/2024/04/The-Takeaway-Podcast-Tile-360x360-1.jpg","officialWebsiteLink":"https://www.wnycstudios.org/shows/takeaway","meta":{"site":"news","source":"WNYC"},"link":"/radio/program/the-takeaway","subscribe":{"apple":"https://itunes.apple.com/us/podcast/the-takeaway/id363143310?mt=2","tuneIn":"http://tunein.com/radio/The-Takeaway-p150731/","rss":"https://feeds.feedburner.com/takeawaypodcast"}},"this-american-life":{"id":"this-american-life","title":"This American Life","info":"This American Life is a weekly public radio show, heard by 2.2 million people on more than 500 stations. Another 2.5 million people download the weekly podcast. It is hosted by Ira Glass, produced in collaboration with Chicago Public Media, delivered to stations by PRX The Public Radio Exchange, and has won all of the major broadcasting awards.","airtime":"SAT 12pm-1pm, 7pm-8pm","imageSrc":"https://ww2.kqed.org/radio/wp-content/uploads/sites/50/2018/04/thisAmericanLife.png","officialWebsiteLink":"https://www.thisamericanlife.org/","meta":{"site":"news","source":"wbez"},"link":"/radio/program/this-american-life","subscribe":{"apple":"https://itunes.apple.com/WebObjects/MZStore.woa/wa/viewPodcast?s=143441&mt=2&id=201671138&at=11l79Y&ct=nprdirectory","rss":"https://www.thisamericanlife.org/podcast/rss.xml"}},"truthbetold":{"id":"truthbetold","title":"Truth Be Told","tagline":"Advice by and for people of color","info":"We’re the friend you call after a long day, the one who gets it. Through wisdom from some of the greatest thinkers of our time, host Tonya Mosley explores what it means to grow and thrive as a Black person in America, while discovering new ways of being that serve as a portal to more love, more healing, and more joy.","airtime":"","imageSrc":"https://cdn.kqed.org/wp-content/uploads/2024/04/Truth-Be-Told-Podcast-Tile-360x360-1.jpg","imageAlt":"KQED Truth Be Told with Tonya Mosley","officialWebsiteLink":"https://www.kqed.ord/podcasts/truthbetold","meta":{"site":"news","source":"npr","order":"12"},"link":"/podcasts/truthbetold","subscribe":{"apple":"https://podcasts.apple.com/us/podcast/truth-be-told/id1462216572","google":"https://podcasts.google.com/feed/aHR0cHM6Ly93dzIua3FlZC5vcmcvbmV3cy9jYXRlZ29yeS90cnV0aC1iZS10b2xkLXBvZGNhc3QvZmVlZA","npr":"https://www.npr.org/podcasts/719210818/truth-be-told","stitcher":"https://www.stitcher.com/s?fid=398170&refid=stpr","spotify":"https://open.spotify.com/show/587DhwTBxke6uvfwDfaV5N"}},"wait-wait-dont-tell-me":{"id":"wait-wait-dont-tell-me","title":"Wait Wait... Don't Tell Me!","info":"Peter Sagal and Bill Kurtis host the weekly NPR News quiz show alongside some of the best and brightest news and entertainment personalities.","airtime":"SUN 10am-11am, SAT 11am-12pm, SAT 6pm-7pm","imageSrc":"https://cdn.kqed.org/wp-content/uploads/2024/04/Wait-Wait-Podcast-Tile-300x300-1.jpg","officialWebsiteLink":"https://www.npr.org/programs/wait-wait-dont-tell-me/","meta":{"site":"news","source":"npr"},"link":"/radio/program/wait-wait-dont-tell-me","subscribe":{"npr":"https://rpb3r.app.goo.gl/Xogv","apple":"https://itunes.apple.com/WebObjects/MZStore.woa/wa/viewPodcast?s=143441&mt=2&id=121493804&at=11l79Y&ct=nprdirectory","tuneIn":"https://tunein.com/radio/Wait-Wait-Dont-Tell-Me-p46/","rss":"https://feeds.npr.org/344098539/podcast.xml"}},"washington-week":{"id":"washington-week","title":"Washington Week","info":"For 50 years, Washington Week has been the most intelligent and up to date conversation about the most important news stories of the week. Washington Week is the longest-running news and public affairs program on PBS and features journalists -- not pundits -- lending insight and perspective to the week's important news stories.","airtime":"SAT 1:30am-2am","imageSrc":"https://ww2.kqed.org/radio/wp-content/uploads/sites/50/2018/04/washington-week.jpg","officialWebsiteLink":"http://www.pbs.org/weta/washingtonweek/","meta":{"site":"news","source":"pbs"},"link":"/radio/program/washington-week","subscribe":{"apple":"https://itunes.apple.com/us/podcast/washington-week-audio-pbs/id83324702?mt=2","tuneIn":"https://tunein.com/podcasts/Current-Affairs/Washington-Week-p693/","rss":"http://feeds.pbs.org/pbs/weta/washingtonweek-audio"}},"weekend-edition-saturday":{"id":"weekend-edition-saturday","title":"Weekend Edition Saturday","info":"Weekend Edition Saturday wraps up the week's news and offers a mix of analysis and features on a wide range of topics, including arts, sports, entertainment, and human interest stories. The two-hour program is hosted by NPR's Peabody Award-winning Scott Simon.","airtime":"SAT 5am-10am","imageSrc":"https://cdn.kqed.org/wp-content/uploads/2024/04/Weekend-Edition-Podcast-Tile-360x360-1.jpg","officialWebsiteLink":"https://www.npr.org/programs/weekend-edition-saturday/","meta":{"site":"news","source":"npr"},"link":"/radio/program/weekend-edition-saturday"},"weekend-edition-sunday":{"id":"weekend-edition-sunday","title":"Weekend Edition Sunday","info":"Weekend Edition Sunday features interviews with newsmakers, artists, scientists, politicians, musicians, writers, theologians and historians. The program has covered news events from Nelson Mandela's 1990 release from a South African prison to the capture of Saddam Hussein.","airtime":"SUN 5am-10am","imageSrc":"https://cdn.kqed.org/wp-content/uploads/2024/04/Weekend-Edition-Podcast-Tile-360x360-1.jpg","officialWebsiteLink":"https://www.npr.org/programs/weekend-edition-sunday/","meta":{"site":"news","source":"npr"},"link":"/radio/program/weekend-edition-sunday"},"world-affairs":{"id":"world-affairs","title":"World Affairs","info":"The world as we knew it is undergoing a rapid transformation…so what's next? Welcome to WorldAffairs, your guide to a changing world. We give you the context you need to navigate across borders and ideologies. Through sound-rich stories and in-depth interviews, we break down what it means to be a global citizen on a hot, crowded planet. Our hosts, Ray Suarez, Teresa Cotsirilos and Philip Yun help you make sense of an uncertain world, one story at a time.","airtime":"MON 10pm, TUE 1am, SAT 3am","imageSrc":"https://cdn.kqed.org/wp-content/uploads/2024/04/World-Affairs-Podcast-Tile-360x360-1.jpg ","officialWebsiteLink":"https://www.worldaffairs.org/","meta":{"site":"news","source":"World Affairs"},"link":"/radio/program/world-affairs","subscribe":{"apple":"https://itunes.apple.com/us/podcast/world-affairs/id101215657?mt=2","tuneIn":"https://tunein.com/radio/WorldAffairs-p1665/","rss":"https://worldaffairs.libsyn.com/rss"}},"on-shifting-ground":{"id":"on-shifting-ground","title":"On Shifting Ground with Ray Suarez","info":"Geopolitical turmoil. A warming planet. Authoritarians on the rise. We live in a chaotic world that’s rapidly shifting around us. “On Shifting Ground with Ray Suarez” explores international fault lines and how they impact us all. Each week, NPR veteran Ray Suarez hosts conversations with journalists, leaders and policy experts to help us read between the headlines – and give us hope for human resilience.","airtime":"MON 10pm, TUE 1am, SAT 3am","imageSrc":"https://ww2.kqed.org/app/uploads/2022/12/onshiftingground-600x600-1.png","officialWebsiteLink":"https://worldaffairs.org/radio-podcast/","meta":{"site":"news","source":"On Shifting Ground"},"link":"/radio/program/on-shifting-ground","subscribe":{"apple":"https://podcasts.apple.com/ie/podcast/on-shifting-ground/id101215657","rss":"https://feeds.libsyn.com/36668/rss"}},"hidden-brain":{"id":"hidden-brain","title":"Hidden Brain","info":"Shankar Vedantam uses science and storytelling to reveal the unconscious patterns that drive human behavior, shape our choices and direct our relationships.","imageSrc":"https://ww2.kqed.org/radio/wp-content/uploads/sites/50/2018/05/hiddenbrain.jpg","officialWebsiteLink":"https://www.npr.org/series/423302056/hidden-brain","airtime":"SUN 7pm-8pm","meta":{"site":"news","source":"NPR"},"link":"/radio/program/hidden-brain","subscribe":{"apple":"https://itunes.apple.com/us/podcast/hidden-brain/id1028908750?mt=2","tuneIn":"https://tunein.com/podcasts/Science-Podcasts/Hidden-Brain-p787503/","rss":"https://feeds.npr.org/510308/podcast.xml"}},"city-arts":{"id":"city-arts","title":"City Arts & Lectures","info":"A one-hour radio program to hear celebrated writers, artists and thinkers address contemporary ideas and values, often discussing the creative process. Please note: tapes or transcripts are not available","imageSrc":"https://ww2.kqed.org/radio/wp-content/uploads/sites/50/2018/05/cityartsandlecture-300x300.jpg","officialWebsiteLink":"https://www.cityarts.net/","airtime":"SUN 1pm-2pm, TUE 10pm, WED 1am","meta":{"site":"news","source":"City Arts & Lectures"},"link":"https://www.cityarts.net","subscribe":{"tuneIn":"https://tunein.com/radio/City-Arts-and-Lectures-p692/","rss":"https://www.cityarts.net/feed/"}},"white-lies":{"id":"white-lies","title":"White Lies","info":"In 1965, Rev. James Reeb was murdered in Selma, Alabama. Three men were tried and acquitted, but no one was ever held to account. Fifty years later, two journalists from Alabama return to the city where it happened, expose the lies that kept the murder from being solved and uncover a story about guilt and memory that says as much about America today as it does about the past.","imageSrc":"https://cdn.kqed.org/wp-content/uploads/2024/04/White-Lies-Podcast-Tile-360x360-1.jpg","officialWebsiteLink":"https://www.npr.org/podcasts/510343/white-lies","meta":{"site":"news","source":"npr"},"link":"/radio/program/white-lies","subscribe":{"npr":"https://rpb3r.app.goo.gl/whitelies","apple":"https://podcasts.apple.com/podcast/id1462650519?mt=2&at=11l79Y&ct=nprdirectory","google":"https://podcasts.google.com/feed/aHR0cHM6Ly9mZWVkcy5ucHIub3JnLzUxMDM0My9wb2RjYXN0LnhtbA","spotify":"https://open.spotify.com/show/12yZ2j8vxqhc0QZyRES3ft?si=LfWYEK6URA63hueKVxRLAw","rss":"https://feeds.npr.org/510343/podcast.xml"}},"rightnowish":{"id":"rightnowish","title":"Rightnowish","tagline":"Art is where you find it","info":"Rightnowish digs into life in the Bay Area right now… ish. Journalist Pendarvis Harshaw takes us to galleries painted on the sides of liquor stores in West Oakland. We'll dance in warehouses in the Bayview, make smoothies with kids in South Berkeley, and listen to classical music in a 1984 Cutlass Supreme in Richmond. Every week, Pen talks to movers and shakers about how the Bay Area shapes what they create, and how they shape the place we call home.","imageSrc":"https://cdn.kqed.org/wp-content/uploads/2024/04/Rightnowish-Podcast-Tile-500x500-1.jpg","imageAlt":"KQED Rightnowish with Pendarvis Harshaw","officialWebsiteLink":"/podcasts/rightnowish","meta":{"site":"arts","source":"kqed","order":"5"},"link":"/podcasts/rightnowish","subscribe":{"npr":"https://www.npr.org/podcasts/721590300/rightnowish","rss":"https://ww2.kqed.org/arts/programs/rightnowish/feed/podcast","apple":"https://podcasts.apple.com/us/podcast/rightnowish/id1482187648","stitcher":"https://www.stitcher.com/podcast/kqed/rightnowish","google":"https://podcasts.google.com/feed/aHR0cHM6Ly9mZWVkcy5tZWdhcGhvbmUuZm0vS1FJTkMxMjU5MTY3NDc4","spotify":"https://open.spotify.com/show/7kEJuafTzTVan7B78ttz1I"}},"jerrybrown":{"id":"jerrybrown","title":"The Political Mind of Jerry Brown","tagline":"Lessons from a lifetime in politics","info":"The Political Mind of Jerry Brown brings listeners the wisdom of the former Governor, Mayor, and presidential candidate. Scott Shafer interviewed Brown for more than 40 hours, covering the former governor's life and half-century in the political game – and Brown has some lessons he'd like to share. ","imageSrc":"https://cdn.kqed.org/wp-content/uploads/2024/04/The-Political-Mind-of-Jerry-Brown-Podcast-Tile-703x703-1.jpg","imageAlt":"KQED The Political Mind of Jerry Brown","officialWebsiteLink":"/podcasts/jerrybrown","meta":{"site":"news","source":"kqed","order":"16"},"link":"/podcasts/jerrybrown","subscribe":{"npr":"https://www.npr.org/podcasts/790253322/the-political-mind-of-jerry-brown","apple":"https://itunes.apple.com/us/podcast/id1492194549","rss":"https://ww2.kqed.org/news/series/jerrybrown/feed/podcast/","tuneIn":"http://tun.in/pjGcK","stitcher":"https://www.stitcher.com/podcast/kqed/the-political-mind-of-jerry-brown","spotify":"https://open.spotify.com/show/54C1dmuyFyKMFttY6X2j6r?si=K8SgRCoISNK6ZbjpXrX5-w","google":"https://podcasts.google.com/feed/aHR0cHM6Ly93dzIua3FlZC5vcmcvbmV3cy9zZXJpZXMvamVycnlicm93bi9mZWVkL3BvZGNhc3Qv"}},"the-splendid-table":{"id":"the-splendid-table","title":"The Splendid Table","info":"\u003cem>The Splendid Table\u003c/em> hosts our nation's conversations about cooking, sustainability and food culture.","imageSrc":"https://cdn.kqed.org/wp-content/uploads/2024/04/The-Splendid-Table-Podcast-Tile-360x360-1.jpg","officialWebsiteLink":"https://www.splendidtable.org/","airtime":"SUN 10-11 pm","meta":{"site":"radio","source":"npr"},"link":"/radio/program/the-splendid-table"}},"racesReducer":{"5921":{"id":"5921","type":"apRace","location":"State of California","raceName":"U.S. House of Representatives, District 7","raceDescription":"Top candidate wins seat.","raceType":"top2","totalVotes":158422,"precinctsReportPercentage":98.97,"eevp":99,"tabulationStatus":"Tabulation Paused","dateUpdated":"March 22, 2024","timeUpdated":"4:48 PM","source":"AP","candidates":[{"candidateName":"Doris Matsui","candidateIncumbent":true,"candidateParty":"D","voteCount":89456,"isWinner":true},{"candidateName":"Tom Silva","candidateIncumbent":false,"candidateParty":"R","voteCount":48920,"isWinner":true},{"candidateName":"David Mandel","candidateIncumbent":false,"candidateParty":"D","voteCount":20046,"isWinner":false}],"winnerDateTime":"2024-03-09T01:00:38.194Z"},"5922":{"id":"5922","type":"apRace","location":"State of California","raceName":"U.S. House of Representatives, District 8","raceDescription":"Top candidate wins seat.","raceType":"top2","totalVotes":0,"uncontested":true,"precinctsReportPercentage":0,"eevp":0,"tabulationStatus":"Tabulation Paused","dateUpdated":"March 22, 2024","timeUpdated":"4:20 PM","source":"AP","candidates":[{"candidateName":"Rudy Recile","candidateIncumbent":false,"candidateParty":"R","voteCount":0,"isWinner":true},{"candidateName":"John Garamendi","candidateIncumbent":true,"candidateParty":"D","voteCount":0,"isWinner":true}],"winnerDateTime":"2024-03-06T04:00:30.000Z"},"5924":{"id":"5924","type":"apRace","location":"State of California","raceName":"U.S. House of Representatives, District 10","raceDescription":"Top candidate wins seat.","raceType":"top2","totalVotes":185034,"precinctsReportPercentage":99.07,"eevp":99,"tabulationStatus":"Tabulation Paused","dateUpdated":"March 22, 2024","timeUpdated":"4:48 PM","source":"AP","candidates":[{"candidateName":"Mark DeSaulnier","candidateIncumbent":true,"candidateParty":"D","voteCount":121265,"isWinner":true},{"candidateName":"Katherine Piccinini","candidateIncumbent":false,"candidateParty":"R","voteCount":34883,"isWinner":true},{"candidateName":"Nolan Chen","candidateIncumbent":false,"candidateParty":"R","voteCount":19459,"isWinner":false},{"candidateName":"Joe Sweeney","candidateIncumbent":false,"candidateParty":"NPP","voteCount":7606,"isWinner":false},{"candidateName":"Mohamed Elsherbini","candidateIncumbent":false,"candidateParty":"NPP","voteCount":1821,"isWinner":false}],"winnerDateTime":"2024-03-09T01:02:32.415Z"},"5926":{"id":"5926","type":"apRace","location":"State of California","raceName":"U.S. House of Representatives, District 12","raceDescription":"Top candidate wins seat.","raceType":"top2","totalVotes":153801,"precinctsReportPercentage":98.88,"eevp":99,"tabulationStatus":"Tabulation Paused","dateUpdated":"March 20, 2024","timeUpdated":"4:41 PM","source":"AP","candidates":[{"candidateName":"Lateefah Simon","candidateIncumbent":false,"candidateParty":"D","voteCount":85905,"isWinner":true},{"candidateName":"Jennifer Tran","candidateIncumbent":false,"candidateParty":"D","voteCount":22964,"isWinner":true},{"candidateName":"Tony Daysog","candidateIncumbent":false,"candidateParty":"D","voteCount":17197,"isWinner":false},{"candidateName":"Stephen Slauson","candidateIncumbent":false,"candidateParty":"R","voteCount":9699,"isWinner":false},{"candidateName":"Glenn Kaplan","candidateIncumbent":false,"candidateParty":"D","voteCount":6785,"isWinner":false},{"candidateName":"Eric Wilson","candidateIncumbent":false,"candidateParty":"D","voteCount":4243,"isWinner":false},{"candidateName":"Abdur Sikder","candidateIncumbent":false,"candidateParty":"D","voteCount":2847,"isWinner":false},{"candidateName":"Ned Nuerge","candidateIncumbent":false,"candidateParty":"R","voteCount":2532,"isWinner":false},{"candidateName":"Andre Todd","candidateIncumbent":false,"candidateParty":"D","voteCount":1629,"isWinner":false}],"winnerDateTime":"2024-03-16T00:22:36.062Z"},"5928":{"id":"5928","type":"apRace","location":"State of California","raceName":"U.S. House of Representatives, District 14","raceDescription":"Top candidate wins seat.","raceType":"top2","totalVotes":125831,"precinctsReportPercentage":99.14,"eevp":99,"tabulationStatus":"Tabulation Paused","dateUpdated":"March 20, 2024","timeUpdated":"4:41 PM","source":"AP","candidates":[{"candidateName":"Eric Swalwell","candidateIncumbent":true,"candidateParty":"D","voteCount":83989,"isWinner":true},{"candidateName":"Vin Kruttiventi","candidateIncumbent":false,"candidateParty":"R","voteCount":22106,"isWinner":true},{"candidateName":"Alison Hayden","candidateIncumbent":false,"candidateParty":"R","voteCount":11928,"isWinner":false},{"candidateName":"Luis Reynoso","candidateIncumbent":false,"candidateParty":"R","voteCount":7808,"isWinner":false}],"winnerDateTime":"2024-03-12T00:51:36.366Z"},"5930":{"id":"5930","type":"apRace","location":"State of California","raceName":"U.S. House of Representatives, District 16","raceDescription":"Top candidate wins seat.","raceType":"top2","totalVotes":182135,"precinctsReportPercentage":98.91,"eevp":99,"tabulationStatus":"Tabulation Paused","dateUpdated":"April 3, 2024","timeUpdated":"3:04 PM","source":"AP","candidates":[{"candidateName":"Sam Liccardo","candidateIncumbent":false,"candidateParty":"D","voteCount":38489,"isWinner":true},{"candidateName":"Evan Low","candidateIncumbent":false,"candidateParty":"D","voteCount":30249,"isWinner":false},{"candidateName":"Joe Simitian","candidateIncumbent":false,"candidateParty":"D","voteCount":30249,"isWinner":false},{"candidateName":"Peter Ohtaki","candidateIncumbent":false,"candidateParty":"R","voteCount":23275,"isWinner":false},{"candidateName":"Peter Dixon","candidateIncumbent":false,"candidateParty":"D","voteCount":14673,"isWinner":false},{"candidateName":"Rishi Kumar","candidateIncumbent":false,"candidateParty":"D","voteCount":12377,"isWinner":false},{"candidateName":"Karl Ryan","candidateIncumbent":false,"candidateParty":"R","voteCount":11557,"isWinner":false},{"candidateName":"Julie Lythcott-Haims","candidateIncumbent":false,"candidateParty":"D","voteCount":11383,"isWinner":false},{"candidateName":"Ahmed Mostafa","candidateIncumbent":false,"candidateParty":"D","voteCount":5811,"isWinner":false},{"candidateName":"Greg Tanaka","candidateIncumbent":false,"candidateParty":"D","voteCount":2421,"isWinner":false},{"candidateName":"Joby Bernstein","candidateIncumbent":false,"candidateParty":"D","voteCount":1651,"isWinner":false}],"winnerDateTime":"2024-03-12T00:32:05.002Z"},"5931":{"id":"5931","type":"apRace","location":"State of California","raceName":"U.S. House of Representatives, District 17","raceDescription":"Top candidate wins seat.","raceType":"top2","totalVotes":117534,"precinctsReportPercentage":98.92,"eevp":99,"tabulationStatus":"Tabulation Paused","dateUpdated":"March 22, 2024","timeUpdated":"4:20 PM","source":"AP","candidates":[{"candidateName":"Ro Khanna","candidateIncumbent":true,"candidateParty":"D","voteCount":73941,"isWinner":true},{"candidateName":"Anita Chen","candidateIncumbent":false,"candidateParty":"R","voteCount":31539,"isWinner":true},{"candidateName":"Ritesh Tandon","candidateIncumbent":false,"candidateParty":"D","voteCount":5728,"isWinner":false},{"candidateName":"Mario Ramirez","candidateIncumbent":false,"candidateParty":"D","voteCount":4491,"isWinner":false},{"candidateName":"Joe Dehn","candidateIncumbent":false,"candidateParty":"Lib","voteCount":1835,"isWinner":false}],"winnerDateTime":"2024-03-08T01:50:53.956Z"},"5932":{"id":"5932","type":"apRace","location":"State of California","raceName":"U.S. House of Representatives, District 18","raceDescription":"Top candidate wins seat.","raceType":"top2","totalVotes":96302,"precinctsReportPercentage":98.93,"eevp":98.83,"tabulationStatus":"Tabulation Paused","dateUpdated":"March 25, 2024","timeUpdated":"5:47 AM","source":"AP","candidates":[{"candidateName":"Zoe Lofgren","candidateIncumbent":true,"candidateParty":"D","voteCount":49323,"isWinner":true},{"candidateName":"Peter Hernandez","candidateIncumbent":false,"candidateParty":"R","voteCount":31622,"isWinner":true},{"candidateName":"Charlene Nijmeh","candidateIncumbent":false,"candidateParty":"D","voteCount":10614,"isWinner":false},{"candidateName":"Lawrence Milan","candidateIncumbent":false,"candidateParty":"D","voteCount":2712,"isWinner":false},{"candidateName":"Luele Kifle","candidateIncumbent":false,"candidateParty":"D","voteCount":2031,"isWinner":false}],"winnerDateTime":"2024-03-12T00:26:02.706Z"},"5963":{"id":"5963","type":"apRace","location":"State of California","raceName":"State House, District 2","raceDescription":"Top candidate wins seat.","raceType":"top2","totalVotes":139085,"precinctsReportPercentage":98.62,"eevp":98.6,"tabulationStatus":"Tabulation Paused","dateUpdated":"March 22, 2024","timeUpdated":"4:20 PM","source":"AP","candidates":[{"candidateName":"Michael Greer","candidateIncumbent":false,"candidateParty":"R","voteCount":38079,"isWinner":true},{"candidateName":"Chris Rogers","candidateIncumbent":false,"candidateParty":"D","voteCount":27126,"isWinner":true},{"candidateName":"Rusty Hicks","candidateIncumbent":false,"candidateParty":"D","voteCount":25615,"isWinner":false},{"candidateName":"Ariel Kelley","candidateIncumbent":false,"candidateParty":"D","voteCount":19483,"isWinner":false},{"candidateName":"Frankie Myers","candidateIncumbent":false,"candidateParty":"D","voteCount":17694,"isWinner":false},{"candidateName":"Ted Williams","candidateIncumbent":false,"candidateParty":"D","voteCount":9550,"isWinner":false},{"candidateName":"Cynthia Click","candidateIncumbent":false,"candidateParty":"D","voteCount":1538,"isWinner":false}],"winnerDateTime":"2024-03-22T21:38:36.711Z"},"5972":{"id":"5972","type":"apRace","location":"State of California","raceName":"State House, District 11","raceDescription":"Top candidate wins seat.","raceType":"top2","totalVotes":99775,"precinctsReportPercentage":99,"eevp":99,"tabulationStatus":"Tabulation Paused","dateUpdated":"March 22, 2024","timeUpdated":"4:48 PM","source":"AP","candidates":[{"candidateName":"Lori Wilson","candidateIncumbent":true,"candidateParty":"D","voteCount":50085,"isWinner":true},{"candidateName":"Dave Ennis","candidateIncumbent":false,"candidateParty":"R","voteCount":26074,"isWinner":true},{"candidateName":"Wanda Wallis","candidateIncumbent":false,"candidateParty":"R","voteCount":14638,"isWinner":false},{"candidateName":"Jeffrey Flack","candidateIncumbent":false,"candidateParty":"D","voteCount":8978,"isWinner":false}],"winnerDateTime":"2024-03-08T02:01:24.524Z"},"5973":{"id":"5973","type":"apRace","location":"State of California","raceName":"State House, District 12","raceDescription":"Top candidate wins seat.","raceType":"top2","totalVotes":143532,"precinctsReportPercentage":99.19,"eevp":99,"tabulationStatus":"Tabulation Paused","dateUpdated":"March 22, 2024","timeUpdated":"4:38 PM","source":"AP","candidates":[{"candidateName":"Damon Connolly","candidateIncumbent":true,"candidateParty":"D","voteCount":111275,"isWinner":true},{"candidateName":"Andy Podshadley","candidateIncumbent":false,"candidateParty":"R","voteCount":17240,"isWinner":true},{"candidateName":"Eryn Cervantes","candidateIncumbent":false,"candidateParty":"R","voteCount":15017,"isWinner":false}],"winnerDateTime":"2024-03-21T00:25:32.262Z"},"5975":{"id":"5975","type":"apRace","location":"State of California","raceName":"State House, District 14","raceDescription":"Top candidate wins seat.","raceType":"top2","totalVotes":106997,"precinctsReportPercentage":99.06,"eevp":99,"tabulationStatus":"Tabulation Paused","dateUpdated":"March 22, 2024","timeUpdated":"4:48 PM","source":"AP","candidates":[{"candidateName":"Buffy Wicks","candidateIncumbent":true,"candidateParty":"D","voteCount":78678,"isWinner":true},{"candidateName":"Margot Smith","candidateIncumbent":false,"candidateParty":"D","voteCount":18251,"isWinner":true},{"candidateName":"Utkarsh Jain","candidateIncumbent":false,"candidateParty":"R","voteCount":10068,"isWinner":false}],"winnerDateTime":"2024-03-15T01:30:34.539Z"},"5976":{"id":"5976","type":"apRace","location":"State of California","raceName":"State House, District 15","raceDescription":"Top candidate wins seat.","raceType":"top2","totalVotes":97144,"precinctsReportPercentage":98.98,"eevp":99,"tabulationStatus":"Tabulation Paused","dateUpdated":"March 22, 2024","timeUpdated":"4:48 PM","source":"AP","candidates":[{"candidateName":"Sonia Ledo","candidateIncumbent":false,"candidateParty":"R","voteCount":30946,"isWinner":true},{"candidateName":"Anamarie Farias","candidateIncumbent":false,"candidateParty":"D","voteCount":29512,"isWinner":true},{"candidateName":"Monica Wilson","candidateIncumbent":false,"candidateParty":"D","voteCount":24775,"isWinner":false},{"candidateName":"Karen Mitchoff","candidateIncumbent":false,"candidateParty":"D","voteCount":11911,"isWinner":false}],"winnerDateTime":"2024-03-14T00:19:38.858Z"},"5977":{"id":"5977","type":"apRace","location":"State of California","raceName":"State House, District 16","raceDescription":"Top candidate wins seat.","raceType":"top2","totalVotes":0,"uncontested":true,"precinctsReportPercentage":0,"eevp":0,"tabulationStatus":"Tabulation Paused","dateUpdated":"March 22, 2024","timeUpdated":"4:20 PM","source":"AP","candidates":[{"candidateName":"Joseph Rubay","candidateIncumbent":false,"candidateParty":"R","voteCount":0,"isWinner":true},{"candidateName":"Rebecca Bauer-Kahan","candidateIncumbent":true,"candidateParty":"D","voteCount":0,"isWinner":true}],"winnerDateTime":"2024-03-06T04:00:30.000Z"},"5978":{"id":"5978","type":"apRace","location":"State of California","raceName":"State House, District 17","raceDescription":"Top candidate wins seat.","raceType":"top2","totalVotes":111003,"precinctsReportPercentage":98.99,"eevp":99,"tabulationStatus":"Tabulation Paused","dateUpdated":"March 22, 2024","timeUpdated":"8:25 AM","source":"AP","candidates":[{"candidateName":"Matt Haney","candidateIncumbent":true,"candidateParty":"D","voteCount":90915,"isWinner":true},{"candidateName":"Manuel Noris-Barrera","candidateIncumbent":false,"candidateParty":"R","voteCount":13843,"isWinner":true},{"candidateName":"Otto Duke","candidateIncumbent":false,"candidateParty":"D","voteCount":6245,"isWinner":false}],"winnerDateTime":"2024-03-12T00:36:19.697Z"},"5979":{"id":"5979","type":"apRace","location":"State of California","raceName":"State House, District 18","raceDescription":"Top candidate wins seat.","raceType":"top2","totalVotes":86008,"precinctsReportPercentage":99.1,"eevp":99,"tabulationStatus":"Tabulation Paused","dateUpdated":"March 20, 2024","timeUpdated":"4:41 PM","source":"AP","candidates":[{"candidateName":"Mia Bonta","candidateIncumbent":true,"candidateParty":"D","voteCount":73040,"isWinner":true},{"candidateName":"Andre Sandford","candidateIncumbent":false,"candidateParty":"AIP","voteCount":4575,"isWinner":false},{"candidateName":"Mindy Pechenuk","candidateIncumbent":false,"candidateParty":"R","voteCount":4389,"isWinner":false},{"candidateName":"Cheyenne Kenney","candidateIncumbent":false,"candidateParty":"R","voteCount":4004,"isWinner":false}],"winnerDateTime":"2024-03-06T08:03:23.729Z"},"5980":{"id":"5980","type":"apRace","location":"State of California","raceName":"State House, District 19","raceDescription":"Top candidate wins seat.","raceType":"top2","totalVotes":113959,"precinctsReportPercentage":98.8,"eevp":99,"tabulationStatus":"Tabulation Paused","dateUpdated":"March 22, 2024","timeUpdated":"4:20 PM","source":"AP","candidates":[{"candidateName":"Catherine Stefani","candidateIncumbent":false,"candidateParty":"D","voteCount":64960,"isWinner":true},{"candidateName":"David Lee","candidateIncumbent":false,"candidateParty":"D","voteCount":33035,"isWinner":true},{"candidateName":"Nadia Flamenco","candidateIncumbent":false,"candidateParty":"R","voteCount":8335,"isWinner":false},{"candidateName":"Arjun Sodhani","candidateIncumbent":false,"candidateParty":"R","voteCount":7629,"isWinner":false}],"winnerDateTime":"2024-03-11T23:50:23.109Z"},"5981":{"id":"5981","type":"apRace","location":"State of California","raceName":"State House, District 20","raceDescription":"Top candidate wins seat.","raceType":"top2","totalVotes":0,"uncontested":true,"precinctsReportPercentage":0,"eevp":0,"tabulationStatus":"Tabulation Paused","dateUpdated":"March 20, 2024","timeUpdated":"4:36 PM","source":"AP","candidates":[{"candidateName":"Liz Ortega","candidateIncumbent":true,"candidateParty":"D","voteCount":0,"isWinner":true}],"winnerDateTime":"2024-03-06T04:00:30.000Z"},"5982":{"id":"5982","type":"apRace","location":"State of California","raceName":"State House, District 21","raceDescription":"Top candidate wins seat.","raceType":"top2","totalVotes":0,"uncontested":true,"precinctsReportPercentage":0,"eevp":0,"tabulationStatus":"Tabulation Paused","dateUpdated":"March 22, 2024","timeUpdated":"4:20 PM","source":"AP","candidates":[{"candidateName":"Mark Gilham","candidateIncumbent":false,"candidateParty":"R","voteCount":0,"isWinner":true},{"candidateName":"Diane Papan","candidateIncumbent":true,"candidateParty":"D","voteCount":0,"isWinner":true}],"winnerDateTime":"2024-03-06T04:00:30.000Z"},"5984":{"id":"5984","type":"apRace","location":"State of California","raceName":"State House, District 23","raceDescription":"Top candidate wins seat.","raceType":"top2","totalVotes":116963,"precinctsReportPercentage":98.91,"eevp":99,"tabulationStatus":"Tabulation Paused","dateUpdated":"March 22, 2024","timeUpdated":"4:20 PM","source":"AP","candidates":[{"candidateName":"Marc Berman","candidateIncumbent":true,"candidateParty":"D","voteCount":67106,"isWinner":true},{"candidateName":"Lydia Kou","candidateIncumbent":false,"candidateParty":"D","voteCount":23699,"isWinner":true},{"candidateName":"Gus Mattammal","candidateIncumbent":false,"candidateParty":"R","voteCount":13277,"isWinner":false},{"candidateName":"Allan Marson","candidateIncumbent":false,"candidateParty":"R","voteCount":12881,"isWinner":false}],"winnerDateTime":"2024-03-12T01:13:06.280Z"},"5987":{"id":"5987","type":"apRace","location":"State of California","raceName":"State House, District 26","raceDescription":"Top candidate wins seat.","raceType":"top2","totalVotes":72753,"precinctsReportPercentage":99.19,"eevp":99,"tabulationStatus":"Tabulation Paused","dateUpdated":"March 22, 2024","timeUpdated":"4:20 PM","source":"AP","candidates":[{"candidateName":"Patrick Ahrens","candidateIncumbent":false,"candidateParty":"D","voteCount":25036,"isWinner":true},{"candidateName":"Tara Sreekrishnan","candidateIncumbent":false,"candidateParty":"D","voteCount":19600,"isWinner":true},{"candidateName":"Sophie Song","candidateIncumbent":false,"candidateParty":"R","voteCount":15954,"isWinner":false},{"candidateName":"Omar Din","candidateIncumbent":false,"candidateParty":"D","voteCount":8772,"isWinner":false},{"candidateName":"Bob Goodwyn","candidateIncumbent":false,"candidateParty":"Lib","voteCount":2170,"isWinner":false},{"candidateName":"Ashish Garg","candidateIncumbent":false,"candidateParty":"NPP","voteCount":1221,"isWinner":false}],"winnerDateTime":"2024-03-13T21:06:29.070Z"},"5989":{"id":"5989","type":"apRace","location":"State of California","raceName":"State House, District 28","raceDescription":"Top candidate wins seat.","raceType":"top2","totalVotes":0,"uncontested":true,"precinctsReportPercentage":0,"eevp":0,"tabulationStatus":"Tabulation Paused","dateUpdated":"March 22, 2024","timeUpdated":"5:10 PM","source":"AP","candidates":[{"candidateName":"Gail Pellerin","candidateIncumbent":true,"candidateParty":"D","voteCount":0,"isWinner":true},{"candidateName":"Liz Lawler","candidateIncumbent":false,"candidateParty":"R","voteCount":0,"isWinner":true}],"winnerDateTime":"2024-03-06T04:00:30.000Z"},"6010":{"id":"6010","type":"apRace","location":"State of California","raceName":"State House, District 49","raceDescription":"Top candidate wins seat.","raceType":"top2","totalVotes":0,"uncontested":true,"precinctsReportPercentage":0,"eevp":0,"tabulationStatus":"Tabulation Paused","dateUpdated":"March 22, 2024","timeUpdated":"4:36 PM","source":"AP","candidates":[{"candidateName":"Mike Fong","candidateIncumbent":true,"candidateParty":"D","voteCount":0,"isWinner":true},{"candidateName":"Long Liu","candidateIncumbent":false,"candidateParty":"R","voteCount":0,"isWinner":true}],"winnerDateTime":"2024-03-06T04:00:30.000Z"},"6018":{"id":"6018","type":"apRace","location":"State of California","raceName":"U.S. House of Representatives, District 2","raceDescription":"Top candidate wins seat.","raceType":"top2","totalVotes":229348,"precinctsReportPercentage":99.05,"eevp":99,"tabulationStatus":"Tabulation Paused","dateUpdated":"March 22, 2024","timeUpdated":"4:38 PM","source":"AP","candidates":[{"candidateName":"Jared Huffman","candidateIncumbent":true,"candidateParty":"D","voteCount":169005,"isWinner":true},{"candidateName":"Chris Coulombe","candidateIncumbent":false,"candidateParty":"R","voteCount":37372,"isWinner":true},{"candidateName":"Tief Gibbs","candidateIncumbent":false,"candidateParty":"R","voteCount":18437,"isWinner":false},{"candidateName":"Jolian Kangas","candidateIncumbent":false,"candidateParty":"NPP","voteCount":3166,"isWinner":false},{"candidateName":"Jason Brisendine","candidateIncumbent":false,"candidateParty":"NPP","voteCount":1368,"isWinner":false}],"winnerDateTime":"2024-03-12T00:46:10.103Z"},"6020":{"id":"6020","type":"apRace","location":"State of California","raceName":"U.S. House of Representatives, District 4","raceDescription":"Top candidate wins seat.","raceType":"top2","totalVotes":187640,"precinctsReportPercentage":96.32,"eevp":96.36,"tabulationStatus":"Tabulation Paused","dateUpdated":"March 22, 2024","timeUpdated":"4:20 PM","source":"AP","candidates":[{"candidateName":"Mike Thompson","candidateIncumbent":true,"candidateParty":"D","voteCount":118147,"isWinner":true},{"candidateName":"John Munn","candidateIncumbent":false,"candidateParty":"R","voteCount":56232,"isWinner":true},{"candidateName":"Andrew Engdahl","candidateIncumbent":false,"candidateParty":"D","voteCount":11202,"isWinner":false},{"candidateName":"Niket Patwardhan","candidateIncumbent":false,"candidateParty":"NPP","voteCount":2059,"isWinner":false}],"winnerDateTime":"2024-03-07T00:30:57.980Z"},"6025":{"id":"6025","type":"apRace","location":"State of California","raceName":"U.S. House of Representatives, District 9","raceDescription":"Top candidate wins seat.","raceType":"top2","totalVotes":121271,"precinctsReportPercentage":99.17,"eevp":99,"tabulationStatus":"Tabulation Paused","dateUpdated":"March 22, 2024","timeUpdated":"5:10 PM","source":"AP","candidates":[{"candidateName":"Josh Harder","candidateIncumbent":true,"candidateParty":"D","voteCount":60396,"isWinner":true},{"candidateName":"Kevin Lincoln","candidateIncumbent":false,"candidateParty":"R","voteCount":36346,"isWinner":true},{"candidateName":"John McBride","candidateIncumbent":false,"candidateParty":"R","voteCount":15525,"isWinner":false},{"candidateName":"Khalid Jafri","candidateIncumbent":false,"candidateParty":"R","voteCount":9004,"isWinner":false}],"winnerDateTime":"2024-03-12T00:49:44.113Z"},"6031":{"id":"6031","type":"apRace","location":"State of California","raceName":"U.S. House of Representatives, District 15","raceDescription":"Top candidate wins seat.","raceType":"top2","totalVotes":0,"uncontested":true,"precinctsReportPercentage":0,"eevp":0,"tabulationStatus":"Tabulation Paused","dateUpdated":"March 22, 2024","timeUpdated":"4:20 PM","source":"AP","candidates":[{"candidateName":"Anna Kramer","candidateIncumbent":false,"candidateParty":"R","voteCount":0,"isWinner":true},{"candidateName":"Kevin Mullin","candidateIncumbent":true,"candidateParty":"D","voteCount":0,"isWinner":true}],"winnerDateTime":"2024-03-06T04:00:30.000Z"},"6035":{"id":"6035","type":"apRace","location":"State of California","raceName":"U.S. House of Representatives, District 19","raceDescription":"Top candidate wins seat.","raceType":"top2","totalVotes":203670,"precinctsReportPercentage":99.11,"eevp":99,"tabulationStatus":"Tabulation Paused","dateUpdated":"March 25, 2024","timeUpdated":"5:47 AM","source":"AP","candidates":[{"candidateName":"Jimmy Panetta","candidateIncumbent":true,"candidateParty":"D","voteCount":132540,"isWinner":true},{"candidateName":"Jason Anderson","candidateIncumbent":false,"candidateParty":"R","voteCount":58120,"isWinner":true},{"candidateName":"Sean Dougherty","candidateIncumbent":false,"candidateParty":"Grn","voteCount":13010,"isWinner":false}],"winnerDateTime":"2024-03-07T00:23:46.779Z"},"6066":{"id":"6066","type":"apRace","location":"State of California","raceName":"State House, District 3","raceDescription":"Top candidate wins seat.","raceType":"top2","totalVotes":0,"uncontested":true,"precinctsReportPercentage":0,"eevp":0,"tabulationStatus":"Tabulation Paused","dateUpdated":"March 22, 2024","timeUpdated":"5:10 PM","source":"AP","candidates":[{"candidateName":"Jamie Gallagher","candidateIncumbent":true,"candidateParty":"R","voteCount":0,"isWinner":true},{"candidateName":"Aaron Draper","candidateIncumbent":false,"candidateParty":"D","voteCount":0,"isWinner":true}],"winnerDateTime":"2024-03-06T04:00:30.000Z"},"6067":{"id":"6067","type":"apRace","location":"State of California","raceName":"State House, District 4","raceDescription":"Top candidate wins seat.","raceType":"top2","totalVotes":0,"uncontested":true,"precinctsReportPercentage":0,"eevp":0,"tabulationStatus":"Tabulation Paused","dateUpdated":"March 22, 2024","timeUpdated":"4:20 PM","source":"AP","candidates":[{"candidateName":"Cecilia Aguiar-Curry","candidateIncumbent":true,"candidateParty":"D","voteCount":0,"isWinner":true}],"winnerDateTime":"2024-03-06T04:00:30.000Z"},"6087":{"id":"6087","type":"apRace","location":"State of California","raceName":"State House, District 24","raceDescription":"Top candidate wins seat.","raceType":"top2","totalVotes":66643,"precinctsReportPercentage":99.19,"eevp":99,"tabulationStatus":"Tabulation Paused","dateUpdated":"March 22, 2024","timeUpdated":"4:20 PM","source":"AP","candidates":[{"candidateName":"Alex Lee","candidateIncumbent":true,"candidateParty":"D","voteCount":45544,"isWinner":true},{"candidateName":"Bob Brunton","candidateIncumbent":false,"candidateParty":"R","voteCount":14951,"isWinner":true},{"candidateName":"Marti Souza","candidateIncumbent":false,"candidateParty":"R","voteCount":6148,"isWinner":false}],"winnerDateTime":"2024-03-14T23:23:49.770Z"},"6088":{"id":"6088","type":"apRace","location":"State of California","raceName":"State House, District 25","raceDescription":"Top candidate wins seat.","raceType":"top2","totalVotes":69560,"precinctsReportPercentage":99.31,"eevp":99,"tabulationStatus":"Tabulation Paused","dateUpdated":"March 22, 2024","timeUpdated":"4:20 PM","source":"AP","candidates":[{"candidateName":"Ash Kalra","candidateIncumbent":true,"candidateParty":"D","voteCount":35821,"isWinner":true},{"candidateName":"Ted Stroll","candidateIncumbent":false,"candidateParty":"R","voteCount":18255,"isWinner":true},{"candidateName":"Lan Ngo","candidateIncumbent":false,"candidateParty":"D","voteCount":15484,"isWinner":false}],"winnerDateTime":"2024-03-14T02:40:57.200Z"},"6092":{"id":"6092","type":"apRace","location":"State of California","raceName":"State House, District 29","raceDescription":"Top candidate wins seat.","raceType":"top2","totalVotes":0,"uncontested":true,"precinctsReportPercentage":0,"eevp":0,"tabulationStatus":"Tabulation Paused","dateUpdated":"March 25, 2024","timeUpdated":"5:47 AM","source":"AP","candidates":[{"candidateName":"Robert Rivas","candidateIncumbent":true,"candidateParty":"D","voteCount":0,"isWinner":true},{"candidateName":"J.W. Paine","candidateIncumbent":false,"candidateParty":"R","voteCount":0,"isWinner":true}],"winnerDateTime":"2024-03-06T04:00:30.000Z"},"6223":{"id":"6223","type":"apRace","location":"State of California","raceName":"U.S. House of Representatives, District 46","raceDescription":"Top candidate wins seat.","raceType":"top2","totalVotes":0,"uncontested":true,"precinctsReportPercentage":0,"eevp":0,"tabulationStatus":"Tabulation Paused","dateUpdated":"March 22, 2024","timeUpdated":"5:16 PM","source":"AP","candidates":[{"candidateName":"Lou Correa","candidateIncumbent":true,"candidateParty":"D","voteCount":0,"isWinner":true},{"candidateName":"David Pan","candidateIncumbent":false,"candidateParty":"R","voteCount":0,"isWinner":true}],"winnerDateTime":"2024-03-06T04:00:30.000Z"},"6530":{"id":"6530","type":"apRace","location":"State of California","raceName":"State Senate, District 3","raceDescription":"Top candidate wins seat.","raceType":"top2","totalVotes":222193,"precinctsReportPercentage":98.99,"eevp":99,"tabulationStatus":"Tabulation Paused","dateUpdated":"March 22, 2024","timeUpdated":"4:48 PM","source":"AP","candidates":[{"candidateName":"Thom Bogue","candidateIncumbent":false,"candidateParty":"R","voteCount":61776,"isWinner":true},{"candidateName":"Christopher Cabaldon","candidateIncumbent":false,"candidateParty":"D","voteCount":59041,"isWinner":true},{"candidateName":"Rozzana Verder-Aliga","candidateIncumbent":false,"candidateParty":"D","voteCount":45546,"isWinner":false},{"candidateName":"Jackie Elward","candidateIncumbent":false,"candidateParty":"D","voteCount":41127,"isWinner":false},{"candidateName":"Jimih Jones","candidateIncumbent":false,"candidateParty":"R","voteCount":14703,"isWinner":false}],"winnerDateTime":"2024-03-15T01:24:31.539Z"},"6531":{"id":"6531","type":"apRace","location":"State of California","raceName":"State Senate, District 5","raceDescription":"Top candidate wins seat.","raceType":"top2","totalVotes":171623,"precinctsReportPercentage":99.09,"eevp":99,"tabulationStatus":"Tabulation Paused","dateUpdated":"March 22, 2024","timeUpdated":"5:10 PM","source":"AP","candidates":[{"candidateName":"Jim Shoemaker","candidateIncumbent":false,"candidateParty":"R","voteCount":74935,"isWinner":true},{"candidateName":"Jerry McNerney","candidateIncumbent":false,"candidateParty":"D","voteCount":57040,"isWinner":true},{"candidateName":"Carlos Villapudua","candidateIncumbent":false,"candidateParty":"D","voteCount":39648,"isWinner":false}],"winnerDateTime":"2024-03-13T20:07:46.382Z"},"6532":{"id":"6532","type":"apRace","location":"State of California","raceName":"State Senate, District 7","raceDescription":"Top candidate wins seat.","raceType":"top2","totalVotes":192446,"precinctsReportPercentage":98.72,"eevp":98.78,"tabulationStatus":"Tabulation Paused","dateUpdated":"March 22, 2024","timeUpdated":"4:48 PM","source":"AP","candidates":[{"candidateName":"Jesse Arreguín","candidateIncumbent":false,"candidateParty":"D","voteCount":61837,"isWinner":true},{"candidateName":"Jovanka Beckles","candidateIncumbent":false,"candidateParty":"D","voteCount":34025,"isWinner":true},{"candidateName":"Dan Kalb","candidateIncumbent":false,"candidateParty":"D","voteCount":28842,"isWinner":false},{"candidateName":"Kathryn Lybarger","candidateIncumbent":false,"candidateParty":"D","voteCount":28041,"isWinner":false},{"candidateName":"Sandre Swanson","candidateIncumbent":false,"candidateParty":"D","voteCount":22862,"isWinner":false},{"candidateName":"Jeanne Solnordal","candidateIncumbent":false,"candidateParty":"R","voteCount":16839,"isWinner":false}],"winnerDateTime":"2024-03-16T00:58:11.533Z"},"6533":{"id":"6533","type":"apRace","location":"State of California","raceName":"State Senate, District 9","raceDescription":"Top candidate wins seat.","raceType":"top2","totalVotes":0,"uncontested":true,"precinctsReportPercentage":0,"eevp":0,"tabulationStatus":"Tabulation Paused","dateUpdated":"March 22, 2024","timeUpdated":"4:20 PM","source":"AP","candidates":[{"candidateName":"Tim Grayson","candidateIncumbent":false,"candidateParty":"D","voteCount":0,"isWinner":true},{"candidateName":"Marisol Rubio","candidateIncumbent":false,"candidateParty":"D","voteCount":0,"isWinner":true}],"winnerDateTime":"2024-03-06T04:00:30.000Z"},"6534":{"id":"6534","type":"apRace","location":"State of California","raceName":"State Senate, District 11","raceDescription":"Top candidate wins seat.","raceType":"top2","totalVotes":228260,"precinctsReportPercentage":99.09,"eevp":99,"tabulationStatus":"Tabulation Paused","dateUpdated":"March 22, 2024","timeUpdated":"4:20 PM","source":"AP","candidates":[{"candidateName":"Scott Wiener","candidateIncumbent":true,"candidateParty":"D","voteCount":166592,"isWinner":true},{"candidateName":"Yvette Corkrean","candidateIncumbent":false,"candidateParty":"R","voteCount":34438,"isWinner":true},{"candidateName":"Cynthia Cravens","candidateIncumbent":false,"candidateParty":"D","voteCount":18513,"isWinner":false},{"candidateName":"Jing Xiong","candidateIncumbent":false,"candidateParty":"NPP","voteCount":8717,"isWinner":false}],"winnerDateTime":"2024-03-12T02:01:51.597Z"},"6535":{"id":"6535","type":"apRace","location":"State of California","raceName":"State Senate, District 13","raceDescription":"Top candidate wins seat.","raceType":"top2","totalVotes":227191,"precinctsReportPercentage":98.88,"eevp":99,"tabulationStatus":"Tabulation Paused","dateUpdated":"March 22, 2024","timeUpdated":"4:20 PM","source":"AP","candidates":[{"candidateName":"Josh Becker","candidateIncumbent":true,"candidateParty":"D","voteCount":167127,"isWinner":true},{"candidateName":"Alexander Glew","candidateIncumbent":false,"candidateParty":"R","voteCount":42788,"isWinner":true},{"candidateName":"Christina Laskowski","candidateIncumbent":false,"candidateParty":"R","voteCount":17276,"isWinner":false}],"winnerDateTime":"2024-03-12T01:56:24.964Z"},"6536":{"id":"6536","type":"apRace","location":"State of California","raceName":"State Senate, District 15","raceDescription":"Top candidate wins seat.","raceType":"top2","totalVotes":180231,"precinctsReportPercentage":98.81,"eevp":98.95,"tabulationStatus":"Tabulation Paused","dateUpdated":"March 22, 2024","timeUpdated":"4:20 PM","source":"AP","candidates":[{"candidateName":"Dave Cortese","candidateIncumbent":true,"candidateParty":"D","voteCount":124440,"isWinner":true},{"candidateName":"Robert Howell","candidateIncumbent":false,"candidateParty":"R","voteCount":34173,"isWinner":true},{"candidateName":"Tony Loaiza","candidateIncumbent":false,"candidateParty":"R","voteCount":21618,"isWinner":false}],"winnerDateTime":"2024-03-13T01:15:45.365Z"},"6548":{"id":"6548","type":"apRace","location":"State of California","raceName":"State Senate, District 39","raceDescription":"Top candidate wins seat.","raceType":"top2","totalVotes":0,"uncontested":true,"precinctsReportPercentage":0,"eevp":0,"tabulationStatus":"Tabulation Paused","dateUpdated":"March 20, 2024","timeUpdated":"4:55 PM","source":"AP","candidates":[{"candidateName":"Akilah Weber","candidateIncumbent":false,"candidateParty":"D","voteCount":0,"isWinner":true},{"candidateName":"Bob Divine","candidateIncumbent":false,"candidateParty":"R","voteCount":0,"isWinner":true}],"winnerDateTime":"2024-03-06T04:00:30.000Z"},"6611":{"id":"6611","type":"apRace","location":"State of California","raceName":"U.S. House of Representatives, District 11","raceDescription":"Top candidate wins seat.","raceType":"top2","totalVotes":188732,"precinctsReportPercentage":98.89,"eevp":99,"tabulationStatus":"Tabulation Paused","dateUpdated":"March 22, 2024","timeUpdated":"8:25 AM","source":"AP","candidates":[{"candidateName":"Nancy Pelosi","candidateIncumbent":true,"candidateParty":"D","voteCount":138285,"isWinner":true},{"candidateName":"Bruce Lou","candidateIncumbent":false,"candidateParty":"R","voteCount":16285,"isWinner":true},{"candidateName":"Marjorie Mikels","candidateIncumbent":false,"candidateParty":"D","voteCount":9363,"isWinner":false},{"candidateName":"Bianca Von Krieg","candidateIncumbent":false,"candidateParty":"D","voteCount":7634,"isWinner":false},{"candidateName":"Jason Zeng","candidateIncumbent":false,"candidateParty":"R","voteCount":6607,"isWinner":false},{"candidateName":"Jason Boyce","candidateIncumbent":false,"candidateParty":"D","voteCount":4325,"isWinner":false},{"candidateName":"Larry Nichelson","candidateIncumbent":false,"candidateParty":"R","voteCount":3482,"isWinner":false},{"candidateName":"Eve Del Castello","candidateIncumbent":false,"candidateParty":"R","voteCount":2751,"isWinner":false}],"winnerDateTime":"2024-03-12T00:31:55.445Z"},"8589":{"id":"8589","type":"apRace","location":"State of California","raceName":"U.S. Senate, Class I","raceDescription":"Top candidate wins seat.","raceType":"top2","totalVotes":7276537,"precinctsReportPercentage":99,"eevp":99,"tabulationStatus":"Tabulation Paused","dateUpdated":"March 25, 2024","timeUpdated":"5:47 AM","source":"AP","candidates":[{"candidateName":"Adam Schiff","candidateIncumbent":false,"candidateParty":"D","voteCount":2299507,"isWinner":true},{"candidateName":"Steve Garvey","candidateIncumbent":false,"candidateParty":"R","voteCount":2292414,"isWinner":true},{"candidateName":"Katie Porter","candidateIncumbent":false,"candidateParty":"D","voteCount":1115606,"isWinner":false},{"candidateName":"Barbara Lee","candidateIncumbent":false,"candidateParty":"D","voteCount":714408,"isWinner":false},{"candidateName":"Eric Early","candidateIncumbent":false,"candidateParty":"R","voteCount":240723,"isWinner":false},{"candidateName":"James Bradley","candidateIncumbent":false,"candidateParty":"R","voteCount":98180,"isWinner":false},{"candidateName":"Christina Pascucci","candidateIncumbent":false,"candidateParty":"D","voteCount":61755,"isWinner":false},{"candidateName":"Sharleta Bassett","candidateIncumbent":false,"candidateParty":"R","voteCount":54422,"isWinner":false},{"candidateName":"Sarah Liew","candidateIncumbent":false,"candidateParty":"R","voteCount":38483,"isWinner":false},{"candidateName":"Laura Garza ","candidateIncumbent":false,"candidateParty":"NPP","voteCount":34320,"isWinner":false},{"candidateName":"Jonathan Reiss","candidateIncumbent":false,"candidateParty":"R","voteCount":34283,"isWinner":false},{"candidateName":"Sepi Gilani","candidateIncumbent":false,"candidateParty":"D","voteCount":34056,"isWinner":false},{"candidateName":"Gail Lightfoot","candidateIncumbent":false,"candidateParty":"Lib","voteCount":33046,"isWinner":false},{"candidateName":"Denice Gary-Pandol","candidateIncumbent":false,"candidateParty":"R","voteCount":25494,"isWinner":false},{"candidateName":"James Macauley","candidateIncumbent":false,"candidateParty":"R","voteCount":23168,"isWinner":false},{"candidateName":"Harmesh Kumar","candidateIncumbent":false,"candidateParty":"D","voteCount":21522,"isWinner":false},{"candidateName":"David Peterson","candidateIncumbent":false,"candidateParty":"D","voteCount":21076,"isWinner":false},{"candidateName":"Douglas Pierce","candidateIncumbent":false,"candidateParty":"D","voteCount":19371,"isWinner":false},{"candidateName":"Major Singh","candidateIncumbent":false,"candidateParty":"NPP","voteCount":16965,"isWinner":false},{"candidateName":"John Rose","candidateIncumbent":false,"candidateParty":"D","voteCount":14577,"isWinner":false},{"candidateName":"Perry Pound","candidateIncumbent":false,"candidateParty":"D","voteCount":14134,"isWinner":false},{"candidateName":"Raji Rab","candidateIncumbent":false,"candidateParty":"D","voteCount":13558,"isWinner":false},{"candidateName":"Mark Ruzon","candidateIncumbent":false,"candidateParty":"NPP","voteCount":13429,"isWinner":false},{"candidateName":"Forrest Jones","candidateIncumbent":false,"candidateParty":"AIP","voteCount":13027,"isWinner":false},{"candidateName":"Stefan Simchowitz","candidateIncumbent":false,"candidateParty":"R","voteCount":12717,"isWinner":false},{"candidateName":"Martin Veprauskas","candidateIncumbent":false,"candidateParty":"R","voteCount":9714,"isWinner":false},{"candidateName":"Don Grundmann","candidateIncumbent":false,"candidateParty":"NPP","voteCount":6582,"isWinner":false}],"winnerDateTime":"2024-03-06T05:01:46.589Z"},"8686":{"id":"8686","type":"apRace","location":"State of California","raceName":"President,","raceDescription":"Top candidate wins seat.","raceType":"top1","totalVotes":3589127,"precinctsReportPercentage":99,"eevp":99,"tabulationStatus":"Tabulation Paused","dateUpdated":"March 25, 2024","timeUpdated":"5:48 AM","source":"AP","candidates":[{"candidateName":"Joe Biden","candidateIncumbent":true,"candidateParty":"D","voteCount":3200188,"isWinner":true},{"candidateName":"Marianne Williamson","candidateIncumbent":false,"candidateParty":"D","voteCount":145690,"isWinner":false},{"candidateName":"Dean Phillips","candidateIncumbent":false,"candidateParty":"D","voteCount":99981,"isWinner":false},{"candidateName":"Armando Perez-Serrato","candidateIncumbent":false,"candidateParty":"D","voteCount":42925,"isWinner":false},{"candidateName":"Gabriel Cornejo","candidateIncumbent":false,"candidateParty":"D","voteCount":41261,"isWinner":false},{"candidateName":"President Boddie","candidateIncumbent":false,"candidateParty":"D","voteCount":25373,"isWinner":false},{"candidateName":"Stephen Lyons","candidateIncumbent":false,"candidateParty":"D","voteCount":21008,"isWinner":false},{"candidateName":"Eban Cambridge","candidateIncumbent":false,"candidateParty":"D","voteCount":12701,"isWinner":false}],"winnerDateTime":"2024-03-06T04:12:27.559Z"},"8688":{"id":"8688","type":"apRace","location":"State of California","raceName":"President,","raceDescription":"Top candidate wins seat.","raceType":"top1","totalVotes":2466569,"precinctsReportPercentage":99,"eevp":99,"tabulationStatus":"Tabulation Paused","dateUpdated":"March 25, 2024","timeUpdated":"5:47 AM","source":"AP","candidates":[{"candidateName":"Donald Trump","candidateIncumbent":false,"candidateParty":"R","voteCount":1953947,"isWinner":true},{"candidateName":"Nikki Haley","candidateIncumbent":false,"candidateParty":"R","voteCount":430792,"isWinner":false},{"candidateName":"Ron DeSantis","candidateIncumbent":false,"candidateParty":"R","voteCount":35581,"isWinner":false},{"candidateName":"Chris Christie","candidateIncumbent":false,"candidateParty":"R","voteCount":20164,"isWinner":false},{"candidateName":"Vivek Ramaswamy","candidateIncumbent":false,"candidateParty":"R","voteCount":11069,"isWinner":false},{"candidateName":"Rachel Swift","candidateIncumbent":false,"candidateParty":"R","voteCount":4231,"isWinner":false},{"candidateName":"David Stuckenberg","candidateIncumbent":false,"candidateParty":"R","voteCount":3895,"isWinner":false},{"candidateName":"Ryan Binkley","candidateIncumbent":false,"candidateParty":"R","voteCount":3563,"isWinner":false},{"candidateName":"Asa Hutchinson","candidateIncumbent":false,"candidateParty":"R","voteCount":3327,"isWinner":false}],"winnerDateTime":"2024-03-06T04:13:19.766Z"},"81993":{"id":"81993","type":"apRace","location":"State of California","raceName":"U.S. Senate, Class I Unexpired Term","raceDescription":"Top candidate wins seat.","raceType":"top2","totalVotes":7358837,"precinctsReportPercentage":99,"eevp":99,"tabulationStatus":"Tabulation Paused","dateUpdated":"March 25, 2024","timeUpdated":"5:47 AM","source":"AP","candidates":[{"candidateName":"Steve Garvey","candidateIncumbent":false,"candidateParty":"R","voteCount":2444940,"isWinner":true},{"candidateName":"Adam Schiff","candidateIncumbent":false,"candidateParty":"D","voteCount":2155146,"isWinner":true},{"candidateName":"Katie Porter","candidateIncumbent":false,"candidateParty":"D","voteCount":1269194,"isWinner":false},{"candidateName":"Barbara Lee","candidateIncumbent":false,"candidateParty":"D","voteCount":863278,"isWinner":false},{"candidateName":"Eric Early","candidateIncumbent":false,"candidateParty":"R","voteCount":448788,"isWinner":false},{"candidateName":"Christina Pascucci","candidateIncumbent":false,"candidateParty":"D","voteCount":109421,"isWinner":false},{"candidateName":"Sepi Gilani","candidateIncumbent":false,"candidateParty":"D","voteCount":68070,"isWinner":false}],"winnerDateTime":"2024-03-06T04:31:08.186Z"},"82014":{"id":"82014","type":"apRace","location":"State of California","raceName":"Proposition, 1 - Behavioral Health Services Program","raceDescription":"Top candidate wins seat.","raceType":"top1","totalVotes":7221972,"precinctsReportPercentage":99,"eevp":99,"tabulationStatus":"Tabulation Paused","dateUpdated":"March 25, 2024","timeUpdated":"5:47 AM","source":"AP","candidates":[{"candidateName":"Yes","candidateIncumbent":false,"candidateParty":null,"voteCount":3624998,"isWinner":true},{"candidateName":"No","candidateIncumbent":false,"candidateParty":null,"voteCount":3596974,"isWinner":false}],"winnerDateTime":"2024-03-21T00:11:06.265Z"},"timeLoaded":"April 26, 2024 4:47 PM","nationalRacesLoaded":true,"localRacesLoaded":true,"overrides":[{"id":"5921","raceName":"U.S. House of Representatives, District 7","raceDescription":"Top two candidates advance to general election.","raceReadTheStory":""},{"id":"5922","raceName":"U.S. House of Representatives, District 8","raceDescription":"Top two candidates advance to general election.","raceReadTheStory":""},{"id":"5924","raceName":"U.S. House of Representatives, District 10","raceDescription":"Top two candidates advance to general election.","raceReadTheStory":""},{"id":"5926","raceName":"U.S. House of Representatives, District 12","raceDescription":"Top two candidates advance to general election.","raceReadTheStory":"https://www.kqed.org/elections/results/alameda/congress-12th-district"},{"id":"5928","raceName":"U.S. House of Representatives, District 14","raceDescription":"Top two candidates advance to general election.","raceReadTheStory":""},{"id":"5930","raceName":"U.S. House of Representatives, District 16","raceDescription":"Top two candidates advance to general election.","raceReadTheStory":"https://www.kqed.org/elections/results/california/congress-16th-district"},{"id":"5931","raceName":"U.S. House of Representatives, District 17","raceDescription":"Top two candidates advance to general election.","raceReadTheStory":""},{"id":"5932","raceName":"U.S. House of Representatives, District 18","raceDescription":"Top two candidates advance to general election.","raceReadTheStory":""},{"id":"5963","raceName":"State Assembly, District 2","raceDescription":"Top two candidates advance to general election.","raceReadTheStory":""},{"id":"5972","raceName":"State Assembly, District 11","raceDescription":"Top two candidates advance to general election.","raceReadTheStory":""},{"id":"5973","raceName":"State Assembly, District 12","raceDescription":"Top two candidates advance to general election.","raceReadTheStory":""},{"id":"5975","raceName":"State Assembly, District 14","raceDescription":"Top two candidates advance to general election.","raceReadTheStory":""},{"id":"5976","raceName":"State Assembly, District 15","raceDescription":"Top two candidates advance to general election.","raceReadTheStory":"https://www.kqed.org/elections/results/contracosta/state-assembly"},{"id":"5977","raceName":"State Assembly, District 16","raceDescription":"Top two candidates advance to general election.","raceReadTheStory":""},{"id":"5978","raceName":"State Assembly, District 17","raceDescription":"Top two candidates advance to general election.","raceReadTheStory":""},{"id":"5979","raceName":"State Assembly, District 18","raceDescription":"Top two candidates advance to general election.","raceReadTheStory":""},{"id":"5980","raceName":"State Assembly, District 19","raceDescription":"Top two candidates advance to general election.","raceReadTheStory":""},{"id":"5981","raceName":"State Assembly, District 20","raceDescription":"Top two candidates advance to general election.","raceReadTheStory":""},{"id":"5982","raceName":"State Assembly, District 21","raceDescription":"Top two candidates advance to general election.","raceReadTheStory":""},{"id":"5984","raceName":"State Assembly, District 23","raceDescription":"Top two candidates advance to general election.","raceReadTheStory":"https://www.kqed.org/elections/results/california/state-assembly-23rd-district"},{"id":"5987","raceName":"State Assembly, District 26","raceDescription":"Top two candidates advance to general election.","raceReadTheStory":"https://www.kqed.org/elections/results/santaclara/state-assembly-26th-district"},{"id":"5989","raceName":"State Assembly, District 28","raceDescription":"Top two candidates advance to general election.","raceReadTheStory":""},{"id":"6010","raceName":"State Assembly, District 4","raceDescription":"Top two candidates advance to general election.","raceReadTheStory":""},{"id":"6018","raceName":"U.S. House of Representatives, District 2","raceDescription":"Top two candidates advance to general election.","raceReadTheStory":""},{"id":"6020","raceName":"U.S. House of Representatives, District 4","raceDescription":"Top two candidates advance to general election.","raceReadTheStory":""},{"id":"6025","raceName":"U.S. House of Representatives, District 9","raceDescription":"Top two candidates advance to general election.","raceReadTheStory":""},{"id":"6031","raceName":"U.S. House of Representatives, District 15","raceDescription":"Top two candidates advance to general election.","raceReadTheStory":""},{"id":"6035","raceName":"U.S. House of Representatives, District 19","raceDescription":"Top two candidates advance to general election.","raceReadTheStory":""},{"id":"6067","raceName":"State Assembly, District 4","raceDescription":"Top two candidates advance to general election.","raceReadTheStory":""},{"id":"6087","raceName":"State Assembly, District 24","raceDescription":"Top two candidates advance to general election.","raceReadTheStory":""},{"id":"6088","raceName":"State Assembly, District 25","raceDescription":"Top two candidates advance to general election.","raceReadTheStory":""},{"id":"6092","raceName":"State Assembly, District 29","raceDescription":"Top two candidates advance to general election.","raceReadTheStory":""},{"id":"6223","raceName":"U.S. House of Representatives, District 4","raceDescription":"Top two candidates advance to general election.","raceReadTheStory":""},{"id":"6530","raceName":"State Senate, District 3","raceDescription":"Top two candidates advance to general election.","raceReadTheStory":"https://www.kqed.org/elections/results/california/state-senate-3rd-district"},{"id":"6531","raceName":"State Senate, District 5","raceDescription":"Top two candidates advance to general election.","raceReadTheStory":""},{"id":"6532","raceName":"State Senate, District 7","raceDescription":"Top two candidates advance to general election.","raceReadTheStory":"https://www.kqed.org/elections/results/california/state-senate-7th-district"},{"id":"6533","raceName":"State Senate, District 9","raceDescription":"Top two candidates advance to general election.","raceReadTheStory":""},{"id":"6534","raceName":"State Senate, District 11","raceDescription":"Top two candidates advance to general election.","raceReadTheStory":""},{"id":"6535","raceName":"State Senate, District 13","raceDescription":"Top two candidates advance to general election.","raceReadTheStory":""},{"id":"6536","raceName":"State Senate, District 15","raceDescription":"Top two candidates advance to general election.","raceReadTheStory":""},{"id":"6611","raceName":"U.S. House of Representatives, District 11","raceDescription":"Top two candidates advance to general election.","raceReadTheStory":""},{"id":"8589","raceName":"U.S. Senate (Full Term)","raceDescription":"Top two candidates advance to general election.","raceReadTheStory":"https://www.kqed.org/elections/results/california/senator"},{"id":"8686","raceName":"California Democratic Presidential Primary","raceDescription":"Candidates are competing for 496 delegates.","raceReadTheStory":"https://www.kqed.org/elections/results/president/democrat"},{"id":"8688","raceName":"California Republican Presidential Primary","raceDescription":"Candidates are competing for 169 delegates.","raceReadTheStory":"https://kqed.org/elections/results/president/republican"},{"id":"81993","raceName":"U.S. Senate (Partial/Unexpired Term)","raceDescription":"Top two candidates advance to general election."},{"id":"82014","raceName":"Proposition 1","raceDescription":"Bond and mental health reforms. Passes with majority vote.","raceReadTheStory":"https://www.kqed.org/elections/results/california/proposition-1"}],"AlamedaJudge5":{"id":"AlamedaJudge5","type":"localRace","location":"Alameda","raceName":"Superior Court Judge, Office 5","raceDescription":"Top candidate wins seat.","raceReadTheStory":"","raceType":"top1","timeUpdated":"7:02 PM","dateUpdated":"April 1, 2024","totalVotes":200601,"candidates":[{"candidateName":"Terry Wiley","candidateIncumbent":true,"candidateParty":"","voteCount":200601}]},"AlamedaJudge12":{"id":"AlamedaJudge12","type":"localRace","location":"Alameda","raceName":"Superior Court Judge, Office 12","raceDescription":"Top candidate wins seat.","raceReadTheStory":"","raceType":"top1","timeUpdated":"7:02 PM","dateUpdated":"April 1, 2024","totalVotes":240853,"candidates":[{"candidateName":"Mark Fickes","candidateIncumbent":false,"candidateParty":"","voteCount":133009},{"candidateName":"Michael P. Johnson","candidateIncumbent":false,"candidateParty":"","voteCount":107844}]},"AlamedaBoard2":{"id":"AlamedaBoard2","type":"localRace","location":"Alameda","raceName":"Board of Education, Trustee Area 2","raceDescription":"Top candidate wins seat.","raceReadTheStory":"","raceType":"top1","timeUpdated":"7:02 PM","dateUpdated":"April 1, 2024","totalVotes":33580,"candidates":[{"candidateName":"John Lewis","candidateIncumbent":false,"candidateParty":"","voteCount":6943},{"candidateName":"Angela Normand","candidateIncumbent":true,"candidateParty":"","voteCount":26637}]},"AlamedaBoard5":{"id":"AlamedaBoard5","type":"localRace","location":"Alameda","raceName":"Board of Education, Trustee Area 5","raceDescription":"Top candidate wins seat.","raceReadTheStory":"","raceType":"top1","timeUpdated":"7:02 PM","dateUpdated":"April 1, 2024","totalVotes":26072,"candidates":[{"candidateName":"Guadalupe \"Lupe\" Angulo","candidateIncumbent":false,"candidateParty":"","voteCount":7521},{"candidateName":"Janevette Cole","candidateIncumbent":true,"candidateParty":"","voteCount":13338},{"candidateName":"Joe Orlando Ramos","candidateIncumbent":false,"candidateParty":"","voteCount":5213}]},"AlamedaBoard6":{"id":"AlamedaBoard6","type":"localRace","location":"Alameda","raceName":"Board of Education, Trustee Area 6","raceDescription":"Top candidate wins seat.","raceReadTheStory":"","raceType":"top1","timeUpdated":"7:02 PM","dateUpdated":"April 1, 2024","totalVotes":30864,"candidates":[{"candidateName":"John Guerrero","candidateIncumbent":false,"candidateParty":"","voteCount":9989},{"candidateName":"Eileen McDonald","candidateIncumbent":true,"candidateParty":"","voteCount":20875}]},"AlamedaSup1":{"id":"AlamedaSup1","type":"localRace","location":"Alameda","raceName":"Board of Supervisors, District 1","raceDescription":"Candidate with majority vote wins seat. If no candidate reaches majority, top two candidates advance to runoff in general election.","raceReadTheStory":"","raceType":"top1","timeUpdated":"7:02 PM","dateUpdated":"April 1, 2024","totalVotes":41038,"candidates":[{"candidateName":"David Haubert","candidateIncumbent":true,"candidateParty":"","voteCount":41038}]},"AlamedaSup2":{"id":"AlamedaSup2","type":"localRace","location":"Alameda","raceName":"Board of Supervisors, District 2","raceDescription":"Candidate with majority vote wins seat. If no candidate reaches majority, top two candidates advance to runoff in general election.","raceReadTheStory":"","raceType":"top2","timeUpdated":"7:02 PM","dateUpdated":"April 1, 2024","totalVotes":31034,"candidates":[{"candidateName":"Elisa Márquez","candidateIncumbent":true,"candidateParty":"","voteCount":31034}]},"AlamedaSup4":{"id":"AlamedaSup4","type":"localRace","location":"Alameda","raceName":"Board of Supervisors, District 4","raceDescription":"Candidate with majority vote wins seat. If no candidate reaches majority, top two candidates advance to runoff in general election.","raceReadTheStory":"https://www.kqed.org/elections/results/alameda/supervisor-4th-district","raceType":"top2","timeUpdated":"7:02 PM","dateUpdated":"April 1, 2024","totalVotes":57007,"candidates":[{"candidateName":"Jennifer Esteen","candidateIncumbent":false,"candidateParty":"","voteCount":22400},{"candidateName":"Nate Miley","candidateIncumbent":true,"candidateParty":"","voteCount":34607}]},"AlamedaSup5":{"id":"AlamedaSup5","type":"localRace","location":"Alameda","raceName":"Board of Supervisors, District 5","raceDescription":"Candidate with majority vote wins seat. If no candidate reaches majority, top two candidates advance to runoff in general election.","raceReadTheStory":"https://www.kqed.org/elections/results/alameda/supervisor-5th-district","raceType":"top2","timeUpdated":"7:02 PM","dateUpdated":"April 1, 2024","totalVotes":81059,"candidates":[{"candidateName":"Ben Bartlett","candidateIncumbent":false,"candidateParty":"","voteCount":13518},{"candidateName":"Nikki Fortunato Bas","candidateIncumbent":false,"candidateParty":"","voteCount":27597},{"candidateName":"John J. Bauters","candidateIncumbent":false,"candidateParty":"","voteCount":16783},{"candidateName":"Ken Berrick","candidateIncumbent":false,"candidateParty":"","voteCount":7520},{"candidateName":"Omar Farmer","candidateIncumbent":false,"candidateParty":"","voteCount":1240},{"candidateName":"Gregory Hodge","candidateIncumbent":false,"candidateParty":"","voteCount":3419},{"candidateName":"Chris Moore","candidateIncumbent":false,"candidateParty":"","voteCount":7428},{"candidateName":"Gerald Pechenuk","candidateIncumbent":false,"candidateParty":"","voteCount":305},{"candidateName":"Lorrel Plimier","candidateIncumbent":false,"candidateParty":"","voteCount":3249}]},"AlamedaBoard7":{"id":"AlamedaBoard7","type":"localRace","location":"Alameda","raceName":"Flood Control & Water Conservation District Director, Zone 7, Full Term","raceDescription":"Top three candidates win seat.","raceReadTheStory":"","raceType":"top3","timeUpdated":"7:02 PM","dateUpdated":"April 1, 2024","totalVotes":134340,"candidates":[{"candidateName":"Alan Burnham","candidateIncumbent":false,"candidateParty":"","voteCount":15723},{"candidateName":"Sandy Figuers","candidateIncumbent":false,"candidateParty":"","voteCount":22454},{"candidateName":"Laurene K. Green","candidateIncumbent":false,"candidateParty":"","voteCount":30343},{"candidateName":"Kathy Narum","candidateIncumbent":true,"candidateParty":"","voteCount":23833},{"candidateName":"Seema Badar","candidateIncumbent":false,"candidateParty":"","voteCount":7468},{"candidateName":"Catherine Brown","candidateIncumbent":false,"candidateParty":"","voteCount":34519}]},"AlamedaAuditor":{"id":"AlamedaAuditor","type":"localRace","location":"Alameda","raceName":"Oakland Auditor","raceDescription":"Top candidate wins seat.","raceReadTheStory":"","raceType":"top1","timeUpdated":"7:02 PM","dateUpdated":"April 1, 2024","totalVotes":59227,"candidates":[{"candidateName":"Michael Houston","candidateIncumbent":true,"candidateParty":"","voteCount":59227}]},"AlamedaMeasureA":{"id":"AlamedaMeasureA","type":"localRace","location":"Alameda","raceName":"Measure A","raceDescription":"Alameda County. Civil service. Passes with majority vote.","raceReadTheStory":"","raceType":"yesNo","timeUpdated":"7:02 PM","dateUpdated":"April 1, 2024","totalVotes":282335,"candidates":[{"candidateName":"Yes","candidateIncumbent":false,"candidateParty":"","voteCount":167903},{"candidateName":"No","candidateIncumbent":false,"candidateParty":"","voteCount":114432}]},"AlamedaMeasureB":{"id":"AlamedaMeasureB","type":"localRace","location":"Alameda","raceName":"Measure B","raceDescription":"Alameda County. Recall rules. Passes with majority vote.","raceReadTheStory":"https://www.kqed.org/elections/results/alameda/measure-b","raceType":"yesNo","timeUpdated":"7:02 PM","dateUpdated":"April 1, 2024","totalVotes":282683,"candidates":[{"candidateName":"Yes","candidateIncumbent":false,"candidateParty":"","voteCount":182200},{"candidateName":"No","candidateIncumbent":false,"candidateParty":"","voteCount":100483}]},"AlamedaMeasureD":{"id":"AlamedaMeasureD","type":"localRace","location":"Alameda","raceName":"Measure D","raceDescription":"Oakland. Appropriations limit. Passes with majority vote.","raceReadTheStory":"","raceType":"yesNo","timeUpdated":"7:02 PM","dateUpdated":"April 1, 2024","totalVotes":79797,"candidates":[{"candidateName":"Yes","candidateIncumbent":false,"candidateParty":"","voteCount":59852},{"candidateName":"No","candidateIncumbent":false,"candidateParty":"","voteCount":19945}]},"AlamedaMeasureE":{"id":"AlamedaMeasureE","type":"localRace","location":"Alameda","raceName":"Measure E","raceDescription":"Alameda Unified School District. Parcel tax. Passes with 2/3 vote.","raceReadTheStory":"","raceType":"yesNo","timeUpdated":"7:02 PM","dateUpdated":"April 1, 2024","totalVotes":22692,"candidates":[{"candidateName":"Yes","candidateIncumbent":false,"candidateParty":"","voteCount":17280},{"candidateName":"No","candidateIncumbent":false,"candidateParty":"","voteCount":5412}]},"AlamedaMeasureF":{"id":"AlamedaMeasureF","type":"localRace","location":"Alameda","raceName":"Measure F","raceDescription":"Piedmont. Parcel tax. Passes with 2/3 vote.","raceReadTheStory":"","raceType":"yesNo","timeUpdated":"7:02 PM","dateUpdated":"April 1, 2024","totalVotes":4855,"candidates":[{"candidateName":"Yes","candidateIncumbent":false,"candidateParty":"","voteCount":3673},{"candidateName":"No","candidateIncumbent":false,"candidateParty":"","voteCount":1182}]},"AlamedaMeasureG":{"id":"AlamedaMeasureG","type":"localRace","location":"Alameda","raceName":"Measure G","raceDescription":"Albany Unified School District. Parcel tax. Passes with 2/3 vote. ","raceReadTheStory":"","raceType":"yesNo","timeUpdated":"7:02 PM","dateUpdated":"April 1, 2024","totalVotes":5898,"candidates":[{"candidateName":"Yes","candidateIncumbent":false,"candidateParty":"","voteCount":4651},{"candidateName":"No","candidateIncumbent":false,"candidateParty":"","voteCount":1247}]},"AlamedaMeasureH":{"id":"AlamedaMeasureH","type":"localRace","location":"Alameda","raceName":"Measure H","raceDescription":"Berkeley Unified School District. Parcel tax. Passes with 2/3 vote.","raceReadTheStory":"","raceType":"yesNo","timeUpdated":"7:02 PM","dateUpdated":"April 1, 2024","totalVotes":33331,"candidates":[{"candidateName":"Yes","candidateIncumbent":false,"candidateParty":"","voteCount":29418},{"candidateName":"No","candidateIncumbent":false,"candidateParty":"","voteCount":3913}]},"AlamedaMeasureI":{"id":"AlamedaMeasureI","type":"localRace","location":"Alameda","raceName":"Measure I","raceDescription":"Hayward Unified School District. School bond. Passes with 55% vote.","raceReadTheStory":"","raceType":"yesNo","timeUpdated":"7:02 PM","dateUpdated":"April 1, 2024","totalVotes":21929,"candidates":[{"candidateName":"Yes","candidateIncumbent":false,"candidateParty":"","voteCount":14151},{"candidateName":"No","candidateIncumbent":false,"candidateParty":"","voteCount":7778}]},"AlamedaMeasureJ":{"id":"AlamedaMeasureJ","type":"localRace","location":"Alameda","raceName":"Measure J","raceDescription":"San Leandro Unified School District. School bond. Passes with 55% vote.","raceReadTheStory":"","raceType":"yesNo","timeUpdated":"7:02 PM","dateUpdated":"April 1, 2024","totalVotes":12338,"candidates":[{"candidateName":"Yes","candidateIncumbent":false,"candidateParty":"","voteCount":7784},{"candidateName":"No","candidateIncumbent":false,"candidateParty":"","voteCount":4554}]},"CCD2":{"id":"CCD2","type":"localRace","location":"Contra Costa","raceName":"Board of Supervisors, District 2","raceDescription":"Candidate with majority vote wins seat. If no candidate reaches majority, top two candidates advance to runoff in general election.","raceReadTheStory":"","raceType":"yesNo","timeUpdated":"6:45 PM","dateUpdated":"March 28, 2024","totalVotes":45776,"candidates":[{"candidateName":"Candace Andersen","candidateIncumbent":true,"candidateParty":"","voteCount":45776}]},"CCD3":{"id":"CCD3","type":"localRace","location":"Contra Costa","raceName":"Board of Supervisors, District 3","raceDescription":"Candidate with majority vote wins seat. If no candidate reaches majority, top two candidates advance to runoff in general election.","raceReadTheStory":"","raceType":"top1","timeUpdated":"6:45 PM","dateUpdated":"March 28, 2024","totalVotes":25120,"candidates":[{"candidateName":"Diane Burgis","candidateIncumbent":true,"candidateParty":"","voteCount":25120}]},"CCD5":{"id":"CCD5","type":"localRace","location":"Contra Costa","raceName":"Board of Supervisors, District 5","raceDescription":"Candidate with majority vote wins seat. If no candidate reaches majority, top two candidates advance to runoff in general election.","raceReadTheStory":"https://www.kqed.org/elections/results/contracosta/supervisor-5th-district","raceType":"top2","timeUpdated":"6:45 PM","dateUpdated":"March 28, 2024","totalVotes":37045,"candidates":[{"candidateName":"Mike Barbanica","candidateIncumbent":false,"candidateParty":"","voteCount":14338},{"candidateName":"Jelani Killings","candidateIncumbent":false,"candidateParty":"","voteCount":5683},{"candidateName":"Shanelle Scales-Preston","candidateIncumbent":false,"candidateParty":"","voteCount":12993},{"candidateName":"Iztaccuauhtli Hector Gonzalez","candidateIncumbent":false,"candidateParty":"","voteCount":4031}]},"CCMeasureA":{"id":"CCMeasureA","type":"localRace","location":"Contra Costa","raceName":"Measure A","raceDescription":"Martinez. Appoint City Clerk. Passes with a majority vote.","raceReadTheStory":"","raceType":"yesNo","timeUpdated":"6:45 PM","dateUpdated":"March 28, 2024","totalVotes":11513,"candidates":[{"candidateName":"Yes","candidateIncumbent":false,"candidateParty":"","voteCount":7554},{"candidateName":"No","candidateIncumbent":false,"candidateParty":"","voteCount":3959}]},"CCMeasureB":{"id":"CCMeasureB","type":"localRace","location":"Contra Costa","raceName":"Measure B","raceDescription":"Antioch Unified School District. School bond. Passes with 55% vote.","raceReadTheStory":"","raceType":"yesNo","timeUpdated":"6:45 PM","dateUpdated":"March 28, 2024","totalVotes":17971,"candidates":[{"candidateName":"Yes","candidateIncumbent":false,"candidateParty":"","voteCount":10397},{"candidateName":"No","candidateIncumbent":false,"candidateParty":"","voteCount":7574}]},"CCMeasureC":{"id":"CCMeasureC","type":"localRace","location":"Contra Costa","raceName":"Measure C","raceDescription":"Martinez Unified School District. Parcel tax. Passes with 2/3 vote.","raceReadTheStory":"","raceType":"yesNo","timeUpdated":"6:45 PM","dateUpdated":"March 28, 2024","totalVotes":9230,"candidates":[{"candidateName":"Yes","candidateIncumbent":false,"candidateParty":"","voteCount":6917},{"candidateName":"No","candidateIncumbent":false,"candidateParty":"","voteCount":2313}]},"CCMeasureD":{"id":"CCMeasureD","type":"localRace","location":"Contra Costa","raceName":"Measure D","raceDescription":"Moraga School District. School bond. Passes with 55% vote.","raceReadTheStory":"","raceType":"yesNo","timeUpdated":"6:45 PM","dateUpdated":"March 28, 2024","totalVotes":6007,"candidates":[{"candidateName":"Yes","candidateIncumbent":false,"candidateParty":"","voteCount":4052},{"candidateName":"No","candidateIncumbent":false,"candidateParty":"","voteCount":1955}]},"MarinD2":{"id":"MarinD2","type":"localRace","location":"Marin","raceName":"Board of Supervisors, District 2","raceDescription":"Candidate with majority vote wins seat. If no candidate reaches majority, top two candidates advance to runoff in general election.","raceReadTheStory":"https://www.kqed.org/elections/results/marin/supervisor-2nd-district","raceType":"top2","timeUpdated":"6:54 PM","dateUpdated":"March 27, 2024","totalVotes":18466,"candidates":[{"candidateName":"Brian Colbert","candidateIncumbent":false,"candidateParty":"","voteCount":7971},{"candidateName":"Heather McPhail Sridharan","candidateIncumbent":false,"candidateParty":"","voteCount":4851},{"candidateName":"Ryan O'Neil","candidateIncumbent":false,"candidateParty":"","voteCount":2647},{"candidateName":"Gabe Paulson","candidateIncumbent":false,"candidateParty":"","voteCount":2997}]},"MarinD3":{"id":"MarinD3","type":"localRace","location":"Marin","raceName":"Board of Supervisors, District 3","raceDescription":"Candidate with majority vote wins seat. If no candidate reaches majority, top two candidates advance to runoff in general election.","raceReadTheStory":"","raceType":"top1","timeUpdated":"6:54 PM","dateUpdated":"March 27, 2024","totalVotes":13274,"candidates":[{"candidateName":"Stephanie Moulton-Peters","candidateIncumbent":true,"candidateParty":"","voteCount":13274}]},"MarinD4":{"id":"MarinD4","type":"localRace","location":"Marin","raceName":"Board of Supervisors, District 4","raceDescription":"Candidate with majority vote wins seat. If no candidate reaches majority, top two candidates advance to runoff in general election.","raceReadTheStory":"","raceType":"top1","timeUpdated":"6:54 PM","dateUpdated":"March 27, 2024","totalVotes":12986,"candidates":[{"candidateName":"Dennis Rodoni","candidateIncumbent":true,"candidateParty":"","voteCount":10086},{"candidateName":"Francis Drouillard","candidateIncumbent":false,"candidateParty":"","voteCount":2900}]},"MarinLarkspurCC":{"id":"MarinLarkspurCC","type":"localRace","location":"Marin","raceName":"Larkspur City Council (Short Term)","raceDescription":"Top candidate wins seat.","raceReadTheStory":"","raceType":"top1","timeUpdated":"6:54 PM","dateUpdated":"March 27, 2024","totalVotes":4176,"candidates":[{"candidateName":"Stephanie Andre","candidateIncumbent":false,"candidateParty":"","voteCount":2514},{"candidateName":"Claire Paquette","candidateIncumbent":false,"candidateParty":"","voteCount":1008},{"candidateName":"Lana Scott","candidateIncumbent":false,"candidateParty":"","voteCount":654}]},"MarinRossCouncil":{"id":"MarinRossCouncil","type":"localRace","location":"Marin","raceName":"Ross Town Council","raceDescription":"Top three candidates win seat.","raceReadTheStory":"","raceType":"top3","timeUpdated":"6:54 PM","dateUpdated":"March 27, 2024","totalVotes":1740,"candidates":[{"candidateName":"Charles William \"Bill\" Kircher, Jr.","candidateIncumbent":false,"candidateParty":"","voteCount":536},{"candidateName":"Mathew Salter","candidateIncumbent":false,"candidateParty":"","voteCount":502},{"candidateName":"Shadi Aboukhater","candidateIncumbent":false,"candidateParty":"","voteCount":187},{"candidateName":"Teri Dowling","candidateIncumbent":false,"candidateParty":"","voteCount":515}]},"MarinMeasureA":{"id":"MarinMeasureA","type":"localRace","location":"Marin","raceName":"Measure A","raceDescription":"Tamalpais Union High School District. School bond. Passes with 55% vote.","raceReadTheStory":"","raceType":"yesNo","timeUpdated":"6:54 PM","dateUpdated":"March 27, 2024","totalVotes":45345,"candidates":[{"candidateName":"Yes","candidateIncumbent":false,"candidateParty":"","voteCount":24376},{"candidateName":"No","candidateIncumbent":false,"candidateParty":"","voteCount":20969}]},"MarinMeasureB":{"id":"MarinMeasureB","type":"localRace","location":"Marin","raceName":"Measure B","raceDescription":"Petaluma Joint Union High School District. Parcel tax. Passes with 2/3 vote.","raceReadTheStory":"","raceType":"yesNo","timeUpdated":"6:54 PM","dateUpdated":"March 27, 2024","totalVotes":132,"candidates":[{"candidateName":"Yes","candidateIncumbent":false,"candidateParty":"","voteCount":62},{"candidateName":"No","candidateIncumbent":false,"candidateParty":"","voteCount":70}]},"MarinMeasureC":{"id":"MarinMeasureC","type":"localRace","location":"Marin","raceName":"Measure C","raceDescription":"Belvedere. Appropriation limit. Passes with majority vote.","raceReadTheStory":"","raceType":"yesNo","timeUpdated":"6:54 PM","dateUpdated":"March 27, 2024","totalVotes":870,"candidates":[{"candidateName":"Yes","candidateIncumbent":false,"candidateParty":"","voteCount":679},{"candidateName":"No","candidateIncumbent":false,"candidateParty":"","voteCount":191}]},"MarinMeasureD":{"id":"MarinMeasureD","type":"localRace","location":"Marin","raceName":"Measure D","raceDescription":"Larkspur. Rent stabilization. Passes with majority vote.","raceReadTheStory":"https://www.kqed.org/elections/results/marin/measure-d","raceType":"yesNo","timeUpdated":"6:54 PM","dateUpdated":"March 27, 2024","totalVotes":4955,"candidates":[{"candidateName":"Yes","candidateIncumbent":false,"candidateParty":"","voteCount":2573},{"candidateName":"No","candidateIncumbent":false,"candidateParty":"","voteCount":2382}]},"MarinMeasureE":{"id":"MarinMeasureE","type":"localRace","location":"Marin","raceName":"Measure E","raceDescription":"Ross. Special tax. Passes with 2/3 vote.","raceReadTheStory":"https://www.kqed.org/elections/results/marin/measure-e","raceType":"yesNo","timeUpdated":"6:54 PM","dateUpdated":"March 27, 2024","totalVotes":874,"candidates":[{"candidateName":"Yes","candidateIncumbent":false,"candidateParty":"","voteCount":683},{"candidateName":"No","candidateIncumbent":false,"candidateParty":"","voteCount":191}]},"MarinMeasureF":{"id":"MarinMeasureF","type":"localRace","location":"Marin","raceName":"Measure F","raceDescription":"San Anselmo. Flood Control and Water Conservation District. Passes with majority vote.","raceReadTheStory":"","raceType":"yesNo","timeUpdated":"6:54 PM","dateUpdated":"March 27, 2024","totalVotes":5193,"candidates":[{"candidateName":"Yes","candidateIncumbent":false,"candidateParty":"","voteCount":3083},{"candidateName":"No","candidateIncumbent":false,"candidateParty":"","voteCount":2110}]},"MarinMeasureG":{"id":"MarinMeasureG","type":"localRace","location":"Marin","raceName":"Measure G","raceDescription":"Bel Marin Keys Community Services District. Special tax. Passes with 2/3 vote.","raceReadTheStory":"","raceType":"yesNo","timeUpdated":"6:54 PM","dateUpdated":"March 27, 2024","totalVotes":830,"candidates":[{"candidateName":"Yes","candidateIncumbent":false,"candidateParty":"","voteCount":661},{"candidateName":"No","candidateIncumbent":false,"candidateParty":"","voteCount":169}]},"MarinMeasureH":{"id":"MarinMeasureH","type":"localRace","location":"Marin","raceName":"Measure H","raceDescription":"Marinwood Community Services District. Appropriations limit, fire protection. Passes with a majority vote.","raceReadTheStory":"","raceType":"yesNo","timeUpdated":"6:54 PM","dateUpdated":"March 27, 2024","totalVotes":1738,"candidates":[{"candidateName":"Yes","candidateIncumbent":false,"candidateParty":"","voteCount":1369},{"candidateName":"No","candidateIncumbent":false,"candidateParty":"","voteCount":369}]},"MarinMeasureI":{"id":"MarinMeasureI","type":"localRace","location":"Marin","raceName":"Measure I","raceDescription":"Marinwood Community Services District. Appropriations limit, parks. Passes with a majority vote.","raceReadTheStory":"","raceType":"yesNo","timeUpdated":"6:54 PM","dateUpdated":"March 27, 2024","totalVotes":1735,"candidates":[{"candidateName":"Yes","candidateIncumbent":false,"candidateParty":"","voteCount":1336},{"candidateName":"No","candidateIncumbent":false,"candidateParty":"","voteCount":399}]},"NapaD2":{"id":"NapaD2","type":"localRace","location":"Napa","raceName":"Board of Supervisors, District 2","raceDescription":"Candidate with majority vote wins seat. If no candidate reaches majority, top two candidates advance to runoff in general election.","raceReadTheStory":"","raceType":"top1","timeUpdated":"6:50 PM","dateUpdated":"April 3, 2024","totalVotes":8351,"candidates":[{"candidateName":"Liz Alessio","candidateIncumbent":false,"candidateParty":"","voteCount":6340},{"candidateName":"Doris Gentry","candidateIncumbent":false,"candidateParty":"","voteCount":2011}]},"NapaD4":{"id":"NapaD4","type":"localRace","location":"Napa","raceName":"Board of Supervisors, District 4","raceDescription":"Candidate with majority vote wins seat. If no candidate reaches majority, top two candidates advance to runoff in general election.","raceReadTheStory":"https://www.kqed.org/elections/results/napa/supervisor-4th-district","raceType":"top1","timeUpdated":"6:50 PM","dateUpdated":"April 3, 2024","totalVotes":7306,"candidates":[{"candidateName":"Amber Manfree","candidateIncumbent":false,"candidateParty":"","voteCount":3913},{"candidateName":"Pete Mott","candidateIncumbent":false,"candidateParty":"","voteCount":3393}]},"NapaD5":{"id":"NapaD5","type":"localRace","location":"Napa","raceName":"Board of Supervisors, District 5","raceDescription":"Candidate with majority vote wins seat. If no candidate reaches majority, top two candidates advance to runoff in general election.","raceReadTheStory":"https://www.kqed.org/elections/results/napa/supervisor-5th-district","raceType":"top1","timeUpdated":"6:50 PM","dateUpdated":"April 3, 2024","totalVotes":5356,"candidates":[{"candidateName":"Mariam Aboudamous","candidateIncumbent":false,"candidateParty":"","voteCount":2379},{"candidateName":"Belia Ramos","candidateIncumbent":true,"candidateParty":"","voteCount":2977}]},"NapaMeasureD":{"id":"NapaMeasureD","type":"localRace","location":"Napa","raceName":"Measure D","raceDescription":"Howell Mountain Elementary School District. School bond. Passes with 55% vote.","raceReadTheStory":"","raceType":"yesNo","timeUpdated":"6:50 PM","dateUpdated":"April 3, 2024","totalVotes":741,"candidates":[{"candidateName":"Yes","candidateIncumbent":false,"candidateParty":"","voteCount":367},{"candidateName":"No","candidateIncumbent":false,"candidateParty":"","voteCount":374}]},"NapaMeasureU":{"id":"NapaMeasureU","type":"localRace","location":"Napa","raceName":"Measure U","raceDescription":"Lake Berryessa Resort Improvement District. Appropriations limit. Passes with majority vote. ","raceReadTheStory":"","raceType":"yesNo","timeUpdated":"6:50 PM","dateUpdated":"April 3, 2024","totalVotes":86,"candidates":[{"candidateName":"Yes","candidateIncumbent":false,"candidateParty":"","voteCount":63},{"candidateName":"No","candidateIncumbent":false,"candidateParty":"","voteCount":23}]},"NapaMeasureU1":{"id":"NapaMeasureU1","type":"localRace","location":"Napa","raceName":"Measure U","raceDescription":"Yountville. Appropriations limit. Passes with majority vote. ","raceReadTheStory":"","raceType":"yesNo","timeUpdated":"6:50 PM","dateUpdated":"April 3, 2024","totalVotes":925,"candidates":[{"candidateName":"Yes","candidateIncumbent":false,"candidateParty":"","voteCount":793},{"candidateName":"No","candidateIncumbent":false,"candidateParty":"","voteCount":132}]},"SFJudge1":{"id":"SFJudge1","type":"localRace","location":"San Francisco","raceName":"Superior Court Judge, Seat 1","raceDescription":"Candidate with majority vote wins seat. If no candidate reaches majority, top two candidates advance to runoff in general election.","raceReadTheStory":"https://www.kqed.org/elections/results/sanfrancisco/superior-court-seat-1","raceType":"top1","timeUpdated":"6:50 PM","dateUpdated":"March 21, 2024","totalVotes":202960,"candidates":[{"candidateName":"Michael Begert","candidateIncumbent":true,"candidateParty":"","voteCount":124943},{"candidateName":"Chip Zecher","candidateIncumbent":false,"candidateParty":"","voteCount":78017}]},"SFJudge13":{"id":"SFJudge13","type":"localRace","location":"San Francisco","raceName":"Superior Court Judge, Seat 13","raceDescription":"Candidate with majority vote wins seat. If no candidate reaches majority, top two candidates advance to runoff in general election.","raceReadTheStory":"https://www.kqed.org/elections/results/sanfrancisco/superior-court-seat-13","raceType":"top1","timeUpdated":"6:50 PM","dateUpdated":"March 21, 2024","totalVotes":202386,"candidates":[{"candidateName":"Jean Myungjin Roland","candidateIncumbent":false,"candidateParty":"","voteCount":90012},{"candidateName":"Patrick S. Thompson","candidateIncumbent":true,"candidateParty":"","voteCount":112374}]},"SFPropA":{"id":"SFPropA","type":"localRace","location":"San Francisco","raceName":"Proposition A","raceDescription":"Housing bond. Passes with 2/3 vote.","raceReadTheStory":"https://www.kqed.org/elections/results/sanfrancisco/proposition-a","raceType":"yesNo","timeUpdated":"6:50 PM","dateUpdated":"March 21, 2024","totalVotes":225187,"candidates":[{"candidateName":"Yes","candidateIncumbent":false,"candidateParty":"","voteCount":158497},{"candidateName":"No","candidateIncumbent":false,"candidateParty":"","voteCount":66690}]},"SFPropB":{"id":"SFPropB","type":"localRace","location":"San Francisco","raceName":"Proposition B","raceDescription":"Police staffing. Passes with majority vote.","raceReadTheStory":"","raceType":"yesNo","timeUpdated":"6:50 PM","dateUpdated":"March 21, 2024","totalVotes":222954,"candidates":[{"candidateName":"Yes","candidateIncumbent":false,"candidateParty":"","voteCount":61580},{"candidateName":"No","candidateIncumbent":false,"candidateParty":"","voteCount":161374}]},"SFPropC":{"id":"SFPropC","type":"localRace","location":"San Francisco","raceName":"Proposition C","raceDescription":"Transfer tax exemption. Passes with majority vote.","raceReadTheStory":"","raceType":"yesNo","timeUpdated":"6:50 PM","dateUpdated":"March 21, 2024","totalVotes":220349,"candidates":[{"candidateName":"Yes","candidateIncumbent":false,"candidateParty":"","voteCount":116311},{"candidateName":"No","candidateIncumbent":false,"candidateParty":"","voteCount":104038}]},"SFPropD":{"id":"SFPropD","type":"localRace","location":"San Francisco","raceName":"Proposition D","raceDescription":"Ethics laws. Passes with majority vote.","raceReadTheStory":"","raceType":"yesNo","timeUpdated":"6:50 PM","dateUpdated":"March 21, 2024","totalVotes":222615,"candidates":[{"candidateName":"Yes","candidateIncumbent":false,"candidateParty":"","voteCount":198584},{"candidateName":"No","candidateIncumbent":false,"candidateParty":"","voteCount":24031}]},"SFPropE":{"id":"SFPropE","type":"localRace","location":"San Francisco","raceName":"Proposition E","raceDescription":"Police policies. Passes with majority vote.","raceReadTheStory":"https://www.kqed.org/elections/results/sanfrancisco/proposition-e","raceType":"yesNo","timeUpdated":"6:50 PM","dateUpdated":"March 21, 2024","totalVotes":222817,"candidates":[{"candidateName":"Yes","candidateIncumbent":false,"candidateParty":"","voteCount":120529},{"candidateName":"No","candidateIncumbent":false,"candidateParty":"","voteCount":102288}]},"SFPropF":{"id":"SFPropF","type":"localRace","location":"San Francisco","raceName":"Proposition F","raceDescription":"Drug screening. Passes with majority vote.","raceReadTheStory":"https://www.kqed.org/elections/results/sanfrancisco/proposition-f","raceType":"yesNo","timeUpdated":"6:50 PM","dateUpdated":"March 21, 2024","totalVotes":224004,"candidates":[{"candidateName":"Yes","candidateIncumbent":false,"candidateParty":"","voteCount":130214},{"candidateName":"No","candidateIncumbent":false,"candidateParty":"","voteCount":93790}]},"SFPropG":{"id":"SFPropG","type":"localRace","location":"San Francisco","raceName":"Proposition G","raceDescription":"Eighth-grade algebra. Passes with majority vote.","raceReadTheStory":"","raceType":"yesNo","timeUpdated":"6:50 PM","dateUpdated":"March 21, 2024","totalVotes":222704,"candidates":[{"candidateName":"Yes","candidateIncumbent":false,"candidateParty":"","voteCount":182066},{"candidateName":"No","candidateIncumbent":false,"candidateParty":"","voteCount":40638}]},"SMJudge4":{"id":"SMJudge4","type":"localRace","location":"San Mateo","raceName":"Superior Court Judge, Office 4","raceDescription":"Candidate with majority vote wins seat. If no candidate reaches majority, top two candidates advance to runoff in general election.","raceReadTheStory":"","raceType":"top1","timeUpdated":"6:56 PM","dateUpdated":"April 4, 2024","totalVotes":108919,"candidates":[{"candidateName":"Sarah Burdick","candidateIncumbent":false,"candidateParty":"","voteCount":108919}]},"SMD1":{"id":"SMD1","type":"localRace","location":"San Mateo","raceName":"Board of Supervisors, District 1","raceDescription":"Candidate with majority vote wins seat. If no candidate reaches majority, top two candidates advance to runoff in general election.","raceReadTheStory":"https://www.kqed.org/elections/results/sanmateo/supervisor-1st-district","raceType":"top1","timeUpdated":"6:56 PM","dateUpdated":"April 4, 2024","totalVotes":29650,"candidates":[{"candidateName":"Jackie Speier","candidateIncumbent":false,"candidateParty":"","voteCount":20353},{"candidateName":"Ann Schneider","candidateIncumbent":false,"candidateParty":"","voteCount":9297}]},"SMD4":{"id":"SMD4","type":"localRace","location":"San Mateo","raceName":"Board of Supervisors, District 4","raceDescription":"Candidate with majority vote wins seat. If no candidate reaches majority, top two candidates advance to runoff in general election.","raceReadTheStory":"https://www.kqed.org/elections/results/sanmateo/supervisor-4th-district","raceType":"top2","timeUpdated":"6:56 PM","dateUpdated":"April 4, 2024","totalVotes":22725,"candidates":[{"candidateName":"Antonio Lopez","candidateIncumbent":false,"candidateParty":"","voteCount":5730},{"candidateName":"Lisa Gauthier","candidateIncumbent":false,"candidateParty":"","voteCount":10358},{"candidateName":"Celeste Brevard","candidateIncumbent":false,"candidateParty":"","voteCount":1268},{"candidateName":"Paul Bocanegra","candidateIncumbent":false,"candidateParty":"","voteCount":1909},{"candidateName":"Maggie Cornejo","candidateIncumbent":false,"candidateParty":"","voteCount":3460}]},"SMD5":{"id":"SMD5","type":"localRace","location":"San Mateo","raceName":"Board of Supervisors, District 5","raceDescription":"Candidate with majority vote wins seat. If no candidate reaches majority, top two candidates advance to runoff in general election.","raceReadTheStory":"","raceType":"top1","timeUpdated":"6:56 PM","dateUpdated":"April 4, 2024","totalVotes":19937,"candidates":[{"candidateName":"David Canepa","candidateIncumbent":true,"candidateParty":"","voteCount":19937}]},"SMMeasureB":{"id":"SMMeasureB","type":"localRace","location":"San Mateo","raceName":"Measure B","raceDescription":"County Service Area #1 (Highlands). Special tax. Passes with 2/3 vote.","raceReadTheStory":"","raceType":"yesNo","timeUpdated":"6:56 PM","dateUpdated":"April 4, 2024","totalVotes":1549,"candidates":[{"candidateName":"Yes","candidateIncumbent":false,"candidateParty":"","voteCount":1360},{"candidateName":"No","candidateIncumbent":false,"candidateParty":"","voteCount":189}]},"SMMeasureC":{"id":"SMMeasureC","type":"localRace","location":"San Mateo","raceName":"Measure C","raceDescription":"Jefferson Elementary School District. Parcel tax. Passes with 2/3 vote","raceReadTheStory":"","raceType":"yesNo","timeUpdated":"6:56 PM","dateUpdated":"April 4, 2024","totalVotes":12234,"candidates":[{"candidateName":"Yes","candidateIncumbent":false,"candidateParty":"","voteCount":8543},{"candidateName":"No","candidateIncumbent":false,"candidateParty":"","voteCount":3691}]},"SMMeasureE":{"id":"SMMeasureE","type":"localRace","location":"San Mateo","raceName":"Measure E","raceDescription":"Woodside Elementary School District. School bond. Passes with 55% vote.","raceReadTheStory":"","raceType":"yesNo","timeUpdated":"6:56 PM","dateUpdated":"April 4, 2024","totalVotes":1392,"candidates":[{"candidateName":"Yes","candidateIncumbent":false,"candidateParty":"","voteCount":910},{"candidateName":"No","candidateIncumbent":false,"candidateParty":"","voteCount":482}]},"SMMeasureG":{"id":"SMMeasureG","type":"localRace","location":"San Mateo","raceName":"Measure G","raceDescription":"Pacifica School District. School bond. Passes with 55% vote.","raceReadTheStory":"","raceType":"yesNo","timeUpdated":"6:56 PM","dateUpdated":"April 4, 2024","totalVotes":11548,"candidates":[{"candidateName":"Yes","candidateIncumbent":false,"candidateParty":"","voteCount":7067},{"candidateName":"No","candidateIncumbent":false,"candidateParty":"","voteCount":4481}]},"SMMeasureH":{"id":"SMMeasureH","type":"localRace","location":"San Mateo","raceName":"Measure H","raceDescription":"San Carlos School District. School bond. Passes with 55% vote.","raceReadTheStory":"","raceType":"yesNo","timeUpdated":"6:56 PM","dateUpdated":"April 4, 2024","totalVotes":9938,"candidates":[{"candidateName":"Yes","candidateIncumbent":false,"candidateParty":"","voteCount":6283},{"candidateName":"No","candidateIncumbent":false,"candidateParty":"","voteCount":3655}]},"SCJudge5":{"id":"SCJudge5","type":"localRace","location":"Santa Clara","raceName":"Superior Court Judge, Office 5","raceDescription":"Candidate with majority vote wins seat. If no candidate reaches majority, top two candidates advance to runoff in general election.","raceReadTheStory":"","raceType":"top1","timeUpdated":"7:05 PM","dateUpdated":"April 4, 2024","totalVotes":301953,"candidates":[{"candidateName":"Jay Boyarsky","candidateIncumbent":false,"candidateParty":"","voteCount":142549},{"candidateName":"Nicole M. Ford","candidateIncumbent":false,"candidateParty":"","voteCount":52147},{"candidateName":"Johnene Linda Stebbins","candidateIncumbent":false,"candidateParty":"","voteCount":107257}]},"SCD2":{"id":"SCD2","type":"localRace","location":"Santa Clara","raceName":"Board of Supervisors, District 2","raceDescription":"Candidate with majority vote wins seat. If no candidate reaches majority, top two candidates advance to runoff in general election.","raceReadTheStory":"https://www.kqed.org/elections/results/santaclara/supervisor-2nd-district","raceType":"top2","timeUpdated":"7:05 PM","dateUpdated":"April 4, 2024","totalVotes":44059,"candidates":[{"candidateName":"Corina Herrera-Loera","candidateIncumbent":false,"candidateParty":"","voteCount":10519},{"candidateName":"Jennifer Margaret Celaya","candidateIncumbent":false,"candidateParty":"","voteCount":2394},{"candidateName":"Madison Nguyen","candidateIncumbent":false,"candidateParty":"","voteCount":12794},{"candidateName":"Betty Duong","candidateIncumbent":false,"candidateParty":"","voteCount":14031},{"candidateName":"Nelson McElmurry","candidateIncumbent":false,"candidateParty":"","voteCount":4321}]},"SCD3":{"id":"SCD3","type":"localRace","location":"Santa Clara","raceName":"Board of Supervisors, District 3","raceDescription":"Candidate with majority vote wins seat. If no candidate reaches majority, top two candidates advance to runoff in general election.","raceReadTheStory":"","raceType":"top1","timeUpdated":"7:05 PM","dateUpdated":"April 4, 2024","totalVotes":42549,"candidates":[{"candidateName":"Otto Lee","candidateIncumbent":true,"candidateParty":"","voteCount":42549}]},"SCD5":{"id":"SCD5","type":"localRace","location":"Santa Clara","raceName":"Board of Supervisors, District 5","raceDescription":"Candidate with majority vote wins seat. If no candidate reaches majority, top two candidates advance to runoff in general election.","raceReadTheStory":"https://www.kqed.org/elections/results/santaclara/supervisor-5th-district","raceType":"top2","timeUpdated":"7:05 PM","dateUpdated":"April 4, 2024","totalVotes":88712,"candidates":[{"candidateName":"Margaret Abe-Koga","candidateIncumbent":false,"candidateParty":"","voteCount":37172},{"candidateName":"Sally J. Lieber","candidateIncumbent":false,"candidateParty":"","voteCount":21962},{"candidateName":"Barry Chang","candidateIncumbent":false,"candidateParty":"","voteCount":6164},{"candidateName":"Peter C. Fung","candidateIncumbent":false,"candidateParty":"","voteCount":17892},{"candidateName":"Sandy Sans","candidateIncumbent":false,"candidateParty":"","voteCount":5522}]},"SCSJMayor":{"id":"SCSJMayor","type":"localRace","location":"Santa Clara","raceName":"San José Mayor","raceDescription":"Candidate with majority vote wins seat. If no candidate reaches majority, top two candidates advance to runoff in general election.","raceReadTheStory":"","raceType":"top1","timeUpdated":"7:05 PM","dateUpdated":"April 4, 2024","totalVotes":167064,"candidates":[{"candidateName":"Matt Mahan","candidateIncumbent":true,"candidateParty":"","voteCount":144701},{"candidateName":"Tyrone Wade","candidateIncumbent":false,"candidateParty":"","voteCount":22363}]},"SCSJD2":{"id":"SCSJD2","type":"localRace","location":"Santa Clara","raceName":"San José City Council, District 2","raceDescription":"Candidate with majority vote wins seat. If no candidate reaches majority, top two candidates advance to runoff in general election.","raceReadTheStory":"","raceType":"top2","timeUpdated":"7:05 PM","dateUpdated":"April 4, 2024","totalVotes":14131,"candidates":[{"candidateName":"Joe Lopez","candidateIncumbent":false,"candidateParty":"","voteCount":4950},{"candidateName":"Pamela Campos","candidateIncumbent":false,"candidateParty":"","voteCount":3436},{"candidateName":"Vanessa Sandoval","candidateIncumbent":false,"candidateParty":"","voteCount":2719},{"candidateName":"Babu Prasad","candidateIncumbent":false,"candidateParty":"","voteCount":3026}]},"SCSJD4":{"id":"SCSJD4","type":"localRace","location":"Santa Clara","raceName":"San José City Council, District 4","raceDescription":"Candidate with majority vote wins seat. If no candidate reaches majority, top two candidates advance to runoff in general election.","raceReadTheStory":"","raceType":"top1","timeUpdated":"7:05 PM","dateUpdated":"April 4, 2024","totalVotes":14322,"candidates":[{"candidateName":"Kansen Chu","candidateIncumbent":false,"candidateParty":"","voteCount":5931},{"candidateName":"David Cohen","candidateIncumbent":true,"candidateParty":"","voteCount":8391}]},"SCSJD6":{"id":"SCSJD6","type":"localRace","location":"Santa Clara","raceName":"San José City Council, District 6","raceDescription":"Candidate with majority vote wins seat. If no candidate reaches majority, top two candidates advance to runoff in general election.","raceReadTheStory":"","raceType":"top2","timeUpdated":"7:05 PM","dateUpdated":"April 4, 2024","totalVotes":25108,"candidates":[{"candidateName":"David Cohen","candidateIncumbent":false,"candidateParty":"","voteCount":9875},{"candidateName":"Alex Shoor","candidateIncumbent":false,"candidateParty":"","voteCount":3850},{"candidateName":"Angelo \"A.J.\" Pasciuti","candidateIncumbent":false,"candidateParty":"","voteCount":2688},{"candidateName":"Michael Mulcahy","candidateIncumbent":false,"candidateParty":"","voteCount":8695}]},"SCSJD8":{"id":"SCSJD8","type":"localRace","location":"Santa Clara","raceName":"San José City Council, District 8","raceDescription":"Candidate with majority vote wins seat. If no candidate reaches majority, top two candidates advance to runoff in general election.","raceReadTheStory":"","raceType":"top2","timeUpdated":"7:05 PM","dateUpdated":"April 4, 2024","totalVotes":21462,"candidates":[{"candidateName":"Tam Truong","candidateIncumbent":false,"candidateParty":"","voteCount":6982},{"candidateName":"Domingo Candelas","candidateIncumbent":true,"candidateParty":"","voteCount":8466},{"candidateName":"Sukhdev Singh Bainiwal","candidateIncumbent":false,"candidateParty":"","voteCount":5513},{"candidateName":"Surinder Kaur Dhaliwal","candidateIncumbent":false,"candidateParty":"","voteCount":501}]},"SCSJD10":{"id":"SCSJD10","type":"localRace","location":"Santa Clara","raceName":"San José City Council, District 10","raceDescription":"Candidate with majority vote wins seat. If no candidate reaches majority, top two candidates advance to runoff in general election.","raceReadTheStory":"","raceType":"top2","timeUpdated":"7:05 PM","dateUpdated":"April 4, 2024","totalVotes":22799,"candidates":[{"candidateName":"George Casey","candidateIncumbent":false,"candidateParty":"","voteCount":8805},{"candidateName":"Arjun Batra","candidateIncumbent":true,"candidateParty":"","voteCount":8354},{"candidateName":"Lenka Wright","candidateIncumbent":false,"candidateParty":"","voteCount":5640}]},"SCMeasureA":{"id":"SCMeasureA","type":"localRace","location":"Santa Clara","raceName":"Measure A","raceDescription":"Santa Clara. Appointed city clerk. Passes with majority vote.","raceReadTheStory":"","raceType":"yesNo","timeUpdated":"7:05 PM","dateUpdated":"April 4, 2024","totalVotes":20315,"candidates":[{"candidateName":"Yes","candidateIncumbent":false,"candidateParty":"","voteCount":6580},{"candidateName":"No","candidateIncumbent":false,"candidateParty":"","voteCount":13735}]},"SCMeasureB":{"id":"SCMeasureB","type":"localRace","location":"Santa Clara","raceName":"Measure B","raceDescription":"Santa Clara. Appointed police chief. Passes with majority vote.","raceReadTheStory":"","raceType":"yesNo","timeUpdated":"7:05 PM","dateUpdated":"April 4, 2024","totalVotes":20567,"candidates":[{"candidateName":"Yes","candidateIncumbent":false,"candidateParty":"","voteCount":5680},{"candidateName":"No","candidateIncumbent":false,"candidateParty":"","voteCount":14887}]},"SCMeasureC":{"id":"SCMeasureC","type":"localRace","location":"Santa Clara","raceName":"Measure C","raceDescription":"Sunnyvale School District. School bond. Passes with 55% vote.","raceReadTheStory":"","raceType":"yesNo","timeUpdated":"7:05 PM","dateUpdated":"April 4, 2024","totalVotes":14656,"candidates":[{"candidateName":"Yes","candidateIncumbent":false,"candidateParty":"","voteCount":10261},{"candidateName":"No","candidateIncumbent":false,"candidateParty":"","voteCount":4395}]},"SolanoD15":{"id":"SolanoD15","type":"localRace","location":"Solano","raceName":"Superior Court Judge, Department 15","raceDescription":"Candidate with majority vote wins seat. If no candidate reaches majority, top two candidates advance to runoff in general election.","raceReadTheStory":"","raceType":"","timeUpdated":"7:08 PM","dateUpdated":"March 28, 2024","totalVotes":81709,"candidates":[{"candidateName":"Mike Thompson","candidateIncumbent":false,"candidateParty":"","voteCount":36844},{"candidateName":"Bryan J. Kim","candidateIncumbent":false,"candidateParty":"","voteCount":44865}]},"SolanoD1":{"id":"SolanoD1","type":"localRace","location":"Solano","raceName":"Board of Supervisors, District 1","raceDescription":"Candidate with majority vote wins seat. If no candidate reaches majority, top two candidates advance to runoff in general election.","raceReadTheStory":"https://www.kqed.org/elections/results/solano/supervisor-1st-district","raceType":"","timeUpdated":"7:08 PM","dateUpdated":"March 28, 2024","totalVotes":13786,"candidates":[{"candidateName":"Michael Wilson","candidateIncumbent":false,"candidateParty":"","voteCount":6401},{"candidateName":"Cassandra James","candidateIncumbent":false,"candidateParty":"","voteCount":7385}]},"SolanoD2":{"id":"SolanoD2","type":"localRace","location":"Solano","raceName":"Board of Supervisors, District 2","raceDescription":"Candidate with majority vote wins seat. If no candidate reaches majority, top two candidates advance to runoff in general election.","raceReadTheStory":"","raceType":"","timeUpdated":"7:08 PM","dateUpdated":"March 28, 2024","totalVotes":19903,"candidates":[{"candidateName":"Monica Brown","candidateIncumbent":true,"candidateParty":"","voteCount":10951},{"candidateName":"Nora Dizon","candidateIncumbent":false,"candidateParty":"","voteCount":3135},{"candidateName":"Rochelle Sherlock","candidateIncumbent":false,"candidateParty":"","voteCount":5817}]},"SolanoD5":{"id":"SolanoD5","type":"localRace","location":"Solano","raceName":"Board of Supervisors, District 5","raceDescription":"Candidate with majority vote wins seat. If no candidate reaches majority, top two candidates advance to runoff in general election.","raceReadTheStory":"","raceType":"","timeUpdated":"7:08 PM","dateUpdated":"March 28, 2024","totalVotes":17888,"candidates":[{"candidateName":"Mitch Mashburn","candidateIncumbent":true,"candidateParty":"","voteCount":11210},{"candidateName":"Chadwick J. Ledoux","candidateIncumbent":false,"candidateParty":"","voteCount":6678}]},"SolanoEducation":{"id":"SolanoEducation","type":"localRace","location":"Solano","raceName":"Sacramento County Board of Education","raceDescription":"Candidate with majority vote wins seat. If no candidate reaches majority, top two candidates advance to runoff in general election.","raceReadTheStory":"","raceType":"","timeUpdated":"7:08 PM","dateUpdated":"March 28, 2024","totalVotes":3650,"candidates":[{"candidateName":"Heather Davis","candidateIncumbent":true,"candidateParty":"","voteCount":2960},{"candidateName":"Shazleen Khan","candidateIncumbent":false,"candidateParty":"","voteCount":690}]},"SolanoMeasureA":{"id":"SolanoMeasureA","type":"localRace","location":"Solano","raceName":"Measure A","raceDescription":"Benicia. Hotel tax. Passes with majority vote.","raceReadTheStory":"https://www.kqed.org/elections/results/solano/measure-a","raceType":"yesNo","timeUpdated":"7:08 PM","dateUpdated":"March 28, 2024","totalVotes":10136,"candidates":[{"candidateName":"Yes","candidateIncumbent":false,"candidateParty":"","voteCount":7869},{"candidateName":"No","candidateIncumbent":false,"candidateParty":"","voteCount":2267}]},"SolanoMeasureB":{"id":"SolanoMeasureB","type":"localRace","location":"Solano","raceName":"Measure B","raceDescription":"Benicia. Sales tax. Passes with majority vote.","raceReadTheStory":"https://www.kqed.org/elections/results/solano/measure-b","raceType":"yesNo","timeUpdated":"7:08 PM","dateUpdated":"March 28, 2024","totalVotes":10164,"candidates":[{"candidateName":"Yes","candidateIncumbent":false,"candidateParty":"","voteCount":7335},{"candidateName":"No","candidateIncumbent":false,"candidateParty":"","voteCount":2829}]},"SolanoMeasureC":{"id":"SolanoMeasureC","type":"localRace","location":"Solano","raceName":"Measure C","raceDescription":"Benicia Unified School District. School bond. Passes with 55% vote.","raceReadTheStory":"","raceType":"yesNo","timeUpdated":"7:08 PM","dateUpdated":"March 28, 2024","totalVotes":10112,"candidates":[{"candidateName":"Yes","candidateIncumbent":false,"candidateParty":"","voteCount":6316},{"candidateName":"No","candidateIncumbent":false,"candidateParty":"","voteCount":3796}]},"SolanoMeasureN":{"id":"SolanoMeasureN","type":"localRace","location":"Solano","raceName":"Measure N","raceDescription":"Davis Joint Unified School District. Parcel tax. Passes with 2/3 vote.","raceReadTheStory":"","raceType":"yesNo","timeUpdated":"7:08 PM","dateUpdated":"March 28, 2024","totalVotes":15,"candidates":[{"candidateName":"Yes","candidateIncumbent":false,"candidateParty":"","voteCount":5},{"candidateName":"No","candidateIncumbent":false,"candidateParty":"","voteCount":10}]},"SonomaJudge3":{"id":"SonomaJudge3","type":"localRace","location":"Sonoma","raceName":"Superior Court Judge, Office 3","raceDescription":"Candidate with majority vote wins seat. If no candidate reaches majority, top two candidates advance to runoff in general election.","raceReadTheStory":"","raceType":"top1","timeUpdated":"6:51 PM","dateUpdated":"March 29, 2024","totalVotes":115405,"candidates":[{"candidateName":"Kristine M. Burk","candidateIncumbent":false,"candidateParty":"","voteCount":79498},{"candidateName":"Beki Berrey","candidateIncumbent":false,"candidateParty":"","voteCount":35907}]},"SonomaJudge4":{"id":"SonomaJudge4","type":"localRace","location":"Sonoma","raceName":"Superior Court Judge, Office 4","raceDescription":"Candidate with majority vote wins seat. If no candidate reaches majority, top two candidates advance to runoff in general election.","raceReadTheStory":"","raceType":"top1","timeUpdated":"6:51 PM","dateUpdated":"March 29, 2024","totalVotes":86789,"candidates":[{"candidateName":"Paul J. Lozada","candidateIncumbent":false,"candidateParty":"","voteCount":86789}]},"SonomaJudge6":{"id":"SonomaJudge6","type":"localRace","location":"Sonoma","raceName":"Superior Court Judge, Office 6","raceDescription":"Candidate with majority vote wins seat. If no candidate reaches majority, top two candidates advance to runoff in general election.","raceReadTheStory":"","raceType":"top1","timeUpdated":"6:51 PM","dateUpdated":"March 29, 2024","totalVotes":117990,"candidates":[{"candidateName":"Omar Figueroa","candidateIncumbent":false,"candidateParty":"","voteCount":42236},{"candidateName":"Kenneth English","candidateIncumbent":false,"candidateParty":"","voteCount":75754}]},"SonomaD1":{"id":"SonomaD1","type":"localRace","location":"Sonoma","raceName":"Board of Supervisors, District 1","raceDescription":"Candidate with majority vote wins seat. If no candidate reaches majority, top two candidates advance to runoff in general election.","raceReadTheStory":"","raceType":"top1","timeUpdated":"6:51 PM","dateUpdated":"March 29, 2024","totalVotes":30348,"candidates":[{"candidateName":"Rebecca Hermosillo","candidateIncumbent":false,"candidateParty":"","voteCount":23958},{"candidateName":"Jonathan Mathieu","candidateIncumbent":false,"candidateParty":"","voteCount":6390}]},"SonomaD3":{"id":"SonomaD3","type":"localRace","location":"Sonoma","raceName":"Board of Supervisors, District 3","raceDescription":"Candidate with majority vote wins seat. If no candidate reaches majority, top two candidates advance to runoff in general election.","raceReadTheStory":"https://www.kqed.org/elections/results/sonoma/supervisor-3rd-district","raceType":"top1","timeUpdated":"6:51 PM","dateUpdated":"March 29, 2024","totalVotes":16312,"candidates":[{"candidateName":"Chris Coursey","candidateIncumbent":true,"candidateParty":"","voteCount":11346},{"candidateName":"Omar Medina","candidateIncumbent":false,"candidateParty":"","voteCount":4966}]},"SonomaD5":{"id":"SonomaD5","type":"localRace","location":"Sonoma","raceName":"Board of Supervisors, District 5","raceDescription":"Candidate with majority vote wins seat. If no candidate reaches majority, top two candidates advance to runoff in general election.","raceReadTheStory":"","raceType":"top1","timeUpdated":"6:51 PM","dateUpdated":"March 29, 2024","totalVotes":23356,"candidates":[{"candidateName":"Lynda Hopkins","candidateIncumbent":true,"candidateParty":"","voteCount":23356}]},"SonomaMeasureA":{"id":"SonomaMeasureA","type":"localRace","location":"Sonoma","raceName":"Measure A","raceDescription":"Cotati-Rohnert Park Unified School District. Parcel tax. Passes with 2/3 vote.","raceReadTheStory":"","raceType":"yesNo","timeUpdated":"6:51 PM","dateUpdated":"March 29, 2024","totalVotes":13756,"candidates":[{"candidateName":"Yes","candidateIncumbent":false,"candidateParty":"","voteCount":10320},{"candidateName":"No","candidateIncumbent":false,"candidateParty":"","voteCount":3436}]},"SonomaMeasureB":{"id":"SonomaMeasureB","type":"localRace","location":"Sonoma","raceName":"Measure B","raceDescription":"Petaluma Joint Union High School District. Parcel tax. Passes with 2/3 vote.","raceReadTheStory":"","raceType":"yesNo","timeUpdated":"6:51 PM","dateUpdated":"March 29, 2024","totalVotes":24877,"candidates":[{"candidateName":"Yes","candidateIncumbent":false,"candidateParty":"","voteCount":15795},{"candidateName":"No","candidateIncumbent":false,"candidateParty":"","voteCount":9082}]},"SonomaMeasureC":{"id":"SonomaMeasureC","type":"localRace","location":"Sonoma","raceName":"Measure C","raceDescription":"Fort Ross School District. School bond. Passes with 55% vote.","raceReadTheStory":"","raceType":"yesNo","timeUpdated":"6:51 PM","dateUpdated":"March 29, 2024","totalVotes":286,"candidates":[{"candidateName":"Yes","candidateIncumbent":false,"candidateParty":"","voteCount":159},{"candidateName":"No","candidateIncumbent":false,"candidateParty":"","voteCount":127}]},"SonomaMeasureD":{"id":"SonomaMeasureD","type":"localRace","location":"Sonoma","raceName":"Measure D","raceDescription":"Harmony Union School District. School bond. Passes with 55% vote.","raceReadTheStory":"","raceType":"yesNo","timeUpdated":"6:51 PM","dateUpdated":"March 29, 2024","totalVotes":1925,"candidates":[{"candidateName":"Yes","candidateIncumbent":false,"candidateParty":"","voteCount":1089},{"candidateName":"No","candidateIncumbent":false,"candidateParty":"","voteCount":836}]},"SonomaMeasureE":{"id":"SonomaMeasureE","type":"localRace","location":"Sonoma","raceName":"Measure E","raceDescription":"Petaluma City (Elementary) School District. Parcel tax. Passes with 2/3 vote.","raceReadTheStory":"","raceType":"yesNo","timeUpdated":"6:51 PM","dateUpdated":"March 29, 2024","totalVotes":11133,"candidates":[{"candidateName":"Yes","candidateIncumbent":false,"candidateParty":"","voteCount":7622},{"candidateName":"No","candidateIncumbent":false,"candidateParty":"","voteCount":3511}]},"SonomaMeasureG":{"id":"SonomaMeasureG","type":"localRace","location":"Sonoma","raceName":"Measure G","raceDescription":"Rincon Valley Union School District. School bond. Passes with 55% vote.","raceReadTheStory":"","raceType":"yesNo","timeUpdated":"6:51 PM","dateUpdated":"March 29, 2024","totalVotes":14577,"candidates":[{"candidateName":"Yes","candidateIncumbent":false,"candidateParty":"","voteCount":8668},{"candidateName":"No","candidateIncumbent":false,"candidateParty":"","voteCount":5909}]},"SonomaMeasureH":{"id":"SonomaMeasureH","type":"localRace","location":"Sonoma","raceName":"Measure H","raceDescription":"Sonoma County. Sales tax. Passes with majority vote.","raceReadTheStory":"https://www.kqed.org/elections/results/sonoma/measure-h","raceType":"yesNo","timeUpdated":"6:51 PM","dateUpdated":"March 29, 2024","totalVotes":145261,"candidates":[{"candidateName":"Yes","candidateIncumbent":false,"candidateParty":"","voteCount":89646},{"candidateName":"No","candidateIncumbent":false,"candidateParty":"","voteCount":55615}]}},"radioSchedulesReducer":{},"listsReducer":{"posts/bayareabites?tag=dessert":{"isFetching":false,"latestQuery":{"from":0,"postsToRender":9},"tag":null,"vitalsOnly":true,"totalRequested":9,"isLoading":false,"isLoadingMore":true,"total":57,"items":["bayareabites_138286","bayareabites_138065","bayareabites_135574","bayareabites_134758","bayareabites_133973","bayareabites_130740","bayareabites_131884","bayareabites_131942","bayareabites_131944"]}},"recallGuideReducer":{"intros":{},"policy":{},"candidates":{}},"savedPostsReducer":{},"pfsSessionReducer":{},"siteSettingsReducer":{},"subscriptionsReducer":{},"termsReducer":{"about":{"name":"About","type":"terms","id":"about","slug":"about","link":"/about","taxonomy":"site"},"arts":{"name":"Arts & Culture","grouping":["arts","pop","trulyca"],"description":"KQED Arts provides daily in-depth coverage of the Bay Area's music, art, film, performing arts, literature and arts news, as well as cultural commentary and criticism.","type":"terms","id":"arts","slug":"arts","link":"/arts","taxonomy":"site"},"artschool":{"name":"Art School","parent":"arts","type":"terms","id":"artschool","slug":"artschool","link":"/artschool","taxonomy":"site"},"bayareabites":{"name":"KQED food","grouping":["food","bayareabites","checkplease"],"parent":"food","type":"terms","id":"bayareabites","slug":"bayareabites","link":"/food","taxonomy":"site"},"bayareahiphop":{"name":"Bay Area Hiphop","type":"terms","id":"bayareahiphop","slug":"bayareahiphop","link":"/bayareahiphop","taxonomy":"site"},"campaign21":{"name":"Campaign 21","type":"terms","id":"campaign21","slug":"campaign21","link":"/campaign21","taxonomy":"site"},"checkplease":{"name":"KQED food","grouping":["food","bayareabites","checkplease"],"parent":"food","type":"terms","id":"checkplease","slug":"checkplease","link":"/food","taxonomy":"site"},"education":{"name":"Education","grouping":["education"],"type":"terms","id":"education","slug":"education","link":"/education","taxonomy":"site"},"elections":{"name":"Elections","type":"terms","id":"elections","slug":"elections","link":"/elections","taxonomy":"site"},"events":{"name":"Events","type":"terms","id":"events","slug":"events","link":"/events","taxonomy":"site"},"event":{"name":"Event","alias":"events","type":"terms","id":"event","slug":"event","link":"/event","taxonomy":"site"},"filmschoolshorts":{"name":"Film School Shorts","type":"terms","id":"filmschoolshorts","slug":"filmschoolshorts","link":"/filmschoolshorts","taxonomy":"site"},"food":{"name":"KQED food","grouping":["food","bayareabites","checkplease"],"type":"terms","id":"food","slug":"food","link":"/food","taxonomy":"site"},"forum":{"name":"Forum","relatedContentQuery":"posts/forum?","parent":"news","type":"terms","id":"forum","slug":"forum","link":"/forum","taxonomy":"site"},"futureofyou":{"name":"Future of You","grouping":["science","futureofyou"],"parent":"science","type":"terms","id":"futureofyou","slug":"futureofyou","link":"/futureofyou","taxonomy":"site"},"jpepinheart":{"name":"KQED food","relatedContentQuery":"trending/food,bayareabites,checkplease","parent":"food","type":"terms","id":"jpepinheart","slug":"jpepinheart","link":"/food","taxonomy":"site"},"liveblog":{"name":"Live Blog","type":"terms","id":"liveblog","slug":"liveblog","link":"/liveblog","taxonomy":"site"},"livetv":{"name":"Live TV","parent":"tv","type":"terms","id":"livetv","slug":"livetv","link":"/livetv","taxonomy":"site"},"lowdown":{"name":"The Lowdown","relatedContentQuery":"posts/lowdown?","parent":"news","type":"terms","id":"lowdown","slug":"lowdown","link":"/lowdown","taxonomy":"site"},"mindshift":{"name":"Mindshift","parent":"news","description":"MindShift explores the future of education by highlighting the innovative – and sometimes counterintuitive – ways educators and parents are helping all children succeed.","type":"terms","id":"mindshift","slug":"mindshift","link":"/mindshift","taxonomy":"site"},"news":{"name":"News","grouping":["news","forum"],"type":"terms","id":"news","slug":"news","link":"/news","taxonomy":"site"},"perspectives":{"name":"Perspectives","parent":"radio","type":"terms","id":"perspectives","slug":"perspectives","link":"/perspectives","taxonomy":"site"},"podcasts":{"name":"Podcasts","type":"terms","id":"podcasts","slug":"podcasts","link":"/podcasts","taxonomy":"site"},"pop":{"name":"Pop","parent":"arts","type":"terms","id":"pop","slug":"pop","link":"/pop","taxonomy":"site"},"pressroom":{"name":"Pressroom","type":"terms","id":"pressroom","slug":"pressroom","link":"/pressroom","taxonomy":"site"},"quest":{"name":"Quest","parent":"science","type":"terms","id":"quest","slug":"quest","link":"/quest","taxonomy":"site"},"radio":{"name":"Radio","grouping":["forum","perspectives"],"description":"Listen to KQED Public Radio – home of Forum and The California Report – on 88.5 FM in San Francisco, 89.3 FM in Sacramento, 88.3 FM in Santa Rosa and 88.1 FM in Martinez.","type":"terms","id":"radio","slug":"radio","link":"/radio","taxonomy":"site"},"root":{"name":"KQED","image":"https://ww2.kqed.org/app/uploads/2020/02/KQED-OG-Image@1x.png","imageWidth":1200,"imageHeight":630,"headData":{"title":"KQED | News, Radio, Podcasts, TV | Public Media for Northern California","description":"KQED provides public radio, television, and independent reporting on issues that matter to the Bay Area. We’re the NPR and PBS member station for Northern California."},"type":"terms","id":"root","slug":"root","link":"/root","taxonomy":"site"},"science":{"name":"Science","grouping":["science","futureofyou"],"description":"KQED Science brings you award-winning science and environment coverage from the Bay Area and beyond.","type":"terms","id":"science","slug":"science","link":"/science","taxonomy":"site"},"stateofhealth":{"name":"State of Health","parent":"science","type":"terms","id":"stateofhealth","slug":"stateofhealth","link":"/stateofhealth","taxonomy":"site"},"support":{"name":"Support","type":"terms","id":"support","slug":"support","link":"/support","taxonomy":"site"},"thedolist":{"name":"The Do List","parent":"arts","type":"terms","id":"thedolist","slug":"thedolist","link":"/thedolist","taxonomy":"site"},"trulyca":{"name":"Truly CA","grouping":["arts","pop","trulyca"],"parent":"arts","type":"terms","id":"trulyca","slug":"trulyca","link":"/trulyca","taxonomy":"site"},"tv":{"name":"TV","type":"terms","id":"tv","slug":"tv","link":"/tv","taxonomy":"site"},"voterguide":{"name":"Voter Guide","parent":"elections","alias":"elections","type":"terms","id":"voterguide","slug":"voterguide","link":"/voterguide","taxonomy":"site"},"bayareabites_49":{"type":"terms","id":"bayareabites_49","meta":{"index":"terms_1591234321","site":"bayareabites","id":"49","found":true},"relationships":{},"included":{},"name":"dessert","slug":"dessert","taxonomy":"tag","description":null,"featImg":null,"headData":{"title":"dessert Archives | KQED Bay Area Bites","description":null,"ogTitle":null,"ogDescription":null,"ogImgId":null,"twTitle":null,"twDescription":null,"twImgId":null,"imageData":{"ogImageSize":{"file":"https://cdn.kqed.org/wp-content/uploads/2020/02/KQED-OG-Image@1x.png","width":1200,"height":630},"twImageSize":{"file":"https://cdn.kqed.org/wp-content/uploads/2020/02/KQED-OG-Image@1x.png"},"twitterCard":"summary_large_image"}},"ttid":1916,"isLoading":false,"link":"/bayareabites/tag/dessert"},"source_bayareabites_138286":{"type":"terms","id":"source_bayareabites_138286","meta":{"override":true},"name":"Flavors at Home","isLoading":false},"bayareabites_109":{"type":"terms","id":"bayareabites_109","meta":{"index":"terms_1591234321","site":"bayareabites","id":"109","found":true},"relationships":{},"included":{},"name":"bay area","slug":"bay-area","taxonomy":"category","description":null,"featImg":null,"headData":{"title":"bay area Archives | KQED Bay Area Bites","description":null,"ogTitle":null,"ogDescription":null,"ogImgId":null,"twTitle":null,"twDescription":null,"twImgId":null},"ttid":73,"isLoading":false,"link":"/bayareabites/category/bay-area"},"bayareabites_752":{"type":"terms","id":"bayareabites_752","meta":{"index":"terms_1591234321","site":"bayareabites","id":"752","found":true},"relationships":{},"included":{},"name":"Bay Area Bites Food + Drink","slug":"food-and-drink","taxonomy":"category","description":null,"featImg":null,"headData":{"title":"Bay Area Bites Food + Drink Archives | KQED Bay Area Bites","description":null,"ogTitle":null,"ogDescription":null,"ogImgId":null,"twTitle":null,"twDescription":null,"twImgId":null},"ttid":1,"isLoading":false,"link":"/bayareabites/category/food-and-drink"},"bayareabites_17082":{"type":"terms","id":"bayareabites_17082","meta":{"index":"terms_1591234321","site":"bayareabites","id":"17082","found":true},"relationships":{},"included":{},"name":"Food","slug":"food","taxonomy":"category","description":null,"featImg":null,"headData":{"title":"Food Archives | KQED Bay Area Bites","description":null,"ogTitle":null,"ogDescription":null,"ogImgId":null,"twTitle":null,"twDescription":null,"twImgId":null},"ttid":101412,"isLoading":false,"link":"/bayareabites/category/food"},"bayareabites_16870":{"type":"terms","id":"bayareabites_16870","meta":{"index":"terms_1591234321","site":"bayareabites","id":"16870","found":true},"relationships":{},"included":{},"name":"apple crisp","slug":"apple-crisp","taxonomy":"tag","description":null,"featImg":null,"headData":{"title":"apple crisp Archives | KQED Bay Area Bites","description":null,"ogTitle":null,"ogDescription":null,"ogImgId":null,"twTitle":null,"twDescription":null,"twImgId":null},"ttid":101200,"isLoading":false,"link":"/bayareabites/tag/apple-crisp"},"bayareabites_16869":{"type":"terms","id":"bayareabites_16869","meta":{"index":"terms_1591234321","site":"bayareabites","id":"16869","found":true},"relationships":{},"included":{},"name":"eating","slug":"eating","taxonomy":"tag","description":null,"featImg":null,"headData":{"title":"eating Archives | KQED Bay Area Bites","description":null,"ogTitle":null,"ogDescription":null,"ogImgId":null,"twTitle":null,"twDescription":null,"twImgId":null},"ttid":101199,"isLoading":false,"link":"/bayareabites/tag/eating"},"bayareabites_16622":{"type":"terms","id":"bayareabites_16622","meta":{"index":"terms_1591234321","site":"bayareabites","id":"16622","found":true},"relationships":{},"included":{},"name":"flavors","slug":"flavors","taxonomy":"tag","description":null,"featImg":null,"headData":{"title":"flavors Archives | KQED Bay Area Bites","description":null,"ogTitle":null,"ogDescription":null,"ogImgId":null,"twTitle":null,"twDescription":null,"twImgId":null},"ttid":100952,"isLoading":false,"link":"/bayareabites/tag/flavors"},"bayareabites_16576":{"type":"terms","id":"bayareabites_16576","meta":{"index":"terms_1591234321","site":"bayareabites","id":"16576","found":true},"relationships":{},"included":{},"name":"flavorsathome","slug":"flavors-at-home","taxonomy":"tag","description":null,"featImg":null,"headData":{"title":"flavorsathome Archives | KQED Bay Area Bites","description":null,"ogTitle":null,"ogDescription":null,"ogImgId":null,"twTitle":null,"twDescription":null,"twImgId":null},"ttid":100906,"isLoading":false,"link":"/bayareabites/tag/flavors-at-home"},"bayareabites_744":{"type":"terms","id":"bayareabites_744","meta":{"index":"terms_1591234321","site":"bayareabites","id":"744","found":true},"relationships":{},"included":{},"name":"food","slug":"food","taxonomy":"tag","description":null,"featImg":null,"headData":{"title":"food Archives | KQED Bay Area Bites","description":null,"ogTitle":null,"ogDescription":null,"ogImgId":null,"twTitle":null,"twDescription":null,"twImgId":null},"ttid":727,"isLoading":false,"link":"/bayareabites/tag/food"},"bayareabites_16871":{"type":"terms","id":"bayareabites_16871","meta":{"index":"terms_1591234321","site":"bayareabites","id":"16871","found":true},"relationships":{},"included":{},"name":"oat apple crisp","slug":"oat-apple-crisp","taxonomy":"tag","description":null,"featImg":null,"headData":{"title":"oat apple crisp Archives | KQED Bay Area Bites","description":null,"ogTitle":null,"ogDescription":null,"ogImgId":null,"twTitle":null,"twDescription":null,"twImgId":null},"ttid":101201,"isLoading":false,"link":"/bayareabites/tag/oat-apple-crisp"},"bayareabites_16872":{"type":"terms","id":"bayareabites_16872","meta":{"index":"terms_1591234321","site":"bayareabites","id":"16872","found":true},"relationships":{},"included":{},"name":"old fashioned apple crisp","slug":"old-fashioned-apple-crisp","taxonomy":"tag","description":null,"featImg":null,"headData":{"title":"old fashioned apple crisp Archives | KQED Bay Area Bites","description":null,"ogTitle":null,"ogDescription":null,"ogImgId":null,"twTitle":null,"twDescription":null,"twImgId":null},"ttid":101202,"isLoading":false,"link":"/bayareabites/tag/old-fashioned-apple-crisp"},"bayareabites_16742":{"type":"terms","id":"bayareabites_16742","meta":{"index":"terms_1591234321","site":"bayareabites","id":"16742","found":true},"relationships":{},"included":{},"name":"recipe","slug":"recipe","taxonomy":"tag","description":null,"featImg":null,"headData":{"title":"recipe Archives | KQED Bay Area Bites","description":null,"ogTitle":null,"ogDescription":null,"ogImgId":null,"twTitle":null,"twDescription":null,"twImgId":null},"ttid":101072,"isLoading":false,"link":"/bayareabites/tag/recipe"},"bayareabites_14453":{"type":"terms","id":"bayareabites_14453","meta":{"index":"terms_1591234321","site":"bayareabites","id":"14453","found":true},"relationships":{},"included":{},"name":"bay area","slug":"bay-area","taxonomy":"tag","description":null,"featImg":null,"headData":{"title":"bay area Archives | KQED Bay Area Bites","description":null,"ogTitle":null,"ogDescription":null,"ogImgId":null,"twTitle":null,"twDescription":null,"twImgId":null},"ttid":98829,"isLoading":false,"link":"/bayareabites/tag/bay-area"},"bayareabites_9037":{"type":"terms","id":"bayareabites_9037","meta":{"index":"terms_1591234321","site":"bayareabites","id":"9037","found":true},"relationships":{},"included":{},"name":"bay area bites","slug":"bay-area-bites","taxonomy":"tag","description":null,"featImg":null,"headData":{"title":"bay area bites Archives | KQED Bay Area Bites","description":null,"ogTitle":null,"ogDescription":null,"ogImgId":null,"twTitle":null,"twDescription":null,"twImgId":null},"ttid":3490,"isLoading":false,"link":"/bayareabites/tag/bay-area-bites"},"bayareabites_16750":{"type":"terms","id":"bayareabites_16750","meta":{"index":"terms_1591234321","site":"bayareabites","id":"16750","found":true},"relationships":{},"included":{},"name":"bay area dessert","slug":"bay-area-dessert","taxonomy":"tag","description":null,"featImg":null,"headData":{"title":"bay area dessert Archives | KQED Bay Area Bites","description":null,"ogTitle":null,"ogDescription":null,"ogImgId":null,"twTitle":null,"twDescription":null,"twImgId":null},"ttid":101080,"isLoading":false,"link":"/bayareabites/tag/bay-area-dessert"},"bayareabites_16748":{"type":"terms","id":"bayareabites_16748","meta":{"index":"terms_1591234321","site":"bayareabites","id":"16748","found":true},"relationships":{},"included":{},"name":"covid eats","slug":"covid-eats","taxonomy":"tag","description":null,"featImg":null,"headData":{"title":"covid eats Archives | KQED Bay Area Bites","description":null,"ogTitle":null,"ogDescription":null,"ogImgId":null,"twTitle":null,"twDescription":null,"twImgId":null},"ttid":101078,"isLoading":false,"link":"/bayareabites/tag/covid-eats"},"bayareabites_16557":{"type":"terms","id":"bayareabites_16557","meta":{"index":"terms_1591234321","site":"bayareabites","id":"16557","found":true},"relationships":{},"included":{},"name":"featured-food","slug":"featured-food","taxonomy":"tag","description":null,"featImg":null,"headData":{"title":"featured-food Archives | KQED Bay Area Bites","description":null,"ogTitle":null,"ogDescription":null,"ogImgId":null,"twTitle":null,"twDescription":null,"twImgId":null},"ttid":100887,"isLoading":false,"link":"/bayareabites/tag/featured-food"},"bayareabites_312":{"type":"terms","id":"bayareabites_312","meta":{"index":"terms_1591234321","site":"bayareabites","id":"312","found":true},"relationships":{},"included":{},"name":"ice cream","slug":"ice-cream","taxonomy":"tag","description":null,"featImg":null,"headData":{"title":"ice cream Archives | KQED Bay Area Bites","description":null,"ogTitle":null,"ogDescription":null,"ogImgId":null,"twTitle":null,"twDescription":null,"twImgId":null},"ttid":277,"isLoading":false,"link":"/bayareabites/tag/ice-cream"},"bayareabites_16747":{"type":"terms","id":"bayareabites_16747","meta":{"index":"terms_1591234321","site":"bayareabites","id":"16747","found":true},"relationships":{},"included":{},"name":"ice cream delivery","slug":"ice-cream-delivery","taxonomy":"tag","description":null,"featImg":null,"headData":{"title":"ice cream delivery Archives | KQED Bay Area Bites","description":null,"ogTitle":null,"ogDescription":null,"ogImgId":null,"twTitle":null,"twDescription":null,"twImgId":null},"ttid":101077,"isLoading":false,"link":"/bayareabites/tag/ice-cream-delivery"},"bayareabites_16749":{"type":"terms","id":"bayareabites_16749","meta":{"index":"terms_1591234321","site":"bayareabites","id":"16749","found":true},"relationships":{},"included":{},"name":"pandemic dining","slug":"pandemic-dining","taxonomy":"tag","description":null,"featImg":null,"headData":{"title":"pandemic dining Archives | KQED Bay Area Bites","description":null,"ogTitle":null,"ogDescription":null,"ogImgId":null,"twTitle":null,"twDescription":null,"twImgId":null},"ttid":101079,"isLoading":false,"link":"/bayareabites/tag/pandemic-dining"},"bayareabites_14745":{"type":"terms","id":"bayareabites_14745","meta":{"index":"terms_1591234321","site":"bayareabites","id":"14745","found":true},"relationships":{},"included":{},"name":"san francisco","slug":"san-francisco","taxonomy":"tag","description":null,"featImg":null,"headData":{"title":"san francisco Archives | KQED Bay Area Bites","description":null,"ogTitle":null,"ogDescription":null,"ogImgId":null,"twTitle":null,"twDescription":null,"twImgId":null},"ttid":817,"isLoading":false,"link":"/bayareabites/tag/san-francisco"},"bayareabites_16751":{"type":"terms","id":"bayareabites_16751","meta":{"index":"terms_1591234321","site":"bayareabites","id":"16751","found":true},"relationships":{},"included":{},"name":"summer ice cream","slug":"summer-ice-cream","taxonomy":"tag","description":null,"featImg":null,"headData":{"title":"summer ice cream Archives | KQED Bay Area Bites","description":null,"ogTitle":null,"ogDescription":null,"ogImgId":null,"twTitle":null,"twDescription":null,"twImgId":null},"ttid":101081,"isLoading":false,"link":"/bayareabites/tag/summer-ice-cream"},"bayareabites_15122":{"type":"terms","id":"bayareabites_15122","meta":{"index":"terms_1591234321","site":"bayareabites","id":"15122","found":true},"relationships":{},"included":{},"name":"Christmas Recipes","slug":"christmas-recipes","taxonomy":"series","description":"\u003cimg src=\"http://ww2.kqed.org/bayareabites/wp-content/uploads/sites/24/2014/12/xmas20141000white.jpg\" alt=\"Merry Christmas dinner menu from Bay Area Bites. Photos: Wendy Goodfriend\" width=\"1000\" height=\"668\" class=\"aligncenter size-full wp-image-91212\" />\r\n\r\nWho doesn't love a bit of decadence for the holidays? Appetizers, entrees, sides, desserts and cocktails— our special collection of 'tis the seasonal recipes will help you create a sumptuous Christmas feast for any of your holiday guests.","featImg":null,"headData":{"title":"Christmas Recipes Archives | KQED Bay Area Bites","description":"Who doesn't love a bit of decadence for the holidays? Appetizers, entrees, sides, desserts and cocktails— our special collection of 'tis the seasonal recipes will help you create a sumptuous Christmas feast for any of your holiday guests.","ogTitle":null,"ogDescription":null,"ogImgId":null,"twTitle":null,"twDescription":null,"twImgId":null},"ttid":99452,"isLoading":false,"link":"/bayareabites/series/christmas-recipes"},"bayareabites_15012":{"type":"terms","id":"bayareabites_15012","meta":{"index":"terms_1591234321","site":"bayareabites","id":"15012","found":true},"relationships":{},"included":{},"name":"Thanksgiving Recipes","slug":"thanksgiving-recipes","taxonomy":"series","description":"\u003cimg src=\"http://ww2.kqed.org/bayareabites/wp-content/uploads/sites/24/2015/11/THANKSGIVING-centerpiece1000-1.jpg\" alt=\"THANKSGIVING-centerpiece1000 (1)\" width=\"1000\" height=\"666\" class=\"aligncenter size-full wp-image-103674\" />\r\n\r\nEntrees, sides, desserts, vegan and gluten-free -- our special collection of autumn-themed recipes will help you create a sumptuous Thanksgiving feast for any of your holiday guests. ","featImg":null,"headData":{"title":"Thanksgiving Recipes Archives | KQED Bay Area Bites","description":"Entrees, sides, desserts, vegan and gluten-free -- our special collection of autumn-themed recipes will help you create a sumptuous Thanksgiving feast for any of your holiday guests.","ogTitle":null,"ogDescription":null,"ogImgId":null,"twTitle":null,"twDescription":null,"twImgId":null},"ttid":99342,"isLoading":false,"link":"/bayareabites/series/thanksgiving-recipes"},"bayareabites_2998":{"type":"terms","id":"bayareabites_2998","meta":{"index":"terms_1591234321","site":"bayareabites","id":"2998","found":true},"relationships":{},"included":{},"name":"asian food and drink","slug":"asian-food-and-drink","taxonomy":"category","description":null,"featImg":null,"headData":{"title":"asian food and drink Archives | KQED Bay Area Bites","description":null,"ogTitle":null,"ogDescription":null,"ogImgId":null,"twTitle":null,"twDescription":null,"twImgId":null},"ttid":58,"isLoading":false,"link":"/bayareabites/category/asian-food-and-drink"},"bayareabites_1516":{"type":"terms","id":"bayareabites_1516","meta":{"index":"terms_1591234321","site":"bayareabites","id":"1516","found":true},"relationships":{},"included":{},"name":"baking and bakeries","slug":"baking-and-bakeries","taxonomy":"category","description":null,"featImg":null,"headData":{"title":"baking and bakeries Archives | KQED Bay Area Bites","description":null,"ogTitle":null,"ogDescription":null,"ogImgId":null,"twTitle":null,"twDescription":null,"twImgId":null},"ttid":1253,"isLoading":false,"link":"/bayareabites/category/baking-and-bakeries"},"bayareabites_12744":{"type":"terms","id":"bayareabites_12744","meta":{"index":"terms_1591234321","site":"bayareabites","id":"12744","found":true},"relationships":{},"included":{},"name":"christmas recipes","slug":"christmas-recipes","taxonomy":"category","description":null,"featImg":null,"headData":{"title":"christmas recipes Archives | KQED Bay Area Bites","description":null,"ogTitle":null,"ogDescription":null,"ogImgId":null,"twTitle":null,"twDescription":null,"twImgId":null},"ttid":7207,"isLoading":false,"link":"/bayareabites/category/christmas-recipes"},"bayareabites_12550":{"type":"terms","id":"bayareabites_12550","meta":{"index":"terms_1591234321","site":"bayareabites","id":"12550","found":true},"relationships":{},"included":{},"name":"holiday recipes","slug":"holiday-recipes","taxonomy":"category","description":null,"featImg":null,"headData":{"title":"holiday recipes Archives | KQED Bay Area Bites","description":null,"ogTitle":null,"ogDescription":null,"ogImgId":null,"twTitle":null,"twDescription":null,"twImgId":null},"ttid":7013,"isLoading":false,"link":"/bayareabites/category/holiday-recipes"},"bayareabites_12":{"type":"terms","id":"bayareabites_12","meta":{"index":"terms_1591234321","site":"bayareabites","id":"12","found":true},"relationships":{},"included":{},"name":"recipes","slug":"recipes","taxonomy":"category","description":null,"featImg":null,"headData":{"title":"recipes Archives | KQED Bay Area Bites","description":null,"ogTitle":null,"ogDescription":null,"ogImgId":null,"twTitle":null,"twDescription":null,"twImgId":null},"ttid":10,"isLoading":false,"link":"/bayareabites/category/recipes"},"bayareabites_16497":{"type":"terms","id":"bayareabites_16497","meta":{"index":"terms_1591234321","site":"bayareabites","id":"16497","found":true},"relationships":{},"included":{},"name":"cake recipes","slug":"cake-recipes","taxonomy":"tag","description":null,"featImg":null,"headData":{"title":"cake recipes Archives | KQED Bay Area Bites","description":null,"ogTitle":null,"ogDescription":null,"ogImgId":null,"twTitle":null,"twDescription":null,"twImgId":null},"ttid":100827,"isLoading":false,"link":"/bayareabites/tag/cake-recipes"},"bayareabites_9710":{"type":"terms","id":"bayareabites_9710","meta":{"index":"terms_1591234321","site":"bayareabites","id":"9710","found":true},"relationships":{},"included":{},"name":"featured","slug":"featured","taxonomy":"tag","description":null,"featImg":null,"headData":{"title":"featured Archives | KQED Bay Area Bites","description":null,"ogTitle":null,"ogDescription":null,"ogImgId":null,"twTitle":null,"twDescription":null,"twImgId":null},"ttid":4164,"isLoading":false,"link":"/bayareabites/tag/featured"},"bayareabites_16317":{"type":"terms","id":"bayareabites_16317","meta":{"index":"terms_1591234321","site":"bayareabites","id":"16317","found":true},"relationships":{},"included":{},"name":"holiday recipes","slug":"holiday-recipes","taxonomy":"tag","description":null,"featImg":null,"headData":{"title":"holiday recipes Archives | KQED Bay Area Bites","description":null,"ogTitle":null,"ogDescription":null,"ogImgId":null,"twTitle":null,"twDescription":null,"twImgId":null},"ttid":100647,"isLoading":false,"link":"/bayareabites/tag/holiday-recipes"},"bayareabites_14738":{"type":"terms","id":"bayareabites_14738","meta":{"index":"terms_1591234321","site":"bayareabites","id":"14738","found":true},"relationships":{},"included":{},"name":"recipes","slug":"recipes","taxonomy":"tag","description":null,"featImg":null,"headData":{"title":"recipes Archives | KQED Bay Area Bites","description":null,"ogTitle":null,"ogDescription":null,"ogImgId":null,"twTitle":null,"twDescription":null,"twImgId":null},"ttid":831,"isLoading":false,"link":"/bayareabites/tag/recipes"},"bayareabites_1653":{"type":"terms","id":"bayareabites_1653","meta":{"index":"terms_1591234321","site":"bayareabites","id":"1653","found":true},"relationships":{},"included":{},"name":"dessert and chocolate","slug":"dessert-and-chocolate","taxonomy":"category","description":null,"featImg":null,"headData":{"title":"dessert and chocolate Archives | KQED Bay Area Bites","description":null,"ogTitle":null,"ogDescription":null,"ogImgId":null,"twTitle":null,"twDescription":null,"twImgId":null},"ttid":12,"isLoading":false,"link":"/bayareabites/category/dessert-and-chocolate"},"bayareabites_4084":{"type":"terms","id":"bayareabites_4084","meta":{"index":"terms_1591234321","site":"bayareabites","id":"4084","found":true},"relationships":{},"included":{},"name":"food trends and technology","slug":"food-and-technology","taxonomy":"category","description":null,"featImg":null,"headData":{"title":"food trends and technology Archives | KQED Bay Area Bites","description":null,"ogTitle":null,"ogDescription":null,"ogImgId":null,"twTitle":null,"twDescription":null,"twImgId":null},"ttid":2573,"isLoading":false,"link":"/bayareabites/category/food-and-technology"},"bayareabites_1807":{"type":"terms","id":"bayareabites_1807","meta":{"index":"terms_1591234321","site":"bayareabites","id":"1807","found":true},"relationships":{},"included":{},"name":"restaurants, bars, cafes, pop-ups","slug":"restaurants-and-bars","taxonomy":"category","description":null,"featImg":null,"headData":{"title":"restaurants, bars, cafes, pop-ups Archives | KQED Bay Area Bites","description":null,"ogTitle":null,"ogDescription":null,"ogImgId":null,"twTitle":null,"twDescription":null,"twImgId":null},"ttid":56,"isLoading":false,"link":"/bayareabites/category/restaurants-and-bars"},"bayareabites_90":{"type":"terms","id":"bayareabites_90","meta":{"index":"terms_1591234321","site":"bayareabites","id":"90","found":true},"relationships":{},"included":{},"name":"san francisco","slug":"san-francisco","taxonomy":"category","description":null,"featImg":null,"headData":{"title":"san francisco Archives | KQED Bay Area Bites","description":null,"ogTitle":null,"ogDescription":null,"ogImgId":null,"twTitle":null,"twDescription":null,"twImgId":null},"ttid":54,"isLoading":false,"link":"/bayareabites/category/san-francisco"},"bayareabites_265":{"type":"terms","id":"bayareabites_265","meta":{"index":"terms_1591234321","site":"bayareabites","id":"265","found":true},"relationships":{},"included":{},"name":"san jose","slug":"san-jose","taxonomy":"category","description":null,"featImg":null,"headData":{"title":"san jose Archives | KQED Bay Area Bites","description":null,"ogTitle":null,"ogDescription":null,"ogImgId":null,"twTitle":null,"twDescription":null,"twImgId":null},"ttid":8158,"isLoading":false,"link":"/bayareabites/category/san-jose"},"bayareabites_91":{"type":"terms","id":"bayareabites_91","meta":{"index":"terms_1591234321","site":"bayareabites","id":"91","found":true},"relationships":{},"included":{},"name":"south bay","slug":"south-bay","taxonomy":"category","description":null,"featImg":null,"headData":{"title":"south bay Archives | KQED Bay Area Bites","description":null,"ogTitle":null,"ogDescription":null,"ogImgId":null,"twTitle":null,"twDescription":null,"twImgId":null},"ttid":8157,"isLoading":false,"link":"/bayareabites/category/south-bay"},"bayareabites_12011":{"type":"terms","id":"bayareabites_12011","meta":{"index":"terms_1591234321","site":"bayareabites","id":"12011","found":true},"relationships":{},"included":{},"name":"donut","slug":"donut","taxonomy":"tag","description":null,"featImg":null,"headData":{"title":"donut Archives | KQED Bay Area Bites","description":null,"ogTitle":null,"ogDescription":null,"ogImgId":null,"twTitle":null,"twDescription":null,"twImgId":null},"ttid":6473,"isLoading":false,"link":"/bayareabites/tag/donut"},"bayareabites_10052":{"type":"terms","id":"bayareabites_10052","meta":{"index":"terms_1591234321","site":"bayareabites","id":"10052","found":true},"relationships":{},"included":{},"name":"mochi","slug":"mochi","taxonomy":"tag","description":null,"featImg":null,"headData":{"title":"mochi Archives | KQED Bay Area Bites","description":null,"ogTitle":null,"ogDescription":null,"ogImgId":null,"twTitle":null,"twDescription":null,"twImgId":null},"ttid":4506,"isLoading":false,"link":"/bayareabites/tag/mochi"},"bayareabites_13306":{"type":"terms","id":"bayareabites_13306","meta":{"index":"terms_1591234321","site":"bayareabites","id":"13306","found":true},"relationships":{},"included":{},"name":"beverages","slug":"beverages","taxonomy":"category","description":null,"featImg":null,"headData":{"title":"beverages Archives | KQED Bay Area Bites","description":null,"ogTitle":null,"ogDescription":null,"ogImgId":null,"twTitle":null,"twDescription":null,"twImgId":null},"ttid":7773,"isLoading":false,"link":"/bayareabites/category/beverages"},"bayareabites_1244":{"type":"terms","id":"bayareabites_1244","meta":{"index":"terms_1591234321","site":"bayareabites","id":"1244","found":true},"relationships":{},"included":{},"name":"cocktails and spirits","slug":"cocktails-and-spirits","taxonomy":"category","description":null,"featImg":null,"headData":{"title":"cocktails and spirits Archives | KQED Bay Area Bites","description":null,"ogTitle":null,"ogDescription":null,"ogImgId":null,"twTitle":null,"twDescription":null,"twImgId":null},"ttid":53,"isLoading":false,"link":"/bayareabites/category/cocktails-and-spirits"},"bayareabites_50":{"type":"terms","id":"bayareabites_50","meta":{"index":"terms_1591234321","site":"bayareabites","id":"50","found":true},"relationships":{},"included":{},"name":"events","slug":"events","taxonomy":"category","description":null,"featImg":null,"headData":{"title":"events Archives | KQED Bay Area Bites","description":null,"ogTitle":null,"ogDescription":null,"ogImgId":null,"twTitle":null,"twDescription":null,"twImgId":null},"ttid":750,"isLoading":false,"link":"/bayareabites/category/events"},"bayareabites_11028":{"type":"terms","id":"bayareabites_11028","meta":{"index":"terms_1591234321","site":"bayareabites","id":"11028","found":true},"relationships":{},"included":{},"name":"food art","slug":"food-art","taxonomy":"category","description":null,"featImg":null,"headData":{"title":"food art Archives | KQED Bay Area Bites","description":null,"ogTitle":null,"ogDescription":null,"ogImgId":null,"twTitle":null,"twDescription":null,"twImgId":null},"ttid":7736,"isLoading":false,"link":"/bayareabites/category/food-art"},"bayareabites_10028":{"type":"terms","id":"bayareabites_10028","meta":{"index":"terms_1591234321","site":"bayareabites","id":"10028","found":true},"relationships":{},"included":{},"name":"food news","slug":"food-news","taxonomy":"category","description":null,"featImg":null,"headData":{"title":"food news Archives | KQED Bay Area Bites","description":null,"ogTitle":null,"ogDescription":null,"ogImgId":null,"twTitle":null,"twDescription":null,"twImgId":null},"ttid":8301,"isLoading":false,"link":"/bayareabites/category/food-news"},"bayareabites_13746":{"type":"terms","id":"bayareabites_13746","meta":{"index":"terms_1591234321","site":"bayareabites","id":"13746","found":true},"relationships":{},"included":{},"name":"guides","slug":"guides-2","taxonomy":"category","description":null,"featImg":null,"headData":{"title":"guides Archives | KQED Bay Area Bites","description":null,"ogTitle":null,"ogDescription":null,"ogImgId":null,"twTitle":null,"twDescription":null,"twImgId":null},"ttid":8219,"isLoading":false,"link":"/bayareabites/category/guides-2"},"bayareabites_1763":{"type":"terms","id":"bayareabites_1763","meta":{"index":"terms_1591234321","site":"bayareabites","id":"1763","found":true},"relationships":{},"included":{},"name":"holidays and traditions","slug":"holidays-and-traditions","taxonomy":"category","description":null,"featImg":null,"headData":{"title":"holidays and traditions Archives | KQED Bay Area Bites","description":null,"ogTitle":null,"ogDescription":null,"ogImgId":null,"twTitle":null,"twDescription":null,"twImgId":null},"ttid":1254,"isLoading":false,"link":"/bayareabites/category/holidays-and-traditions"},"bayareabites_181":{"type":"terms","id":"bayareabites_181","meta":{"index":"terms_1591234321","site":"bayareabites","id":"181","found":true},"relationships":{},"included":{},"name":"street food and fast food","slug":"street-food","taxonomy":"category","description":null,"featImg":null,"headData":{"title":"street food and fast food Archives | KQED Bay Area Bites","description":null,"ogTitle":null,"ogDescription":null,"ogImgId":null,"twTitle":null,"twDescription":null,"twImgId":null},"ttid":1872,"isLoading":false,"link":"/bayareabites/category/street-food"},"bayareabites_13419":{"type":"terms","id":"bayareabites_13419","meta":{"index":"terms_1591234321","site":"bayareabites","id":"13419","found":true},"relationships":{},"included":{},"name":"guides","slug":"guides","taxonomy":"tag","description":null,"featImg":null,"headData":{"title":"guides Archives | KQED Bay Area Bites","description":null,"ogTitle":null,"ogDescription":null,"ogImgId":null,"twTitle":null,"twDescription":null,"twImgId":null},"ttid":7888,"isLoading":false,"link":"/bayareabites/tag/guides"},"bayareabites_2327":{"type":"terms","id":"bayareabites_2327","meta":{"index":"terms_1591234321","site":"bayareabites","id":"2327","found":true},"relationships":{},"included":{},"name":"pride","slug":"pride","taxonomy":"tag","description":null,"featImg":null,"headData":{"title":"pride Archives | KQED Bay Area Bites","description":null,"ogTitle":null,"ogDescription":null,"ogImgId":null,"twTitle":null,"twDescription":null,"twImgId":null},"ttid":1731,"isLoading":false,"link":"/bayareabites/tag/pride"},"bayareabites_8770":{"type":"terms","id":"bayareabites_8770","meta":{"index":"terms_1591234321","site":"bayareabites","id":"8770","found":true},"relationships":{},"included":{},"name":"east bay","slug":"east-bay","taxonomy":"category","description":null,"featImg":null,"headData":{"title":"east bay Archives | KQED Bay Area Bites","description":null,"ogTitle":null,"ogDescription":null,"ogImgId":null,"twTitle":null,"twDescription":null,"twImgId":null},"ttid":7634,"isLoading":false,"link":"/bayareabites/category/east-bay"},"bayareabites_477":{"type":"terms","id":"bayareabites_477","meta":{"index":"terms_1591234321","site":"bayareabites","id":"477","found":true},"relationships":{},"included":{},"name":"breakfast","slug":"breakfast","taxonomy":"tag","description":null,"featImg":null,"headData":{"title":"breakfast Archives | KQED Bay Area Bites","description":null,"ogTitle":null,"ogDescription":null,"ogImgId":null,"twTitle":null,"twDescription":null,"twImgId":null},"ttid":442,"isLoading":false,"link":"/bayareabites/tag/breakfast"},"bayareabites_125":{"type":"terms","id":"bayareabites_125","meta":{"index":"terms_1591234321","site":"bayareabites","id":"125","found":true},"relationships":{},"included":{},"name":"coffee","slug":"coffee","taxonomy":"tag","description":null,"featImg":null,"headData":{"title":"coffee Archives | KQED Bay Area Bites","description":null,"ogTitle":null,"ogDescription":null,"ogImgId":null,"twTitle":null,"twDescription":null,"twImgId":null},"ttid":89,"isLoading":false,"link":"/bayareabites/tag/coffee"},"bayareabites_2889":{"type":"terms","id":"bayareabites_2889","meta":{"index":"terms_1591234321","site":"bayareabites","id":"2889","found":true},"relationships":{},"included":{},"name":"donuts","slug":"donuts","taxonomy":"tag","description":null,"featImg":null,"headData":{"title":"donuts Archives | KQED Bay Area Bites","description":null,"ogTitle":null,"ogDescription":null,"ogImgId":null,"twTitle":null,"twDescription":null,"twImgId":null},"ttid":2017,"isLoading":false,"link":"/bayareabites/tag/donuts"},"bayareabites_14757":{"type":"terms","id":"bayareabites_14757","meta":{"index":"terms_1591234321","site":"bayareabites","id":"14757","found":true},"relationships":{},"included":{},"name":"oakland","slug":"oakland","taxonomy":"tag","description":null,"featImg":null,"headData":{"title":"oakland Archives | KQED Bay Area Bites","description":null,"ogTitle":null,"ogDescription":null,"ogImgId":null,"twTitle":null,"twDescription":null,"twImgId":null},"ttid":331,"isLoading":false,"link":"/bayareabites/tag/oakland"},"bayareabites_9359":{"type":"terms","id":"bayareabites_9359","meta":{"index":"terms_1591234321","site":"bayareabites","id":"9359","found":true},"relationships":{},"included":{},"name":"sweet","slug":"sweet","taxonomy":"tag","description":null,"featImg":null,"headData":{"title":"sweet Archives | KQED Bay Area Bites","description":null,"ogTitle":null,"ogDescription":null,"ogImgId":null,"twTitle":null,"twDescription":null,"twImgId":null},"ttid":3813,"isLoading":false,"link":"/bayareabites/tag/sweet"},"bayareabites_14780":{"type":"terms","id":"bayareabites_14780","meta":{"index":"terms_1591234321","site":"bayareabites","id":"14780","found":true},"relationships":{},"included":{},"name":"food art","slug":"food-art","taxonomy":"tag","description":null,"featImg":null,"headData":{"title":"food art Archives | KQED Bay Area Bites","description":null,"ogTitle":null,"ogDescription":null,"ogImgId":null,"twTitle":null,"twDescription":null,"twImgId":null},"ttid":5487,"isLoading":false,"link":"/bayareabites/tag/food-art"},"bayareabites_2256":{"type":"terms","id":"bayareabites_2256","meta":{"index":"terms_1591234321","site":"bayareabites","id":"2256","found":true},"relationships":{},"included":{},"name":"food trends","slug":"food-trends","taxonomy":"tag","description":null,"featImg":null,"headData":{"title":"food trends Archives | KQED Bay Area Bites","description":null,"ogTitle":null,"ogDescription":null,"ogImgId":null,"twTitle":null,"twDescription":null,"twImgId":null},"ttid":1679,"isLoading":false,"link":"/bayareabites/tag/food-trends"},"bayareabites_15718":{"type":"terms","id":"bayareabites_15718","meta":{"index":"terms_1591234321","site":"bayareabites","id":"15718","found":true},"relationships":{},"included":{},"name":"Instant Pot","slug":"instant-pot","taxonomy":"tag","description":null,"featImg":null,"headData":{"title":"Instant Pot Archives | KQED Bay Area Bites","description":null,"ogTitle":null,"ogDescription":null,"ogImgId":null,"twTitle":null,"twDescription":null,"twImgId":null},"ttid":100048,"isLoading":false,"link":"/bayareabites/tag/instant-pot"},"bayareabites_336":{"type":"terms","id":"bayareabites_336","meta":{"index":"terms_1591234321","site":"bayareabites","id":"336","found":true},"relationships":{},"included":{},"name":"sushi","slug":"sushi","taxonomy":"tag","description":null,"featImg":null,"headData":{"title":"sushi Archives | KQED Bay Area Bites","description":null,"ogTitle":null,"ogDescription":null,"ogImgId":null,"twTitle":null,"twDescription":null,"twImgId":null},"ttid":301,"isLoading":false,"link":"/bayareabites/tag/sushi"},"bayareabites_1245":{"type":"terms","id":"bayareabites_1245","meta":{"index":"terms_1591234321","site":"bayareabites","id":"1245","found":true},"relationships":{},"included":{},"name":"health and nutrition","slug":"health-and-nutrition","taxonomy":"category","description":null,"featImg":null,"headData":{"title":"health and nutrition Archives | KQED Bay Area Bites","description":null,"ogTitle":null,"ogDescription":null,"ogImgId":null,"twTitle":null,"twDescription":null,"twImgId":null},"ttid":1078,"isLoading":false,"link":"/bayareabites/category/health-and-nutrition"},"bayareabites_15155":{"type":"terms","id":"bayareabites_15155","meta":{"index":"terms_1591234321","site":"bayareabites","id":"15155","found":true},"relationships":{},"included":{},"name":"north bay","slug":"north-bay","taxonomy":"category","description":null,"featImg":null,"headData":{"title":"north bay Archives | KQED Bay Area Bites","description":null,"ogTitle":null,"ogDescription":null,"ogImgId":null,"twTitle":null,"twDescription":null,"twImgId":null},"ttid":99485,"isLoading":false,"link":"/bayareabites/category/north-bay"},"bayareabites_358":{"type":"terms","id":"bayareabites_358","meta":{"index":"terms_1591234321","site":"bayareabites","id":"358","found":true},"relationships":{},"included":{},"name":"science","slug":"science","taxonomy":"category","description":null,"featImg":null,"headData":{"title":"science Archives | KQED Bay Area Bites","description":null,"ogTitle":null,"ogDescription":null,"ogImgId":null,"twTitle":null,"twDescription":null,"twImgId":null},"ttid":7943,"isLoading":false,"link":"/bayareabites/category/science"},"bayareabites_1248":{"type":"terms","id":"bayareabites_1248","meta":{"index":"terms_1591234321","site":"bayareabites","id":"1248","found":true},"relationships":{},"included":{},"name":"tea and coffee","slug":"tea-and-coffee","taxonomy":"category","description":null,"featImg":null,"headData":{"title":"tea and coffee Archives | KQED Bay Area Bites","description":null,"ogTitle":null,"ogDescription":null,"ogImgId":null,"twTitle":null,"twDescription":null,"twImgId":null},"ttid":1086,"isLoading":false,"link":"/bayareabites/category/tea-and-coffee"},"bayareabites_9995":{"type":"terms","id":"bayareabites_9995","meta":{"index":"terms_1591234321","site":"bayareabites","id":"9995","found":true},"relationships":{},"included":{},"name":"albany","slug":"albany","taxonomy":"tag","description":null,"featImg":null,"headData":{"title":"albany Archives | KQED Bay Area Bites","description":null,"ogTitle":null,"ogDescription":null,"ogImgId":null,"twTitle":null,"twDescription":null,"twImgId":null},"ttid":4449,"isLoading":false,"link":"/bayareabites/tag/albany"},"bayareabites_14751":{"type":"terms","id":"bayareabites_14751","meta":{"index":"terms_1591234321","site":"bayareabites","id":"14751","found":true},"relationships":{},"included":{},"name":"berkeley","slug":"berkeley","taxonomy":"tag","description":null,"featImg":null,"headData":{"title":"berkeley Archives | KQED Bay Area Bites","description":null,"ogTitle":null,"ogDescription":null,"ogImgId":null,"twTitle":null,"twDescription":null,"twImgId":null},"ttid":229,"isLoading":false,"link":"/bayareabites/tag/berkeley"},"bayareabites_16274":{"type":"terms","id":"bayareabites_16274","meta":{"index":"terms_1591234321","site":"bayareabites","id":"16274","found":true},"relationships":{},"included":{},"name":"cafes","slug":"cafes","taxonomy":"tag","description":null,"featImg":null,"headData":{"title":"cafes Archives | KQED Bay Area Bites","description":null,"ogTitle":null,"ogDescription":null,"ogImgId":null,"twTitle":null,"twDescription":null,"twImgId":null},"ttid":100604,"isLoading":false,"link":"/bayareabites/tag/cafes"},"bayareabites_16267":{"type":"terms","id":"bayareabites_16267","meta":{"index":"terms_1591234321","site":"bayareabites","id":"16267","found":true},"relationships":{},"included":{},"name":"kid-friendly","slug":"kid-friendly","taxonomy":"tag","description":null,"featImg":null,"headData":{"title":"kid-friendly Archives | KQED Bay Area Bites","description":null,"ogTitle":null,"ogDescription":null,"ogImgId":null,"twTitle":null,"twDescription":null,"twImgId":null},"ttid":100597,"isLoading":false,"link":"/bayareabites/tag/kid-friendly"},"bayareabites_9161":{"type":"terms","id":"bayareabites_9161","meta":{"index":"terms_1591234321","site":"bayareabites","id":"9161","found":true},"relationships":{},"included":{},"name":"San Mateo","slug":"san-mateo","taxonomy":"tag","description":null,"featImg":null,"headData":{"title":"San Mateo Archives | KQED Bay Area Bites","description":null,"ogTitle":null,"ogDescription":null,"ogImgId":null,"twTitle":null,"twDescription":null,"twImgId":null},"ttid":3615,"isLoading":false,"link":"/bayareabites/tag/san-mateo"},"bayareabites_16039":{"type":"terms","id":"bayareabites_16039","meta":{"index":"terms_1591234321","site":"bayareabites","id":"16039","found":true},"relationships":{},"included":{},"name":"Celebrity Chefs Recipes","slug":"celebrity-chefs-recipes","taxonomy":"series","description":"KQED invites you into the kitchen with award winning Bay Area chefs. \u003cstrong>\u003cem>Bay Area Bites\u003c/em> Celebrity Chefs Recipe\u003c/strong> series features video and step-by-step photos of local chefs preparing their signature dishes. Impress your friends and family with these tried and true recipes for mouth-watering dishes and learn techniques straight from the masters.\r\n\r\n\u003cstrong>First Up: Chef Tanya Holland, Brown Sugar Kitchen, Oakland, CA\u003c/strong>\r\n\"Brown Sugar Kitchen has become more than just a restaurant, it’s a community...West Oakland is more than just a place where we live. It’s our home now, and we can’t imagine living anywhere else. People say that I’ve changed West Oakland, but the truth is, West Oakland has changed me.\" --\u003cem>Tanya Holland\u003c/em>","featImg":"https://ww2.kqed.org/app/uploads/sites/24/2018/01/CC_1180x177_V3.png","headData":{"title":"Bay Area Bites; the Best Celebrity Chef Recipes | KQED","description":"Learn to cook like your favorite stars with these delicious and easy-to-follow recipes from KQED's \"Bay Area Bites the Best Celebrity Chef Recipes\" series.","ogTitle":null,"ogDescription":null,"ogImgId":null,"twTitle":null,"twDescription":null,"twImgId":null},"ttid":100369,"isLoading":false,"link":"/bayareabites/series/celebrity-chefs-recipes"},"bayareabites_63":{"type":"terms","id":"bayareabites_63","meta":{"index":"terms_1591234321","site":"bayareabites","id":"63","found":true},"relationships":{},"included":{},"name":"chefs","slug":"chefs","taxonomy":"category","description":null,"featImg":null,"headData":{"title":"chefs Archives | KQED Bay Area Bites","description":null,"ogTitle":null,"ogDescription":null,"ogImgId":null,"twTitle":null,"twDescription":null,"twImgId":null},"ttid":27,"isLoading":false,"link":"/bayareabites/category/chefs"},"bayareabites_16431":{"type":"terms","id":"bayareabites_16431","meta":{"index":"terms_1591234321","site":"bayareabites","id":"16431","found":true},"relationships":{},"included":{},"name":"celebrity chefs","slug":"celebrity-chefs","taxonomy":"tag","description":null,"featImg":null,"headData":{"title":"celebrity chefs Archives | KQED Bay Area Bites","description":null,"ogTitle":null,"ogDescription":null,"ogImgId":null,"twTitle":null,"twDescription":null,"twImgId":null},"ttid":100761,"isLoading":false,"link":"/bayareabites/tag/celebrity-chefs"},"bayareabites_16261":{"type":"terms","id":"bayareabites_16261","meta":{"index":"terms_1591234321","site":"bayareabites","id":"16261","found":true},"relationships":{},"included":{},"name":"fruit recipes","slug":"fruit-recipes","taxonomy":"tag","description":null,"featImg":null,"headData":{"title":"fruit recipes Archives | KQED Bay Area Bites","description":null,"ogTitle":null,"ogDescription":null,"ogImgId":null,"twTitle":null,"twDescription":null,"twImgId":null},"ttid":100591,"isLoading":false,"link":"/bayareabites/tag/fruit-recipes"}},"userAgentReducer":{"userAgent":"Mozilla/5.0 AppleWebKit/537.36 (KHTML, like Gecko; compatible; ClaudeBot/1.0; +claudebot@anthropic.com)","isBot":true},"userPermissionsReducer":{"wpLoggedIn":false},"localStorageReducer":{},"browserHistoryReducer":[],"eventsReducer":{},"fssReducer":{},"tvDailyScheduleReducer":{},"tvWeeklyScheduleReducer":{},"tvPrimetimeScheduleReducer":{},"tvMonthlyScheduleReducer":{},"userAccountReducer":{"routeTo":"","showDeleteConfirmModal":false,"user":{"userId":"","isFound":false,"firstName":"","lastName":"","phoneNumber":"","email":"","articles":[]}},"youthMediaReducer":{},"checkPleaseReducer":{"filterData":{},"restaurantData":[]},"reframeReducer":{"attendee":null},"location":{"pathname":"/bayareabites/tag/dessert/","previousPathname":"/"}}