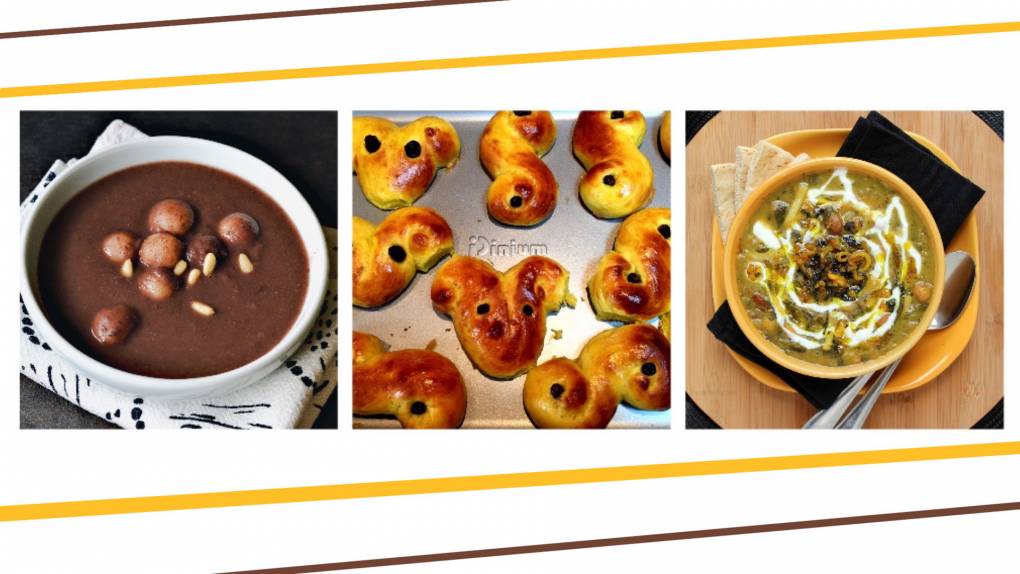
Korean, Swedish and Persian Dishes for Winter Solstice
Thalai Deepavali and New Traditions in the Time of Coronavirus
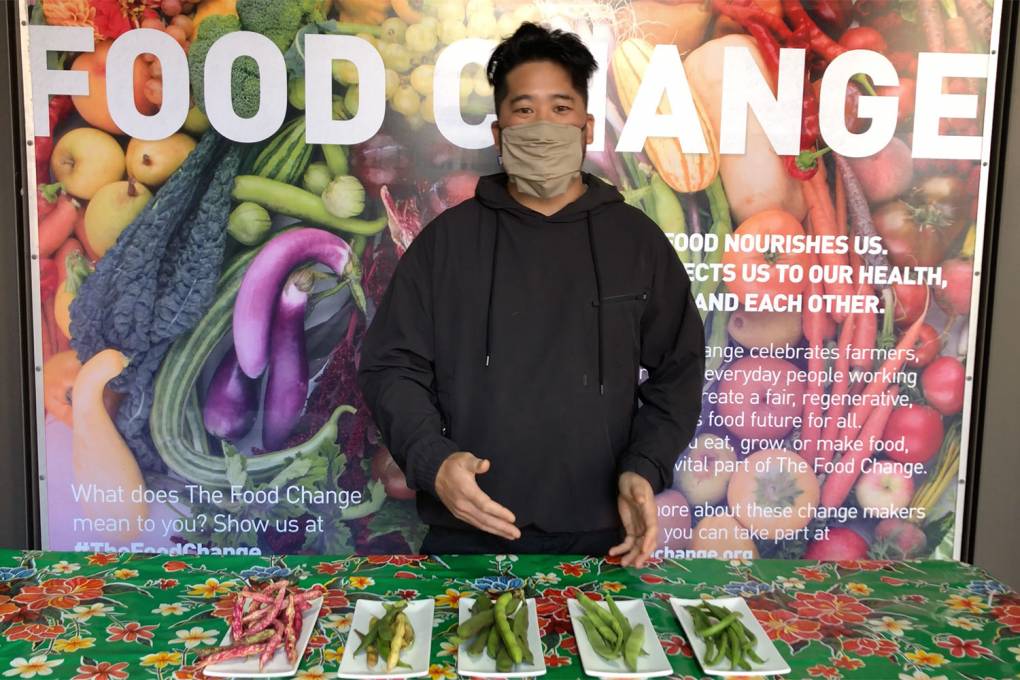
Brandon Jew and Lonely Mountain Farm Walk You Through Shelling Beans
Mom’s Nigerian Stew Is Three Generations of Comfort
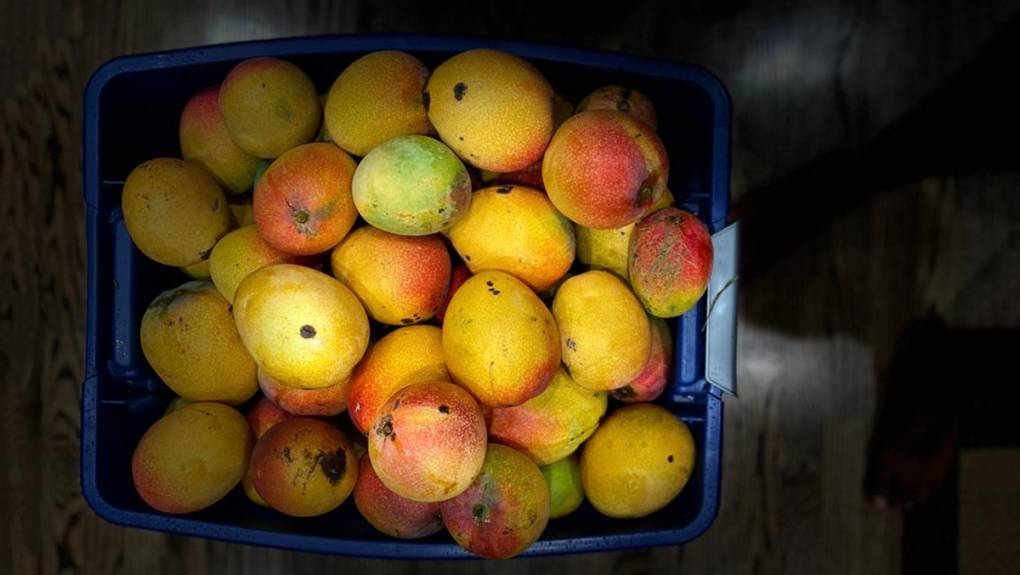
Missing Family During Mango Season
What It’s Like to Move a Food Manufacturing Facility in the Middle of a Pandemic
All Stuffed Doughs Lead to Mandu
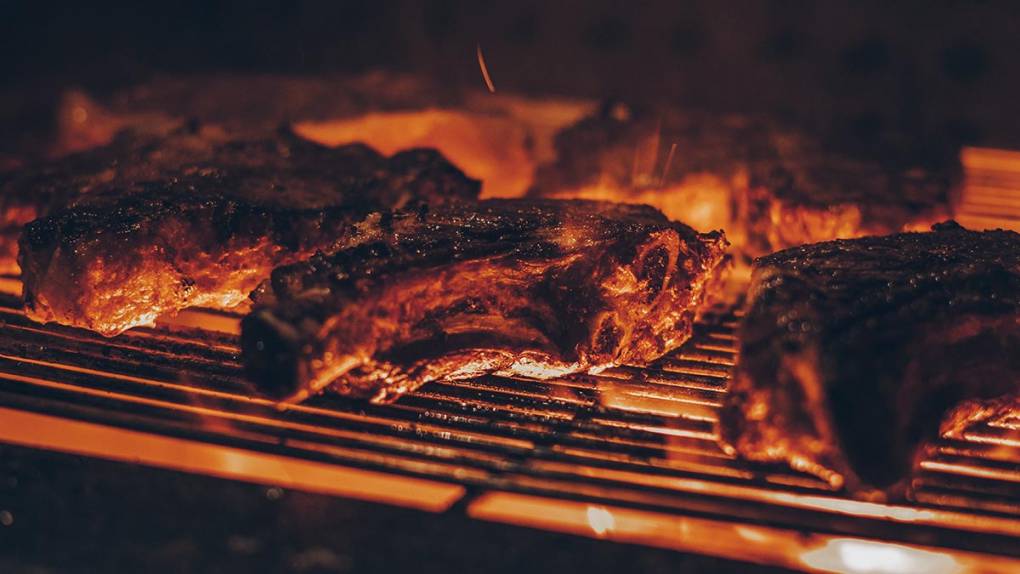
Summer Is Here: How to Grill and Barbecue in Quarantine—Or Simply Get it Delivered
Celebrity Chef Recipes: Ryan Farr's Best Damn Cheeseburger
Sponsored
window.__IS_SSR__=true
window.__INITIAL_STATE__={"attachmentsReducer":{"audio_0":{"type":"attachments","id":"audio_0","imgSizes":{"kqedFullSize":{"file":"https://ww2.kqed.org/news/wp-content/themes/KQED-unified/img/audio_bgs/background0.jpg"}}},"audio_1":{"type":"attachments","id":"audio_1","imgSizes":{"kqedFullSize":{"file":"https://ww2.kqed.org/news/wp-content/themes/KQED-unified/img/audio_bgs/background1.jpg"}}},"audio_2":{"type":"attachments","id":"audio_2","imgSizes":{"kqedFullSize":{"file":"https://ww2.kqed.org/news/wp-content/themes/KQED-unified/img/audio_bgs/background2.jpg"}}},"audio_3":{"type":"attachments","id":"audio_3","imgSizes":{"kqedFullSize":{"file":"https://ww2.kqed.org/news/wp-content/themes/KQED-unified/img/audio_bgs/background3.jpg"}}},"audio_4":{"type":"attachments","id":"audio_4","imgSizes":{"kqedFullSize":{"file":"https://ww2.kqed.org/news/wp-content/themes/KQED-unified/img/audio_bgs/background4.jpg"}}},"placeholder":{"type":"attachments","id":"placeholder","imgSizes":{"thumbnail":{"file":"https://ww2.kqed.org/wp-content/uploads/sites/10/2018/01/GettyImages-896326950-160x96.jpg","width":160,"height":96,"mimeType":"image/jpeg"},"medium":{"file":"https://ww2.kqed.org/wp-content/uploads/sites/10/2018/01/GettyImages-896326950-800x478.jpg","width":800,"height":478,"mimeType":"image/jpeg"},"large":{"file":"https://ww2.kqed.org/wp-content/uploads/sites/10/2018/01/GettyImages-896326950-1020x610.jpg","width":1020,"height":610,"mimeType":"image/jpeg"},"fd-lrg":{"file":"https://ww2.kqed.org/wp-content/uploads/sites/10/2018/01/GettyImages-896326950-1920x1148.jpg","width":1920,"height":1148,"mimeType":"image/jpeg"},"fd-med":{"file":"https://ww2.kqed.org/wp-content/uploads/sites/10/2018/01/GettyImages-896326950-1180x705.jpg","width":1180,"height":705,"mimeType":"image/jpeg"},"fd-sm":{"file":"https://ww2.kqed.org/wp-content/uploads/sites/10/2018/01/GettyImages-896326950-960x574.jpg","width":960,"height":574,"mimeType":"image/jpeg"},"post-thumbnail":{"file":"https://ww2.kqed.org/wp-content/uploads/sites/10/2018/01/GettyImages-896326950-672x372.jpg","width":672,"height":372,"mimeType":"image/jpeg"},"twentyfourteen-full-width":{"file":"https://ww2.kqed.org/wp-content/uploads/sites/10/2018/01/GettyImages-896326950-1038x576.jpg","width":1038,"height":576,"mimeType":"image/jpeg"},"xxsmall":{"file":"https://ww2.kqed.org/wp-content/uploads/sites/10/2018/01/GettyImages-896326950-240x143.jpg","width":240,"height":143,"mimeType":"image/jpeg"},"xsmall":{"file":"https://ww2.kqed.org/wp-content/uploads/sites/10/2018/01/GettyImages-896326950-375x224.jpg","width":375,"height":224,"mimeType":"image/jpeg"},"small":{"file":"https://ww2.kqed.org/wp-content/uploads/sites/10/2018/01/GettyImages-896326950-520x311.jpg","width":520,"height":311,"mimeType":"image/jpeg"},"xlarge":{"file":"https://ww2.kqed.org/wp-content/uploads/sites/10/2018/01/GettyImages-896326950-1180x705.jpg","width":1180,"height":705,"mimeType":"image/jpeg"},"full-width":{"file":"https://ww2.kqed.org/wp-content/uploads/sites/10/2018/01/GettyImages-896326950-1920x1148.jpg","width":1920,"height":1148,"mimeType":"image/jpeg"},"guest-author-32":{"file":"https://ww2.kqed.org/wp-content/uploads/sites/10/2018/01/GettyImages-896326950-32x32.jpg","width":32,"height":32,"mimeType":"image/jpeg"},"guest-author-50":{"file":"https://ww2.kqed.org/wp-content/uploads/sites/10/2018/01/GettyImages-896326950-50x50.jpg","width":50,"height":50,"mimeType":"image/jpeg"},"guest-author-64":{"file":"https://ww2.kqed.org/wp-content/uploads/sites/10/2018/01/GettyImages-896326950-64x64.jpg","width":64,"height":64,"mimeType":"image/jpeg"},"guest-author-96":{"file":"https://ww2.kqed.org/wp-content/uploads/sites/10/2018/01/GettyImages-896326950-96x96.jpg","width":96,"height":96,"mimeType":"image/jpeg"},"guest-author-128":{"file":"https://ww2.kqed.org/wp-content/uploads/sites/10/2018/01/GettyImages-896326950-128x128.jpg","width":128,"height":128,"mimeType":"image/jpeg"},"detail":{"file":"https://ww2.kqed.org/wp-content/uploads/sites/10/2018/01/GettyImages-896326950-150x150.jpg","width":150,"height":150,"mimeType":"image/jpeg"},"kqedFullSize":{"file":"https://ww2.kqed.org/wp-content/uploads/sites/10/2018/01/GettyImages-896326950-e1514998105161.jpg","width":1920,"height":1148}}},"bayareabites_139644":{"type":"attachments","id":"bayareabites_139644","meta":{"index":"attachments_1591205162","site":"bayareabites","id":"139644","found":true},"title":"Solstice.MAIN","publishDate":1607125943,"status":"inherit","parent":139639,"modified":1607455215,"caption":"Winter Solstice traditions around the world include (L–R) patjuk bean soup, lussekatt buns and ash soup.\n","credit":"Selina S. Lee/Birgitta Holma Durell/Azita Mehran","altTag":"Winter Solstice traditions around the world include (L–R) patjuk bean soup, lussekatt buns and ash soup.","description":"Winter Solstice traditions around the world include (L–R) patjuk bean soup, lussekatt buns and ash soup.\n","imgSizes":{"medium":{"file":"https://ww2.kqed.org/app/uploads/sites/24/2020/12/Solstice.MAIN_-800x450.jpg","width":800,"height":450,"mimeType":"image/jpeg"},"large":{"file":"https://ww2.kqed.org/app/uploads/sites/24/2020/12/Solstice.MAIN_-1020x574.jpg","width":1020,"height":574,"mimeType":"image/jpeg"},"thumbnail":{"file":"https://ww2.kqed.org/app/uploads/sites/24/2020/12/Solstice.MAIN_-160x90.jpg","width":160,"height":90,"mimeType":"image/jpeg"},"medium_large":{"file":"https://ww2.kqed.org/app/uploads/sites/24/2020/12/Solstice.MAIN_-768x432.jpg","width":768,"height":432,"mimeType":"image/jpeg"},"1536x1536":{"file":"https://ww2.kqed.org/app/uploads/sites/24/2020/12/Solstice.MAIN_-1536x864.jpg","width":1536,"height":864,"mimeType":"image/jpeg"},"post-thumbnail":{"file":"https://ww2.kqed.org/app/uploads/sites/24/2020/12/Solstice.MAIN_-672x372.jpg","width":672,"height":372,"mimeType":"image/jpeg"},"twentyfourteen-full-width":{"file":"https://ww2.kqed.org/app/uploads/sites/24/2020/12/Solstice.MAIN_-1038x576.jpg","width":1038,"height":576,"mimeType":"image/jpeg"},"kqedFullSize":{"file":"https://ww2.kqed.org/app/uploads/sites/24/2020/12/Solstice.MAIN_.jpg","width":1920,"height":1080}},"fetchFailed":false,"isLoading":false},"bayareabites_139542":{"type":"attachments","id":"bayareabites_139542","meta":{"index":"attachments_1591205162","site":"bayareabites","id":"139542","found":true},"title":"ZAK03792","publishDate":1605567158,"status":"inherit","parent":139532,"modified":1605567221,"caption":"A tradition of Diwali is lighting lights around the house.","credit":"Urmila Ramakrishnan / KQED","description":null,"imgSizes":{"medium":{"file":"https://ww2.kqed.org/app/uploads/sites/24/2020/11/ZAK03792-800x450.jpg","width":800,"height":450,"mimeType":"image/jpeg"},"large":{"file":"https://ww2.kqed.org/app/uploads/sites/24/2020/11/ZAK03792-1020x574.jpg","width":1020,"height":574,"mimeType":"image/jpeg"},"thumbnail":{"file":"https://ww2.kqed.org/app/uploads/sites/24/2020/11/ZAK03792-160x90.jpg","width":160,"height":90,"mimeType":"image/jpeg"},"medium_large":{"file":"https://ww2.kqed.org/app/uploads/sites/24/2020/11/ZAK03792-768x432.jpg","width":768,"height":432,"mimeType":"image/jpeg"},"post-thumbnail":{"file":"https://ww2.kqed.org/app/uploads/sites/24/2020/11/ZAK03792-672x372.jpg","width":672,"height":372,"mimeType":"image/jpeg"},"twentyfourteen-full-width":{"file":"https://ww2.kqed.org/app/uploads/sites/24/2020/11/ZAK03792-1038x576.jpg","width":1038,"height":576,"mimeType":"image/jpeg"},"kqedFullSize":{"file":"https://ww2.kqed.org/app/uploads/sites/24/2020/11/ZAK03792.jpg","width":1200,"height":675}},"fetchFailed":false,"isLoading":false},"bayareabites_139219":{"type":"attachments","id":"bayareabites_139219","meta":{"index":"attachments_1591205162","site":"bayareabites","id":"139219","found":true},"title":"beans_brandon_jew","publishDate":1602269950,"status":"inherit","parent":139218,"modified":1602270611,"caption":"Chef Brandon Jew, of SF's Mister Jiu's.","credit":null,"description":null,"imgSizes":{"medium":{"file":"https://ww2.kqed.org/app/uploads/sites/24/2020/10/beans_brandon_jew-800x533.jpg","width":800,"height":533,"mimeType":"image/jpeg"},"large":{"file":"https://ww2.kqed.org/app/uploads/sites/24/2020/10/beans_brandon_jew-1020x680.jpg","width":1020,"height":680,"mimeType":"image/jpeg"},"thumbnail":{"file":"https://ww2.kqed.org/app/uploads/sites/24/2020/10/beans_brandon_jew-160x107.jpg","width":160,"height":107,"mimeType":"image/jpeg"},"medium_large":{"file":"https://ww2.kqed.org/app/uploads/sites/24/2020/10/beans_brandon_jew-768x512.jpg","width":768,"height":512,"mimeType":"image/jpeg"},"post-thumbnail":{"file":"https://ww2.kqed.org/app/uploads/sites/24/2020/10/beans_brandon_jew-672x372.jpg","width":672,"height":372,"mimeType":"image/jpeg"},"twentyfourteen-full-width":{"file":"https://ww2.kqed.org/app/uploads/sites/24/2020/10/beans_brandon_jew-1038x576.jpg","width":1038,"height":576,"mimeType":"image/jpeg"},"kqedFullSize":{"file":"https://ww2.kqed.org/app/uploads/sites/24/2020/10/beans_brandon_jew.jpg","width":1500,"height":1000}},"fetchFailed":false,"isLoading":false},"bayareabites_138837":{"type":"attachments","id":"bayareabites_138837","meta":{"index":"attachments_1591205162","site":"bayareabites","id":"138837","found":true},"title":"Nigerian Stew - YummyMedley.com[1] copy","publishDate":1597265400,"status":"inherit","parent":138836,"modified":1597265460,"caption":"Courtesy of Yummy Medley blog","credit":null,"description":null,"imgSizes":{"medium":{"file":"https://ww2.kqed.org/app/uploads/sites/24/2020/08/Nigerian-Stew-YummyMedley.com1-copy-800x450.jpg","width":800,"height":450,"mimeType":"image/jpeg"},"large":{"file":"https://ww2.kqed.org/app/uploads/sites/24/2020/08/Nigerian-Stew-YummyMedley.com1-copy-1020x574.jpg","width":1020,"height":574,"mimeType":"image/jpeg"},"thumbnail":{"file":"https://ww2.kqed.org/app/uploads/sites/24/2020/08/Nigerian-Stew-YummyMedley.com1-copy-160x90.jpg","width":160,"height":90,"mimeType":"image/jpeg"},"medium_large":{"file":"https://ww2.kqed.org/app/uploads/sites/24/2020/08/Nigerian-Stew-YummyMedley.com1-copy-768x432.jpg","width":768,"height":432,"mimeType":"image/jpeg"},"post-thumbnail":{"file":"https://ww2.kqed.org/app/uploads/sites/24/2020/08/Nigerian-Stew-YummyMedley.com1-copy-672x372.jpg","width":672,"height":372,"mimeType":"image/jpeg"},"twentyfourteen-full-width":{"file":"https://ww2.kqed.org/app/uploads/sites/24/2020/08/Nigerian-Stew-YummyMedley.com1-copy-1038x576.jpg","width":1038,"height":576,"mimeType":"image/jpeg"},"kqedFullSize":{"file":"https://ww2.kqed.org/app/uploads/sites/24/2020/08/Nigerian-Stew-YummyMedley.com1-copy.jpg","width":1200,"height":675}},"fetchFailed":false,"isLoading":false},"bayareabites_137369":{"type":"attachments","id":"bayareabites_137369","meta":{"index":"attachments_1591205162","site":"bayareabites","id":"137369","found":true},"title":"8e41a0e3-d84d-481f-9860-3d3439bccdb8","publishDate":1590598352,"status":"inherit","parent":137363,"modified":1590598958,"caption":"May is mango season in Miami, and Urmila Ramakrishnan's parents have 14 trees in their backyard.","credit":"Sundaram Ramakrishnan","description":null,"imgSizes":{"thumbnail":{"file":"https://ww2.kqed.org/app/uploads/sites/24/2020/05/8e41a0e3-d84d-481f-9860-3d3439bccdb8-160x90.jpg","width":160,"height":90,"mimeType":"image/jpeg"},"medium":{"file":"https://ww2.kqed.org/app/uploads/sites/24/2020/05/8e41a0e3-d84d-481f-9860-3d3439bccdb8-800x451.jpg","width":800,"height":451,"mimeType":"image/jpeg"},"medium_large":{"file":"https://ww2.kqed.org/app/uploads/sites/24/2020/05/8e41a0e3-d84d-481f-9860-3d3439bccdb8-768x433.jpg","width":768,"height":433,"mimeType":"image/jpeg"},"large":{"file":"https://ww2.kqed.org/app/uploads/sites/24/2020/05/8e41a0e3-d84d-481f-9860-3d3439bccdb8-1020x575.jpg","width":1020,"height":575,"mimeType":"image/jpeg"},"post-thumbnail":{"file":"https://ww2.kqed.org/app/uploads/sites/24/2020/05/8e41a0e3-d84d-481f-9860-3d3439bccdb8-672x372.jpg","width":672,"height":372,"mimeType":"image/jpeg"},"twentyfourteen-full-width":{"file":"https://ww2.kqed.org/app/uploads/sites/24/2020/05/8e41a0e3-d84d-481f-9860-3d3439bccdb8-1038x576.jpg","width":1038,"height":576,"mimeType":"image/jpeg"},"kqedFullSize":{"file":"https://ww2.kqed.org/app/uploads/sites/24/2020/05/8e41a0e3-d84d-481f-9860-3d3439bccdb8.jpg","width":1200,"height":676}},"fetchFailed":false,"isLoading":false},"bayareabites_137393":{"type":"attachments","id":"bayareabites_137393","meta":{"index":"attachments_1591205162","site":"bayareabites","id":"137393","found":true},"title":"Torani Team at the Flavor Factory","publishDate":1590624176,"status":"inherit","parent":137381,"modified":1590624202,"caption":"Torani employees at the new factory in San Leandro.","credit":"Torani","description":null,"imgSizes":{"thumbnail":{"file":"https://ww2.kqed.org/app/uploads/sites/24/2020/05/Torani-Team-at-the-Flavor-Factory-160x120.jpg","width":160,"height":120,"mimeType":"image/jpeg"},"medium":{"file":"https://ww2.kqed.org/app/uploads/sites/24/2020/05/Torani-Team-at-the-Flavor-Factory-800x600.jpg","width":800,"height":600,"mimeType":"image/jpeg"},"medium_large":{"file":"https://ww2.kqed.org/app/uploads/sites/24/2020/05/Torani-Team-at-the-Flavor-Factory-768x576.jpg","width":768,"height":576,"mimeType":"image/jpeg"},"large":{"file":"https://ww2.kqed.org/app/uploads/sites/24/2020/05/Torani-Team-at-the-Flavor-Factory-1020x765.jpg","width":1020,"height":765,"mimeType":"image/jpeg"},"post-thumbnail":{"file":"https://ww2.kqed.org/app/uploads/sites/24/2020/05/Torani-Team-at-the-Flavor-Factory-672x372.jpg","width":672,"height":372,"mimeType":"image/jpeg"},"twentyfourteen-full-width":{"file":"https://ww2.kqed.org/app/uploads/sites/24/2020/05/Torani-Team-at-the-Flavor-Factory-1038x576.jpg","width":1038,"height":576,"mimeType":"image/jpeg"},"kqedFullSize":{"file":"https://ww2.kqed.org/app/uploads/sites/24/2020/05/Torani-Team-at-the-Flavor-Factory.jpg","width":1280,"height":960}},"fetchFailed":false,"isLoading":false},"bayareabites_137322":{"type":"attachments","id":"bayareabites_137322","meta":{"index":"attachments_1591205162","site":"bayareabites","id":"137322","found":true},"title":"IMG_3819","publishDate":1590091887,"status":"inherit","parent":137321,"modified":1590091947,"caption":"For Olivia Won, stuffed pasta tell the tale of making mandu with her grandmother. ","credit":"Olivia Won / KQED","description":null,"imgSizes":{"thumbnail":{"file":"https://ww2.kqed.org/app/uploads/sites/24/2020/05/IMG_3819-160x84.jpg","width":160,"height":84,"mimeType":"image/jpeg"},"medium":{"file":"https://ww2.kqed.org/app/uploads/sites/24/2020/05/IMG_3819-800x420.jpg","width":800,"height":420,"mimeType":"image/jpeg"},"medium_large":{"file":"https://ww2.kqed.org/app/uploads/sites/24/2020/05/IMG_3819-768x403.jpg","width":768,"height":403,"mimeType":"image/jpeg"},"large":{"file":"https://ww2.kqed.org/app/uploads/sites/24/2020/05/IMG_3819-1020x536.jpg","width":1020,"height":536,"mimeType":"image/jpeg"},"post-thumbnail":{"file":"https://ww2.kqed.org/app/uploads/sites/24/2020/05/IMG_3819-672x372.jpg","width":672,"height":372,"mimeType":"image/jpeg"},"twentyfourteen-full-width":{"file":"https://ww2.kqed.org/app/uploads/sites/24/2020/05/IMG_3819-1038x576.jpg","width":1038,"height":576,"mimeType":"image/jpeg"},"kqedFullSize":{"file":"https://ww2.kqed.org/app/uploads/sites/24/2020/05/IMG_3819.jpg","width":1200,"height":630}},"fetchFailed":false,"isLoading":false},"bayareabites_137294":{"type":"attachments","id":"bayareabites_137294","meta":{"index":"attachments_1591205162","site":"bayareabites","id":"137294","found":true},"title":"emerson-vieira-RO6Ke69Szhg-unsplash","publishDate":1590016983,"status":"inherit","parent":137291,"modified":1590017100,"caption":null,"credit":"Emerson Viera / Unsplash","description":null,"imgSizes":{"thumbnail":{"file":"https://ww2.kqed.org/app/uploads/sites/24/2020/05/emerson-vieira-RO6Ke69Szhg-unsplash-160x90.jpg","width":160,"height":90,"mimeType":"image/jpeg"},"medium":{"file":"https://ww2.kqed.org/app/uploads/sites/24/2020/05/emerson-vieira-RO6Ke69Szhg-unsplash-800x450.jpg","width":800,"height":450,"mimeType":"image/jpeg"},"medium_large":{"file":"https://ww2.kqed.org/app/uploads/sites/24/2020/05/emerson-vieira-RO6Ke69Szhg-unsplash-768x432.jpg","width":768,"height":432,"mimeType":"image/jpeg"},"large":{"file":"https://ww2.kqed.org/app/uploads/sites/24/2020/05/emerson-vieira-RO6Ke69Szhg-unsplash-1020x574.jpg","width":1020,"height":574,"mimeType":"image/jpeg"},"post-thumbnail":{"file":"https://ww2.kqed.org/app/uploads/sites/24/2020/05/emerson-vieira-RO6Ke69Szhg-unsplash-672x372.jpg","width":672,"height":372,"mimeType":"image/jpeg"},"twentyfourteen-full-width":{"file":"https://ww2.kqed.org/app/uploads/sites/24/2020/05/emerson-vieira-RO6Ke69Szhg-unsplash-1038x576.jpg","width":1038,"height":576,"mimeType":"image/jpeg"},"kqedFullSize":{"file":"https://ww2.kqed.org/app/uploads/sites/24/2020/05/emerson-vieira-RO6Ke69Szhg-unsplash.jpg","width":1200,"height":675}},"fetchFailed":false,"isLoading":false},"bayareabites_137255":{"type":"attachments","id":"bayareabites_137255","meta":{"index":"attachments_1591205162","site":"bayareabites","id":"137255","found":true},"title":"ryanfarrburger (2)","publishDate":1589587900,"status":"inherit","parent":137244,"modified":1589587921,"caption":null,"credit":"Vic Chin/KQED","description":"Chef Ryan Farr digs into his Best Damn Cheeseburger with Shhh! Sauce.","imgSizes":{"thumbnail":{"file":"https://ww2.kqed.org/app/uploads/sites/24/2020/05/ryanfarrburger-2-160x90.png","width":160,"height":90,"mimeType":"image/png"},"medium":{"file":"https://ww2.kqed.org/app/uploads/sites/24/2020/05/ryanfarrburger-2-800x450.png","width":800,"height":450,"mimeType":"image/png"},"medium_large":{"file":"https://ww2.kqed.org/app/uploads/sites/24/2020/05/ryanfarrburger-2-768x432.png","width":768,"height":432,"mimeType":"image/png"},"large":{"file":"https://ww2.kqed.org/app/uploads/sites/24/2020/05/ryanfarrburger-2-1020x574.png","width":1020,"height":574,"mimeType":"image/png"},"post-thumbnail":{"file":"https://ww2.kqed.org/app/uploads/sites/24/2020/05/ryanfarrburger-2-672x372.png","width":672,"height":372,"mimeType":"image/png"},"twentyfourteen-full-width":{"file":"https://ww2.kqed.org/app/uploads/sites/24/2020/05/ryanfarrburger-2-1038x576.png","width":1038,"height":576,"mimeType":"image/png"},"kqedFullSize":{"file":"https://ww2.kqed.org/app/uploads/sites/24/2020/05/ryanfarrburger-2.png","width":1280,"height":720}},"fetchFailed":false,"isLoading":false}},"audioPlayerReducer":{"postId":"stream_live"},"authorsReducer":{"byline_bayareabites_138836":{"type":"authors","id":"byline_bayareabites_138836","meta":{"override":true},"slug":"byline_bayareabites_138836","name":"Anthonia Onyejekwe","isLoading":false},"bayareabites":{"type":"authors","id":"5083","meta":{"index":"authors_1591205172","id":"5083","found":true},"name":"KQED Food Staff","firstName":null,"lastName":null,"slug":"bayareabites","email":"bayareabites@kqed.org","display_author_email":false,"staff_mastheads":[],"title":"KQED Contributor","bio":"Bay Area Bites (BAB), KQED's public media food blog, feeds you visually compelling food-related stories, news, recipes and reviews from the San Francisco Bay Area and beyond.","avatar":"https://secure.gravatar.com/avatar/7113fdeeace4c1251f9bbe4b2fab415a?s=600&d=blank&r=g","twitter":"bayareabites","facebook":"bayareabites","instagram":null,"linkedin":null,"sites":[{"site":"arts","roles":["contributor"]},{"site":"bayareabites","roles":["administrator"]},{"site":"food","roles":["author"]}],"headData":{"title":"KQED Food Staff | KQED","description":"KQED Contributor","ogImgSrc":"https://secure.gravatar.com/avatar/7113fdeeace4c1251f9bbe4b2fab415a?s=600&d=blank&r=g","twImgSrc":"https://secure.gravatar.com/avatar/7113fdeeace4c1251f9bbe4b2fab415a?s=600&d=blank&r=g"},"isLoading":false,"link":"/author/bayareabites"},"annamindess":{"type":"authors","id":"5283","meta":{"index":"authors_1591205172","id":"5283","found":true},"name":"Anna Mindess","firstName":"Anna","lastName":"Mindess","slug":"annamindess","email":"amindess@aol.com","display_author_email":false,"staff_mastheads":[],"title":null,"bio":"My passion is exploring the connections between food, travel and culture. I am a regular contributor to AFAR, Edible East Bay Magazine, Oakland Magazine, Berkeleyside's NOSH and other publications. I usually take a route that's slightly off the beaten path, like \u003ca href=\"http://edibleeastbay.com/online-magazine/fall-harvest-2017/fun-with-food-insults/\">collecting food-related insults\u003c/a> around the world or \u003ca href=\"https://www.afar.com/magazine/what-i-learned-hawking-sweet-potatoes-with-a-street-vendor-in-taiwan?email=amindess%40aol.com&utm_source=Sailthru&utm_medium=email&utm_campaign=Doctors%20Without%20Borders&utm_term=Daily%20Wander%20Newsletter\">volunteering with a Sweet Potato Mama\u003c/a> (street food seller) in Tapei.\r\n\r\nCulture is the thread that ties together my several careers. I also work as a sign language interpreter, educator and author. My study of Deaf culture has taken me around the world, where I am always on a quest to find Deaf-owned restaurants. I love making connections between my different worlds, for example in this AFAR story where I share \u003ca href=\"https://www.afar.com/magazine/tips-from-a-sign-language-interpreter-for-overcoming-language-barriers\">tips for communicating across cultures\u003c/a> that I learned from the real experts, Deaf people. Or this \u003ca href=\"http://edibleeastbay.com/online-magazine/fall-harvest-2017/deaf-chefs-compete/\">profile of a Deaf chef and culinary arts instructor\u003c/a> at the California School for the Deaf.\r\n\r\nTo see my visual/edible take on the world, follow me on Instagram: \u003ca href=\"https://www.instagram.com/annamindess/\">annamindess. \u003c/a>\r\n\r\nFor more of my stories: visit Contently \u003ca href=\"http://annamindess.contently.com\">annamindess.contently.com\u003c/a>","avatar":"https://secure.gravatar.com/avatar/5c0a68a51a07d3996f57634ef0cddaa6?s=600&d=blank&r=g","twitter":null,"facebook":null,"instagram":null,"linkedin":null,"sites":[{"site":"arts","roles":["author"]},{"site":"bayareabites","roles":["author"]},{"site":"food","roles":["contributor"]}],"headData":{"title":"Anna Mindess | KQED","description":null,"ogImgSrc":"https://secure.gravatar.com/avatar/5c0a68a51a07d3996f57634ef0cddaa6?s=600&d=blank&r=g","twImgSrc":"https://secure.gravatar.com/avatar/5c0a68a51a07d3996f57634ef0cddaa6?s=600&d=blank&r=g"},"isLoading":false,"link":"/author/annamindess"},"cuesa":{"type":"authors","id":"5484","meta":{"index":"authors_1591205172","id":"5484","found":true},"name":"CUESA","firstName":"CUESA","lastName":null,"slug":"cuesa","email":"brie@cuesa.org","display_author_email":false,"staff_mastheads":[],"title":null,"bio":"CUESA (Center for Urban Education about Sustainable Agriculture) is a nonprofit organization dedicated to cultivating a sustainable food system through the operation of the Ferry Plaza Farmers Market and its educational programs. Learn more at \u003ca href=\"http://www.cuesa.org/\">cuesa.org\u003c/a>.","avatar":"https://secure.gravatar.com/avatar/323b5bab8e802e76af5b72a66b7c6987?s=600&d=blank&r=g","twitter":"cuesa","facebook":"CUESA","instagram":null,"linkedin":null,"sites":[{"site":"arts","roles":["author"]},{"site":"bayareabites","roles":["contributor"]},{"site":"food","roles":["contributor"]}],"headData":{"title":"CUESA | KQED","description":null,"ogImgSrc":"https://secure.gravatar.com/avatar/323b5bab8e802e76af5b72a66b7c6987?s=600&d=blank&r=g","twImgSrc":"https://secure.gravatar.com/avatar/323b5bab8e802e76af5b72a66b7c6987?s=600&d=blank&r=g"},"isLoading":false,"link":"/author/cuesa"},"owon":{"type":"authors","id":"11614","meta":{"index":"authors_1591205172","id":"11614","found":true},"name":"Olivia Won","firstName":"Olivia","lastName":"Won","slug":"owon","email":"owon@kqed.org","display_author_email":false,"staff_mastheads":[],"title":null,"bio":"\u003cspan style=\"font-weight: 400;\">Olivia Won is a writer, producer, and plant-tender living in her hometown of Oakland, California. She currently works with KQED Food, where she writes about Bay Area food culture and produces \u003c/span>\u003ci>\u003cspan style=\"font-weight: 400;\">Check, Please! Bay Area\u003c/span>\u003c/i>\u003cspan style=\"font-weight: 400;\">. \u003c/span>","avatar":"https://secure.gravatar.com/avatar/a0ce8718461a291f08887a424d1ce561?s=600&d=blank&r=g","twitter":null,"facebook":null,"instagram":null,"linkedin":null,"sites":[{"site":"bayareabites","roles":["editor"]},{"site":"checkplease","roles":["editor"]},{"site":"food","roles":["editor"]}],"headData":{"title":"Olivia Won | KQED","description":null,"ogImgSrc":"https://secure.gravatar.com/avatar/a0ce8718461a291f08887a424d1ce561?s=600&d=blank&r=g","twImgSrc":"https://secure.gravatar.com/avatar/a0ce8718461a291f08887a424d1ce561?s=600&d=blank&r=g"},"isLoading":false,"link":"/author/owon"},"uramakrishnan":{"type":"authors","id":"11689","meta":{"index":"authors_1591205172","id":"11689","found":true},"name":"Urmila Ramakrishnan","firstName":"Urmila","lastName":"Ramakrishnan","slug":"uramakrishnan","email":"uramakrishnan@kqed.org","display_author_email":false,"staff_mastheads":[],"title":"KQED Food Editor","bio":"Urmila Ramakrishnan is KQED Arts & Culture’s food editor and an award-winning food journalist based in the Bay Area. Her multi-platform work has been featured in \u003ci>The New York Times\u003c/i>, \u003ci>Edible\u003c/i>, \u003ci>The San Francisco Chronicle\u003c/i>, among other publications. She’s a kitchen gadget enthusiast who also loves food puns. Keep up with her cooking adventures on Instagram at \u003ca href=\"https://www.instagram.com/urmilamakes/\" rel=\"noopener noreferrer\">@urmilamakes\u003c/a> and join the food discussion \u003ca href=\"https://twitter.com/U_Ramakrishnan\" rel=\"noopener noreferrer\">@U_Ramakrishnan\u003c/a>.","avatar":"https://secure.gravatar.com/avatar/d014718b767c29f78f33117b5b75eb6d?s=600&d=blank&r=g","twitter":"U_Ramakrishnan","facebook":null,"instagram":null,"linkedin":null,"sites":[{"site":"arts","roles":["subscriber"]},{"site":"bayareabites","roles":["subscriber"]},{"site":"checkplease","roles":["editor"]},{"site":"food","roles":["editor"]}],"headData":{"title":"Urmila Ramakrishnan | KQED","description":"KQED Food Editor","ogImgSrc":"https://secure.gravatar.com/avatar/d014718b767c29f78f33117b5b75eb6d?s=600&d=blank&r=g","twImgSrc":"https://secure.gravatar.com/avatar/d014718b767c29f78f33117b5b75eb6d?s=600&d=blank&r=g"},"isLoading":false,"link":"/author/uramakrishnan"}},"breakingNewsReducer":{},"campaignFinanceReducer":{},"firebase":{"requesting":{},"requested":{},"timestamps":{},"data":{},"ordered":{},"auth":{"isLoaded":false,"isEmpty":true},"authError":null,"profile":{"isLoaded":false,"isEmpty":true},"listeners":{"byId":{},"allIds":[]},"isInitializing":false,"errors":[]},"navBarReducer":{"navBarId":"arts","fullView":true,"showPlayer":false},"navMenuReducer":{"menus":[{"key":"menu1","items":[{"name":"News","link":"/","type":"title"},{"name":"Politics","link":"/politics"},{"name":"Science","link":"/science"},{"name":"Education","link":"/educationnews"},{"name":"Housing","link":"/housing"},{"name":"Immigration","link":"/immigration"},{"name":"Criminal Justice","link":"/criminaljustice"},{"name":"Silicon Valley","link":"/siliconvalley"},{"name":"Forum","link":"/forum"},{"name":"The California Report","link":"/californiareport"}]},{"key":"menu2","items":[{"name":"Arts & Culture","link":"/arts","type":"title"},{"name":"Critics’ Picks","link":"/thedolist"},{"name":"Cultural Commentary","link":"/artscommentary"},{"name":"Food & Drink","link":"/food"},{"name":"Bay Area Hip-Hop","link":"/bayareahiphop"},{"name":"Rebel Girls","link":"/rebelgirls"},{"name":"Arts Video","link":"/artsvideos"}]},{"key":"menu3","items":[{"name":"Podcasts","link":"/podcasts","type":"title"},{"name":"Bay Curious","link":"/podcasts/baycurious"},{"name":"Rightnowish","link":"/podcasts/rightnowish"},{"name":"The Bay","link":"/podcasts/thebay"},{"name":"On Our Watch","link":"/podcasts/onourwatch"},{"name":"Mindshift","link":"/podcasts/mindshift"},{"name":"Consider This","link":"/podcasts/considerthis"},{"name":"Political Breakdown","link":"/podcasts/politicalbreakdown"}]},{"key":"menu4","items":[{"name":"Live Radio","link":"/radio","type":"title"},{"name":"TV","link":"/tv","type":"title"},{"name":"Events","link":"/events","type":"title"},{"name":"For Educators","link":"/education","type":"title"},{"name":"Support KQED","link":"/support","type":"title"},{"name":"About","link":"/about","type":"title"},{"name":"Help Center","link":"https://kqed-helpcenter.kqed.org/s","type":"title"}]}]},"pagesReducer":{},"postsReducer":{"stream_live":{"type":"live","id":"stream_live","audioUrl":"https://streams.kqed.org/kqedradio","title":"Live Stream","excerpt":"Live Stream information currently unavailable.","link":"/radio","featImg":"","label":{"name":"KQED Live","link":"/"}},"stream_kqedNewscast":{"type":"posts","id":"stream_kqedNewscast","audioUrl":"https://www.kqed.org/.stream/anon/radio/RDnews/newscast.mp3?_=1","title":"KQED Newscast","featImg":"","label":{"name":"88.5 FM","link":"/"}},"bayareabites_139639":{"type":"posts","id":"bayareabites_139639","meta":{"index":"posts_1591205157","site":"bayareabites","id":"139639","score":null,"sort":[1607388701000]},"guestAuthors":[],"slug":"korean-swedish-and-persian-dishes-for-winter-solstice","title":"Korean, Swedish and Persian Dishes for Winter Solstice","publishDate":1607388701,"format":"standard","headTitle":"Bay Area Bites | KQED Food","labelTerm":{"site":"bayareabites"},"content":"\u003cp>Winter Solstice festivities to celebrate the longest night of the year are an ancient ritual that can be traced back to the Stone Age. The auspicious day falls between the 20–23 of December (or June, in the Southern Hemisphere). Cultures including the Ancient Romans, the Incas and the Hopi Indians have employed dancing and fires to chase away any malevolent spirits lurking around during the long, cold dark night—and special foods are an essential element of every revelry.\u003c/p>\n\u003cp>Below are three different traditions, complete with recipes, celebrated around the world during the Winter Solstice.\u003c/p>\n\u003cp>\u003cem>\u003cstrong>Jump to:\u003c/strong>\u003c/em>\u003c/p>\n\u003cp>\u003ca href=\"#patjuk\">Patjuk, from Korea\u003c/a>\u003c/p>\n\u003cp>\u003ca href=\"#lussekatt\">Lussekatt Buns, from Sweden\u003c/a>\u003c/p>\n\u003cp>\u003ca href=\"#ash\">Ash Reshteh, from Iran\u003c/a>\u003c/p>\n\u003cfigure id=\"attachment_139649\" class=\"wp-caption aligncenter\" style=\"max-width: 800px\">\u003cimg src=\"https://ww2.kqed.org/app/uploads/sites/24/2020/12/2.-Red_Bean_Porridge-photo-credit-Selina-S.-Lee.-jpg.jpg\" alt=\"Patjuk.\" width=\"800\" height=\"533\" class=\"size-full wp-image-139649\" srcset=\"https://ww2.kqed.org/app/uploads/sites/24/2020/12/2.-Red_Bean_Porridge-photo-credit-Selina-S.-Lee.-jpg.jpg 800w, https://ww2.kqed.org/app/uploads/sites/24/2020/12/2.-Red_Bean_Porridge-photo-credit-Selina-S.-Lee.-jpg-160x107.jpg 160w, https://ww2.kqed.org/app/uploads/sites/24/2020/12/2.-Red_Bean_Porridge-photo-credit-Selina-S.-Lee.-jpg-768x512.jpg 768w\" sizes=\"(max-width: 800px) 100vw, 800px\">\u003cfigcaption class=\"wp-caption-text\">Patjuk. \u003ccite>(Selina S. Lee)\u003c/cite>\u003c/figcaption>\u003c/figure>\n\u003cp>\u003ca id=\"patjuk\">\u003c/a>\u003c/p>\n\u003ch2>Patjuk\u003c/h2>\n\u003cp>\u003cstrong>Dongji (Korean Culture)\u003c/strong>\u003c/p>\n\u003cp>The deep red hue of the Korean bean soup, patjuk, that is eaten on Dongji (the winter solstice) is believed to have the power to ward off evil spirits and, traditionally, was sprinkled around the house to chase them away.\u003c/p>\n\u003cp>Having grown up in Seoul, \u003ca href=\"https://selinaslee.com/\" rel=\"noopener noreferrer\" target=\"_blank\">Selina S. Lee\u003c/a>, an Oakland restaurant consultant for new Korean restaurants, doesn’t remember her mother making a big deal out of Dongji, but she always made patjuk. Lee contrasts life in modern Seoul to the surrounding villages, where she suspects that Dongji is celebrated more widely, especially among the older generation.\u003c/p>\n\u003cp>“My mom made the red bean soup every year,” says Lee, “but I had no idea it was for the winter solstice. She didn’t tell me we are eating it for the beginning of winter. Now I know. I don’t really celebrate Dongji, but I want my kids to know it.” Lee now has two boys, age 14 and 12, and makes patjuk every year.\u003c/p>\n\u003cp>“I have figured out an easier way,” says the recipe developer, “because the traditional method takes a lot of time. First you have to wash, soak the beans, make sure there are no bad ones, then you are supposed to boil them several times and strain it by hand so that all the skin gets separated. I love that kind of cooking, slow rather than fast and easy. But a couple of years ago, looking online for different recipes, I found that people were just blending the beans in the food processor and eating the skin as well. There was something nutritional about the skin. Actually, it turns out smoother and silkier.\u003c/p>\n\u003cp>“My kids aren’t the biggest fans,” Lee admits, “but it reminds me when I was little, and my mother gave me patjuk with just some salt and I didn’t like it much. Then I realized you could make it with sugar, more like a dessert.”\u003c/p>\n\u003cp>[ad fullwidth]\u003c/p>\n\u003cp>Besides red beans, an essential ingredient of patjuk are little rice balls, which symbolize birds’ eggs and new life. “You are supposed to eat the number of rice balls that equals your age. But you really can’t after you reach a certain age,” says Lee, laughing. “You can’t eat 40 rice balls.”\u003c/p>\n\u003cp>Adds Lee: “I would love to make this into my own tradition now and share stories with my followers, especially Korean-Americans, if they were born here, I’m sure they have had no exposure to it.”\u003c/p>\n\u003cp>https://youtu.be/NxyJ_xk4BXI\u003c/p>\n\u003cp>\u003cstrong>Red Bean Porridge (동지팥죽, Dongji Patjuk)\u003c/strong>\u003cbr>\nMakes 4-6 servings\u003cbr>\nBy Selina S. Lee\u003c/p>\n\u003cp>2 cups red beans (a.k.a. azuki beans)\u003cbr>\n½ cup sweet rice flour (a.k.a. mochiko rice flour)\u003cbr>\nPine nuts - optional\u003cbr>\nSugar\u003cbr>\nSalt\u003cbr>\nWater\u003c/p>\n\u003cp>· \tWash your beans in cold water and soak them for about 30 minutes. You can pick out broken beans.\u003c/p>\n\u003cp>· \tIn a large pot, add clean beans to 3 cups of water and bring it to a boil on medium-high heat. Drain the water out after the first boil, and put the beans back in the pot with 4 cups of new water. Boil on medium-low heat for 1 hour with the lid on. Stir the beans a few times to make sure they don’t stick to the bottom of the pot. Lower the heat if necessary.\u003c/p>\n\u003cp>· \tWhile the beans are cooking, you can make your sweet rice balls (called ‘sae al shim’) by making a dough with ½ cup sweet rice flour, 2 tsp sugar, ¼ tsp salt and ¼ cup of hot boiling water. Add the hot water a little bit at a time and mix and fold/knead gently with your fingers (when it’s not piping hot!) into a long 1-inch-thick dough log. Cover it with plastic wrap and let it sit for at least 15 minutes.\u003c/p>\n\u003cp>· \tRoll out your dough with your hand until it becomes 8-10 inches long, then cut it evenly into pieces to mold into small round balls using the palm of your hand. I like to keep them at about ½ inch size. Cover your rice balls so they don’t get dried out.\u003c/p>\n\u003cp>· \tAfter about 1 hour of boiling, the beans should be soft and mashable. Drain, wait until they cool down a little, then add the beans to the blender with about ¼ cup of water until it’s a smooth, silky texture. I do this in 2 batches. You can add more water if needed. It will be a little grainy at first because of the skin, but will smooth out when you cook it. You can store this mixture in your freezer for later use. \u003c/p>\n\u003cp>· \tAdd blended red beans and sweet rice balls to your pot and bring them to a boil by adding a little bit more water (about ¼ cup), sugar (1 tsp) and salt (pinch). Keep stirring for about 10-15 minutes until achieving desired consistency. I like mine a little bit more runny than a thick porridge.\u003c/p>\n\u003cp>· \tServe with some pine nuts, salt or sugar on the side. I prefer to eat it with salt first, then eat a second bowl with some sugar. \u003c/p>\n\u003cfigure id=\"attachment_139651\" class=\"wp-caption aligncenter\" style=\"max-width: 800px\">\u003cimg src=\"https://ww2.kqed.org/app/uploads/sites/24/2020/12/buns.jpg\" alt=\"Lussekatt buns.\" width=\"800\" height=\"435\" class=\"size-full wp-image-139651\" srcset=\"https://ww2.kqed.org/app/uploads/sites/24/2020/12/buns.jpg 800w, https://ww2.kqed.org/app/uploads/sites/24/2020/12/buns-160x87.jpg 160w, https://ww2.kqed.org/app/uploads/sites/24/2020/12/buns-768x418.jpg 768w\" sizes=\"(max-width: 800px) 100vw, 800px\">\u003cfigcaption class=\"wp-caption-text\">Lussekatt buns. \u003ccite>(Birgitta Holma Durell)\u003c/cite>\u003c/figcaption>\u003c/figure>\n\u003cp>\u003ca id=\"lussekatt\">\u003c/a>\u003c/p>\n\u003ch2>Lussekatt Buns\u003c/h2>\n\u003cp>\u003cstrong>St. Lucia’s Day (Swedish Culture)\u003c/strong>\u003c/p>\n\u003cp>Instead of soup, Swedes hunger for warm, saffron-scented buns on the cold, dark morning of St. Lucia’s Day. The Swedish holiday features a procession of singing children dressed in white gowns, led by the appointed “St. Lucia,” who wears a crown of lit candles (or nowadays, a safer battery-powered version).\u003c/p>\n\u003cp>Berkeley resident Birgitta Holma Durell, who grew up in a small city in Southern Sweden, remembers the ritual fondly. “My sister and brother and I would get up early in the morning. My mother had already baked the Lucia rolls, which we warmed up in the oven. Then we made coffee for my parents. We would put on our white gowns, and my brother would wear the cone shaped hat with stars on it. Because I had blond hair, I got to wear the crown and we walked upstairs to my parents’ bedroom, singing the Lucia songs and bringing them coffee and Lucia rolls. I liked that we kids did something for our parents.”\u003c/p>\n\u003cp>The co-founder of Berkeley-based \u003ca href=\"https://www.cultcrackers.com/\" rel=\"noopener noreferrer\" target=\"_blank\">Cult Crackers\u003c/a> (which are inspired by Swedish crispbread) explains that after the morning ritual, another procession commenced at school, and often one at church. The choir would sing away the gloom and darkness and hasten rosy skies. “One girl was picked to be Lucia with candles on her head and a red band around her waist,” says Durell. “The rest of us would have glitter in our hair and around our waist. Then everybody would eat Lucia rolls and gingerbread cookies with tea or cocoa.”\u003c/p>\n\u003cfigure id=\"attachment_139648\" class=\"wp-caption aligncenter\" style=\"max-width: 800px\">\u003cimg src=\"https://ww2.kqed.org/app/uploads/sites/24/2020/12/5.-Little-girls-celebrate-St.-Lucia_s-day-photo-credit-Birgitta-Holma-Durrell.jpg\" alt=\"Little girls celebrate St. Lucia's Day.\" width=\"800\" height=\"533\" class=\"size-full wp-image-139648\" srcset=\"https://ww2.kqed.org/app/uploads/sites/24/2020/12/5.-Little-girls-celebrate-St.-Lucia_s-day-photo-credit-Birgitta-Holma-Durrell.jpg 800w, https://ww2.kqed.org/app/uploads/sites/24/2020/12/5.-Little-girls-celebrate-St.-Lucia_s-day-photo-credit-Birgitta-Holma-Durrell-160x107.jpg 160w, https://ww2.kqed.org/app/uploads/sites/24/2020/12/5.-Little-girls-celebrate-St.-Lucia_s-day-photo-credit-Birgitta-Holma-Durrell-768x512.jpg 768w\" sizes=\"(max-width: 800px) 100vw, 800px\">\u003cfigcaption class=\"wp-caption-text\">Little girls celebrate St. Lucia's Day. \u003ccite>(Birgitta Holma Durrell)\u003c/cite>\u003c/figcaption>\u003c/figure>\n\u003cp>Although St. Lucia’s Day celebrates the return of the light, Swedes celebrate it on Dec. 13 (not the 21st) because when Sweden followed the old Julian calendar, that was the date of the winter solstice. In the early 18th century, the country switched to the Gregorian calendar, but kept their traditional celebration on the 13th.\u003c/p>\n\u003cp>Santa Lucia was a Sicilian saint. Her name means “carrier of light.” Legend has it that Lucia secretly brought food to persecuted Christians who hid in catacombs beneath Rome. She wore candles on her head in order to keep her hands free to carry more food. She died a martyr in 304, and her Saint day is Dec. 13.\u003c/p>\n\u003cp>The traditional Swedish rolls, called Lussekatt (Lucia cat), are only eaten in December. Their curled-up shape represents a sleeping cat (an animal believed to be the devil in disguise). To keep the devil away, the sweet buns are colored a cheery yellow with the precious spice saffron, and adorned with two raisins to represent the cat’s eyes.\u003c/p>\n\u003cp>\u003cstrong>Lussekatt (Lucia’s cat) Buns\u003c/strong>\u003cbr>\nBy Birgitta Holma Durell\u003c/p>\n\u003cp>2 teaspoons dry active yeast\u003cbr>\n¾ cup butter\u003cbr>\n2 cups of milk\u003cbr>\n½ teaspoon saffron threads\u003cbr>\n½ cup natural cane sugar\u003cbr>\n1 teaspoon salt\u003cbr>\n6½ cups all-purpose flour\u003cbr>\n1 egg\u003c/p>\n\u003cp>To finish:\u003cbr>\n1 egg, beaten\u003cbr>\n¼ cup of raisins\u003c/p>\n\u003cp>· \tPut the saffron threads in a mortar with a spoonful of the sugar, and crush the saffron with the sugar.\u003cbr>\n· \tMelt the butter in a saucepan and add the saffron/sugar mixture.\u003cbr>\n· \tAdd the milk to the butter and saffron/sugar. Heat until about 110° F.\u003cbr>\n· \tIn a small bowl, dissolve the yeast in 4 tbsps of the warm milk mixture and set aside for a few minutes until small bubbles form.\u003cbr>\n· \tIn a large bowl, whisk 1 egg and blend in the rest of the sugar, the salt, and then the saffron/milk mixture. Stir until well blended.\u003cbr>\n· \tSlowly add the flour to the liquid. Mix with a wooden spoon until you can make a ball out of the dough.\u003cbr>\n· \tKnead the dough until smooth. If the dough sticks to your fingers and bowl, add a little more flour.\u003cbr>\n· \tCover the bowl with a tea towel and place it in a warm and draft-free place until doubled in size (about 1 hour).\u003cbr>\n· \tLine baking sheets with parchment paper. Whisk an egg for the wash.\u003cbr>\n· \tRemove the dough from the bowl and knead it a little more.\u003cbr>\n· \tCut the dough into 35 equally sized pieces. Roll them into balls, and then into snake shapes.\u003cbr>\n· \tCurl the top of the snake one direction and the bottom in the other direction (so it resembles the letter “S”).\u003cbr>\n· \tAfter your 35 “lussekatter” are rolled up and put onto sheet pans, cover them with a tea towel and put them back in the same warm spot. Let them rise another 40 minutes.\u003cbr>\n· \tMeanwhile, preheat the oven to 400° F.\u003cbr>\n· \tBrush the rolls with the egg, and add two raisin eyes to each “lussekatter,” one in the center of each spiral\u003cbr>\n· \tBake for 15-20 minutes until golden.\u003c/p>\n\u003cfigure id=\"attachment_139645\" class=\"wp-caption aligncenter\" style=\"max-width: 800px\">\u003cimg src=\"https://ww2.kqed.org/app/uploads/sites/24/2020/12/7.-Ash-Reshteh-photo-credit-Azita-Mehran.jpg\" alt=\"Ash Reshteh.\" width=\"800\" height=\"798\" class=\"size-full wp-image-139645\" srcset=\"https://ww2.kqed.org/app/uploads/sites/24/2020/12/7.-Ash-Reshteh-photo-credit-Azita-Mehran.jpg 800w, https://ww2.kqed.org/app/uploads/sites/24/2020/12/7.-Ash-Reshteh-photo-credit-Azita-Mehran-160x160.jpg 160w, https://ww2.kqed.org/app/uploads/sites/24/2020/12/7.-Ash-Reshteh-photo-credit-Azita-Mehran-768x766.jpg 768w\" sizes=\"(max-width: 800px) 100vw, 800px\">\u003cfigcaption class=\"wp-caption-text\">Ash Reshteh. \u003ccite>(Azita Mehran)\u003c/cite>\u003c/figcaption>\u003c/figure>\n\u003cp>\u003ca id=\"ash\">\u003c/a>\u003c/p>\n\u003ch2>Ash Reshteh\u003c/h2>\n\u003cp>\u003cstrong>Yalda Night (Persian Culture)\u003c/strong>\u003c/p>\n\u003cp>A hearty soup is also common fare for Yalda Night, an ancient Zoroastrian celebration of the winter solstice, observed in Iran and the Persian diaspora. But the essential elements of Yalda are watermelons (traditionally saved from the summer in cellars) and pomegranates. These are traditionally set, along with dried fruit, nuts and candles, on a low table with a heater underneath, where the family gathers round. To protect against evil forces on the longest night, guests keep the festive mood going until past midnight, drinking wine, telling stories and reading poetry. The red colors of the fruit symbolize the crimson dawn and life; the word “yalda” means “birth” or “rebirth.”\u003c/p>\n\u003cp>Yalda Modabber is the co-founder and executive director of \u003ca href=\"https://golestankids.com/\" rel=\"noopener noreferrer\" target=\"_blank\">Golestan\u003c/a>, the first Persian language immersion school in the United States, located in El Cerrito. She happens to share her name with the holiday. “It was unusual when my parents named me, like calling your kid Easter. But now it’s become more popular as a name.”\u003c/p>\n\u003cfigure id=\"attachment_139646\" class=\"wp-caption aligncenter\" style=\"max-width: 800px\">\u003cimg src=\"https://ww2.kqed.org/app/uploads/sites/24/2020/12/6.-watermelon-and-pomegranate-credit-Golestan-School.jpg\" alt=\"Watermelon and pomegranate.\" width=\"800\" height=\"536\" class=\"size-full wp-image-139646\" srcset=\"https://ww2.kqed.org/app/uploads/sites/24/2020/12/6.-watermelon-and-pomegranate-credit-Golestan-School.jpg 800w, https://ww2.kqed.org/app/uploads/sites/24/2020/12/6.-watermelon-and-pomegranate-credit-Golestan-School-160x107.jpg 160w, https://ww2.kqed.org/app/uploads/sites/24/2020/12/6.-watermelon-and-pomegranate-credit-Golestan-School-768x515.jpg 768w\" sizes=\"(max-width: 800px) 100vw, 800px\">\u003cfigcaption class=\"wp-caption-text\">Watermelon and pomegranate. \u003ccite>(Golestan School)\u003c/cite>\u003c/figcaption>\u003c/figure>\n\u003cp>“I didn’t celebrate Yalda as a child, because it was past my bedtime,” says Modabber. “But, at Golestan, this has traditionally been our biggest event of the year, when we recognize Yalda and all the holidays celebrating light that are rooted in the solstice. That month, the children make lanterns and learn about the ways different cultures celebrate their festivals of light. One evening we have a big bonfire with hundreds of people gathering outside, where we all stand around the fire and sing songs.”\u003c/p>\n\u003cp>This year, because of the pandemic, the school families will not be able to gather as a community, but the classroom teachers will continue the tradition of having each child peel their own pomegranate. At Golestan, food is recognized as an important vehicle of culture, and the school chef always makes Ash (pronounced “osh”), a thick, hearty soup that includes a medley of beans, lots of herbs, turmeric, onions and special noodles.\u003c/p>\n\u003cp>\u003cstrong>Ash Reshteh - Bean and Noodle Soup\u003c/strong>\u003cbr>\nServes 4-6\u003cbr>\nBy \u003ca href=\"https://turmericsaffron.blogspot.com/\" rel=\"noopener noreferrer\" target=\"_blank\">Azita Mehran\u003c/a>\u003c/p>\n\u003cp>Ingredients:\u003c/p>\n\u003cp>1 cup red kidney beans, soaked overnight, drained\u003cbr>\n1 cup chickpeas, soaked overnight, drained\u003cbr>\n1 cup lentils\u003cbr>\n1 bunch parsley, chopped\u003cbr>\n1 bunch cilantro, chopped\u003cbr>\n1 bunch spinach, fresh, chopped\u003cbr>\n1 bunch scallion or chives, chopped\u003cbr>\nSalt and pepper to taste\u003cbr>\n6 ounces dried noodles for ash; you may find reshteh (noodles) in Persian/Iranian grocery stores.\u003cbr>\nWater\u003c/p>\n\u003cp>For Garnish:\u003c/p>\n\u003cp>1 large onion, thinly sliced\u003cbr>\n5 cloves of garlic, chopped\u003cbr>\n2 tablespoons dried mint\u003cbr>\n½ teaspoon turmeric\u003cbr>\nVegetable oil or olive oil\u003cbr>\n1 cup kashk (liquid whey)\u003cbr>\n2 teaspoons liquid saffron, optional\u003c/p>\n\u003cp>· \tPlace the chickpeas, beans and lentils in a large pot with 8 cups of water. Bring to a boil over medium-high heat. Reduce heat to medium, cover and cook for 1 1/2–2 hours or until beans are tender. \u003c/p>\n\u003cp>· \tAdd the chopped vegetables, noodles, salt and pepper. Stir well, cover and cook for another 30-40 minutes on medium-low heat.\u003c/p>\n\u003cp>· \tAdd more water if needed. Taste and adjust the seasoning.\u003c/p>\n\u003cp>· \tIn medium pan, heat 3-4 tbsps olive oil over medium-high heat. Add sliced onions and cook until golden.\u003c/p>\n\u003cp>· \tAdd the garlic and sauté for another 3-5 minutes.\u003c/p>\n\u003cp>· \tAdd the turmeric powder, stir well.\u003c/p>\n\u003cp>· \tAdd the dried mint and sauté for 2-3 minutes.\u003c/p>\n\u003cp>· \tPour the soup in a large serving bowl, top with fried onion, garlic and mint mixture, drizzle with liquid saffron and a generous amount of liquid kash. Serve hot with warm bread and extra kashk on the side.\u003c/p>\n\u003cp>[ad floatright]\u003c/p>\n","blocks":[],"excerpt":"Festivities for longest night of the year are an ancient ritual—and special foods are an essential element.","status":"publish","parent":0,"modified":1621555223,"stats":{"hasAudio":false,"hasVideo":false,"hasChartOrMap":false,"iframeSrcs":[],"hasGoogleForm":false,"hasGallery":false,"hasHearkenModule":false,"hasPolis":false,"paragraphCount":57,"wordCount":2497},"headData":{"title":"Korean, Swedish and Persian Dishes for Winter Solstice | KQED","description":"Festivities for longest night of the year are an ancient ritual—and special foods are an essential element.","ogTitle":"","ogDescription":"","ogImgId":"","twTitle":"","twDescription":"","twImgId":"","schema":{"@context":"http://schema.org","@type":"Article","headline":"Korean, Swedish and Persian Dishes for Winter Solstice","datePublished":"2020-12-08T00:51:41.000Z","dateModified":"2021-05-21T00:00:23.000Z","image":"https://cdn.kqed.org/wp-content/uploads/2020/02/KQED-OG-Image@1x.png"}},"disqusIdentifier":"139639 https://ww2.kqed.org/bayareabites/?p=139639","disqusUrl":"https://ww2.kqed.org/bayareabites/2020/12/07/korean-swedish-and-persian-dishes-for-winter-solstice/","disqusTitle":"Korean, Swedish and Persian Dishes for Winter Solstice","templateType":"standard","featuredImageType":"standard","path":"/bayareabites/139639/korean-swedish-and-persian-dishes-for-winter-solstice","audioTrackLength":null,"parsedContent":[{"type":"contentString","content":"\u003cdiv class=\"post-body\">\u003cp>\u003cp>Winter Solstice festivities to celebrate the longest night of the year are an ancient ritual that can be traced back to the Stone Age. The auspicious day falls between the 20–23 of December (or June, in the Southern Hemisphere). Cultures including the Ancient Romans, the Incas and the Hopi Indians have employed dancing and fires to chase away any malevolent spirits lurking around during the long, cold dark night—and special foods are an essential element of every revelry.\u003c/p>\n\u003cp>Below are three different traditions, complete with recipes, celebrated around the world during the Winter Solstice.\u003c/p>\n\u003cp>\u003cem>\u003cstrong>Jump to:\u003c/strong>\u003c/em>\u003c/p>\n\u003cp>\u003ca href=\"#patjuk\">Patjuk, from Korea\u003c/a>\u003c/p>\n\u003cp>\u003ca href=\"#lussekatt\">Lussekatt Buns, from Sweden\u003c/a>\u003c/p>\n\u003cp>\u003ca href=\"#ash\">Ash Reshteh, from Iran\u003c/a>\u003c/p>\n\u003cfigure id=\"attachment_139649\" class=\"wp-caption aligncenter\" style=\"max-width: 800px\">\u003cimg src=\"https://ww2.kqed.org/app/uploads/sites/24/2020/12/2.-Red_Bean_Porridge-photo-credit-Selina-S.-Lee.-jpg.jpg\" alt=\"Patjuk.\" width=\"800\" height=\"533\" class=\"size-full wp-image-139649\" srcset=\"https://ww2.kqed.org/app/uploads/sites/24/2020/12/2.-Red_Bean_Porridge-photo-credit-Selina-S.-Lee.-jpg.jpg 800w, https://ww2.kqed.org/app/uploads/sites/24/2020/12/2.-Red_Bean_Porridge-photo-credit-Selina-S.-Lee.-jpg-160x107.jpg 160w, https://ww2.kqed.org/app/uploads/sites/24/2020/12/2.-Red_Bean_Porridge-photo-credit-Selina-S.-Lee.-jpg-768x512.jpg 768w\" sizes=\"(max-width: 800px) 100vw, 800px\">\u003cfigcaption class=\"wp-caption-text\">Patjuk. \u003ccite>(Selina S. Lee)\u003c/cite>\u003c/figcaption>\u003c/figure>\n\u003cp>\u003ca id=\"patjuk\">\u003c/a>\u003c/p>\n\u003ch2>Patjuk\u003c/h2>\n\u003cp>\u003cstrong>Dongji (Korean Culture)\u003c/strong>\u003c/p>\n\u003cp>The deep red hue of the Korean bean soup, patjuk, that is eaten on Dongji (the winter solstice) is believed to have the power to ward off evil spirits and, traditionally, was sprinkled around the house to chase them away.\u003c/p>\n\u003cp>Having grown up in Seoul, \u003ca href=\"https://selinaslee.com/\" rel=\"noopener noreferrer\" target=\"_blank\">Selina S. Lee\u003c/a>, an Oakland restaurant consultant for new Korean restaurants, doesn’t remember her mother making a big deal out of Dongji, but she always made patjuk. Lee contrasts life in modern Seoul to the surrounding villages, where she suspects that Dongji is celebrated more widely, especially among the older generation.\u003c/p>\n\u003cp>“My mom made the red bean soup every year,” says Lee, “but I had no idea it was for the winter solstice. She didn’t tell me we are eating it for the beginning of winter. Now I know. I don’t really celebrate Dongji, but I want my kids to know it.” Lee now has two boys, age 14 and 12, and makes patjuk every year.\u003c/p>\n\u003cp>“I have figured out an easier way,” says the recipe developer, “because the traditional method takes a lot of time. First you have to wash, soak the beans, make sure there are no bad ones, then you are supposed to boil them several times and strain it by hand so that all the skin gets separated. I love that kind of cooking, slow rather than fast and easy. But a couple of years ago, looking online for different recipes, I found that people were just blending the beans in the food processor and eating the skin as well. There was something nutritional about the skin. Actually, it turns out smoother and silkier.\u003c/p>\n\u003cp>“My kids aren’t the biggest fans,” Lee admits, “but it reminds me when I was little, and my mother gave me patjuk with just some salt and I didn’t like it much. Then I realized you could make it with sugar, more like a dessert.”\u003c/p>\n\u003cp>\u003c/p>\u003c/div>","attributes":{"named":{},"numeric":[]}},{"type":"component","content":"","name":"ad","attributes":{"named":{"label":"fullwidth"},"numeric":["fullwidth"]}},{"type":"contentString","content":"\u003cdiv class=\"post-body\">\u003cp>\u003c/p>\n\u003cp>Besides red beans, an essential ingredient of patjuk are little rice balls, which symbolize birds’ eggs and new life. “You are supposed to eat the number of rice balls that equals your age. But you really can’t after you reach a certain age,” says Lee, laughing. “You can’t eat 40 rice balls.”\u003c/p>\n\u003cp>Adds Lee: “I would love to make this into my own tradition now and share stories with my followers, especially Korean-Americans, if they were born here, I’m sure they have had no exposure to it.”\u003c/p>\u003c/p>\u003cp>\u003cspan class='utils-parseShortcode-shortcodes-__youtubeShortcode__embedYoutube'>\n \u003cspan class='utils-parseShortcode-shortcodes-__youtubeShortcode__embedYoutubeInside'>\n \u003ciframe\n loading='lazy'\n class='utils-parseShortcode-shortcodes-__youtubeShortcode__youtubePlayer'\n type='text/html'\n src='//www.youtube.com/embed/NxyJ_xk4BXI'\n title='//www.youtube.com/embed/NxyJ_xk4BXI'\n allowfullscreen='true'\n style='border:0;'>\u003c/iframe>\n \u003c/span>\n \u003c/span>\u003c/p>\u003cp>\u003cp>\u003cstrong>Red Bean Porridge (동지팥죽, Dongji Patjuk)\u003c/strong>\u003cbr>\nMakes 4-6 servings\u003cbr>\nBy Selina S. Lee\u003c/p>\n\u003cp>2 cups red beans (a.k.a. azuki beans)\u003cbr>\n½ cup sweet rice flour (a.k.a. mochiko rice flour)\u003cbr>\nPine nuts - optional\u003cbr>\nSugar\u003cbr>\nSalt\u003cbr>\nWater\u003c/p>\n\u003cp>· \tWash your beans in cold water and soak them for about 30 minutes. You can pick out broken beans.\u003c/p>\n\u003cp>· \tIn a large pot, add clean beans to 3 cups of water and bring it to a boil on medium-high heat. Drain the water out after the first boil, and put the beans back in the pot with 4 cups of new water. Boil on medium-low heat for 1 hour with the lid on. Stir the beans a few times to make sure they don’t stick to the bottom of the pot. Lower the heat if necessary.\u003c/p>\n\u003cp>· \tWhile the beans are cooking, you can make your sweet rice balls (called ‘sae al shim’) by making a dough with ½ cup sweet rice flour, 2 tsp sugar, ¼ tsp salt and ¼ cup of hot boiling water. Add the hot water a little bit at a time and mix and fold/knead gently with your fingers (when it’s not piping hot!) into a long 1-inch-thick dough log. Cover it with plastic wrap and let it sit for at least 15 minutes.\u003c/p>\n\u003cp>· \tRoll out your dough with your hand until it becomes 8-10 inches long, then cut it evenly into pieces to mold into small round balls using the palm of your hand. I like to keep them at about ½ inch size. Cover your rice balls so they don’t get dried out.\u003c/p>\n\u003cp>· \tAfter about 1 hour of boiling, the beans should be soft and mashable. Drain, wait until they cool down a little, then add the beans to the blender with about ¼ cup of water until it’s a smooth, silky texture. I do this in 2 batches. You can add more water if needed. It will be a little grainy at first because of the skin, but will smooth out when you cook it. You can store this mixture in your freezer for later use. \u003c/p>\n\u003cp>· \tAdd blended red beans and sweet rice balls to your pot and bring them to a boil by adding a little bit more water (about ¼ cup), sugar (1 tsp) and salt (pinch). Keep stirring for about 10-15 minutes until achieving desired consistency. I like mine a little bit more runny than a thick porridge.\u003c/p>\n\u003cp>· \tServe with some pine nuts, salt or sugar on the side. I prefer to eat it with salt first, then eat a second bowl with some sugar. \u003c/p>\n\u003cfigure id=\"attachment_139651\" class=\"wp-caption aligncenter\" style=\"max-width: 800px\">\u003cimg src=\"https://ww2.kqed.org/app/uploads/sites/24/2020/12/buns.jpg\" alt=\"Lussekatt buns.\" width=\"800\" height=\"435\" class=\"size-full wp-image-139651\" srcset=\"https://ww2.kqed.org/app/uploads/sites/24/2020/12/buns.jpg 800w, https://ww2.kqed.org/app/uploads/sites/24/2020/12/buns-160x87.jpg 160w, https://ww2.kqed.org/app/uploads/sites/24/2020/12/buns-768x418.jpg 768w\" sizes=\"(max-width: 800px) 100vw, 800px\">\u003cfigcaption class=\"wp-caption-text\">Lussekatt buns. \u003ccite>(Birgitta Holma Durell)\u003c/cite>\u003c/figcaption>\u003c/figure>\n\u003cp>\u003ca id=\"lussekatt\">\u003c/a>\u003c/p>\n\u003ch2>Lussekatt Buns\u003c/h2>\n\u003cp>\u003cstrong>St. Lucia’s Day (Swedish Culture)\u003c/strong>\u003c/p>\n\u003cp>Instead of soup, Swedes hunger for warm, saffron-scented buns on the cold, dark morning of St. Lucia’s Day. The Swedish holiday features a procession of singing children dressed in white gowns, led by the appointed “St. Lucia,” who wears a crown of lit candles (or nowadays, a safer battery-powered version).\u003c/p>\n\u003cp>Berkeley resident Birgitta Holma Durell, who grew up in a small city in Southern Sweden, remembers the ritual fondly. “My sister and brother and I would get up early in the morning. My mother had already baked the Lucia rolls, which we warmed up in the oven. Then we made coffee for my parents. We would put on our white gowns, and my brother would wear the cone shaped hat with stars on it. Because I had blond hair, I got to wear the crown and we walked upstairs to my parents’ bedroom, singing the Lucia songs and bringing them coffee and Lucia rolls. I liked that we kids did something for our parents.”\u003c/p>\n\u003cp>The co-founder of Berkeley-based \u003ca href=\"https://www.cultcrackers.com/\" rel=\"noopener noreferrer\" target=\"_blank\">Cult Crackers\u003c/a> (which are inspired by Swedish crispbread) explains that after the morning ritual, another procession commenced at school, and often one at church. The choir would sing away the gloom and darkness and hasten rosy skies. “One girl was picked to be Lucia with candles on her head and a red band around her waist,” says Durell. “The rest of us would have glitter in our hair and around our waist. Then everybody would eat Lucia rolls and gingerbread cookies with tea or cocoa.”\u003c/p>\n\u003cfigure id=\"attachment_139648\" class=\"wp-caption aligncenter\" style=\"max-width: 800px\">\u003cimg src=\"https://ww2.kqed.org/app/uploads/sites/24/2020/12/5.-Little-girls-celebrate-St.-Lucia_s-day-photo-credit-Birgitta-Holma-Durrell.jpg\" alt=\"Little girls celebrate St. Lucia's Day.\" width=\"800\" height=\"533\" class=\"size-full wp-image-139648\" srcset=\"https://ww2.kqed.org/app/uploads/sites/24/2020/12/5.-Little-girls-celebrate-St.-Lucia_s-day-photo-credit-Birgitta-Holma-Durrell.jpg 800w, https://ww2.kqed.org/app/uploads/sites/24/2020/12/5.-Little-girls-celebrate-St.-Lucia_s-day-photo-credit-Birgitta-Holma-Durrell-160x107.jpg 160w, https://ww2.kqed.org/app/uploads/sites/24/2020/12/5.-Little-girls-celebrate-St.-Lucia_s-day-photo-credit-Birgitta-Holma-Durrell-768x512.jpg 768w\" sizes=\"(max-width: 800px) 100vw, 800px\">\u003cfigcaption class=\"wp-caption-text\">Little girls celebrate St. Lucia's Day. \u003ccite>(Birgitta Holma Durrell)\u003c/cite>\u003c/figcaption>\u003c/figure>\n\u003cp>Although St. Lucia’s Day celebrates the return of the light, Swedes celebrate it on Dec. 13 (not the 21st) because when Sweden followed the old Julian calendar, that was the date of the winter solstice. In the early 18th century, the country switched to the Gregorian calendar, but kept their traditional celebration on the 13th.\u003c/p>\n\u003cp>Santa Lucia was a Sicilian saint. Her name means “carrier of light.” Legend has it that Lucia secretly brought food to persecuted Christians who hid in catacombs beneath Rome. She wore candles on her head in order to keep her hands free to carry more food. She died a martyr in 304, and her Saint day is Dec. 13.\u003c/p>\n\u003cp>The traditional Swedish rolls, called Lussekatt (Lucia cat), are only eaten in December. Their curled-up shape represents a sleeping cat (an animal believed to be the devil in disguise). To keep the devil away, the sweet buns are colored a cheery yellow with the precious spice saffron, and adorned with two raisins to represent the cat’s eyes.\u003c/p>\n\u003cp>\u003cstrong>Lussekatt (Lucia’s cat) Buns\u003c/strong>\u003cbr>\nBy Birgitta Holma Durell\u003c/p>\n\u003cp>2 teaspoons dry active yeast\u003cbr>\n¾ cup butter\u003cbr>\n2 cups of milk\u003cbr>\n½ teaspoon saffron threads\u003cbr>\n½ cup natural cane sugar\u003cbr>\n1 teaspoon salt\u003cbr>\n6½ cups all-purpose flour\u003cbr>\n1 egg\u003c/p>\n\u003cp>To finish:\u003cbr>\n1 egg, beaten\u003cbr>\n¼ cup of raisins\u003c/p>\n\u003cp>· \tPut the saffron threads in a mortar with a spoonful of the sugar, and crush the saffron with the sugar.\u003cbr>\n· \tMelt the butter in a saucepan and add the saffron/sugar mixture.\u003cbr>\n· \tAdd the milk to the butter and saffron/sugar. Heat until about 110° F.\u003cbr>\n· \tIn a small bowl, dissolve the yeast in 4 tbsps of the warm milk mixture and set aside for a few minutes until small bubbles form.\u003cbr>\n· \tIn a large bowl, whisk 1 egg and blend in the rest of the sugar, the salt, and then the saffron/milk mixture. Stir until well blended.\u003cbr>\n· \tSlowly add the flour to the liquid. Mix with a wooden spoon until you can make a ball out of the dough.\u003cbr>\n· \tKnead the dough until smooth. If the dough sticks to your fingers and bowl, add a little more flour.\u003cbr>\n· \tCover the bowl with a tea towel and place it in a warm and draft-free place until doubled in size (about 1 hour).\u003cbr>\n· \tLine baking sheets with parchment paper. Whisk an egg for the wash.\u003cbr>\n· \tRemove the dough from the bowl and knead it a little more.\u003cbr>\n· \tCut the dough into 35 equally sized pieces. Roll them into balls, and then into snake shapes.\u003cbr>\n· \tCurl the top of the snake one direction and the bottom in the other direction (so it resembles the letter “S”).\u003cbr>\n· \tAfter your 35 “lussekatter” are rolled up and put onto sheet pans, cover them with a tea towel and put them back in the same warm spot. Let them rise another 40 minutes.\u003cbr>\n· \tMeanwhile, preheat the oven to 400° F.\u003cbr>\n· \tBrush the rolls with the egg, and add two raisin eyes to each “lussekatter,” one in the center of each spiral\u003cbr>\n· \tBake for 15-20 minutes until golden.\u003c/p>\n\u003cfigure id=\"attachment_139645\" class=\"wp-caption aligncenter\" style=\"max-width: 800px\">\u003cimg src=\"https://ww2.kqed.org/app/uploads/sites/24/2020/12/7.-Ash-Reshteh-photo-credit-Azita-Mehran.jpg\" alt=\"Ash Reshteh.\" width=\"800\" height=\"798\" class=\"size-full wp-image-139645\" srcset=\"https://ww2.kqed.org/app/uploads/sites/24/2020/12/7.-Ash-Reshteh-photo-credit-Azita-Mehran.jpg 800w, https://ww2.kqed.org/app/uploads/sites/24/2020/12/7.-Ash-Reshteh-photo-credit-Azita-Mehran-160x160.jpg 160w, https://ww2.kqed.org/app/uploads/sites/24/2020/12/7.-Ash-Reshteh-photo-credit-Azita-Mehran-768x766.jpg 768w\" sizes=\"(max-width: 800px) 100vw, 800px\">\u003cfigcaption class=\"wp-caption-text\">Ash Reshteh. \u003ccite>(Azita Mehran)\u003c/cite>\u003c/figcaption>\u003c/figure>\n\u003cp>\u003ca id=\"ash\">\u003c/a>\u003c/p>\n\u003ch2>Ash Reshteh\u003c/h2>\n\u003cp>\u003cstrong>Yalda Night (Persian Culture)\u003c/strong>\u003c/p>\n\u003cp>A hearty soup is also common fare for Yalda Night, an ancient Zoroastrian celebration of the winter solstice, observed in Iran and the Persian diaspora. But the essential elements of Yalda are watermelons (traditionally saved from the summer in cellars) and pomegranates. These are traditionally set, along with dried fruit, nuts and candles, on a low table with a heater underneath, where the family gathers round. To protect against evil forces on the longest night, guests keep the festive mood going until past midnight, drinking wine, telling stories and reading poetry. The red colors of the fruit symbolize the crimson dawn and life; the word “yalda” means “birth” or “rebirth.”\u003c/p>\n\u003cp>Yalda Modabber is the co-founder and executive director of \u003ca href=\"https://golestankids.com/\" rel=\"noopener noreferrer\" target=\"_blank\">Golestan\u003c/a>, the first Persian language immersion school in the United States, located in El Cerrito. She happens to share her name with the holiday. “It was unusual when my parents named me, like calling your kid Easter. But now it’s become more popular as a name.”\u003c/p>\n\u003cfigure id=\"attachment_139646\" class=\"wp-caption aligncenter\" style=\"max-width: 800px\">\u003cimg src=\"https://ww2.kqed.org/app/uploads/sites/24/2020/12/6.-watermelon-and-pomegranate-credit-Golestan-School.jpg\" alt=\"Watermelon and pomegranate.\" width=\"800\" height=\"536\" class=\"size-full wp-image-139646\" srcset=\"https://ww2.kqed.org/app/uploads/sites/24/2020/12/6.-watermelon-and-pomegranate-credit-Golestan-School.jpg 800w, https://ww2.kqed.org/app/uploads/sites/24/2020/12/6.-watermelon-and-pomegranate-credit-Golestan-School-160x107.jpg 160w, https://ww2.kqed.org/app/uploads/sites/24/2020/12/6.-watermelon-and-pomegranate-credit-Golestan-School-768x515.jpg 768w\" sizes=\"(max-width: 800px) 100vw, 800px\">\u003cfigcaption class=\"wp-caption-text\">Watermelon and pomegranate. \u003ccite>(Golestan School)\u003c/cite>\u003c/figcaption>\u003c/figure>\n\u003cp>“I didn’t celebrate Yalda as a child, because it was past my bedtime,” says Modabber. “But, at Golestan, this has traditionally been our biggest event of the year, when we recognize Yalda and all the holidays celebrating light that are rooted in the solstice. That month, the children make lanterns and learn about the ways different cultures celebrate their festivals of light. One evening we have a big bonfire with hundreds of people gathering outside, where we all stand around the fire and sing songs.”\u003c/p>\n\u003cp>This year, because of the pandemic, the school families will not be able to gather as a community, but the classroom teachers will continue the tradition of having each child peel their own pomegranate. At Golestan, food is recognized as an important vehicle of culture, and the school chef always makes Ash (pronounced “osh”), a thick, hearty soup that includes a medley of beans, lots of herbs, turmeric, onions and special noodles.\u003c/p>\n\u003cp>\u003cstrong>Ash Reshteh - Bean and Noodle Soup\u003c/strong>\u003cbr>\nServes 4-6\u003cbr>\nBy \u003ca href=\"https://turmericsaffron.blogspot.com/\" rel=\"noopener noreferrer\" target=\"_blank\">Azita Mehran\u003c/a>\u003c/p>\n\u003cp>Ingredients:\u003c/p>\n\u003cp>1 cup red kidney beans, soaked overnight, drained\u003cbr>\n1 cup chickpeas, soaked overnight, drained\u003cbr>\n1 cup lentils\u003cbr>\n1 bunch parsley, chopped\u003cbr>\n1 bunch cilantro, chopped\u003cbr>\n1 bunch spinach, fresh, chopped\u003cbr>\n1 bunch scallion or chives, chopped\u003cbr>\nSalt and pepper to taste\u003cbr>\n6 ounces dried noodles for ash; you may find reshteh (noodles) in Persian/Iranian grocery stores.\u003cbr>\nWater\u003c/p>\n\u003cp>For Garnish:\u003c/p>\n\u003cp>1 large onion, thinly sliced\u003cbr>\n5 cloves of garlic, chopped\u003cbr>\n2 tablespoons dried mint\u003cbr>\n½ teaspoon turmeric\u003cbr>\nVegetable oil or olive oil\u003cbr>\n1 cup kashk (liquid whey)\u003cbr>\n2 teaspoons liquid saffron, optional\u003c/p>\n\u003cp>· \tPlace the chickpeas, beans and lentils in a large pot with 8 cups of water. Bring to a boil over medium-high heat. Reduce heat to medium, cover and cook for 1 1/2–2 hours or until beans are tender. \u003c/p>\n\u003cp>· \tAdd the chopped vegetables, noodles, salt and pepper. Stir well, cover and cook for another 30-40 minutes on medium-low heat.\u003c/p>\n\u003cp>· \tAdd more water if needed. Taste and adjust the seasoning.\u003c/p>\n\u003cp>· \tIn medium pan, heat 3-4 tbsps olive oil over medium-high heat. Add sliced onions and cook until golden.\u003c/p>\n\u003cp>· \tAdd the garlic and sauté for another 3-5 minutes.\u003c/p>\n\u003cp>· \tAdd the turmeric powder, stir well.\u003c/p>\n\u003cp>· \tAdd the dried mint and sauté for 2-3 minutes.\u003c/p>\n\u003cp>· \tPour the soup in a large serving bowl, top with fried onion, garlic and mint mixture, drizzle with liquid saffron and a generous amount of liquid kash. Serve hot with warm bread and extra kashk on the side.\u003c/p>\n\u003cp>\u003c/p>\u003c/div>","attributes":{"named":{},"numeric":[]}},{"type":"component","content":"","name":"ad","attributes":{"named":{"label":"floatright"},"numeric":["floatright"]}},{"type":"contentString","content":"\u003cdiv class=\"post-body\">\u003cp>\u003c/p>\n\u003c/div>\u003c/p>","attributes":{"named":{},"numeric":[]}}],"link":"/bayareabites/139639/korean-swedish-and-persian-dishes-for-winter-solstice","authors":["5283"],"categories":["bayareabites_16558","bayareabites_1516","bayareabites_16818","bayareabites_17082","bayareabites_12550","bayareabites_1763","bayareabites_12","bayareabites_16837"],"tags":["bayareabites_17057","bayareabites_17059","bayareabites_11945","bayareabites_15574","bayareabites_17056","bayareabites_17055","bayareabites_16742","bayareabites_17053","bayareabites_439","bayareabites_17058","bayareabites_17054"],"featImg":"bayareabites_139644","label":"bayareabites"},"bayareabites_139532":{"type":"posts","id":"bayareabites_139532","meta":{"index":"posts_1591205157","site":"bayareabites","id":"139532","score":null,"sort":[1605571351000]},"guestAuthors":[],"slug":"thalai-deepavali-and-new-traditions-in-the-time-of-coronavirus","title":"Thalai Deepavali and New Traditions in the Time of Coronavirus","publishDate":1605571351,"format":"standard","headTitle":"Bay Area Bites | KQED Food","labelTerm":{"site":"bayareabites"},"content":"\u003cp>The alarm trilled at 5:45am on Saturday, and I dragged myself out of bed to try making kaju katli for the first time. I grew up eating the diamond-shaped, store-bought versions of this cashew confection, lined with silver and gold foil, but it was never something we made at home. After a year of not seeing my family, sheltering-in-place, the election and everything in between, this labor of love was something I could pour myself into while dance-cooking listening to a Bollywood top hits playlist blaring in my headphones. It wasn't picture perfect or lined with shimmering foil, but making these sweets felt like my offering to my family.\u003c/p>\n\u003cp>It was going to be a Deepavali first, like so many other firsts this year. Unlike previous years, where I'd light the solitary candle or sparkler, my partner Zak Kirchner and I made a conscious decision to spend Halloween through New Years at my parents' place in Miami (we were careful by masking, sanitizing, quarantining and getting tested after we landed). With all that 2020 brought, we wanted to root ourselves in long-standing traditions, like lighting candles around the house, celebrating memories (like lighting mile-long firecrackers at my aunt's house in Nagercoil, India the year I moved to the Bay Area) and creating new ones as a new family.\u003c/p>\n\u003cfigure id=\"attachment_139543\" class=\"wp-caption alignnone\" style=\"max-width: 800px\">\u003cimg class=\"size-medium wp-image-139543\" src=\"https://ww2.kqed.org/app/uploads/sites/24/2020/11/ZAK03964-800x533.jpg\" alt=\"kaju katli on a stainless steel plate\" width=\"800\" height=\"533\" srcset=\"https://ww2.kqed.org/app/uploads/sites/24/2020/11/ZAK03964-800x533.jpg 800w, https://ww2.kqed.org/app/uploads/sites/24/2020/11/ZAK03964-1020x680.jpg 1020w, https://ww2.kqed.org/app/uploads/sites/24/2020/11/ZAK03964-160x107.jpg 160w, https://ww2.kqed.org/app/uploads/sites/24/2020/11/ZAK03964-768x512.jpg 768w, https://ww2.kqed.org/app/uploads/sites/24/2020/11/ZAK03964.jpg 1500w\" sizes=\"(max-width: 800px) 100vw, 800px\">\u003cfigcaption class=\"wp-caption-text\">Kaju katli is an Indian sweet made of cashews, sugar, water, cardamom and sometimes ghee. \u003ccite>(Urmila Ramakrishnan / KQED)\u003c/cite>\u003c/figcaption>\u003c/figure>\n\u003cp>Deepavali (or Diwali) is essentially a celebration of light over darkness, unity over conflict. Like most holidays and foods, the way it's celebrated \u003ca href=\"https://www.indiatimes.com/news/india/11-ways-how-diwali-is-celebrated-differently-in-various-regions-of-india-331909.html\">varies from region to region in India\u003c/a>, and from family to family. For me, that means blending both Bengali and Tamilian traditions.\u003c/p>\n\u003cfigure id=\"attachment_139544\" class=\"wp-caption alignnone\" style=\"max-width: 800px\">\u003cimg class=\"size-medium wp-image-139544\" src=\"https://ww2.kqed.org/app/uploads/sites/24/2020/11/2ZAK03908-800x533.jpg\" alt=\"Family posing for a picture\" width=\"800\" height=\"533\" srcset=\"https://ww2.kqed.org/app/uploads/sites/24/2020/11/2ZAK03908-800x533.jpg 800w, https://ww2.kqed.org/app/uploads/sites/24/2020/11/2ZAK03908-1020x680.jpg 1020w, https://ww2.kqed.org/app/uploads/sites/24/2020/11/2ZAK03908-160x107.jpg 160w, https://ww2.kqed.org/app/uploads/sites/24/2020/11/2ZAK03908-768x512.jpg 768w, https://ww2.kqed.org/app/uploads/sites/24/2020/11/2ZAK03908.jpg 1200w\" sizes=\"(max-width: 800px) 100vw, 800px\">\u003cfigcaption class=\"wp-caption-text\">Urmila's family striking a pose during Diwali \u003ccite>(Urmila Ramakrishnan / KQED)\u003c/cite>\u003c/figcaption>\u003c/figure>\n\u003cp>I grew up oscillating between my mother's Bengali traditions of Kali Puja and lighting the kuthu vilaku oil lamp with my father. The women would light tea candles around the house to welcome the goddess of wealth Lakshmi into the home. This year, as newlyweds, Zak and I celebrated our Thalai Deepavali. We sat cross-legged on a beach towel-lined yoga mat with my brother and his fiancé. My dad poured coconut oil into a stainless steel tumbler that was then poured onto our crowns. My father rubbed in the cool oil with his fingertips as some dripped down our necks onto our shoulders. My mother followed, then Zak, who rubbed oil onto our calves and arms. I followed as the next youngest, ending with my brother.\u003c/p>\n\u003cfigure id=\"attachment_139545\" class=\"wp-caption alignnone\" style=\"max-width: 800px\">\u003cimg class=\"size-medium wp-image-139545\" src=\"https://ww2.kqed.org/app/uploads/sites/24/2020/11/ZAK03711-800x533.jpg\" alt=\"Two women lighting an oil lamp\" width=\"800\" height=\"533\" srcset=\"https://ww2.kqed.org/app/uploads/sites/24/2020/11/ZAK03711-800x533.jpg 800w, https://ww2.kqed.org/app/uploads/sites/24/2020/11/ZAK03711-1020x680.jpg 1020w, https://ww2.kqed.org/app/uploads/sites/24/2020/11/ZAK03711-160x107.jpg 160w, https://ww2.kqed.org/app/uploads/sites/24/2020/11/ZAK03711-768x512.jpg 768w, https://ww2.kqed.org/app/uploads/sites/24/2020/11/ZAK03711.jpg 1200w\" sizes=\"(max-width: 800px) 100vw, 800px\">\u003cfigcaption class=\"wp-caption-text\">Urmila and her brother's fiancé lighting an oil lamp. \u003ccite>(Urmila Ramakrishnan / KQED)\u003c/cite>\u003c/figcaption>\u003c/figure>\n\u003cp>After, we showered and lit our own kuthu vilaku that we first lit as part of our marriage ceremony. I foraged betel leaves and hibiscus flowers from the backyard with my dad to prepare for prayers, got blessings from my parents and honored both of my grandparents with an offering of almonds and water. I read one of the only letters I had from my maternal grandmother titled \"My Family,\" where she talked about how proud she was of all her children and how happy it made her. It's something I cherish every time because she died when I was two.\u003c/p>\n\u003cfigure id=\"attachment_139546\" class=\"wp-caption alignnone\" style=\"max-width: 800px\">\u003cimg class=\"size-medium wp-image-139546\" src=\"https://ww2.kqed.org/app/uploads/sites/24/2020/11/ZAK03700-800x533.jpg\" alt=\"people lighting an oil lamp\" width=\"800\" height=\"533\" srcset=\"https://ww2.kqed.org/app/uploads/sites/24/2020/11/ZAK03700-800x533.jpg 800w, https://ww2.kqed.org/app/uploads/sites/24/2020/11/ZAK03700-1020x680.jpg 1020w, https://ww2.kqed.org/app/uploads/sites/24/2020/11/ZAK03700-160x107.jpg 160w, https://ww2.kqed.org/app/uploads/sites/24/2020/11/ZAK03700-768x512.jpg 768w, https://ww2.kqed.org/app/uploads/sites/24/2020/11/ZAK03700.jpg 1200w\" sizes=\"(max-width: 800px) 100vw, 800px\">\u003cfigcaption class=\"wp-caption-text\">Urmila, her father, her mother and her brother's fiancé lighting an oil lamp during Diwali. \u003ccite>(Urmila Ramakrishnan / KQED)\u003c/cite>\u003c/figcaption>\u003c/figure>\n\u003cp>After, the kitchen was delightful hungama (mayhem) with the Mixi whirring to blend coconut chutney, the quiet sputter of dosa mavu (batter) hitting the hot tawa, the sizzle of mustard seeds and curry leaves hitting hot oil for a sambar thadka. Rava and paper dosa expanded in our stomachs as they continued to appear on our stainless steel plates, something I always associated with my trips visiting my dad's side of the family, dipping them in sambar, coconut chutney and \u003ca href=\"https://rakskitchen.net/idli-milagai-podi-recipe-how-to-make-idli-podi/\">milagai podi\u003c/a> mixed with sesame oil.\u003c/p>\n\u003cfigure id=\"attachment_139547\" class=\"wp-caption alignnone\" style=\"max-width: 800px\">\u003cimg class=\"size-medium wp-image-139547\" src=\"https://ww2.kqed.org/app/uploads/sites/24/2020/11/2ZAK03650-copy-800x533.jpg\" alt=\"Female version of Buddha\" width=\"800\" height=\"533\" srcset=\"https://ww2.kqed.org/app/uploads/sites/24/2020/11/2ZAK03650-copy-800x533.jpg 800w, https://ww2.kqed.org/app/uploads/sites/24/2020/11/2ZAK03650-copy-1020x680.jpg 1020w, https://ww2.kqed.org/app/uploads/sites/24/2020/11/2ZAK03650-copy-160x107.jpg 160w, https://ww2.kqed.org/app/uploads/sites/24/2020/11/2ZAK03650-copy-768x512.jpg 768w, https://ww2.kqed.org/app/uploads/sites/24/2020/11/2ZAK03650-copy.jpg 1200w\" sizes=\"(max-width: 800px) 100vw, 800px\">\u003cfigcaption class=\"wp-caption-text\">An oil lamp is lit by a female by a female Budha. \u003ccite>(Urmila Ramakrishnan / KQED)\u003c/cite>\u003c/figcaption>\u003c/figure>\n\u003cp>In the evening, we welcomed Lakshmi in by lighting candles and fireworks. This Deepavali was very different from all the others I've celebrated with Zak. It felt brighter and also heavier. Deepavali normally symbolizes the start of the holiday season for me, but this year it felt more like a needed welcoming of light.\u003c/p>\n\u003cp>[ad fullwidth]\u003c/p>\u003cp>\u003c/p>\n","blocks":[],"excerpt":"Thalai Deepavali is a Tamilian tradition for newlyweds. In the time of coronavirus, we're highlighting changing traditions and ways of celebrating this holiday season. ","status":"publish","parent":0,"modified":1621555307,"stats":{"hasAudio":false,"hasVideo":false,"hasChartOrMap":false,"iframeSrcs":[],"hasGoogleForm":false,"hasGallery":false,"hasHearkenModule":false,"hasPolis":false,"paragraphCount":9,"wordCount":730},"headData":{"title":"Thalai Deepavali and New Traditions in the Time of Coronavirus | KQED","description":"Thalai Deepavali is a Tamilian tradition for newlyweds. In the time of coronavirus, we're highlighting changing traditions and ways of celebrating this holiday season. ","ogTitle":"","ogDescription":"","ogImgId":"","twTitle":"","twDescription":"","twImgId":"","schema":{"@context":"http://schema.org","@type":"Article","headline":"Thalai Deepavali and New Traditions in the Time of Coronavirus","datePublished":"2020-11-17T00:02:31.000Z","dateModified":"2021-05-21T00:01:47.000Z","image":"https://cdn.kqed.org/wp-content/uploads/2020/02/KQED-OG-Image@1x.png"}},"disqusIdentifier":"139532 https://ww2.kqed.org/bayareabites/?p=139532","disqusUrl":"https://ww2.kqed.org/bayareabites/2020/11/16/thalai-deepavali-and-new-traditions-in-the-time-of-coronavirus/","disqusTitle":"Thalai Deepavali and New Traditions in the Time of Coronavirus","templateType":"standard","featuredImageType":"standard","path":"/bayareabites/139532/thalai-deepavali-and-new-traditions-in-the-time-of-coronavirus","audioTrackLength":null,"parsedContent":[{"type":"contentString","content":"\u003cdiv class=\"post-body\">\u003cp>\u003cp>The alarm trilled at 5:45am on Saturday, and I dragged myself out of bed to try making kaju katli for the first time. I grew up eating the diamond-shaped, store-bought versions of this cashew confection, lined with silver and gold foil, but it was never something we made at home. After a year of not seeing my family, sheltering-in-place, the election and everything in between, this labor of love was something I could pour myself into while dance-cooking listening to a Bollywood top hits playlist blaring in my headphones. It wasn't picture perfect or lined with shimmering foil, but making these sweets felt like my offering to my family.\u003c/p>\n\u003cp>It was going to be a Deepavali first, like so many other firsts this year. Unlike previous years, where I'd light the solitary candle or sparkler, my partner Zak Kirchner and I made a conscious decision to spend Halloween through New Years at my parents' place in Miami (we were careful by masking, sanitizing, quarantining and getting tested after we landed). With all that 2020 brought, we wanted to root ourselves in long-standing traditions, like lighting candles around the house, celebrating memories (like lighting mile-long firecrackers at my aunt's house in Nagercoil, India the year I moved to the Bay Area) and creating new ones as a new family.\u003c/p>\n\u003cfigure id=\"attachment_139543\" class=\"wp-caption alignnone\" style=\"max-width: 800px\">\u003cimg class=\"size-medium wp-image-139543\" src=\"https://ww2.kqed.org/app/uploads/sites/24/2020/11/ZAK03964-800x533.jpg\" alt=\"kaju katli on a stainless steel plate\" width=\"800\" height=\"533\" srcset=\"https://ww2.kqed.org/app/uploads/sites/24/2020/11/ZAK03964-800x533.jpg 800w, https://ww2.kqed.org/app/uploads/sites/24/2020/11/ZAK03964-1020x680.jpg 1020w, https://ww2.kqed.org/app/uploads/sites/24/2020/11/ZAK03964-160x107.jpg 160w, https://ww2.kqed.org/app/uploads/sites/24/2020/11/ZAK03964-768x512.jpg 768w, https://ww2.kqed.org/app/uploads/sites/24/2020/11/ZAK03964.jpg 1500w\" sizes=\"(max-width: 800px) 100vw, 800px\">\u003cfigcaption class=\"wp-caption-text\">Kaju katli is an Indian sweet made of cashews, sugar, water, cardamom and sometimes ghee. \u003ccite>(Urmila Ramakrishnan / KQED)\u003c/cite>\u003c/figcaption>\u003c/figure>\n\u003cp>Deepavali (or Diwali) is essentially a celebration of light over darkness, unity over conflict. Like most holidays and foods, the way it's celebrated \u003ca href=\"https://www.indiatimes.com/news/india/11-ways-how-diwali-is-celebrated-differently-in-various-regions-of-india-331909.html\">varies from region to region in India\u003c/a>, and from family to family. For me, that means blending both Bengali and Tamilian traditions.\u003c/p>\n\u003cfigure id=\"attachment_139544\" class=\"wp-caption alignnone\" style=\"max-width: 800px\">\u003cimg class=\"size-medium wp-image-139544\" src=\"https://ww2.kqed.org/app/uploads/sites/24/2020/11/2ZAK03908-800x533.jpg\" alt=\"Family posing for a picture\" width=\"800\" height=\"533\" srcset=\"https://ww2.kqed.org/app/uploads/sites/24/2020/11/2ZAK03908-800x533.jpg 800w, https://ww2.kqed.org/app/uploads/sites/24/2020/11/2ZAK03908-1020x680.jpg 1020w, https://ww2.kqed.org/app/uploads/sites/24/2020/11/2ZAK03908-160x107.jpg 160w, https://ww2.kqed.org/app/uploads/sites/24/2020/11/2ZAK03908-768x512.jpg 768w, https://ww2.kqed.org/app/uploads/sites/24/2020/11/2ZAK03908.jpg 1200w\" sizes=\"(max-width: 800px) 100vw, 800px\">\u003cfigcaption class=\"wp-caption-text\">Urmila's family striking a pose during Diwali \u003ccite>(Urmila Ramakrishnan / KQED)\u003c/cite>\u003c/figcaption>\u003c/figure>\n\u003cp>I grew up oscillating between my mother's Bengali traditions of Kali Puja and lighting the kuthu vilaku oil lamp with my father. The women would light tea candles around the house to welcome the goddess of wealth Lakshmi into the home. This year, as newlyweds, Zak and I celebrated our Thalai Deepavali. We sat cross-legged on a beach towel-lined yoga mat with my brother and his fiancé. My dad poured coconut oil into a stainless steel tumbler that was then poured onto our crowns. My father rubbed in the cool oil with his fingertips as some dripped down our necks onto our shoulders. My mother followed, then Zak, who rubbed oil onto our calves and arms. I followed as the next youngest, ending with my brother.\u003c/p>\n\u003cfigure id=\"attachment_139545\" class=\"wp-caption alignnone\" style=\"max-width: 800px\">\u003cimg class=\"size-medium wp-image-139545\" src=\"https://ww2.kqed.org/app/uploads/sites/24/2020/11/ZAK03711-800x533.jpg\" alt=\"Two women lighting an oil lamp\" width=\"800\" height=\"533\" srcset=\"https://ww2.kqed.org/app/uploads/sites/24/2020/11/ZAK03711-800x533.jpg 800w, https://ww2.kqed.org/app/uploads/sites/24/2020/11/ZAK03711-1020x680.jpg 1020w, https://ww2.kqed.org/app/uploads/sites/24/2020/11/ZAK03711-160x107.jpg 160w, https://ww2.kqed.org/app/uploads/sites/24/2020/11/ZAK03711-768x512.jpg 768w, https://ww2.kqed.org/app/uploads/sites/24/2020/11/ZAK03711.jpg 1200w\" sizes=\"(max-width: 800px) 100vw, 800px\">\u003cfigcaption class=\"wp-caption-text\">Urmila and her brother's fiancé lighting an oil lamp. \u003ccite>(Urmila Ramakrishnan / KQED)\u003c/cite>\u003c/figcaption>\u003c/figure>\n\u003cp>After, we showered and lit our own kuthu vilaku that we first lit as part of our marriage ceremony. I foraged betel leaves and hibiscus flowers from the backyard with my dad to prepare for prayers, got blessings from my parents and honored both of my grandparents with an offering of almonds and water. I read one of the only letters I had from my maternal grandmother titled \"My Family,\" where she talked about how proud she was of all her children and how happy it made her. It's something I cherish every time because she died when I was two.\u003c/p>\n\u003cfigure id=\"attachment_139546\" class=\"wp-caption alignnone\" style=\"max-width: 800px\">\u003cimg class=\"size-medium wp-image-139546\" src=\"https://ww2.kqed.org/app/uploads/sites/24/2020/11/ZAK03700-800x533.jpg\" alt=\"people lighting an oil lamp\" width=\"800\" height=\"533\" srcset=\"https://ww2.kqed.org/app/uploads/sites/24/2020/11/ZAK03700-800x533.jpg 800w, https://ww2.kqed.org/app/uploads/sites/24/2020/11/ZAK03700-1020x680.jpg 1020w, https://ww2.kqed.org/app/uploads/sites/24/2020/11/ZAK03700-160x107.jpg 160w, https://ww2.kqed.org/app/uploads/sites/24/2020/11/ZAK03700-768x512.jpg 768w, https://ww2.kqed.org/app/uploads/sites/24/2020/11/ZAK03700.jpg 1200w\" sizes=\"(max-width: 800px) 100vw, 800px\">\u003cfigcaption class=\"wp-caption-text\">Urmila, her father, her mother and her brother's fiancé lighting an oil lamp during Diwali. \u003ccite>(Urmila Ramakrishnan / KQED)\u003c/cite>\u003c/figcaption>\u003c/figure>\n\u003cp>After, the kitchen was delightful hungama (mayhem) with the Mixi whirring to blend coconut chutney, the quiet sputter of dosa mavu (batter) hitting the hot tawa, the sizzle of mustard seeds and curry leaves hitting hot oil for a sambar thadka. Rava and paper dosa expanded in our stomachs as they continued to appear on our stainless steel plates, something I always associated with my trips visiting my dad's side of the family, dipping them in sambar, coconut chutney and \u003ca href=\"https://rakskitchen.net/idli-milagai-podi-recipe-how-to-make-idli-podi/\">milagai podi\u003c/a> mixed with sesame oil.\u003c/p>\n\u003cfigure id=\"attachment_139547\" class=\"wp-caption alignnone\" style=\"max-width: 800px\">\u003cimg class=\"size-medium wp-image-139547\" src=\"https://ww2.kqed.org/app/uploads/sites/24/2020/11/2ZAK03650-copy-800x533.jpg\" alt=\"Female version of Buddha\" width=\"800\" height=\"533\" srcset=\"https://ww2.kqed.org/app/uploads/sites/24/2020/11/2ZAK03650-copy-800x533.jpg 800w, https://ww2.kqed.org/app/uploads/sites/24/2020/11/2ZAK03650-copy-1020x680.jpg 1020w, https://ww2.kqed.org/app/uploads/sites/24/2020/11/2ZAK03650-copy-160x107.jpg 160w, https://ww2.kqed.org/app/uploads/sites/24/2020/11/2ZAK03650-copy-768x512.jpg 768w, https://ww2.kqed.org/app/uploads/sites/24/2020/11/2ZAK03650-copy.jpg 1200w\" sizes=\"(max-width: 800px) 100vw, 800px\">\u003cfigcaption class=\"wp-caption-text\">An oil lamp is lit by a female by a female Budha. \u003ccite>(Urmila Ramakrishnan / KQED)\u003c/cite>\u003c/figcaption>\u003c/figure>\n\u003cp>In the evening, we welcomed Lakshmi in by lighting candles and fireworks. This Deepavali was very different from all the others I've celebrated with Zak. It felt brighter and also heavier. Deepavali normally symbolizes the start of the holiday season for me, but this year it felt more like a needed welcoming of light.\u003c/p>\n\u003cp>\u003c/p>\u003c/div>","attributes":{"named":{},"numeric":[]}},{"type":"component","content":"","name":"ad","attributes":{"named":{"label":"fullwidth"},"numeric":["fullwidth"]}},{"type":"contentString","content":"\u003cdiv class=\"post-body\">\u003cp>\u003c/p>\u003cp>\u003c/p>\n\u003c/div>\u003c/p>","attributes":{"named":{},"numeric":[]}}],"link":"/bayareabites/139532/thalai-deepavali-and-new-traditions-in-the-time-of-coronavirus","authors":["11689"],"categories":["bayareabites_16558","bayareabites_109","bayareabites_752","bayareabites_17082","bayareabites_12"],"tags":["bayareabites_16484","bayareabites_4190","bayareabites_13179","bayareabites_16557","bayareabites_744","bayareabites_17034","bayareabites_17036","bayareabites_17035","bayareabites_3144"],"featImg":"bayareabites_139542","label":"bayareabites"},"bayareabites_139218":{"type":"posts","id":"bayareabites_139218","meta":{"index":"posts_1591205157","site":"bayareabites","id":"139218","score":null,"sort":[1602272647000]},"guestAuthors":[],"slug":"brandon-jew-and-lonely-mountain-farm-walk-you-through-shelling-beans","title":"Brandon Jew and Lonely Mountain Farm Walk You Through Shelling Beans","publishDate":1602272647,"format":"standard","headTitle":"Bay Area Bites | KQED Food","labelTerm":{"site":"bayareabites"},"content":"\u003cp>What’s a fresh shelling bean, and how does it differ from the dried beans you find in your pantry? Chef Brandon Jew of San Francisco’s\u003ca href=\"http://misterjius.com/\"> Mister Jiu’s\u003c/a> stops by the Ferry Plaza Farmers Market in search of fresh shelling beans from\u003ca href=\"https://cuesa.org/seller/lonely-mountain-farm\"> Lonely Mountain Farm\u003c/a>, then provides a quick bean primer and offers tips for preparing perfect shelling beans at home.\u003c/p>\n\u003cp>While most of us are familiar with dried or canned beans, you can find fresh beans still in their pods at the farmers market in the late summer and fall. Nutritionally, shelling beans are similar to dried beans, but they take less time to cook than dried beans and are packed with flavor. Unlike green beans, the pods of shelling beans should be removed before cooking.\u003c/p>\n\u003cp>\u003cspan style=\"font-weight: 400\"> [aside tag=\"recipes\" label=\"More Recipes.\"]\u003c/span>\u003c/p>\n\u003cp>Chinese cuisine incorporates all kinds of beans, and Brandon draws on his experiences eating Chinese bean dishes for inspiration when cooking with shelling beans at Mister Jiu’s. When he lived in Shanghai, he would go to an udon restaurant where they used a bean similar to a pinto bean that was lightly sweetened and incorporated into very spicy dishes. Eating this dish opened his mind to thinking of beans in a different way. A particular dish he loves to make now is traditionally made with bacon, but at Mister Jiu’s they use smoked tofu as the backbone to impart a smokey flavor to the dish. The smoked tofu is cooked in a wok along with leeks, fermented black beans, chilies, chili oil, seasoned with black vinegar, soy sauce, ginger, and cooked shelling beans tossed with their cooking liquid to finish the dish.\u003c/p>\n\u003cfigure id=\"attachment_139223\" class=\"wp-caption alignnone\" style=\"max-width: 800px\">\u003cimg class=\"size-medium wp-image-139223\" src=\"https://ww2.kqed.org/app/uploads/sites/24/2020/10/beans_brandon_kenny-800x533.jpg\" alt=\"Brandon Jiu visiting Kenny Baker of Lonely Mountain Farm at the Ferry Plaza Farmers Market.\" width=\"800\" height=\"533\" srcset=\"https://ww2.kqed.org/app/uploads/sites/24/2020/10/beans_brandon_kenny-800x533.jpg 800w, https://ww2.kqed.org/app/uploads/sites/24/2020/10/beans_brandon_kenny-1020x680.jpg 1020w, https://ww2.kqed.org/app/uploads/sites/24/2020/10/beans_brandon_kenny-160x107.jpg 160w, https://ww2.kqed.org/app/uploads/sites/24/2020/10/beans_brandon_kenny-768x512.jpg 768w, https://ww2.kqed.org/app/uploads/sites/24/2020/10/beans_brandon_kenny.jpg 1500w\" sizes=\"(max-width: 800px) 100vw, 800px\">\u003cfigcaption class=\"wp-caption-text\">Brandon Jiu visiting Kenny Baker of Lonely Mountain Farm at the Ferry Plaza Farmers Market.\u003c/figcaption>\u003c/figure>\n\u003cp>Brandon has formed a special connection with Lonely Mountain Farm, an organic farm in Corralitos, near Santa Cruz. First-generation farmers Kenny and Molly Baker have found their niche growing unusual vegetable and herb varieties, heirloom beans, and cut flowers for farmers markets and restaurants. Support\u003ca href=\"https://cuesa.org/seller/lonely-mountain-farm\"> Lonely Mountain Farm \u003c/a>at the Ferry Plaza Farmers Market on Saturdays, and visit \u003ca href=\"http://misterjius.com/\">Mister Jiu’s\u003c/a> for their seasonal takeout and delivery menu.\u003c/p>\n\u003cp>[ad fullwidth]\u003c/p>\n\u003cp>\u003cem>Brandon Jew and Lonely Mountain Farm will be featured in CUESA's Sunday Supper: A Farm to Home Feast on October 18. \u003ca href=\"https://cuesa.org/event/2020/sunday-supper\">Learn more.\u003c/a>\u003c/em>\u003c/p>\n\u003cp>https://www.youtube.com/watch?v=JtEaFDExGeE&feature=emb_title\u003c/p>\n\u003ch2>Fresh Shelling Beans Tips\u003c/h2>\n\u003cfigure id=\"attachment_139220\" class=\"wp-caption alignnone\" style=\"max-width: 800px\">\u003cimg class=\"size-medium wp-image-139220\" src=\"https://ww2.kqed.org/app/uploads/sites/24/2020/10/beans_varieties-800x533.jpg\" alt=\"Fresh beans from the farmers market (from the left: cranberry, butter, fava, romano) \" width=\"800\" height=\"533\" srcset=\"https://ww2.kqed.org/app/uploads/sites/24/2020/10/beans_varieties-800x533.jpg 800w, https://ww2.kqed.org/app/uploads/sites/24/2020/10/beans_varieties-1020x680.jpg 1020w, https://ww2.kqed.org/app/uploads/sites/24/2020/10/beans_varieties-160x107.jpg 160w, https://ww2.kqed.org/app/uploads/sites/24/2020/10/beans_varieties-768x512.jpg 768w, https://ww2.kqed.org/app/uploads/sites/24/2020/10/beans_varieties.jpg 1500w\" sizes=\"(max-width: 800px) 100vw, 800px\">\u003cfigcaption class=\"wp-caption-text\">Fresh beans from the farmers market (from the left: cranberry, butter, fava, romano) \u003ccite>(Courtesy of CUESA)\u003c/cite>\u003c/figcaption>\u003c/figure>\n\u003cul>\n\u003cli>\u003cstrong>Selecting beans: \u003c/strong>When choosing shelling beans at the farmers market, you’ll find anything from young beans with tight, slightly green pods to more mature beans with brown, leathery, shriveled pods. They are all good; the beans will just have different cooking times, so make sure when shelling them to keep the young, greener beans separate from the more mature beans. If you are cooking younger and older beans together, add the older ones to the pot first and cook them for a few minutes before adding the younger beans, so they finish cooking at the same time.\u003c/li>\n\u003cli>\u003cstrong>Shelling: \u003c/strong>Unlike snap or filet beans, shelling beans are pretty sturdy and do not require delicate prep work, so anyone can help you with the working of shelling them (a great task for kids!). Shelled beans will keep in the refrigerator for a couple days, but Brandon prefers to shell and cook his beans on the same day for best results.\u003c/li>\n\u003cli>\u003cstrong>Cooking: \u003c/strong>Fresh shelling beans don’t require soaking, and they cook in about half the time as dried beans. Brandon always cooks his beans separately before incorporating them into a final dish. This allows time to cook them gently, so that all the starch has been cooked out and the beans are perfectly creamy on the inside (see the recipe below). Try to avoid cooking them to the point where the skins burst, so they keep their shape and texture. The bean should pop in your mouth for that pleasurable eating experience\u003c/li>\n\u003cli>\u003cstrong>Saving the broth: \u003c/strong>The bean cooking liquid is like a stock that’s been imparted with the flavor and starch from cooking the beans. It can be used like pasta cooking water to tighten up sauces and add flavor when finishing a dish. Stir in a couple tablespoons of the liquid along with a little butter or olive oil, and it will bring everything together and be super tasty.\u003c/li>\n\u003cli>\u003cstrong>Using beans: \u003c/strong>At home, Brandon likes to incorporate cooked beans into soups. Combine the cooked beans and some of their liquid in a pot with some broth. In a separate sauté pan, cook some greens, such as spinach, kale, or chard. Add the greens to the beans and broth and season the soup with salt and pepper to taste. Or simply bloom a little garlic in really good olive oil (see the recipe below), then add the cooked beans and some of their broth, stir in a lot of tender herbs, season to taste, and enjoy.\u003c/li>\n\u003c/ul>\n\u003ch2>Perfect Shelling Beans\u003c/h2>\n\u003cfigure id=\"attachment_139222\" class=\"wp-caption alignnone\" style=\"max-width: 800px\">\u003cimg class=\"size-medium wp-image-139222\" src=\"https://ww2.kqed.org/app/uploads/sites/24/2020/10/beans_cranberry_14-800x533.jpg\" alt=\"\" width=\"800\" height=\"533\" srcset=\"https://ww2.kqed.org/app/uploads/sites/24/2020/10/beans_cranberry_14-800x533.jpg 800w, https://ww2.kqed.org/app/uploads/sites/24/2020/10/beans_cranberry_14-1020x680.jpg 1020w, https://ww2.kqed.org/app/uploads/sites/24/2020/10/beans_cranberry_14-160x107.jpg 160w, https://ww2.kqed.org/app/uploads/sites/24/2020/10/beans_cranberry_14-768x512.jpg 768w, https://ww2.kqed.org/app/uploads/sites/24/2020/10/beans_cranberry_14.jpg 1500w\" sizes=\"(max-width: 800px) 100vw, 800px\">\u003cfigcaption class=\"wp-caption-text\">Tongue of Fire cranberry beans \u003ccite>(Courtesy of CUESA)\u003c/cite>\u003c/figcaption>\u003c/figure>\n\u003cp>\u003cem>This is how chef Brandon Jew cooks fresh shelling beans, like the visually stunning Tongue of Fire cranberry beans from Lonely Mountain Farm. This simple recipe is a great side dish to a piece of meat or grilled vegetables, or works as a hearty dish on its own.\u003c/em>\u003c/p>\n\u003cp>\u003cstrong>Ingredients\u003c/strong>\u003c/p>\n\u003cul>\n\u003cli>Fresh shelling beans, such as Tongue of Fire cranberry beans (about 1 pound unshelled beans yields about 2 cups cooked beans)\u003c/li>\n\u003cli>Nice olive oil\u003c/li>\n\u003cli>Garlic, peeled and chopped\u003c/li>\n\u003cli>Bay leaf\u003c/li>\n\u003cli>Hearty herbs like thyme and rosemary, leaves removed from stems\u003c/li>\n\u003cli>Salt and pepper\u003c/li>\n\u003c/ul>\n\u003cp>\u003cstrong>Method\u003c/strong>\u003c/p>\n\u003cp>Open up the outer shell and remove the beans into a bowl. Rinse the beans in water to remove any debris. Drain and set aside.\u003c/p>\n\u003cp>Pour a few glugs of the olive oil into a heavy-bottom pot over medium flame. Bloom the aromatics in the olive oil by adding the garlic, bay leaf, and other herbs and cooking slowly to let the oil infuse with these flavors. Add the drained beans and stir them around to coat the beans with the aromatic oil. Cover with water, with about an inch of water on top of the beans at all times. You want the beans to always be submerged in the water, but just barely, so keep an eye on them and add more water to the pot as needed. Bring the waterto a simmer and cook gently, making sure the beans never go above that gentle simmer.\u003c/p>\n\u003cp>[ad floatright]\u003c/p>\n\u003cp>Cook for 15 minutes, then taste a bean. If it’s fully cooked (creamy, non-starchy inside, with the skin still intact), set them aside in their liquid until you are ready to use them in another dish. If not, keep cooking them gently, checking every 5 to 10 minutes until they reach that perfect consistency. Season to taste with salt and freshly cracked pepper.\u003c/p>\n\n","blocks":[],"excerpt":"It's a little in between seasons this time of year. Shelling beans bridge that gap in stews, chillis and so much more. ","status":"publish","parent":0,"modified":1621632043,"stats":{"hasAudio":false,"hasVideo":true,"hasChartOrMap":false,"iframeSrcs":[],"hasGoogleForm":false,"hasGallery":false,"hasHearkenModule":false,"hasPolis":false,"paragraphCount":13,"wordCount":1181},"headData":{"title":"Brandon Jew and Lonely Mountain Farm Walk You Through Shelling Beans | KQED","description":"It's a little in between seasons this time of year. Shelling beans bridge that gap in stews, chillis and so much more. ","ogTitle":"","ogDescription":"","ogImgId":"","twTitle":"","twDescription":"","twImgId":"","schema":{"@context":"http://schema.org","@type":"Article","headline":"Brandon Jew and Lonely Mountain Farm Walk You Through Shelling Beans","datePublished":"2020-10-09T19:44:07.000Z","dateModified":"2021-05-21T21:20:43.000Z","image":"https://cdn.kqed.org/wp-content/uploads/2020/02/KQED-OG-Image@1x.png"}},"disqusIdentifier":"139218 https://ww2.kqed.org/bayareabites/?p=139218","disqusUrl":"https://ww2.kqed.org/bayareabites/2020/10/09/brandon-jew-and-lonely-mountain-farm-walk-you-through-shelling-beans/","disqusTitle":"Brandon Jew and Lonely Mountain Farm Walk You Through Shelling Beans","path":"/bayareabites/139218/brandon-jew-and-lonely-mountain-farm-walk-you-through-shelling-beans","audioTrackLength":null,"parsedContent":[{"type":"contentString","content":"\u003cdiv class=\"post-body\">\u003cp>\u003cp>What’s a fresh shelling bean, and how does it differ from the dried beans you find in your pantry? Chef Brandon Jew of San Francisco’s\u003ca href=\"http://misterjius.com/\"> Mister Jiu’s\u003c/a> stops by the Ferry Plaza Farmers Market in search of fresh shelling beans from\u003ca href=\"https://cuesa.org/seller/lonely-mountain-farm\"> Lonely Mountain Farm\u003c/a>, then provides a quick bean primer and offers tips for preparing perfect shelling beans at home.\u003c/p>\n\u003cp>While most of us are familiar with dried or canned beans, you can find fresh beans still in their pods at the farmers market in the late summer and fall. Nutritionally, shelling beans are similar to dried beans, but they take less time to cook than dried beans and are packed with flavor. Unlike green beans, the pods of shelling beans should be removed before cooking.\u003c/p>\n\u003cp>\u003cspan style=\"font-weight: 400\"> \u003c/p>\u003c/div>","attributes":{"named":{},"numeric":[]}},{"type":"component","content":"","name":"aside","attributes":{"named":{"tag":"recipes","label":"More Recipes. "},"numeric":[]}},{"type":"contentString","content":"\u003cdiv class=\"post-body\">\u003cp>\u003c/span>\u003c/p>\n\u003cp>Chinese cuisine incorporates all kinds of beans, and Brandon draws on his experiences eating Chinese bean dishes for inspiration when cooking with shelling beans at Mister Jiu’s. When he lived in Shanghai, he would go to an udon restaurant where they used a bean similar to a pinto bean that was lightly sweetened and incorporated into very spicy dishes. Eating this dish opened his mind to thinking of beans in a different way. A particular dish he loves to make now is traditionally made with bacon, but at Mister Jiu’s they use smoked tofu as the backbone to impart a smokey flavor to the dish. The smoked tofu is cooked in a wok along with leeks, fermented black beans, chilies, chili oil, seasoned with black vinegar, soy sauce, ginger, and cooked shelling beans tossed with their cooking liquid to finish the dish.\u003c/p>\n\u003cfigure id=\"attachment_139223\" class=\"wp-caption alignnone\" style=\"max-width: 800px\">\u003cimg class=\"size-medium wp-image-139223\" src=\"https://ww2.kqed.org/app/uploads/sites/24/2020/10/beans_brandon_kenny-800x533.jpg\" alt=\"Brandon Jiu visiting Kenny Baker of Lonely Mountain Farm at the Ferry Plaza Farmers Market.\" width=\"800\" height=\"533\" srcset=\"https://ww2.kqed.org/app/uploads/sites/24/2020/10/beans_brandon_kenny-800x533.jpg 800w, https://ww2.kqed.org/app/uploads/sites/24/2020/10/beans_brandon_kenny-1020x680.jpg 1020w, https://ww2.kqed.org/app/uploads/sites/24/2020/10/beans_brandon_kenny-160x107.jpg 160w, https://ww2.kqed.org/app/uploads/sites/24/2020/10/beans_brandon_kenny-768x512.jpg 768w, https://ww2.kqed.org/app/uploads/sites/24/2020/10/beans_brandon_kenny.jpg 1500w\" sizes=\"(max-width: 800px) 100vw, 800px\">\u003cfigcaption class=\"wp-caption-text\">Brandon Jiu visiting Kenny Baker of Lonely Mountain Farm at the Ferry Plaza Farmers Market.\u003c/figcaption>\u003c/figure>\n\u003cp>Brandon has formed a special connection with Lonely Mountain Farm, an organic farm in Corralitos, near Santa Cruz. First-generation farmers Kenny and Molly Baker have found their niche growing unusual vegetable and herb varieties, heirloom beans, and cut flowers for farmers markets and restaurants. Support\u003ca href=\"https://cuesa.org/seller/lonely-mountain-farm\"> Lonely Mountain Farm \u003c/a>at the Ferry Plaza Farmers Market on Saturdays, and visit \u003ca href=\"http://misterjius.com/\">Mister Jiu’s\u003c/a> for their seasonal takeout and delivery menu.\u003c/p>\n\u003cp>\u003c/p>\u003c/div>","attributes":{"named":{},"numeric":[]}},{"type":"component","content":"","name":"ad","attributes":{"named":{"label":"fullwidth"},"numeric":["fullwidth"]}},{"type":"contentString","content":"\u003cdiv class=\"post-body\">\u003cp>\u003c/p>\n\u003cp>\u003cem>Brandon Jew and Lonely Mountain Farm will be featured in CUESA's Sunday Supper: A Farm to Home Feast on October 18. \u003ca href=\"https://cuesa.org/event/2020/sunday-supper\">Learn more.\u003c/a>\u003c/em>\u003c/p>\u003c/p>\u003cp>\u003cspan class='utils-parseShortcode-shortcodes-__youtubeShortcode__embedYoutube'>\n \u003cspan class='utils-parseShortcode-shortcodes-__youtubeShortcode__embedYoutubeInside'>\n \u003ciframe\n loading='lazy'\n class='utils-parseShortcode-shortcodes-__youtubeShortcode__youtubePlayer'\n type='text/html'\n src='//www.youtube.com/embed/JtEaFDExGeE'\n title='//www.youtube.com/embed/JtEaFDExGeE'\n allowfullscreen='true'\n style='border:0;'>\u003c/iframe>\n \u003c/span>\n \u003c/span>\u003c/p>\u003cp>\u003ch2>Fresh Shelling Beans Tips\u003c/h2>\n\u003cfigure id=\"attachment_139220\" class=\"wp-caption alignnone\" style=\"max-width: 800px\">\u003cimg class=\"size-medium wp-image-139220\" src=\"https://ww2.kqed.org/app/uploads/sites/24/2020/10/beans_varieties-800x533.jpg\" alt=\"Fresh beans from the farmers market (from the left: cranberry, butter, fava, romano) \" width=\"800\" height=\"533\" srcset=\"https://ww2.kqed.org/app/uploads/sites/24/2020/10/beans_varieties-800x533.jpg 800w, https://ww2.kqed.org/app/uploads/sites/24/2020/10/beans_varieties-1020x680.jpg 1020w, https://ww2.kqed.org/app/uploads/sites/24/2020/10/beans_varieties-160x107.jpg 160w, https://ww2.kqed.org/app/uploads/sites/24/2020/10/beans_varieties-768x512.jpg 768w, https://ww2.kqed.org/app/uploads/sites/24/2020/10/beans_varieties.jpg 1500w\" sizes=\"(max-width: 800px) 100vw, 800px\">\u003cfigcaption class=\"wp-caption-text\">Fresh beans from the farmers market (from the left: cranberry, butter, fava, romano) \u003ccite>(Courtesy of CUESA)\u003c/cite>\u003c/figcaption>\u003c/figure>\n\u003cul>\n\u003cli>\u003cstrong>Selecting beans: \u003c/strong>When choosing shelling beans at the farmers market, you’ll find anything from young beans with tight, slightly green pods to more mature beans with brown, leathery, shriveled pods. They are all good; the beans will just have different cooking times, so make sure when shelling them to keep the young, greener beans separate from the more mature beans. If you are cooking younger and older beans together, add the older ones to the pot first and cook them for a few minutes before adding the younger beans, so they finish cooking at the same time.\u003c/li>\n\u003cli>\u003cstrong>Shelling: \u003c/strong>Unlike snap or filet beans, shelling beans are pretty sturdy and do not require delicate prep work, so anyone can help you with the working of shelling them (a great task for kids!). Shelled beans will keep in the refrigerator for a couple days, but Brandon prefers to shell and cook his beans on the same day for best results.\u003c/li>\n\u003cli>\u003cstrong>Cooking: \u003c/strong>Fresh shelling beans don’t require soaking, and they cook in about half the time as dried beans. Brandon always cooks his beans separately before incorporating them into a final dish. This allows time to cook them gently, so that all the starch has been cooked out and the beans are perfectly creamy on the inside (see the recipe below). Try to avoid cooking them to the point where the skins burst, so they keep their shape and texture. The bean should pop in your mouth for that pleasurable eating experience\u003c/li>\n\u003cli>\u003cstrong>Saving the broth: \u003c/strong>The bean cooking liquid is like a stock that’s been imparted with the flavor and starch from cooking the beans. It can be used like pasta cooking water to tighten up sauces and add flavor when finishing a dish. Stir in a couple tablespoons of the liquid along with a little butter or olive oil, and it will bring everything together and be super tasty.\u003c/li>\n\u003cli>\u003cstrong>Using beans: \u003c/strong>At home, Brandon likes to incorporate cooked beans into soups. Combine the cooked beans and some of their liquid in a pot with some broth. In a separate sauté pan, cook some greens, such as spinach, kale, or chard. Add the greens to the beans and broth and season the soup with salt and pepper to taste. Or simply bloom a little garlic in really good olive oil (see the recipe below), then add the cooked beans and some of their broth, stir in a lot of tender herbs, season to taste, and enjoy.\u003c/li>\n\u003c/ul>\n\u003ch2>Perfect Shelling Beans\u003c/h2>\n\u003cfigure id=\"attachment_139222\" class=\"wp-caption alignnone\" style=\"max-width: 800px\">\u003cimg class=\"size-medium wp-image-139222\" src=\"https://ww2.kqed.org/app/uploads/sites/24/2020/10/beans_cranberry_14-800x533.jpg\" alt=\"\" width=\"800\" height=\"533\" srcset=\"https://ww2.kqed.org/app/uploads/sites/24/2020/10/beans_cranberry_14-800x533.jpg 800w, https://ww2.kqed.org/app/uploads/sites/24/2020/10/beans_cranberry_14-1020x680.jpg 1020w, https://ww2.kqed.org/app/uploads/sites/24/2020/10/beans_cranberry_14-160x107.jpg 160w, https://ww2.kqed.org/app/uploads/sites/24/2020/10/beans_cranberry_14-768x512.jpg 768w, https://ww2.kqed.org/app/uploads/sites/24/2020/10/beans_cranberry_14.jpg 1500w\" sizes=\"(max-width: 800px) 100vw, 800px\">\u003cfigcaption class=\"wp-caption-text\">Tongue of Fire cranberry beans \u003ccite>(Courtesy of CUESA)\u003c/cite>\u003c/figcaption>\u003c/figure>\n\u003cp>\u003cem>This is how chef Brandon Jew cooks fresh shelling beans, like the visually stunning Tongue of Fire cranberry beans from Lonely Mountain Farm. This simple recipe is a great side dish to a piece of meat or grilled vegetables, or works as a hearty dish on its own.\u003c/em>\u003c/p>\n\u003cp>\u003cstrong>Ingredients\u003c/strong>\u003c/p>\n\u003cul>\n\u003cli>Fresh shelling beans, such as Tongue of Fire cranberry beans (about 1 pound unshelled beans yields about 2 cups cooked beans)\u003c/li>\n\u003cli>Nice olive oil\u003c/li>\n\u003cli>Garlic, peeled and chopped\u003c/li>\n\u003cli>Bay leaf\u003c/li>\n\u003cli>Hearty herbs like thyme and rosemary, leaves removed from stems\u003c/li>\n\u003cli>Salt and pepper\u003c/li>\n\u003c/ul>\n\u003cp>\u003cstrong>Method\u003c/strong>\u003c/p>\n\u003cp>Open up the outer shell and remove the beans into a bowl. Rinse the beans in water to remove any debris. Drain and set aside.\u003c/p>\n\u003cp>Pour a few glugs of the olive oil into a heavy-bottom pot over medium flame. Bloom the aromatics in the olive oil by adding the garlic, bay leaf, and other herbs and cooking slowly to let the oil infuse with these flavors. Add the drained beans and stir them around to coat the beans with the aromatic oil. Cover with water, with about an inch of water on top of the beans at all times. You want the beans to always be submerged in the water, but just barely, so keep an eye on them and add more water to the pot as needed. Bring the waterto a simmer and cook gently, making sure the beans never go above that gentle simmer.\u003c/p>\n\u003cp>\u003c/p>\u003c/div>","attributes":{"named":{},"numeric":[]}},{"type":"component","content":"","name":"ad","attributes":{"named":{"label":"floatright"},"numeric":["floatright"]}},{"type":"contentString","content":"\u003cdiv class=\"post-body\">\u003cp>\u003c/p>\n\u003cp>Cook for 15 minutes, then taste a bean. If it’s fully cooked (creamy, non-starchy inside, with the skin still intact), set them aside in their liquid until you are ready to use them in another dish. If not, keep cooking them gently, checking every 5 to 10 minutes until they reach that perfect consistency. Season to taste with salt and freshly cracked pepper.\u003c/p>\n\n\u003c/div>\u003c/p>","attributes":{"named":{},"numeric":[]}}],"link":"/bayareabites/139218/brandon-jew-and-lonely-mountain-farm-walk-you-through-shelling-beans","authors":["5484"],"categories":["bayareabites_752","bayareabites_17082","bayareabites_1875","bayareabites_12"],"tags":["bayareabites_1931","bayareabites_16557","bayareabites_744","bayareabites_14775","bayareabites_14738"],"featImg":"bayareabites_139219","label":"bayareabites"},"bayareabites_138836":{"type":"posts","id":"bayareabites_138836","meta":{"index":"posts_1591205157","site":"bayareabites","id":"138836","score":null,"sort":[1597346898000]},"guestAuthors":[],"slug":"flavors-at-home-moms-nigerian-stew-is-three-generations-of-comfort","title":"Mom’s Nigerian Stew Is Three Generations of Comfort","publishDate":1597346898,"format":"standard","headTitle":"Flavors at Home | Bay Area Bites | KQED Food","labelTerm":{},"content":"\u003cp>\u003ci>In light of the shelter-in-place order, many of us have resorted to cooking at home, revisiting old recipes and getting creative with our pantries. Instead of our usual Flavors Worth Finding column with recommendations from restaurants, KQED staffers are sharing the meals they’ve been making at home to find some comfort and grounding during uncertain times.\u003c/i>\u003c/p>\n\u003cp>\u003cspan style=\"font-weight: 400\">When I was about 4-years-old my mother was featured in \u003c/span>\u003ci>\u003cspan style=\"font-weight: 400\">San Francisco Focus Magazine\u003c/span>\u003c/i>\u003cspan style=\"font-weight: 400\">, a publication once run by KQED. In the article, she talked about her stew and its connection to my grandmother, who was a chef in Lagos, Nigeria. Since then, my mother has taught me how to prepare the traditional dish growing up in Oakland. It came back to my mind recently after a family friend shared the article with me. \u003c/span>\u003c/p>\n\u003cp>\u003cspan style=\"font-weight: 400\">Every Nigerian stew is different, from its ingredients to the preparation. Some Nigerians like to add fresh garlic, while others might add a sage leaf. Ultimately, most settle on a method that works for them, and I strongly believe my mother has one of the best ways of making stew. The base starts with freshly pureed organic tomatoes and an array of herbs and spices like Maggi’s bouillon cubes, Lion’s yellow curry powder, fresh basil and red habanero peppers or ground Cameroon peppers. We love ours extra spicy, so we use both peppers. \u003c/span>\u003c/p>\n\u003cfigure id=\"attachment_138839\" class=\"wp-caption alignnone\" style=\"max-width: 768px\">\u003cimg class=\"size-full wp-image-138839\" src=\"https://ww2.kqed.org/app/uploads/sites/24/2020/08/KQED-SF-Focus-Magazine.jpeg\" alt=\"Magazine photo of recipe\" width=\"768\" height=\"1024\" srcset=\"https://ww2.kqed.org/app/uploads/sites/24/2020/08/KQED-SF-Focus-Magazine.jpeg 768w, https://ww2.kqed.org/app/uploads/sites/24/2020/08/KQED-SF-Focus-Magazine-160x213.jpeg 160w\" sizes=\"(max-width: 768px) 100vw, 768px\">\u003cfigcaption class=\"wp-caption-text\">When Anthonia Onyejekwe was about 4-years-old, her mom was featured in a magazine article talking about her version of Nigerian tomato stew. \u003ccite>(Anthonia Onyejekwe / KQED)\u003c/cite>\u003c/figcaption>\u003c/figure>\n\u003cp>\u003cspan style=\"font-weight: 400\">Depending on my mother’s stock, the stew can have assorted meats like beef, chicken, cow skin, goat meat or even fish. For this version, she used bone-in beef. First she places the beef inside a large pot filled with water, herbs, spices and fresh onions. Once that’s cooked, she begins making the stew. A cup of oil is poured into a hot pot, along with more onions, basil, bouillon cubes and curry powder. Next, she adds the blended tomatoes, salt, and ground Cameroon peppers. While the stew is bubbling, she then adds the beef. After the beef simmers and soaks up the flavors, it’s so tender that the meat is nearly falling off the bone. \u003c/span>\u003c/p>\n\u003cp>\u003cspan style=\"font-weight: 400\">The stew is served with fluffy parboiled rice, but it can also be paired with cassava yams and fried plantain. To thoroughly enjoy the stew, it’s best to eat it with a chilled bottle of malta, Hatuey preferably.\u003c/span>\u003c/p>\n\u003cp>[ad fullwidth]\u003c/p>\n\u003cp>\u003cspan style=\"font-weight: 400\">Just like my mother did in the article, I want to dedicate my love for Nigerian stew to my mother and her passion for loving others through cooking. Enjoy!\u003c/span>\u003c/p>\n\u003cp>Here's the version my mom shared in her magazine article:\u003c/p>\n\u003ch2>Nigerian Stew\u003c/h2>\n\u003cp>\u003cstrong>Ingredients\u003c/strong>\u003cbr>\n[aside tag=\"flavors\" label=\"More Flavors at Home\"]\u003cbr>\nFor the beef:\u003c/p>\n\u003cul>\n\u003cli>\u003cspan style=\"font-weight: 400\">2 lbs bone-in beef shank, cubed into 1-2 inch pieces*\u003c/span>\u003c/li>\n\u003cli>\u003cspan style=\"font-weight: 400\">2 cloves of garlic\u003c/span>\u003c/li>\n\u003cli>\u003cspan style=\"font-weight: 400\">1 medium ginger root, peeled\u003c/span>\u003c/li>\n\u003cli>\u003cspan style=\"font-weight: 400\">1 tablespoon Lion’s Curry Powder\u003c/span>\u003c/li>\n\u003cli>\u003cspan style=\"font-weight: 400\">2 Maggi cubes\u003c/span>\u003c/li>\n\u003cli>\u003cspan style=\"font-weight: 400\">2 cups of water\u003c/span>\u003c/li>\n\u003cli>\u003cspan style=\"font-weight: 400\">Salt to taste \u003c/span>\u003c/li>\n\u003cli>\u003cspan style=\"font-weight: 400\">1 red onion, cubed \u003c/span>\u003c/li>\n\u003c/ul>\n\u003cp>For the stew:\u003c/p>\n\u003cul>\n\u003cli>\u003cspan style=\"font-weight: 400\">1 red large onion cubed\u003c/span>\u003c/li>\n\u003cli>\u003cspan style=\"font-weight: 400\">1 cup of canola oil or any other flavorless oil\u003c/span>\u003c/li>\n\u003cli>\u003cspan style=\"font-weight: 400\">5 red or orange habanero peppers blended\u003c/span>\u003c/li>\n\u003cli>\u003cspan style=\"font-weight: 400\">1 tablespoon of Lion’s Curry Powder\u003c/span>\u003c/li>\n\u003cli>\u003cspan style=\"font-weight: 400\">Salt to taste\u003c/span>\u003c/li>\n\u003cli>\u003cspan style=\"font-weight: 400\">1 bunch of chopped fresh basil leaves\u003c/span>\u003c/li>\n\u003cli>\u003cspan style=\"font-weight: 400\">8 Roma tomatoes, blended or 2 14-ounce cans tomato sauce\u003c/span>\u003c/li>\n\u003cli>\u003cspan style=\"font-weight: 400\">Ground Cameroon pepper to taste\u003c/span>\u003c/li>\n\u003cli>\u003cspan style=\"font-weight: 400\">2 Maggi cubes \u003c/span>\u003c/li>\n\u003c/ul>\n\u003cp>* If getting your beef from a butcher, ask them to cube it for you.\u003c/p>\n\u003cp>\u003cstrong>Instructions:\u003c/strong>\u003c/p>\n\u003cp>\u003cspan style=\"font-weight: 400\">In a large pot on medium-high heat, add beef, cubed red onions, one peeled ginger, 2 cloves of garlic, 2 Maggi cubes lion’s curry powder and 2 cups water. Bring to a boil then reduce to a simmer until beef is tender. Remove from heat and drain the excess water from the pot. set aside\u003c/span>\u003c/p>\n\u003cp>\u003c/p>\n\u003cp>\u003cspan style=\"font-weight: 400\">for the stew, heat another pot to medium heat. Add oil, chopped fresh basil, red cubed onion, curry powder and Maggi cubes. Allow the ingredients to fry together until onions are translucent. Next add the fresh blended tomatoes or canned tomato sauce, then add the blended habanero peppers. Let the stew simmer for 15 minutes until the tomatoes are a deep reddish brown. Add the beef to the stew and add salt and Cameroon pepper to taste. Allow the stew simmer for another 15-20 minutes until beef is fall-off-the-bone tender. Serve with parboil rice, fried plantain, or cassava yams. \u003c/span>\u003c/p>\n\n","blocks":[],"excerpt":"Nigerian tomato stew has many versions and methods, but mom's is the best for Anthonia Onyejekwe","status":"publish","parent":0,"modified":1621633648,"stats":{"hasAudio":false,"hasVideo":false,"hasChartOrMap":false,"iframeSrcs":[],"hasGoogleForm":false,"hasGallery":false,"hasHearkenModule":false,"hasPolis":false,"paragraphCount":15,"wordCount":768},"headData":{"title":"Mom’s Nigerian Stew Is Three Generations of Comfort | KQED","description":"Nigerian tomato stew has many versions and methods, but mom's is the best for Anthonia Onyejekwe","ogTitle":"","ogDescription":"","ogImgId":"","twTitle":"","twDescription":"","twImgId":"","schema":{"@context":"http://schema.org","@type":"Article","headline":"Mom’s Nigerian Stew Is Three Generations of Comfort","datePublished":"2020-08-13T19:28:18.000Z","dateModified":"2021-05-21T21:47:28.000Z","image":"https://cdn.kqed.org/wp-content/uploads/2020/02/KQED-OG-Image@1x.png"}},"disqusIdentifier":"138836 https://ww2.kqed.org/bayareabites/?p=138836","disqusUrl":"https://ww2.kqed.org/bayareabites/2020/08/13/flavors-at-home-moms-nigerian-stew-is-three-generations-of-comfort/","disqusTitle":"Mom’s Nigerian Stew Is Three Generations of Comfort","source":"Flavors at Home","nprByline":"Anthonia Onyejekwe","path":"/bayareabites/138836/flavors-at-home-moms-nigerian-stew-is-three-generations-of-comfort","audioTrackLength":null,"parsedContent":[{"type":"contentString","content":"\u003cdiv class=\"post-body\">\u003cp>\u003cp>\u003ci>In light of the shelter-in-place order, many of us have resorted to cooking at home, revisiting old recipes and getting creative with our pantries. Instead of our usual Flavors Worth Finding column with recommendations from restaurants, KQED staffers are sharing the meals they’ve been making at home to find some comfort and grounding during uncertain times.\u003c/i>\u003c/p>\n\u003cp>\u003cspan style=\"font-weight: 400\">When I was about 4-years-old my mother was featured in \u003c/span>\u003ci>\u003cspan style=\"font-weight: 400\">San Francisco Focus Magazine\u003c/span>\u003c/i>\u003cspan style=\"font-weight: 400\">, a publication once run by KQED. In the article, she talked about her stew and its connection to my grandmother, who was a chef in Lagos, Nigeria. Since then, my mother has taught me how to prepare the traditional dish growing up in Oakland. It came back to my mind recently after a family friend shared the article with me. \u003c/span>\u003c/p>\n\u003cp>\u003cspan style=\"font-weight: 400\">Every Nigerian stew is different, from its ingredients to the preparation. Some Nigerians like to add fresh garlic, while others might add a sage leaf. Ultimately, most settle on a method that works for them, and I strongly believe my mother has one of the best ways of making stew. The base starts with freshly pureed organic tomatoes and an array of herbs and spices like Maggi’s bouillon cubes, Lion’s yellow curry powder, fresh basil and red habanero peppers or ground Cameroon peppers. We love ours extra spicy, so we use both peppers. \u003c/span>\u003c/p>\n\u003cfigure id=\"attachment_138839\" class=\"wp-caption alignnone\" style=\"max-width: 768px\">\u003cimg class=\"size-full wp-image-138839\" src=\"https://ww2.kqed.org/app/uploads/sites/24/2020/08/KQED-SF-Focus-Magazine.jpeg\" alt=\"Magazine photo of recipe\" width=\"768\" height=\"1024\" srcset=\"https://ww2.kqed.org/app/uploads/sites/24/2020/08/KQED-SF-Focus-Magazine.jpeg 768w, https://ww2.kqed.org/app/uploads/sites/24/2020/08/KQED-SF-Focus-Magazine-160x213.jpeg 160w\" sizes=\"(max-width: 768px) 100vw, 768px\">\u003cfigcaption class=\"wp-caption-text\">When Anthonia Onyejekwe was about 4-years-old, her mom was featured in a magazine article talking about her version of Nigerian tomato stew. \u003ccite>(Anthonia Onyejekwe / KQED)\u003c/cite>\u003c/figcaption>\u003c/figure>\n\u003cp>\u003cspan style=\"font-weight: 400\">Depending on my mother’s stock, the stew can have assorted meats like beef, chicken, cow skin, goat meat or even fish. For this version, she used bone-in beef. First she places the beef inside a large pot filled with water, herbs, spices and fresh onions. Once that’s cooked, she begins making the stew. A cup of oil is poured into a hot pot, along with more onions, basil, bouillon cubes and curry powder. Next, she adds the blended tomatoes, salt, and ground Cameroon peppers. While the stew is bubbling, she then adds the beef. After the beef simmers and soaks up the flavors, it’s so tender that the meat is nearly falling off the bone. \u003c/span>\u003c/p>\n\u003cp>\u003cspan style=\"font-weight: 400\">The stew is served with fluffy parboiled rice, but it can also be paired with cassava yams and fried plantain. To thoroughly enjoy the stew, it’s best to eat it with a chilled bottle of malta, Hatuey preferably.\u003c/span>\u003c/p>\n\u003cp>\u003c/p>\u003c/div>","attributes":{"named":{},"numeric":[]}},{"type":"component","content":"","name":"ad","attributes":{"named":{"label":"fullwidth"},"numeric":["fullwidth"]}},{"type":"contentString","content":"\u003cdiv class=\"post-body\">\u003cp>\u003c/p>\n\u003cp>\u003cspan style=\"font-weight: 400\">Just like my mother did in the article, I want to dedicate my love for Nigerian stew to my mother and her passion for loving others through cooking. Enjoy!\u003c/span>\u003c/p>\n\u003cp>Here's the version my mom shared in her magazine article:\u003c/p>\n\u003ch2>Nigerian Stew\u003c/h2>\n\u003cp>\u003cstrong>Ingredients\u003c/strong>\u003cbr>\n\u003c/p>\u003c/div>","attributes":{"named":{},"numeric":[]}},{"type":"component","content":"","name":"aside","attributes":{"named":{"tag":"flavors","label":"More Flavors at Home "},"numeric":[]}},{"type":"contentString","content":"\u003cdiv class=\"post-body\">\u003cp>\u003cbr>\nFor the beef:\u003c/p>\n\u003cul>\n\u003cli>\u003cspan style=\"font-weight: 400\">2 lbs bone-in beef shank, cubed into 1-2 inch pieces*\u003c/span>\u003c/li>\n\u003cli>\u003cspan style=\"font-weight: 400\">2 cloves of garlic\u003c/span>\u003c/li>\n\u003cli>\u003cspan style=\"font-weight: 400\">1 medium ginger root, peeled\u003c/span>\u003c/li>\n\u003cli>\u003cspan style=\"font-weight: 400\">1 tablespoon Lion’s Curry Powder\u003c/span>\u003c/li>\n\u003cli>\u003cspan style=\"font-weight: 400\">2 Maggi cubes\u003c/span>\u003c/li>\n\u003cli>\u003cspan style=\"font-weight: 400\">2 cups of water\u003c/span>\u003c/li>\n\u003cli>\u003cspan style=\"font-weight: 400\">Salt to taste \u003c/span>\u003c/li>\n\u003cli>\u003cspan style=\"font-weight: 400\">1 red onion, cubed \u003c/span>\u003c/li>\n\u003c/ul>\n\u003cp>For the stew:\u003c/p>\n\u003cul>\n\u003cli>\u003cspan style=\"font-weight: 400\">1 red large onion cubed\u003c/span>\u003c/li>\n\u003cli>\u003cspan style=\"font-weight: 400\">1 cup of canola oil or any other flavorless oil\u003c/span>\u003c/li>\n\u003cli>\u003cspan style=\"font-weight: 400\">5 red or orange habanero peppers blended\u003c/span>\u003c/li>\n\u003cli>\u003cspan style=\"font-weight: 400\">1 tablespoon of Lion’s Curry Powder\u003c/span>\u003c/li>\n\u003cli>\u003cspan style=\"font-weight: 400\">Salt to taste\u003c/span>\u003c/li>\n\u003cli>\u003cspan style=\"font-weight: 400\">1 bunch of chopped fresh basil leaves\u003c/span>\u003c/li>\n\u003cli>\u003cspan style=\"font-weight: 400\">8 Roma tomatoes, blended or 2 14-ounce cans tomato sauce\u003c/span>\u003c/li>\n\u003cli>\u003cspan style=\"font-weight: 400\">Ground Cameroon pepper to taste\u003c/span>\u003c/li>\n\u003cli>\u003cspan style=\"font-weight: 400\">2 Maggi cubes \u003c/span>\u003c/li>\n\u003c/ul>\n\u003cp>* If getting your beef from a butcher, ask them to cube it for you.\u003c/p>\n\u003cp>\u003cstrong>Instructions:\u003c/strong>\u003c/p>\n\u003cp>\u003cspan style=\"font-weight: 400\">In a large pot on medium-high heat, add beef, cubed red onions, one peeled ginger, 2 cloves of garlic, 2 Maggi cubes lion’s curry powder and 2 cups water. Bring to a boil then reduce to a simmer until beef is tender. Remove from heat and drain the excess water from the pot. set aside\u003c/span>\u003c/p>\n\u003cp>\u003c/p>\n\u003cp>\u003cspan style=\"font-weight: 400\">for the stew, heat another pot to medium heat. Add oil, chopped fresh basil, red cubed onion, curry powder and Maggi cubes. Allow the ingredients to fry together until onions are translucent. Next add the fresh blended tomatoes or canned tomato sauce, then add the blended habanero peppers. Let the stew simmer for 15 minutes until the tomatoes are a deep reddish brown. Add the beef to the stew and add salt and Cameroon pepper to taste. Allow the stew simmer for another 15-20 minutes until beef is fall-off-the-bone tender. Serve with parboil rice, fried plantain, or cassava yams. \u003c/span>\u003c/p>\n\n\u003c/div>\u003c/p>","attributes":{"named":{},"numeric":[]}}],"link":"/bayareabites/138836/flavors-at-home-moms-nigerian-stew-is-three-generations-of-comfort","authors":["byline_bayareabites_138836"],"series":["bayareabites_16895"],"categories":["bayareabites_109","bayareabites_752","bayareabites_17082","bayareabites_12"],"tags":["bayareabites_16557","bayareabites_16622","bayareabites_16576","bayareabites_744","bayareabites_16918","bayareabites_16919","bayareabites_14738"],"featImg":"bayareabites_138837","label":"source_bayareabites_138836"},"bayareabites_137363":{"type":"posts","id":"bayareabites_137363","meta":{"index":"posts_1591205157","site":"bayareabites","id":"137363","score":null,"sort":[1590685245000]},"guestAuthors":[],"slug":"flavors-at-home-missing-family-during-mango-season","title":"Missing Family During Mango Season","publishDate":1590685245,"format":"standard","headTitle":"Bay Area Bites | KQED Food","labelTerm":{},"content":"\u003cp>\u003ci>In light of the shelter-in-place order, many of us have resorted to cooking at home, revisiting old recipes and getting creative with our pantries. Instead of our usual Flavors Worth Finding column with recommendations from restaurants, KQED staffers are sharing the meals they’ve been making at home to find some comfort and grounding during uncertain times.\u003c/i>\u003c/p>\n\u003cp>\u003cspan style=\"font-weight: 400\">It’s mango season in Miami, a three-week period where all the trees are weighed down with hundreds of mangoes. Driving down Old Cutler Road in Coral Gables, you’ll see fallen mangoes picked over by an assortment of animals. \u003c/span>\u003c/p>\n\u003cp>\u003cspan style=\"font-weight: 400\">The backyard of my parents’ house is a paradise of tropical fruits. You’ll find fruits my mom grew up eating in Malaysia, like longan, jambu and lychee. There are starfruit, passionfruit, orange, apple and avocado trees all hiding in plain sight in this little mini forest, an ode to my family’s past and present. And, of course, there are mangoes. So. Many. Mangoes. \u003c/span>\u003c/p>\n\u003cfigure id=\"attachment_137368\" class=\"wp-caption alignnone\" style=\"max-width: 800px\">\u003cimg class=\"size-medium wp-image-137368\" src=\"https://ww2.kqed.org/app/uploads/sites/24/2020/05/IMG_5716-800x600.jpeg\" alt=\"mangai thokku\" width=\"800\" height=\"600\" srcset=\"https://ww2.kqed.org/app/uploads/sites/24/2020/05/IMG_5716-800x600.jpeg 800w, https://ww2.kqed.org/app/uploads/sites/24/2020/05/IMG_5716-160x120.jpeg 160w, https://ww2.kqed.org/app/uploads/sites/24/2020/05/IMG_5716-768x576.jpeg 768w, https://ww2.kqed.org/app/uploads/sites/24/2020/05/IMG_5716-1020x765.jpeg 1020w, https://ww2.kqed.org/app/uploads/sites/24/2020/05/IMG_5716.jpeg 1500w\" sizes=\"(max-width: 800px) 100vw, 800px\">\u003cfigcaption class=\"wp-caption-text\">Urmila's father, Sundaram, making mangai thokku. \u003ccite>(Sundaram Ramakrishnan)\u003c/cite>\u003c/figcaption>\u003c/figure>\n\u003cp>\u003cspan style=\"font-weight: 400\">When calling my parents to catch up, I often interrupt some sort of mango adventure: My dad filling up giant, plastic storage boxes of the red-orange fruit, collecting addresses to send mangoes to friends and family and prepping kacha (unripe, green) mangoes to make mankgai thokku (a \u003c/span>\u003ca href=\"https://www.padhuskitchen.com/2012/05/mango-thokku-manga-thokku-recipe.html\">\u003cspan style=\"font-weight: 400\">Tamilian mango pickle\u003c/span>\u003c/a>\u003cspan style=\"font-weight: 400\">), or my mom pulping and freezing super-ripe mangos for ice cream. \u003c/span>\u003c/p>\n\u003cfigure id=\"attachment_137370\" class=\"wp-caption aligncenter\" style=\"max-width: 800px\">\u003cimg class=\"wp-image-137370 size-medium\" src=\"https://ww2.kqed.org/app/uploads/sites/24/2020/05/FullSizeRender-800x1067.jpg\" alt=\"mangoes on a counter\" width=\"800\" height=\"1067\" srcset=\"https://ww2.kqed.org/app/uploads/sites/24/2020/05/FullSizeRender-800x1067.jpg 800w, https://ww2.kqed.org/app/uploads/sites/24/2020/05/FullSizeRender-160x213.jpg 160w, https://ww2.kqed.org/app/uploads/sites/24/2020/05/FullSizeRender-768x1024.jpg 768w, https://ww2.kqed.org/app/uploads/sites/24/2020/05/FullSizeRender-1020x1360.jpg 1020w, https://ww2.kqed.org/app/uploads/sites/24/2020/05/FullSizeRender.jpg 1500w\" sizes=\"(max-width: 800px) 100vw, 800px\">\u003cfigcaption class=\"wp-caption-text\">Mangoes getting prepped to ship to friends and family. \u003ccite>(Sundaram Ramakrishnan)\u003c/cite>\u003c/figcaption>\u003c/figure>\n\u003cp>\u003cspan style=\"font-weight: 400\">My mom’s birthday was recently, and to my surprise, my brother (who is not the cook or baker in the family) attempted a \u003ca href=\"https://www.foodnetwork.com/recipes/marcela-valladolid/upside-down-mango-cake-3235737\" target=\"_blank\" rel=\"noopener noreferrer\">mango-upside-down cake\u003c/a>. I called in via video chat to watch her blow out a solitary candle, cut the cake and take a bite. I’m not sure why, but during this quarantine, I’m missing my family more than usual. It’s not like I would typically be taking a flight to see them at this time, but there is a sense of displacement and loss. Perhaps it is the classic case of wanting what you know you can’t have.\u003cbr>\n[aside tag='flavors at home, food-featured' label='More Quarantine Cooking Stories.']\u003c/span>\u003c/p>\n\u003cp>[ad fullwidth]\u003c/p>\n\u003cp>\u003cspan style=\"font-weight: 400\">Three days later, a package arrived with my mom’s curvy handwriting scrawled on a USPS priority box. I cut it open with the knife end of a wine key to find a box full of mangoes, the new family heirloom. \u003c/span>\u003c/p>\n\u003cfigure id=\"attachment_137372\" class=\"wp-caption alignnone\" style=\"max-width: 800px\">\u003cimg class=\"size-medium wp-image-137372\" src=\"https://ww2.kqed.org/app/uploads/sites/24/2020/05/IMG_0783-1-800x600.jpg\" alt=\"mangoes in a box\" width=\"800\" height=\"600\" srcset=\"https://ww2.kqed.org/app/uploads/sites/24/2020/05/IMG_0783-1-800x600.jpg 800w, https://ww2.kqed.org/app/uploads/sites/24/2020/05/IMG_0783-1-160x120.jpg 160w, https://ww2.kqed.org/app/uploads/sites/24/2020/05/IMG_0783-1-768x576.jpg 768w, https://ww2.kqed.org/app/uploads/sites/24/2020/05/IMG_0783-1-1020x765.jpg 1020w, https://ww2.kqed.org/app/uploads/sites/24/2020/05/IMG_0783-1.jpg 1500w\" sizes=\"(max-width: 800px) 100vw, 800px\">\u003cfigcaption class=\"wp-caption-text\">A box of mangoes from Urmila's parents house in Florida. \u003ccite>(Urmila Ramakrishnan / KQED)\u003c/cite>\u003c/figcaption>\u003c/figure>\n\u003cp>\u003cspan style=\"font-weight: 400\">Cutting into a mango from my parents’ backyard is a piece of home—a piece of my family and where we’ve been to get to where we are. Biting into that sweet mango flesh with a hint of salt brings me back to the times I was there, armed with a makeshift mango picker—best described as a cross between a broom handle and a makeshift lacrosse cradle—to reach heights of just-ripe mangoes while standing tip-toed. My brother would even attempt to climb the low hanging branches. It’s a memory of measured adventure. A treasure hunt of fruit. A longing for family. \u003c/span>\u003c/p>\n\u003cfigure id=\"attachment_137367\" class=\"wp-caption aligncenter\" style=\"max-width: 800px\">\u003cimg class=\"wp-image-137367 size-medium\" src=\"https://ww2.kqed.org/app/uploads/sites/24/2020/05/61057467141__35D09F23-E5E8-4F7B-A05D-22EA2AB61261-800x930.jpeg\" alt=\"usps boxes\" width=\"800\" height=\"930\" srcset=\"https://ww2.kqed.org/app/uploads/sites/24/2020/05/61057467141__35D09F23-E5E8-4F7B-A05D-22EA2AB61261-800x930.jpeg 800w, https://ww2.kqed.org/app/uploads/sites/24/2020/05/61057467141__35D09F23-E5E8-4F7B-A05D-22EA2AB61261-160x186.jpeg 160w, https://ww2.kqed.org/app/uploads/sites/24/2020/05/61057467141__35D09F23-E5E8-4F7B-A05D-22EA2AB61261-768x892.jpeg 768w, https://ww2.kqed.org/app/uploads/sites/24/2020/05/61057467141__35D09F23-E5E8-4F7B-A05D-22EA2AB61261-1020x1185.jpeg 1020w, https://ww2.kqed.org/app/uploads/sites/24/2020/05/61057467141__35D09F23-E5E8-4F7B-A05D-22EA2AB61261.jpeg 1500w\" sizes=\"(max-width: 800px) 100vw, 800px\">\u003cfigcaption class=\"wp-caption-text\">Boxes of mangoes ready to be shipped to friends and family. \u003ccite>(Sabita Roy)\u003c/cite>\u003c/figcaption>\u003c/figure>\n\u003cp> \u003c/p>\n\u003cp> \u003c/p>\n\u003cp> \u003c/p>\n\u003cp> \u003c/p>\n\u003cp>\u003cspan style=\"font-weight: 400\">As I pulp and prep my own mangoes for the freezer, I think of my mom and how many plastic freezer bags she must have used to store her harvest for the year. I dream of \u003ca href=\"https://www.youtube.com/watch?v=wUBWl8baJjQ\">mango kulfi\u003c/a> and ice cream, which I will eventually make from the pulp. I scour the internet for desserts that will do these mangoes justice. \u003c/span>\u003c/p>\n\u003cp>\u003cspan style=\"font-weight: 400\">I don’t know the next time I’ll see them, but getting a fruit care package means being able to connect through mango lassi, ice cream and sharing recipe inspiration. \u003c/span>\u003c/p>\n\u003cp>\u003cstrong>Mango Ice Cream\u003c/strong>\u003c/p>\n\u003cp>1 14-oz can sweetened condensed milk\u003c/p>\n\u003cp>14 oz heavy whipping cream\u003c/p>\n\u003cp>5-6 cardamom pods, freshly crushed and ground, shells discarded\u003c/p>\n\u003cp>30 oz mango puree\u003c/p>\n\u003cp>\u003c/p>\n\u003cp>In a blender, combine the mango pulp, cardamom powder and sweetened condensed milk. Pour into a late bowl and set aside. Using an electric or standing mixer with the whisk attachment, whip the heavy cream until stiff peaks form. Fold the whipping cream into the mango mixture and pour into a loaf pan or a sealable glass container. Freeze for a minimum of three hours, until the ice cream is set.\u003c/p>\n\n","blocks":[],"excerpt":"For KQED Food editor Urmila Ramakrishnan, mango season brings a longing for family and an assortment of exciting recipes. ","status":"publish","parent":0,"modified":1621634248,"stats":{"hasAudio":false,"hasVideo":false,"hasChartOrMap":false,"iframeSrcs":[],"hasGoogleForm":false,"hasGallery":false,"hasHearkenModule":false,"hasPolis":false,"paragraphCount":17,"wordCount":767},"headData":{"title":"Missing Family During Mango Season | KQED","description":"For KQED Food editor Urmila Ramakrishnan, mango season brings a longing for family and an assortment of exciting recipes. ","ogTitle":"","ogDescription":"","ogImgId":"","twTitle":"","twDescription":"","twImgId":"","schema":{"@context":"http://schema.org","@type":"Article","headline":"Missing Family During Mango Season","datePublished":"2020-05-28T17:00:45.000Z","dateModified":"2021-05-21T21:57:28.000Z","image":"https://cdn.kqed.org/wp-content/uploads/2020/02/KQED-OG-Image@1x.png"}},"disqusIdentifier":"137363 https://ww2.kqed.org/bayareabites/?p=137363","disqusUrl":"https://ww2.kqed.org/bayareabites/2020/05/28/flavors-at-home-missing-family-during-mango-season/","disqusTitle":"Missing Family During Mango Season","source":"Flavors at Home","templateType":"standard","featuredImageType":"standard","path":"/bayareabites/137363/flavors-at-home-missing-family-during-mango-season","audioTrackLength":null,"parsedContent":[{"type":"contentString","content":"\u003cdiv class=\"post-body\">\u003cp>\u003cp>\u003ci>In light of the shelter-in-place order, many of us have resorted to cooking at home, revisiting old recipes and getting creative with our pantries. Instead of our usual Flavors Worth Finding column with recommendations from restaurants, KQED staffers are sharing the meals they’ve been making at home to find some comfort and grounding during uncertain times.\u003c/i>\u003c/p>\n\u003cp>\u003cspan style=\"font-weight: 400\">It’s mango season in Miami, a three-week period where all the trees are weighed down with hundreds of mangoes. Driving down Old Cutler Road in Coral Gables, you’ll see fallen mangoes picked over by an assortment of animals. \u003c/span>\u003c/p>\n\u003cp>\u003cspan style=\"font-weight: 400\">The backyard of my parents’ house is a paradise of tropical fruits. You’ll find fruits my mom grew up eating in Malaysia, like longan, jambu and lychee. There are starfruit, passionfruit, orange, apple and avocado trees all hiding in plain sight in this little mini forest, an ode to my family’s past and present. And, of course, there are mangoes. So. Many. Mangoes. \u003c/span>\u003c/p>\n\u003cfigure id=\"attachment_137368\" class=\"wp-caption alignnone\" style=\"max-width: 800px\">\u003cimg class=\"size-medium wp-image-137368\" src=\"https://ww2.kqed.org/app/uploads/sites/24/2020/05/IMG_5716-800x600.jpeg\" alt=\"mangai thokku\" width=\"800\" height=\"600\" srcset=\"https://ww2.kqed.org/app/uploads/sites/24/2020/05/IMG_5716-800x600.jpeg 800w, https://ww2.kqed.org/app/uploads/sites/24/2020/05/IMG_5716-160x120.jpeg 160w, https://ww2.kqed.org/app/uploads/sites/24/2020/05/IMG_5716-768x576.jpeg 768w, https://ww2.kqed.org/app/uploads/sites/24/2020/05/IMG_5716-1020x765.jpeg 1020w, https://ww2.kqed.org/app/uploads/sites/24/2020/05/IMG_5716.jpeg 1500w\" sizes=\"(max-width: 800px) 100vw, 800px\">\u003cfigcaption class=\"wp-caption-text\">Urmila's father, Sundaram, making mangai thokku. \u003ccite>(Sundaram Ramakrishnan)\u003c/cite>\u003c/figcaption>\u003c/figure>\n\u003cp>\u003cspan style=\"font-weight: 400\">When calling my parents to catch up, I often interrupt some sort of mango adventure: My dad filling up giant, plastic storage boxes of the red-orange fruit, collecting addresses to send mangoes to friends and family and prepping kacha (unripe, green) mangoes to make mankgai thokku (a \u003c/span>\u003ca href=\"https://www.padhuskitchen.com/2012/05/mango-thokku-manga-thokku-recipe.html\">\u003cspan style=\"font-weight: 400\">Tamilian mango pickle\u003c/span>\u003c/a>\u003cspan style=\"font-weight: 400\">), or my mom pulping and freezing super-ripe mangos for ice cream. \u003c/span>\u003c/p>\n\u003cfigure id=\"attachment_137370\" class=\"wp-caption aligncenter\" style=\"max-width: 800px\">\u003cimg class=\"wp-image-137370 size-medium\" src=\"https://ww2.kqed.org/app/uploads/sites/24/2020/05/FullSizeRender-800x1067.jpg\" alt=\"mangoes on a counter\" width=\"800\" height=\"1067\" srcset=\"https://ww2.kqed.org/app/uploads/sites/24/2020/05/FullSizeRender-800x1067.jpg 800w, https://ww2.kqed.org/app/uploads/sites/24/2020/05/FullSizeRender-160x213.jpg 160w, https://ww2.kqed.org/app/uploads/sites/24/2020/05/FullSizeRender-768x1024.jpg 768w, https://ww2.kqed.org/app/uploads/sites/24/2020/05/FullSizeRender-1020x1360.jpg 1020w, https://ww2.kqed.org/app/uploads/sites/24/2020/05/FullSizeRender.jpg 1500w\" sizes=\"(max-width: 800px) 100vw, 800px\">\u003cfigcaption class=\"wp-caption-text\">Mangoes getting prepped to ship to friends and family. \u003ccite>(Sundaram Ramakrishnan)\u003c/cite>\u003c/figcaption>\u003c/figure>\n\u003cp>\u003cspan style=\"font-weight: 400\">My mom’s birthday was recently, and to my surprise, my brother (who is not the cook or baker in the family) attempted a \u003ca href=\"https://www.foodnetwork.com/recipes/marcela-valladolid/upside-down-mango-cake-3235737\" target=\"_blank\" rel=\"noopener noreferrer\">mango-upside-down cake\u003c/a>. I called in via video chat to watch her blow out a solitary candle, cut the cake and take a bite. I’m not sure why, but during this quarantine, I’m missing my family more than usual. It’s not like I would typically be taking a flight to see them at this time, but there is a sense of displacement and loss. Perhaps it is the classic case of wanting what you know you can’t have.\u003cbr>\n\u003c/p>\u003c/div>","attributes":{"named":{},"numeric":[]}},{"type":"component","content":"","name":"aside","attributes":{"named":{"tag":"flavors at home, food-featured","label":"More Quarantine Cooking Stories. "},"numeric":[]}},{"type":"contentString","content":"\u003cdiv class=\"post-body\">\u003cp>\u003c/span>\u003c/p>\n\u003cp>\u003c/p>\u003c/div>","attributes":{"named":{},"numeric":[]}},{"type":"component","content":"","name":"ad","attributes":{"named":{"label":"fullwidth"},"numeric":["fullwidth"]}},{"type":"contentString","content":"\u003cdiv class=\"post-body\">\u003cp>\u003c/p>\n\u003cp>\u003cspan style=\"font-weight: 400\">Three days later, a package arrived with my mom’s curvy handwriting scrawled on a USPS priority box. I cut it open with the knife end of a wine key to find a box full of mangoes, the new family heirloom. \u003c/span>\u003c/p>\n\u003cfigure id=\"attachment_137372\" class=\"wp-caption alignnone\" style=\"max-width: 800px\">\u003cimg class=\"size-medium wp-image-137372\" src=\"https://ww2.kqed.org/app/uploads/sites/24/2020/05/IMG_0783-1-800x600.jpg\" alt=\"mangoes in a box\" width=\"800\" height=\"600\" srcset=\"https://ww2.kqed.org/app/uploads/sites/24/2020/05/IMG_0783-1-800x600.jpg 800w, https://ww2.kqed.org/app/uploads/sites/24/2020/05/IMG_0783-1-160x120.jpg 160w, https://ww2.kqed.org/app/uploads/sites/24/2020/05/IMG_0783-1-768x576.jpg 768w, https://ww2.kqed.org/app/uploads/sites/24/2020/05/IMG_0783-1-1020x765.jpg 1020w, https://ww2.kqed.org/app/uploads/sites/24/2020/05/IMG_0783-1.jpg 1500w\" sizes=\"(max-width: 800px) 100vw, 800px\">\u003cfigcaption class=\"wp-caption-text\">A box of mangoes from Urmila's parents house in Florida. \u003ccite>(Urmila Ramakrishnan / KQED)\u003c/cite>\u003c/figcaption>\u003c/figure>\n\u003cp>\u003cspan style=\"font-weight: 400\">Cutting into a mango from my parents’ backyard is a piece of home—a piece of my family and where we’ve been to get to where we are. Biting into that sweet mango flesh with a hint of salt brings me back to the times I was there, armed with a makeshift mango picker—best described as a cross between a broom handle and a makeshift lacrosse cradle—to reach heights of just-ripe mangoes while standing tip-toed. My brother would even attempt to climb the low hanging branches. It’s a memory of measured adventure. A treasure hunt of fruit. A longing for family. \u003c/span>\u003c/p>\n\u003cfigure id=\"attachment_137367\" class=\"wp-caption aligncenter\" style=\"max-width: 800px\">\u003cimg class=\"wp-image-137367 size-medium\" src=\"https://ww2.kqed.org/app/uploads/sites/24/2020/05/61057467141__35D09F23-E5E8-4F7B-A05D-22EA2AB61261-800x930.jpeg\" alt=\"usps boxes\" width=\"800\" height=\"930\" srcset=\"https://ww2.kqed.org/app/uploads/sites/24/2020/05/61057467141__35D09F23-E5E8-4F7B-A05D-22EA2AB61261-800x930.jpeg 800w, https://ww2.kqed.org/app/uploads/sites/24/2020/05/61057467141__35D09F23-E5E8-4F7B-A05D-22EA2AB61261-160x186.jpeg 160w, https://ww2.kqed.org/app/uploads/sites/24/2020/05/61057467141__35D09F23-E5E8-4F7B-A05D-22EA2AB61261-768x892.jpeg 768w, https://ww2.kqed.org/app/uploads/sites/24/2020/05/61057467141__35D09F23-E5E8-4F7B-A05D-22EA2AB61261-1020x1185.jpeg 1020w, https://ww2.kqed.org/app/uploads/sites/24/2020/05/61057467141__35D09F23-E5E8-4F7B-A05D-22EA2AB61261.jpeg 1500w\" sizes=\"(max-width: 800px) 100vw, 800px\">\u003cfigcaption class=\"wp-caption-text\">Boxes of mangoes ready to be shipped to friends and family. \u003ccite>(Sabita Roy)\u003c/cite>\u003c/figcaption>\u003c/figure>\n\u003cp> \u003c/p>\n\u003cp> \u003c/p>\n\u003cp> \u003c/p>\n\u003cp> \u003c/p>\n\u003cp>\u003cspan style=\"font-weight: 400\">As I pulp and prep my own mangoes for the freezer, I think of my mom and how many plastic freezer bags she must have used to store her harvest for the year. I dream of \u003ca href=\"https://www.youtube.com/watch?v=wUBWl8baJjQ\">mango kulfi\u003c/a> and ice cream, which I will eventually make from the pulp. I scour the internet for desserts that will do these mangoes justice. \u003c/span>\u003c/p>\n\u003cp>\u003cspan style=\"font-weight: 400\">I don’t know the next time I’ll see them, but getting a fruit care package means being able to connect through mango lassi, ice cream and sharing recipe inspiration. \u003c/span>\u003c/p>\n\u003cp>\u003cstrong>Mango Ice Cream\u003c/strong>\u003c/p>\n\u003cp>1 14-oz can sweetened condensed milk\u003c/p>\n\u003cp>14 oz heavy whipping cream\u003c/p>\n\u003cp>5-6 cardamom pods, freshly crushed and ground, shells discarded\u003c/p>\n\u003cp>30 oz mango puree\u003c/p>\n\u003cp>\u003c/p>\n\u003cp>In a blender, combine the mango pulp, cardamom powder and sweetened condensed milk. Pour into a late bowl and set aside. Using an electric or standing mixer with the whisk attachment, whip the heavy cream until stiff peaks form. Fold the whipping cream into the mango mixture and pour into a loaf pan or a sealable glass container. Freeze for a minimum of three hours, until the ice cream is set.\u003c/p>\n\n\u003c/div>\u003c/p>","attributes":{"named":{},"numeric":[]}}],"link":"/bayareabites/137363/flavors-at-home-missing-family-during-mango-season","authors":["11689"],"categories":["bayareabites_109","bayareabites_752","bayareabites_17082","bayareabites_10916","bayareabites_12"],"tags":["bayareabites_16618","bayareabites_16617","bayareabites_16622","bayareabites_16536","bayareabites_16576","bayareabites_16621","bayareabites_16613","bayareabites_16619","bayareabites_16620"],"featImg":"bayareabites_137369","label":"source_bayareabites_137363"},"bayareabites_137381":{"type":"posts","id":"bayareabites_137381","meta":{"index":"posts_1591205157","site":"bayareabites","id":"137381","score":null,"sort":[1590624207000]},"guestAuthors":[],"slug":"what-its-like-to-move-a-food-manufacturing-facility-in-the-middle-of-a-pandemic","title":"What It’s Like to Move a Food Manufacturing Facility in the Middle of a Pandemic","publishDate":1590624207,"format":"standard","headTitle":"Bay Area Bites | KQED Food","labelTerm":{"site":"bayareabites"},"content":"\u003cp>\u003cspan style=\"font-weight: 400\">Before the COVID-19 pandemic, the Torani Syrups factory lunchroom was where employees gathered around the table, shared meals and took breaks. Now, everything has changed. Chairs have been removed to promote social distancing; every employee is required to sanitize their eating area and workspace; bosses have changed the way they bring in food for their workers on special occasions. Now that the Bay Area company is in the process of moving its South San Francisco facility to San Leandro, it’s facing challenges it never expected. \u003c/span>\u003c/p>\n\u003cp>\u003cspan style=\"font-weight: 400\">Torani \u003c/span>\u003ca href=\"https://www.sfchronicle.com/food/article/Food-manufacturers-find-a-home-in-San-Leandro-14928210.php\">\u003cspan style=\"font-weight: 400\">first announced plans to move\u003c/span>\u003c/a> back in December\u003cspan style=\"font-weight: 400\">. The company had outgrown its space, and the rent was going to increase. “We were faced with a need to move to continue to grow,” says CEO Melanie Dulbecco. “We’re currently paying rent in three locations right now, and it’s really hard. Rent in the Bay Area is not an easy thing.” \u003c/span>\u003c/p>\n\u003cp>\u003cspan style=\"font-weight: 400\">Then March marked the start of the Bay Area’s shelter-in-place orders, and the company encountered a whole new set of hurdles. It’s one thing to move a factory under normal circumstances. There’s an update in technology, training employees on the new factory lines, compliance certifications, fire alarm testing and a massive migration of people. \u003c/span>\u003c/p>\n\u003cp>\u003cspan style=\"font-weight: 400\">But during the pandemic, Dulbecco had to figure out how to do all of that safely. She originally had plans to move in May and in the beginning of June. But that was no longer feasible. The company developed a task force to look at different solutions. It was able to extend its lease on one of its South San Francisco buildings for a month. “It was expensive, but we needed to do it,” says Dulbecco. “We couldn’t extend the other building because Amazon is already renting it. So we’re up against a wall.” \u003c/span>\u003c/p>\n\u003cp>\u003cspan style=\"font-weight: 400\">And Torani couldn’t wait until the pandemic and shelter-in-place cleared to start the move. “We wanted to move forward, and we needed to move forward,” says Dulbecco.\u003c/span>\u003c/p>\n\u003cfigure id=\"attachment_137382\" class=\"wp-caption alignnone\" style=\"max-width: 800px\">\u003cimg class=\"size-medium wp-image-137382\" src=\"https://ww2.kqed.org/app/uploads/sites/24/2020/05/Exterior-Corner-800x533.jpg\" alt=\"The exterior of the new Torani syrup factory facility\" width=\"800\" height=\"533\" srcset=\"https://ww2.kqed.org/app/uploads/sites/24/2020/05/Exterior-Corner-800x533.jpg 800w, https://ww2.kqed.org/app/uploads/sites/24/2020/05/Exterior-Corner-160x107.jpg 160w, https://ww2.kqed.org/app/uploads/sites/24/2020/05/Exterior-Corner-768x512.jpg 768w, https://ww2.kqed.org/app/uploads/sites/24/2020/05/Exterior-Corner-1020x680.jpg 1020w, https://ww2.kqed.org/app/uploads/sites/24/2020/05/Exterior-Corner.jpg 1086w\" sizes=\"(max-width: 800px) 100vw, 800px\">\u003cfigcaption class=\"wp-caption-text\">The exterior of the new San Leandro facility. \u003ccite>(Torani)\u003c/cite>\u003c/figcaption>\u003c/figure>\n\u003cp>\u003cspan style=\"font-weight: 400\">The company is currently still producing in South San Francisco, with a quarter of production now happening in the new San Leandro space. The goal is to move one line of production at a time, which takes about six weeks to install. “It’s taken a lot of heroics on part of the team members,” says Dulbecco.\u003c/span>\u003c/p>\n\u003cp>[ad fullwidth]\u003c/p>\n\u003cp>\u003cspan style=\"font-weight: 400\">One of those team members is Greg Phillips, who is the director of manufacturing at Torani. He’s been with the company for seven years and runs all of the manufacturing operations. “It’s been interesting,” says Phillips. “The whole world changed in March, and it’s been a real challenge, but it’s also been extremely rewarding.”\u003c/span>\u003c/p>\n\u003cp>\u003cspan style=\"font-weight: 400\">Possibly one of the biggest difficulties has been training employees on the new lines built at the San Leandro facility. Phillips says that how they’ve approached training in the coronavirus era has “fundamentally changed.” There are steps like limiting the number of people in a training room, sanitizing desks and reconfiguring communication in an already noisy factory. \u003c/span>\u003c/p>\n\u003cp>\u003cspan style=\"font-weight: 400\">In a typical training, Phillips would have five to seven people clustered around a 10-foot area looking at an iPad or training apparatus. “In manufacturing, you’re touching buttons, you’re clearing a jam that’s bottling,” says Phillips. It’s hands-on work that can’t really be replaced by a Zoom meeting or a how-to video. It’s tactile and requires in-person supervision. To work safely under those parameters, the company has staggered its working hours and training sessions. It has also reduced the number of people per training. Phillips also mentioned that the company is trying to limit the number of people who commute between the two factories while they’re in transition. \u003c/span>\u003c/p>\n\u003cfigure id=\"attachment_137383\" class=\"wp-caption alignnone\" style=\"max-width: 800px\">\u003cimg class=\"size-medium wp-image-137383\" src=\"https://ww2.kqed.org/app/uploads/sites/24/2020/05/lobby-800x535.jpg\" alt=\"Sketch of the Torani lobby\" width=\"800\" height=\"535\" srcset=\"https://ww2.kqed.org/app/uploads/sites/24/2020/05/lobby-800x535.jpg 800w, https://ww2.kqed.org/app/uploads/sites/24/2020/05/lobby-160x107.jpg 160w, https://ww2.kqed.org/app/uploads/sites/24/2020/05/lobby-768x514.jpg 768w, https://ww2.kqed.org/app/uploads/sites/24/2020/05/lobby-1020x682.jpg 1020w, https://ww2.kqed.org/app/uploads/sites/24/2020/05/lobby.jpg 1290w\" sizes=\"(max-width: 800px) 100vw, 800px\">\u003cfigcaption class=\"wp-caption-text\">Sketch of the new Torani lobby. \u003ccite>(Torani)\u003c/cite>\u003c/figcaption>\u003c/figure>\n\u003cp>\u003cspan style=\"font-weight: 400\">One advantage of being in food manufacturing is that workers on the factory line are already used to wearing personal protective equipment. “We probably wash our hands 20-30 times already pre-COVID,” says Phillips. “But now we just have to be really smart about it.” The harder thing for the company is how they’d use the space for things like breaks. \u003c/span>\u003c/p>\n\u003cp>\u003cspan style=\"font-weight: 400\">“We’re not a meatpacking plant,” says Dulbecco. “We don’t have people working shoulder-to-shoulder. But people really connect around the table together.”\u003c/span>\u003c/p>\n\u003cp>\u003c/p>\n\u003cp>\u003cspan style=\"font-weight: 400\">Amid all the changes, one thing that Dulbecco wants to avoid are layoffs. A big part of Torani’s sales come from independent cafes, and with many of them currently closed, the company had to plan for how it could keep retention at 100% with a 20% or 50% downturn in business. So far, it’s been successful. “In our 95-year history, we’ve never had layoffs,” says Dulbecco. “We want to have our 100th anniversary saying the same thing.”\u003c/span>\u003c/p>\n\n","blocks":[],"excerpt":"Moving a factory under normal circumstances isn't easy. Coronavirus presents new challenges for one Bay Area company. ","status":"publish","parent":0,"modified":1621634263,"stats":{"hasAudio":false,"hasVideo":false,"hasChartOrMap":false,"iframeSrcs":[],"hasGoogleForm":false,"hasGallery":false,"hasHearkenModule":false,"hasPolis":false,"paragraphCount":14,"wordCount":877},"headData":{"title":"What It’s Like to Move a Food Manufacturing Facility in the Middle of a Pandemic | KQED","description":"Moving a factory under normal circumstances isn't easy. Coronavirus presents new challenges for one Bay Area company. ","ogTitle":"","ogDescription":"","ogImgId":"","twTitle":"","twDescription":"","twImgId":"","schema":{"@context":"http://schema.org","@type":"Article","headline":"What It’s Like to Move a Food Manufacturing Facility in the Middle of a Pandemic","datePublished":"2020-05-28T00:03:27.000Z","dateModified":"2021-05-21T21:57:43.000Z","image":"https://cdn.kqed.org/wp-content/uploads/2020/02/KQED-OG-Image@1x.png"}},"disqusIdentifier":"137381 https://ww2.kqed.org/bayareabites/?p=137381","disqusUrl":"https://ww2.kqed.org/bayareabites/2020/05/27/what-its-like-to-move-a-food-manufacturing-facility-in-the-middle-of-a-pandemic/","disqusTitle":"What It’s Like to Move a Food Manufacturing Facility in the Middle of a Pandemic","templateType":"standard","featuredImageType":"standard","path":"/bayareabites/137381/what-its-like-to-move-a-food-manufacturing-facility-in-the-middle-of-a-pandemic","audioTrackLength":null,"parsedContent":[{"type":"contentString","content":"\u003cdiv class=\"post-body\">\u003cp>\u003cp>\u003cspan style=\"font-weight: 400\">Before the COVID-19 pandemic, the Torani Syrups factory lunchroom was where employees gathered around the table, shared meals and took breaks. Now, everything has changed. Chairs have been removed to promote social distancing; every employee is required to sanitize their eating area and workspace; bosses have changed the way they bring in food for their workers on special occasions. Now that the Bay Area company is in the process of moving its South San Francisco facility to San Leandro, it’s facing challenges it never expected. \u003c/span>\u003c/p>\n\u003cp>\u003cspan style=\"font-weight: 400\">Torani \u003c/span>\u003ca href=\"https://www.sfchronicle.com/food/article/Food-manufacturers-find-a-home-in-San-Leandro-14928210.php\">\u003cspan style=\"font-weight: 400\">first announced plans to move\u003c/span>\u003c/a> back in December\u003cspan style=\"font-weight: 400\">. The company had outgrown its space, and the rent was going to increase. “We were faced with a need to move to continue to grow,” says CEO Melanie Dulbecco. “We’re currently paying rent in three locations right now, and it’s really hard. Rent in the Bay Area is not an easy thing.” \u003c/span>\u003c/p>\n\u003cp>\u003cspan style=\"font-weight: 400\">Then March marked the start of the Bay Area’s shelter-in-place orders, and the company encountered a whole new set of hurdles. It’s one thing to move a factory under normal circumstances. There’s an update in technology, training employees on the new factory lines, compliance certifications, fire alarm testing and a massive migration of people. \u003c/span>\u003c/p>\n\u003cp>\u003cspan style=\"font-weight: 400\">But during the pandemic, Dulbecco had to figure out how to do all of that safely. She originally had plans to move in May and in the beginning of June. But that was no longer feasible. The company developed a task force to look at different solutions. It was able to extend its lease on one of its South San Francisco buildings for a month. “It was expensive, but we needed to do it,” says Dulbecco. “We couldn’t extend the other building because Amazon is already renting it. So we’re up against a wall.” \u003c/span>\u003c/p>\n\u003cp>\u003cspan style=\"font-weight: 400\">And Torani couldn’t wait until the pandemic and shelter-in-place cleared to start the move. “We wanted to move forward, and we needed to move forward,” says Dulbecco.\u003c/span>\u003c/p>\n\u003cfigure id=\"attachment_137382\" class=\"wp-caption alignnone\" style=\"max-width: 800px\">\u003cimg class=\"size-medium wp-image-137382\" src=\"https://ww2.kqed.org/app/uploads/sites/24/2020/05/Exterior-Corner-800x533.jpg\" alt=\"The exterior of the new Torani syrup factory facility\" width=\"800\" height=\"533\" srcset=\"https://ww2.kqed.org/app/uploads/sites/24/2020/05/Exterior-Corner-800x533.jpg 800w, https://ww2.kqed.org/app/uploads/sites/24/2020/05/Exterior-Corner-160x107.jpg 160w, https://ww2.kqed.org/app/uploads/sites/24/2020/05/Exterior-Corner-768x512.jpg 768w, https://ww2.kqed.org/app/uploads/sites/24/2020/05/Exterior-Corner-1020x680.jpg 1020w, https://ww2.kqed.org/app/uploads/sites/24/2020/05/Exterior-Corner.jpg 1086w\" sizes=\"(max-width: 800px) 100vw, 800px\">\u003cfigcaption class=\"wp-caption-text\">The exterior of the new San Leandro facility. \u003ccite>(Torani)\u003c/cite>\u003c/figcaption>\u003c/figure>\n\u003cp>\u003cspan style=\"font-weight: 400\">The company is currently still producing in South San Francisco, with a quarter of production now happening in the new San Leandro space. The goal is to move one line of production at a time, which takes about six weeks to install. “It’s taken a lot of heroics on part of the team members,” says Dulbecco.\u003c/span>\u003c/p>\n\u003cp>\u003c/p>\u003c/div>","attributes":{"named":{},"numeric":[]}},{"type":"component","content":"","name":"ad","attributes":{"named":{"label":"fullwidth"},"numeric":["fullwidth"]}},{"type":"contentString","content":"\u003cdiv class=\"post-body\">\u003cp>\u003c/p>\n\u003cp>\u003cspan style=\"font-weight: 400\">One of those team members is Greg Phillips, who is the director of manufacturing at Torani. He’s been with the company for seven years and runs all of the manufacturing operations. “It’s been interesting,” says Phillips. “The whole world changed in March, and it’s been a real challenge, but it’s also been extremely rewarding.”\u003c/span>\u003c/p>\n\u003cp>\u003cspan style=\"font-weight: 400\">Possibly one of the biggest difficulties has been training employees on the new lines built at the San Leandro facility. Phillips says that how they’ve approached training in the coronavirus era has “fundamentally changed.” There are steps like limiting the number of people in a training room, sanitizing desks and reconfiguring communication in an already noisy factory. \u003c/span>\u003c/p>\n\u003cp>\u003cspan style=\"font-weight: 400\">In a typical training, Phillips would have five to seven people clustered around a 10-foot area looking at an iPad or training apparatus. “In manufacturing, you’re touching buttons, you’re clearing a jam that’s bottling,” says Phillips. It’s hands-on work that can’t really be replaced by a Zoom meeting or a how-to video. It’s tactile and requires in-person supervision. To work safely under those parameters, the company has staggered its working hours and training sessions. It has also reduced the number of people per training. Phillips also mentioned that the company is trying to limit the number of people who commute between the two factories while they’re in transition. \u003c/span>\u003c/p>\n\u003cfigure id=\"attachment_137383\" class=\"wp-caption alignnone\" style=\"max-width: 800px\">\u003cimg class=\"size-medium wp-image-137383\" src=\"https://ww2.kqed.org/app/uploads/sites/24/2020/05/lobby-800x535.jpg\" alt=\"Sketch of the Torani lobby\" width=\"800\" height=\"535\" srcset=\"https://ww2.kqed.org/app/uploads/sites/24/2020/05/lobby-800x535.jpg 800w, https://ww2.kqed.org/app/uploads/sites/24/2020/05/lobby-160x107.jpg 160w, https://ww2.kqed.org/app/uploads/sites/24/2020/05/lobby-768x514.jpg 768w, https://ww2.kqed.org/app/uploads/sites/24/2020/05/lobby-1020x682.jpg 1020w, https://ww2.kqed.org/app/uploads/sites/24/2020/05/lobby.jpg 1290w\" sizes=\"(max-width: 800px) 100vw, 800px\">\u003cfigcaption class=\"wp-caption-text\">Sketch of the new Torani lobby. \u003ccite>(Torani)\u003c/cite>\u003c/figcaption>\u003c/figure>\n\u003cp>\u003cspan style=\"font-weight: 400\">One advantage of being in food manufacturing is that workers on the factory line are already used to wearing personal protective equipment. “We probably wash our hands 20-30 times already pre-COVID,” says Phillips. “But now we just have to be really smart about it.” The harder thing for the company is how they’d use the space for things like breaks. \u003c/span>\u003c/p>\n\u003cp>\u003cspan style=\"font-weight: 400\">“We’re not a meatpacking plant,” says Dulbecco. “We don’t have people working shoulder-to-shoulder. But people really connect around the table together.”\u003c/span>\u003c/p>\n\u003cp>\u003c/p>\n\u003cp>\u003cspan style=\"font-weight: 400\">Amid all the changes, one thing that Dulbecco wants to avoid are layoffs. A big part of Torani’s sales come from independent cafes, and with many of them currently closed, the company had to plan for how it could keep retention at 100% with a 20% or 50% downturn in business. So far, it’s been successful. “In our 95-year history, we’ve never had layoffs,” says Dulbecco. “We want to have our 100th anniversary saying the same thing.”\u003c/span>\u003c/p>\n\n\u003c/div>\u003c/p>","attributes":{"named":{},"numeric":[]}}],"link":"/bayareabites/137381/what-its-like-to-move-a-food-manufacturing-facility-in-the-middle-of-a-pandemic","authors":["11689"],"categories":["bayareabites_109","bayareabites_752","bayareabites_17082","bayareabites_10916","bayareabites_12","bayareabites_1807"],"tags":["bayareabites_16549","bayareabites_16554","bayareabites_14775","bayareabites_289"],"featImg":"bayareabites_137393","label":"bayareabites"},"bayareabites_137321":{"type":"posts","id":"bayareabites_137321","meta":{"index":"posts_1591205157","site":"bayareabites","id":"137321","score":null,"sort":[1590092406000]},"guestAuthors":[],"slug":"all-stuffed-doughs-lead-to-mandu","title":"All Stuffed Doughs Lead to Mandu","publishDate":1590092406,"format":"standard","headTitle":"Bay Area Bites | KQED Food","labelTerm":{"site":"bayareabites"},"content":"\u003cp>\u003cspan style=\"font-weight: 400\">Growing up, making mandu (Korean dumplings) with my halmoni (grandmother) was the most sacred kitchen ritual. Once or twice a year, the process would begin with her chopping up towering piles of Napa cabbage, onions and re-hydrated shiitake mushrooms. \u003c/span>\u003c/p>\n\u003cp>\u003cspan style=\"font-weight: 400\">Donning plastic kitchen gloves, she would then mixed the pounds and pounds of filling and I, her dutiful sous-chef, waited to pour extra soy sauce or sesame oil into her waiting cupped hands. For the assembly, my aunts and cousins would gather around the kitchen table, placing spoonfuls of filling in the center of circular wrappers and delicately enclosing the dumplings with imperfect folds. The hours of labor were rewarded with plates and plates of golden, pan-fried mandu, as well as filled freezer bags for us to ration until the next time halmoni came to visit.\u003c/span>\u003c/p>\n\u003cfigure id=\"attachment_137323\" class=\"wp-caption alignnone\" style=\"max-width: 800px\">\u003cimg class=\"size-medium wp-image-137323\" src=\"https://ww2.kqed.org/app/uploads/sites/24/2020/05/IMG_3822-Olivia-Won-800x600.jpg\" alt=\"Mandu\" width=\"800\" height=\"600\" srcset=\"https://ww2.kqed.org/app/uploads/sites/24/2020/05/IMG_3822-Olivia-Won-800x600.jpg 800w, https://ww2.kqed.org/app/uploads/sites/24/2020/05/IMG_3822-Olivia-Won-160x120.jpg 160w, https://ww2.kqed.org/app/uploads/sites/24/2020/05/IMG_3822-Olivia-Won-768x576.jpg 768w, https://ww2.kqed.org/app/uploads/sites/24/2020/05/IMG_3822-Olivia-Won-1020x765.jpg 1020w, https://ww2.kqed.org/app/uploads/sites/24/2020/05/IMG_3822-Olivia-Won.jpg 1500w\" sizes=\"(max-width: 800px) 100vw, 800px\">\u003cfigcaption class=\"wp-caption-text\">Mandu are Korean dumplings that are typically pan-fried. \u003ccite>(Olivia Won / KQED)\u003c/cite>\u003c/figcaption>\u003c/figure>\n\u003cp>\u003cspan style=\"font-weight: 400\">These days, I’ve been chasing kitchen projects that I would have previously dismissed as too laborious or time-consuming to stave off idle quarantine hands. One day led me to handmade mezzalunas. With some elbow grease, a flour well filled with egg yolks was transformed into thin sheets of silken yellow dough. I gently folded the pasta over dollops of ricotta and cut out the painfully-cute, half-moon stuffed pasta, boiling some for dinner and freezing the rest for future meals. As I made these Italian dumplings, I found myself longing for my halmoni, who is currently quarantined in Los Angeles. I missed the companionable silence shared in the kitchen, the quiet joy of observing the culinary techniques that she had inherited from her mother, the sound of her laughter at my silly questions. \u003c/span>\u003c/p>\n\u003cp>[aside postID='bayareabites_137011' label='More Flavors at Home]\u003cbr>\n\u003cspan style=\"font-weight: 400\">To quell this brimming heartache, I impulsively embarked on my first solo mandu-making project. With random stuff in my fridge, an unorthodox filling was born: chopped white kimchi, blanched Chinese broccoli, maitake mushrooms, windowsill scallions, and old-ish tofu seasoned with sesame oil, fish sauce and my halmoni’s homemade extra funky soy sauce, all held together with egg as a binder. I defrosted mandu skins and, guided by @hellolisalin’s tutorials, spent the afternoon practicing my folding technique on each precious parcel. Once fried, I promptly ate an entire plate. With each step of the process, I had felt my halmoni’s presence all around me, like a spell: I found my hands imitating hers and my mind circulating warm memories of time spent with her. For a precious moment, I was satiated. \u003c/span>\u003c/p>\n\u003cp>[ad fullwidth]\u003c/p>\u003cp>\u003c/p>\n","blocks":[],"excerpt":"For Olivia Won, quarantine brings back warm memories of making mandu with her grandmother. ","status":"publish","parent":0,"modified":1621634293,"stats":{"hasAudio":false,"hasVideo":false,"hasChartOrMap":false,"iframeSrcs":[],"hasGoogleForm":false,"hasGallery":false,"hasHearkenModule":false,"hasPolis":false,"paragraphCount":6,"wordCount":437},"headData":{"title":"All Stuffed Doughs Lead to Mandu | KQED","description":"For Olivia Won, quarantine brings back warm memories of making mandu with her grandmother. ","ogTitle":"","ogDescription":"","ogImgId":"","twTitle":"","twDescription":"","twImgId":"","schema":{"@context":"http://schema.org","@type":"Article","headline":"All Stuffed Doughs Lead to Mandu","datePublished":"2020-05-21T20:20:06.000Z","dateModified":"2021-05-21T21:58:13.000Z","image":"https://cdn.kqed.org/wp-content/uploads/2020/02/KQED-OG-Image@1x.png"}},"disqusIdentifier":"137321 https://ww2.kqed.org/bayareabites/?p=137321","disqusUrl":"https://ww2.kqed.org/bayareabites/2020/05/21/all-stuffed-doughs-lead-to-mandu/","disqusTitle":"All Stuffed Doughs Lead to Mandu","path":"/bayareabites/137321/all-stuffed-doughs-lead-to-mandu","audioTrackLength":null,"parsedContent":[{"type":"contentString","content":"\u003cdiv class=\"post-body\">\u003cp>\u003cp>\u003cspan style=\"font-weight: 400\">Growing up, making mandu (Korean dumplings) with my halmoni (grandmother) was the most sacred kitchen ritual. Once or twice a year, the process would begin with her chopping up towering piles of Napa cabbage, onions and re-hydrated shiitake mushrooms. \u003c/span>\u003c/p>\n\u003cp>\u003cspan style=\"font-weight: 400\">Donning plastic kitchen gloves, she would then mixed the pounds and pounds of filling and I, her dutiful sous-chef, waited to pour extra soy sauce or sesame oil into her waiting cupped hands. For the assembly, my aunts and cousins would gather around the kitchen table, placing spoonfuls of filling in the center of circular wrappers and delicately enclosing the dumplings with imperfect folds. The hours of labor were rewarded with plates and plates of golden, pan-fried mandu, as well as filled freezer bags for us to ration until the next time halmoni came to visit.\u003c/span>\u003c/p>\n\u003cfigure id=\"attachment_137323\" class=\"wp-caption alignnone\" style=\"max-width: 800px\">\u003cimg class=\"size-medium wp-image-137323\" src=\"https://ww2.kqed.org/app/uploads/sites/24/2020/05/IMG_3822-Olivia-Won-800x600.jpg\" alt=\"Mandu\" width=\"800\" height=\"600\" srcset=\"https://ww2.kqed.org/app/uploads/sites/24/2020/05/IMG_3822-Olivia-Won-800x600.jpg 800w, https://ww2.kqed.org/app/uploads/sites/24/2020/05/IMG_3822-Olivia-Won-160x120.jpg 160w, https://ww2.kqed.org/app/uploads/sites/24/2020/05/IMG_3822-Olivia-Won-768x576.jpg 768w, https://ww2.kqed.org/app/uploads/sites/24/2020/05/IMG_3822-Olivia-Won-1020x765.jpg 1020w, https://ww2.kqed.org/app/uploads/sites/24/2020/05/IMG_3822-Olivia-Won.jpg 1500w\" sizes=\"(max-width: 800px) 100vw, 800px\">\u003cfigcaption class=\"wp-caption-text\">Mandu are Korean dumplings that are typically pan-fried. \u003ccite>(Olivia Won / KQED)\u003c/cite>\u003c/figcaption>\u003c/figure>\n\u003cp>\u003cspan style=\"font-weight: 400\">These days, I’ve been chasing kitchen projects that I would have previously dismissed as too laborious or time-consuming to stave off idle quarantine hands. One day led me to handmade mezzalunas. With some elbow grease, a flour well filled with egg yolks was transformed into thin sheets of silken yellow dough. I gently folded the pasta over dollops of ricotta and cut out the painfully-cute, half-moon stuffed pasta, boiling some for dinner and freezing the rest for future meals. As I made these Italian dumplings, I found myself longing for my halmoni, who is currently quarantined in Los Angeles. I missed the companionable silence shared in the kitchen, the quiet joy of observing the culinary techniques that she had inherited from her mother, the sound of her laughter at my silly questions. \u003c/span>\u003c/p>\n\u003cp>\u003c/p>\u003c/div>","attributes":{"named":{},"numeric":[]}},{"type":"component","content":"","name":"aside","attributes":{"named":{"postid":"bayareabites_137011","label":"label='More Flavors at Home"},"numeric":["label='More","Flavors","at","Home"]}},{"type":"contentString","content":"\u003cdiv class=\"post-body\">\u003cp>\u003cbr>\n\u003cspan style=\"font-weight: 400\">To quell this brimming heartache, I impulsively embarked on my first solo mandu-making project. With random stuff in my fridge, an unorthodox filling was born: chopped white kimchi, blanched Chinese broccoli, maitake mushrooms, windowsill scallions, and old-ish tofu seasoned with sesame oil, fish sauce and my halmoni’s homemade extra funky soy sauce, all held together with egg as a binder. I defrosted mandu skins and, guided by @hellolisalin’s tutorials, spent the afternoon practicing my folding technique on each precious parcel. Once fried, I promptly ate an entire plate. With each step of the process, I had felt my halmoni’s presence all around me, like a spell: I found my hands imitating hers and my mind circulating warm memories of time spent with her. For a precious moment, I was satiated. \u003c/span>\u003c/p>\n\u003cp>\u003c/p>\u003c/div>","attributes":{"named":{},"numeric":[]}},{"type":"component","content":"","name":"ad","attributes":{"named":{"label":"fullwidth"},"numeric":["fullwidth"]}},{"type":"contentString","content":"\u003cdiv class=\"post-body\">\u003cp>\u003c/p>\u003cp>\u003c/p>\n\u003c/div>\u003c/p>","attributes":{"named":{},"numeric":[]}}],"link":"/bayareabites/137321/all-stuffed-doughs-lead-to-mandu","authors":["11614"],"categories":["bayareabites_109","bayareabites_752","bayareabites_17082","bayareabites_12"],"tags":["bayareabites_1544","bayareabites_16557","bayareabites_744","bayareabites_16613","bayareabites_16612"],"featImg":"bayareabites_137322","label":"bayareabites"},"bayareabites_137291":{"type":"posts","id":"bayareabites_137291","meta":{"index":"posts_1591205157","site":"bayareabites","id":"137291","score":null,"sort":[1590086432000]},"guestAuthors":[],"slug":"summer-is-here-how-to-grill-and-barbecue-in-quarantine-or-simply-get-it-delivered","title":"Summer Is Here: How to Grill and Barbecue in Quarantine—Or Simply Get it Delivered","publishDate":1590086432,"format":"standard","headTitle":"Bay Area Bites | KQED Food","labelTerm":{"site":"bayareabites"},"content":"\u003cp>Memorial Day weekend typically marks the start of summer and grilling season. It’s a time to break out the apron and tongs, fire up the charcoal and listen to the sweet sizzle of patties and corn on the cob. It’s all about the slow and low smoke of barbecued brisket, and the Dolores Park or Golden Gate Park cookout for those who don’t have grills in their homes.\u003c/p>\n\u003cp>This year is a little different, though. While that big park-side grill-out may not be advisable, or even possible, there are many different ways to have a barbecue at home. Use this guide to find delivery or pickup options of pre-seasoned meats ready for your oven or grill pan. You can look through recipes to make yourself, try some smoker hacks or go the takeout route.\u003c/p>\n\u003ch2>Delivery and Takeout Options\u003c/h2>\n\u003cp>\u003cstrong>Cook-at-Home Meal Kits and Pre-seasoned Meats\u003c/strong>\u003cbr>\nWhile \u003cb>Perbacco\u003c/b>\u003cspan style=\"font-weight: 400\"> is typically closed the Sunday and Monday of Memorial Day Weekend, the restaurant decided to offer a special menu based on the success of their previous coronavirus holiday kits. The FiDi restaurant doesn’t typically offer takeout, and has had to adapt. One of its more well-known events is a Passover Sedar dinner. But, this year, the restaurant couldn’t host it. Instead, they turned to meal kits, and they’ve seen success with it. “It hasn’t been easy,” says general manager and co-owner Umberto Gibin. “We’re learning day by day. [This] is successful enough, but not sustainable. We’re taking care of the people around us who would normally come into the restaurant.”[aside postID='bayareabites_27318' label='10 Tips for Making Great Hamburgers']\u003c/span>\u003c/p>\n\u003cp>Perbacco's \u003ca href=\"http://www.perbaccosf.com/menus/\">\u003cspan style=\"font-weight: 400\">Memorial Day menu \u003c/span>\u003c/a>\u003cspan style=\"font-weight: 400\">is an a-la-carte list of ready-to-grill items ranging from dry-aged steaks and king salmon to asparagus and fingerling potatoes. Wine and cocktails are also on the menu for takeout. \u003c/span>\u003c/p>\n\u003cfigure id=\"attachment_137295\" class=\"wp-caption alignnone\" style=\"max-width: 800px\">\u003cimg class=\"size-medium wp-image-137295\" src=\"https://ww2.kqed.org/app/uploads/sites/24/2020/05/Palette-at-Home-Memorial-Day-Box-credit-Peter-J.-Hemsley-800x832.jpg\" alt=\"Burger box from Palatte\" width=\"800\" height=\"832\" srcset=\"https://ww2.kqed.org/app/uploads/sites/24/2020/05/Palette-at-Home-Memorial-Day-Box-credit-Peter-J.-Hemsley-800x832.jpg 800w, https://ww2.kqed.org/app/uploads/sites/24/2020/05/Palette-at-Home-Memorial-Day-Box-credit-Peter-J.-Hemsley-160x166.jpg 160w, https://ww2.kqed.org/app/uploads/sites/24/2020/05/Palette-at-Home-Memorial-Day-Box-credit-Peter-J.-Hemsley-768x798.jpg 768w, https://ww2.kqed.org/app/uploads/sites/24/2020/05/Palette-at-Home-Memorial-Day-Box-credit-Peter-J.-Hemsley-1020x1060.jpg 1020w, https://ww2.kqed.org/app/uploads/sites/24/2020/05/Palette-at-Home-Memorial-Day-Box-credit-Peter-J.-Hemsley-1920x1996.jpg 1920w\" sizes=\"(max-width: 800px) 100vw, 800px\">\u003cfigcaption class=\"wp-caption-text\">The burger kit from Palette. \u003ccite>(Peter Hemsley / Palatte)\u003c/cite>\u003c/figcaption>\u003c/figure>\n\u003cp>\u003cb>Palette \u003c/b>\u003cspan style=\"font-weight: 400\">is known for its artistic takes on food, but this Memorial Day, chef-owner Peter Hemsley decided to do simple \u003ca href=\"https://protect-us.mimecast.com/s/5YuYCZ6W5NuMrVKYIzuu4h?domain=palette-sf.com\" target=\"_blank\" rel=\"noopener noreferrer\">burger kits.\u003c/a> “It was the kickoff of summer and what Memorial Day means, outdoor grilling and summertime casual dining,” says Hemsley. “Putting on the takeout picnic or barbecue box is a move toward what people are gravitating toward in the next couple weeks. We went for a more generic Americana feel because we feel like people are desiring and craving some of that right now.” The restaurant is offering a vegetarian patty made from jackfruit, grains, oats, spices, beets and other vegetables that Hemsley calls the Palette Possible burger. \u003c/span>\u003cb>Mina Family Kitchen\u003c/b>\u003cspan style=\"font-weight: 400\"> is going the meal-kit route with a whole rack of ribs, a liter of pulled pork, barbecue chicken and a burger grill kit that are all grill-ready.\u003c/span>\u003ca href=\"http://mx.michaelmina.net/recipe-exchange/download/?file_id=28479&nodl=true\">\u003cspan style=\"font-weight: 400\"> The meal-kit\u003c/span>\u003c/a>\u003cspan style=\"font-weight: 400\"> also comes with sides like coleslaw, potato salad and barbecue beans. The kits ($139) are meant to serve three to four people throughout the weekend. Orders must be made in advance, and there’s a May 21, 5pm deadline for Saturday pickup or delivery and a May 22 deadline for Sunday pickup or delivery. Delivery is available in San Francisco and within a 40-mile radius for an additional charge.\u003c/span>\u003c/p>\n\u003cp>\u003cspan style=\"font-weight: 400\">\u003cstrong>4505 Burgers and BBQ\u003c/strong> isn’t offering any particular specials for the weekend, but its Oakland location will be open on Memorial Day for pickup. The restaurant has \u003c/span>\u003ca href=\"https://www.toasttab.com/4505-burgers-bbq-divisadero/v3#1faa2ad1-dfc4-4e22-83e2-f1fa17eec24b\">\u003cspan style=\"font-weight: 400\">a smoked meat by-the-pound option \u003c/span>\u003c/a>\u003cspan style=\"font-weight: 400\">for those looking to get some barbecue without having to cook.\u003c/span>\u003ca href=\"https://babybluesbbq.com/baby-blues-bbq-menus/menu-san-francisco/\">\u003cspan style=\"font-weight: 400\"> \u003cstrong>Baby Blues BBQ\u003c/strong> in SF\u003c/span>\u003c/a>\u003cspan style=\"font-weight: 400\">, which originally started out of Los Angeles, has its menu available for delivery via DoorDash. \u003c/span>\u003c/p>\n\u003cp>\u003cstrong>Staying Out of the Kitchen Entirely With Pre-Made BBQ\u003c/strong>\u003cbr>\n\u003cspan style=\"font-weight: 400\">In Oakland, \u003c/span>\u003ca href=\"https://www.smokinwoodsbbq.com/\">\u003cspan style=\"font-weight: 400\">\u003cstrong>Smokin Woods BBQ\u003c/strong>\u003c/span>\u003c/a>\u003cspan style=\"font-weight: 400\"> offers next-day pickup or same-day meat plates via Caviar. \u003ca href=\"https://kcsbbq.com/covid-19-hours/\">\u003cstrong>KC's Barbecue\u003c/strong>\u003c/a> in Berkeley is also offering ribs, brisket and chicken for online ordering. For those looking to go beyond smoked meats and burgers, \u003c/span>\u003ca href=\"http://www.rosamundesausagegrill.com/menu.html\">\u003cspan style=\"font-weight: 400\">\u003cstrong>Rosamunde\u003c/strong>\u003c/span>\u003c/a>\u003cspan style=\"font-weight: 400\"> has delivery and takeout options for its sausages in both Oakland and San Francisco. \u003c/span>\u003c/p>\n\u003cp>\u003cspan style=\"font-weight: 400\">In Martinez and Pleasant Hill,\u003c/span>\u003ca href=\"https://www.slowhandbbq.com/\">\u003cspan style=\"font-weight: 400\"> \u003cstrong>Slow Hand Barbecue\u003c/strong>\u003c/span>\u003c/a>\u003cspan style=\"font-weight: 400\"> recently started offering beer and wine sales with orders. Delivery is available through GrubHub, DoorDash or by calling. \u003c/span>\u003c/p>\n\u003cp>\u003cspan style=\"font-weight: 400\">And \u003cstrong>Gott’s\u003c/strong> is probably one of the more well-known local names \u003c/span>\u003ca href=\"https://www.gotts.com/\">\u003cspan style=\"font-weight: 400\">when it comes to burgers\u003c/span>\u003c/a>\u003cspan style=\"font-weight: 400\">. They’re open for pickup and delivery in St. Helena, downtown Napa, the Ferry Building in SF, Walnut Creek, Marin and Palo Alto. \u003c/span>\u003c/p>\n\u003cp>[ad fullwidth]\u003c/p>\n\u003ch2>Cook It Yourself: Tips and Techniques During Shelter-in Place\u003c/h2>\n\u003cp>\u003cstrong>Shopping\u003c/strong>\u003cbr>\n“Fat is flavor,” says Ryan Farr of 4505 Burgers and BBQ. For a good pork chop for grilling, look for one with pearly white fat that’s about half an inch to three-quarters of an inch. Look for dark pork, as opposed to lighter pork resembling chicken breast. In all cuts, especially for meats that are going to be smoked or baked low and slow, a good amount of fat will help add to the flavor. In terms of where to go, Farr recommends Clove and Hoof in Oakland, and Marina Meats or Fatted Calf, both in San Francisco. Several local butcheries are open during the pandemic, which are great spots to look for prime cuts, especially with \u003ca href=\"https://www.npr.org/2020/05/09/853349931/meatpackers-warn-that-the-coronavirus-outbreaks-might-lead-to-meat-shortages\">\u003cspan style=\"font-weight: 400\">potential meat shortages\u003c/span>\u003c/a>\u003cspan style=\"font-weight: 400\">. When it comes to \u003ca href=\"https://www.kqed.org/bayareabites/27318/10-tips-for-making-great-hamburgers\">burgers\u003c/a>, consider grinding your own ratio of lean and fatty meat. The most important thing is looking for quality.\u003c/span>\u003c/p>\n\u003cp>\u003cimg class=\"alignnone size-medium wp-image-137296\" src=\"https://ww2.kqed.org/app/uploads/sites/24/2020/05/barbecue-bbq-beef-charcoal-533325-800x510.jpg\" alt=\"meat and veggies on a grill\" width=\"800\" height=\"510\" srcset=\"https://ww2.kqed.org/app/uploads/sites/24/2020/05/barbecue-bbq-beef-charcoal-533325-800x510.jpg 800w, https://ww2.kqed.org/app/uploads/sites/24/2020/05/barbecue-bbq-beef-charcoal-533325-160x102.jpg 160w, https://ww2.kqed.org/app/uploads/sites/24/2020/05/barbecue-bbq-beef-charcoal-533325-768x490.jpg 768w, https://ww2.kqed.org/app/uploads/sites/24/2020/05/barbecue-bbq-beef-charcoal-533325-1020x651.jpg 1020w, https://ww2.kqed.org/app/uploads/sites/24/2020/05/barbecue-bbq-beef-charcoal-533325.jpg 1500w\" sizes=\"(max-width: 800px) 100vw, 800px\">\u003c/p>\n\u003cp>\u003cstrong>Barbecue Without a Smoker\u003c/strong>[aside postID='bayareabites_95541' label='Fall-Off-The-Bone BBQ Baby Back Ribs with Homemade Barbecue Sauce']\u003cbr>\nThere's a key difference between grilling and barbecue. Grilling is what you do on July 4. It's high heat, over charcoal. Barbecue, however, is all about that low and slow. Here, it's all about the smoke.\u003c/p>\n\u003cp>For those who live in apartments or don’t have a smoker or grill at home, the oven, \u003ca href=\"https://www.thespruceeats.com/best-grill-pans-4160537\">\u003cspan style=\"font-weight: 400\">grill pan\u003c/span>\u003c/a>\u003cspan style=\"font-weight: 400\"> and cast iron pan are the best tools to turn to. When it comes to barbecue, without smoke, the main focus is on the actual technique, says Farr. That means cooking it low and slow with dry heat. For something like a brisket, he recommends setting the oven to 215° F on a non-convection setting if you have a convection oven. For a five-pound piece of pork shoulder without a bone, Farr says he’d bake it at that temperature for five to seven hours until the internal temperature reaches 180° F.\u003c/span>\u003c/p>\n\u003cp>While there may not be smoke, there are other ways to create depth of flavor and browning. Farr recommends using raw turbinado sugar in the dry rub. The sugar will react to the heat over time, and will caramelize and lend color. Patience is also key here. “You don’t want to go in there with your fork and start pulling apart the meat,” says Farr. Picking at it too often and too soon will release the internal moisture, and it can end up drying out the meat. “One big tip is that you don’t want to do anything. After you take it out of the oven, put it on the stove and let it rest for up to an hour. If you start to see steam come out when cutting, it’s still too hot. If you see steam, that’s your juice. That’s the stuff you want to stay in there.”[aside postID='bayareabites_86210' label='Summer Decadence: Crispy Zucchini Fritters with Lemony Yogurt-Herb Dip']\u003c/p>\n\u003cp>For those who really want that smoke flavor, your oven can be converted into a makeshift smoker. Grab some applewood smoking chips from the local grocer, hit them with a blow torch right before you put the meat in the oven and place the chips on the bottom rack of the oven at the same time the meat goes in above the chips. Farr says that putting the chips in at the beginning will be the most effective way to get that smoked flavor. The dry heat at the beginning dries out the moisture, and that’s the point where the smoke will adhere to the meat, he says. The smoke might trip up the smoke detector, so consider this a fair warning to do at your own risk, especially if you have a landlord.\u003c/p>\n\u003cp>There's also a safer way to get a \u003ca href=\"https://www.kqed.org/bayareabites/95541/memorial-day-recipe-fall-off-the-bone-bbq-baby-back-ribs-with-homemade-barbecue-sauce\">serious rack of ribs\u003c/a>. You'll need an oven, a grill and a spicy rub to get things started. \u003c/p>\n\u003cp>\u003cstrong>Grilling Without a Grill\u003c/strong>\u003cbr>\n\u003cspan style=\"font-weight: 400\">In terms of grilling, a good sear and browning can be achieved from the oven broiler or a well seasoned pre-heated cast iron pan. There won’t be grill marks unless you have a grill pan, but both options are good in getting even high-heat for burgers, and simulated grilled veggies. One trick Farr uses for searing steaks or burger patties is to heat the pan until it’s nice and hot on medium heat. It will take some time to get the right temperature, but this will ensure an even temperature on the whole surface of your pan. You can test the temperature by pressing a side of the meat or burger patty you’re grilling in the pan. Right before turning, crank up the heat to high and flip. Farr says that this ensures a sear on both sides. Be careful with oil here because more oil equals more smoke (and more potential for your fire alarm going off).\u003c/span>\u003c/p>\n\u003cp>\u003cstrong>And Finally: Learning about Condiments\u003c/strong>\u003cbr>\n\u003cspan style=\"font-weight: 400\">For a virtual cooking class that focuses on what to put on your burger, \u003c/span>\u003ca href=\"https://protect-us.mimecast.com/s/KHKGC680k4sojALJFBg7OE?domain=avitaltours.com\">\u003cspan style=\"font-weight: 400\">Rooh’s Pujan Sarkar\u003c/span>\u003c/a>\u003cspan style=\"font-weight: 400\"> hosts a how-to on rhubarb chutney on May 24 ($25). Sarkar has a long history with using rhubarb, and the recipe he's teaching is a riff off of tomato-date chutney. \u003c/span>\u003c/p>\n\u003cp>[ad floatright]\u003c/p>\n","blocks":[],"excerpt":"This year's Memorial Day weekend looks a little different. Here's how to still get your BBQ fix.","status":"publish","parent":0,"modified":1621634299,"stats":{"hasAudio":false,"hasVideo":false,"hasChartOrMap":false,"iframeSrcs":[],"hasGoogleForm":false,"hasGallery":false,"hasHearkenModule":false,"hasPolis":false,"paragraphCount":20,"wordCount":1682},"headData":{"title":"Summer Is Here: How to Grill and Barbecue in Quarantine—Or Simply Get it Delivered | KQED","description":"This year's Memorial Day weekend looks a little different. Here's how to still get your BBQ fix.","ogTitle":"","ogDescription":"","ogImgId":"","twTitle":"","twDescription":"","twImgId":"","schema":{"@context":"http://schema.org","@type":"Article","headline":"Summer Is Here: How to Grill and Barbecue in Quarantine—Or Simply Get it Delivered","datePublished":"2020-05-21T18:40:32.000Z","dateModified":"2021-05-21T21:58:19.000Z","image":"https://cdn.kqed.org/wp-content/uploads/2020/02/KQED-OG-Image@1x.png"}},"disqusIdentifier":"137291 https://ww2.kqed.org/bayareabites/?p=137291","disqusUrl":"https://ww2.kqed.org/bayareabites/2020/05/21/summer-is-here-how-to-grill-and-barbecue-in-quarantine-or-simply-get-it-delivered/","disqusTitle":"Summer Is Here: How to Grill and Barbecue in Quarantine—Or Simply Get it Delivered","templateType":"standard","featuredImageType":"standard","path":"/bayareabites/137291/summer-is-here-how-to-grill-and-barbecue-in-quarantine-or-simply-get-it-delivered","audioTrackLength":null,"parsedContent":[{"type":"contentString","content":"\u003cdiv class=\"post-body\">\u003cp>\u003cp>Memorial Day weekend typically marks the start of summer and grilling season. It’s a time to break out the apron and tongs, fire up the charcoal and listen to the sweet sizzle of patties and corn on the cob. It’s all about the slow and low smoke of barbecued brisket, and the Dolores Park or Golden Gate Park cookout for those who don’t have grills in their homes.\u003c/p>\n\u003cp>This year is a little different, though. While that big park-side grill-out may not be advisable, or even possible, there are many different ways to have a barbecue at home. Use this guide to find delivery or pickup options of pre-seasoned meats ready for your oven or grill pan. You can look through recipes to make yourself, try some smoker hacks or go the takeout route.\u003c/p>\n\u003ch2>Delivery and Takeout Options\u003c/h2>\n\u003cp>\u003cstrong>Cook-at-Home Meal Kits and Pre-seasoned Meats\u003c/strong>\u003cbr>\nWhile \u003cb>Perbacco\u003c/b>\u003cspan style=\"font-weight: 400\"> is typically closed the Sunday and Monday of Memorial Day Weekend, the restaurant decided to offer a special menu based on the success of their previous coronavirus holiday kits. The FiDi restaurant doesn’t typically offer takeout, and has had to adapt. One of its more well-known events is a Passover Sedar dinner. But, this year, the restaurant couldn’t host it. Instead, they turned to meal kits, and they’ve seen success with it. “It hasn’t been easy,” says general manager and co-owner Umberto Gibin. “We’re learning day by day. [This] is successful enough, but not sustainable. We’re taking care of the people around us who would normally come into the restaurant.”\u003c/p>\u003c/div>","attributes":{"named":{},"numeric":[]}},{"type":"component","content":"","name":"aside","attributes":{"named":{"postid":"bayareabites_27318","label":"10 Tips for Making Great Hamburgers "},"numeric":[]}},{"type":"contentString","content":"\u003cdiv class=\"post-body\">\u003cp>\u003c/span>\u003c/p>\n\u003cp>Perbacco's \u003ca href=\"http://www.perbaccosf.com/menus/\">\u003cspan style=\"font-weight: 400\">Memorial Day menu \u003c/span>\u003c/a>\u003cspan style=\"font-weight: 400\">is an a-la-carte list of ready-to-grill items ranging from dry-aged steaks and king salmon to asparagus and fingerling potatoes. Wine and cocktails are also on the menu for takeout. \u003c/span>\u003c/p>\n\u003cfigure id=\"attachment_137295\" class=\"wp-caption alignnone\" style=\"max-width: 800px\">\u003cimg class=\"size-medium wp-image-137295\" src=\"https://ww2.kqed.org/app/uploads/sites/24/2020/05/Palette-at-Home-Memorial-Day-Box-credit-Peter-J.-Hemsley-800x832.jpg\" alt=\"Burger box from Palatte\" width=\"800\" height=\"832\" srcset=\"https://ww2.kqed.org/app/uploads/sites/24/2020/05/Palette-at-Home-Memorial-Day-Box-credit-Peter-J.-Hemsley-800x832.jpg 800w, https://ww2.kqed.org/app/uploads/sites/24/2020/05/Palette-at-Home-Memorial-Day-Box-credit-Peter-J.-Hemsley-160x166.jpg 160w, https://ww2.kqed.org/app/uploads/sites/24/2020/05/Palette-at-Home-Memorial-Day-Box-credit-Peter-J.-Hemsley-768x798.jpg 768w, https://ww2.kqed.org/app/uploads/sites/24/2020/05/Palette-at-Home-Memorial-Day-Box-credit-Peter-J.-Hemsley-1020x1060.jpg 1020w, https://ww2.kqed.org/app/uploads/sites/24/2020/05/Palette-at-Home-Memorial-Day-Box-credit-Peter-J.-Hemsley-1920x1996.jpg 1920w\" sizes=\"(max-width: 800px) 100vw, 800px\">\u003cfigcaption class=\"wp-caption-text\">The burger kit from Palette. \u003ccite>(Peter Hemsley / Palatte)\u003c/cite>\u003c/figcaption>\u003c/figure>\n\u003cp>\u003cb>Palette \u003c/b>\u003cspan style=\"font-weight: 400\">is known for its artistic takes on food, but this Memorial Day, chef-owner Peter Hemsley decided to do simple \u003ca href=\"https://protect-us.mimecast.com/s/5YuYCZ6W5NuMrVKYIzuu4h?domain=palette-sf.com\" target=\"_blank\" rel=\"noopener noreferrer\">burger kits.\u003c/a> “It was the kickoff of summer and what Memorial Day means, outdoor grilling and summertime casual dining,” says Hemsley. “Putting on the takeout picnic or barbecue box is a move toward what people are gravitating toward in the next couple weeks. We went for a more generic Americana feel because we feel like people are desiring and craving some of that right now.” The restaurant is offering a vegetarian patty made from jackfruit, grains, oats, spices, beets and other vegetables that Hemsley calls the Palette Possible burger. \u003c/span>\u003cb>Mina Family Kitchen\u003c/b>\u003cspan style=\"font-weight: 400\"> is going the meal-kit route with a whole rack of ribs, a liter of pulled pork, barbecue chicken and a burger grill kit that are all grill-ready.\u003c/span>\u003ca href=\"http://mx.michaelmina.net/recipe-exchange/download/?file_id=28479&nodl=true\">\u003cspan style=\"font-weight: 400\"> The meal-kit\u003c/span>\u003c/a>\u003cspan style=\"font-weight: 400\"> also comes with sides like coleslaw, potato salad and barbecue beans. The kits ($139) are meant to serve three to four people throughout the weekend. Orders must be made in advance, and there’s a May 21, 5pm deadline for Saturday pickup or delivery and a May 22 deadline for Sunday pickup or delivery. Delivery is available in San Francisco and within a 40-mile radius for an additional charge.\u003c/span>\u003c/p>\n\u003cp>\u003cspan style=\"font-weight: 400\">\u003cstrong>4505 Burgers and BBQ\u003c/strong> isn’t offering any particular specials for the weekend, but its Oakland location will be open on Memorial Day for pickup. The restaurant has \u003c/span>\u003ca href=\"https://www.toasttab.com/4505-burgers-bbq-divisadero/v3#1faa2ad1-dfc4-4e22-83e2-f1fa17eec24b\">\u003cspan style=\"font-weight: 400\">a smoked meat by-the-pound option \u003c/span>\u003c/a>\u003cspan style=\"font-weight: 400\">for those looking to get some barbecue without having to cook.\u003c/span>\u003ca href=\"https://babybluesbbq.com/baby-blues-bbq-menus/menu-san-francisco/\">\u003cspan style=\"font-weight: 400\"> \u003cstrong>Baby Blues BBQ\u003c/strong> in SF\u003c/span>\u003c/a>\u003cspan style=\"font-weight: 400\">, which originally started out of Los Angeles, has its menu available for delivery via DoorDash. \u003c/span>\u003c/p>\n\u003cp>\u003cstrong>Staying Out of the Kitchen Entirely With Pre-Made BBQ\u003c/strong>\u003cbr>\n\u003cspan style=\"font-weight: 400\">In Oakland, \u003c/span>\u003ca href=\"https://www.smokinwoodsbbq.com/\">\u003cspan style=\"font-weight: 400\">\u003cstrong>Smokin Woods BBQ\u003c/strong>\u003c/span>\u003c/a>\u003cspan style=\"font-weight: 400\"> offers next-day pickup or same-day meat plates via Caviar. \u003ca href=\"https://kcsbbq.com/covid-19-hours/\">\u003cstrong>KC's Barbecue\u003c/strong>\u003c/a> in Berkeley is also offering ribs, brisket and chicken for online ordering. For those looking to go beyond smoked meats and burgers, \u003c/span>\u003ca href=\"http://www.rosamundesausagegrill.com/menu.html\">\u003cspan style=\"font-weight: 400\">\u003cstrong>Rosamunde\u003c/strong>\u003c/span>\u003c/a>\u003cspan style=\"font-weight: 400\"> has delivery and takeout options for its sausages in both Oakland and San Francisco. \u003c/span>\u003c/p>\n\u003cp>\u003cspan style=\"font-weight: 400\">In Martinez and Pleasant Hill,\u003c/span>\u003ca href=\"https://www.slowhandbbq.com/\">\u003cspan style=\"font-weight: 400\"> \u003cstrong>Slow Hand Barbecue\u003c/strong>\u003c/span>\u003c/a>\u003cspan style=\"font-weight: 400\"> recently started offering beer and wine sales with orders. Delivery is available through GrubHub, DoorDash or by calling. \u003c/span>\u003c/p>\n\u003cp>\u003cspan style=\"font-weight: 400\">And \u003cstrong>Gott’s\u003c/strong> is probably one of the more well-known local names \u003c/span>\u003ca href=\"https://www.gotts.com/\">\u003cspan style=\"font-weight: 400\">when it comes to burgers\u003c/span>\u003c/a>\u003cspan style=\"font-weight: 400\">. They’re open for pickup and delivery in St. Helena, downtown Napa, the Ferry Building in SF, Walnut Creek, Marin and Palo Alto. \u003c/span>\u003c/p>\n\u003cp>\u003c/p>\u003c/div>","attributes":{"named":{},"numeric":[]}},{"type":"component","content":"","name":"ad","attributes":{"named":{"label":"fullwidth"},"numeric":["fullwidth"]}},{"type":"contentString","content":"\u003cdiv class=\"post-body\">\u003cp>\u003c/p>\n\u003ch2>Cook It Yourself: Tips and Techniques During Shelter-in Place\u003c/h2>\n\u003cp>\u003cstrong>Shopping\u003c/strong>\u003cbr>\n“Fat is flavor,” says Ryan Farr of 4505 Burgers and BBQ. For a good pork chop for grilling, look for one with pearly white fat that’s about half an inch to three-quarters of an inch. Look for dark pork, as opposed to lighter pork resembling chicken breast. In all cuts, especially for meats that are going to be smoked or baked low and slow, a good amount of fat will help add to the flavor. In terms of where to go, Farr recommends Clove and Hoof in Oakland, and Marina Meats or Fatted Calf, both in San Francisco. Several local butcheries are open during the pandemic, which are great spots to look for prime cuts, especially with \u003ca href=\"https://www.npr.org/2020/05/09/853349931/meatpackers-warn-that-the-coronavirus-outbreaks-might-lead-to-meat-shortages\">\u003cspan style=\"font-weight: 400\">potential meat shortages\u003c/span>\u003c/a>\u003cspan style=\"font-weight: 400\">. When it comes to \u003ca href=\"https://www.kqed.org/bayareabites/27318/10-tips-for-making-great-hamburgers\">burgers\u003c/a>, consider grinding your own ratio of lean and fatty meat. The most important thing is looking for quality.\u003c/span>\u003c/p>\n\u003cp>\u003cimg class=\"alignnone size-medium wp-image-137296\" src=\"https://ww2.kqed.org/app/uploads/sites/24/2020/05/barbecue-bbq-beef-charcoal-533325-800x510.jpg\" alt=\"meat and veggies on a grill\" width=\"800\" height=\"510\" srcset=\"https://ww2.kqed.org/app/uploads/sites/24/2020/05/barbecue-bbq-beef-charcoal-533325-800x510.jpg 800w, https://ww2.kqed.org/app/uploads/sites/24/2020/05/barbecue-bbq-beef-charcoal-533325-160x102.jpg 160w, https://ww2.kqed.org/app/uploads/sites/24/2020/05/barbecue-bbq-beef-charcoal-533325-768x490.jpg 768w, https://ww2.kqed.org/app/uploads/sites/24/2020/05/barbecue-bbq-beef-charcoal-533325-1020x651.jpg 1020w, https://ww2.kqed.org/app/uploads/sites/24/2020/05/barbecue-bbq-beef-charcoal-533325.jpg 1500w\" sizes=\"(max-width: 800px) 100vw, 800px\">\u003c/p>\n\u003cp>\u003cstrong>Barbecue Without a Smoker\u003c/strong>\u003c/p>\u003c/div>","attributes":{"named":{},"numeric":[]}},{"type":"component","content":"","name":"aside","attributes":{"named":{"postid":"bayareabites_95541","label":"Fall-Off-The-Bone BBQ Baby Back Ribs with Homemade Barbecue Sauce "},"numeric":[]}},{"type":"contentString","content":"\u003cdiv class=\"post-body\">\u003cp>\u003cbr>\nThere's a key difference between grilling and barbecue. Grilling is what you do on July 4. It's high heat, over charcoal. Barbecue, however, is all about that low and slow. Here, it's all about the smoke.\u003c/p>\n\u003cp>For those who live in apartments or don’t have a smoker or grill at home, the oven, \u003ca href=\"https://www.thespruceeats.com/best-grill-pans-4160537\">\u003cspan style=\"font-weight: 400\">grill pan\u003c/span>\u003c/a>\u003cspan style=\"font-weight: 400\"> and cast iron pan are the best tools to turn to. When it comes to barbecue, without smoke, the main focus is on the actual technique, says Farr. That means cooking it low and slow with dry heat. For something like a brisket, he recommends setting the oven to 215° F on a non-convection setting if you have a convection oven. For a five-pound piece of pork shoulder without a bone, Farr says he’d bake it at that temperature for five to seven hours until the internal temperature reaches 180° F.\u003c/span>\u003c/p>\n\u003cp>While there may not be smoke, there are other ways to create depth of flavor and browning. Farr recommends using raw turbinado sugar in the dry rub. The sugar will react to the heat over time, and will caramelize and lend color. Patience is also key here. “You don’t want to go in there with your fork and start pulling apart the meat,” says Farr. Picking at it too often and too soon will release the internal moisture, and it can end up drying out the meat. “One big tip is that you don’t want to do anything. After you take it out of the oven, put it on the stove and let it rest for up to an hour. If you start to see steam come out when cutting, it’s still too hot. If you see steam, that’s your juice. That’s the stuff you want to stay in there.”\u003c/p>\u003c/div>","attributes":{"named":{},"numeric":[]}},{"type":"component","content":"","name":"aside","attributes":{"named":{"postid":"bayareabites_86210","label":"Summer Decadence: Crispy Zucchini Fritters with Lemony Yogurt-Herb Dip "},"numeric":[]}},{"type":"contentString","content":"\u003cdiv class=\"post-body\">\u003cp>\u003c/p>\n\u003cp>For those who really want that smoke flavor, your oven can be converted into a makeshift smoker. Grab some applewood smoking chips from the local grocer, hit them with a blow torch right before you put the meat in the oven and place the chips on the bottom rack of the oven at the same time the meat goes in above the chips. Farr says that putting the chips in at the beginning will be the most effective way to get that smoked flavor. The dry heat at the beginning dries out the moisture, and that’s the point where the smoke will adhere to the meat, he says. The smoke might trip up the smoke detector, so consider this a fair warning to do at your own risk, especially if you have a landlord.\u003c/p>\n\u003cp>There's also a safer way to get a \u003ca href=\"https://www.kqed.org/bayareabites/95541/memorial-day-recipe-fall-off-the-bone-bbq-baby-back-ribs-with-homemade-barbecue-sauce\">serious rack of ribs\u003c/a>. You'll need an oven, a grill and a spicy rub to get things started. \u003c/p>\n\u003cp>\u003cstrong>Grilling Without a Grill\u003c/strong>\u003cbr>\n\u003cspan style=\"font-weight: 400\">In terms of grilling, a good sear and browning can be achieved from the oven broiler or a well seasoned pre-heated cast iron pan. There won’t be grill marks unless you have a grill pan, but both options are good in getting even high-heat for burgers, and simulated grilled veggies. One trick Farr uses for searing steaks or burger patties is to heat the pan until it’s nice and hot on medium heat. It will take some time to get the right temperature, but this will ensure an even temperature on the whole surface of your pan. You can test the temperature by pressing a side of the meat or burger patty you’re grilling in the pan. Right before turning, crank up the heat to high and flip. Farr says that this ensures a sear on both sides. Be careful with oil here because more oil equals more smoke (and more potential for your fire alarm going off).\u003c/span>\u003c/p>\n\u003cp>\u003cstrong>And Finally: Learning about Condiments\u003c/strong>\u003cbr>\n\u003cspan style=\"font-weight: 400\">For a virtual cooking class that focuses on what to put on your burger, \u003c/span>\u003ca href=\"https://protect-us.mimecast.com/s/KHKGC680k4sojALJFBg7OE?domain=avitaltours.com\">\u003cspan style=\"font-weight: 400\">Rooh’s Pujan Sarkar\u003c/span>\u003c/a>\u003cspan style=\"font-weight: 400\"> hosts a how-to on rhubarb chutney on May 24 ($25). Sarkar has a long history with using rhubarb, and the recipe he's teaching is a riff off of tomato-date chutney. \u003c/span>\u003c/p>\n\u003cp>\u003c/p>\u003c/div>","attributes":{"named":{},"numeric":[]}},{"type":"component","content":"","name":"ad","attributes":{"named":{"label":"floatright"},"numeric":["floatright"]}},{"type":"contentString","content":"\u003cdiv class=\"post-body\">\u003cp>\u003c/p>\n\u003c/div>\u003c/p>","attributes":{"named":{},"numeric":[]}}],"link":"/bayareabites/137291/summer-is-here-how-to-grill-and-barbecue-in-quarantine-or-simply-get-it-delivered","authors":["11689"],"categories":["bayareabites_109","bayareabites_752","bayareabites_17082","bayareabites_10028","bayareabites_10916","bayareabites_12"],"tags":["bayareabites_2250","bayareabites_744","bayareabites_2550","bayareabites_2198"],"featImg":"bayareabites_137294","label":"bayareabites"},"bayareabites_137244":{"type":"posts","id":"bayareabites_137244","meta":{"index":"posts_1591205157","site":"bayareabites","id":"137244","score":null,"sort":[1589850262000]},"guestAuthors":[],"slug":"celebrity-chef-recipes-ryan-farrs-best-damn-cheeseburger","title":"Celebrity Chef Recipes: Ryan Farr's Best Damn Cheeseburger","publishDate":1589850262,"format":"video","headTitle":"Celebrity Chefs Recipes | Bay Area Bites | KQED Food","labelTerm":{"term":16039,"site":"bayareabites"},"content":"\u003cp>\u003cem>\u003ca href=\"http://kqed.org/celebritychefs\">Celebrity Chefs\u003c/a> is supported by\u003ca href=\"https://marblecompany.com/\"> Integrated Resources Group\u003c/a>.\u003c/em>\u003c/p>\n\u003cp>\u003ci>\u003cstrong>Video\u003c/strong>: \u003ca href=\"https://ww2.kqed.org/bayareabites/author/vicchin/\" target=\"_blank\" rel=\"noopener noreferrer\">Vic Chin\u003c/a> and Peter Ruocco\u003c/i>\u003cbr>\n\u003ci>\u003cstrong>Photos\u003c/strong>: Vic Chin\u003c/i>\u003cbr>\n\u003ci>\u003cstrong>Words & Recipe\u003c/strong>: Ryan Farr\u003c/i>\u003cbr>\n[aside tag='celebrity-chefs' num='2' label='More Celebrity Chefs Recipes']\u003c/p>\n\u003cp>Our signature cheeseburger, complete with Gruyère cheese, thin red onion, crisp lettuce and our secret sauce, is the best. You’ll want to make it for your next cookout.\u003c/p>\n\u003cp>I could really write a love letter about this burger. We’ve been serving this recipe at 4505 since the beginning. During our early farmers market days, I ate them for breakfast, and we usually live off of them when we work at Outside Lands.\u003c/p>\n\u003cp>The cheeseburger is a composition that I dreamt up long ago—a brioche bun full of parmesan and scallions, crisp lettuce, red onion, grass-fed and grass-finished beef, Gruyère and our special, secret Shhh! Sauce. It has it all. You won’t need to take a nap after this burger, although that may change if you make it a double or add a fried egg.\u003c/p>\n\u003cp>At 4505 we pride ourselves on serving great grass-fed beef. We grind it fresh daily to our exact specifications. We’ve been serving this burger the same way since the beginning of the company at the farmers market. It’s now one of the most popular items at our restaurant.\u003cem>—Ryan Farr\u003c/em>\u003c/p>\n\u003ch2>Ryan Farr’s Best Damn Cheeseburger\u003c/h2>\n\u003cp>\u003ci>Serves six\u003c/i>\u003c/p>\n\u003cfigure id=\"attachment_137247\" class=\"wp-caption alignnone\" style=\"max-width: 800px\">\u003cimg class=\"size-medium wp-image-137247\" src=\"https://ww2.kqed.org/app/uploads/sites/24/2020/05/burger-800x450.jpg\" alt=\"Best Damn Cheeseburger with Shhh! Sauce. \" width=\"800\" height=\"450\" srcset=\"https://ww2.kqed.org/app/uploads/sites/24/2020/05/burger-800x450.jpg 800w, https://ww2.kqed.org/app/uploads/sites/24/2020/05/burger-160x90.jpg 160w, https://ww2.kqed.org/app/uploads/sites/24/2020/05/burger-768x432.jpg 768w, https://ww2.kqed.org/app/uploads/sites/24/2020/05/burger-1020x574.jpg 1020w, https://ww2.kqed.org/app/uploads/sites/24/2020/05/burger-1920x1080.jpg 1920w\" sizes=\"(max-width: 800px) 100vw, 800px\">\u003cfigcaption class=\"wp-caption-text\">4505's Best Damn Cheeseburger with Shhh! Sauce. \u003ccite>(Vic Chin/KQED)\u003c/cite>\u003c/figcaption>\u003c/figure>\n\u003cp>\u003cstrong>Ingredients:\u003c/strong>\u003c/p>\n\u003cul>\n\u003cli>1½ pounds ground grass-fed beef (80% lean, 20% fat)\u003c/li>\n\u003cli>4 tablespoons butter, melted\u003c/li>\n\u003cli>6 hamburger buns\u003c/li>\n\u003cli>1½ teaspoons salt\u003c/li>\n\u003cli>½ cup red onion, thinly sliced\u003c/li>\n\u003cli>½ large head iceberg lettuce, cut into 2 wedges\u003c/li>\n\u003cli>3 tomatoes (in season), sliced ¼-inch thick, 12 slices\u003c/li>\n\u003cli>6 ounces Gruyère cheese, sliced ¹⁄₁₆-inch thick, 6 slices\u003c/li>\n\u003cli>4 ounces Shhh! Sauce (recipe below)\u003c/li>\n\u003c/ul>\n\u003cp>\u003cstrong>Instructions:\u003c/strong>\u003c/p>\n\u003cp>1. Portion and shape the ground beef into six, 4-ounce patties about ¼-inch thick. Set aside.\u003c/p>\n\u003cp>2. Heat a large cast iron skillet over medium heat. Drizzle half of the butter into the skillet. Place buns in the pan, cut side down, and cook until golden, about 1½ minutes. Turn and repeat with other side. Remove buns from pan and set aside.\u003c/p>\n\u003cp>4. Increase the heat to high. Season the patties with the salt. Add the patties to the pan and cook 1½ minutes, then flip. Cover each patty with a slice of the cheese and continue to cook 1½ minutes more until medium rare. Set each patty on the bottom half of a toasted bun.\u003c/p>\n\u003cp>5. Using a spoon, slather a hefty tablespoon of Shhh! Sauce on leaves of lettuce, then layer lettuce, tomato, and onion on top of each patty. Place a bun top over each burger and serve immediately. Enjoy!\u003c/p>\n\u003cp>[ad fullwidth]\u003c/p>\n\u003ch2>4505's Secret Shhh! Sauce\u003c/h2>\n\u003cp>\u003ci>Makes approximately 1 cup\u003c/i>\u003cbr>\n\u003cstrong>Ingredients:\u003c/strong>\u003c/p>\n\u003cul>\n\u003cli>6 ounces mayonnaise\u003c/li>\n\u003cli>3 tablespoons sweet relish\u003c/li>\n\u003cli>2 teaspoons ketchup\u003c/li>\n\u003cli>1 teaspoon mustard\u003c/li>\n\u003cli>Pinch extra-fine salt\u003c/li>\n\u003c/ul>\n\u003cp>\u003cstrong>Instructions:\u003c/strong>\u003c/p>\n\u003col>\n\u003cli>\u003cspan style=\"font-weight: 400\"> In a glass bowl, whisk together the mayonnaise, relish, ketchup, mustard, and salt. Place in refrigerator until well chilled, about 1 hour. Serve immediately.\u003c/span>\u003c/li>\n\u003c/ol>\n\u003cfigure id=\"attachment_137246\" class=\"wp-caption alignnone\" style=\"max-width: 800px\">\u003cimg class=\"size-medium wp-image-137246\" src=\"https://ww2.kqed.org/app/uploads/sites/24/2020/05/chow-down-800x1423.jpg\" alt=\"Chef Ryan Farr digs into his Best Damn Cheeseburger with Shhh! Sauce. \" width=\"800\" height=\"1423\" srcset=\"https://ww2.kqed.org/app/uploads/sites/24/2020/05/chow-down-800x1423.jpg 800w, https://ww2.kqed.org/app/uploads/sites/24/2020/05/chow-down-160x285.jpg 160w, https://ww2.kqed.org/app/uploads/sites/24/2020/05/chow-down-768x1366.jpg 768w, https://ww2.kqed.org/app/uploads/sites/24/2020/05/chow-down-1020x1814.jpg 1020w, https://ww2.kqed.org/app/uploads/sites/24/2020/05/chow-down-1920x3415.jpg 1920w\" sizes=\"(max-width: 800px) 100vw, 800px\">\u003cfigcaption class=\"wp-caption-text\">Chef Ryan Farr digs into his Best Damn Cheeseburger with Shhh! Sauce. \u003ccite>(VIc Chin/KQED)\u003c/cite>\u003c/figcaption>\u003c/figure>\n\u003cul>\n\u003cli style=\"list-style-type: none\">\n\u003cul>\n\u003cli style=\"list-style-type: none\">\n\u003c/ul>\n\u003c/li>\n\u003c/ul>\n\u003cp>\u003c/p>\n","blocks":[],"excerpt":"Ryan Farr's Harissa Wings have a nice kick that pair perfectly with 4505 Burgers & BBQ's cooling White Alabama BBQ Sauce.","status":"publish","parent":0,"modified":1621634323,"stats":{"hasAudio":false,"hasVideo":false,"hasChartOrMap":false,"iframeSrcs":[],"hasGoogleForm":false,"hasGallery":false,"hasHearkenModule":false,"hasPolis":false,"paragraphCount":17,"wordCount":556},"headData":{"title":"Celebrity Chef Recipes: Ryan Farr's Best Damn Cheeseburger | KQED","description":"Ryan Farr's Harissa Wings have a nice kick that pair perfectly with 4505 Burgers & BBQ's cooling White Alabama BBQ Sauce.","ogTitle":"","ogDescription":"","ogImgId":"","twTitle":"","twDescription":"","twImgId":"","schema":{"@context":"http://schema.org","@type":"Article","headline":"Celebrity Chef Recipes: Ryan Farr's Best Damn Cheeseburger","datePublished":"2020-05-19T01:04:22.000Z","dateModified":"2021-05-21T21:58:43.000Z","image":"https://cdn.kqed.org/wp-content/uploads/2020/02/KQED-OG-Image@1x.png"}},"disqusIdentifier":"137244 https://ww2.kqed.org/bayareabites/?p=137244","disqusUrl":"https://ww2.kqed.org/bayareabites/2020/05/18/celebrity-chef-recipes-ryan-farrs-best-damn-cheeseburger/","disqusTitle":"Celebrity Chef Recipes: Ryan Farr's Best Damn Cheeseburger","videoEmbed":"https://youtu.be/QC2e50U_i-w","templateType":"standard","featuredImageType":"standard","path":"/bayareabites/137244/celebrity-chef-recipes-ryan-farrs-best-damn-cheeseburger","audioTrackLength":null,"parsedContent":[{"type":"contentString","content":"\u003cdiv class=\"post-body\">\u003cp>\u003cp>\u003cem>\u003ca href=\"http://kqed.org/celebritychefs\">Celebrity Chefs\u003c/a> is supported by\u003ca href=\"https://marblecompany.com/\"> Integrated Resources Group\u003c/a>.\u003c/em>\u003c/p>\n\u003cp>\u003ci>\u003cstrong>Video\u003c/strong>: \u003ca href=\"https://ww2.kqed.org/bayareabites/author/vicchin/\" target=\"_blank\" rel=\"noopener noreferrer\">Vic Chin\u003c/a> and Peter Ruocco\u003c/i>\u003cbr>\n\u003ci>\u003cstrong>Photos\u003c/strong>: Vic Chin\u003c/i>\u003cbr>\n\u003ci>\u003cstrong>Words & Recipe\u003c/strong>: Ryan Farr\u003c/i>\u003cbr>\n\u003c/p>\u003c/div>","attributes":{"named":{},"numeric":[]}},{"type":"component","content":"","name":"aside","attributes":{"named":{"tag":"celebrity-chefs","num":"2","label":"More Celebrity Chefs Recipes "},"numeric":[]}},{"type":"contentString","content":"\u003cdiv class=\"post-body\">\u003cp>\u003c/p>\n\u003cp>Our signature cheeseburger, complete with Gruyère cheese, thin red onion, crisp lettuce and our secret sauce, is the best. You’ll want to make it for your next cookout.\u003c/p>\n\u003cp>I could really write a love letter about this burger. We’ve been serving this recipe at 4505 since the beginning. During our early farmers market days, I ate them for breakfast, and we usually live off of them when we work at Outside Lands.\u003c/p>\n\u003cp>The cheeseburger is a composition that I dreamt up long ago—a brioche bun full of parmesan and scallions, crisp lettuce, red onion, grass-fed and grass-finished beef, Gruyère and our special, secret Shhh! Sauce. It has it all. You won’t need to take a nap after this burger, although that may change if you make it a double or add a fried egg.\u003c/p>\n\u003cp>At 4505 we pride ourselves on serving great grass-fed beef. We grind it fresh daily to our exact specifications. We’ve been serving this burger the same way since the beginning of the company at the farmers market. It’s now one of the most popular items at our restaurant.\u003cem>—Ryan Farr\u003c/em>\u003c/p>\n\u003ch2>Ryan Farr’s Best Damn Cheeseburger\u003c/h2>\n\u003cp>\u003ci>Serves six\u003c/i>\u003c/p>\n\u003cfigure id=\"attachment_137247\" class=\"wp-caption alignnone\" style=\"max-width: 800px\">\u003cimg class=\"size-medium wp-image-137247\" src=\"https://ww2.kqed.org/app/uploads/sites/24/2020/05/burger-800x450.jpg\" alt=\"Best Damn Cheeseburger with Shhh! Sauce. \" width=\"800\" height=\"450\" srcset=\"https://ww2.kqed.org/app/uploads/sites/24/2020/05/burger-800x450.jpg 800w, https://ww2.kqed.org/app/uploads/sites/24/2020/05/burger-160x90.jpg 160w, https://ww2.kqed.org/app/uploads/sites/24/2020/05/burger-768x432.jpg 768w, https://ww2.kqed.org/app/uploads/sites/24/2020/05/burger-1020x574.jpg 1020w, https://ww2.kqed.org/app/uploads/sites/24/2020/05/burger-1920x1080.jpg 1920w\" sizes=\"(max-width: 800px) 100vw, 800px\">\u003cfigcaption class=\"wp-caption-text\">4505's Best Damn Cheeseburger with Shhh! Sauce. \u003ccite>(Vic Chin/KQED)\u003c/cite>\u003c/figcaption>\u003c/figure>\n\u003cp>\u003cstrong>Ingredients:\u003c/strong>\u003c/p>\n\u003cul>\n\u003cli>1½ pounds ground grass-fed beef (80% lean, 20% fat)\u003c/li>\n\u003cli>4 tablespoons butter, melted\u003c/li>\n\u003cli>6 hamburger buns\u003c/li>\n\u003cli>1½ teaspoons salt\u003c/li>\n\u003cli>½ cup red onion, thinly sliced\u003c/li>\n\u003cli>½ large head iceberg lettuce, cut into 2 wedges\u003c/li>\n\u003cli>3 tomatoes (in season), sliced ¼-inch thick, 12 slices\u003c/li>\n\u003cli>6 ounces Gruyère cheese, sliced ¹⁄₁₆-inch thick, 6 slices\u003c/li>\n\u003cli>4 ounces Shhh! Sauce (recipe below)\u003c/li>\n\u003c/ul>\n\u003cp>\u003cstrong>Instructions:\u003c/strong>\u003c/p>\n\u003cp>1. Portion and shape the ground beef into six, 4-ounce patties about ¼-inch thick. Set aside.\u003c/p>\n\u003cp>2. Heat a large cast iron skillet over medium heat. Drizzle half of the butter into the skillet. Place buns in the pan, cut side down, and cook until golden, about 1½ minutes. Turn and repeat with other side. Remove buns from pan and set aside.\u003c/p>\n\u003cp>4. Increase the heat to high. Season the patties with the salt. Add the patties to the pan and cook 1½ minutes, then flip. Cover each patty with a slice of the cheese and continue to cook 1½ minutes more until medium rare. Set each patty on the bottom half of a toasted bun.\u003c/p>\n\u003cp>5. Using a spoon, slather a hefty tablespoon of Shhh! Sauce on leaves of lettuce, then layer lettuce, tomato, and onion on top of each patty. Place a bun top over each burger and serve immediately. Enjoy!\u003c/p>\n\u003cp>\u003c/p>\u003c/div>","attributes":{"named":{},"numeric":[]}},{"type":"component","content":"","name":"ad","attributes":{"named":{"label":"fullwidth"},"numeric":["fullwidth"]}},{"type":"contentString","content":"\u003cdiv class=\"post-body\">\u003cp>\u003c/p>\n\u003ch2>4505's Secret Shhh! Sauce\u003c/h2>\n\u003cp>\u003ci>Makes approximately 1 cup\u003c/i>\u003cbr>\n\u003cstrong>Ingredients:\u003c/strong>\u003c/p>\n\u003cul>\n\u003cli>6 ounces mayonnaise\u003c/li>\n\u003cli>3 tablespoons sweet relish\u003c/li>\n\u003cli>2 teaspoons ketchup\u003c/li>\n\u003cli>1 teaspoon mustard\u003c/li>\n\u003cli>Pinch extra-fine salt\u003c/li>\n\u003c/ul>\n\u003cp>\u003cstrong>Instructions:\u003c/strong>\u003c/p>\n\u003col>\n\u003cli>\u003cspan style=\"font-weight: 400\"> In a glass bowl, whisk together the mayonnaise, relish, ketchup, mustard, and salt. Place in refrigerator until well chilled, about 1 hour. Serve immediately.\u003c/span>\u003c/li>\n\u003c/ol>\n\u003cfigure id=\"attachment_137246\" class=\"wp-caption alignnone\" style=\"max-width: 800px\">\u003cimg class=\"size-medium wp-image-137246\" src=\"https://ww2.kqed.org/app/uploads/sites/24/2020/05/chow-down-800x1423.jpg\" alt=\"Chef Ryan Farr digs into his Best Damn Cheeseburger with Shhh! Sauce. \" width=\"800\" height=\"1423\" srcset=\"https://ww2.kqed.org/app/uploads/sites/24/2020/05/chow-down-800x1423.jpg 800w, https://ww2.kqed.org/app/uploads/sites/24/2020/05/chow-down-160x285.jpg 160w, https://ww2.kqed.org/app/uploads/sites/24/2020/05/chow-down-768x1366.jpg 768w, https://ww2.kqed.org/app/uploads/sites/24/2020/05/chow-down-1020x1814.jpg 1020w, https://ww2.kqed.org/app/uploads/sites/24/2020/05/chow-down-1920x3415.jpg 1920w\" sizes=\"(max-width: 800px) 100vw, 800px\">\u003cfigcaption class=\"wp-caption-text\">Chef Ryan Farr digs into his Best Damn Cheeseburger with Shhh! Sauce. \u003ccite>(VIc Chin/KQED)\u003c/cite>\u003c/figcaption>\u003c/figure>\n\u003cul>\n\u003cli style=\"list-style-type: none\">\n\u003cul>\n\u003cli style=\"list-style-type: none\">\n\u003c/ul>\n\u003c/li>\n\u003c/ul>\n\u003cp>\u003c/p>\n\u003c/div>\u003c/p>","attributes":{"named":{},"numeric":[]}}],"link":"/bayareabites/137244/celebrity-chef-recipes-ryan-farrs-best-damn-cheeseburger","authors":["5083"],"series":["bayareabites_16039"],"categories":["bayareabites_63","bayareabites_17082","bayareabites_11028","bayareabites_12"],"tags":["bayareabites_16431","bayareabites_16432","bayareabites_16285","bayareabites_9710","bayareabites_14738","bayareabites_2958","bayareabites_3682","bayareabites_16284"],"featImg":"bayareabites_137255","label":"bayareabites_16039"}},"programsReducer":{"possible":{"id":"possible","title":"Possible","info":"Possible is hosted by entrepreneur Reid Hoffman and writer Aria Finger. Together in Possible, Hoffman and Finger lead enlightening discussions about building a brighter collective future. The show features interviews with visionary guests like Trevor Noah, Sam Altman and Janette Sadik-Khan. Possible paints an optimistic portrait of the world we can create through science, policy, business, art and our shared humanity. It asks: What if everything goes right for once? How can we get there? Each episode also includes a short fiction story generated by advanced AI GPT-4, serving as a thought-provoking springboard to speculate how humanity could leverage technology for good.","airtime":"SUN 2pm","imageSrc":"https://cdn.kqed.org/wp-content/uploads/2024/04/Possible-Podcast-Tile-360x360-1.jpg","officialWebsiteLink":"https://www.possible.fm/","meta":{"site":"news","source":"Possible"},"link":"/radio/program/possible","subscribe":{"apple":"https://podcasts.apple.com/us/podcast/possible/id1677184070","spotify":"https://open.spotify.com/show/730YpdUSNlMyPQwNnyjp4k"}},"1a":{"id":"1a","title":"1A","info":"1A is home to the national conversation. 1A brings on great guests and frames the best debate in ways that make you think, share and engage.","airtime":"MON-THU 11pm-12am","imageSrc":"https://ww2.kqed.org/radio/wp-content/uploads/sites/50/2018/04/1a.jpg","officialWebsiteLink":"https://the1a.org/","meta":{"site":"news","source":"npr"},"link":"/radio/program/1a","subscribe":{"npr":"https://rpb3r.app.goo.gl/RBrW","apple":"https://itunes.apple.com/WebObjects/MZStore.woa/wa/viewPodcast?s=143441&mt=2&id=1188724250&at=11l79Y&ct=nprdirectory","tuneIn":"https://tunein.com/radio/1A-p947376/","rss":"https://feeds.npr.org/510316/podcast.xml"}},"all-things-considered":{"id":"all-things-considered","title":"All Things Considered","info":"Every weekday, \u003cem>All Things Considered\u003c/em> hosts Robert Siegel, Audie Cornish, Ari Shapiro, and Kelly McEvers present the program's trademark mix of news, interviews, commentaries, reviews, and offbeat features. Michel Martin hosts on the weekends.","airtime":"MON-FRI 1pm-2pm, 4:30pm-6:30pm\u003cbr />SAT-SUN 5pm-6pm","imageSrc":"https://cdn.kqed.org/wp-content/uploads/2024/04/All-Things-Considered-Podcast-Tile-360x360-1.jpg","officialWebsiteLink":"https://www.npr.org/programs/all-things-considered/","meta":{"site":"news","source":"npr"},"link":"/radio/program/all-things-considered"},"american-suburb-podcast":{"id":"american-suburb-podcast","title":"American Suburb: The Podcast","tagline":"The flip side of gentrification, told through one town","info":"Gentrification is changing cities across America, forcing people from neighborhoods they have long called home. Call them the displaced. Now those priced out of the Bay Area are looking for a better life in an unlikely place. American Suburb follows this migration to one California town along the Delta, 45 miles from San Francisco. But is this once sleepy suburb ready for them?","imageSrc":"https://cdn.kqed.org/wp-content/uploads/2024/04/American-Suburb-Podcast-Tile-703x703-1.jpg","officialWebsiteLink":"/news/series/american-suburb-podcast","meta":{"site":"news","source":"kqed","order":"13"},"link":"/news/series/american-suburb-podcast/","subscribe":{"npr":"https://rpb3r.app.goo.gl/RBrW","apple":"https://itunes.apple.com/WebObjects/MZStore.woa/wa/viewPodcast?mt=2&id=1287748328","tuneIn":"https://tunein.com/radio/American-Suburb-p1086805/","rss":"https://ww2.kqed.org/news/series/american-suburb-podcast/feed/podcast","google":"https://podcasts.google.com/feed/aHR0cHM6Ly9mZWVkcy5tZWdhcGhvbmUuZm0vS1FJTkMzMDExODgxNjA5"}},"baycurious":{"id":"baycurious","title":"Bay Curious","tagline":"Exploring the Bay Area, one question at a time","info":"KQED’s new podcast, Bay Curious, gets to the bottom of the mysteries — both profound and peculiar — that give the Bay Area its unique identity. And we’ll do it with your help! You ask the questions. You decide what Bay Curious investigates. And you join us on the journey to find the answers.","imageSrc":"https://cdn.kqed.org/wp-content/uploads/2024/04/Bay-Curious-Podcast-Tile-703x703-1.jpg","imageAlt":"\"KQED Bay Curious","officialWebsiteLink":"/news/series/baycurious","meta":{"site":"news","source":"kqed","order":"4"},"link":"/podcasts/baycurious","subscribe":{"apple":"https://podcasts.apple.com/us/podcast/bay-curious/id1172473406","npr":"https://www.npr.org/podcasts/500557090/bay-curious","rss":"https://ww2.kqed.org/news/category/bay-curious-podcast/feed/podcast","google":"https://podcasts.google.com/feed/aHR0cHM6Ly93dzIua3FlZC5vcmcvbmV3cy9jYXRlZ29yeS9iYXktY3VyaW91cy1wb2RjYXN0L2ZlZWQvcG9kY2FzdA","stitcher":"https://www.stitcher.com/podcast/kqed/bay-curious","spotify":"https://open.spotify.com/show/6O76IdmhixfijmhTZLIJ8k"}},"bbc-world-service":{"id":"bbc-world-service","title":"BBC World Service","info":"The day's top stories from BBC News compiled twice daily in the week, once at weekends.","airtime":"MON-FRI 9pm-10pm, TUE-FRI 1am-2am","imageSrc":"https://cdn.kqed.org/wp-content/uploads/2024/04/BBC-World-Service-Podcast-Tile-360x360-1.jpg","officialWebsiteLink":"https://www.bbc.co.uk/sounds/play/live:bbc_world_service","meta":{"site":"news","source":"BBC World Service"},"link":"/radio/program/bbc-world-service","subscribe":{"apple":"https://itunes.apple.com/us/podcast/global-news-podcast/id135067274?mt=2","tuneIn":"https://tunein.com/radio/BBC-World-Service-p455581/","rss":"https://podcasts.files.bbci.co.uk/p02nq0gn.rss"}},"code-switch-life-kit":{"id":"code-switch-life-kit","title":"Code Switch / Life Kit","info":"\u003cem>Code Switch\u003c/em>, which listeners will hear in the first part of the hour, has fearless and much-needed conversations about race. Hosted by journalists of color, the show tackles the subject of race head-on, exploring how it impacts every part of society — from politics and pop culture to history, sports and more.\u003cbr />\u003cbr />\u003cem>Life Kit\u003c/em>, which will be in the second part of the hour, guides you through spaces and feelings no one prepares you for — from finances to mental health, from workplace microaggressions to imposter syndrome, from relationships to parenting. The show features experts with real world experience and shares their knowledge. Because everyone needs a little help being human.\u003cbr />\u003cbr />\u003ca href=\"https://www.npr.org/podcasts/510312/codeswitch\">\u003cem>Code Switch\u003c/em> offical site and podcast\u003c/a>\u003cbr />\u003ca href=\"https://www.npr.org/lifekit\">\u003cem>Life Kit\u003c/em> offical site and podcast\u003c/a>\u003cbr />","airtime":"SUN 9pm-10pm","imageSrc":"https://cdn.kqed.org/wp-content/uploads/2024/04/Code-Switch-Life-Kit-Podcast-Tile-360x360-1.jpg","meta":{"site":"radio","source":"npr"},"link":"/radio/program/code-switch-life-kit","subscribe":{"apple":"https://podcasts.apple.com/podcast/1112190608?mt=2&at=11l79Y&ct=nprdirectory","google":"https://podcasts.google.com/feed/aHR0cHM6Ly93d3cubnByLm9yZy9yc3MvcG9kY2FzdC5waHA_aWQ9NTEwMzEy","spotify":"https://open.spotify.com/show/3bExJ9JQpkwNhoHvaIIuyV","rss":"https://feeds.npr.org/510312/podcast.xml"}},"commonwealth-club":{"id":"commonwealth-club","title":"Commonwealth Club of California Podcast","info":"The Commonwealth Club of California is the nation's oldest and largest public affairs forum. As a non-partisan forum, The Club brings to the public airwaves diverse viewpoints on important topics. The Club's weekly radio broadcast - the oldest in the U.S., dating back to 1924 - is carried across the nation on public radio stations and is now podcasting. Our website archive features audio of our recent programs, as well as selected speeches from our long and distinguished history. This podcast feed is usually updated twice a week and is always un-edited.","airtime":"THU 10pm, FRI 1am","imageSrc":"https://cdn.kqed.org/wp-content/uploads/2024/04/Commonwealth-Club-Podcast-Tile-360x360-1.jpg","officialWebsiteLink":"https://www.commonwealthclub.org/podcasts","meta":{"site":"news","source":"Commonwealth Club of California"},"link":"/radio/program/commonwealth-club","subscribe":{"apple":"https://itunes.apple.com/us/podcast/commonwealth-club-of-california-podcast/id976334034?mt=2","google":"https://podcasts.google.com/feed/aHR0cDovL3d3dy5jb21tb253ZWFsdGhjbHViLm9yZy9hdWRpby9wb2RjYXN0L3dlZWtseS54bWw","tuneIn":"https://tunein.com/radio/Commonwealth-Club-of-California-p1060/"}},"considerthis":{"id":"considerthis","title":"Consider This","tagline":"Make sense of the day","info":"Make sense of the day. Every weekday afternoon, Consider This helps you consider the major stories of the day in less than 15 minutes, featuring the reporting and storytelling resources of NPR. Plus, KQED’s Bianca Taylor brings you the local KQED news you need to know.","imageSrc":"https://cdn.kqed.org/wp-content/uploads/2024/04/Consider-This-Podcast-Tile-703x703-1.jpg","imageAlt":"Consider This from NPR and KQED","officialWebsiteLink":"/podcasts/considerthis","meta":{"site":"news","source":"kqed","order":"7"},"link":"/podcasts/considerthis","subscribe":{"apple":"https://podcasts.apple.com/podcast/id1503226625?mt=2&at=11l79Y&ct=nprdirectory","npr":"https://rpb3r.app.goo.gl/coronavirusdaily","google":"https://podcasts.google.com/feed/aHR0cHM6Ly9mZWVkcy5ucHIub3JnLzUxMDM1NS9wb2RjYXN0LnhtbA","spotify":"https://open.spotify.com/show/3Z6JdCS2d0eFEpXHKI6WqH"}},"forum":{"id":"forum","title":"Forum","tagline":"The conversation starts here","info":"KQED’s live call-in program discussing local, state, national and international issues, as well as in-depth interviews.","airtime":"MON-FRI 9am-11am, 10pm-11pm","imageSrc":"https://cdn.kqed.org/wp-content/uploads/2024/04/Forum-Podcast-Tile-703x703-1.jpg","imageAlt":"KQED Forum with Mina Kim and Alexis Madrigal","officialWebsiteLink":"/forum","meta":{"site":"news","source":"kqed","order":"8"},"link":"/forum","subscribe":{"apple":"https://podcasts.apple.com/us/podcast/kqeds-forum/id73329719","google":"https://podcasts.google.com/feed/aHR0cHM6Ly9mZWVkcy5tZWdhcGhvbmUuZm0vS1FJTkM5NTU3MzgxNjMz","npr":"https://www.npr.org/podcasts/432307980/forum","stitcher":"https://www.stitcher.com/podcast/kqedfm-kqeds-forum-podcast","rss":"https://feeds.megaphone.fm/KQINC9557381633"}},"freakonomics-radio":{"id":"freakonomics-radio","title":"Freakonomics Radio","info":"Freakonomics Radio is a one-hour award-winning podcast and public-radio project hosted by Stephen Dubner, with co-author Steve Levitt as a regular guest. It is produced in partnership with WNYC.","imageSrc":"https://ww2.kqed.org/news/wp-content/uploads/sites/10/2018/05/freakonomicsRadio.png","officialWebsiteLink":"http://freakonomics.com/","airtime":"SUN 1am-2am, SAT 3pm-4pm","meta":{"site":"radio","source":"WNYC"},"link":"/radio/program/freakonomics-radio","subscribe":{"npr":"https://rpb3r.app.goo.gl/4s8b","apple":"https://itunes.apple.com/us/podcast/freakonomics-radio/id354668519","tuneIn":"https://tunein.com/podcasts/WNYC-Podcasts/Freakonomics-Radio-p272293/","rss":"https://feeds.feedburner.com/freakonomicsradio"}},"fresh-air":{"id":"fresh-air","title":"Fresh Air","info":"Hosted by Terry Gross, \u003cem>Fresh Air from WHYY\u003c/em> is the Peabody Award-winning weekday magazine of contemporary arts and issues. One of public radio's most popular programs, Fresh Air features intimate conversations with today's biggest luminaries.","airtime":"MON-FRI 7pm-8pm","imageSrc":"https://cdn.kqed.org/wp-content/uploads/2024/04/Fresh-Air-Podcast-Tile-360x360-1.jpg","officialWebsiteLink":"https://www.npr.org/programs/fresh-air/","meta":{"site":"radio","source":"npr"},"link":"/radio/program/fresh-air","subscribe":{"npr":"https://rpb3r.app.goo.gl/4s8b","apple":"https://itunes.apple.com/WebObjects/MZStore.woa/wa/viewPodcast?s=143441&mt=2&id=214089682&at=11l79Y&ct=nprdirectory","tuneIn":"https://tunein.com/radio/Fresh-Air-p17/","rss":"https://feeds.npr.org/381444908/podcast.xml"}},"here-and-now":{"id":"here-and-now","title":"Here & Now","info":"A live production of NPR and WBUR Boston, in collaboration with stations across the country, Here & Now reflects the fluid world of news as it's happening in the middle of the day, with timely, in-depth news, interviews and conversation. Hosted by Robin Young, Jeremy Hobson and Tonya Mosley.","airtime":"MON-THU 11am-12pm","imageSrc":"https://cdn.kqed.org/wp-content/uploads/2024/04/Here-And-Now-Podcast-Tile-360x360-1.jpg","officialWebsiteLink":"http://www.wbur.org/hereandnow","meta":{"site":"news","source":"npr"},"link":"/radio/program/here-and-now","subsdcribe":{"apple":"https://itunes.apple.com/WebObjects/MZStore.woa/wa/viewPodcast?mt=2&id=426698661","tuneIn":"https://tunein.com/radio/Here--Now-p211/","rss":"https://feeds.npr.org/510051/podcast.xml"}},"how-i-built-this":{"id":"how-i-built-this","title":"How I Built This with Guy Raz","info":"Guy Raz dives into the stories behind some of the world's best known companies. How I Built This weaves a narrative journey about innovators, entrepreneurs and idealists—and the movements they built.","imageSrc":"https://ww2.kqed.org/news/wp-content/uploads/sites/10/2018/05/howIBuiltThis.png","officialWebsiteLink":"https://www.npr.org/podcasts/510313/how-i-built-this","airtime":"SUN 7:30pm-8pm","meta":{"site":"news","source":"npr"},"link":"/radio/program/how-i-built-this","subscribe":{"npr":"https://rpb3r.app.goo.gl/3zxy","apple":"https://itunes.apple.com/us/podcast/how-i-built-this-with-guy-raz/id1150510297?mt=2","tuneIn":"https://tunein.com/podcasts/Arts--Culture-Podcasts/How-I-Built-This-p910896/","rss":"https://feeds.npr.org/510313/podcast.xml"}},"inside-europe":{"id":"inside-europe","title":"Inside Europe","info":"Inside Europe, a one-hour weekly news magazine hosted by Helen Seeney and Keith Walker, explores the topical issues shaping the continent. No other part of the globe has experienced such dynamic political and social change in recent years.","airtime":"SAT 3am-4am","imageSrc":"https://cdn.kqed.org/wp-content/uploads/2024/04/Inside-Europe-Podcast-Tile-300x300-1.jpg","meta":{"site":"news","source":"Deutsche Welle"},"link":"/radio/program/inside-europe","subscribe":{"apple":"https://itunes.apple.com/us/podcast/inside-europe/id80106806?mt=2","tuneIn":"https://tunein.com/radio/Inside-Europe-p731/","rss":"https://partner.dw.com/xml/podcast_inside-europe"}},"latino-usa":{"id":"latino-usa","title":"Latino USA","airtime":"MON 1am-2am, SUN 6pm-7pm","info":"Latino USA, the radio journal of news and culture, is the only national, English-language radio program produced from a Latino perspective.","imageSrc":"https://ww2.kqed.org/radio/wp-content/uploads/sites/50/2018/04/latinoUsa.jpg","officialWebsiteLink":"http://latinousa.org/","meta":{"site":"news","source":"npr"},"link":"/radio/program/latino-usa","subscribe":{"npr":"https://rpb3r.app.goo.gl/xtTd","apple":"https://itunes.apple.com/WebObjects/MZStore.woa/wa/viewPodcast?s=143441&mt=2&id=79681317&at=11l79Y&ct=nprdirectory","tuneIn":"https://tunein.com/radio/Latino-USA-p621/","rss":"https://feeds.npr.org/510016/podcast.xml"}},"live-from-here-highlights":{"id":"live-from-here-highlights","title":"Live from Here Highlights","info":"Chris Thile steps to the mic as the host of Live from Here (formerly A Prairie Home Companion), a live public radio variety show. Download Chris’s Song of the Week plus other highlights from the broadcast. Produced by American Public Media.","airtime":"SAT 6pm-8pm, SUN 11am-1pm","imageSrc":"https://cdn.kqed.org/wp-content/uploads/2024/04/Live-From-Here-Podcast-Tile-360x360-1.jpg","officialWebsiteLink":"https://www.livefromhere.org/","meta":{"site":"arts","source":"american public media"},"link":"/radio/program/live-from-here-highlights","subscribe":{"apple":"https://itunes.apple.com/us/podcast/id1167173941","tuneIn":"https://tunein.com/radio/Live-from-Here-Highlights-p921744/","rss":"https://feeds.publicradio.org/public_feeds/a-prairie-home-companion-highlights/rss/rss"}},"marketplace":{"id":"marketplace","title":"Marketplace","info":"Our flagship program, helmed by Kai Ryssdal, examines what the day in money delivered, through stories, conversations, newsworthy numbers and more. Updated Monday through Friday at about 3:30 p.m. PT.","airtime":"MON-FRI 4pm-4:30pm, MON-WED 6:30pm-7pm","imageSrc":"https://cdn.kqed.org/wp-content/uploads/2024/04/Marketplace-Podcast-Tile-360x360-1.jpg","officialWebsiteLink":"https://www.marketplace.org/","meta":{"site":"news","source":"American Public Media"},"link":"/radio/program/marketplace","subscribe":{"apple":"https://itunes.apple.com/WebObjects/MZStore.woa/wa/viewPodcast?s=143441&mt=2&id=201853034&at=11l79Y&ct=nprdirectory","tuneIn":"https://tunein.com/radio/APM-Marketplace-p88/","rss":"https://feeds.publicradio.org/public_feeds/marketplace-pm/rss/rss"}},"mindshift":{"id":"mindshift","title":"MindShift","tagline":"A podcast about the future of learning and how we raise our kids","info":"The MindShift podcast explores the innovations in education that are shaping how kids learn. Hosts Ki Sung and Katrina Schwartz introduce listeners to educators, researchers, parents and students who are developing effective ways to improve how kids learn. We cover topics like how fed-up administrators are developing surprising tactics to deal with classroom disruptions; how listening to podcasts are helping kids develop reading skills; the consequences of overparenting; and why interdisciplinary learning can engage students on all ends of the traditional achievement spectrum. This podcast is part of the MindShift education site, a division of KQED News. KQED is an NPR/PBS member station based in San Francisco. You can also visit the MindShift website for episodes and supplemental blog posts or tweet us \u003ca href=\"https://twitter.com/MindShiftKQED\">@MindShiftKQED\u003c/a> or visit us at \u003ca href=\"/mindshift\">MindShift.KQED.org\u003c/a>","imageSrc":"https://cdn.kqed.org/wp-content/uploads/2024/04/Mindshift-Podcast-Tile-703x703-1.jpg","imageAlt":"KQED MindShift: How We Will Learn","officialWebsiteLink":"/mindshift/","meta":{"site":"news","source":"kqed","order":"2"},"link":"/podcasts/mindshift","subscribe":{"apple":"https://podcasts.apple.com/us/podcast/mindshift-podcast/id1078765985","google":"https://podcasts.google.com/feed/aHR0cHM6Ly9mZWVkcy5tZWdhcGhvbmUuZm0vS1FJTkM1NzY0NjAwNDI5","npr":"https://www.npr.org/podcasts/464615685/mind-shift-podcast","stitcher":"https://www.stitcher.com/podcast/kqed/stories-teachers-share","spotify":"https://open.spotify.com/show/0MxSpNYZKNprFLCl7eEtyx"}},"morning-edition":{"id":"morning-edition","title":"Morning Edition","info":"\u003cem>Morning Edition\u003c/em> takes listeners around the country and the world with multi-faceted stories and commentaries every weekday. Hosts Steve Inskeep, David Greene and Rachel Martin bring you the latest breaking news and features to prepare you for the day.","airtime":"MON-FRI 3am-9am","imageSrc":"https://cdn.kqed.org/wp-content/uploads/2024/04/Morning-Edition-Podcast-Tile-360x360-1.jpg","officialWebsiteLink":"https://www.npr.org/programs/morning-edition/","meta":{"site":"news","source":"npr"},"link":"/radio/program/morning-edition"},"onourwatch":{"id":"onourwatch","title":"On Our Watch","tagline":"Police secrets, unsealed","info":"For decades, the process for how police police themselves has been inconsistent – if not opaque. In some states, like California, these proceedings were completely hidden. After a new police transparency law unsealed scores of internal affairs files, our reporters set out to examine these cases and the shadow world of police discipline. On Our Watch brings listeners into the rooms where officers are questioned and witnesses are interrogated to find out who this system is really protecting. Is it the officers, or the public they've sworn to serve?","imageSrc":"https://cdn.kqed.org/wp-content/uploads/2024/04/On-Our-Watch-Podcast-Tile-703x703-1.jpg","imageAlt":"On Our Watch from NPR and KQED","officialWebsiteLink":"/podcasts/onourwatch","meta":{"site":"news","source":"kqed","order":"1"},"link":"/podcasts/onourwatch","subscribe":{"apple":"https://podcasts.apple.com/podcast/id1567098962","google":"https://podcasts.google.com/feed/aHR0cHM6Ly9mZWVkcy5ucHIub3JnLzUxMDM2MC9wb2RjYXN0LnhtbD9zYz1nb29nbGVwb2RjYXN0cw","npr":"https://rpb3r.app.goo.gl/onourwatch","spotify":"https://open.spotify.com/show/0OLWoyizopu6tY1XiuX70x","tuneIn":"https://tunein.com/radio/On-Our-Watch-p1436229/","stitcher":"https://www.stitcher.com/show/on-our-watch","rss":"https://feeds.npr.org/510360/podcast.xml"}},"on-the-media":{"id":"on-the-media","title":"On The Media","info":"Our weekly podcast explores how the media 'sausage' is made, casts an incisive eye on fluctuations in the marketplace of ideas, and examines threats to the freedom of information and expression in America and abroad. For one hour a week, the show tries to lift the veil from the process of \"making media,\" especially news media, because it's through that lens that we see the world and the world sees us","airtime":"SUN 2pm-3pm, MON 12am-1am","imageSrc":"https://ww2.kqed.org/radio/wp-content/uploads/sites/50/2018/04/onTheMedia.png","officialWebsiteLink":"https://www.wnycstudios.org/shows/otm","meta":{"site":"news","source":"wnyc"},"link":"/radio/program/on-the-media","subscribe":{"apple":"https://itunes.apple.com/us/podcast/on-the-media/id73330715?mt=2","tuneIn":"https://tunein.com/radio/On-the-Media-p69/","rss":"http://feeds.wnyc.org/onthemedia"}},"our-body-politic":{"id":"our-body-politic","title":"Our Body Politic","info":"Presented by KQED, KCRW and KPCC, and created and hosted by award-winning journalist Farai Chideya, Our Body Politic is unapologetically centered on reporting on not just how women of color experience the major political events of today, but how they’re impacting those very issues.","airtime":"SAT 6pm-7pm, SUN 1am-2am","imageSrc":"https://cdn.kqed.org/wp-content/uploads/2024/04/Our-Body-Politic-Podcast-Tile-360x360-1.jpg","officialWebsiteLink":"https://our-body-politic.simplecast.com/","meta":{"site":"news","source":"kcrw"},"link":"/radio/program/our-body-politic","subscribe":{"apple":"https://podcasts.apple.com/us/podcast/our-body-politic/id1533069868","google":"https://podcasts.google.com/feed/aHR0cHM6Ly9mZWVkcy5zaW1wbGVjYXN0LmNvbS9feGFQaHMxcw","spotify":"https://open.spotify.com/show/4ApAiLT1kV153TttWAmqmc","rss":"https://feeds.simplecast.com/_xaPhs1s","tuneIn":"https://tunein.com/podcasts/News--Politics-Podcasts/Our-Body-Politic-p1369211/"}},"pbs-newshour":{"id":"pbs-newshour","title":"PBS NewsHour","info":"Analysis, background reports and updates from the PBS NewsHour putting today's news in context.","airtime":"MON-FRI 3pm-4pm","imageSrc":"https://cdn.kqed.org/wp-content/uploads/2024/04/PBS-News-Hour-Podcast-Tile-360x360-1.jpg","officialWebsiteLink":"https://www.pbs.org/newshour/","meta":{"site":"news","source":"pbs"},"link":"/radio/program/pbs-newshour","subscribe":{"apple":"https://itunes.apple.com/us/podcast/pbs-newshour-full-show/id394432287?mt=2","tuneIn":"https://tunein.com/radio/PBS-NewsHour---Full-Show-p425698/","rss":"https://www.pbs.org/newshour/feeds/rss/podcasts/show"}},"perspectives":{"id":"perspectives","title":"Perspectives","tagline":"KQED's series of of daily listener commentaries since 1991","info":"KQED's series of of daily listener commentaries since 1991.","imageSrc":"https://cdn.kqed.org/wp-content/uploads/2024/04/Perspectives-Podcast-Tile-703x703-1.jpg","officialWebsiteLink":"/perspectives/","meta":{"site":"radio","source":"kqed","order":"15"},"link":"/perspectives","subscribe":{"apple":"https://podcasts.apple.com/us/podcast/id73801135","npr":"https://www.npr.org/podcasts/432309616/perspectives","rss":"https://ww2.kqed.org/perspectives/category/perspectives/feed/","google":"https://podcasts.google.com/feed/aHR0cHM6Ly93dzIua3FlZC5vcmcvcGVyc3BlY3RpdmVzL2NhdGVnb3J5L3BlcnNwZWN0aXZlcy9mZWVkLw"}},"planet-money":{"id":"planet-money","title":"Planet Money","info":"The economy explained. Imagine you could call up a friend and say, Meet me at the bar and tell me what's going on with the economy. Now imagine that's actually a fun evening.","airtime":"SUN 3pm-4pm","imageSrc":"https://ww2.kqed.org/radio/wp-content/uploads/sites/50/2018/04/planetmoney.jpg","officialWebsiteLink":"https://www.npr.org/sections/money/","meta":{"site":"news","source":"npr"},"link":"/radio/program/planet-money","subscribe":{"npr":"https://rpb3r.app.goo.gl/M4f5","apple":"https://itunes.apple.com/us/podcast/planet-money/id290783428?mt=2","tuneIn":"https://tunein.com/podcasts/Business--Economics-Podcasts/Planet-Money-p164680/","rss":"https://feeds.npr.org/510289/podcast.xml"}},"politicalbreakdown":{"id":"politicalbreakdown","title":"Political Breakdown","tagline":"Politics from a personal perspective","info":"Political Breakdown is a new series that explores the political intersection of California and the nation. Each week hosts Scott Shafer and Marisa Lagos are joined with a new special guest to unpack politics -- with personality — and offer an insider’s glimpse at how politics happens.","airtime":"THU 6:30pm-7pm","imageSrc":"https://cdn.kqed.org/wp-content/uploads/2024/04/Political-Breakdown-2024-Podcast-Tile-703x703-1.jpg","imageAlt":"KQED Political Breakdown","officialWebsiteLink":"/podcasts/politicalbreakdown","meta":{"site":"radio","source":"kqed","order":"11"},"link":"/podcasts/politicalbreakdown","subscribe":{"apple":"https://podcasts.apple.com/us/podcast/political-breakdown/id1327641087","google":"https://podcasts.google.com/feed/aHR0cHM6Ly9mZWVkcy5tZWdhcGhvbmUuZm0vS1FJTkM5Nzk2MzI2MTEx","npr":"https://www.npr.org/podcasts/572155894/political-breakdown","stitcher":"https://www.stitcher.com/podcast/kqed/political-breakdown","spotify":"https://open.spotify.com/show/07RVyIjIdk2WDuVehvBMoN","rss":"https://ww2.kqed.org/news/tag/political-breakdown/feed/podcast"}},"pri-the-world":{"id":"pri-the-world","title":"PRI's The World: Latest Edition","info":"Each weekday, host Marco Werman and his team of producers bring you the world's most interesting stories in an hour of radio that reminds us just how small our planet really is.","airtime":"MON-FRI 2pm-3pm","imageSrc":"https://cdn.kqed.org/wp-content/uploads/2024/04/The-World-Podcast-Tile-360x360-1.jpg","officialWebsiteLink":"https://www.pri.org/programs/the-world","meta":{"site":"news","source":"PRI"},"link":"/radio/program/pri-the-world","subscribe":{"apple":"https://itunes.apple.com/us/podcast/pris-the-world-latest-edition/id278196007?mt=2","tuneIn":"https://tunein.com/podcasts/News--Politics-Podcasts/PRIs-The-World-p24/","rss":"http://feeds.feedburner.com/pri/theworld"}},"radiolab":{"id":"radiolab","title":"Radiolab","info":"A two-time Peabody Award-winner, Radiolab is an investigation told through sounds and stories, and centered around one big idea. In the Radiolab world, information sounds like music and science and culture collide. Hosted by Jad Abumrad and Robert Krulwich, the show is designed for listeners who demand skepticism, but appreciate wonder. WNYC Studios is the producer of other leading podcasts including Freakonomics Radio, Death, Sex & Money, On the Media and many more.","airtime":"SUN 12am-1am, SAT 2pm-3pm","imageSrc":"https://ww2.kqed.org/radio/wp-content/uploads/sites/50/2018/04/radiolab1400.png","officialWebsiteLink":"https://www.wnycstudios.org/shows/radiolab/","meta":{"site":"science","source":"WNYC"},"link":"/radio/program/radiolab","subscribe":{"apple":"https://itunes.apple.com/us/podcast/radiolab/id152249110?mt=2","tuneIn":"https://tunein.com/radio/RadioLab-p68032/","rss":"https://feeds.wnyc.org/radiolab"}},"reveal":{"id":"reveal","title":"Reveal","info":"Created by The Center for Investigative Reporting and PRX, Reveal is public radios first one-hour weekly radio show and podcast dedicated to investigative reporting. Credible, fact based and without a partisan agenda, Reveal combines the power and artistry of driveway moment storytelling with data-rich reporting on critically important issues. The result is stories that inform and inspire, arming our listeners with information to right injustices, hold the powerful accountable and improve lives.Reveal is hosted by Al Letson and showcases the award-winning work of CIR and newsrooms large and small across the nation. In a radio and podcast market crowded with choices, Reveal focuses on important and often surprising stories that illuminate the world for our listeners.","airtime":"SAT 4pm-5pm","imageSrc":"https://ww2.kqed.org/radio/wp-content/uploads/sites/50/2018/04/reveal300px.png","officialWebsiteLink":"https://www.revealnews.org/episodes/","meta":{"site":"news","source":"npr"},"link":"/radio/program/reveal","subscribe":{"apple":"https://itunes.apple.com/us/podcast/reveal/id886009669","tuneIn":"https://tunein.com/radio/Reveal-p679597/","rss":"http://feeds.revealradio.org/revealpodcast"}},"says-you":{"id":"says-you","title":"Says You!","info":"Public radio's game show of bluff and bluster, words and whimsy. The warmest, wittiest cocktail party - it's spirited and civil, brainy and boisterous, peppered with musical interludes. Fast paced and playful, it's the most fun you can have with language without getting your mouth washed out with soap. Our motto: It's not important to know the answers, it's important to like the answers!","airtime":"SUN 4pm-5pm","imageSrc":"https://cdn.kqed.org/wp-content/uploads/2024/04/Says-You-Podcast-Tile-360x360-1.jpg","officialWebsiteLink":"http://www.saysyouradio.com/","meta":{"site":"comedy","source":"Pipit and Finch"},"link":"/radio/program/says-you","subscribe":{"apple":"https://itunes.apple.com/us/podcast/says-you!/id1050199826","tuneIn":"https://tunein.com/radio/Says-You-p480/","rss":"https://saysyou.libsyn.com/rss"}},"science-friday":{"id":"science-friday","title":"Science Friday","info":"Science Friday is a weekly science talk show, broadcast live over public radio stations nationwide. Each week, the show focuses on science topics that are in the news and tries to bring an educated, balanced discussion to bear on the scientific issues at hand. Panels of expert guests join host Ira Flatow, a veteran science journalist, to discuss science and to take questions from listeners during the call-in portion of the program.","airtime":"FRI 11am-1pm","imageSrc":"https://cdn.kqed.org/wp-content/uploads/2024/04/Science-Friday-Podcast-Tile-360x360-1.jpg","officialWebsiteLink":"https://www.wnycstudios.org/shows/science-friday","meta":{"site":"news","source":"npr"},"link":"/radio/program/science-friday","subscribe":{"apple":"https://itunes.apple.com/WebObjects/MZStore.woa/wa/viewPodcast?s=143441&mt=2&id=73329284&at=11l79Y&ct=nprdirectory","tuneIn":"https://tunein.com/radio/Science-Friday-p394/","rss":"http://feeds.wnyc.org/science-friday"}},"science-podcast":{"id":"science-podcast","title":"KQED Science News","tagline":"From the lab, to your ears","info":"KQED Science explores science and environment news, trends, and events from the Bay Area and beyond.","imageSrc":"https://cdn.kqed.org/wp-content/uploads/2024/04/Science-News-Podcast-Tile-703x703-1.jpg","officialWebsiteLink":"https://ww2.kqed.org/science/category/science-podcast/","meta":{"site":"science","source":"kqed","order":"17"},"link":"/science/category/science-podcast","subscribe":{"apple":"https://podcasts.apple.com/us/podcast/kqed-science-news/id214663465","google":"https://podcasts.google.com/feed/aHR0cDovL2Jsb2dzLmtxZWQub3JnL3NjaWVuY2UvZmVlZC8","stitcher":"https://www.stitcher.com/podcast/kqed-science-news","rss":"https://ww2.kqed.org/science/category/science-podcast/feed/podcast"}},"selected-shorts":{"id":"selected-shorts","title":"Selected Shorts","info":"Spellbinding short stories by established and emerging writers take on a new life when they are performed by stars of the stage and screen.","airtime":"SAT 8pm-9pm","imageSrc":"https://cdn.kqed.org/wp-content/uploads/2024/04/Selected-Shorts-Podcast-Tile-360x360-1.jpg","officialWebsiteLink":"https://www.pri.org/programs/selected-shorts","meta":{"site":"arts","source":"pri"},"link":"/radio/program/selected-shorts","subscribe":{"apple":"https://itunes.apple.com/WebObjects/MZStore.woa/wa/viewPodcast?s=143441&mt=2&id=253191824&at=11l79Y&ct=nprdirectory","tuneIn":"https://tunein.com/radio/Selected-Shorts-p31792/","rss":"https://feeds.megaphone.fm/selectedshorts"}},"snap-judgment":{"id":"snap-judgment","title":"Snap Judgment","info":"Snap Judgment (Storytelling, with a BEAT) mixes real stories with killer beats to produce cinematic, dramatic, kick-ass radio. Snap’s raw, musical brand of storytelling dares listeners to see the world through the eyes of another. WNYC studios is the producer of leading podcasts including Radiolab, Freakonomics Radio, Note To Self, Here’s The Thing With Alec Baldwin, and more.","airtime":"SAT 1pm-2pm, 9pm-10pm","imageSrc":"https://ww2.kqed.org/radio/wp-content/uploads/sites/50/2018/04/snapJudgement.jpg","officialWebsiteLink":"https://snapjudgment.org","meta":{"site":"arts","source":"WNYC"},"link":"/radio/program/snap-judgment","subscribe":{"apple":"https://itunes.apple.com/WebObjects/MZStore.woa/wa/viewPodcast?s=143441&mt=2&id=283657561&at=11l79Y&ct=nprdirectory","tuneIn":"https://tunein.com/radio/Snap-Judgment-p243817/","rss":"https://feeds.feedburner.com/snapjudgment-wnyc"}},"soldout":{"id":"soldout","title":"SOLD OUT: Rethinking Housing in America","tagline":"A new future for housing","info":"Sold Out: Rethinking Housing in America","imageSrc":"https://cdn.kqed.org/wp-content/uploads/2024/04/Sold-Out-Podcast-Tile-703x703-1.jpg","imageAlt":"KQED Sold Out: Rethinking Housing in America","officialWebsiteLink":"/podcasts/soldout","meta":{"site":"news","source":"kqed","order":3},"link":"/podcasts/soldout","subscribe":{"npr":"https://www.npr.org/podcasts/911586047/s-o-l-d-o-u-t-a-new-future-for-housing","apple":"https://podcasts.apple.com/us/podcast/introducing-sold-out-rethinking-housing-in-america/id1531354937","rss":"https://feeds.megaphone.fm/soldout","spotify":"https://open.spotify.com/show/38dTBSk2ISFoPiyYNoKn1X","stitcher":"https://www.stitcher.com/podcast/kqed/sold-out-rethinking-housing-in-america","tunein":"https://tunein.com/radio/SOLD-OUT-Rethinking-Housing-in-America-p1365871/","google":"https://podcasts.google.com/feed/aHR0cHM6Ly9mZWVkcy5tZWdhcGhvbmUuZm0vc29sZG91dA"}},"ted-radio-hour":{"id":"ted-radio-hour","title":"TED Radio Hour","info":"The TED Radio Hour is a journey through fascinating ideas, astonishing inventions, fresh approaches to old problems, and new ways to think and create.","airtime":"SUN 3pm-4pm, SAT 10pm-11pm","imageSrc":"https://ww2.kqed.org/radio/wp-content/uploads/sites/50/2018/04/tedRadioHour.jpg","officialWebsiteLink":"https://www.npr.org/programs/ted-radio-hour/?showDate=2018-06-22","meta":{"site":"news","source":"npr"},"link":"/radio/program/ted-radio-hour","subscribe":{"npr":"https://rpb3r.app.goo.gl/8vsS","apple":"https://itunes.apple.com/WebObjects/MZStore.woa/wa/viewPodcast?s=143441&mt=2&id=523121474&at=11l79Y&ct=nprdirectory","tuneIn":"https://tunein.com/radio/TED-Radio-Hour-p418021/","rss":"https://feeds.npr.org/510298/podcast.xml"}},"tech-nation":{"id":"tech-nation","title":"Tech Nation Radio Podcast","info":"Tech Nation is a weekly public radio program, hosted by Dr. Moira Gunn. Founded in 1993, it has grown from a simple interview show to a multi-faceted production, featuring conversations with noted technology and science leaders, and a weekly science and technology-related commentary.","airtime":"FRI 10pm","imageSrc":"https://cdn.kqed.org/wp-content/uploads/2024/04/Tech-Nation-Radio-Podcast-Tile-360x360-1.jpg","officialWebsiteLink":"http://technation.podomatic.com/","meta":{"site":"science","source":"Tech Nation Media"},"link":"/radio/program/tech-nation","subscribe":{"rss":"https://technation.podomatic.com/rss2.xml"}},"thebay":{"id":"thebay","title":"The Bay","tagline":"Local news to keep you rooted","info":"Host Devin Katayama walks you through the biggest story of the day with reporters and newsmakers.","imageSrc":"https://cdn.kqed.org/wp-content/uploads/2024/04/The-Bay-Podcast-Tile-703x703-1.jpg","imageAlt":"\"KQED The Bay","officialWebsiteLink":"/podcasts/thebay","meta":{"site":"radio","source":"kqed","order":"6"},"link":"/podcasts/thebay","subscribe":{"apple":"https://podcasts.apple.com/us/podcast/the-bay/id1350043452","google":"https://podcasts.google.com/feed/aHR0cHM6Ly9mZWVkcy5tZWdhcGhvbmUuZm0vS1FJTkM4MjU5Nzg2MzI3","npr":"https://www.npr.org/podcasts/586725995/the-bay","stitcher":"https://www.stitcher.com/podcast/kqed/the-bay","spotify":"https://open.spotify.com/show/4BIKBKIujizLHlIlBNaAqQ","rss":"https://feeds.megaphone.fm/KQINC8259786327"}},"californiareport":{"id":"californiareport","title":"The California Report","tagline":"California, day by day","info":"KQED’s statewide radio news program providing daily coverage of issues, trends and public policy decisions.","imageSrc":"https://cdn.kqed.org/wp-content/uploads/2024/04/The-California-Report-Podcast-Tile-703x703-1.jpg","imageAlt":"KQED The California Report","officialWebsiteLink":"/californiareport","meta":{"site":"news","source":"kqed","order":"9"},"link":"/californiareport","subscribe":{"apple":"https://podcasts.apple.com/us/podcast/kqeds-the-california-report/id79681292","google":"https://podcasts.google.com/feed/aHR0cHM6Ly9mZWVkcy5tZWdhcGhvbmUuZm0vS1FJTkM1MDAyODE4NTgz","npr":"https://www.npr.org/podcasts/432285393/the-california-report","stitcher":"https://www.stitcher.com/podcast/kqedfm-kqeds-the-california-report-podcast-8838","rss":"https://ww2.kqed.org/news/tag/tcram/feed/podcast"}},"californiareportmagazine":{"id":"californiareportmagazine","title":"The California Report Magazine","tagline":"Your state, your stories","info":"Every week, The California Report Magazine takes you on a road trip for the ears: to visit the places and meet the people who make California unique. The in-depth storytelling podcast from the California Report.","airtime":"FRI 4:30pm-5pm, 6:30pm-7pm, 11pm-11:30pm","imageSrc":"https://cdn.kqed.org/wp-content/uploads/2024/04/The-California-Report-Magazine-Podcast-Tile-703x703-1.jpg","officialWebsiteLink":"/californiareportmagazine","meta":{"site":"news","source":"kqed","order":"10"},"link":"/californiareportmagazine","subscribe":{"apple":"https://podcasts.apple.com/us/podcast/the-california-report-magazine/id1314750545","google":"https://podcasts.google.com/feed/aHR0cHM6Ly9mZWVkcy5tZWdhcGhvbmUuZm0vS1FJTkM3NjkwNjk1OTAz","npr":"https://www.npr.org/podcasts/564733126/the-california-report-magazine","stitcher":"https://www.stitcher.com/podcast/kqed/the-california-report-magazine","rss":"https://ww2.kqed.org/news/tag/tcrmag/feed/podcast"}},"theleap":{"id":"theleap","title":"The Leap","tagline":"What if you closed your eyes, and jumped?","info":"Stories about people making dramatic, risky changes, told by award-winning public radio reporter Judy Campbell.","imageSrc":"https://cdn.kqed.org/wp-content/uploads/2024/04/The-Leap-Podcast-Tile-703x703-1.jpg","imageAlt":"KQED The Leap","officialWebsiteLink":"/podcasts/theleap","meta":{"site":"news","source":"kqed","order":"14"},"link":"/podcasts/theleap","subscribe":{"apple":"https://podcasts.apple.com/us/podcast/the-leap/id1046668171","google":"https://podcasts.google.com/feed/aHR0cHM6Ly9mZWVkcy5tZWdhcGhvbmUuZm0vS1FJTkM0NTcwODQ2MjY2","npr":"https://www.npr.org/podcasts/447248267/the-leap","stitcher":"https://www.stitcher.com/podcast/kqed/the-leap","spotify":"https://open.spotify.com/show/3sSlVHHzU0ytLwuGs1SD1U","rss":"https://ww2.kqed.org/news/programs/the-leap/feed/podcast"}},"masters-of-scale":{"id":"masters-of-scale","title":"Masters of Scale","info":"Masters of Scale is an original podcast in which LinkedIn co-founder and Greylock Partner Reid Hoffman sets out to describe and prove theories that explain how great entrepreneurs take their companies from zero to a gazillion in ingenious fashion.","airtime":"Every other Wednesday June 12 through October 16 at 8pm (repeats Thursdays at 2am)","imageSrc":"https://cdn.kqed.org/wp-content/uploads/2024/04/Masters-of-Scale-Podcast-Tile-360x360-1.jpg","officialWebsiteLink":"https://mastersofscale.com/","meta":{"site":"radio","source":"WaitWhat"},"link":"/radio/program/masters-of-scale","subscribe":{"apple":"http://mastersofscale.app.link/","rss":"https://rss.art19.com/masters-of-scale"}},"the-moth-radio-hour":{"id":"the-moth-radio-hour","title":"The Moth Radio Hour","info":"Since its launch in 1997, The Moth has presented thousands of true stories, told live and without notes, to standing-room-only crowds worldwide. Moth storytellers stand alone, under a spotlight, with only a microphone and a roomful of strangers. The storyteller and the audience embark on a high-wire act of shared experience which is both terrifying and exhilarating. Since 2008, The Moth podcast has featured many of our favorite stories told live on Moth stages around the country. For information on all of our programs and live events, visit themoth.org.","airtime":"SAT 8pm-9pm and SUN 11am-12pm","imageSrc":"https://ww2.kqed.org/radio/wp-content/uploads/sites/50/2018/04/theMoth.jpg","officialWebsiteLink":"https://themoth.org/","meta":{"site":"arts","source":"prx"},"link":"/radio/program/the-moth-radio-hour","subscribe":{"apple":"https://itunes.apple.com/us/podcast/the-moth-podcast/id275699983?mt=2","tuneIn":"https://tunein.com/radio/The-Moth-p273888/","rss":"http://feeds.themoth.org/themothpodcast"}},"the-new-yorker-radio-hour":{"id":"the-new-yorker-radio-hour","title":"The New Yorker Radio Hour","info":"The New Yorker Radio Hour is a weekly program presented by the magazine's editor, David Remnick, and produced by WNYC Studios and The New Yorker. Each episode features a diverse mix of interviews, profiles, storytelling, and an occasional burst of humor inspired by the magazine, and shaped by its writers, artists, and editors. This isn't a radio version of a magazine, but something all its own, reflecting the rich possibilities of audio storytelling and conversation. Theme music for the show was composed and performed by Merrill Garbus of tUnE-YArDs.","airtime":"SAT 10am-11am","imageSrc":"https://cdn.kqed.org/wp-content/uploads/2024/04/The-New-Yorker-Podcast-Tile-360x360-1.jpg","officialWebsiteLink":"https://www.wnycstudios.org/shows/tnyradiohour","meta":{"site":"arts","source":"WNYC"},"link":"/radio/program/the-new-yorker-radio-hour","subscribe":{"apple":"https://itunes.apple.com/us/podcast/id1050430296","tuneIn":"https://tunein.com/podcasts/WNYC-Podcasts/New-Yorker-Radio-Hour-p803804/","rss":"https://feeds.feedburner.com/newyorkerradiohour"}},"the-takeaway":{"id":"the-takeaway","title":"The Takeaway","info":"The Takeaway is produced in partnership with its national audience. It delivers perspective and analysis to help us better understand the day’s news. Be a part of the American conversation on-air and online.","airtime":"MON-THU 12pm-1pm","imageSrc":"https://cdn.kqed.org/wp-content/uploads/2024/04/The-Takeaway-Podcast-Tile-360x360-1.jpg","officialWebsiteLink":"https://www.wnycstudios.org/shows/takeaway","meta":{"site":"news","source":"WNYC"},"link":"/radio/program/the-takeaway","subscribe":{"apple":"https://itunes.apple.com/us/podcast/the-takeaway/id363143310?mt=2","tuneIn":"http://tunein.com/radio/The-Takeaway-p150731/","rss":"https://feeds.feedburner.com/takeawaypodcast"}},"this-american-life":{"id":"this-american-life","title":"This American Life","info":"This American Life is a weekly public radio show, heard by 2.2 million people on more than 500 stations. Another 2.5 million people download the weekly podcast. It is hosted by Ira Glass, produced in collaboration with Chicago Public Media, delivered to stations by PRX The Public Radio Exchange, and has won all of the major broadcasting awards.","airtime":"SAT 12pm-1pm, 7pm-8pm","imageSrc":"https://ww2.kqed.org/radio/wp-content/uploads/sites/50/2018/04/thisAmericanLife.png","officialWebsiteLink":"https://www.thisamericanlife.org/","meta":{"site":"news","source":"wbez"},"link":"/radio/program/this-american-life","subscribe":{"apple":"https://itunes.apple.com/WebObjects/MZStore.woa/wa/viewPodcast?s=143441&mt=2&id=201671138&at=11l79Y&ct=nprdirectory","rss":"https://www.thisamericanlife.org/podcast/rss.xml"}},"truthbetold":{"id":"truthbetold","title":"Truth Be Told","tagline":"Advice by and for people of color","info":"We’re the friend you call after a long day, the one who gets it. Through wisdom from some of the greatest thinkers of our time, host Tonya Mosley explores what it means to grow and thrive as a Black person in America, while discovering new ways of being that serve as a portal to more love, more healing, and more joy.","airtime":"","imageSrc":"https://cdn.kqed.org/wp-content/uploads/2024/04/Truth-Be-Told-Podcast-Tile-360x360-1.jpg","imageAlt":"KQED Truth Be Told with Tonya Mosley","officialWebsiteLink":"https://www.kqed.ord/podcasts/truthbetold","meta":{"site":"news","source":"npr","order":"12"},"link":"/podcasts/truthbetold","subscribe":{"apple":"https://podcasts.apple.com/us/podcast/truth-be-told/id1462216572","google":"https://podcasts.google.com/feed/aHR0cHM6Ly93dzIua3FlZC5vcmcvbmV3cy9jYXRlZ29yeS90cnV0aC1iZS10b2xkLXBvZGNhc3QvZmVlZA","npr":"https://www.npr.org/podcasts/719210818/truth-be-told","stitcher":"https://www.stitcher.com/s?fid=398170&refid=stpr","spotify":"https://open.spotify.com/show/587DhwTBxke6uvfwDfaV5N"}},"wait-wait-dont-tell-me":{"id":"wait-wait-dont-tell-me","title":"Wait Wait... Don't Tell Me!","info":"Peter Sagal and Bill Kurtis host the weekly NPR News quiz show alongside some of the best and brightest news and entertainment personalities.","airtime":"SUN 10am-11am, SAT 11am-12pm, SAT 6pm-7pm","imageSrc":"https://cdn.kqed.org/wp-content/uploads/2024/04/Wait-Wait-Podcast-Tile-300x300-1.jpg","officialWebsiteLink":"https://www.npr.org/programs/wait-wait-dont-tell-me/","meta":{"site":"news","source":"npr"},"link":"/radio/program/wait-wait-dont-tell-me","subscribe":{"npr":"https://rpb3r.app.goo.gl/Xogv","apple":"https://itunes.apple.com/WebObjects/MZStore.woa/wa/viewPodcast?s=143441&mt=2&id=121493804&at=11l79Y&ct=nprdirectory","tuneIn":"https://tunein.com/radio/Wait-Wait-Dont-Tell-Me-p46/","rss":"https://feeds.npr.org/344098539/podcast.xml"}},"washington-week":{"id":"washington-week","title":"Washington Week","info":"For 50 years, Washington Week has been the most intelligent and up to date conversation about the most important news stories of the week. Washington Week is the longest-running news and public affairs program on PBS and features journalists -- not pundits -- lending insight and perspective to the week's important news stories.","airtime":"SAT 1:30am-2am","imageSrc":"https://ww2.kqed.org/radio/wp-content/uploads/sites/50/2018/04/washington-week.jpg","officialWebsiteLink":"http://www.pbs.org/weta/washingtonweek/","meta":{"site":"news","source":"pbs"},"link":"/radio/program/washington-week","subscribe":{"apple":"https://itunes.apple.com/us/podcast/washington-week-audio-pbs/id83324702?mt=2","tuneIn":"https://tunein.com/podcasts/Current-Affairs/Washington-Week-p693/","rss":"http://feeds.pbs.org/pbs/weta/washingtonweek-audio"}},"weekend-edition-saturday":{"id":"weekend-edition-saturday","title":"Weekend Edition Saturday","info":"Weekend Edition Saturday wraps up the week's news and offers a mix of analysis and features on a wide range of topics, including arts, sports, entertainment, and human interest stories. The two-hour program is hosted by NPR's Peabody Award-winning Scott Simon.","airtime":"SAT 5am-10am","imageSrc":"https://cdn.kqed.org/wp-content/uploads/2024/04/Weekend-Edition-Podcast-Tile-360x360-1.jpg","officialWebsiteLink":"https://www.npr.org/programs/weekend-edition-saturday/","meta":{"site":"news","source":"npr"},"link":"/radio/program/weekend-edition-saturday"},"weekend-edition-sunday":{"id":"weekend-edition-sunday","title":"Weekend Edition Sunday","info":"Weekend Edition Sunday features interviews with newsmakers, artists, scientists, politicians, musicians, writers, theologians and historians. The program has covered news events from Nelson Mandela's 1990 release from a South African prison to the capture of Saddam Hussein.","airtime":"SUN 5am-10am","imageSrc":"https://cdn.kqed.org/wp-content/uploads/2024/04/Weekend-Edition-Podcast-Tile-360x360-1.jpg","officialWebsiteLink":"https://www.npr.org/programs/weekend-edition-sunday/","meta":{"site":"news","source":"npr"},"link":"/radio/program/weekend-edition-sunday"},"world-affairs":{"id":"world-affairs","title":"World Affairs","info":"The world as we knew it is undergoing a rapid transformation…so what's next? Welcome to WorldAffairs, your guide to a changing world. We give you the context you need to navigate across borders and ideologies. Through sound-rich stories and in-depth interviews, we break down what it means to be a global citizen on a hot, crowded planet. Our hosts, Ray Suarez, Teresa Cotsirilos and Philip Yun help you make sense of an uncertain world, one story at a time.","airtime":"MON 10pm, TUE 1am, SAT 3am","imageSrc":"https://cdn.kqed.org/wp-content/uploads/2024/04/World-Affairs-Podcast-Tile-360x360-1.jpg ","officialWebsiteLink":"https://www.worldaffairs.org/","meta":{"site":"news","source":"World Affairs"},"link":"/radio/program/world-affairs","subscribe":{"apple":"https://itunes.apple.com/us/podcast/world-affairs/id101215657?mt=2","tuneIn":"https://tunein.com/radio/WorldAffairs-p1665/","rss":"https://worldaffairs.libsyn.com/rss"}},"on-shifting-ground":{"id":"on-shifting-ground","title":"On Shifting Ground with Ray Suarez","info":"Geopolitical turmoil. A warming planet. Authoritarians on the rise. We live in a chaotic world that’s rapidly shifting around us. “On Shifting Ground with Ray Suarez” explores international fault lines and how they impact us all. Each week, NPR veteran Ray Suarez hosts conversations with journalists, leaders and policy experts to help us read between the headlines – and give us hope for human resilience.","airtime":"MON 10pm, TUE 1am, SAT 3am","imageSrc":"https://ww2.kqed.org/app/uploads/2022/12/onshiftingground-600x600-1.png","officialWebsiteLink":"https://worldaffairs.org/radio-podcast/","meta":{"site":"news","source":"On Shifting Ground"},"link":"/radio/program/on-shifting-ground","subscribe":{"apple":"https://podcasts.apple.com/ie/podcast/on-shifting-ground/id101215657","rss":"https://feeds.libsyn.com/36668/rss"}},"hidden-brain":{"id":"hidden-brain","title":"Hidden Brain","info":"Shankar Vedantam uses science and storytelling to reveal the unconscious patterns that drive human behavior, shape our choices and direct our relationships.","imageSrc":"https://ww2.kqed.org/radio/wp-content/uploads/sites/50/2018/05/hiddenbrain.jpg","officialWebsiteLink":"https://www.npr.org/series/423302056/hidden-brain","airtime":"SUN 7pm-8pm","meta":{"site":"news","source":"NPR"},"link":"/radio/program/hidden-brain","subscribe":{"apple":"https://itunes.apple.com/us/podcast/hidden-brain/id1028908750?mt=2","tuneIn":"https://tunein.com/podcasts/Science-Podcasts/Hidden-Brain-p787503/","rss":"https://feeds.npr.org/510308/podcast.xml"}},"city-arts":{"id":"city-arts","title":"City Arts & Lectures","info":"A one-hour radio program to hear celebrated writers, artists and thinkers address contemporary ideas and values, often discussing the creative process. Please note: tapes or transcripts are not available","imageSrc":"https://ww2.kqed.org/radio/wp-content/uploads/sites/50/2018/05/cityartsandlecture-300x300.jpg","officialWebsiteLink":"https://www.cityarts.net/","airtime":"SUN 1pm-2pm, TUE 10pm, WED 1am","meta":{"site":"news","source":"City Arts & Lectures"},"link":"https://www.cityarts.net","subscribe":{"tuneIn":"https://tunein.com/radio/City-Arts-and-Lectures-p692/","rss":"https://www.cityarts.net/feed/"}},"white-lies":{"id":"white-lies","title":"White Lies","info":"In 1965, Rev. James Reeb was murdered in Selma, Alabama. Three men were tried and acquitted, but no one was ever held to account. Fifty years later, two journalists from Alabama return to the city where it happened, expose the lies that kept the murder from being solved and uncover a story about guilt and memory that says as much about America today as it does about the past.","imageSrc":"https://cdn.kqed.org/wp-content/uploads/2024/04/White-Lies-Podcast-Tile-360x360-1.jpg","officialWebsiteLink":"https://www.npr.org/podcasts/510343/white-lies","meta":{"site":"news","source":"npr"},"link":"/radio/program/white-lies","subscribe":{"npr":"https://rpb3r.app.goo.gl/whitelies","apple":"https://podcasts.apple.com/podcast/id1462650519?mt=2&at=11l79Y&ct=nprdirectory","google":"https://podcasts.google.com/feed/aHR0cHM6Ly9mZWVkcy5ucHIub3JnLzUxMDM0My9wb2RjYXN0LnhtbA","spotify":"https://open.spotify.com/show/12yZ2j8vxqhc0QZyRES3ft?si=LfWYEK6URA63hueKVxRLAw","rss":"https://feeds.npr.org/510343/podcast.xml"}},"rightnowish":{"id":"rightnowish","title":"Rightnowish","tagline":"Art is where you find it","info":"Rightnowish digs into life in the Bay Area right now… ish. Journalist Pendarvis Harshaw takes us to galleries painted on the sides of liquor stores in West Oakland. We'll dance in warehouses in the Bayview, make smoothies with kids in South Berkeley, and listen to classical music in a 1984 Cutlass Supreme in Richmond. Every week, Pen talks to movers and shakers about how the Bay Area shapes what they create, and how they shape the place we call home.","imageSrc":"https://cdn.kqed.org/wp-content/uploads/2024/04/Rightnowish-Podcast-Tile-500x500-1.jpg","imageAlt":"KQED Rightnowish with Pendarvis Harshaw","officialWebsiteLink":"/podcasts/rightnowish","meta":{"site":"arts","source":"kqed","order":"5"},"link":"/podcasts/rightnowish","subscribe":{"npr":"https://www.npr.org/podcasts/721590300/rightnowish","rss":"https://ww2.kqed.org/arts/programs/rightnowish/feed/podcast","apple":"https://podcasts.apple.com/us/podcast/rightnowish/id1482187648","stitcher":"https://www.stitcher.com/podcast/kqed/rightnowish","google":"https://podcasts.google.com/feed/aHR0cHM6Ly9mZWVkcy5tZWdhcGhvbmUuZm0vS1FJTkMxMjU5MTY3NDc4","spotify":"https://open.spotify.com/show/7kEJuafTzTVan7B78ttz1I"}},"jerrybrown":{"id":"jerrybrown","title":"The Political Mind of Jerry Brown","tagline":"Lessons from a lifetime in politics","info":"The Political Mind of Jerry Brown brings listeners the wisdom of the former Governor, Mayor, and presidential candidate. Scott Shafer interviewed Brown for more than 40 hours, covering the former governor's life and half-century in the political game – and Brown has some lessons he'd like to share. ","imageSrc":"https://cdn.kqed.org/wp-content/uploads/2024/04/The-Political-Mind-of-Jerry-Brown-Podcast-Tile-703x703-1.jpg","imageAlt":"KQED The Political Mind of Jerry Brown","officialWebsiteLink":"/podcasts/jerrybrown","meta":{"site":"news","source":"kqed","order":"16"},"link":"/podcasts/jerrybrown","subscribe":{"npr":"https://www.npr.org/podcasts/790253322/the-political-mind-of-jerry-brown","apple":"https://itunes.apple.com/us/podcast/id1492194549","rss":"https://ww2.kqed.org/news/series/jerrybrown/feed/podcast/","tuneIn":"http://tun.in/pjGcK","stitcher":"https://www.stitcher.com/podcast/kqed/the-political-mind-of-jerry-brown","spotify":"https://open.spotify.com/show/54C1dmuyFyKMFttY6X2j6r?si=K8SgRCoISNK6ZbjpXrX5-w","google":"https://podcasts.google.com/feed/aHR0cHM6Ly93dzIua3FlZC5vcmcvbmV3cy9zZXJpZXMvamVycnlicm93bi9mZWVkL3BvZGNhc3Qv"}},"the-splendid-table":{"id":"the-splendid-table","title":"The Splendid Table","info":"\u003cem>The Splendid Table\u003c/em> hosts our nation's conversations about cooking, sustainability and food culture.","imageSrc":"https://cdn.kqed.org/wp-content/uploads/2024/04/The-Splendid-Table-Podcast-Tile-360x360-1.jpg","officialWebsiteLink":"https://www.splendidtable.org/","airtime":"SUN 10-11 pm","meta":{"site":"radio","source":"npr"},"link":"/radio/program/the-splendid-table"}},"racesReducer":{"5921":{"id":"5921","type":"apRace","location":"State of California","raceName":"U.S. House of Representatives, District 7","raceDescription":"Top candidate wins seat.","raceType":"top2","totalVotes":158422,"precinctsReportPercentage":98.97,"eevp":99,"tabulationStatus":"Tabulation Paused","dateUpdated":"March 22, 2024","timeUpdated":"4:48 PM","source":"AP","candidates":[{"candidateName":"Doris Matsui","candidateIncumbent":true,"candidateParty":"D","voteCount":89456,"isWinner":true},{"candidateName":"Tom Silva","candidateIncumbent":false,"candidateParty":"R","voteCount":48920,"isWinner":true},{"candidateName":"David Mandel","candidateIncumbent":false,"candidateParty":"D","voteCount":20046,"isWinner":false}],"winnerDateTime":"2024-03-09T01:00:38.194Z"},"5922":{"id":"5922","type":"apRace","location":"State of California","raceName":"U.S. House of Representatives, District 8","raceDescription":"Top candidate wins seat.","raceType":"top2","totalVotes":0,"uncontested":true,"precinctsReportPercentage":0,"eevp":0,"tabulationStatus":"Tabulation Paused","dateUpdated":"March 22, 2024","timeUpdated":"4:20 PM","source":"AP","candidates":[{"candidateName":"Rudy Recile","candidateIncumbent":false,"candidateParty":"R","voteCount":0,"isWinner":true},{"candidateName":"John Garamendi","candidateIncumbent":true,"candidateParty":"D","voteCount":0,"isWinner":true}],"winnerDateTime":"2024-03-06T04:00:30.000Z"},"5924":{"id":"5924","type":"apRace","location":"State of California","raceName":"U.S. House of Representatives, District 10","raceDescription":"Top candidate wins seat.","raceType":"top2","totalVotes":185034,"precinctsReportPercentage":99.07,"eevp":99,"tabulationStatus":"Tabulation Paused","dateUpdated":"March 22, 2024","timeUpdated":"4:48 PM","source":"AP","candidates":[{"candidateName":"Mark DeSaulnier","candidateIncumbent":true,"candidateParty":"D","voteCount":121265,"isWinner":true},{"candidateName":"Katherine Piccinini","candidateIncumbent":false,"candidateParty":"R","voteCount":34883,"isWinner":true},{"candidateName":"Nolan Chen","candidateIncumbent":false,"candidateParty":"R","voteCount":19459,"isWinner":false},{"candidateName":"Joe Sweeney","candidateIncumbent":false,"candidateParty":"NPP","voteCount":7606,"isWinner":false},{"candidateName":"Mohamed Elsherbini","candidateIncumbent":false,"candidateParty":"NPP","voteCount":1821,"isWinner":false}],"winnerDateTime":"2024-03-09T01:02:32.415Z"},"5926":{"id":"5926","type":"apRace","location":"State of California","raceName":"U.S. House of Representatives, District 12","raceDescription":"Top candidate wins seat.","raceType":"top2","totalVotes":153801,"precinctsReportPercentage":98.88,"eevp":99,"tabulationStatus":"Tabulation Paused","dateUpdated":"March 20, 2024","timeUpdated":"4:41 PM","source":"AP","candidates":[{"candidateName":"Lateefah Simon","candidateIncumbent":false,"candidateParty":"D","voteCount":85905,"isWinner":true},{"candidateName":"Jennifer Tran","candidateIncumbent":false,"candidateParty":"D","voteCount":22964,"isWinner":true},{"candidateName":"Tony Daysog","candidateIncumbent":false,"candidateParty":"D","voteCount":17197,"isWinner":false},{"candidateName":"Stephen Slauson","candidateIncumbent":false,"candidateParty":"R","voteCount":9699,"isWinner":false},{"candidateName":"Glenn Kaplan","candidateIncumbent":false,"candidateParty":"D","voteCount":6785,"isWinner":false},{"candidateName":"Eric Wilson","candidateIncumbent":false,"candidateParty":"D","voteCount":4243,"isWinner":false},{"candidateName":"Abdur Sikder","candidateIncumbent":false,"candidateParty":"D","voteCount":2847,"isWinner":false},{"candidateName":"Ned Nuerge","candidateIncumbent":false,"candidateParty":"R","voteCount":2532,"isWinner":false},{"candidateName":"Andre Todd","candidateIncumbent":false,"candidateParty":"D","voteCount":1629,"isWinner":false}],"winnerDateTime":"2024-03-16T00:22:36.062Z"},"5928":{"id":"5928","type":"apRace","location":"State of California","raceName":"U.S. House of Representatives, District 14","raceDescription":"Top candidate wins seat.","raceType":"top2","totalVotes":125831,"precinctsReportPercentage":99.14,"eevp":99,"tabulationStatus":"Tabulation Paused","dateUpdated":"March 20, 2024","timeUpdated":"4:41 PM","source":"AP","candidates":[{"candidateName":"Eric Swalwell","candidateIncumbent":true,"candidateParty":"D","voteCount":83989,"isWinner":true},{"candidateName":"Vin Kruttiventi","candidateIncumbent":false,"candidateParty":"R","voteCount":22106,"isWinner":true},{"candidateName":"Alison Hayden","candidateIncumbent":false,"candidateParty":"R","voteCount":11928,"isWinner":false},{"candidateName":"Luis Reynoso","candidateIncumbent":false,"candidateParty":"R","voteCount":7808,"isWinner":false}],"winnerDateTime":"2024-03-12T00:51:36.366Z"},"5930":{"id":"5930","type":"apRace","location":"State of California","raceName":"U.S. House of Representatives, District 16","raceDescription":"Top candidate wins seat.","raceType":"top2","totalVotes":182135,"precinctsReportPercentage":98.91,"eevp":99,"tabulationStatus":"Tabulation Paused","dateUpdated":"April 3, 2024","timeUpdated":"3:04 PM","source":"AP","candidates":[{"candidateName":"Sam Liccardo","candidateIncumbent":false,"candidateParty":"D","voteCount":38489,"isWinner":true},{"candidateName":"Evan Low","candidateIncumbent":false,"candidateParty":"D","voteCount":30249,"isWinner":false},{"candidateName":"Joe Simitian","candidateIncumbent":false,"candidateParty":"D","voteCount":30249,"isWinner":false},{"candidateName":"Peter Ohtaki","candidateIncumbent":false,"candidateParty":"R","voteCount":23275,"isWinner":false},{"candidateName":"Peter Dixon","candidateIncumbent":false,"candidateParty":"D","voteCount":14673,"isWinner":false},{"candidateName":"Rishi Kumar","candidateIncumbent":false,"candidateParty":"D","voteCount":12377,"isWinner":false},{"candidateName":"Karl Ryan","candidateIncumbent":false,"candidateParty":"R","voteCount":11557,"isWinner":false},{"candidateName":"Julie Lythcott-Haims","candidateIncumbent":false,"candidateParty":"D","voteCount":11383,"isWinner":false},{"candidateName":"Ahmed Mostafa","candidateIncumbent":false,"candidateParty":"D","voteCount":5811,"isWinner":false},{"candidateName":"Greg Tanaka","candidateIncumbent":false,"candidateParty":"D","voteCount":2421,"isWinner":false},{"candidateName":"Joby Bernstein","candidateIncumbent":false,"candidateParty":"D","voteCount":1651,"isWinner":false}],"winnerDateTime":"2024-03-12T00:32:05.002Z"},"5931":{"id":"5931","type":"apRace","location":"State of California","raceName":"U.S. House of Representatives, District 17","raceDescription":"Top candidate wins seat.","raceType":"top2","totalVotes":117534,"precinctsReportPercentage":98.92,"eevp":99,"tabulationStatus":"Tabulation Paused","dateUpdated":"March 22, 2024","timeUpdated":"4:20 PM","source":"AP","candidates":[{"candidateName":"Ro Khanna","candidateIncumbent":true,"candidateParty":"D","voteCount":73941,"isWinner":true},{"candidateName":"Anita Chen","candidateIncumbent":false,"candidateParty":"R","voteCount":31539,"isWinner":true},{"candidateName":"Ritesh Tandon","candidateIncumbent":false,"candidateParty":"D","voteCount":5728,"isWinner":false},{"candidateName":"Mario Ramirez","candidateIncumbent":false,"candidateParty":"D","voteCount":4491,"isWinner":false},{"candidateName":"Joe Dehn","candidateIncumbent":false,"candidateParty":"Lib","voteCount":1835,"isWinner":false}],"winnerDateTime":"2024-03-08T01:50:53.956Z"},"5932":{"id":"5932","type":"apRace","location":"State of California","raceName":"U.S. House of Representatives, District 18","raceDescription":"Top candidate wins seat.","raceType":"top2","totalVotes":96302,"precinctsReportPercentage":98.93,"eevp":98.83,"tabulationStatus":"Tabulation Paused","dateUpdated":"March 25, 2024","timeUpdated":"5:47 AM","source":"AP","candidates":[{"candidateName":"Zoe Lofgren","candidateIncumbent":true,"candidateParty":"D","voteCount":49323,"isWinner":true},{"candidateName":"Peter Hernandez","candidateIncumbent":false,"candidateParty":"R","voteCount":31622,"isWinner":true},{"candidateName":"Charlene Nijmeh","candidateIncumbent":false,"candidateParty":"D","voteCount":10614,"isWinner":false},{"candidateName":"Lawrence Milan","candidateIncumbent":false,"candidateParty":"D","voteCount":2712,"isWinner":false},{"candidateName":"Luele Kifle","candidateIncumbent":false,"candidateParty":"D","voteCount":2031,"isWinner":false}],"winnerDateTime":"2024-03-12T00:26:02.706Z"},"5963":{"id":"5963","type":"apRace","location":"State of California","raceName":"State House, District 2","raceDescription":"Top candidate wins seat.","raceType":"top2","totalVotes":139085,"precinctsReportPercentage":98.62,"eevp":98.6,"tabulationStatus":"Tabulation Paused","dateUpdated":"March 22, 2024","timeUpdated":"4:20 PM","source":"AP","candidates":[{"candidateName":"Michael Greer","candidateIncumbent":false,"candidateParty":"R","voteCount":38079,"isWinner":true},{"candidateName":"Chris Rogers","candidateIncumbent":false,"candidateParty":"D","voteCount":27126,"isWinner":true},{"candidateName":"Rusty Hicks","candidateIncumbent":false,"candidateParty":"D","voteCount":25615,"isWinner":false},{"candidateName":"Ariel Kelley","candidateIncumbent":false,"candidateParty":"D","voteCount":19483,"isWinner":false},{"candidateName":"Frankie Myers","candidateIncumbent":false,"candidateParty":"D","voteCount":17694,"isWinner":false},{"candidateName":"Ted Williams","candidateIncumbent":false,"candidateParty":"D","voteCount":9550,"isWinner":false},{"candidateName":"Cynthia Click","candidateIncumbent":false,"candidateParty":"D","voteCount":1538,"isWinner":false}],"winnerDateTime":"2024-03-22T21:38:36.711Z"},"5972":{"id":"5972","type":"apRace","location":"State of California","raceName":"State House, District 11","raceDescription":"Top candidate wins seat.","raceType":"top2","totalVotes":99775,"precinctsReportPercentage":99,"eevp":99,"tabulationStatus":"Tabulation Paused","dateUpdated":"March 22, 2024","timeUpdated":"4:48 PM","source":"AP","candidates":[{"candidateName":"Lori Wilson","candidateIncumbent":true,"candidateParty":"D","voteCount":50085,"isWinner":true},{"candidateName":"Dave Ennis","candidateIncumbent":false,"candidateParty":"R","voteCount":26074,"isWinner":true},{"candidateName":"Wanda Wallis","candidateIncumbent":false,"candidateParty":"R","voteCount":14638,"isWinner":false},{"candidateName":"Jeffrey Flack","candidateIncumbent":false,"candidateParty":"D","voteCount":8978,"isWinner":false}],"winnerDateTime":"2024-03-08T02:01:24.524Z"},"5973":{"id":"5973","type":"apRace","location":"State of California","raceName":"State House, District 12","raceDescription":"Top candidate wins seat.","raceType":"top2","totalVotes":143532,"precinctsReportPercentage":99.19,"eevp":99,"tabulationStatus":"Tabulation Paused","dateUpdated":"March 22, 2024","timeUpdated":"4:38 PM","source":"AP","candidates":[{"candidateName":"Damon Connolly","candidateIncumbent":true,"candidateParty":"D","voteCount":111275,"isWinner":true},{"candidateName":"Andy Podshadley","candidateIncumbent":false,"candidateParty":"R","voteCount":17240,"isWinner":true},{"candidateName":"Eryn Cervantes","candidateIncumbent":false,"candidateParty":"R","voteCount":15017,"isWinner":false}],"winnerDateTime":"2024-03-21T00:25:32.262Z"},"5975":{"id":"5975","type":"apRace","location":"State of California","raceName":"State House, District 14","raceDescription":"Top candidate wins seat.","raceType":"top2","totalVotes":106997,"precinctsReportPercentage":99.06,"eevp":99,"tabulationStatus":"Tabulation Paused","dateUpdated":"March 22, 2024","timeUpdated":"4:48 PM","source":"AP","candidates":[{"candidateName":"Buffy Wicks","candidateIncumbent":true,"candidateParty":"D","voteCount":78678,"isWinner":true},{"candidateName":"Margot Smith","candidateIncumbent":false,"candidateParty":"D","voteCount":18251,"isWinner":true},{"candidateName":"Utkarsh Jain","candidateIncumbent":false,"candidateParty":"R","voteCount":10068,"isWinner":false}],"winnerDateTime":"2024-03-15T01:30:34.539Z"},"5976":{"id":"5976","type":"apRace","location":"State of California","raceName":"State House, District 15","raceDescription":"Top candidate wins seat.","raceType":"top2","totalVotes":97144,"precinctsReportPercentage":98.98,"eevp":99,"tabulationStatus":"Tabulation Paused","dateUpdated":"March 22, 2024","timeUpdated":"4:48 PM","source":"AP","candidates":[{"candidateName":"Sonia Ledo","candidateIncumbent":false,"candidateParty":"R","voteCount":30946,"isWinner":true},{"candidateName":"Anamarie Farias","candidateIncumbent":false,"candidateParty":"D","voteCount":29512,"isWinner":true},{"candidateName":"Monica Wilson","candidateIncumbent":false,"candidateParty":"D","voteCount":24775,"isWinner":false},{"candidateName":"Karen Mitchoff","candidateIncumbent":false,"candidateParty":"D","voteCount":11911,"isWinner":false}],"winnerDateTime":"2024-03-14T00:19:38.858Z"},"5977":{"id":"5977","type":"apRace","location":"State of California","raceName":"State House, District 16","raceDescription":"Top candidate wins seat.","raceType":"top2","totalVotes":0,"uncontested":true,"precinctsReportPercentage":0,"eevp":0,"tabulationStatus":"Tabulation Paused","dateUpdated":"March 22, 2024","timeUpdated":"4:20 PM","source":"AP","candidates":[{"candidateName":"Joseph Rubay","candidateIncumbent":false,"candidateParty":"R","voteCount":0,"isWinner":true},{"candidateName":"Rebecca Bauer-Kahan","candidateIncumbent":true,"candidateParty":"D","voteCount":0,"isWinner":true}],"winnerDateTime":"2024-03-06T04:00:30.000Z"},"5978":{"id":"5978","type":"apRace","location":"State of California","raceName":"State House, District 17","raceDescription":"Top candidate wins seat.","raceType":"top2","totalVotes":111003,"precinctsReportPercentage":98.99,"eevp":99,"tabulationStatus":"Tabulation Paused","dateUpdated":"March 22, 2024","timeUpdated":"8:25 AM","source":"AP","candidates":[{"candidateName":"Matt Haney","candidateIncumbent":true,"candidateParty":"D","voteCount":90915,"isWinner":true},{"candidateName":"Manuel Noris-Barrera","candidateIncumbent":false,"candidateParty":"R","voteCount":13843,"isWinner":true},{"candidateName":"Otto Duke","candidateIncumbent":false,"candidateParty":"D","voteCount":6245,"isWinner":false}],"winnerDateTime":"2024-03-12T00:36:19.697Z"},"5979":{"id":"5979","type":"apRace","location":"State of California","raceName":"State House, District 18","raceDescription":"Top candidate wins seat.","raceType":"top2","totalVotes":86008,"precinctsReportPercentage":99.1,"eevp":99,"tabulationStatus":"Tabulation Paused","dateUpdated":"March 20, 2024","timeUpdated":"4:41 PM","source":"AP","candidates":[{"candidateName":"Mia Bonta","candidateIncumbent":true,"candidateParty":"D","voteCount":73040,"isWinner":true},{"candidateName":"Andre Sandford","candidateIncumbent":false,"candidateParty":"AIP","voteCount":4575,"isWinner":false},{"candidateName":"Mindy Pechenuk","candidateIncumbent":false,"candidateParty":"R","voteCount":4389,"isWinner":false},{"candidateName":"Cheyenne Kenney","candidateIncumbent":false,"candidateParty":"R","voteCount":4004,"isWinner":false}],"winnerDateTime":"2024-03-06T08:03:23.729Z"},"5980":{"id":"5980","type":"apRace","location":"State of California","raceName":"State House, District 19","raceDescription":"Top candidate wins seat.","raceType":"top2","totalVotes":113959,"precinctsReportPercentage":98.8,"eevp":99,"tabulationStatus":"Tabulation Paused","dateUpdated":"March 22, 2024","timeUpdated":"4:20 PM","source":"AP","candidates":[{"candidateName":"Catherine Stefani","candidateIncumbent":false,"candidateParty":"D","voteCount":64960,"isWinner":true},{"candidateName":"David Lee","candidateIncumbent":false,"candidateParty":"D","voteCount":33035,"isWinner":true},{"candidateName":"Nadia Flamenco","candidateIncumbent":false,"candidateParty":"R","voteCount":8335,"isWinner":false},{"candidateName":"Arjun Sodhani","candidateIncumbent":false,"candidateParty":"R","voteCount":7629,"isWinner":false}],"winnerDateTime":"2024-03-11T23:50:23.109Z"},"5981":{"id":"5981","type":"apRace","location":"State of California","raceName":"State House, District 20","raceDescription":"Top candidate wins seat.","raceType":"top2","totalVotes":0,"uncontested":true,"precinctsReportPercentage":0,"eevp":0,"tabulationStatus":"Tabulation Paused","dateUpdated":"March 20, 2024","timeUpdated":"4:36 PM","source":"AP","candidates":[{"candidateName":"Liz Ortega","candidateIncumbent":true,"candidateParty":"D","voteCount":0,"isWinner":true}],"winnerDateTime":"2024-03-06T04:00:30.000Z"},"5982":{"id":"5982","type":"apRace","location":"State of California","raceName":"State House, District 21","raceDescription":"Top candidate wins seat.","raceType":"top2","totalVotes":0,"uncontested":true,"precinctsReportPercentage":0,"eevp":0,"tabulationStatus":"Tabulation Paused","dateUpdated":"March 22, 2024","timeUpdated":"4:20 PM","source":"AP","candidates":[{"candidateName":"Mark Gilham","candidateIncumbent":false,"candidateParty":"R","voteCount":0,"isWinner":true},{"candidateName":"Diane Papan","candidateIncumbent":true,"candidateParty":"D","voteCount":0,"isWinner":true}],"winnerDateTime":"2024-03-06T04:00:30.000Z"},"5984":{"id":"5984","type":"apRace","location":"State of California","raceName":"State House, District 23","raceDescription":"Top candidate wins seat.","raceType":"top2","totalVotes":116963,"precinctsReportPercentage":98.91,"eevp":99,"tabulationStatus":"Tabulation Paused","dateUpdated":"March 22, 2024","timeUpdated":"4:20 PM","source":"AP","candidates":[{"candidateName":"Marc Berman","candidateIncumbent":true,"candidateParty":"D","voteCount":67106,"isWinner":true},{"candidateName":"Lydia Kou","candidateIncumbent":false,"candidateParty":"D","voteCount":23699,"isWinner":true},{"candidateName":"Gus Mattammal","candidateIncumbent":false,"candidateParty":"R","voteCount":13277,"isWinner":false},{"candidateName":"Allan Marson","candidateIncumbent":false,"candidateParty":"R","voteCount":12881,"isWinner":false}],"winnerDateTime":"2024-03-12T01:13:06.280Z"},"5987":{"id":"5987","type":"apRace","location":"State of California","raceName":"State House, District 26","raceDescription":"Top candidate wins seat.","raceType":"top2","totalVotes":72753,"precinctsReportPercentage":99.19,"eevp":99,"tabulationStatus":"Tabulation Paused","dateUpdated":"March 22, 2024","timeUpdated":"4:20 PM","source":"AP","candidates":[{"candidateName":"Patrick Ahrens","candidateIncumbent":false,"candidateParty":"D","voteCount":25036,"isWinner":true},{"candidateName":"Tara Sreekrishnan","candidateIncumbent":false,"candidateParty":"D","voteCount":19600,"isWinner":true},{"candidateName":"Sophie Song","candidateIncumbent":false,"candidateParty":"R","voteCount":15954,"isWinner":false},{"candidateName":"Omar Din","candidateIncumbent":false,"candidateParty":"D","voteCount":8772,"isWinner":false},{"candidateName":"Bob Goodwyn","candidateIncumbent":false,"candidateParty":"Lib","voteCount":2170,"isWinner":false},{"candidateName":"Ashish Garg","candidateIncumbent":false,"candidateParty":"NPP","voteCount":1221,"isWinner":false}],"winnerDateTime":"2024-03-13T21:06:29.070Z"},"5989":{"id":"5989","type":"apRace","location":"State of California","raceName":"State House, District 28","raceDescription":"Top candidate wins seat.","raceType":"top2","totalVotes":0,"uncontested":true,"precinctsReportPercentage":0,"eevp":0,"tabulationStatus":"Tabulation Paused","dateUpdated":"March 22, 2024","timeUpdated":"5:10 PM","source":"AP","candidates":[{"candidateName":"Gail Pellerin","candidateIncumbent":true,"candidateParty":"D","voteCount":0,"isWinner":true},{"candidateName":"Liz Lawler","candidateIncumbent":false,"candidateParty":"R","voteCount":0,"isWinner":true}],"winnerDateTime":"2024-03-06T04:00:30.000Z"},"6010":{"id":"6010","type":"apRace","location":"State of California","raceName":"State House, District 49","raceDescription":"Top candidate wins seat.","raceType":"top2","totalVotes":0,"uncontested":true,"precinctsReportPercentage":0,"eevp":0,"tabulationStatus":"Tabulation Paused","dateUpdated":"March 22, 2024","timeUpdated":"4:36 PM","source":"AP","candidates":[{"candidateName":"Mike Fong","candidateIncumbent":true,"candidateParty":"D","voteCount":0,"isWinner":true},{"candidateName":"Long Liu","candidateIncumbent":false,"candidateParty":"R","voteCount":0,"isWinner":true}],"winnerDateTime":"2024-03-06T04:00:30.000Z"},"6018":{"id":"6018","type":"apRace","location":"State of California","raceName":"U.S. House of Representatives, District 2","raceDescription":"Top candidate wins seat.","raceType":"top2","totalVotes":229348,"precinctsReportPercentage":99.05,"eevp":99,"tabulationStatus":"Tabulation Paused","dateUpdated":"March 22, 2024","timeUpdated":"4:38 PM","source":"AP","candidates":[{"candidateName":"Jared Huffman","candidateIncumbent":true,"candidateParty":"D","voteCount":169005,"isWinner":true},{"candidateName":"Chris Coulombe","candidateIncumbent":false,"candidateParty":"R","voteCount":37372,"isWinner":true},{"candidateName":"Tief Gibbs","candidateIncumbent":false,"candidateParty":"R","voteCount":18437,"isWinner":false},{"candidateName":"Jolian Kangas","candidateIncumbent":false,"candidateParty":"NPP","voteCount":3166,"isWinner":false},{"candidateName":"Jason Brisendine","candidateIncumbent":false,"candidateParty":"NPP","voteCount":1368,"isWinner":false}],"winnerDateTime":"2024-03-12T00:46:10.103Z"},"6020":{"id":"6020","type":"apRace","location":"State of California","raceName":"U.S. House of Representatives, District 4","raceDescription":"Top candidate wins seat.","raceType":"top2","totalVotes":187640,"precinctsReportPercentage":96.32,"eevp":96.36,"tabulationStatus":"Tabulation Paused","dateUpdated":"March 22, 2024","timeUpdated":"4:20 PM","source":"AP","candidates":[{"candidateName":"Mike Thompson","candidateIncumbent":true,"candidateParty":"D","voteCount":118147,"isWinner":true},{"candidateName":"John Munn","candidateIncumbent":false,"candidateParty":"R","voteCount":56232,"isWinner":true},{"candidateName":"Andrew Engdahl","candidateIncumbent":false,"candidateParty":"D","voteCount":11202,"isWinner":false},{"candidateName":"Niket Patwardhan","candidateIncumbent":false,"candidateParty":"NPP","voteCount":2059,"isWinner":false}],"winnerDateTime":"2024-03-07T00:30:57.980Z"},"6025":{"id":"6025","type":"apRace","location":"State of California","raceName":"U.S. House of Representatives, District 9","raceDescription":"Top candidate wins seat.","raceType":"top2","totalVotes":121271,"precinctsReportPercentage":99.17,"eevp":99,"tabulationStatus":"Tabulation Paused","dateUpdated":"March 22, 2024","timeUpdated":"5:10 PM","source":"AP","candidates":[{"candidateName":"Josh Harder","candidateIncumbent":true,"candidateParty":"D","voteCount":60396,"isWinner":true},{"candidateName":"Kevin Lincoln","candidateIncumbent":false,"candidateParty":"R","voteCount":36346,"isWinner":true},{"candidateName":"John McBride","candidateIncumbent":false,"candidateParty":"R","voteCount":15525,"isWinner":false},{"candidateName":"Khalid Jafri","candidateIncumbent":false,"candidateParty":"R","voteCount":9004,"isWinner":false}],"winnerDateTime":"2024-03-12T00:49:44.113Z"},"6031":{"id":"6031","type":"apRace","location":"State of California","raceName":"U.S. House of Representatives, District 15","raceDescription":"Top candidate wins seat.","raceType":"top2","totalVotes":0,"uncontested":true,"precinctsReportPercentage":0,"eevp":0,"tabulationStatus":"Tabulation Paused","dateUpdated":"March 22, 2024","timeUpdated":"4:20 PM","source":"AP","candidates":[{"candidateName":"Anna Kramer","candidateIncumbent":false,"candidateParty":"R","voteCount":0,"isWinner":true},{"candidateName":"Kevin Mullin","candidateIncumbent":true,"candidateParty":"D","voteCount":0,"isWinner":true}],"winnerDateTime":"2024-03-06T04:00:30.000Z"},"6035":{"id":"6035","type":"apRace","location":"State of California","raceName":"U.S. House of Representatives, District 19","raceDescription":"Top candidate wins seat.","raceType":"top2","totalVotes":203670,"precinctsReportPercentage":99.11,"eevp":99,"tabulationStatus":"Tabulation Paused","dateUpdated":"March 25, 2024","timeUpdated":"5:47 AM","source":"AP","candidates":[{"candidateName":"Jimmy Panetta","candidateIncumbent":true,"candidateParty":"D","voteCount":132540,"isWinner":true},{"candidateName":"Jason Anderson","candidateIncumbent":false,"candidateParty":"R","voteCount":58120,"isWinner":true},{"candidateName":"Sean Dougherty","candidateIncumbent":false,"candidateParty":"Grn","voteCount":13010,"isWinner":false}],"winnerDateTime":"2024-03-07T00:23:46.779Z"},"6066":{"id":"6066","type":"apRace","location":"State of California","raceName":"State House, District 3","raceDescription":"Top candidate wins seat.","raceType":"top2","totalVotes":0,"uncontested":true,"precinctsReportPercentage":0,"eevp":0,"tabulationStatus":"Tabulation Paused","dateUpdated":"March 22, 2024","timeUpdated":"5:10 PM","source":"AP","candidates":[{"candidateName":"Jamie Gallagher","candidateIncumbent":true,"candidateParty":"R","voteCount":0,"isWinner":true},{"candidateName":"Aaron Draper","candidateIncumbent":false,"candidateParty":"D","voteCount":0,"isWinner":true}],"winnerDateTime":"2024-03-06T04:00:30.000Z"},"6067":{"id":"6067","type":"apRace","location":"State of California","raceName":"State House, District 4","raceDescription":"Top candidate wins seat.","raceType":"top2","totalVotes":0,"uncontested":true,"precinctsReportPercentage":0,"eevp":0,"tabulationStatus":"Tabulation Paused","dateUpdated":"March 22, 2024","timeUpdated":"4:20 PM","source":"AP","candidates":[{"candidateName":"Cecilia Aguiar-Curry","candidateIncumbent":true,"candidateParty":"D","voteCount":0,"isWinner":true}],"winnerDateTime":"2024-03-06T04:00:30.000Z"},"6087":{"id":"6087","type":"apRace","location":"State of California","raceName":"State House, District 24","raceDescription":"Top candidate wins seat.","raceType":"top2","totalVotes":66643,"precinctsReportPercentage":99.19,"eevp":99,"tabulationStatus":"Tabulation Paused","dateUpdated":"March 22, 2024","timeUpdated":"4:20 PM","source":"AP","candidates":[{"candidateName":"Alex Lee","candidateIncumbent":true,"candidateParty":"D","voteCount":45544,"isWinner":true},{"candidateName":"Bob Brunton","candidateIncumbent":false,"candidateParty":"R","voteCount":14951,"isWinner":true},{"candidateName":"Marti Souza","candidateIncumbent":false,"candidateParty":"R","voteCount":6148,"isWinner":false}],"winnerDateTime":"2024-03-14T23:23:49.770Z"},"6088":{"id":"6088","type":"apRace","location":"State of California","raceName":"State House, District 25","raceDescription":"Top candidate wins seat.","raceType":"top2","totalVotes":69560,"precinctsReportPercentage":99.31,"eevp":99,"tabulationStatus":"Tabulation Paused","dateUpdated":"March 22, 2024","timeUpdated":"4:20 PM","source":"AP","candidates":[{"candidateName":"Ash Kalra","candidateIncumbent":true,"candidateParty":"D","voteCount":35821,"isWinner":true},{"candidateName":"Ted Stroll","candidateIncumbent":false,"candidateParty":"R","voteCount":18255,"isWinner":true},{"candidateName":"Lan Ngo","candidateIncumbent":false,"candidateParty":"D","voteCount":15484,"isWinner":false}],"winnerDateTime":"2024-03-14T02:40:57.200Z"},"6092":{"id":"6092","type":"apRace","location":"State of California","raceName":"State House, District 29","raceDescription":"Top candidate wins seat.","raceType":"top2","totalVotes":0,"uncontested":true,"precinctsReportPercentage":0,"eevp":0,"tabulationStatus":"Tabulation Paused","dateUpdated":"March 25, 2024","timeUpdated":"5:47 AM","source":"AP","candidates":[{"candidateName":"Robert Rivas","candidateIncumbent":true,"candidateParty":"D","voteCount":0,"isWinner":true},{"candidateName":"J.W. Paine","candidateIncumbent":false,"candidateParty":"R","voteCount":0,"isWinner":true}],"winnerDateTime":"2024-03-06T04:00:30.000Z"},"6223":{"id":"6223","type":"apRace","location":"State of California","raceName":"U.S. House of Representatives, District 46","raceDescription":"Top candidate wins seat.","raceType":"top2","totalVotes":0,"uncontested":true,"precinctsReportPercentage":0,"eevp":0,"tabulationStatus":"Tabulation Paused","dateUpdated":"March 22, 2024","timeUpdated":"5:16 PM","source":"AP","candidates":[{"candidateName":"Lou Correa","candidateIncumbent":true,"candidateParty":"D","voteCount":0,"isWinner":true},{"candidateName":"David Pan","candidateIncumbent":false,"candidateParty":"R","voteCount":0,"isWinner":true}],"winnerDateTime":"2024-03-06T04:00:30.000Z"},"6530":{"id":"6530","type":"apRace","location":"State of California","raceName":"State Senate, District 3","raceDescription":"Top candidate wins seat.","raceType":"top2","totalVotes":222193,"precinctsReportPercentage":98.99,"eevp":99,"tabulationStatus":"Tabulation Paused","dateUpdated":"March 22, 2024","timeUpdated":"4:48 PM","source":"AP","candidates":[{"candidateName":"Thom Bogue","candidateIncumbent":false,"candidateParty":"R","voteCount":61776,"isWinner":true},{"candidateName":"Christopher Cabaldon","candidateIncumbent":false,"candidateParty":"D","voteCount":59041,"isWinner":true},{"candidateName":"Rozzana Verder-Aliga","candidateIncumbent":false,"candidateParty":"D","voteCount":45546,"isWinner":false},{"candidateName":"Jackie Elward","candidateIncumbent":false,"candidateParty":"D","voteCount":41127,"isWinner":false},{"candidateName":"Jimih Jones","candidateIncumbent":false,"candidateParty":"R","voteCount":14703,"isWinner":false}],"winnerDateTime":"2024-03-15T01:24:31.539Z"},"6531":{"id":"6531","type":"apRace","location":"State of California","raceName":"State Senate, District 5","raceDescription":"Top candidate wins seat.","raceType":"top2","totalVotes":171623,"precinctsReportPercentage":99.09,"eevp":99,"tabulationStatus":"Tabulation Paused","dateUpdated":"March 22, 2024","timeUpdated":"5:10 PM","source":"AP","candidates":[{"candidateName":"Jim Shoemaker","candidateIncumbent":false,"candidateParty":"R","voteCount":74935,"isWinner":true},{"candidateName":"Jerry McNerney","candidateIncumbent":false,"candidateParty":"D","voteCount":57040,"isWinner":true},{"candidateName":"Carlos Villapudua","candidateIncumbent":false,"candidateParty":"D","voteCount":39648,"isWinner":false}],"winnerDateTime":"2024-03-13T20:07:46.382Z"},"6532":{"id":"6532","type":"apRace","location":"State of California","raceName":"State Senate, District 7","raceDescription":"Top candidate wins seat.","raceType":"top2","totalVotes":192446,"precinctsReportPercentage":98.72,"eevp":98.78,"tabulationStatus":"Tabulation Paused","dateUpdated":"March 22, 2024","timeUpdated":"4:48 PM","source":"AP","candidates":[{"candidateName":"Jesse Arreguín","candidateIncumbent":false,"candidateParty":"D","voteCount":61837,"isWinner":true},{"candidateName":"Jovanka Beckles","candidateIncumbent":false,"candidateParty":"D","voteCount":34025,"isWinner":true},{"candidateName":"Dan Kalb","candidateIncumbent":false,"candidateParty":"D","voteCount":28842,"isWinner":false},{"candidateName":"Kathryn Lybarger","candidateIncumbent":false,"candidateParty":"D","voteCount":28041,"isWinner":false},{"candidateName":"Sandre Swanson","candidateIncumbent":false,"candidateParty":"D","voteCount":22862,"isWinner":false},{"candidateName":"Jeanne Solnordal","candidateIncumbent":false,"candidateParty":"R","voteCount":16839,"isWinner":false}],"winnerDateTime":"2024-03-16T00:58:11.533Z"},"6533":{"id":"6533","type":"apRace","location":"State of California","raceName":"State Senate, District 9","raceDescription":"Top candidate wins seat.","raceType":"top2","totalVotes":0,"uncontested":true,"precinctsReportPercentage":0,"eevp":0,"tabulationStatus":"Tabulation Paused","dateUpdated":"March 22, 2024","timeUpdated":"4:20 PM","source":"AP","candidates":[{"candidateName":"Tim Grayson","candidateIncumbent":false,"candidateParty":"D","voteCount":0,"isWinner":true},{"candidateName":"Marisol Rubio","candidateIncumbent":false,"candidateParty":"D","voteCount":0,"isWinner":true}],"winnerDateTime":"2024-03-06T04:00:30.000Z"},"6534":{"id":"6534","type":"apRace","location":"State of California","raceName":"State Senate, District 11","raceDescription":"Top candidate wins seat.","raceType":"top2","totalVotes":228260,"precinctsReportPercentage":99.09,"eevp":99,"tabulationStatus":"Tabulation Paused","dateUpdated":"March 22, 2024","timeUpdated":"4:20 PM","source":"AP","candidates":[{"candidateName":"Scott Wiener","candidateIncumbent":true,"candidateParty":"D","voteCount":166592,"isWinner":true},{"candidateName":"Yvette Corkrean","candidateIncumbent":false,"candidateParty":"R","voteCount":34438,"isWinner":true},{"candidateName":"Cynthia Cravens","candidateIncumbent":false,"candidateParty":"D","voteCount":18513,"isWinner":false},{"candidateName":"Jing Xiong","candidateIncumbent":false,"candidateParty":"NPP","voteCount":8717,"isWinner":false}],"winnerDateTime":"2024-03-12T02:01:51.597Z"},"6535":{"id":"6535","type":"apRace","location":"State of California","raceName":"State Senate, District 13","raceDescription":"Top candidate wins seat.","raceType":"top2","totalVotes":227191,"precinctsReportPercentage":98.88,"eevp":99,"tabulationStatus":"Tabulation Paused","dateUpdated":"March 22, 2024","timeUpdated":"4:20 PM","source":"AP","candidates":[{"candidateName":"Josh Becker","candidateIncumbent":true,"candidateParty":"D","voteCount":167127,"isWinner":true},{"candidateName":"Alexander Glew","candidateIncumbent":false,"candidateParty":"R","voteCount":42788,"isWinner":true},{"candidateName":"Christina Laskowski","candidateIncumbent":false,"candidateParty":"R","voteCount":17276,"isWinner":false}],"winnerDateTime":"2024-03-12T01:56:24.964Z"},"6536":{"id":"6536","type":"apRace","location":"State of California","raceName":"State Senate, District 15","raceDescription":"Top candidate wins seat.","raceType":"top2","totalVotes":180231,"precinctsReportPercentage":98.81,"eevp":98.95,"tabulationStatus":"Tabulation Paused","dateUpdated":"March 22, 2024","timeUpdated":"4:20 PM","source":"AP","candidates":[{"candidateName":"Dave Cortese","candidateIncumbent":true,"candidateParty":"D","voteCount":124440,"isWinner":true},{"candidateName":"Robert Howell","candidateIncumbent":false,"candidateParty":"R","voteCount":34173,"isWinner":true},{"candidateName":"Tony Loaiza","candidateIncumbent":false,"candidateParty":"R","voteCount":21618,"isWinner":false}],"winnerDateTime":"2024-03-13T01:15:45.365Z"},"6548":{"id":"6548","type":"apRace","location":"State of California","raceName":"State Senate, District 39","raceDescription":"Top candidate wins seat.","raceType":"top2","totalVotes":0,"uncontested":true,"precinctsReportPercentage":0,"eevp":0,"tabulationStatus":"Tabulation Paused","dateUpdated":"March 20, 2024","timeUpdated":"4:55 PM","source":"AP","candidates":[{"candidateName":"Akilah Weber","candidateIncumbent":false,"candidateParty":"D","voteCount":0,"isWinner":true},{"candidateName":"Bob Divine","candidateIncumbent":false,"candidateParty":"R","voteCount":0,"isWinner":true}],"winnerDateTime":"2024-03-06T04:00:30.000Z"},"6611":{"id":"6611","type":"apRace","location":"State of California","raceName":"U.S. House of Representatives, District 11","raceDescription":"Top candidate wins seat.","raceType":"top2","totalVotes":188732,"precinctsReportPercentage":98.89,"eevp":99,"tabulationStatus":"Tabulation Paused","dateUpdated":"March 22, 2024","timeUpdated":"8:25 AM","source":"AP","candidates":[{"candidateName":"Nancy Pelosi","candidateIncumbent":true,"candidateParty":"D","voteCount":138285,"isWinner":true},{"candidateName":"Bruce Lou","candidateIncumbent":false,"candidateParty":"R","voteCount":16285,"isWinner":true},{"candidateName":"Marjorie Mikels","candidateIncumbent":false,"candidateParty":"D","voteCount":9363,"isWinner":false},{"candidateName":"Bianca Von Krieg","candidateIncumbent":false,"candidateParty":"D","voteCount":7634,"isWinner":false},{"candidateName":"Jason Zeng","candidateIncumbent":false,"candidateParty":"R","voteCount":6607,"isWinner":false},{"candidateName":"Jason Boyce","candidateIncumbent":false,"candidateParty":"D","voteCount":4325,"isWinner":false},{"candidateName":"Larry Nichelson","candidateIncumbent":false,"candidateParty":"R","voteCount":3482,"isWinner":false},{"candidateName":"Eve Del Castello","candidateIncumbent":false,"candidateParty":"R","voteCount":2751,"isWinner":false}],"winnerDateTime":"2024-03-12T00:31:55.445Z"},"8589":{"id":"8589","type":"apRace","location":"State of California","raceName":"U.S. Senate, Class I","raceDescription":"Top candidate wins seat.","raceType":"top2","totalVotes":7276537,"precinctsReportPercentage":99,"eevp":99,"tabulationStatus":"Tabulation Paused","dateUpdated":"March 25, 2024","timeUpdated":"5:47 AM","source":"AP","candidates":[{"candidateName":"Adam Schiff","candidateIncumbent":false,"candidateParty":"D","voteCount":2299507,"isWinner":true},{"candidateName":"Steve Garvey","candidateIncumbent":false,"candidateParty":"R","voteCount":2292414,"isWinner":true},{"candidateName":"Katie Porter","candidateIncumbent":false,"candidateParty":"D","voteCount":1115606,"isWinner":false},{"candidateName":"Barbara Lee","candidateIncumbent":false,"candidateParty":"D","voteCount":714408,"isWinner":false},{"candidateName":"Eric Early","candidateIncumbent":false,"candidateParty":"R","voteCount":240723,"isWinner":false},{"candidateName":"James Bradley","candidateIncumbent":false,"candidateParty":"R","voteCount":98180,"isWinner":false},{"candidateName":"Christina Pascucci","candidateIncumbent":false,"candidateParty":"D","voteCount":61755,"isWinner":false},{"candidateName":"Sharleta Bassett","candidateIncumbent":false,"candidateParty":"R","voteCount":54422,"isWinner":false},{"candidateName":"Sarah Liew","candidateIncumbent":false,"candidateParty":"R","voteCount":38483,"isWinner":false},{"candidateName":"Laura Garza ","candidateIncumbent":false,"candidateParty":"NPP","voteCount":34320,"isWinner":false},{"candidateName":"Jonathan Reiss","candidateIncumbent":false,"candidateParty":"R","voteCount":34283,"isWinner":false},{"candidateName":"Sepi Gilani","candidateIncumbent":false,"candidateParty":"D","voteCount":34056,"isWinner":false},{"candidateName":"Gail Lightfoot","candidateIncumbent":false,"candidateParty":"Lib","voteCount":33046,"isWinner":false},{"candidateName":"Denice Gary-Pandol","candidateIncumbent":false,"candidateParty":"R","voteCount":25494,"isWinner":false},{"candidateName":"James Macauley","candidateIncumbent":false,"candidateParty":"R","voteCount":23168,"isWinner":false},{"candidateName":"Harmesh Kumar","candidateIncumbent":false,"candidateParty":"D","voteCount":21522,"isWinner":false},{"candidateName":"David Peterson","candidateIncumbent":false,"candidateParty":"D","voteCount":21076,"isWinner":false},{"candidateName":"Douglas Pierce","candidateIncumbent":false,"candidateParty":"D","voteCount":19371,"isWinner":false},{"candidateName":"Major Singh","candidateIncumbent":false,"candidateParty":"NPP","voteCount":16965,"isWinner":false},{"candidateName":"John Rose","candidateIncumbent":false,"candidateParty":"D","voteCount":14577,"isWinner":false},{"candidateName":"Perry Pound","candidateIncumbent":false,"candidateParty":"D","voteCount":14134,"isWinner":false},{"candidateName":"Raji Rab","candidateIncumbent":false,"candidateParty":"D","voteCount":13558,"isWinner":false},{"candidateName":"Mark Ruzon","candidateIncumbent":false,"candidateParty":"NPP","voteCount":13429,"isWinner":false},{"candidateName":"Forrest Jones","candidateIncumbent":false,"candidateParty":"AIP","voteCount":13027,"isWinner":false},{"candidateName":"Stefan Simchowitz","candidateIncumbent":false,"candidateParty":"R","voteCount":12717,"isWinner":false},{"candidateName":"Martin Veprauskas","candidateIncumbent":false,"candidateParty":"R","voteCount":9714,"isWinner":false},{"candidateName":"Don Grundmann","candidateIncumbent":false,"candidateParty":"NPP","voteCount":6582,"isWinner":false}],"winnerDateTime":"2024-03-06T05:01:46.589Z"},"8686":{"id":"8686","type":"apRace","location":"State of California","raceName":"President,","raceDescription":"Top candidate wins seat.","raceType":"top1","totalVotes":3589127,"precinctsReportPercentage":99,"eevp":99,"tabulationStatus":"Tabulation Paused","dateUpdated":"March 25, 2024","timeUpdated":"5:48 AM","source":"AP","candidates":[{"candidateName":"Joe Biden","candidateIncumbent":true,"candidateParty":"D","voteCount":3200188,"isWinner":true},{"candidateName":"Marianne Williamson","candidateIncumbent":false,"candidateParty":"D","voteCount":145690,"isWinner":false},{"candidateName":"Dean Phillips","candidateIncumbent":false,"candidateParty":"D","voteCount":99981,"isWinner":false},{"candidateName":"Armando Perez-Serrato","candidateIncumbent":false,"candidateParty":"D","voteCount":42925,"isWinner":false},{"candidateName":"Gabriel Cornejo","candidateIncumbent":false,"candidateParty":"D","voteCount":41261,"isWinner":false},{"candidateName":"President Boddie","candidateIncumbent":false,"candidateParty":"D","voteCount":25373,"isWinner":false},{"candidateName":"Stephen Lyons","candidateIncumbent":false,"candidateParty":"D","voteCount":21008,"isWinner":false},{"candidateName":"Eban Cambridge","candidateIncumbent":false,"candidateParty":"D","voteCount":12701,"isWinner":false}],"winnerDateTime":"2024-03-06T04:12:27.559Z"},"8688":{"id":"8688","type":"apRace","location":"State of California","raceName":"President,","raceDescription":"Top candidate wins seat.","raceType":"top1","totalVotes":2466569,"precinctsReportPercentage":99,"eevp":99,"tabulationStatus":"Tabulation Paused","dateUpdated":"March 25, 2024","timeUpdated":"5:47 AM","source":"AP","candidates":[{"candidateName":"Donald Trump","candidateIncumbent":false,"candidateParty":"R","voteCount":1953947,"isWinner":true},{"candidateName":"Nikki Haley","candidateIncumbent":false,"candidateParty":"R","voteCount":430792,"isWinner":false},{"candidateName":"Ron DeSantis","candidateIncumbent":false,"candidateParty":"R","voteCount":35581,"isWinner":false},{"candidateName":"Chris Christie","candidateIncumbent":false,"candidateParty":"R","voteCount":20164,"isWinner":false},{"candidateName":"Vivek Ramaswamy","candidateIncumbent":false,"candidateParty":"R","voteCount":11069,"isWinner":false},{"candidateName":"Rachel Swift","candidateIncumbent":false,"candidateParty":"R","voteCount":4231,"isWinner":false},{"candidateName":"David Stuckenberg","candidateIncumbent":false,"candidateParty":"R","voteCount":3895,"isWinner":false},{"candidateName":"Ryan Binkley","candidateIncumbent":false,"candidateParty":"R","voteCount":3563,"isWinner":false},{"candidateName":"Asa Hutchinson","candidateIncumbent":false,"candidateParty":"R","voteCount":3327,"isWinner":false}],"winnerDateTime":"2024-03-06T04:13:19.766Z"},"81993":{"id":"81993","type":"apRace","location":"State of California","raceName":"U.S. Senate, Class I Unexpired Term","raceDescription":"Top candidate wins seat.","raceType":"top2","totalVotes":7358837,"precinctsReportPercentage":99,"eevp":99,"tabulationStatus":"Tabulation Paused","dateUpdated":"March 25, 2024","timeUpdated":"5:47 AM","source":"AP","candidates":[{"candidateName":"Steve Garvey","candidateIncumbent":false,"candidateParty":"R","voteCount":2444940,"isWinner":true},{"candidateName":"Adam Schiff","candidateIncumbent":false,"candidateParty":"D","voteCount":2155146,"isWinner":true},{"candidateName":"Katie Porter","candidateIncumbent":false,"candidateParty":"D","voteCount":1269194,"isWinner":false},{"candidateName":"Barbara Lee","candidateIncumbent":false,"candidateParty":"D","voteCount":863278,"isWinner":false},{"candidateName":"Eric Early","candidateIncumbent":false,"candidateParty":"R","voteCount":448788,"isWinner":false},{"candidateName":"Christina Pascucci","candidateIncumbent":false,"candidateParty":"D","voteCount":109421,"isWinner":false},{"candidateName":"Sepi Gilani","candidateIncumbent":false,"candidateParty":"D","voteCount":68070,"isWinner":false}],"winnerDateTime":"2024-03-06T04:31:08.186Z"},"82014":{"id":"82014","type":"apRace","location":"State of California","raceName":"Proposition, 1 - Behavioral Health Services Program","raceDescription":"Top candidate wins seat.","raceType":"top1","totalVotes":7221972,"precinctsReportPercentage":99,"eevp":99,"tabulationStatus":"Tabulation Paused","dateUpdated":"March 25, 2024","timeUpdated":"5:47 AM","source":"AP","candidates":[{"candidateName":"Yes","candidateIncumbent":false,"candidateParty":null,"voteCount":3624998,"isWinner":true},{"candidateName":"No","candidateIncumbent":false,"candidateParty":null,"voteCount":3596974,"isWinner":false}],"winnerDateTime":"2024-03-21T00:11:06.265Z"},"timeLoaded":"May 1, 2024 7:56 PM","nationalRacesLoaded":true,"localRacesLoaded":true,"overrides":[{"id":"5921","raceName":"U.S. House of Representatives, District 7","raceDescription":"Top two candidates advance to general election.","raceReadTheStory":""},{"id":"5922","raceName":"U.S. House of Representatives, District 8","raceDescription":"Top two candidates advance to general election.","raceReadTheStory":""},{"id":"5924","raceName":"U.S. House of Representatives, District 10","raceDescription":"Top two candidates advance to general election.","raceReadTheStory":""},{"id":"5926","raceName":"U.S. House of Representatives, District 12","raceDescription":"Top two candidates advance to general election.","raceReadTheStory":"https://www.kqed.org/elections/results/alameda/congress-12th-district"},{"id":"5928","raceName":"U.S. House of Representatives, District 14","raceDescription":"Top two candidates advance to general election.","raceReadTheStory":""},{"id":"5930","raceName":"U.S. House of Representatives, District 16","raceDescription":"Top two candidates advance to general election.","raceReadTheStory":"https://www.kqed.org/elections/results/california/congress-16th-district"},{"id":"5931","raceName":"U.S. House of Representatives, District 17","raceDescription":"Top two candidates advance to general election.","raceReadTheStory":""},{"id":"5932","raceName":"U.S. House of Representatives, District 18","raceDescription":"Top two candidates advance to general election.","raceReadTheStory":""},{"id":"5963","raceName":"State Assembly, District 2","raceDescription":"Top two candidates advance to general election.","raceReadTheStory":""},{"id":"5972","raceName":"State Assembly, District 11","raceDescription":"Top two candidates advance to general election.","raceReadTheStory":""},{"id":"5973","raceName":"State Assembly, District 12","raceDescription":"Top two candidates advance to general election.","raceReadTheStory":""},{"id":"5975","raceName":"State Assembly, District 14","raceDescription":"Top two candidates advance to general election.","raceReadTheStory":""},{"id":"5976","raceName":"State Assembly, District 15","raceDescription":"Top two candidates advance to general election.","raceReadTheStory":"https://www.kqed.org/elections/results/contracosta/state-assembly"},{"id":"5977","raceName":"State Assembly, District 16","raceDescription":"Top two candidates advance to general election.","raceReadTheStory":""},{"id":"5978","raceName":"State Assembly, District 17","raceDescription":"Top two candidates advance to general election.","raceReadTheStory":""},{"id":"5979","raceName":"State Assembly, District 18","raceDescription":"Top two candidates advance to general election.","raceReadTheStory":""},{"id":"5980","raceName":"State Assembly, District 19","raceDescription":"Top two candidates advance to general election.","raceReadTheStory":""},{"id":"5981","raceName":"State Assembly, District 20","raceDescription":"Top two candidates advance to general election.","raceReadTheStory":""},{"id":"5982","raceName":"State Assembly, District 21","raceDescription":"Top two candidates advance to general election.","raceReadTheStory":""},{"id":"5984","raceName":"State Assembly, District 23","raceDescription":"Top two candidates advance to general election.","raceReadTheStory":"https://www.kqed.org/elections/results/california/state-assembly-23rd-district"},{"id":"5987","raceName":"State Assembly, District 26","raceDescription":"Top two candidates advance to general election.","raceReadTheStory":"https://www.kqed.org/elections/results/santaclara/state-assembly-26th-district"},{"id":"5989","raceName":"State Assembly, District 28","raceDescription":"Top two candidates advance to general election.","raceReadTheStory":""},{"id":"6010","raceName":"State Assembly, District 4","raceDescription":"Top two candidates advance to general election.","raceReadTheStory":""},{"id":"6018","raceName":"U.S. House of Representatives, District 2","raceDescription":"Top two candidates advance to general election.","raceReadTheStory":""},{"id":"6020","raceName":"U.S. House of Representatives, District 4","raceDescription":"Top two candidates advance to general election.","raceReadTheStory":""},{"id":"6025","raceName":"U.S. House of Representatives, District 9","raceDescription":"Top two candidates advance to general election.","raceReadTheStory":""},{"id":"6031","raceName":"U.S. House of Representatives, District 15","raceDescription":"Top two candidates advance to general election.","raceReadTheStory":""},{"id":"6035","raceName":"U.S. House of Representatives, District 19","raceDescription":"Top two candidates advance to general election.","raceReadTheStory":""},{"id":"6067","raceName":"State Assembly, District 4","raceDescription":"Top two candidates advance to general election.","raceReadTheStory":""},{"id":"6087","raceName":"State Assembly, District 24","raceDescription":"Top two candidates advance to general election.","raceReadTheStory":""},{"id":"6088","raceName":"State Assembly, District 25","raceDescription":"Top two candidates advance to general election.","raceReadTheStory":""},{"id":"6092","raceName":"State Assembly, District 29","raceDescription":"Top two candidates advance to general election.","raceReadTheStory":""},{"id":"6223","raceName":"U.S. House of Representatives, District 4","raceDescription":"Top two candidates advance to general election.","raceReadTheStory":""},{"id":"6530","raceName":"State Senate, District 3","raceDescription":"Top two candidates advance to general election.","raceReadTheStory":"https://www.kqed.org/elections/results/california/state-senate-3rd-district"},{"id":"6531","raceName":"State Senate, District 5","raceDescription":"Top two candidates advance to general election.","raceReadTheStory":""},{"id":"6532","raceName":"State Senate, District 7","raceDescription":"Top two candidates advance to general election.","raceReadTheStory":"https://www.kqed.org/elections/results/california/state-senate-7th-district"},{"id":"6533","raceName":"State Senate, District 9","raceDescription":"Top two candidates advance to general election.","raceReadTheStory":""},{"id":"6534","raceName":"State Senate, District 11","raceDescription":"Top two candidates advance to general election.","raceReadTheStory":""},{"id":"6535","raceName":"State Senate, District 13","raceDescription":"Top two candidates advance to general election.","raceReadTheStory":""},{"id":"6536","raceName":"State Senate, District 15","raceDescription":"Top two candidates advance to general election.","raceReadTheStory":""},{"id":"6611","raceName":"U.S. House of Representatives, District 11","raceDescription":"Top two candidates advance to general election.","raceReadTheStory":""},{"id":"8589","raceName":"U.S. Senate (Full Term)","raceDescription":"Top two candidates advance to general election.","raceReadTheStory":"https://www.kqed.org/elections/results/california/senator"},{"id":"8686","raceName":"California Democratic Presidential Primary","raceDescription":"Candidates are competing for 496 delegates.","raceReadTheStory":"https://www.kqed.org/elections/results/president/democrat"},{"id":"8688","raceName":"California Republican Presidential Primary","raceDescription":"Candidates are competing for 169 delegates.","raceReadTheStory":"https://kqed.org/elections/results/president/republican"},{"id":"81993","raceName":"U.S. Senate (Partial/Unexpired Term)","raceDescription":"Top two candidates advance to general election."},{"id":"82014","raceName":"Proposition 1","raceDescription":"Bond and mental health reforms. Passes with majority vote.","raceReadTheStory":"https://www.kqed.org/elections/results/california/proposition-1"}],"AlamedaJudge5":{"id":"AlamedaJudge5","type":"localRace","location":"Alameda","raceName":"Superior Court Judge, Office 5","raceDescription":"Top candidate wins seat.","raceReadTheStory":"","raceType":"top1","timeUpdated":"7:02 PM","dateUpdated":"April 1, 2024","totalVotes":200601,"candidates":[{"candidateName":"Terry Wiley","candidateIncumbent":true,"candidateParty":"","voteCount":200601}]},"AlamedaJudge12":{"id":"AlamedaJudge12","type":"localRace","location":"Alameda","raceName":"Superior Court Judge, Office 12","raceDescription":"Top candidate wins seat.","raceReadTheStory":"","raceType":"top1","timeUpdated":"7:02 PM","dateUpdated":"April 1, 2024","totalVotes":240853,"candidates":[{"candidateName":"Mark Fickes","candidateIncumbent":false,"candidateParty":"","voteCount":133009},{"candidateName":"Michael P. Johnson","candidateIncumbent":false,"candidateParty":"","voteCount":107844}]},"AlamedaBoard2":{"id":"AlamedaBoard2","type":"localRace","location":"Alameda","raceName":"Board of Education, Trustee Area 2","raceDescription":"Top candidate wins seat.","raceReadTheStory":"","raceType":"top1","timeUpdated":"7:02 PM","dateUpdated":"April 1, 2024","totalVotes":33580,"candidates":[{"candidateName":"John Lewis","candidateIncumbent":false,"candidateParty":"","voteCount":6943},{"candidateName":"Angela Normand","candidateIncumbent":true,"candidateParty":"","voteCount":26637}]},"AlamedaBoard5":{"id":"AlamedaBoard5","type":"localRace","location":"Alameda","raceName":"Board of Education, Trustee Area 5","raceDescription":"Top candidate wins seat.","raceReadTheStory":"","raceType":"top1","timeUpdated":"7:02 PM","dateUpdated":"April 1, 2024","totalVotes":26072,"candidates":[{"candidateName":"Guadalupe \"Lupe\" Angulo","candidateIncumbent":false,"candidateParty":"","voteCount":7521},{"candidateName":"Janevette Cole","candidateIncumbent":true,"candidateParty":"","voteCount":13338},{"candidateName":"Joe Orlando Ramos","candidateIncumbent":false,"candidateParty":"","voteCount":5213}]},"AlamedaBoard6":{"id":"AlamedaBoard6","type":"localRace","location":"Alameda","raceName":"Board of Education, Trustee Area 6","raceDescription":"Top candidate wins seat.","raceReadTheStory":"","raceType":"top1","timeUpdated":"7:02 PM","dateUpdated":"April 1, 2024","totalVotes":30864,"candidates":[{"candidateName":"John Guerrero","candidateIncumbent":false,"candidateParty":"","voteCount":9989},{"candidateName":"Eileen McDonald","candidateIncumbent":true,"candidateParty":"","voteCount":20875}]},"AlamedaSup1":{"id":"AlamedaSup1","type":"localRace","location":"Alameda","raceName":"Board of Supervisors, District 1","raceDescription":"Candidate with majority vote wins seat. If no candidate reaches majority, top two candidates advance to runoff in general election.","raceReadTheStory":"","raceType":"top1","timeUpdated":"7:02 PM","dateUpdated":"April 1, 2024","totalVotes":41038,"candidates":[{"candidateName":"David Haubert","candidateIncumbent":true,"candidateParty":"","voteCount":41038}]},"AlamedaSup2":{"id":"AlamedaSup2","type":"localRace","location":"Alameda","raceName":"Board of Supervisors, District 2","raceDescription":"Candidate with majority vote wins seat. If no candidate reaches majority, top two candidates advance to runoff in general election.","raceReadTheStory":"","raceType":"top2","timeUpdated":"7:02 PM","dateUpdated":"April 1, 2024","totalVotes":31034,"candidates":[{"candidateName":"Elisa Márquez","candidateIncumbent":true,"candidateParty":"","voteCount":31034}]},"AlamedaSup4":{"id":"AlamedaSup4","type":"localRace","location":"Alameda","raceName":"Board of Supervisors, District 4","raceDescription":"Candidate with majority vote wins seat. If no candidate reaches majority, top two candidates advance to runoff in general election.","raceReadTheStory":"https://www.kqed.org/elections/results/alameda/supervisor-4th-district","raceType":"top2","timeUpdated":"7:02 PM","dateUpdated":"April 1, 2024","totalVotes":57007,"candidates":[{"candidateName":"Jennifer Esteen","candidateIncumbent":false,"candidateParty":"","voteCount":22400},{"candidateName":"Nate Miley","candidateIncumbent":true,"candidateParty":"","voteCount":34607}]},"AlamedaSup5":{"id":"AlamedaSup5","type":"localRace","location":"Alameda","raceName":"Board of Supervisors, District 5","raceDescription":"Candidate with majority vote wins seat. If no candidate reaches majority, top two candidates advance to runoff in general election.","raceReadTheStory":"https://www.kqed.org/elections/results/alameda/supervisor-5th-district","raceType":"top2","timeUpdated":"7:02 PM","dateUpdated":"April 1, 2024","totalVotes":81059,"candidates":[{"candidateName":"Ben Bartlett","candidateIncumbent":false,"candidateParty":"","voteCount":13518},{"candidateName":"Nikki Fortunato Bas","candidateIncumbent":false,"candidateParty":"","voteCount":27597},{"candidateName":"John J. Bauters","candidateIncumbent":false,"candidateParty":"","voteCount":16783},{"candidateName":"Ken Berrick","candidateIncumbent":false,"candidateParty":"","voteCount":7520},{"candidateName":"Omar Farmer","candidateIncumbent":false,"candidateParty":"","voteCount":1240},{"candidateName":"Gregory Hodge","candidateIncumbent":false,"candidateParty":"","voteCount":3419},{"candidateName":"Chris Moore","candidateIncumbent":false,"candidateParty":"","voteCount":7428},{"candidateName":"Gerald Pechenuk","candidateIncumbent":false,"candidateParty":"","voteCount":305},{"candidateName":"Lorrel Plimier","candidateIncumbent":false,"candidateParty":"","voteCount":3249}]},"AlamedaBoard7":{"id":"AlamedaBoard7","type":"localRace","location":"Alameda","raceName":"Flood Control & Water Conservation District Director, Zone 7, Full Term","raceDescription":"Top three candidates win seat.","raceReadTheStory":"","raceType":"top3","timeUpdated":"7:02 PM","dateUpdated":"April 1, 2024","totalVotes":134340,"candidates":[{"candidateName":"Alan Burnham","candidateIncumbent":false,"candidateParty":"","voteCount":15723},{"candidateName":"Sandy Figuers","candidateIncumbent":false,"candidateParty":"","voteCount":22454},{"candidateName":"Laurene K. Green","candidateIncumbent":false,"candidateParty":"","voteCount":30343},{"candidateName":"Kathy Narum","candidateIncumbent":true,"candidateParty":"","voteCount":23833},{"candidateName":"Seema Badar","candidateIncumbent":false,"candidateParty":"","voteCount":7468},{"candidateName":"Catherine Brown","candidateIncumbent":false,"candidateParty":"","voteCount":34519}]},"AlamedaAuditor":{"id":"AlamedaAuditor","type":"localRace","location":"Alameda","raceName":"Oakland Auditor","raceDescription":"Top candidate wins seat.","raceReadTheStory":"","raceType":"top1","timeUpdated":"7:02 PM","dateUpdated":"April 1, 2024","totalVotes":59227,"candidates":[{"candidateName":"Michael Houston","candidateIncumbent":true,"candidateParty":"","voteCount":59227}]},"AlamedaMeasureA":{"id":"AlamedaMeasureA","type":"localRace","location":"Alameda","raceName":"Measure A","raceDescription":"Alameda County. Civil service. Passes with majority vote.","raceReadTheStory":"","raceType":"yesNo","timeUpdated":"7:02 PM","dateUpdated":"April 1, 2024","totalVotes":282335,"candidates":[{"candidateName":"Yes","candidateIncumbent":false,"candidateParty":"","voteCount":167903},{"candidateName":"No","candidateIncumbent":false,"candidateParty":"","voteCount":114432}]},"AlamedaMeasureB":{"id":"AlamedaMeasureB","type":"localRace","location":"Alameda","raceName":"Measure B","raceDescription":"Alameda County. Recall rules. Passes with majority vote.","raceReadTheStory":"https://www.kqed.org/elections/results/alameda/measure-b","raceType":"yesNo","timeUpdated":"7:02 PM","dateUpdated":"April 1, 2024","totalVotes":282683,"candidates":[{"candidateName":"Yes","candidateIncumbent":false,"candidateParty":"","voteCount":182200},{"candidateName":"No","candidateIncumbent":false,"candidateParty":"","voteCount":100483}]},"AlamedaMeasureD":{"id":"AlamedaMeasureD","type":"localRace","location":"Alameda","raceName":"Measure D","raceDescription":"Oakland. Appropriations limit. Passes with majority vote.","raceReadTheStory":"","raceType":"yesNo","timeUpdated":"7:02 PM","dateUpdated":"April 1, 2024","totalVotes":79797,"candidates":[{"candidateName":"Yes","candidateIncumbent":false,"candidateParty":"","voteCount":59852},{"candidateName":"No","candidateIncumbent":false,"candidateParty":"","voteCount":19945}]},"AlamedaMeasureE":{"id":"AlamedaMeasureE","type":"localRace","location":"Alameda","raceName":"Measure E","raceDescription":"Alameda Unified School District. Parcel tax. Passes with 2/3 vote.","raceReadTheStory":"","raceType":"yesNo","timeUpdated":"7:02 PM","dateUpdated":"April 1, 2024","totalVotes":22692,"candidates":[{"candidateName":"Yes","candidateIncumbent":false,"candidateParty":"","voteCount":17280},{"candidateName":"No","candidateIncumbent":false,"candidateParty":"","voteCount":5412}]},"AlamedaMeasureF":{"id":"AlamedaMeasureF","type":"localRace","location":"Alameda","raceName":"Measure F","raceDescription":"Piedmont. Parcel tax. Passes with 2/3 vote.","raceReadTheStory":"","raceType":"yesNo","timeUpdated":"7:02 PM","dateUpdated":"April 1, 2024","totalVotes":4855,"candidates":[{"candidateName":"Yes","candidateIncumbent":false,"candidateParty":"","voteCount":3673},{"candidateName":"No","candidateIncumbent":false,"candidateParty":"","voteCount":1182}]},"AlamedaMeasureG":{"id":"AlamedaMeasureG","type":"localRace","location":"Alameda","raceName":"Measure G","raceDescription":"Albany Unified School District. Parcel tax. Passes with 2/3 vote. ","raceReadTheStory":"","raceType":"yesNo","timeUpdated":"7:02 PM","dateUpdated":"April 1, 2024","totalVotes":5898,"candidates":[{"candidateName":"Yes","candidateIncumbent":false,"candidateParty":"","voteCount":4651},{"candidateName":"No","candidateIncumbent":false,"candidateParty":"","voteCount":1247}]},"AlamedaMeasureH":{"id":"AlamedaMeasureH","type":"localRace","location":"Alameda","raceName":"Measure H","raceDescription":"Berkeley Unified School District. Parcel tax. Passes with 2/3 vote.","raceReadTheStory":"","raceType":"yesNo","timeUpdated":"7:02 PM","dateUpdated":"April 1, 2024","totalVotes":33331,"candidates":[{"candidateName":"Yes","candidateIncumbent":false,"candidateParty":"","voteCount":29418},{"candidateName":"No","candidateIncumbent":false,"candidateParty":"","voteCount":3913}]},"AlamedaMeasureI":{"id":"AlamedaMeasureI","type":"localRace","location":"Alameda","raceName":"Measure I","raceDescription":"Hayward Unified School District. School bond. Passes with 55% vote.","raceReadTheStory":"","raceType":"yesNo","timeUpdated":"7:02 PM","dateUpdated":"April 1, 2024","totalVotes":21929,"candidates":[{"candidateName":"Yes","candidateIncumbent":false,"candidateParty":"","voteCount":14151},{"candidateName":"No","candidateIncumbent":false,"candidateParty":"","voteCount":7778}]},"AlamedaMeasureJ":{"id":"AlamedaMeasureJ","type":"localRace","location":"Alameda","raceName":"Measure J","raceDescription":"San Leandro Unified School District. School bond. Passes with 55% vote.","raceReadTheStory":"","raceType":"yesNo","timeUpdated":"7:02 PM","dateUpdated":"April 1, 2024","totalVotes":12338,"candidates":[{"candidateName":"Yes","candidateIncumbent":false,"candidateParty":"","voteCount":7784},{"candidateName":"No","candidateIncumbent":false,"candidateParty":"","voteCount":4554}]},"CCD2":{"id":"CCD2","type":"localRace","location":"Contra Costa","raceName":"Board of Supervisors, District 2","raceDescription":"Candidate with majority vote wins seat. If no candidate reaches majority, top two candidates advance to runoff in general election.","raceReadTheStory":"","raceType":"yesNo","timeUpdated":"6:45 PM","dateUpdated":"March 28, 2024","totalVotes":45776,"candidates":[{"candidateName":"Candace Andersen","candidateIncumbent":true,"candidateParty":"","voteCount":45776}]},"CCD3":{"id":"CCD3","type":"localRace","location":"Contra Costa","raceName":"Board of Supervisors, District 3","raceDescription":"Candidate with majority vote wins seat. If no candidate reaches majority, top two candidates advance to runoff in general election.","raceReadTheStory":"","raceType":"top1","timeUpdated":"6:45 PM","dateUpdated":"March 28, 2024","totalVotes":25120,"candidates":[{"candidateName":"Diane Burgis","candidateIncumbent":true,"candidateParty":"","voteCount":25120}]},"CCD5":{"id":"CCD5","type":"localRace","location":"Contra Costa","raceName":"Board of Supervisors, District 5","raceDescription":"Candidate with majority vote wins seat. If no candidate reaches majority, top two candidates advance to runoff in general election.","raceReadTheStory":"https://www.kqed.org/elections/results/contracosta/supervisor-5th-district","raceType":"top2","timeUpdated":"6:45 PM","dateUpdated":"March 28, 2024","totalVotes":37045,"candidates":[{"candidateName":"Mike Barbanica","candidateIncumbent":false,"candidateParty":"","voteCount":14338},{"candidateName":"Jelani Killings","candidateIncumbent":false,"candidateParty":"","voteCount":5683},{"candidateName":"Shanelle Scales-Preston","candidateIncumbent":false,"candidateParty":"","voteCount":12993},{"candidateName":"Iztaccuauhtli Hector Gonzalez","candidateIncumbent":false,"candidateParty":"","voteCount":4031}]},"CCMeasureA":{"id":"CCMeasureA","type":"localRace","location":"Contra Costa","raceName":"Measure A","raceDescription":"Martinez. Appoint City Clerk. Passes with a majority vote.","raceReadTheStory":"","raceType":"yesNo","timeUpdated":"6:45 PM","dateUpdated":"March 28, 2024","totalVotes":11513,"candidates":[{"candidateName":"Yes","candidateIncumbent":false,"candidateParty":"","voteCount":7554},{"candidateName":"No","candidateIncumbent":false,"candidateParty":"","voteCount":3959}]},"CCMeasureB":{"id":"CCMeasureB","type":"localRace","location":"Contra Costa","raceName":"Measure B","raceDescription":"Antioch Unified School District. School bond. Passes with 55% vote.","raceReadTheStory":"","raceType":"yesNo","timeUpdated":"6:45 PM","dateUpdated":"March 28, 2024","totalVotes":17971,"candidates":[{"candidateName":"Yes","candidateIncumbent":false,"candidateParty":"","voteCount":10397},{"candidateName":"No","candidateIncumbent":false,"candidateParty":"","voteCount":7574}]},"CCMeasureC":{"id":"CCMeasureC","type":"localRace","location":"Contra Costa","raceName":"Measure C","raceDescription":"Martinez Unified School District. Parcel tax. Passes with 2/3 vote.","raceReadTheStory":"","raceType":"yesNo","timeUpdated":"6:45 PM","dateUpdated":"March 28, 2024","totalVotes":9230,"candidates":[{"candidateName":"Yes","candidateIncumbent":false,"candidateParty":"","voteCount":6917},{"candidateName":"No","candidateIncumbent":false,"candidateParty":"","voteCount":2313}]},"CCMeasureD":{"id":"CCMeasureD","type":"localRace","location":"Contra Costa","raceName":"Measure D","raceDescription":"Moraga School District. School bond. Passes with 55% vote.","raceReadTheStory":"","raceType":"yesNo","timeUpdated":"6:45 PM","dateUpdated":"March 28, 2024","totalVotes":6007,"candidates":[{"candidateName":"Yes","candidateIncumbent":false,"candidateParty":"","voteCount":4052},{"candidateName":"No","candidateIncumbent":false,"candidateParty":"","voteCount":1955}]},"MarinD2":{"id":"MarinD2","type":"localRace","location":"Marin","raceName":"Board of Supervisors, District 2","raceDescription":"Candidate with majority vote wins seat. If no candidate reaches majority, top two candidates advance to runoff in general election.","raceReadTheStory":"https://www.kqed.org/elections/results/marin/supervisor-2nd-district","raceType":"top2","timeUpdated":"6:54 PM","dateUpdated":"March 27, 2024","totalVotes":18466,"candidates":[{"candidateName":"Brian Colbert","candidateIncumbent":false,"candidateParty":"","voteCount":7971},{"candidateName":"Heather McPhail Sridharan","candidateIncumbent":false,"candidateParty":"","voteCount":4851},{"candidateName":"Ryan O'Neil","candidateIncumbent":false,"candidateParty":"","voteCount":2647},{"candidateName":"Gabe Paulson","candidateIncumbent":false,"candidateParty":"","voteCount":2997}]},"MarinD3":{"id":"MarinD3","type":"localRace","location":"Marin","raceName":"Board of Supervisors, District 3","raceDescription":"Candidate with majority vote wins seat. If no candidate reaches majority, top two candidates advance to runoff in general election.","raceReadTheStory":"","raceType":"top1","timeUpdated":"6:54 PM","dateUpdated":"March 27, 2024","totalVotes":13274,"candidates":[{"candidateName":"Stephanie Moulton-Peters","candidateIncumbent":true,"candidateParty":"","voteCount":13274}]},"MarinD4":{"id":"MarinD4","type":"localRace","location":"Marin","raceName":"Board of Supervisors, District 4","raceDescription":"Candidate with majority vote wins seat. If no candidate reaches majority, top two candidates advance to runoff in general election.","raceReadTheStory":"","raceType":"top1","timeUpdated":"6:54 PM","dateUpdated":"March 27, 2024","totalVotes":12986,"candidates":[{"candidateName":"Dennis Rodoni","candidateIncumbent":true,"candidateParty":"","voteCount":10086},{"candidateName":"Francis Drouillard","candidateIncumbent":false,"candidateParty":"","voteCount":2900}]},"MarinLarkspurCC":{"id":"MarinLarkspurCC","type":"localRace","location":"Marin","raceName":"Larkspur City Council (Short Term)","raceDescription":"Top candidate wins seat.","raceReadTheStory":"","raceType":"top1","timeUpdated":"6:54 PM","dateUpdated":"March 27, 2024","totalVotes":4176,"candidates":[{"candidateName":"Stephanie Andre","candidateIncumbent":false,"candidateParty":"","voteCount":2514},{"candidateName":"Claire Paquette","candidateIncumbent":false,"candidateParty":"","voteCount":1008},{"candidateName":"Lana Scott","candidateIncumbent":false,"candidateParty":"","voteCount":654}]},"MarinRossCouncil":{"id":"MarinRossCouncil","type":"localRace","location":"Marin","raceName":"Ross Town Council","raceDescription":"Top three candidates win seat.","raceReadTheStory":"","raceType":"top3","timeUpdated":"6:54 PM","dateUpdated":"March 27, 2024","totalVotes":1740,"candidates":[{"candidateName":"Charles William \"Bill\" Kircher, Jr.","candidateIncumbent":false,"candidateParty":"","voteCount":536},{"candidateName":"Mathew Salter","candidateIncumbent":false,"candidateParty":"","voteCount":502},{"candidateName":"Shadi Aboukhater","candidateIncumbent":false,"candidateParty":"","voteCount":187},{"candidateName":"Teri Dowling","candidateIncumbent":false,"candidateParty":"","voteCount":515}]},"MarinMeasureA":{"id":"MarinMeasureA","type":"localRace","location":"Marin","raceName":"Measure A","raceDescription":"Tamalpais Union High School District. School bond. Passes with 55% vote.","raceReadTheStory":"","raceType":"yesNo","timeUpdated":"6:54 PM","dateUpdated":"March 27, 2024","totalVotes":45345,"candidates":[{"candidateName":"Yes","candidateIncumbent":false,"candidateParty":"","voteCount":24376},{"candidateName":"No","candidateIncumbent":false,"candidateParty":"","voteCount":20969}]},"MarinMeasureB":{"id":"MarinMeasureB","type":"localRace","location":"Marin","raceName":"Measure B","raceDescription":"Petaluma Joint Union High School District. Parcel tax. Passes with 2/3 vote.","raceReadTheStory":"","raceType":"yesNo","timeUpdated":"6:54 PM","dateUpdated":"March 27, 2024","totalVotes":132,"candidates":[{"candidateName":"Yes","candidateIncumbent":false,"candidateParty":"","voteCount":62},{"candidateName":"No","candidateIncumbent":false,"candidateParty":"","voteCount":70}]},"MarinMeasureC":{"id":"MarinMeasureC","type":"localRace","location":"Marin","raceName":"Measure C","raceDescription":"Belvedere. Appropriation limit. Passes with majority vote.","raceReadTheStory":"","raceType":"yesNo","timeUpdated":"6:54 PM","dateUpdated":"March 27, 2024","totalVotes":870,"candidates":[{"candidateName":"Yes","candidateIncumbent":false,"candidateParty":"","voteCount":679},{"candidateName":"No","candidateIncumbent":false,"candidateParty":"","voteCount":191}]},"MarinMeasureD":{"id":"MarinMeasureD","type":"localRace","location":"Marin","raceName":"Measure D","raceDescription":"Larkspur. Rent stabilization. Passes with majority vote.","raceReadTheStory":"https://www.kqed.org/elections/results/marin/measure-d","raceType":"yesNo","timeUpdated":"6:54 PM","dateUpdated":"March 27, 2024","totalVotes":4955,"candidates":[{"candidateName":"Yes","candidateIncumbent":false,"candidateParty":"","voteCount":2573},{"candidateName":"No","candidateIncumbent":false,"candidateParty":"","voteCount":2382}]},"MarinMeasureE":{"id":"MarinMeasureE","type":"localRace","location":"Marin","raceName":"Measure E","raceDescription":"Ross. Special tax. Passes with 2/3 vote.","raceReadTheStory":"https://www.kqed.org/elections/results/marin/measure-e","raceType":"yesNo","timeUpdated":"6:54 PM","dateUpdated":"March 27, 2024","totalVotes":874,"candidates":[{"candidateName":"Yes","candidateIncumbent":false,"candidateParty":"","voteCount":683},{"candidateName":"No","candidateIncumbent":false,"candidateParty":"","voteCount":191}]},"MarinMeasureF":{"id":"MarinMeasureF","type":"localRace","location":"Marin","raceName":"Measure F","raceDescription":"San Anselmo. Flood Control and Water Conservation District. Passes with majority vote.","raceReadTheStory":"","raceType":"yesNo","timeUpdated":"6:54 PM","dateUpdated":"March 27, 2024","totalVotes":5193,"candidates":[{"candidateName":"Yes","candidateIncumbent":false,"candidateParty":"","voteCount":3083},{"candidateName":"No","candidateIncumbent":false,"candidateParty":"","voteCount":2110}]},"MarinMeasureG":{"id":"MarinMeasureG","type":"localRace","location":"Marin","raceName":"Measure G","raceDescription":"Bel Marin Keys Community Services District. Special tax. Passes with 2/3 vote.","raceReadTheStory":"","raceType":"yesNo","timeUpdated":"6:54 PM","dateUpdated":"March 27, 2024","totalVotes":830,"candidates":[{"candidateName":"Yes","candidateIncumbent":false,"candidateParty":"","voteCount":661},{"candidateName":"No","candidateIncumbent":false,"candidateParty":"","voteCount":169}]},"MarinMeasureH":{"id":"MarinMeasureH","type":"localRace","location":"Marin","raceName":"Measure H","raceDescription":"Marinwood Community Services District. Appropriations limit, fire protection. Passes with a majority vote.","raceReadTheStory":"","raceType":"yesNo","timeUpdated":"6:54 PM","dateUpdated":"March 27, 2024","totalVotes":1738,"candidates":[{"candidateName":"Yes","candidateIncumbent":false,"candidateParty":"","voteCount":1369},{"candidateName":"No","candidateIncumbent":false,"candidateParty":"","voteCount":369}]},"MarinMeasureI":{"id":"MarinMeasureI","type":"localRace","location":"Marin","raceName":"Measure I","raceDescription":"Marinwood Community Services District. Appropriations limit, parks. Passes with a majority vote.","raceReadTheStory":"","raceType":"yesNo","timeUpdated":"6:54 PM","dateUpdated":"March 27, 2024","totalVotes":1735,"candidates":[{"candidateName":"Yes","candidateIncumbent":false,"candidateParty":"","voteCount":1336},{"candidateName":"No","candidateIncumbent":false,"candidateParty":"","voteCount":399}]},"NapaD2":{"id":"NapaD2","type":"localRace","location":"Napa","raceName":"Board of Supervisors, District 2","raceDescription":"Candidate with majority vote wins seat. If no candidate reaches majority, top two candidates advance to runoff in general election.","raceReadTheStory":"","raceType":"top1","timeUpdated":"6:50 PM","dateUpdated":"April 3, 2024","totalVotes":8351,"candidates":[{"candidateName":"Liz Alessio","candidateIncumbent":false,"candidateParty":"","voteCount":6340},{"candidateName":"Doris Gentry","candidateIncumbent":false,"candidateParty":"","voteCount":2011}]},"NapaD4":{"id":"NapaD4","type":"localRace","location":"Napa","raceName":"Board of Supervisors, District 4","raceDescription":"Candidate with majority vote wins seat. If no candidate reaches majority, top two candidates advance to runoff in general election.","raceReadTheStory":"https://www.kqed.org/elections/results/napa/supervisor-4th-district","raceType":"top1","timeUpdated":"6:50 PM","dateUpdated":"April 3, 2024","totalVotes":7306,"candidates":[{"candidateName":"Amber Manfree","candidateIncumbent":false,"candidateParty":"","voteCount":3913},{"candidateName":"Pete Mott","candidateIncumbent":false,"candidateParty":"","voteCount":3393}]},"NapaD5":{"id":"NapaD5","type":"localRace","location":"Napa","raceName":"Board of Supervisors, District 5","raceDescription":"Candidate with majority vote wins seat. If no candidate reaches majority, top two candidates advance to runoff in general election.","raceReadTheStory":"https://www.kqed.org/elections/results/napa/supervisor-5th-district","raceType":"top1","timeUpdated":"6:50 PM","dateUpdated":"April 3, 2024","totalVotes":5356,"candidates":[{"candidateName":"Mariam Aboudamous","candidateIncumbent":false,"candidateParty":"","voteCount":2379},{"candidateName":"Belia Ramos","candidateIncumbent":true,"candidateParty":"","voteCount":2977}]},"NapaMeasureD":{"id":"NapaMeasureD","type":"localRace","location":"Napa","raceName":"Measure D","raceDescription":"Howell Mountain Elementary School District. School bond. Passes with 55% vote.","raceReadTheStory":"","raceType":"yesNo","timeUpdated":"6:50 PM","dateUpdated":"April 3, 2024","totalVotes":741,"candidates":[{"candidateName":"Yes","candidateIncumbent":false,"candidateParty":"","voteCount":367},{"candidateName":"No","candidateIncumbent":false,"candidateParty":"","voteCount":374}]},"NapaMeasureU":{"id":"NapaMeasureU","type":"localRace","location":"Napa","raceName":"Measure U","raceDescription":"Lake Berryessa Resort Improvement District. Appropriations limit. Passes with majority vote. ","raceReadTheStory":"","raceType":"yesNo","timeUpdated":"6:50 PM","dateUpdated":"April 3, 2024","totalVotes":86,"candidates":[{"candidateName":"Yes","candidateIncumbent":false,"candidateParty":"","voteCount":63},{"candidateName":"No","candidateIncumbent":false,"candidateParty":"","voteCount":23}]},"NapaMeasureU1":{"id":"NapaMeasureU1","type":"localRace","location":"Napa","raceName":"Measure U","raceDescription":"Yountville. Appropriations limit. Passes with majority vote. ","raceReadTheStory":"","raceType":"yesNo","timeUpdated":"6:50 PM","dateUpdated":"April 3, 2024","totalVotes":925,"candidates":[{"candidateName":"Yes","candidateIncumbent":false,"candidateParty":"","voteCount":793},{"candidateName":"No","candidateIncumbent":false,"candidateParty":"","voteCount":132}]},"SFJudge1":{"id":"SFJudge1","type":"localRace","location":"San Francisco","raceName":"Superior Court Judge, Seat 1","raceDescription":"Candidate with majority vote wins seat. If no candidate reaches majority, top two candidates advance to runoff in general election.","raceReadTheStory":"https://www.kqed.org/elections/results/sanfrancisco/superior-court-seat-1","raceType":"top1","timeUpdated":"6:50 PM","dateUpdated":"March 21, 2024","totalVotes":202960,"candidates":[{"candidateName":"Michael Begert","candidateIncumbent":true,"candidateParty":"","voteCount":124943},{"candidateName":"Chip Zecher","candidateIncumbent":false,"candidateParty":"","voteCount":78017}]},"SFJudge13":{"id":"SFJudge13","type":"localRace","location":"San Francisco","raceName":"Superior Court Judge, Seat 13","raceDescription":"Candidate with majority vote wins seat. If no candidate reaches majority, top two candidates advance to runoff in general election.","raceReadTheStory":"https://www.kqed.org/elections/results/sanfrancisco/superior-court-seat-13","raceType":"top1","timeUpdated":"6:50 PM","dateUpdated":"March 21, 2024","totalVotes":202386,"candidates":[{"candidateName":"Jean Myungjin Roland","candidateIncumbent":false,"candidateParty":"","voteCount":90012},{"candidateName":"Patrick S. Thompson","candidateIncumbent":true,"candidateParty":"","voteCount":112374}]},"SFPropA":{"id":"SFPropA","type":"localRace","location":"San Francisco","raceName":"Proposition A","raceDescription":"Housing bond. Passes with 2/3 vote.","raceReadTheStory":"https://www.kqed.org/elections/results/sanfrancisco/proposition-a","raceType":"yesNo","timeUpdated":"6:50 PM","dateUpdated":"March 21, 2024","totalVotes":225187,"candidates":[{"candidateName":"Yes","candidateIncumbent":false,"candidateParty":"","voteCount":158497},{"candidateName":"No","candidateIncumbent":false,"candidateParty":"","voteCount":66690}]},"SFPropB":{"id":"SFPropB","type":"localRace","location":"San Francisco","raceName":"Proposition B","raceDescription":"Police staffing. Passes with majority vote.","raceReadTheStory":"","raceType":"yesNo","timeUpdated":"6:50 PM","dateUpdated":"March 21, 2024","totalVotes":222954,"candidates":[{"candidateName":"Yes","candidateIncumbent":false,"candidateParty":"","voteCount":61580},{"candidateName":"No","candidateIncumbent":false,"candidateParty":"","voteCount":161374}]},"SFPropC":{"id":"SFPropC","type":"localRace","location":"San Francisco","raceName":"Proposition C","raceDescription":"Transfer tax exemption. Passes with majority vote.","raceReadTheStory":"","raceType":"yesNo","timeUpdated":"6:50 PM","dateUpdated":"March 21, 2024","totalVotes":220349,"candidates":[{"candidateName":"Yes","candidateIncumbent":false,"candidateParty":"","voteCount":116311},{"candidateName":"No","candidateIncumbent":false,"candidateParty":"","voteCount":104038}]},"SFPropD":{"id":"SFPropD","type":"localRace","location":"San Francisco","raceName":"Proposition D","raceDescription":"Ethics laws. Passes with majority vote.","raceReadTheStory":"","raceType":"yesNo","timeUpdated":"6:50 PM","dateUpdated":"March 21, 2024","totalVotes":222615,"candidates":[{"candidateName":"Yes","candidateIncumbent":false,"candidateParty":"","voteCount":198584},{"candidateName":"No","candidateIncumbent":false,"candidateParty":"","voteCount":24031}]},"SFPropE":{"id":"SFPropE","type":"localRace","location":"San Francisco","raceName":"Proposition E","raceDescription":"Police policies. Passes with majority vote.","raceReadTheStory":"https://www.kqed.org/elections/results/sanfrancisco/proposition-e","raceType":"yesNo","timeUpdated":"6:50 PM","dateUpdated":"March 21, 2024","totalVotes":222817,"candidates":[{"candidateName":"Yes","candidateIncumbent":false,"candidateParty":"","voteCount":120529},{"candidateName":"No","candidateIncumbent":false,"candidateParty":"","voteCount":102288}]},"SFPropF":{"id":"SFPropF","type":"localRace","location":"San Francisco","raceName":"Proposition F","raceDescription":"Drug screening. Passes with majority vote.","raceReadTheStory":"https://www.kqed.org/elections/results/sanfrancisco/proposition-f","raceType":"yesNo","timeUpdated":"6:50 PM","dateUpdated":"March 21, 2024","totalVotes":224004,"candidates":[{"candidateName":"Yes","candidateIncumbent":false,"candidateParty":"","voteCount":130214},{"candidateName":"No","candidateIncumbent":false,"candidateParty":"","voteCount":93790}]},"SFPropG":{"id":"SFPropG","type":"localRace","location":"San Francisco","raceName":"Proposition G","raceDescription":"Eighth-grade algebra. Passes with majority vote.","raceReadTheStory":"","raceType":"yesNo","timeUpdated":"6:50 PM","dateUpdated":"March 21, 2024","totalVotes":222704,"candidates":[{"candidateName":"Yes","candidateIncumbent":false,"candidateParty":"","voteCount":182066},{"candidateName":"No","candidateIncumbent":false,"candidateParty":"","voteCount":40638}]},"SMJudge4":{"id":"SMJudge4","type":"localRace","location":"San Mateo","raceName":"Superior Court Judge, Office 4","raceDescription":"Candidate with majority vote wins seat. If no candidate reaches majority, top two candidates advance to runoff in general election.","raceReadTheStory":"","raceType":"top1","timeUpdated":"6:56 PM","dateUpdated":"April 4, 2024","totalVotes":108919,"candidates":[{"candidateName":"Sarah Burdick","candidateIncumbent":false,"candidateParty":"","voteCount":108919}]},"SMD1":{"id":"SMD1","type":"localRace","location":"San Mateo","raceName":"Board of Supervisors, District 1","raceDescription":"Candidate with majority vote wins seat. If no candidate reaches majority, top two candidates advance to runoff in general election.","raceReadTheStory":"https://www.kqed.org/elections/results/sanmateo/supervisor-1st-district","raceType":"top1","timeUpdated":"6:56 PM","dateUpdated":"April 4, 2024","totalVotes":29650,"candidates":[{"candidateName":"Jackie Speier","candidateIncumbent":false,"candidateParty":"","voteCount":20353},{"candidateName":"Ann Schneider","candidateIncumbent":false,"candidateParty":"","voteCount":9297}]},"SMD4":{"id":"SMD4","type":"localRace","location":"San Mateo","raceName":"Board of Supervisors, District 4","raceDescription":"Candidate with majority vote wins seat. If no candidate reaches majority, top two candidates advance to runoff in general election.","raceReadTheStory":"https://www.kqed.org/elections/results/sanmateo/supervisor-4th-district","raceType":"top2","timeUpdated":"6:56 PM","dateUpdated":"April 4, 2024","totalVotes":22725,"candidates":[{"candidateName":"Antonio Lopez","candidateIncumbent":false,"candidateParty":"","voteCount":5730},{"candidateName":"Lisa Gauthier","candidateIncumbent":false,"candidateParty":"","voteCount":10358},{"candidateName":"Celeste Brevard","candidateIncumbent":false,"candidateParty":"","voteCount":1268},{"candidateName":"Paul Bocanegra","candidateIncumbent":false,"candidateParty":"","voteCount":1909},{"candidateName":"Maggie Cornejo","candidateIncumbent":false,"candidateParty":"","voteCount":3460}]},"SMD5":{"id":"SMD5","type":"localRace","location":"San Mateo","raceName":"Board of Supervisors, District 5","raceDescription":"Candidate with majority vote wins seat. If no candidate reaches majority, top two candidates advance to runoff in general election.","raceReadTheStory":"","raceType":"top1","timeUpdated":"6:56 PM","dateUpdated":"April 4, 2024","totalVotes":19937,"candidates":[{"candidateName":"David Canepa","candidateIncumbent":true,"candidateParty":"","voteCount":19937}]},"SMMeasureB":{"id":"SMMeasureB","type":"localRace","location":"San Mateo","raceName":"Measure B","raceDescription":"County Service Area #1 (Highlands). Special tax. Passes with 2/3 vote.","raceReadTheStory":"","raceType":"yesNo","timeUpdated":"6:56 PM","dateUpdated":"April 4, 2024","totalVotes":1549,"candidates":[{"candidateName":"Yes","candidateIncumbent":false,"candidateParty":"","voteCount":1360},{"candidateName":"No","candidateIncumbent":false,"candidateParty":"","voteCount":189}]},"SMMeasureC":{"id":"SMMeasureC","type":"localRace","location":"San Mateo","raceName":"Measure C","raceDescription":"Jefferson Elementary School District. Parcel tax. Passes with 2/3 vote","raceReadTheStory":"","raceType":"yesNo","timeUpdated":"6:56 PM","dateUpdated":"April 4, 2024","totalVotes":12234,"candidates":[{"candidateName":"Yes","candidateIncumbent":false,"candidateParty":"","voteCount":8543},{"candidateName":"No","candidateIncumbent":false,"candidateParty":"","voteCount":3691}]},"SMMeasureE":{"id":"SMMeasureE","type":"localRace","location":"San Mateo","raceName":"Measure E","raceDescription":"Woodside Elementary School District. School bond. Passes with 55% vote.","raceReadTheStory":"","raceType":"yesNo","timeUpdated":"6:56 PM","dateUpdated":"April 4, 2024","totalVotes":1392,"candidates":[{"candidateName":"Yes","candidateIncumbent":false,"candidateParty":"","voteCount":910},{"candidateName":"No","candidateIncumbent":false,"candidateParty":"","voteCount":482}]},"SMMeasureG":{"id":"SMMeasureG","type":"localRace","location":"San Mateo","raceName":"Measure G","raceDescription":"Pacifica School District. School bond. Passes with 55% vote.","raceReadTheStory":"","raceType":"yesNo","timeUpdated":"6:56 PM","dateUpdated":"April 4, 2024","totalVotes":11548,"candidates":[{"candidateName":"Yes","candidateIncumbent":false,"candidateParty":"","voteCount":7067},{"candidateName":"No","candidateIncumbent":false,"candidateParty":"","voteCount":4481}]},"SMMeasureH":{"id":"SMMeasureH","type":"localRace","location":"San Mateo","raceName":"Measure H","raceDescription":"San Carlos School District. School bond. Passes with 55% vote.","raceReadTheStory":"","raceType":"yesNo","timeUpdated":"6:56 PM","dateUpdated":"April 4, 2024","totalVotes":9938,"candidates":[{"candidateName":"Yes","candidateIncumbent":false,"candidateParty":"","voteCount":6283},{"candidateName":"No","candidateIncumbent":false,"candidateParty":"","voteCount":3655}]},"SCJudge5":{"id":"SCJudge5","type":"localRace","location":"Santa Clara","raceName":"Superior Court Judge, Office 5","raceDescription":"Candidate with majority vote wins seat. If no candidate reaches majority, top two candidates advance to runoff in general election.","raceReadTheStory":"","raceType":"top1","timeUpdated":"7:05 PM","dateUpdated":"April 4, 2024","totalVotes":301953,"candidates":[{"candidateName":"Jay Boyarsky","candidateIncumbent":false,"candidateParty":"","voteCount":142549},{"candidateName":"Nicole M. Ford","candidateIncumbent":false,"candidateParty":"","voteCount":52147},{"candidateName":"Johnene Linda Stebbins","candidateIncumbent":false,"candidateParty":"","voteCount":107257}]},"SCD2":{"id":"SCD2","type":"localRace","location":"Santa Clara","raceName":"Board of Supervisors, District 2","raceDescription":"Candidate with majority vote wins seat. If no candidate reaches majority, top two candidates advance to runoff in general election.","raceReadTheStory":"https://www.kqed.org/elections/results/santaclara/supervisor-2nd-district","raceType":"top2","timeUpdated":"7:05 PM","dateUpdated":"April 4, 2024","totalVotes":44059,"candidates":[{"candidateName":"Corina Herrera-Loera","candidateIncumbent":false,"candidateParty":"","voteCount":10519},{"candidateName":"Jennifer Margaret Celaya","candidateIncumbent":false,"candidateParty":"","voteCount":2394},{"candidateName":"Madison Nguyen","candidateIncumbent":false,"candidateParty":"","voteCount":12794},{"candidateName":"Betty Duong","candidateIncumbent":false,"candidateParty":"","voteCount":14031},{"candidateName":"Nelson McElmurry","candidateIncumbent":false,"candidateParty":"","voteCount":4321}]},"SCD3":{"id":"SCD3","type":"localRace","location":"Santa Clara","raceName":"Board of Supervisors, District 3","raceDescription":"Candidate with majority vote wins seat. If no candidate reaches majority, top two candidates advance to runoff in general election.","raceReadTheStory":"","raceType":"top1","timeUpdated":"7:05 PM","dateUpdated":"April 4, 2024","totalVotes":42549,"candidates":[{"candidateName":"Otto Lee","candidateIncumbent":true,"candidateParty":"","voteCount":42549}]},"SCD5":{"id":"SCD5","type":"localRace","location":"Santa Clara","raceName":"Board of Supervisors, District 5","raceDescription":"Candidate with majority vote wins seat. If no candidate reaches majority, top two candidates advance to runoff in general election.","raceReadTheStory":"https://www.kqed.org/elections/results/santaclara/supervisor-5th-district","raceType":"top2","timeUpdated":"7:05 PM","dateUpdated":"April 4, 2024","totalVotes":88712,"candidates":[{"candidateName":"Margaret Abe-Koga","candidateIncumbent":false,"candidateParty":"","voteCount":37172},{"candidateName":"Sally J. Lieber","candidateIncumbent":false,"candidateParty":"","voteCount":21962},{"candidateName":"Barry Chang","candidateIncumbent":false,"candidateParty":"","voteCount":6164},{"candidateName":"Peter C. Fung","candidateIncumbent":false,"candidateParty":"","voteCount":17892},{"candidateName":"Sandy Sans","candidateIncumbent":false,"candidateParty":"","voteCount":5522}]},"SCSJMayor":{"id":"SCSJMayor","type":"localRace","location":"Santa Clara","raceName":"San José Mayor","raceDescription":"Candidate with majority vote wins seat. If no candidate reaches majority, top two candidates advance to runoff in general election.","raceReadTheStory":"","raceType":"top1","timeUpdated":"7:05 PM","dateUpdated":"April 4, 2024","totalVotes":167064,"candidates":[{"candidateName":"Matt Mahan","candidateIncumbent":true,"candidateParty":"","voteCount":144701},{"candidateName":"Tyrone Wade","candidateIncumbent":false,"candidateParty":"","voteCount":22363}]},"SCSJD2":{"id":"SCSJD2","type":"localRace","location":"Santa Clara","raceName":"San José City Council, District 2","raceDescription":"Candidate with majority vote wins seat. If no candidate reaches majority, top two candidates advance to runoff in general election.","raceReadTheStory":"","raceType":"top2","timeUpdated":"7:05 PM","dateUpdated":"April 4, 2024","totalVotes":14131,"candidates":[{"candidateName":"Joe Lopez","candidateIncumbent":false,"candidateParty":"","voteCount":4950},{"candidateName":"Pamela Campos","candidateIncumbent":false,"candidateParty":"","voteCount":3436},{"candidateName":"Vanessa Sandoval","candidateIncumbent":false,"candidateParty":"","voteCount":2719},{"candidateName":"Babu Prasad","candidateIncumbent":false,"candidateParty":"","voteCount":3026}]},"SCSJD4":{"id":"SCSJD4","type":"localRace","location":"Santa Clara","raceName":"San José City Council, District 4","raceDescription":"Candidate with majority vote wins seat. If no candidate reaches majority, top two candidates advance to runoff in general election.","raceReadTheStory":"","raceType":"top1","timeUpdated":"7:05 PM","dateUpdated":"April 4, 2024","totalVotes":14322,"candidates":[{"candidateName":"Kansen Chu","candidateIncumbent":false,"candidateParty":"","voteCount":5931},{"candidateName":"David Cohen","candidateIncumbent":true,"candidateParty":"","voteCount":8391}]},"SCSJD6":{"id":"SCSJD6","type":"localRace","location":"Santa Clara","raceName":"San José City Council, District 6","raceDescription":"Candidate with majority vote wins seat. If no candidate reaches majority, top two candidates advance to runoff in general election.","raceReadTheStory":"","raceType":"top2","timeUpdated":"7:05 PM","dateUpdated":"April 4, 2024","totalVotes":25108,"candidates":[{"candidateName":"David Cohen","candidateIncumbent":false,"candidateParty":"","voteCount":9875},{"candidateName":"Alex Shoor","candidateIncumbent":false,"candidateParty":"","voteCount":3850},{"candidateName":"Angelo \"A.J.\" Pasciuti","candidateIncumbent":false,"candidateParty":"","voteCount":2688},{"candidateName":"Michael Mulcahy","candidateIncumbent":false,"candidateParty":"","voteCount":8695}]},"SCSJD8":{"id":"SCSJD8","type":"localRace","location":"Santa Clara","raceName":"San José City Council, District 8","raceDescription":"Candidate with majority vote wins seat. If no candidate reaches majority, top two candidates advance to runoff in general election.","raceReadTheStory":"","raceType":"top2","timeUpdated":"7:05 PM","dateUpdated":"April 4, 2024","totalVotes":21462,"candidates":[{"candidateName":"Tam Truong","candidateIncumbent":false,"candidateParty":"","voteCount":6982},{"candidateName":"Domingo Candelas","candidateIncumbent":true,"candidateParty":"","voteCount":8466},{"candidateName":"Sukhdev Singh Bainiwal","candidateIncumbent":false,"candidateParty":"","voteCount":5513},{"candidateName":"Surinder Kaur Dhaliwal","candidateIncumbent":false,"candidateParty":"","voteCount":501}]},"SCSJD10":{"id":"SCSJD10","type":"localRace","location":"Santa Clara","raceName":"San José City Council, District 10","raceDescription":"Candidate with majority vote wins seat. If no candidate reaches majority, top two candidates advance to runoff in general election.","raceReadTheStory":"","raceType":"top2","timeUpdated":"7:05 PM","dateUpdated":"April 4, 2024","totalVotes":22799,"candidates":[{"candidateName":"George Casey","candidateIncumbent":false,"candidateParty":"","voteCount":8805},{"candidateName":"Arjun Batra","candidateIncumbent":true,"candidateParty":"","voteCount":8354},{"candidateName":"Lenka Wright","candidateIncumbent":false,"candidateParty":"","voteCount":5640}]},"SCMeasureA":{"id":"SCMeasureA","type":"localRace","location":"Santa Clara","raceName":"Measure A","raceDescription":"Santa Clara. Appointed city clerk. Passes with majority vote.","raceReadTheStory":"","raceType":"yesNo","timeUpdated":"7:05 PM","dateUpdated":"April 4, 2024","totalVotes":20315,"candidates":[{"candidateName":"Yes","candidateIncumbent":false,"candidateParty":"","voteCount":6580},{"candidateName":"No","candidateIncumbent":false,"candidateParty":"","voteCount":13735}]},"SCMeasureB":{"id":"SCMeasureB","type":"localRace","location":"Santa Clara","raceName":"Measure B","raceDescription":"Santa Clara. Appointed police chief. Passes with majority vote.","raceReadTheStory":"","raceType":"yesNo","timeUpdated":"7:05 PM","dateUpdated":"April 4, 2024","totalVotes":20567,"candidates":[{"candidateName":"Yes","candidateIncumbent":false,"candidateParty":"","voteCount":5680},{"candidateName":"No","candidateIncumbent":false,"candidateParty":"","voteCount":14887}]},"SCMeasureC":{"id":"SCMeasureC","type":"localRace","location":"Santa Clara","raceName":"Measure C","raceDescription":"Sunnyvale School District. School bond. Passes with 55% vote.","raceReadTheStory":"","raceType":"yesNo","timeUpdated":"7:05 PM","dateUpdated":"April 4, 2024","totalVotes":14656,"candidates":[{"candidateName":"Yes","candidateIncumbent":false,"candidateParty":"","voteCount":10261},{"candidateName":"No","candidateIncumbent":false,"candidateParty":"","voteCount":4395}]},"SolanoD15":{"id":"SolanoD15","type":"localRace","location":"Solano","raceName":"Superior Court Judge, Department 15","raceDescription":"Candidate with majority vote wins seat. If no candidate reaches majority, top two candidates advance to runoff in general election.","raceReadTheStory":"","raceType":"","timeUpdated":"7:08 PM","dateUpdated":"March 28, 2024","totalVotes":81709,"candidates":[{"candidateName":"Mike Thompson","candidateIncumbent":false,"candidateParty":"","voteCount":36844},{"candidateName":"Bryan J. Kim","candidateIncumbent":false,"candidateParty":"","voteCount":44865}]},"SolanoD1":{"id":"SolanoD1","type":"localRace","location":"Solano","raceName":"Board of Supervisors, District 1","raceDescription":"Candidate with majority vote wins seat. If no candidate reaches majority, top two candidates advance to runoff in general election.","raceReadTheStory":"https://www.kqed.org/elections/results/solano/supervisor-1st-district","raceType":"","timeUpdated":"7:08 PM","dateUpdated":"March 28, 2024","totalVotes":13786,"candidates":[{"candidateName":"Michael Wilson","candidateIncumbent":false,"candidateParty":"","voteCount":6401},{"candidateName":"Cassandra James","candidateIncumbent":false,"candidateParty":"","voteCount":7385}]},"SolanoD2":{"id":"SolanoD2","type":"localRace","location":"Solano","raceName":"Board of Supervisors, District 2","raceDescription":"Candidate with majority vote wins seat. If no candidate reaches majority, top two candidates advance to runoff in general election.","raceReadTheStory":"","raceType":"","timeUpdated":"7:08 PM","dateUpdated":"March 28, 2024","totalVotes":19903,"candidates":[{"candidateName":"Monica Brown","candidateIncumbent":true,"candidateParty":"","voteCount":10951},{"candidateName":"Nora Dizon","candidateIncumbent":false,"candidateParty":"","voteCount":3135},{"candidateName":"Rochelle Sherlock","candidateIncumbent":false,"candidateParty":"","voteCount":5817}]},"SolanoD5":{"id":"SolanoD5","type":"localRace","location":"Solano","raceName":"Board of Supervisors, District 5","raceDescription":"Candidate with majority vote wins seat. If no candidate reaches majority, top two candidates advance to runoff in general election.","raceReadTheStory":"","raceType":"","timeUpdated":"7:08 PM","dateUpdated":"March 28, 2024","totalVotes":17888,"candidates":[{"candidateName":"Mitch Mashburn","candidateIncumbent":true,"candidateParty":"","voteCount":11210},{"candidateName":"Chadwick J. Ledoux","candidateIncumbent":false,"candidateParty":"","voteCount":6678}]},"SolanoEducation":{"id":"SolanoEducation","type":"localRace","location":"Solano","raceName":"Sacramento County Board of Education","raceDescription":"Candidate with majority vote wins seat. If no candidate reaches majority, top two candidates advance to runoff in general election.","raceReadTheStory":"","raceType":"","timeUpdated":"7:08 PM","dateUpdated":"March 28, 2024","totalVotes":3650,"candidates":[{"candidateName":"Heather Davis","candidateIncumbent":true,"candidateParty":"","voteCount":2960},{"candidateName":"Shazleen Khan","candidateIncumbent":false,"candidateParty":"","voteCount":690}]},"SolanoMeasureA":{"id":"SolanoMeasureA","type":"localRace","location":"Solano","raceName":"Measure A","raceDescription":"Benicia. Hotel tax. Passes with majority vote.","raceReadTheStory":"https://www.kqed.org/elections/results/solano/measure-a","raceType":"yesNo","timeUpdated":"7:08 PM","dateUpdated":"March 28, 2024","totalVotes":10136,"candidates":[{"candidateName":"Yes","candidateIncumbent":false,"candidateParty":"","voteCount":7869},{"candidateName":"No","candidateIncumbent":false,"candidateParty":"","voteCount":2267}]},"SolanoMeasureB":{"id":"SolanoMeasureB","type":"localRace","location":"Solano","raceName":"Measure B","raceDescription":"Benicia. Sales tax. Passes with majority vote.","raceReadTheStory":"https://www.kqed.org/elections/results/solano/measure-b","raceType":"yesNo","timeUpdated":"7:08 PM","dateUpdated":"March 28, 2024","totalVotes":10164,"candidates":[{"candidateName":"Yes","candidateIncumbent":false,"candidateParty":"","voteCount":7335},{"candidateName":"No","candidateIncumbent":false,"candidateParty":"","voteCount":2829}]},"SolanoMeasureC":{"id":"SolanoMeasureC","type":"localRace","location":"Solano","raceName":"Measure C","raceDescription":"Benicia Unified School District. School bond. Passes with 55% vote.","raceReadTheStory":"","raceType":"yesNo","timeUpdated":"7:08 PM","dateUpdated":"March 28, 2024","totalVotes":10112,"candidates":[{"candidateName":"Yes","candidateIncumbent":false,"candidateParty":"","voteCount":6316},{"candidateName":"No","candidateIncumbent":false,"candidateParty":"","voteCount":3796}]},"SolanoMeasureN":{"id":"SolanoMeasureN","type":"localRace","location":"Solano","raceName":"Measure N","raceDescription":"Davis Joint Unified School District. Parcel tax. Passes with 2/3 vote.","raceReadTheStory":"","raceType":"yesNo","timeUpdated":"7:08 PM","dateUpdated":"March 28, 2024","totalVotes":15,"candidates":[{"candidateName":"Yes","candidateIncumbent":false,"candidateParty":"","voteCount":5},{"candidateName":"No","candidateIncumbent":false,"candidateParty":"","voteCount":10}]},"SonomaJudge3":{"id":"SonomaJudge3","type":"localRace","location":"Sonoma","raceName":"Superior Court Judge, Office 3","raceDescription":"Candidate with majority vote wins seat. If no candidate reaches majority, top two candidates advance to runoff in general election.","raceReadTheStory":"","raceType":"top1","timeUpdated":"6:51 PM","dateUpdated":"March 29, 2024","totalVotes":115405,"candidates":[{"candidateName":"Kristine M. Burk","candidateIncumbent":false,"candidateParty":"","voteCount":79498},{"candidateName":"Beki Berrey","candidateIncumbent":false,"candidateParty":"","voteCount":35907}]},"SonomaJudge4":{"id":"SonomaJudge4","type":"localRace","location":"Sonoma","raceName":"Superior Court Judge, Office 4","raceDescription":"Candidate with majority vote wins seat. If no candidate reaches majority, top two candidates advance to runoff in general election.","raceReadTheStory":"","raceType":"top1","timeUpdated":"6:51 PM","dateUpdated":"March 29, 2024","totalVotes":86789,"candidates":[{"candidateName":"Paul J. Lozada","candidateIncumbent":false,"candidateParty":"","voteCount":86789}]},"SonomaJudge6":{"id":"SonomaJudge6","type":"localRace","location":"Sonoma","raceName":"Superior Court Judge, Office 6","raceDescription":"Candidate with majority vote wins seat. If no candidate reaches majority, top two candidates advance to runoff in general election.","raceReadTheStory":"","raceType":"top1","timeUpdated":"6:51 PM","dateUpdated":"March 29, 2024","totalVotes":117990,"candidates":[{"candidateName":"Omar Figueroa","candidateIncumbent":false,"candidateParty":"","voteCount":42236},{"candidateName":"Kenneth English","candidateIncumbent":false,"candidateParty":"","voteCount":75754}]},"SonomaD1":{"id":"SonomaD1","type":"localRace","location":"Sonoma","raceName":"Board of Supervisors, District 1","raceDescription":"Candidate with majority vote wins seat. If no candidate reaches majority, top two candidates advance to runoff in general election.","raceReadTheStory":"","raceType":"top1","timeUpdated":"6:51 PM","dateUpdated":"March 29, 2024","totalVotes":30348,"candidates":[{"candidateName":"Rebecca Hermosillo","candidateIncumbent":false,"candidateParty":"","voteCount":23958},{"candidateName":"Jonathan Mathieu","candidateIncumbent":false,"candidateParty":"","voteCount":6390}]},"SonomaD3":{"id":"SonomaD3","type":"localRace","location":"Sonoma","raceName":"Board of Supervisors, District 3","raceDescription":"Candidate with majority vote wins seat. If no candidate reaches majority, top two candidates advance to runoff in general election.","raceReadTheStory":"https://www.kqed.org/elections/results/sonoma/supervisor-3rd-district","raceType":"top1","timeUpdated":"6:51 PM","dateUpdated":"March 29, 2024","totalVotes":16312,"candidates":[{"candidateName":"Chris Coursey","candidateIncumbent":true,"candidateParty":"","voteCount":11346},{"candidateName":"Omar Medina","candidateIncumbent":false,"candidateParty":"","voteCount":4966}]},"SonomaD5":{"id":"SonomaD5","type":"localRace","location":"Sonoma","raceName":"Board of Supervisors, District 5","raceDescription":"Candidate with majority vote wins seat. If no candidate reaches majority, top two candidates advance to runoff in general election.","raceReadTheStory":"","raceType":"top1","timeUpdated":"6:51 PM","dateUpdated":"March 29, 2024","totalVotes":23356,"candidates":[{"candidateName":"Lynda Hopkins","candidateIncumbent":true,"candidateParty":"","voteCount":23356}]},"SonomaMeasureA":{"id":"SonomaMeasureA","type":"localRace","location":"Sonoma","raceName":"Measure A","raceDescription":"Cotati-Rohnert Park Unified School District. Parcel tax. Passes with 2/3 vote.","raceReadTheStory":"","raceType":"yesNo","timeUpdated":"6:51 PM","dateUpdated":"March 29, 2024","totalVotes":13756,"candidates":[{"candidateName":"Yes","candidateIncumbent":false,"candidateParty":"","voteCount":10320},{"candidateName":"No","candidateIncumbent":false,"candidateParty":"","voteCount":3436}]},"SonomaMeasureB":{"id":"SonomaMeasureB","type":"localRace","location":"Sonoma","raceName":"Measure B","raceDescription":"Petaluma Joint Union High School District. Parcel tax. Passes with 2/3 vote.","raceReadTheStory":"","raceType":"yesNo","timeUpdated":"6:51 PM","dateUpdated":"March 29, 2024","totalVotes":24877,"candidates":[{"candidateName":"Yes","candidateIncumbent":false,"candidateParty":"","voteCount":15795},{"candidateName":"No","candidateIncumbent":false,"candidateParty":"","voteCount":9082}]},"SonomaMeasureC":{"id":"SonomaMeasureC","type":"localRace","location":"Sonoma","raceName":"Measure C","raceDescription":"Fort Ross School District. School bond. Passes with 55% vote.","raceReadTheStory":"","raceType":"yesNo","timeUpdated":"6:51 PM","dateUpdated":"March 29, 2024","totalVotes":286,"candidates":[{"candidateName":"Yes","candidateIncumbent":false,"candidateParty":"","voteCount":159},{"candidateName":"No","candidateIncumbent":false,"candidateParty":"","voteCount":127}]},"SonomaMeasureD":{"id":"SonomaMeasureD","type":"localRace","location":"Sonoma","raceName":"Measure D","raceDescription":"Harmony Union School District. School bond. Passes with 55% vote.","raceReadTheStory":"","raceType":"yesNo","timeUpdated":"6:51 PM","dateUpdated":"March 29, 2024","totalVotes":1925,"candidates":[{"candidateName":"Yes","candidateIncumbent":false,"candidateParty":"","voteCount":1089},{"candidateName":"No","candidateIncumbent":false,"candidateParty":"","voteCount":836}]},"SonomaMeasureE":{"id":"SonomaMeasureE","type":"localRace","location":"Sonoma","raceName":"Measure E","raceDescription":"Petaluma City (Elementary) School District. Parcel tax. Passes with 2/3 vote.","raceReadTheStory":"","raceType":"yesNo","timeUpdated":"6:51 PM","dateUpdated":"March 29, 2024","totalVotes":11133,"candidates":[{"candidateName":"Yes","candidateIncumbent":false,"candidateParty":"","voteCount":7622},{"candidateName":"No","candidateIncumbent":false,"candidateParty":"","voteCount":3511}]},"SonomaMeasureG":{"id":"SonomaMeasureG","type":"localRace","location":"Sonoma","raceName":"Measure G","raceDescription":"Rincon Valley Union School District. School bond. Passes with 55% vote.","raceReadTheStory":"","raceType":"yesNo","timeUpdated":"6:51 PM","dateUpdated":"March 29, 2024","totalVotes":14577,"candidates":[{"candidateName":"Yes","candidateIncumbent":false,"candidateParty":"","voteCount":8668},{"candidateName":"No","candidateIncumbent":false,"candidateParty":"","voteCount":5909}]},"SonomaMeasureH":{"id":"SonomaMeasureH","type":"localRace","location":"Sonoma","raceName":"Measure H","raceDescription":"Sonoma County. Sales tax. Passes with majority vote.","raceReadTheStory":"https://www.kqed.org/elections/results/sonoma/measure-h","raceType":"yesNo","timeUpdated":"6:51 PM","dateUpdated":"March 29, 2024","totalVotes":145261,"candidates":[{"candidateName":"Yes","candidateIncumbent":false,"candidateParty":"","voteCount":89646},{"candidateName":"No","candidateIncumbent":false,"candidateParty":"","voteCount":55615}]}},"radioSchedulesReducer":{},"listsReducer":{"posts/bayareabites?category=recipes":{"isFetching":false,"latestQuery":{"from":0,"postsToRender":9},"tag":null,"vitalsOnly":true,"totalRequested":9,"isLoading":false,"isLoadingMore":true,"total":1243,"items":["bayareabites_139639","bayareabites_139532","bayareabites_139218","bayareabites_138836","bayareabites_137363","bayareabites_137381","bayareabites_137321","bayareabites_137291","bayareabites_137244"]}},"recallGuideReducer":{"intros":{},"policy":{},"candidates":{}},"savedPostsReducer":{},"pfsSessionReducer":{},"siteSettingsReducer":{},"subscriptionsReducer":{},"termsReducer":{"about":{"name":"About","type":"terms","id":"about","slug":"about","link":"/about","taxonomy":"site"},"arts":{"name":"Arts & Culture","grouping":["arts","pop","trulyca"],"description":"KQED Arts provides daily in-depth coverage of the Bay Area's music, art, film, performing arts, literature and arts news, as well as cultural commentary and criticism.","type":"terms","id":"arts","slug":"arts","link":"/arts","taxonomy":"site"},"artschool":{"name":"Art School","parent":"arts","type":"terms","id":"artschool","slug":"artschool","link":"/artschool","taxonomy":"site"},"bayareabites":{"name":"KQED food","grouping":["food","bayareabites","checkplease"],"parent":"food","type":"terms","id":"bayareabites","slug":"bayareabites","link":"/food","taxonomy":"site"},"bayareahiphop":{"name":"Bay Area Hiphop","type":"terms","id":"bayareahiphop","slug":"bayareahiphop","link":"/bayareahiphop","taxonomy":"site"},"campaign21":{"name":"Campaign 21","type":"terms","id":"campaign21","slug":"campaign21","link":"/campaign21","taxonomy":"site"},"checkplease":{"name":"KQED food","grouping":["food","bayareabites","checkplease"],"parent":"food","type":"terms","id":"checkplease","slug":"checkplease","link":"/food","taxonomy":"site"},"education":{"name":"Education","grouping":["education"],"type":"terms","id":"education","slug":"education","link":"/education","taxonomy":"site"},"elections":{"name":"Elections","type":"terms","id":"elections","slug":"elections","link":"/elections","taxonomy":"site"},"events":{"name":"Events","type":"terms","id":"events","slug":"events","link":"/events","taxonomy":"site"},"event":{"name":"Event","alias":"events","type":"terms","id":"event","slug":"event","link":"/event","taxonomy":"site"},"filmschoolshorts":{"name":"Film School Shorts","type":"terms","id":"filmschoolshorts","slug":"filmschoolshorts","link":"/filmschoolshorts","taxonomy":"site"},"food":{"name":"KQED food","grouping":["food","bayareabites","checkplease"],"type":"terms","id":"food","slug":"food","link":"/food","taxonomy":"site"},"forum":{"name":"Forum","relatedContentQuery":"posts/forum?","parent":"news","type":"terms","id":"forum","slug":"forum","link":"/forum","taxonomy":"site"},"futureofyou":{"name":"Future of You","grouping":["science","futureofyou"],"parent":"science","type":"terms","id":"futureofyou","slug":"futureofyou","link":"/futureofyou","taxonomy":"site"},"jpepinheart":{"name":"KQED food","relatedContentQuery":"trending/food,bayareabites,checkplease","parent":"food","type":"terms","id":"jpepinheart","slug":"jpepinheart","link":"/food","taxonomy":"site"},"liveblog":{"name":"Live Blog","type":"terms","id":"liveblog","slug":"liveblog","link":"/liveblog","taxonomy":"site"},"livetv":{"name":"Live TV","parent":"tv","type":"terms","id":"livetv","slug":"livetv","link":"/livetv","taxonomy":"site"},"lowdown":{"name":"The Lowdown","relatedContentQuery":"posts/lowdown?","parent":"news","type":"terms","id":"lowdown","slug":"lowdown","link":"/lowdown","taxonomy":"site"},"mindshift":{"name":"Mindshift","parent":"news","description":"MindShift explores the future of education by highlighting the innovative – and sometimes counterintuitive – ways educators and parents are helping all children succeed.","type":"terms","id":"mindshift","slug":"mindshift","link":"/mindshift","taxonomy":"site"},"news":{"name":"News","grouping":["news","forum"],"type":"terms","id":"news","slug":"news","link":"/news","taxonomy":"site"},"perspectives":{"name":"Perspectives","parent":"radio","type":"terms","id":"perspectives","slug":"perspectives","link":"/perspectives","taxonomy":"site"},"podcasts":{"name":"Podcasts","type":"terms","id":"podcasts","slug":"podcasts","link":"/podcasts","taxonomy":"site"},"pop":{"name":"Pop","parent":"arts","type":"terms","id":"pop","slug":"pop","link":"/pop","taxonomy":"site"},"pressroom":{"name":"Pressroom","type":"terms","id":"pressroom","slug":"pressroom","link":"/pressroom","taxonomy":"site"},"quest":{"name":"Quest","parent":"science","type":"terms","id":"quest","slug":"quest","link":"/quest","taxonomy":"site"},"radio":{"name":"Radio","grouping":["forum","perspectives"],"description":"Listen to KQED Public Radio – home of Forum and The California Report – on 88.5 FM in San Francisco, 89.3 FM in Sacramento, 88.3 FM in Santa Rosa and 88.1 FM in Martinez.","type":"terms","id":"radio","slug":"radio","link":"/radio","taxonomy":"site"},"root":{"name":"KQED","image":"https://ww2.kqed.org/app/uploads/2020/02/KQED-OG-Image@1x.png","imageWidth":1200,"imageHeight":630,"headData":{"title":"KQED | News, Radio, Podcasts, TV | Public Media for Northern California","description":"KQED provides public radio, television, and independent reporting on issues that matter to the Bay Area. We’re the NPR and PBS member station for Northern California."},"type":"terms","id":"root","slug":"root","link":"/root","taxonomy":"site"},"science":{"name":"Science","grouping":["science","futureofyou"],"description":"KQED Science brings you award-winning science and environment coverage from the Bay Area and beyond.","type":"terms","id":"science","slug":"science","link":"/science","taxonomy":"site"},"stateofhealth":{"name":"State of Health","parent":"science","type":"terms","id":"stateofhealth","slug":"stateofhealth","link":"/stateofhealth","taxonomy":"site"},"support":{"name":"Support","type":"terms","id":"support","slug":"support","link":"/support","taxonomy":"site"},"thedolist":{"name":"The Do List","parent":"arts","type":"terms","id":"thedolist","slug":"thedolist","link":"/thedolist","taxonomy":"site"},"trulyca":{"name":"Truly CA","grouping":["arts","pop","trulyca"],"parent":"arts","type":"terms","id":"trulyca","slug":"trulyca","link":"/trulyca","taxonomy":"site"},"tv":{"name":"TV","type":"terms","id":"tv","slug":"tv","link":"/tv","taxonomy":"site"},"voterguide":{"name":"Voter Guide","parent":"elections","alias":"elections","type":"terms","id":"voterguide","slug":"voterguide","link":"/voterguide","taxonomy":"site"},"bayareabites_12":{"type":"terms","id":"bayareabites_12","meta":{"index":"terms_1591234321","site":"bayareabites","id":"12","found":true},"relationships":{},"included":{},"name":"recipes","slug":"recipes","taxonomy":"category","description":null,"featImg":null,"headData":{"title":"recipes Archives | KQED Bay Area Bites","description":null,"ogTitle":null,"ogDescription":null,"ogImgId":null,"twTitle":null,"twDescription":null,"twImgId":null,"imageData":{"ogImageSize":{"file":"https://cdn.kqed.org/wp-content/uploads/2020/02/KQED-OG-Image@1x.png","width":1200,"height":630},"twImageSize":{"file":"https://cdn.kqed.org/wp-content/uploads/2020/02/KQED-OG-Image@1x.png"},"twitterCard":"summary_large_image"}},"ttid":10,"isLoading":false,"link":"/bayareabites/category/recipes"},"source_bayareabites_138836":{"type":"terms","id":"source_bayareabites_138836","meta":{"override":true},"name":"Flavors at Home","isLoading":false},"source_bayareabites_137363":{"type":"terms","id":"source_bayareabites_137363","meta":{"override":true},"name":"Flavors at Home","isLoading":false},"bayareabites_16558":{"type":"terms","id":"bayareabites_16558","meta":{"index":"terms_1591234321","site":"bayareabites","id":"16558","found":true},"relationships":{},"included":{},"name":"Arts","slug":"arts","taxonomy":"category","description":null,"featImg":null,"headData":{"title":"Arts Archives | KQED Bay Area Bites","description":null,"ogTitle":null,"ogDescription":null,"ogImgId":null,"twTitle":null,"twDescription":null,"twImgId":null},"ttid":100888,"isLoading":false,"link":"/bayareabites/category/arts"},"bayareabites_1516":{"type":"terms","id":"bayareabites_1516","meta":{"index":"terms_1591234321","site":"bayareabites","id":"1516","found":true},"relationships":{},"included":{},"name":"baking and bakeries","slug":"baking-and-bakeries","taxonomy":"category","description":null,"featImg":null,"headData":{"title":"baking and bakeries Archives | KQED Bay Area Bites","description":null,"ogTitle":null,"ogDescription":null,"ogImgId":null,"twTitle":null,"twDescription":null,"twImgId":null},"ttid":1253,"isLoading":false,"link":"/bayareabites/category/baking-and-bakeries"},"bayareabites_16818":{"type":"terms","id":"bayareabites_16818","meta":{"index":"terms_1591234321","site":"bayareabites","id":"16818","found":true},"relationships":{},"included":{},"name":"beans","slug":"beans","taxonomy":"category","description":null,"featImg":null,"headData":{"title":"beans Archives | KQED Bay Area Bites","description":null,"ogTitle":null,"ogDescription":null,"ogImgId":null,"twTitle":null,"twDescription":null,"twImgId":null},"ttid":101148,"isLoading":false,"link":"/bayareabites/category/beans"},"bayareabites_17082":{"type":"terms","id":"bayareabites_17082","meta":{"index":"terms_1591234321","site":"bayareabites","id":"17082","found":true},"relationships":{},"included":{},"name":"Food","slug":"food","taxonomy":"category","description":null,"featImg":null,"headData":{"title":"Food Archives | KQED Bay Area Bites","description":null,"ogTitle":null,"ogDescription":null,"ogImgId":null,"twTitle":null,"twDescription":null,"twImgId":null},"ttid":101412,"isLoading":false,"link":"/bayareabites/category/food"},"bayareabites_12550":{"type":"terms","id":"bayareabites_12550","meta":{"index":"terms_1591234321","site":"bayareabites","id":"12550","found":true},"relationships":{},"included":{},"name":"holiday recipes","slug":"holiday-recipes","taxonomy":"category","description":null,"featImg":null,"headData":{"title":"holiday recipes Archives | KQED Bay Area Bites","description":null,"ogTitle":null,"ogDescription":null,"ogImgId":null,"twTitle":null,"twDescription":null,"twImgId":null},"ttid":7013,"isLoading":false,"link":"/bayareabites/category/holiday-recipes"},"bayareabites_1763":{"type":"terms","id":"bayareabites_1763","meta":{"index":"terms_1591234321","site":"bayareabites","id":"1763","found":true},"relationships":{},"included":{},"name":"holidays and traditions","slug":"holidays-and-traditions","taxonomy":"category","description":null,"featImg":null,"headData":{"title":"holidays and traditions Archives | KQED Bay Area Bites","description":null,"ogTitle":null,"ogDescription":null,"ogImgId":null,"twTitle":null,"twDescription":null,"twImgId":null},"ttid":1254,"isLoading":false,"link":"/bayareabites/category/holidays-and-traditions"},"bayareabites_16837":{"type":"terms","id":"bayareabites_16837","meta":{"index":"terms_1591234321","site":"bayareabites","id":"16837","found":true},"relationships":{},"included":{},"name":"soup","slug":"soup","taxonomy":"category","description":null,"featImg":null,"headData":{"title":"soup Archives | KQED Bay Area Bites","description":null,"ogTitle":null,"ogDescription":null,"ogImgId":null,"twTitle":null,"twDescription":null,"twImgId":null},"ttid":101167,"isLoading":false,"link":"/bayareabites/category/soup"},"bayareabites_17057":{"type":"terms","id":"bayareabites_17057","meta":{"index":"terms_1591234321","site":"bayareabites","id":"17057","found":true},"relationships":{},"included":{},"name":"ash reshteh","slug":"ash-reshteh","taxonomy":"tag","description":null,"featImg":null,"headData":{"title":"ash reshteh Archives | KQED Bay Area Bites","description":null,"ogTitle":null,"ogDescription":null,"ogImgId":null,"twTitle":null,"twDescription":null,"twImgId":null},"ttid":101387,"isLoading":false,"link":"/bayareabites/tag/ash-reshteh"},"bayareabites_17059":{"type":"terms","id":"bayareabites_17059","meta":{"index":"terms_1591234321","site":"bayareabites","id":"17059","found":true},"relationships":{},"included":{},"name":"buns","slug":"buns","taxonomy":"tag","description":null,"featImg":null,"headData":{"title":"buns Archives | KQED Bay Area Bites","description":null,"ogTitle":null,"ogDescription":null,"ogImgId":null,"twTitle":null,"twDescription":null,"twImgId":null},"ttid":101389,"isLoading":false,"link":"/bayareabites/tag/buns"},"bayareabites_11945":{"type":"terms","id":"bayareabites_11945","meta":{"index":"terms_1591234321","site":"bayareabites","id":"11945","found":true},"relationships":{},"included":{},"name":"iran","slug":"iran","taxonomy":"tag","description":null,"featImg":null,"headData":{"title":"iran Archives | KQED Bay Area Bites","description":null,"ogTitle":null,"ogDescription":null,"ogImgId":null,"twTitle":null,"twDescription":null,"twImgId":null},"ttid":6407,"isLoading":false,"link":"/bayareabites/tag/iran"},"bayareabites_15574":{"type":"terms","id":"bayareabites_15574","meta":{"index":"terms_1591234321","site":"bayareabites","id":"15574","found":true},"relationships":{},"included":{},"name":"korea","slug":"korea","taxonomy":"tag","description":null,"featImg":null,"headData":{"title":"korea Archives | KQED Bay Area Bites","description":null,"ogTitle":null,"ogDescription":null,"ogImgId":null,"twTitle":null,"twDescription":null,"twImgId":null},"ttid":99904,"isLoading":false,"link":"/bayareabites/tag/korea"},"bayareabites_17056":{"type":"terms","id":"bayareabites_17056","meta":{"index":"terms_1591234321","site":"bayareabites","id":"17056","found":true},"relationships":{},"included":{},"name":"lussekatt","slug":"lussekatt","taxonomy":"tag","description":null,"featImg":null,"headData":{"title":"lussekatt Archives | KQED Bay Area Bites","description":null,"ogTitle":null,"ogDescription":null,"ogImgId":null,"twTitle":null,"twDescription":null,"twImgId":null},"ttid":101386,"isLoading":false,"link":"/bayareabites/tag/lussekatt"},"bayareabites_17055":{"type":"terms","id":"bayareabites_17055","meta":{"index":"terms_1591234321","site":"bayareabites","id":"17055","found":true},"relationships":{},"included":{},"name":"patjuk","slug":"patjuk","taxonomy":"tag","description":null,"featImg":null,"headData":{"title":"patjuk Archives | KQED Bay Area Bites","description":null,"ogTitle":null,"ogDescription":null,"ogImgId":null,"twTitle":null,"twDescription":null,"twImgId":null},"ttid":101385,"isLoading":false,"link":"/bayareabites/tag/patjuk"},"bayareabites_16742":{"type":"terms","id":"bayareabites_16742","meta":{"index":"terms_1591234321","site":"bayareabites","id":"16742","found":true},"relationships":{},"included":{},"name":"recipe","slug":"recipe","taxonomy":"tag","description":null,"featImg":null,"headData":{"title":"recipe Archives | KQED Bay Area Bites","description":null,"ogTitle":null,"ogDescription":null,"ogImgId":null,"twTitle":null,"twDescription":null,"twImgId":null},"ttid":101072,"isLoading":false,"link":"/bayareabites/tag/recipe"},"bayareabites_17053":{"type":"terms","id":"bayareabites_17053","meta":{"index":"terms_1591234321","site":"bayareabites","id":"17053","found":true},"relationships":{},"included":{},"name":"solstice","slug":"solstice","taxonomy":"tag","description":null,"featImg":null,"headData":{"title":"solstice Archives | KQED Bay Area Bites","description":null,"ogTitle":null,"ogDescription":null,"ogImgId":null,"twTitle":null,"twDescription":null,"twImgId":null},"ttid":101383,"isLoading":false,"link":"/bayareabites/tag/solstice"},"bayareabites_439":{"type":"terms","id":"bayareabites_439","meta":{"index":"terms_1591234321","site":"bayareabites","id":"439","found":true},"relationships":{},"included":{},"name":"soup","slug":"soup","taxonomy":"tag","description":null,"featImg":null,"headData":{"title":"soup Archives | KQED Bay Area Bites","description":null,"ogTitle":null,"ogDescription":null,"ogImgId":null,"twTitle":null,"twDescription":null,"twImgId":null},"ttid":404,"isLoading":false,"link":"/bayareabites/tag/soup"},"bayareabites_17058":{"type":"terms","id":"bayareabites_17058","meta":{"index":"terms_1591234321","site":"bayareabites","id":"17058","found":true},"relationships":{},"included":{},"name":"sweden","slug":"sweden","taxonomy":"tag","description":null,"featImg":null,"headData":{"title":"sweden Archives | KQED Bay Area Bites","description":null,"ogTitle":null,"ogDescription":null,"ogImgId":null,"twTitle":null,"twDescription":null,"twImgId":null},"ttid":101388,"isLoading":false,"link":"/bayareabites/tag/sweden"},"bayareabites_17054":{"type":"terms","id":"bayareabites_17054","meta":{"index":"terms_1591234321","site":"bayareabites","id":"17054","found":true},"relationships":{},"included":{},"name":"winter solstice","slug":"winter-solstice","taxonomy":"tag","description":null,"featImg":null,"headData":{"title":"winter solstice Archives | KQED Bay Area Bites","description":null,"ogTitle":null,"ogDescription":null,"ogImgId":null,"twTitle":null,"twDescription":null,"twImgId":null},"ttid":101384,"isLoading":false,"link":"/bayareabites/tag/winter-solstice"},"bayareabites_109":{"type":"terms","id":"bayareabites_109","meta":{"index":"terms_1591234321","site":"bayareabites","id":"109","found":true},"relationships":{},"included":{},"name":"bay area","slug":"bay-area","taxonomy":"category","description":null,"featImg":null,"headData":{"title":"bay area Archives | KQED Bay Area Bites","description":null,"ogTitle":null,"ogDescription":null,"ogImgId":null,"twTitle":null,"twDescription":null,"twImgId":null},"ttid":73,"isLoading":false,"link":"/bayareabites/category/bay-area"},"bayareabites_752":{"type":"terms","id":"bayareabites_752","meta":{"index":"terms_1591234321","site":"bayareabites","id":"752","found":true},"relationships":{},"included":{},"name":"Bay Area Bites Food + Drink","slug":"food-and-drink","taxonomy":"category","description":null,"featImg":null,"headData":{"title":"Bay Area Bites Food + Drink Archives | KQED Bay Area Bites","description":null,"ogTitle":null,"ogDescription":null,"ogImgId":null,"twTitle":null,"twDescription":null,"twImgId":null},"ttid":1,"isLoading":false,"link":"/bayareabites/category/food-and-drink"},"bayareabites_16484":{"type":"terms","id":"bayareabites_16484","meta":{"index":"terms_1591234321","site":"bayareabites","id":"16484","found":true},"relationships":{},"included":{},"name":"diwali","slug":"diwali","taxonomy":"tag","description":null,"featImg":null,"headData":{"title":"diwali Archives | KQED Bay Area Bites","description":null,"ogTitle":null,"ogDescription":null,"ogImgId":null,"twTitle":null,"twDescription":null,"twImgId":null},"ttid":100814,"isLoading":false,"link":"/bayareabites/tag/diwali"},"bayareabites_4190":{"type":"terms","id":"bayareabites_4190","meta":{"index":"terms_1591234321","site":"bayareabites","id":"4190","found":true},"relationships":{},"included":{},"name":"dosa","slug":"dosa","taxonomy":"tag","description":null,"featImg":null,"headData":{"title":"dosa Archives | KQED Bay Area Bites","description":null,"ogTitle":null,"ogDescription":null,"ogImgId":null,"twTitle":null,"twDescription":null,"twImgId":null},"ttid":2629,"isLoading":false,"link":"/bayareabites/tag/dosa"},"bayareabites_13179":{"type":"terms","id":"bayareabites_13179","meta":{"index":"terms_1591234321","site":"bayareabites","id":"13179","found":true},"relationships":{},"included":{},"name":"dosas","slug":"dosas","taxonomy":"tag","description":null,"featImg":null,"headData":{"title":"dosas Archives | KQED Bay Area Bites","description":null,"ogTitle":null,"ogDescription":null,"ogImgId":null,"twTitle":null,"twDescription":null,"twImgId":null},"ttid":7645,"isLoading":false,"link":"/bayareabites/tag/dosas"},"bayareabites_16557":{"type":"terms","id":"bayareabites_16557","meta":{"index":"terms_1591234321","site":"bayareabites","id":"16557","found":true},"relationships":{},"included":{},"name":"featured-food","slug":"featured-food","taxonomy":"tag","description":null,"featImg":null,"headData":{"title":"featured-food Archives | KQED Bay Area Bites","description":null,"ogTitle":null,"ogDescription":null,"ogImgId":null,"twTitle":null,"twDescription":null,"twImgId":null},"ttid":100887,"isLoading":false,"link":"/bayareabites/tag/featured-food"},"bayareabites_744":{"type":"terms","id":"bayareabites_744","meta":{"index":"terms_1591234321","site":"bayareabites","id":"744","found":true},"relationships":{},"included":{},"name":"food","slug":"food","taxonomy":"tag","description":null,"featImg":null,"headData":{"title":"food Archives | KQED Bay Area Bites","description":null,"ogTitle":null,"ogDescription":null,"ogImgId":null,"twTitle":null,"twDescription":null,"twImgId":null},"ttid":727,"isLoading":false,"link":"/bayareabites/tag/food"},"bayareabites_17034":{"type":"terms","id":"bayareabites_17034","meta":{"index":"terms_1591234321","site":"bayareabites","id":"17034","found":true},"relationships":{},"included":{},"name":"kaju katli","slug":"kaju-katli","taxonomy":"tag","description":null,"featImg":null,"headData":{"title":"kaju katli Archives | KQED Bay Area Bites","description":null,"ogTitle":null,"ogDescription":null,"ogImgId":null,"twTitle":null,"twDescription":null,"twImgId":null},"ttid":101364,"isLoading":false,"link":"/bayareabites/tag/kaju-katli"},"bayareabites_17036":{"type":"terms","id":"bayareabites_17036","meta":{"index":"terms_1591234321","site":"bayareabites","id":"17036","found":true},"relationships":{},"included":{},"name":"rava dosa","slug":"rava-dosa","taxonomy":"tag","description":null,"featImg":null,"headData":{"title":"rava dosa Archives | KQED Bay Area Bites","description":null,"ogTitle":null,"ogDescription":null,"ogImgId":null,"twTitle":null,"twDescription":null,"twImgId":null},"ttid":101366,"isLoading":false,"link":"/bayareabites/tag/rava-dosa"},"bayareabites_17035":{"type":"terms","id":"bayareabites_17035","meta":{"index":"terms_1591234321","site":"bayareabites","id":"17035","found":true},"relationships":{},"included":{},"name":"samosas","slug":"samosas","taxonomy":"tag","description":null,"featImg":null,"headData":{"title":"samosas Archives | KQED Bay Area Bites","description":null,"ogTitle":null,"ogDescription":null,"ogImgId":null,"twTitle":null,"twDescription":null,"twImgId":null},"ttid":101365,"isLoading":false,"link":"/bayareabites/tag/samosas"},"bayareabites_3144":{"type":"terms","id":"bayareabites_3144","meta":{"index":"terms_1591234321","site":"bayareabites","id":"3144","found":true},"relationships":{},"included":{},"name":"sweets","slug":"sweets","taxonomy":"tag","description":null,"featImg":null,"headData":{"title":"sweets Archives | KQED Bay Area Bites","description":null,"ogTitle":null,"ogDescription":null,"ogImgId":null,"twTitle":null,"twDescription":null,"twImgId":null},"ttid":2164,"isLoading":false,"link":"/bayareabites/tag/sweets"},"bayareabites_1875":{"type":"terms","id":"bayareabites_1875","meta":{"index":"terms_1591234321","site":"bayareabites","id":"1875","found":true},"relationships":{},"included":{},"name":"local food businesses","slug":"local-food-businesses","taxonomy":"category","description":null,"featImg":null,"headData":{"title":"local food businesses Archives | KQED Bay Area Bites","description":null,"ogTitle":null,"ogDescription":null,"ogImgId":null,"twTitle":null,"twDescription":null,"twImgId":null},"ttid":1453,"isLoading":false,"link":"/bayareabites/category/local-food-businesses"},"bayareabites_1931":{"type":"terms","id":"bayareabites_1931","meta":{"index":"terms_1591234321","site":"bayareabites","id":"1931","found":true},"relationships":{},"included":{},"name":"beans","slug":"beans","taxonomy":"tag","description":null,"featImg":null,"headData":{"title":"beans Archives | KQED Bay Area Bites","description":null,"ogTitle":null,"ogDescription":null,"ogImgId":null,"twTitle":null,"twDescription":null,"twImgId":null},"ttid":1473,"isLoading":false,"link":"/bayareabites/tag/beans"},"bayareabites_14775":{"type":"terms","id":"bayareabites_14775","meta":{"index":"terms_1591234321","site":"bayareabites","id":"14775","found":true},"relationships":{},"included":{},"name":"food news","slug":"food-news","taxonomy":"tag","description":null,"featImg":null,"headData":{"title":"food news Archives | KQED Bay Area Bites","description":null,"ogTitle":null,"ogDescription":null,"ogImgId":null,"twTitle":null,"twDescription":null,"twImgId":null},"ttid":4482,"isLoading":false,"link":"/bayareabites/tag/food-news"},"bayareabites_14738":{"type":"terms","id":"bayareabites_14738","meta":{"index":"terms_1591234321","site":"bayareabites","id":"14738","found":true},"relationships":{},"included":{},"name":"recipes","slug":"recipes","taxonomy":"tag","description":null,"featImg":null,"headData":{"title":"recipes Archives | KQED Bay Area Bites","description":null,"ogTitle":null,"ogDescription":null,"ogImgId":null,"twTitle":null,"twDescription":null,"twImgId":null},"ttid":831,"isLoading":false,"link":"/bayareabites/tag/recipes"},"bayareabites_16895":{"type":"terms","id":"bayareabites_16895","meta":{"index":"terms_1591234321","site":"bayareabites","id":"16895","found":true},"relationships":{},"included":{},"name":"Flavors at Home","slug":"flavors-at-home","taxonomy":"series","description":null,"featImg":null,"headData":{"title":"Flavors at Home Archives | KQED Bay Area Bites","description":null,"ogTitle":null,"ogDescription":null,"ogImgId":null,"twTitle":null,"twDescription":null,"twImgId":null},"ttid":101225,"isLoading":false,"link":"/bayareabites/series/flavors-at-home"},"bayareabites_16622":{"type":"terms","id":"bayareabites_16622","meta":{"index":"terms_1591234321","site":"bayareabites","id":"16622","found":true},"relationships":{},"included":{},"name":"flavors","slug":"flavors","taxonomy":"tag","description":null,"featImg":null,"headData":{"title":"flavors Archives | KQED Bay Area Bites","description":null,"ogTitle":null,"ogDescription":null,"ogImgId":null,"twTitle":null,"twDescription":null,"twImgId":null},"ttid":100952,"isLoading":false,"link":"/bayareabites/tag/flavors"},"bayareabites_16576":{"type":"terms","id":"bayareabites_16576","meta":{"index":"terms_1591234321","site":"bayareabites","id":"16576","found":true},"relationships":{},"included":{},"name":"flavorsathome","slug":"flavors-at-home","taxonomy":"tag","description":null,"featImg":null,"headData":{"title":"flavorsathome Archives | KQED Bay Area Bites","description":null,"ogTitle":null,"ogDescription":null,"ogImgId":null,"twTitle":null,"twDescription":null,"twImgId":null},"ttid":100906,"isLoading":false,"link":"/bayareabites/tag/flavors-at-home"},"bayareabites_16918":{"type":"terms","id":"bayareabites_16918","meta":{"index":"terms_1591234321","site":"bayareabites","id":"16918","found":true},"relationships":{},"included":{},"name":"nigerian stew","slug":"nigerian-stew","taxonomy":"tag","description":null,"featImg":null,"headData":{"title":"nigerian stew Archives | KQED Bay Area Bites","description":null,"ogTitle":null,"ogDescription":null,"ogImgId":null,"twTitle":null,"twDescription":null,"twImgId":null},"ttid":101248,"isLoading":false,"link":"/bayareabites/tag/nigerian-stew"},"bayareabites_16919":{"type":"terms","id":"bayareabites_16919","meta":{"index":"terms_1591234321","site":"bayareabites","id":"16919","found":true},"relationships":{},"included":{},"name":"nigerian tomato stew","slug":"nigerian-tomato-stew","taxonomy":"tag","description":null,"featImg":null,"headData":{"title":"nigerian tomato stew Archives | KQED Bay Area Bites","description":null,"ogTitle":null,"ogDescription":null,"ogImgId":null,"twTitle":null,"twDescription":null,"twImgId":null},"ttid":101249,"isLoading":false,"link":"/bayareabites/tag/nigerian-tomato-stew"},"bayareabites_10916":{"type":"terms","id":"bayareabites_10916","meta":{"index":"terms_1591234321","site":"bayareabites","id":"10916","found":true},"relationships":{},"included":{},"name":"NPR food","slug":"npr-food","taxonomy":"category","description":null,"featImg":null,"headData":{"title":"NPR food Archives | KQED Bay Area Bites","description":null,"ogTitle":null,"ogDescription":null,"ogImgId":null,"twTitle":null,"twDescription":null,"twImgId":null},"ttid":5375,"isLoading":false,"link":"/bayareabites/category/npr-food"},"bayareabites_16618":{"type":"terms","id":"bayareabites_16618","meta":{"index":"terms_1591234321","site":"bayareabites","id":"16618","found":true},"relationships":{},"included":{},"name":"bay area food","slug":"bay-area-food","taxonomy":"tag","description":null,"featImg":null,"headData":{"title":"bay area food Archives | KQED Bay Area Bites","description":null,"ogTitle":null,"ogDescription":null,"ogImgId":null,"twTitle":null,"twDescription":null,"twImgId":null},"ttid":100948,"isLoading":false,"link":"/bayareabites/tag/bay-area-food"},"bayareabites_16617":{"type":"terms","id":"bayareabites_16617","meta":{"index":"terms_1591234321","site":"bayareabites","id":"16617","found":true},"relationships":{},"included":{},"name":"coronavirus stories","slug":"coronavirus-stories","taxonomy":"tag","description":null,"featImg":null,"headData":{"title":"coronavirus stories Archives | KQED Bay Area Bites","description":null,"ogTitle":null,"ogDescription":null,"ogImgId":null,"twTitle":null,"twDescription":null,"twImgId":null},"ttid":100947,"isLoading":false,"link":"/bayareabites/tag/coronavirus-stories"},"bayareabites_16536":{"type":"terms","id":"bayareabites_16536","meta":{"index":"terms_1591234321","site":"bayareabites","id":"16536","found":true},"relationships":{},"included":{},"name":"flavors worth finding","slug":"flavors-worth-finding","taxonomy":"tag","description":null,"featImg":null,"headData":{"title":"flavors worth finding Archives | KQED Bay Area Bites","description":null,"ogTitle":null,"ogDescription":null,"ogImgId":null,"twTitle":null,"twDescription":null,"twImgId":null},"ttid":100866,"isLoading":false,"link":"/bayareabites/tag/flavors-worth-finding"},"bayareabites_16621":{"type":"terms","id":"bayareabites_16621","meta":{"index":"terms_1591234321","site":"bayareabites","id":"16621","found":true},"relationships":{},"included":{},"name":"food essay","slug":"food-essay","taxonomy":"tag","description":null,"featImg":null,"headData":{"title":"food essay Archives | KQED Bay Area Bites","description":null,"ogTitle":null,"ogDescription":null,"ogImgId":null,"twTitle":null,"twDescription":null,"twImgId":null},"ttid":100951,"isLoading":false,"link":"/bayareabites/tag/food-essay"},"bayareabites_16613":{"type":"terms","id":"bayareabites_16613","meta":{"index":"terms_1591234321","site":"bayareabites","id":"16613","found":true},"relationships":{},"included":{},"name":"food stories","slug":"food-stories","taxonomy":"tag","description":null,"featImg":null,"headData":{"title":"food stories Archives | KQED Bay Area Bites","description":null,"ogTitle":null,"ogDescription":null,"ogImgId":null,"twTitle":null,"twDescription":null,"twImgId":null},"ttid":100943,"isLoading":false,"link":"/bayareabites/tag/food-stories"},"bayareabites_16619":{"type":"terms","id":"bayareabites_16619","meta":{"index":"terms_1591234321","site":"bayareabites","id":"16619","found":true},"relationships":{},"included":{},"name":"mangoes","slug":"mangoes","taxonomy":"tag","description":null,"featImg":null,"headData":{"title":"mangoes Archives | KQED Bay Area Bites","description":null,"ogTitle":null,"ogDescription":null,"ogImgId":null,"twTitle":null,"twDescription":null,"twImgId":null},"ttid":100949,"isLoading":false,"link":"/bayareabites/tag/mangoes"},"bayareabites_16620":{"type":"terms","id":"bayareabites_16620","meta":{"index":"terms_1591234321","site":"bayareabites","id":"16620","found":true},"relationships":{},"included":{},"name":"mangos","slug":"mangos","taxonomy":"tag","description":null,"featImg":null,"headData":{"title":"mangos Archives | KQED Bay Area Bites","description":null,"ogTitle":null,"ogDescription":null,"ogImgId":null,"twTitle":null,"twDescription":null,"twImgId":null},"ttid":100950,"isLoading":false,"link":"/bayareabites/tag/mangos"},"bayareabites_1807":{"type":"terms","id":"bayareabites_1807","meta":{"index":"terms_1591234321","site":"bayareabites","id":"1807","found":true},"relationships":{},"included":{},"name":"restaurants, bars, cafes, pop-ups","slug":"restaurants-and-bars","taxonomy":"category","description":null,"featImg":null,"headData":{"title":"restaurants, bars, cafes, pop-ups Archives | KQED Bay Area Bites","description":null,"ogTitle":null,"ogDescription":null,"ogImgId":null,"twTitle":null,"twDescription":null,"twImgId":null},"ttid":56,"isLoading":false,"link":"/bayareabites/category/restaurants-and-bars"},"bayareabites_16549":{"type":"terms","id":"bayareabites_16549","meta":{"index":"terms_1591234321","site":"bayareabites","id":"16549","found":true},"relationships":{},"included":{},"name":"coronavirus","slug":"coronavirus","taxonomy":"tag","description":null,"featImg":null,"headData":{"title":"coronavirus Archives | KQED Bay Area Bites","description":null,"ogTitle":null,"ogDescription":null,"ogImgId":null,"twTitle":null,"twDescription":null,"twImgId":null},"ttid":100879,"isLoading":false,"link":"/bayareabites/tag/coronavirus"},"bayareabites_16554":{"type":"terms","id":"bayareabites_16554","meta":{"index":"terms_1591234321","site":"bayareabites","id":"16554","found":true},"relationships":{},"included":{},"name":"covid19","slug":"covid19","taxonomy":"tag","description":null,"featImg":null,"headData":{"title":"covid19 Archives | KQED Bay Area Bites","description":null,"ogTitle":null,"ogDescription":null,"ogImgId":null,"twTitle":null,"twDescription":null,"twImgId":null},"ttid":100884,"isLoading":false,"link":"/bayareabites/tag/covid19"},"bayareabites_289":{"type":"terms","id":"bayareabites_289","meta":{"index":"terms_1591234321","site":"bayareabites","id":"289","found":true},"relationships":{},"included":{},"name":"news","slug":"news","taxonomy":"tag","description":null,"featImg":null,"headData":{"title":"news Archives | KQED Bay Area Bites","description":null,"ogTitle":null,"ogDescription":null,"ogImgId":null,"twTitle":null,"twDescription":null,"twImgId":null},"ttid":254,"isLoading":false,"link":"/bayareabites/tag/news"},"bayareabites_1544":{"type":"terms","id":"bayareabites_1544","meta":{"index":"terms_1591234321","site":"bayareabites","id":"1544","found":true},"relationships":{},"included":{},"name":"dumplings","slug":"dumplings","taxonomy":"tag","description":null,"featImg":null,"headData":{"title":"dumplings Archives | KQED Bay Area Bites","description":null,"ogTitle":null,"ogDescription":null,"ogImgId":null,"twTitle":null,"twDescription":null,"twImgId":null},"ttid":1266,"isLoading":false,"link":"/bayareabites/tag/dumplings"},"bayareabites_16612":{"type":"terms","id":"bayareabites_16612","meta":{"index":"terms_1591234321","site":"bayareabites","id":"16612","found":true},"relationships":{},"included":{},"name":"mandu","slug":"mandu","taxonomy":"tag","description":null,"featImg":null,"headData":{"title":"mandu Archives | KQED Bay Area Bites","description":null,"ogTitle":null,"ogDescription":null,"ogImgId":null,"twTitle":null,"twDescription":null,"twImgId":null},"ttid":100942,"isLoading":false,"link":"/bayareabites/tag/mandu"},"bayareabites_10028":{"type":"terms","id":"bayareabites_10028","meta":{"index":"terms_1591234321","site":"bayareabites","id":"10028","found":true},"relationships":{},"included":{},"name":"food news","slug":"food-news","taxonomy":"category","description":null,"featImg":null,"headData":{"title":"food news Archives | KQED Bay Area Bites","description":null,"ogTitle":null,"ogDescription":null,"ogImgId":null,"twTitle":null,"twDescription":null,"twImgId":null},"ttid":8301,"isLoading":false,"link":"/bayareabites/category/food-news"},"bayareabites_2250":{"type":"terms","id":"bayareabites_2250","meta":{"index":"terms_1591234321","site":"bayareabites","id":"2250","found":true},"relationships":{},"included":{},"name":"barbecue","slug":"barbecue","taxonomy":"tag","description":null,"featImg":null,"headData":{"title":"barbecue Archives | KQED Bay Area Bites","description":null,"ogTitle":null,"ogDescription":null,"ogImgId":null,"twTitle":null,"twDescription":null,"twImgId":null},"ttid":1673,"isLoading":false,"link":"/bayareabites/tag/barbecue"},"bayareabites_2550":{"type":"terms","id":"bayareabites_2550","meta":{"index":"terms_1591234321","site":"bayareabites","id":"2550","found":true},"relationships":{},"included":{},"name":"grilling","slug":"grilling","taxonomy":"tag","description":null,"featImg":null,"headData":{"title":"grilling Archives | KQED Bay Area Bites","description":null,"ogTitle":null,"ogDescription":null,"ogImgId":null,"twTitle":null,"twDescription":null,"twImgId":null},"ttid":1838,"isLoading":false,"link":"/bayareabites/tag/grilling"},"bayareabites_2198":{"type":"terms","id":"bayareabites_2198","meta":{"index":"terms_1591234321","site":"bayareabites","id":"2198","found":true},"relationships":{},"included":{},"name":"memorial day","slug":"memorial-day","taxonomy":"tag","description":null,"featImg":null,"headData":{"title":"memorial day Archives | KQED Bay Area Bites","description":null,"ogTitle":null,"ogDescription":null,"ogImgId":null,"twTitle":null,"twDescription":null,"twImgId":null},"ttid":1634,"isLoading":false,"link":"/bayareabites/tag/memorial-day"},"bayareabites_16039":{"type":"terms","id":"bayareabites_16039","meta":{"index":"terms_1591234321","site":"bayareabites","id":"16039","found":true},"relationships":{},"included":{},"name":"Celebrity Chefs Recipes","slug":"celebrity-chefs-recipes","taxonomy":"series","description":"KQED invites you into the kitchen with award winning Bay Area chefs. \u003cstrong>\u003cem>Bay Area Bites\u003c/em> Celebrity Chefs Recipe\u003c/strong> series features video and step-by-step photos of local chefs preparing their signature dishes. Impress your friends and family with these tried and true recipes for mouth-watering dishes and learn techniques straight from the masters.\r\n\r\n\u003cstrong>First Up: Chef Tanya Holland, Brown Sugar Kitchen, Oakland, CA\u003c/strong>\r\n\"Brown Sugar Kitchen has become more than just a restaurant, it’s a community...West Oakland is more than just a place where we live. It’s our home now, and we can’t imagine living anywhere else. People say that I’ve changed West Oakland, but the truth is, West Oakland has changed me.\" --\u003cem>Tanya Holland\u003c/em>","featImg":"https://ww2.kqed.org/app/uploads/sites/24/2018/01/CC_1180x177_V3.png","headData":{"title":"Bay Area Bites; the Best Celebrity Chef Recipes | KQED","description":"Learn to cook like your favorite stars with these delicious and easy-to-follow recipes from KQED's \"Bay Area Bites the Best Celebrity Chef Recipes\" series.","ogTitle":null,"ogDescription":null,"ogImgId":null,"twTitle":null,"twDescription":null,"twImgId":null},"ttid":100369,"isLoading":false,"link":"/bayareabites/series/celebrity-chefs-recipes"},"bayareabites_63":{"type":"terms","id":"bayareabites_63","meta":{"index":"terms_1591234321","site":"bayareabites","id":"63","found":true},"relationships":{},"included":{},"name":"chefs","slug":"chefs","taxonomy":"category","description":null,"featImg":null,"headData":{"title":"chefs Archives | KQED Bay Area Bites","description":null,"ogTitle":null,"ogDescription":null,"ogImgId":null,"twTitle":null,"twDescription":null,"twImgId":null},"ttid":27,"isLoading":false,"link":"/bayareabites/category/chefs"},"bayareabites_11028":{"type":"terms","id":"bayareabites_11028","meta":{"index":"terms_1591234321","site":"bayareabites","id":"11028","found":true},"relationships":{},"included":{},"name":"food art","slug":"food-art","taxonomy":"category","description":null,"featImg":null,"headData":{"title":"food art Archives | KQED Bay Area Bites","description":null,"ogTitle":null,"ogDescription":null,"ogImgId":null,"twTitle":null,"twDescription":null,"twImgId":null},"ttid":7736,"isLoading":false,"link":"/bayareabites/category/food-art"},"bayareabites_16431":{"type":"terms","id":"bayareabites_16431","meta":{"index":"terms_1591234321","site":"bayareabites","id":"16431","found":true},"relationships":{},"included":{},"name":"celebrity chefs","slug":"celebrity-chefs","taxonomy":"tag","description":null,"featImg":null,"headData":{"title":"celebrity chefs Archives | KQED Bay Area Bites","description":null,"ogTitle":null,"ogDescription":null,"ogImgId":null,"twTitle":null,"twDescription":null,"twImgId":null},"ttid":100761,"isLoading":false,"link":"/bayareabites/tag/celebrity-chefs"},"bayareabites_16432":{"type":"terms","id":"bayareabites_16432","meta":{"index":"terms_1591234321","site":"bayareabites","id":"16432","found":true},"relationships":{},"included":{},"name":"chicken recipes","slug":"chicken-recipes","taxonomy":"tag","description":null,"featImg":null,"headData":{"title":"chicken recipes Archives | KQED Bay Area Bites","description":null,"ogTitle":null,"ogDescription":null,"ogImgId":null,"twTitle":null,"twDescription":null,"twImgId":null},"ttid":100762,"isLoading":false,"link":"/bayareabites/tag/chicken-recipes"},"bayareabites_16285":{"type":"terms","id":"bayareabites_16285","meta":{"index":"terms_1591234321","site":"bayareabites","id":"16285","found":true},"relationships":{},"included":{},"name":"fall recipes","slug":"fall-recipes","taxonomy":"tag","description":null,"featImg":null,"headData":{"title":"fall recipes Archives | KQED Bay Area Bites","description":null,"ogTitle":null,"ogDescription":null,"ogImgId":null,"twTitle":null,"twDescription":null,"twImgId":null},"ttid":100615,"isLoading":false,"link":"/bayareabites/tag/fall-recipes"},"bayareabites_9710":{"type":"terms","id":"bayareabites_9710","meta":{"index":"terms_1591234321","site":"bayareabites","id":"9710","found":true},"relationships":{},"included":{},"name":"featured","slug":"featured","taxonomy":"tag","description":null,"featImg":null,"headData":{"title":"featured Archives | KQED Bay Area Bites","description":null,"ogTitle":null,"ogDescription":null,"ogImgId":null,"twTitle":null,"twDescription":null,"twImgId":null},"ttid":4164,"isLoading":false,"link":"/bayareabites/tag/featured"},"bayareabites_2958":{"type":"terms","id":"bayareabites_2958","meta":{"index":"terms_1591234321","site":"bayareabites","id":"2958","found":true},"relationships":{},"included":{},"name":"ryan farr","slug":"ryan-farr","taxonomy":"tag","description":null,"featImg":null,"headData":{"title":"ryan farr Archives | KQED Bay Area Bites","description":null,"ogTitle":null,"ogDescription":null,"ogImgId":null,"twTitle":null,"twDescription":null,"twImgId":null},"ttid":2064,"isLoading":false,"link":"/bayareabites/tag/ryan-farr"},"bayareabites_3682":{"type":"terms","id":"bayareabites_3682","meta":{"index":"terms_1591234321","site":"bayareabites","id":"3682","found":true},"relationships":{},"included":{},"name":"summer recipes","slug":"summer-recipes","taxonomy":"tag","description":null,"featImg":null,"headData":{"title":"summer recipes Archives | KQED Bay Area Bites","description":null,"ogTitle":null,"ogDescription":null,"ogImgId":null,"twTitle":null,"twDescription":null,"twImgId":null},"ttid":2433,"isLoading":false,"link":"/bayareabites/tag/summer-recipes"},"bayareabites_16284":{"type":"terms","id":"bayareabites_16284","meta":{"index":"terms_1591234321","site":"bayareabites","id":"16284","found":true},"relationships":{},"included":{},"name":"winter recipes","slug":"winter-recipes","taxonomy":"tag","description":null,"featImg":null,"headData":{"title":"winter recipes Archives | KQED Bay Area Bites","description":null,"ogTitle":null,"ogDescription":null,"ogImgId":null,"twTitle":null,"twDescription":null,"twImgId":null},"ttid":100614,"isLoading":false,"link":"/bayareabites/tag/winter-recipes"}},"userAgentReducer":{"userAgent":"Mozilla/5.0 AppleWebKit/537.36 (KHTML, like Gecko; compatible; ClaudeBot/1.0; +claudebot@anthropic.com)","isBot":true},"userPermissionsReducer":{"wpLoggedIn":false},"localStorageReducer":{},"browserHistoryReducer":[],"eventsReducer":{},"fssReducer":{},"tvDailyScheduleReducer":{},"tvWeeklyScheduleReducer":{},"tvPrimetimeScheduleReducer":{},"tvMonthlyScheduleReducer":{},"userAccountReducer":{"routeTo":"","showDeleteConfirmModal":false,"user":{"userId":"","isFound":false,"firstName":"","lastName":"","phoneNumber":"","email":"","articles":[]}},"youthMediaReducer":{},"checkPleaseReducer":{"filterData":{},"restaurantData":[]},"reframeReducer":{"attendee":null},"location":{"pathname":"/bayareabites/category/recipes/","previousPathname":"/"}}