Eating More — Or Less — Of 10 Foods May Cut Risk Of Early Death
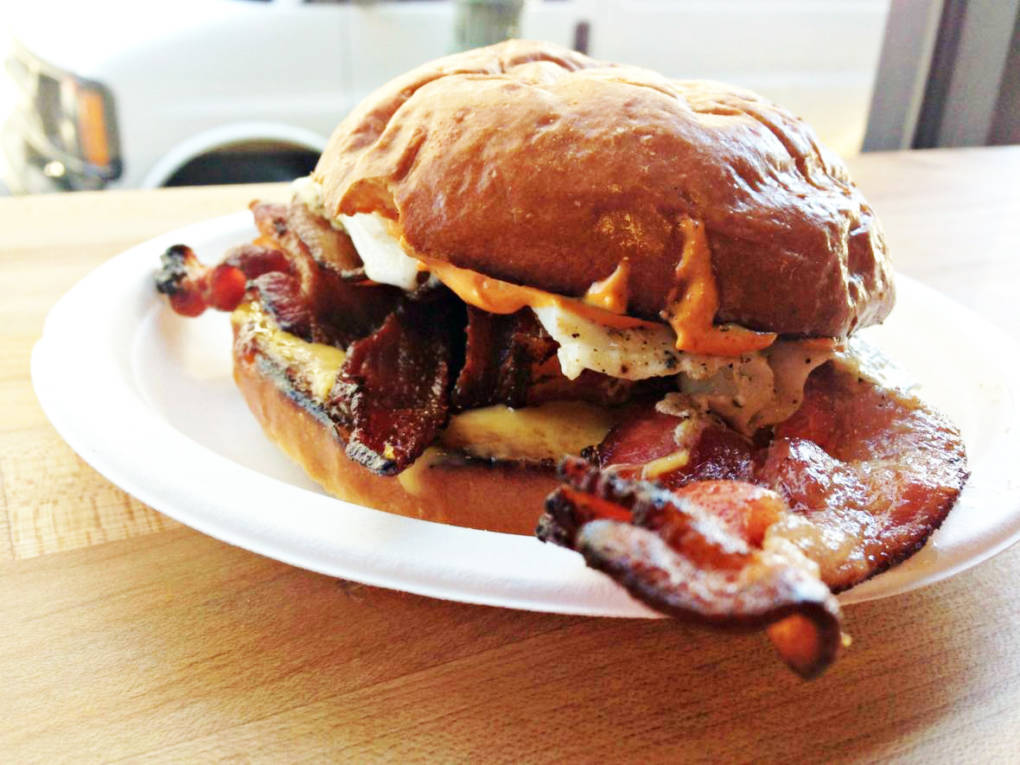
Gastropig: A New Destination For Breakfast Sandwiches In Uptown Oakland
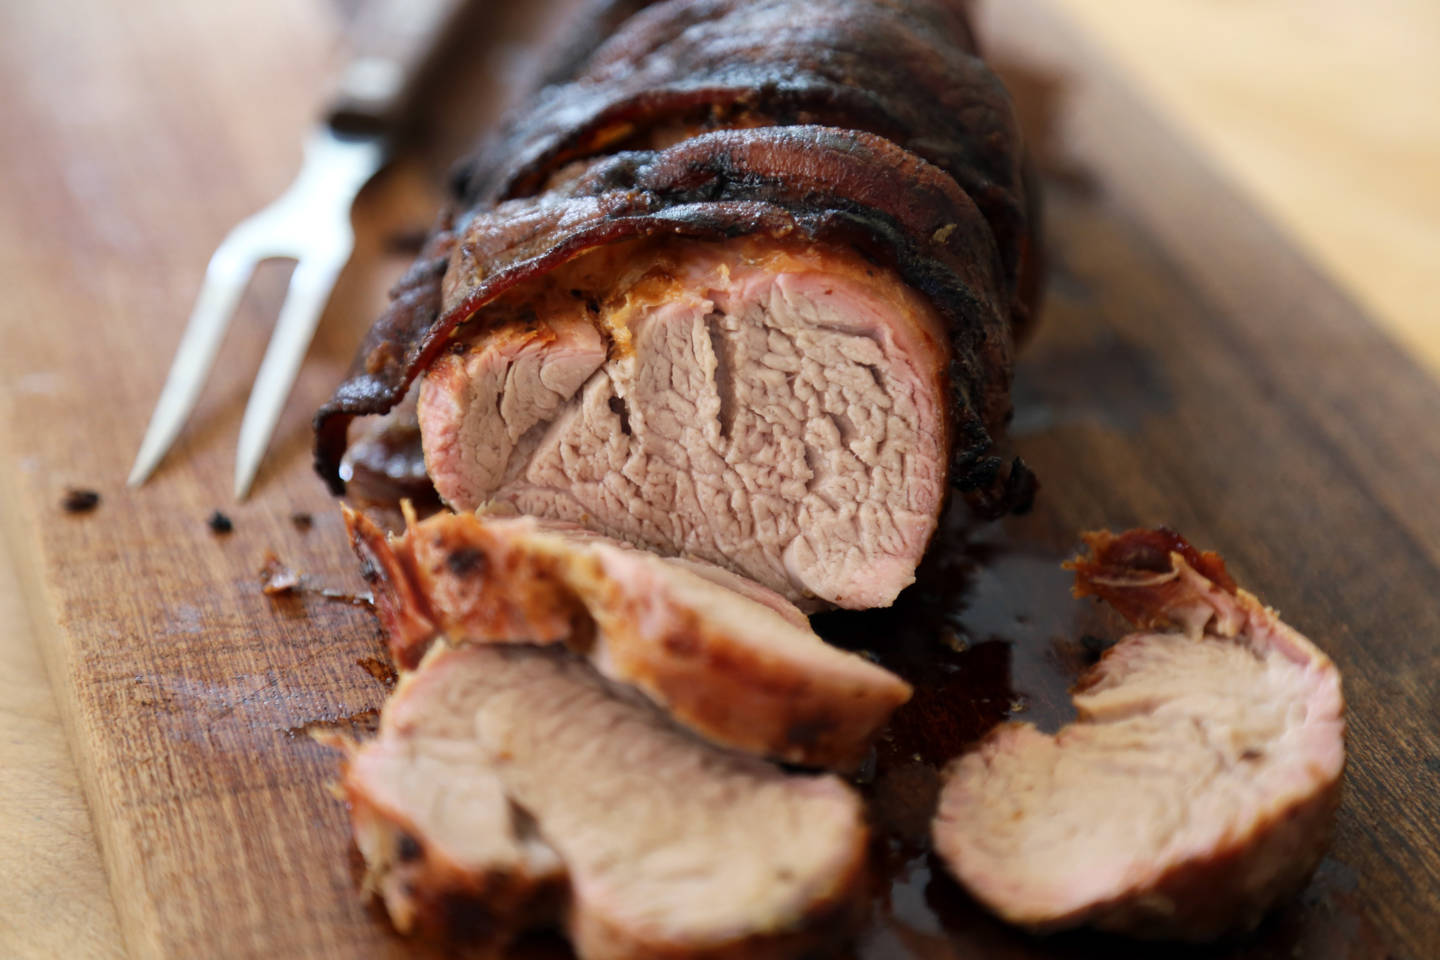
Time to Grill for the 4th of July: Grilled Bacon-Wrapped Pork Tenderloin with Mustard
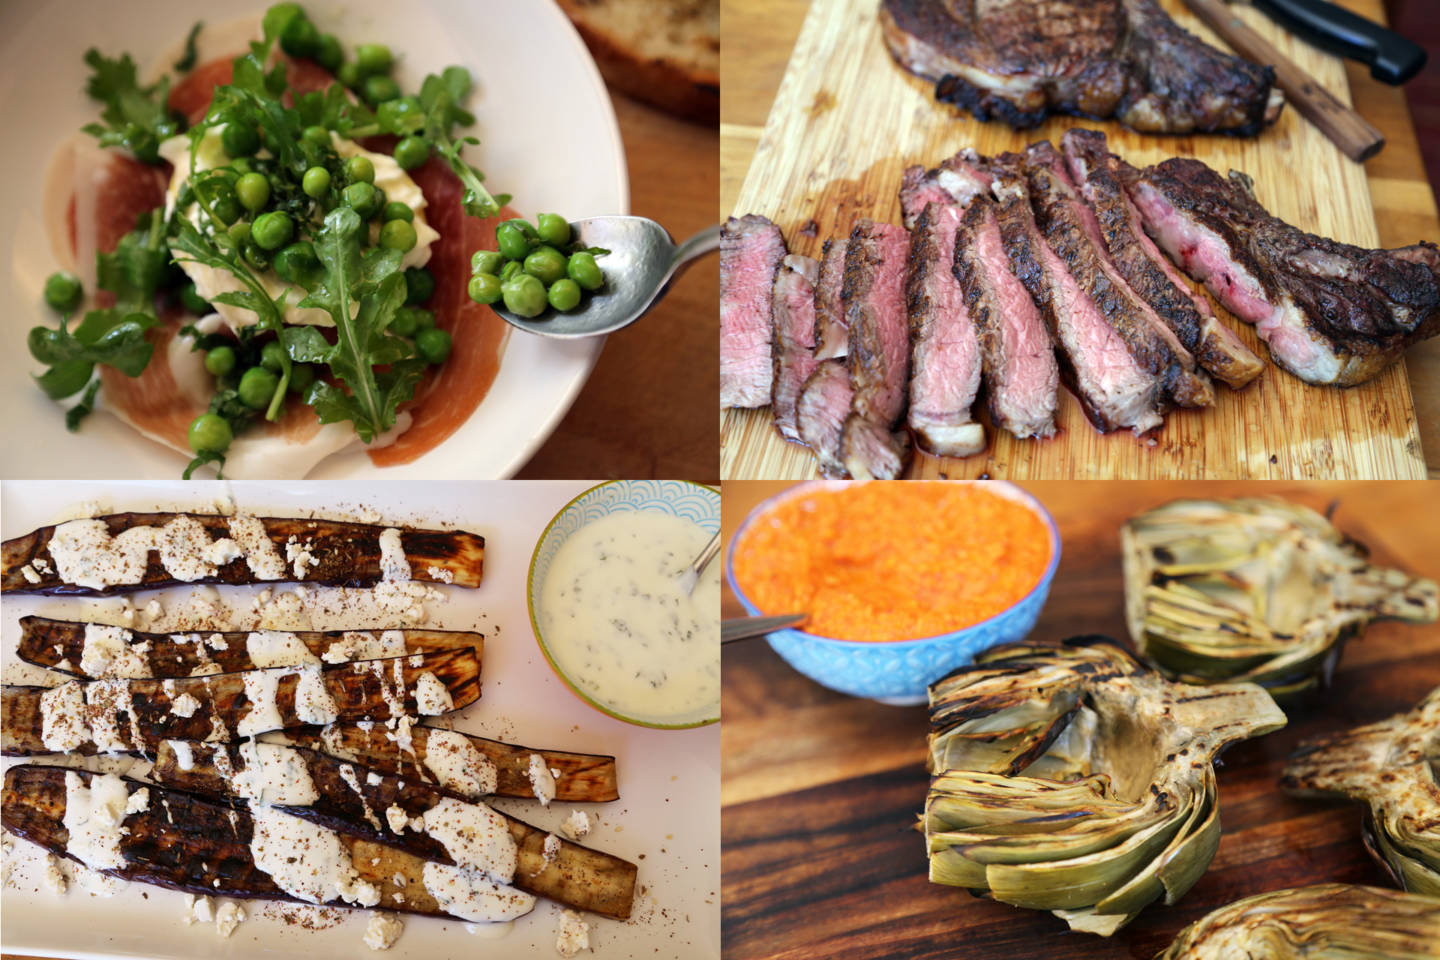
Bay Area Bites Memorial Day Summer Grilling Recipes
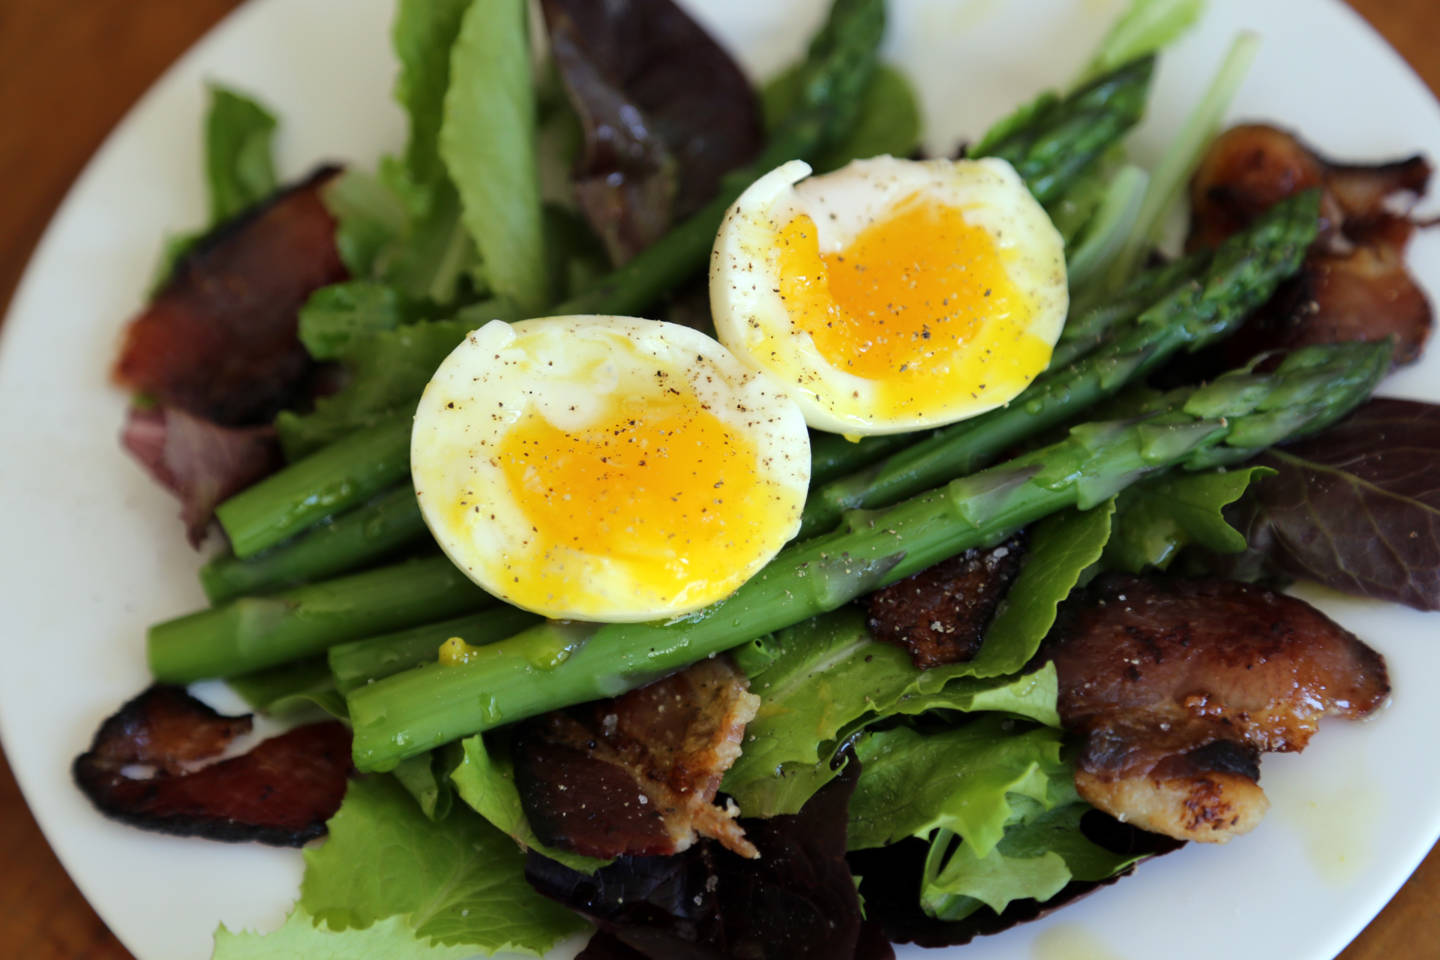
Celebrate Mother’s Day with a Breakfast Salad!
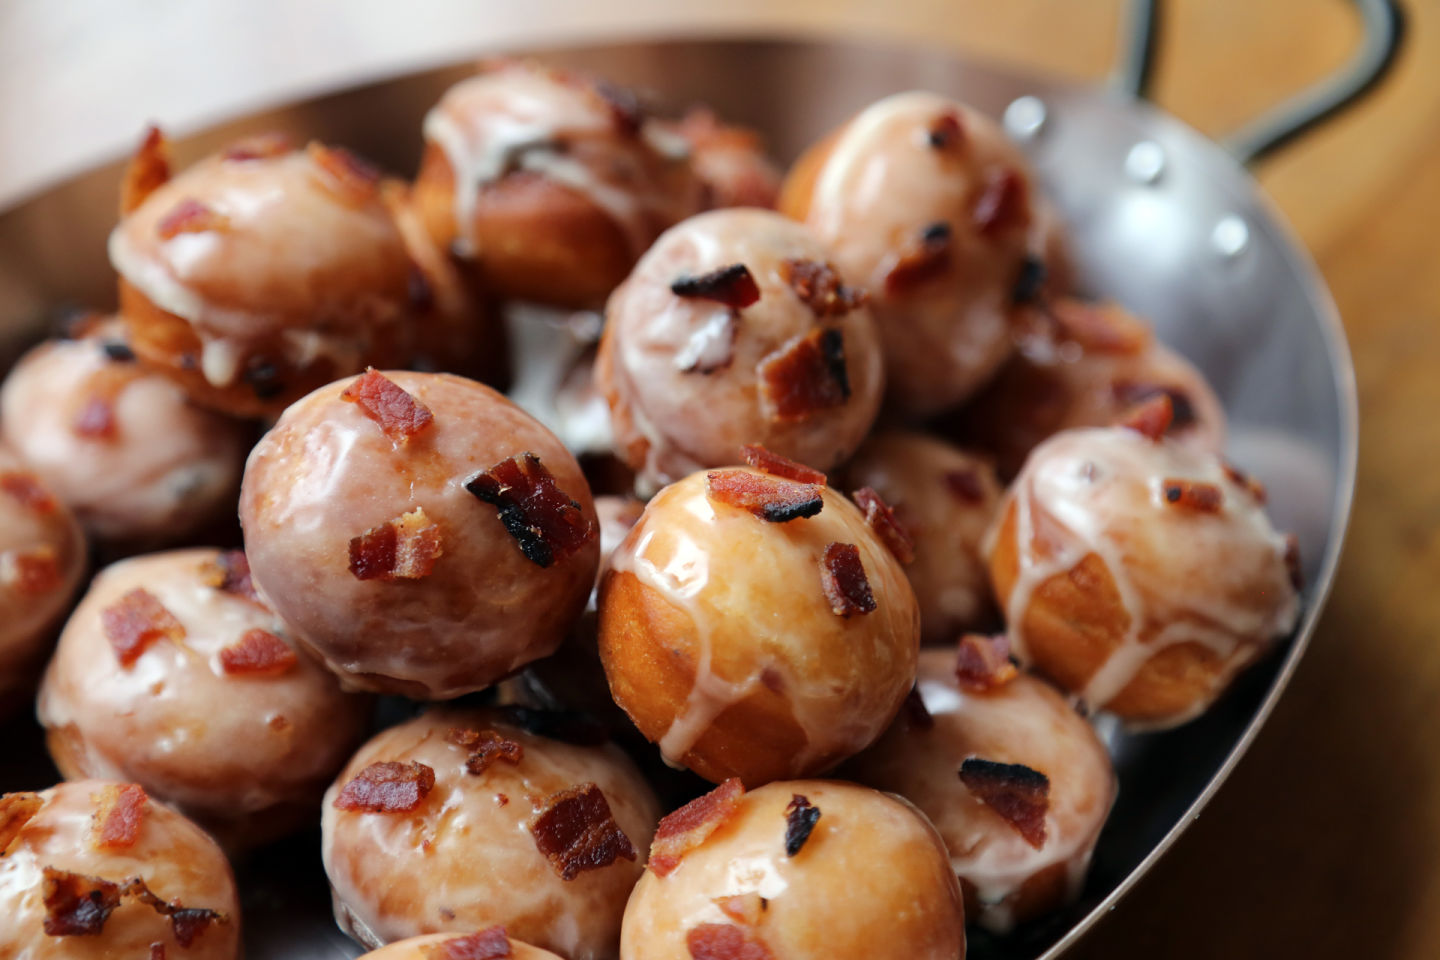
New Year’s Eve Appetizers: Sweet and Savory Maple-Bacon Donut Holes
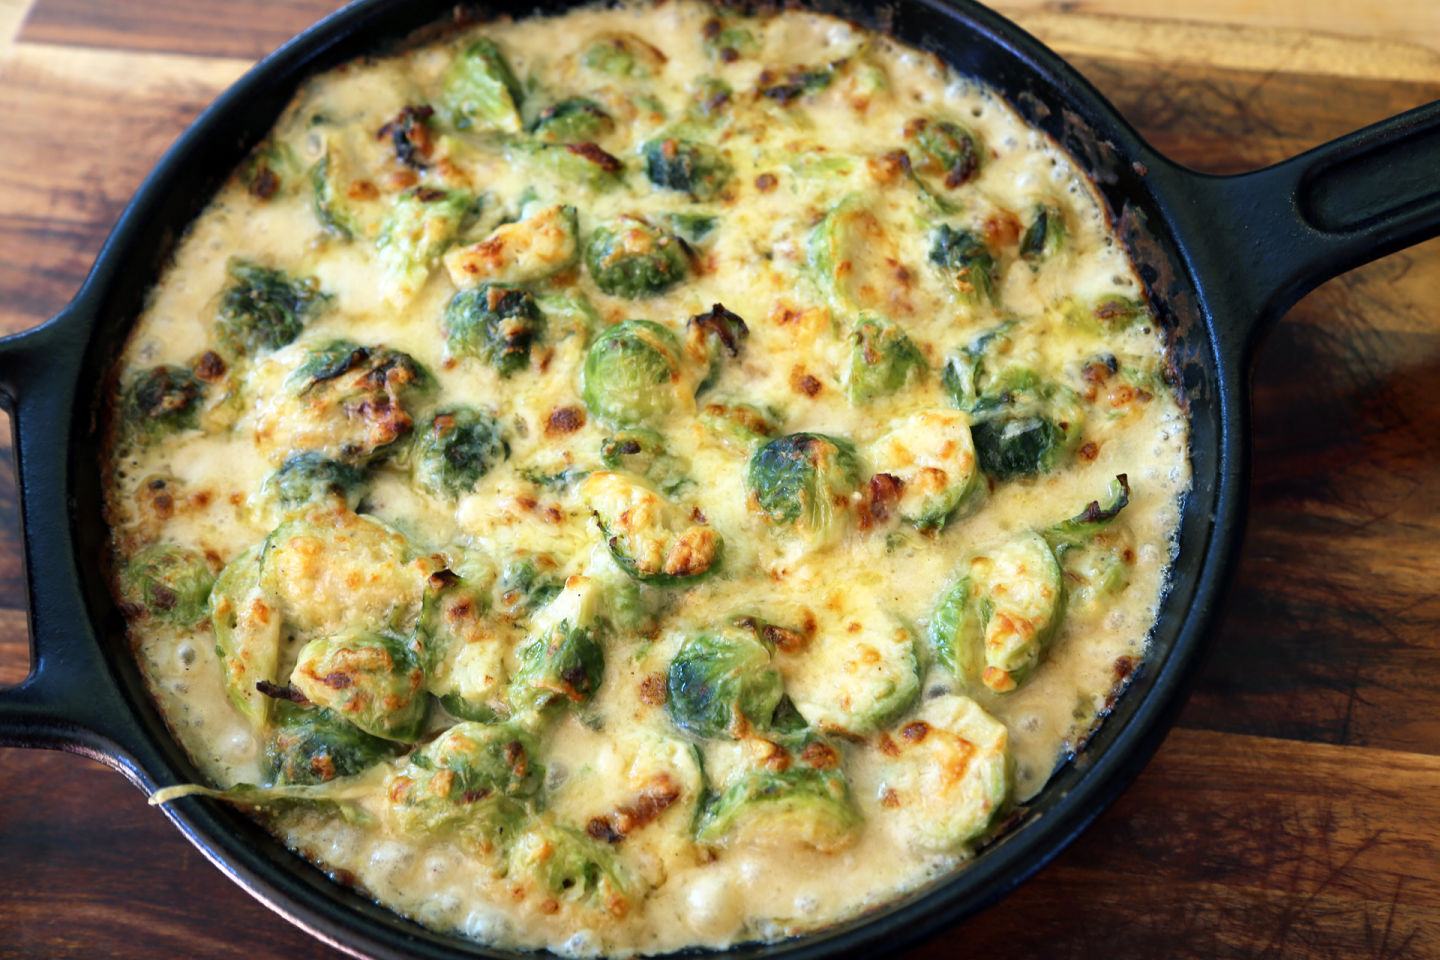
Thanksgiving Side Dish: Creamy Brussels Sprouts and Bacon Gratin with Shallots and Gruyère
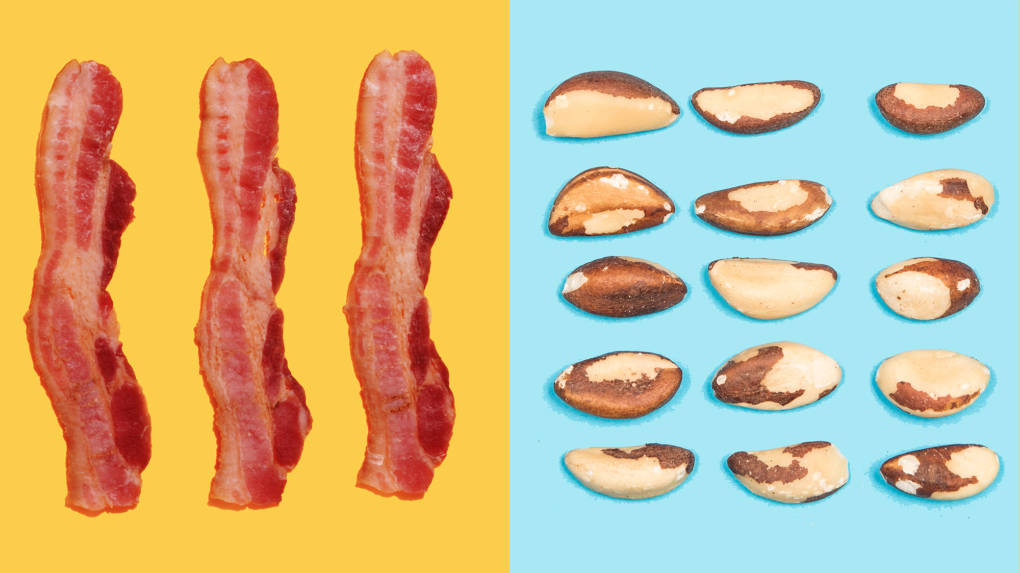
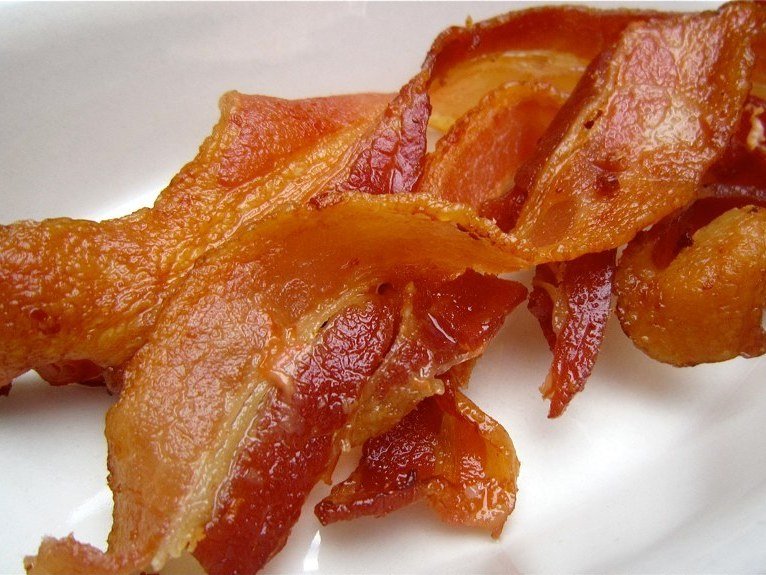
Bad Day For Bacon: Processed Meats Cause Cancer, WHO Says
Sponsored
window.__IS_SSR__=true
window.__INITIAL_STATE__={"attachmentsReducer":{"audio_0":{"type":"attachments","id":"audio_0","imgSizes":{"kqedFullSize":{"file":"https://ww2.kqed.org/news/wp-content/themes/KQED-unified/img/audio_bgs/background0.jpg"}}},"audio_1":{"type":"attachments","id":"audio_1","imgSizes":{"kqedFullSize":{"file":"https://ww2.kqed.org/news/wp-content/themes/KQED-unified/img/audio_bgs/background1.jpg"}}},"audio_2":{"type":"attachments","id":"audio_2","imgSizes":{"kqedFullSize":{"file":"https://ww2.kqed.org/news/wp-content/themes/KQED-unified/img/audio_bgs/background2.jpg"}}},"audio_3":{"type":"attachments","id":"audio_3","imgSizes":{"kqedFullSize":{"file":"https://ww2.kqed.org/news/wp-content/themes/KQED-unified/img/audio_bgs/background3.jpg"}}},"audio_4":{"type":"attachments","id":"audio_4","imgSizes":{"kqedFullSize":{"file":"https://ww2.kqed.org/news/wp-content/themes/KQED-unified/img/audio_bgs/background4.jpg"}}},"placeholder":{"type":"attachments","id":"placeholder","imgSizes":{"thumbnail":{"file":"https://ww2.kqed.org/wp-content/uploads/sites/10/2018/01/GettyImages-896326950-160x96.jpg","width":160,"height":96,"mimeType":"image/jpeg"},"medium":{"file":"https://ww2.kqed.org/wp-content/uploads/sites/10/2018/01/GettyImages-896326950-800x478.jpg","width":800,"height":478,"mimeType":"image/jpeg"},"large":{"file":"https://ww2.kqed.org/wp-content/uploads/sites/10/2018/01/GettyImages-896326950-1020x610.jpg","width":1020,"height":610,"mimeType":"image/jpeg"},"fd-lrg":{"file":"https://ww2.kqed.org/wp-content/uploads/sites/10/2018/01/GettyImages-896326950-1920x1148.jpg","width":1920,"height":1148,"mimeType":"image/jpeg"},"fd-med":{"file":"https://ww2.kqed.org/wp-content/uploads/sites/10/2018/01/GettyImages-896326950-1180x705.jpg","width":1180,"height":705,"mimeType":"image/jpeg"},"fd-sm":{"file":"https://ww2.kqed.org/wp-content/uploads/sites/10/2018/01/GettyImages-896326950-960x574.jpg","width":960,"height":574,"mimeType":"image/jpeg"},"post-thumbnail":{"file":"https://ww2.kqed.org/wp-content/uploads/sites/10/2018/01/GettyImages-896326950-672x372.jpg","width":672,"height":372,"mimeType":"image/jpeg"},"twentyfourteen-full-width":{"file":"https://ww2.kqed.org/wp-content/uploads/sites/10/2018/01/GettyImages-896326950-1038x576.jpg","width":1038,"height":576,"mimeType":"image/jpeg"},"xxsmall":{"file":"https://ww2.kqed.org/wp-content/uploads/sites/10/2018/01/GettyImages-896326950-240x143.jpg","width":240,"height":143,"mimeType":"image/jpeg"},"xsmall":{"file":"https://ww2.kqed.org/wp-content/uploads/sites/10/2018/01/GettyImages-896326950-375x224.jpg","width":375,"height":224,"mimeType":"image/jpeg"},"small":{"file":"https://ww2.kqed.org/wp-content/uploads/sites/10/2018/01/GettyImages-896326950-520x311.jpg","width":520,"height":311,"mimeType":"image/jpeg"},"xlarge":{"file":"https://ww2.kqed.org/wp-content/uploads/sites/10/2018/01/GettyImages-896326950-1180x705.jpg","width":1180,"height":705,"mimeType":"image/jpeg"},"full-width":{"file":"https://ww2.kqed.org/wp-content/uploads/sites/10/2018/01/GettyImages-896326950-1920x1148.jpg","width":1920,"height":1148,"mimeType":"image/jpeg"},"guest-author-32":{"file":"https://ww2.kqed.org/wp-content/uploads/sites/10/2018/01/GettyImages-896326950-32x32.jpg","width":32,"height":32,"mimeType":"image/jpeg"},"guest-author-50":{"file":"https://ww2.kqed.org/wp-content/uploads/sites/10/2018/01/GettyImages-896326950-50x50.jpg","width":50,"height":50,"mimeType":"image/jpeg"},"guest-author-64":{"file":"https://ww2.kqed.org/wp-content/uploads/sites/10/2018/01/GettyImages-896326950-64x64.jpg","width":64,"height":64,"mimeType":"image/jpeg"},"guest-author-96":{"file":"https://ww2.kqed.org/wp-content/uploads/sites/10/2018/01/GettyImages-896326950-96x96.jpg","width":96,"height":96,"mimeType":"image/jpeg"},"guest-author-128":{"file":"https://ww2.kqed.org/wp-content/uploads/sites/10/2018/01/GettyImages-896326950-128x128.jpg","width":128,"height":128,"mimeType":"image/jpeg"},"detail":{"file":"https://ww2.kqed.org/wp-content/uploads/sites/10/2018/01/GettyImages-896326950-150x150.jpg","width":150,"height":150,"mimeType":"image/jpeg"},"kqedFullSize":{"file":"https://ww2.kqed.org/wp-content/uploads/sites/10/2018/01/GettyImages-896326950-e1514998105161.jpg","width":1920,"height":1148}}},"bayareabites_131289":{"type":"attachments","id":"bayareabites_131289","meta":{"index":"attachments_1591205162","site":"bayareabites","id":"131289","found":true},"title":"KQED_MonicaLo_Holiday2018_BaconJam-5585","publishDate":1541890004,"status":"inherit","parent":131287,"modified":1542164857,"caption":"Bourbon Bacon Jam with Dark Fruits.","credit":"Monica Lo","description":"Bourbon Bacon Jam with Dark Fruits.","imgSizes":{"thumbnail":{"file":"https://ww2.kqed.org/app/uploads/sites/24/2018/11/KQED_MonicaLo_Holiday2018_BaconJam-5585-160x111.jpg","width":160,"height":111,"mimeType":"image/jpeg"},"medium":{"file":"https://ww2.kqed.org/app/uploads/sites/24/2018/11/KQED_MonicaLo_Holiday2018_BaconJam-5585-800x556.jpg","width":800,"height":556,"mimeType":"image/jpeg"},"medium_large":{"file":"https://ww2.kqed.org/app/uploads/sites/24/2018/11/KQED_MonicaLo_Holiday2018_BaconJam-5585-768x534.jpg","width":768,"height":534,"mimeType":"image/jpeg"},"large":{"file":"https://ww2.kqed.org/app/uploads/sites/24/2018/11/KQED_MonicaLo_Holiday2018_BaconJam-5585-1020x709.jpg","width":1020,"height":709,"mimeType":"image/jpeg"},"complete_open_graph":{"file":"https://ww2.kqed.org/app/uploads/sites/24/2018/11/KQED_MonicaLo_Holiday2018_BaconJam-5585-1200x834.jpg","width":1200,"height":834,"mimeType":"image/jpeg"},"fd-lrg":{"file":"https://ww2.kqed.org/app/uploads/sites/24/2018/11/KQED_MonicaLo_Holiday2018_BaconJam-5585-1920x1334.jpg","width":1920,"height":1334,"mimeType":"image/jpeg"},"fd-med":{"file":"https://ww2.kqed.org/app/uploads/sites/24/2018/11/KQED_MonicaLo_Holiday2018_BaconJam-5585-1180x820.jpg","width":1180,"height":820,"mimeType":"image/jpeg"},"fd-sm":{"file":"https://ww2.kqed.org/app/uploads/sites/24/2018/11/KQED_MonicaLo_Holiday2018_BaconJam-5585-960x667.jpg","width":960,"height":667,"mimeType":"image/jpeg"},"post-thumbnail":{"file":"https://ww2.kqed.org/app/uploads/sites/24/2018/11/KQED_MonicaLo_Holiday2018_BaconJam-5585-672x372.jpg","width":672,"height":372,"mimeType":"image/jpeg"},"twentyfourteen-full-width":{"file":"https://ww2.kqed.org/app/uploads/sites/24/2018/11/KQED_MonicaLo_Holiday2018_BaconJam-5585-1038x576.jpg","width":1038,"height":576,"mimeType":"image/jpeg"},"xxsmall":{"file":"https://ww2.kqed.org/app/uploads/sites/24/2018/11/KQED_MonicaLo_Holiday2018_BaconJam-5585-240x167.jpg","width":240,"height":167,"mimeType":"image/jpeg"},"xsmall":{"file":"https://ww2.kqed.org/app/uploads/sites/24/2018/11/KQED_MonicaLo_Holiday2018_BaconJam-5585-375x261.jpg","width":375,"height":261,"mimeType":"image/jpeg"},"small":{"file":"https://ww2.kqed.org/app/uploads/sites/24/2018/11/KQED_MonicaLo_Holiday2018_BaconJam-5585-520x361.jpg","width":520,"height":361,"mimeType":"image/jpeg"},"xlarge":{"file":"https://ww2.kqed.org/app/uploads/sites/24/2018/11/KQED_MonicaLo_Holiday2018_BaconJam-5585-1180x820.jpg","width":1180,"height":820,"mimeType":"image/jpeg"},"full-width":{"file":"https://ww2.kqed.org/app/uploads/sites/24/2018/11/KQED_MonicaLo_Holiday2018_BaconJam-5585-1920x1334.jpg","width":1920,"height":1334,"mimeType":"image/jpeg"},"guest-author-32":{"file":"https://ww2.kqed.org/app/uploads/sites/24/2018/11/KQED_MonicaLo_Holiday2018_BaconJam-5585-32x32.jpg","width":32,"height":32,"mimeType":"image/jpeg"},"guest-author-50":{"file":"https://ww2.kqed.org/app/uploads/sites/24/2018/11/KQED_MonicaLo_Holiday2018_BaconJam-5585-50x50.jpg","width":50,"height":50,"mimeType":"image/jpeg"},"guest-author-64":{"file":"https://ww2.kqed.org/app/uploads/sites/24/2018/11/KQED_MonicaLo_Holiday2018_BaconJam-5585-64x64.jpg","width":64,"height":64,"mimeType":"image/jpeg"},"guest-author-96":{"file":"https://ww2.kqed.org/app/uploads/sites/24/2018/11/KQED_MonicaLo_Holiday2018_BaconJam-5585-96x96.jpg","width":96,"height":96,"mimeType":"image/jpeg"},"guest-author-128":{"file":"https://ww2.kqed.org/app/uploads/sites/24/2018/11/KQED_MonicaLo_Holiday2018_BaconJam-5585-128x128.jpg","width":128,"height":128,"mimeType":"image/jpeg"},"detail":{"file":"https://ww2.kqed.org/app/uploads/sites/24/2018/11/KQED_MonicaLo_Holiday2018_BaconJam-5585-150x150.jpg","width":150,"height":150,"mimeType":"image/jpeg"},"kqedFullSize":{"file":"https://ww2.kqed.org/app/uploads/sites/24/2018/11/KQED_MonicaLo_Holiday2018_BaconJam-5585-e1542164904320.jpg","width":1920,"height":1334}},"fetchFailed":false,"isLoading":false},"bayareabites_115853":{"type":"attachments","id":"bayareabites_115853","meta":{"index":"attachments_1591205162","site":"bayareabites","id":"115853","found":true},"title":"Eating too much bacon, or too few whole grains, nuts and seeds, can influence your risk of death from heart disease. Nearly half of all deaths from heart disease and Type 2 diabetes are linked to diet.","publishDate":1489426087,"status":"inherit","parent":115852,"modified":1489426200,"caption":"Eating too much bacon, or too few whole grains, nuts and seeds, can influence your risk of death from heart disease. Nearly half of all deaths from heart disease and Type 2 diabetes are linked to diet.","credit":"Paul Taylor/John Lawson/Belhaven/Getty Images","description":"Eating too much bacon, or too few whole grains, nuts and seeds, can influence your risk of death from heart disease. Nearly half of all deaths from heart disease and Type 2 diabetes are linked to diet.","imgSizes":{"thumbnail":{"file":"https://ww2.kqed.org/app/uploads/sites/24/2017/03/10foods_custom-ddbe984b5ba43e2da1a9d83b0f7c532ba995c57c-160x90.jpg","width":160,"height":90,"mimeType":"image/jpeg"},"medium":{"file":"https://ww2.kqed.org/app/uploads/sites/24/2017/03/10foods_custom-ddbe984b5ba43e2da1a9d83b0f7c532ba995c57c-800x449.jpg","width":800,"height":449,"mimeType":"image/jpeg"},"medium_large":{"file":"https://ww2.kqed.org/app/uploads/sites/24/2017/03/10foods_custom-ddbe984b5ba43e2da1a9d83b0f7c532ba995c57c-768x431.jpg","width":768,"height":431,"mimeType":"image/jpeg"},"large":{"file":"https://ww2.kqed.org/app/uploads/sites/24/2017/03/10foods_custom-ddbe984b5ba43e2da1a9d83b0f7c532ba995c57c-1020x573.jpg","width":1020,"height":573,"mimeType":"image/jpeg"},"fd-lrg":{"file":"https://ww2.kqed.org/app/uploads/sites/24/2017/03/10foods_custom-ddbe984b5ba43e2da1a9d83b0f7c532ba995c57c-1920x1078.jpg","width":1920,"height":1078,"mimeType":"image/jpeg"},"fd-med":{"file":"https://ww2.kqed.org/app/uploads/sites/24/2017/03/10foods_custom-ddbe984b5ba43e2da1a9d83b0f7c532ba995c57c-1180x663.jpg","width":1180,"height":663,"mimeType":"image/jpeg"},"fd-sm":{"file":"https://ww2.kqed.org/app/uploads/sites/24/2017/03/10foods_custom-ddbe984b5ba43e2da1a9d83b0f7c532ba995c57c-960x539.jpg","width":960,"height":539,"mimeType":"image/jpeg"},"post-thumbnail":{"file":"https://ww2.kqed.org/app/uploads/sites/24/2017/03/10foods_custom-ddbe984b5ba43e2da1a9d83b0f7c532ba995c57c-672x372.jpg","width":672,"height":372,"mimeType":"image/jpeg"},"twentyfourteen-full-width":{"file":"https://ww2.kqed.org/app/uploads/sites/24/2017/03/10foods_custom-ddbe984b5ba43e2da1a9d83b0f7c532ba995c57c-1038x576.jpg","width":1038,"height":576,"mimeType":"image/jpeg"},"xxsmall":{"file":"https://ww2.kqed.org/app/uploads/sites/24/2017/03/10foods_custom-ddbe984b5ba43e2da1a9d83b0f7c532ba995c57c-240x135.jpg","width":240,"height":135,"mimeType":"image/jpeg"},"xsmall":{"file":"https://ww2.kqed.org/app/uploads/sites/24/2017/03/10foods_custom-ddbe984b5ba43e2da1a9d83b0f7c532ba995c57c-375x211.jpg","width":375,"height":211,"mimeType":"image/jpeg"},"small":{"file":"https://ww2.kqed.org/app/uploads/sites/24/2017/03/10foods_custom-ddbe984b5ba43e2da1a9d83b0f7c532ba995c57c-520x292.jpg","width":520,"height":292,"mimeType":"image/jpeg"},"xlarge":{"file":"https://ww2.kqed.org/app/uploads/sites/24/2017/03/10foods_custom-ddbe984b5ba43e2da1a9d83b0f7c532ba995c57c-1180x663.jpg","width":1180,"height":663,"mimeType":"image/jpeg"},"full-width":{"file":"https://ww2.kqed.org/app/uploads/sites/24/2017/03/10foods_custom-ddbe984b5ba43e2da1a9d83b0f7c532ba995c57c-1920x1078.jpg","width":1920,"height":1078,"mimeType":"image/jpeg"},"guest-author-32":{"file":"https://ww2.kqed.org/app/uploads/sites/24/2017/03/10foods_custom-ddbe984b5ba43e2da1a9d83b0f7c532ba995c57c-32x32.jpg","width":32,"height":32,"mimeType":"image/jpeg"},"guest-author-50":{"file":"https://ww2.kqed.org/app/uploads/sites/24/2017/03/10foods_custom-ddbe984b5ba43e2da1a9d83b0f7c532ba995c57c-50x50.jpg","width":50,"height":50,"mimeType":"image/jpeg"},"guest-author-64":{"file":"https://ww2.kqed.org/app/uploads/sites/24/2017/03/10foods_custom-ddbe984b5ba43e2da1a9d83b0f7c532ba995c57c-64x64.jpg","width":64,"height":64,"mimeType":"image/jpeg"},"guest-author-96":{"file":"https://ww2.kqed.org/app/uploads/sites/24/2017/03/10foods_custom-ddbe984b5ba43e2da1a9d83b0f7c532ba995c57c-96x96.jpg","width":96,"height":96,"mimeType":"image/jpeg"},"guest-author-128":{"file":"https://ww2.kqed.org/app/uploads/sites/24/2017/03/10foods_custom-ddbe984b5ba43e2da1a9d83b0f7c532ba995c57c-128x128.jpg","width":128,"height":128,"mimeType":"image/jpeg"},"detail":{"file":"https://ww2.kqed.org/app/uploads/sites/24/2017/03/10foods_custom-ddbe984b5ba43e2da1a9d83b0f7c532ba995c57c-150x150.jpg","width":150,"height":150,"mimeType":"image/jpeg"},"kqedFullSize":{"file":"https://ww2.kqed.org/app/uploads/sites/24/2017/03/10foods_custom-ddbe984b5ba43e2da1a9d83b0f7c532ba995c57c.jpg","width":2000,"height":1123}},"fetchFailed":false,"isLoading":false},"bayareabites_114538":{"type":"attachments","id":"bayareabites_114538","meta":{"index":"attachments_1591205162","site":"bayareabites","id":"114538","found":true},"title":"baconslut","publishDate":1483718983,"status":"inherit","parent":114520,"modified":1483719126,"caption":"The #Baconslut.","credit":"Shelby Pope","description":null,"imgSizes":{"thumbnail":{"file":"https://ww2.kqed.org/app/uploads/sites/24/2017/01/baconslut-160x120.jpg","width":160,"height":120,"mimeType":"image/jpeg"},"medium":{"file":"https://ww2.kqed.org/app/uploads/sites/24/2017/01/baconslut-800x600.jpg","width":800,"height":600,"mimeType":"image/jpeg"},"medium_large":{"file":"https://ww2.kqed.org/app/uploads/sites/24/2017/01/baconslut-768x576.jpg","width":768,"height":576,"mimeType":"image/jpeg"},"large":{"file":"https://ww2.kqed.org/app/uploads/sites/24/2017/01/baconslut-1020x765.jpg","width":1020,"height":765,"mimeType":"image/jpeg"},"fd-med":{"file":"https://ww2.kqed.org/app/uploads/sites/24/2017/01/baconslut-1180x885.jpg","width":1180,"height":885,"mimeType":"image/jpeg"},"fd-sm":{"file":"https://ww2.kqed.org/app/uploads/sites/24/2017/01/baconslut-960x720.jpg","width":960,"height":720,"mimeType":"image/jpeg"},"post-thumbnail":{"file":"https://ww2.kqed.org/app/uploads/sites/24/2017/01/baconslut-672x372.jpg","width":672,"height":372,"mimeType":"image/jpeg"},"twentyfourteen-full-width":{"file":"https://ww2.kqed.org/app/uploads/sites/24/2017/01/baconslut-1038x576.jpg","width":1038,"height":576,"mimeType":"image/jpeg"},"xxsmall":{"file":"https://ww2.kqed.org/app/uploads/sites/24/2017/01/baconslut-240x180.jpg","width":240,"height":180,"mimeType":"image/jpeg"},"xsmall":{"file":"https://ww2.kqed.org/app/uploads/sites/24/2017/01/baconslut-375x281.jpg","width":375,"height":281,"mimeType":"image/jpeg"},"small":{"file":"https://ww2.kqed.org/app/uploads/sites/24/2017/01/baconslut-520x390.jpg","width":520,"height":390,"mimeType":"image/jpeg"},"xlarge":{"file":"https://ww2.kqed.org/app/uploads/sites/24/2017/01/baconslut-1180x885.jpg","width":1180,"height":885,"mimeType":"image/jpeg"},"guest-author-32":{"file":"https://ww2.kqed.org/app/uploads/sites/24/2017/01/baconslut-32x32.jpg","width":32,"height":32,"mimeType":"image/jpeg"},"guest-author-50":{"file":"https://ww2.kqed.org/app/uploads/sites/24/2017/01/baconslut-50x50.jpg","width":50,"height":50,"mimeType":"image/jpeg"},"guest-author-64":{"file":"https://ww2.kqed.org/app/uploads/sites/24/2017/01/baconslut-64x64.jpg","width":64,"height":64,"mimeType":"image/jpeg"},"guest-author-96":{"file":"https://ww2.kqed.org/app/uploads/sites/24/2017/01/baconslut-96x96.jpg","width":96,"height":96,"mimeType":"image/jpeg"},"guest-author-128":{"file":"https://ww2.kqed.org/app/uploads/sites/24/2017/01/baconslut-128x128.jpg","width":128,"height":128,"mimeType":"image/jpeg"},"detail":{"file":"https://ww2.kqed.org/app/uploads/sites/24/2017/01/baconslut-150x150.jpg","width":150,"height":150,"mimeType":"image/jpeg"},"kqedFullSize":{"file":"https://ww2.kqed.org/app/uploads/sites/24/2017/01/baconslut.jpg","width":1180,"height":885}},"fetchFailed":false,"isLoading":false},"bayareabites_110516":{"type":"attachments","id":"bayareabites_110516","meta":{"index":"attachments_1591205162","site":"bayareabites","id":"110516","found":true},"title":"pork-finish-sliced1","publishDate":1467404206,"status":"inherit","parent":110434,"modified":1467404652,"caption":"Grilled Bacon-Wrapped Pork Tenderloin\n","credit":"Wendy Goodfriend","description":null,"imgSizes":{"thumbnail":{"file":"https://ww2.kqed.org/app/uploads/sites/24/2016/06/pork-finish-sliced1-400x267.jpg","width":400,"height":267,"mimeType":"image/jpeg"},"medium":{"file":"https://ww2.kqed.org/app/uploads/sites/24/2016/06/pork-finish-sliced1-800x533.jpg","width":800,"height":533,"mimeType":"image/jpeg"},"medium_large":{"file":"https://ww2.kqed.org/app/uploads/sites/24/2016/06/pork-finish-sliced1-768x512.jpg","width":768,"height":512,"mimeType":"image/jpeg"},"large":{"file":"https://ww2.kqed.org/app/uploads/sites/24/2016/06/pork-finish-sliced1-1440x960.jpg","width":1440,"height":960,"mimeType":"image/jpeg"},"fd-lrg":{"file":"https://ww2.kqed.org/app/uploads/sites/24/2016/06/pork-finish-sliced1-1920x1280.jpg","width":1920,"height":1280,"mimeType":"image/jpeg"},"fd-med":{"file":"https://ww2.kqed.org/app/uploads/sites/24/2016/06/pork-finish-sliced1-1180x787.jpg","width":1180,"height":787,"mimeType":"image/jpeg"},"fd-sm":{"file":"https://ww2.kqed.org/app/uploads/sites/24/2016/06/pork-finish-sliced1-960x640.jpg","width":960,"height":640,"mimeType":"image/jpeg"},"post-thumbnail":{"file":"https://ww2.kqed.org/app/uploads/sites/24/2016/06/pork-finish-sliced1-672x372.jpg","width":672,"height":372,"mimeType":"image/jpeg"},"twentyfourteen-full-width":{"file":"https://ww2.kqed.org/app/uploads/sites/24/2016/06/pork-finish-sliced1-1038x576.jpg","width":1038,"height":576,"mimeType":"image/jpeg"},"cat_post_thumb_sizecategory-posts-2":{"file":"https://ww2.kqed.org/app/uploads/sites/24/2016/06/pork-finish-sliced1-150x150.jpg","width":150,"height":150,"mimeType":"image/jpeg"},"guest-author-32":{"file":"https://ww2.kqed.org/app/uploads/sites/24/2016/06/pork-finish-sliced1-32x32.jpg","width":32,"height":32,"mimeType":"image/jpeg"},"guest-author-50":{"file":"https://ww2.kqed.org/app/uploads/sites/24/2016/06/pork-finish-sliced1-50x50.jpg","width":50,"height":50,"mimeType":"image/jpeg"},"guest-author-64":{"file":"https://ww2.kqed.org/app/uploads/sites/24/2016/06/pork-finish-sliced1-64x64.jpg","width":64,"height":64,"mimeType":"image/jpeg"},"guest-author-96":{"file":"https://ww2.kqed.org/app/uploads/sites/24/2016/06/pork-finish-sliced1-96x96.jpg","width":96,"height":96,"mimeType":"image/jpeg"},"guest-author-128":{"file":"https://ww2.kqed.org/app/uploads/sites/24/2016/06/pork-finish-sliced1-128x128.jpg","width":128,"height":128,"mimeType":"image/jpeg"},"detail":{"file":"https://ww2.kqed.org/app/uploads/sites/24/2016/06/pork-finish-sliced1-150x150.jpg","width":150,"height":150,"mimeType":"image/jpeg"},"kqedFullSize":{"file":"https://ww2.kqed.org/app/uploads/sites/24/2016/06/pork-finish-sliced1.jpg","width":1920,"height":1280}},"fetchFailed":false,"isLoading":false},"bayareabites_109638":{"type":"attachments","id":"bayareabites_109638","meta":{"index":"attachments_1591205162","site":"bayareabites","id":"109638","found":true},"title":"memorial-day-recipes","publishDate":1463787303,"status":"inherit","parent":109637,"modified":1463787533,"caption":"Memorial Day Summer BBQ recipes","credit":"Wendy Goodfriend","description":null,"imgSizes":{"thumbnail":{"file":"https://ww2.kqed.org/app/uploads/sites/24/2016/05/memorial-day-recipes-400x267.jpg","width":400,"height":267,"mimeType":"image/jpeg"},"medium":{"file":"https://ww2.kqed.org/app/uploads/sites/24/2016/05/memorial-day-recipes-800x533.jpg","width":800,"height":533,"mimeType":"image/jpeg"},"medium_large":{"file":"https://ww2.kqed.org/app/uploads/sites/24/2016/05/memorial-day-recipes-768x512.jpg","width":768,"height":512,"mimeType":"image/jpeg"},"large":{"file":"https://ww2.kqed.org/app/uploads/sites/24/2016/05/memorial-day-recipes-1440x960.jpg","width":1440,"height":960,"mimeType":"image/jpeg"},"fd-lrg":{"file":"https://ww2.kqed.org/app/uploads/sites/24/2016/05/memorial-day-recipes-1920x1280.jpg","width":1920,"height":1280,"mimeType":"image/jpeg"},"fd-med":{"file":"https://ww2.kqed.org/app/uploads/sites/24/2016/05/memorial-day-recipes-1180x787.jpg","width":1180,"height":787,"mimeType":"image/jpeg"},"fd-sm":{"file":"https://ww2.kqed.org/app/uploads/sites/24/2016/05/memorial-day-recipes-960x640.jpg","width":960,"height":640,"mimeType":"image/jpeg"},"post-thumbnail":{"file":"https://ww2.kqed.org/app/uploads/sites/24/2016/05/memorial-day-recipes-672x372.jpg","width":672,"height":372,"mimeType":"image/jpeg"},"twentyfourteen-full-width":{"file":"https://ww2.kqed.org/app/uploads/sites/24/2016/05/memorial-day-recipes-1038x576.jpg","width":1038,"height":576,"mimeType":"image/jpeg"},"guest-author-32":{"file":"https://ww2.kqed.org/app/uploads/sites/24/2016/05/memorial-day-recipes-32x32.jpg","width":32,"height":32,"mimeType":"image/jpeg"},"guest-author-50":{"file":"https://ww2.kqed.org/app/uploads/sites/24/2016/05/memorial-day-recipes-50x50.jpg","width":50,"height":50,"mimeType":"image/jpeg"},"guest-author-64":{"file":"https://ww2.kqed.org/app/uploads/sites/24/2016/05/memorial-day-recipes-64x64.jpg","width":64,"height":64,"mimeType":"image/jpeg"},"guest-author-96":{"file":"https://ww2.kqed.org/app/uploads/sites/24/2016/05/memorial-day-recipes-96x96.jpg","width":96,"height":96,"mimeType":"image/jpeg"},"guest-author-128":{"file":"https://ww2.kqed.org/app/uploads/sites/24/2016/05/memorial-day-recipes-128x128.jpg","width":128,"height":128,"mimeType":"image/jpeg"},"cat_post_thumb_sizecategory-posts-2":{"file":"https://ww2.kqed.org/app/uploads/sites/24/2016/05/memorial-day-recipes-150x150.jpg","width":150,"height":150,"mimeType":"image/jpeg"},"detail":{"file":"https://ww2.kqed.org/app/uploads/sites/24/2016/05/memorial-day-recipes-150x150.jpg","width":150,"height":150,"mimeType":"image/jpeg"},"kqedFullSize":{"file":"https://ww2.kqed.org/app/uploads/sites/24/2016/05/memorial-day-recipes.jpg","width":1920,"height":1280}},"fetchFailed":false,"isLoading":false},"bayareabites_109137":{"type":"attachments","id":"bayareabites_109137","meta":{"index":"attachments_1591205162","site":"bayareabites","id":"109137","found":true},"title":"breakfast-salad-final","publishDate":1462577944,"status":"inherit","parent":109087,"modified":1462578252,"caption":"Mother's Day Breakfast Salad","credit":"Wendy Goodfriend","description":"Mother's Day Breakfast Salad","imgSizes":{"thumbnail":{"file":"https://ww2.kqed.org/app/uploads/sites/24/2016/05/breakfast-salad-final-400x267.jpg","width":400,"height":267,"mimeType":"image/jpeg"},"medium":{"file":"https://ww2.kqed.org/app/uploads/sites/24/2016/05/breakfast-salad-final-800x533.jpg","width":800,"height":533,"mimeType":"image/jpeg"},"medium_large":{"file":"https://ww2.kqed.org/app/uploads/sites/24/2016/05/breakfast-salad-final-768x512.jpg","width":768,"height":512,"mimeType":"image/jpeg"},"large":{"file":"https://ww2.kqed.org/app/uploads/sites/24/2016/05/breakfast-salad-final-1440x960.jpg","width":1440,"height":960,"mimeType":"image/jpeg"},"fd-lrg":{"file":"https://ww2.kqed.org/app/uploads/sites/24/2016/05/breakfast-salad-final-1920x1280.jpg","width":1920,"height":1280,"mimeType":"image/jpeg"},"fd-med":{"file":"https://ww2.kqed.org/app/uploads/sites/24/2016/05/breakfast-salad-final-1180x787.jpg","width":1180,"height":787,"mimeType":"image/jpeg"},"fd-sm":{"file":"https://ww2.kqed.org/app/uploads/sites/24/2016/05/breakfast-salad-final-960x640.jpg","width":960,"height":640,"mimeType":"image/jpeg"},"post-thumbnail":{"file":"https://ww2.kqed.org/app/uploads/sites/24/2016/05/breakfast-salad-final-672x372.jpg","width":672,"height":372,"mimeType":"image/jpeg"},"twentyfourteen-full-width":{"file":"https://ww2.kqed.org/app/uploads/sites/24/2016/05/breakfast-salad-final-1038x576.jpg","width":1038,"height":576,"mimeType":"image/jpeg"},"guest-author-32":{"file":"https://ww2.kqed.org/app/uploads/sites/24/2016/05/breakfast-salad-final-32x32.jpg","width":32,"height":32,"mimeType":"image/jpeg"},"guest-author-64":{"file":"https://ww2.kqed.org/app/uploads/sites/24/2016/05/breakfast-salad-final-64x64.jpg","width":64,"height":64,"mimeType":"image/jpeg"},"guest-author-96":{"file":"https://ww2.kqed.org/app/uploads/sites/24/2016/05/breakfast-salad-final-96x96.jpg","width":96,"height":96,"mimeType":"image/jpeg"},"guest-author-128":{"file":"https://ww2.kqed.org/app/uploads/sites/24/2016/05/breakfast-salad-final-128x128.jpg","width":128,"height":128,"mimeType":"image/jpeg"},"cat_post_thumb_sizecategory-posts-2":{"file":"https://ww2.kqed.org/app/uploads/sites/24/2016/05/breakfast-salad-final-150x150.jpg","width":150,"height":150,"mimeType":"image/jpeg"},"detail":{"file":"https://ww2.kqed.org/app/uploads/sites/24/2016/05/breakfast-salad-final-150x150.jpg","width":150,"height":150,"mimeType":"image/jpeg"},"kqedFullSize":{"file":"https://ww2.kqed.org/app/uploads/sites/24/2016/05/breakfast-salad-final.jpg","width":1920,"height":1280}},"fetchFailed":false,"isLoading":false},"bayareabites_105582":{"type":"attachments","id":"bayareabites_105582","meta":{"index":"attachments_1591205162","site":"bayareabites","id":"105582","found":true},"title":"Maple Bacon Donut Holes","publishDate":1451501338,"status":"inherit","parent":105321,"modified":1451501411,"caption":"Maple Bacon Donut Holes","credit":"Wendy Goodfriend","description":"Maple Bacon Donut Holes","imgSizes":{"thumbnail":{"file":"https://ww2.kqed.org/app/uploads/sites/24/2015/12/maple-bacon-donuts-final-400x267.jpg","width":400,"height":267,"mimeType":"image/jpeg"},"medium":{"file":"https://ww2.kqed.org/app/uploads/sites/24/2015/12/maple-bacon-donuts-final-800x533.jpg","width":800,"height":533,"mimeType":"image/jpeg"},"medium_large":{"file":"https://ww2.kqed.org/app/uploads/sites/24/2015/12/maple-bacon-donuts-final-768x512.jpg","width":768,"height":512,"mimeType":"image/jpeg"},"large":{"file":"https://ww2.kqed.org/app/uploads/sites/24/2015/12/maple-bacon-donuts-final-1440x960.jpg","width":1440,"height":960,"mimeType":"image/jpeg"},"fd-lrg":{"file":"https://ww2.kqed.org/app/uploads/sites/24/2015/12/maple-bacon-donuts-final-1920x1280.jpg","width":1920,"height":1280,"mimeType":"image/jpeg"},"fd-med":{"file":"https://ww2.kqed.org/app/uploads/sites/24/2015/12/maple-bacon-donuts-final-1180x787.jpg","width":1180,"height":787,"mimeType":"image/jpeg"},"fd-sm":{"file":"https://ww2.kqed.org/app/uploads/sites/24/2015/12/maple-bacon-donuts-final-960x640.jpg","width":960,"height":640,"mimeType":"image/jpeg"},"post-thumbnail":{"file":"https://ww2.kqed.org/app/uploads/sites/24/2015/12/maple-bacon-donuts-final-672x372.jpg","width":672,"height":372,"mimeType":"image/jpeg"},"twentyfourteen-full-width":{"file":"https://ww2.kqed.org/app/uploads/sites/24/2015/12/maple-bacon-donuts-final-1038x576.jpg","width":1038,"height":576,"mimeType":"image/jpeg"},"guest-author-32":{"file":"https://ww2.kqed.org/app/uploads/sites/24/2015/12/maple-bacon-donuts-final-32x32.jpg","width":32,"height":32,"mimeType":"image/jpeg"},"guest-author-64":{"file":"https://ww2.kqed.org/app/uploads/sites/24/2015/12/maple-bacon-donuts-final-64x64.jpg","width":64,"height":64,"mimeType":"image/jpeg"},"guest-author-96":{"file":"https://ww2.kqed.org/app/uploads/sites/24/2015/12/maple-bacon-donuts-final-96x96.jpg","width":96,"height":96,"mimeType":"image/jpeg"},"guest-author-128":{"file":"https://ww2.kqed.org/app/uploads/sites/24/2015/12/maple-bacon-donuts-final-128x128.jpg","width":128,"height":128,"mimeType":"image/jpeg"},"cat_post_thumb_sizecategory-posts-2":{"file":"https://ww2.kqed.org/app/uploads/sites/24/2015/12/maple-bacon-donuts-final-150x150.jpg","width":150,"height":150,"mimeType":"image/jpeg"},"detail":{"file":"https://ww2.kqed.org/app/uploads/sites/24/2015/12/maple-bacon-donuts-final-75x75.jpg","width":75,"height":75,"mimeType":"image/jpeg"},"kqedFullSize":{"file":"https://ww2.kqed.org/app/uploads/sites/24/2015/12/maple-bacon-donuts-final.jpg","width":1920,"height":1280}},"fetchFailed":false,"isLoading":false},"bayareabites_103086":{"type":"attachments","id":"bayareabites_103086","meta":{"index":"attachments_1591205162","site":"bayareabites","id":"103086","found":true},"title":"Brussels Sprouts Gratin with Bacon and Gruyere","publishDate":1446851832,"status":"inherit","parent":102926,"modified":1446852126,"caption":"Brussels Sprouts Gratin with Bacon and Gruyere","credit":"Wendy Goodfriend","description":"Brussels Sprouts Gratin with Bacon and Gruyere","imgSizes":{"thumbnail":{"file":"https://ww2.kqed.org/app/uploads/sites/24/2015/11/brusselsprouts-finish-overhead1-400x267.jpg","width":400,"height":267,"mimeType":"image/jpeg"},"medium":{"file":"https://ww2.kqed.org/app/uploads/sites/24/2015/11/brusselsprouts-finish-overhead1-800x533.jpg","width":800,"height":533,"mimeType":"image/jpeg"},"large":{"file":"https://ww2.kqed.org/app/uploads/sites/24/2015/11/brusselsprouts-finish-overhead1-1440x960.jpg","width":1440,"height":960,"mimeType":"image/jpeg"},"fd-lrg":{"file":"https://ww2.kqed.org/app/uploads/sites/24/2015/11/brusselsprouts-finish-overhead1-1920x1280.jpg","width":1920,"height":1280,"mimeType":"image/jpeg"},"fd-med":{"file":"https://ww2.kqed.org/app/uploads/sites/24/2015/11/brusselsprouts-finish-overhead1-1180x787.jpg","width":1180,"height":787,"mimeType":"image/jpeg"},"fd-sm":{"file":"https://ww2.kqed.org/app/uploads/sites/24/2015/11/brusselsprouts-finish-overhead1-960x640.jpg","width":960,"height":640,"mimeType":"image/jpeg"},"post-thumbnail":{"file":"https://ww2.kqed.org/app/uploads/sites/24/2015/11/brusselsprouts-finish-overhead1-672x372.jpg","width":672,"height":372,"mimeType":"image/jpeg"},"twentyfourteen-full-width":{"file":"https://ww2.kqed.org/app/uploads/sites/24/2015/11/brusselsprouts-finish-overhead1-1038x576.jpg","width":1038,"height":576,"mimeType":"image/jpeg"},"guest-author-32":{"file":"https://ww2.kqed.org/app/uploads/sites/24/2015/11/brusselsprouts-finish-overhead1-32x32.jpg","width":32,"height":32,"mimeType":"image/jpeg"},"guest-author-64":{"file":"https://ww2.kqed.org/app/uploads/sites/24/2015/11/brusselsprouts-finish-overhead1-64x64.jpg","width":64,"height":64,"mimeType":"image/jpeg"},"guest-author-96":{"file":"https://ww2.kqed.org/app/uploads/sites/24/2015/11/brusselsprouts-finish-overhead1-96x96.jpg","width":96,"height":96,"mimeType":"image/jpeg"},"guest-author-128":{"file":"https://ww2.kqed.org/app/uploads/sites/24/2015/11/brusselsprouts-finish-overhead1-128x128.jpg","width":128,"height":128,"mimeType":"image/jpeg"},"cat_post_thumb_sizecategory-posts-2":{"file":"https://ww2.kqed.org/app/uploads/sites/24/2015/11/brusselsprouts-finish-overhead1-150x150.jpg","width":150,"height":150,"mimeType":"image/jpeg"},"detail":{"file":"https://ww2.kqed.org/app/uploads/sites/24/2015/11/brusselsprouts-finish-overhead1-75x75.jpg","width":75,"height":75,"mimeType":"image/jpeg"},"kqedFullSize":{"file":"https://ww2.kqed.org/app/uploads/sites/24/2015/11/brusselsprouts-finish-overhead1.jpg","width":1920,"height":1280}},"fetchFailed":false,"isLoading":false},"bayareabites_102474":{"type":"attachments","id":"bayareabites_102474","meta":{"index":"attachments_1591205162","site":"bayareabites","id":"102474","found":true},"title":"The World Health Organization has put bacon, hot dogs and sausages in the same category of cancer risk as tobacco smoking.","publishDate":1445890353,"status":"inherit","parent":102469,"modified":1445890414,"caption":"The World Health Organization has put bacon, hot dogs and sausages in the same category of cancer risk as tobacco smoking.","credit":"\u003ca href=\"https://www.flickr.com/photos/anokarina/5152097912/in/photolist-8RgRdm\" target=\"_blank\">Anokarina/Flickr\u003c/a>","description":"The World Health Organization has put bacon, hot dogs and sausages in the same category of cancer risk as tobacco smoking.","imgSizes":{"thumbnail":{"file":"https://ww2.kqed.org/app/uploads/sites/24/2015/10/bacon-400x300.jpg","width":400,"height":300,"mimeType":"image/jpeg"},"post-thumbnail":{"file":"https://ww2.kqed.org/app/uploads/sites/24/2015/10/bacon-672x372.jpg","width":672,"height":372,"mimeType":"image/jpeg"},"guest-author-32":{"file":"https://ww2.kqed.org/app/uploads/sites/24/2015/10/bacon-32x32.jpg","width":32,"height":32,"mimeType":"image/jpeg"},"guest-author-64":{"file":"https://ww2.kqed.org/app/uploads/sites/24/2015/10/bacon-64x64.jpg","width":64,"height":64,"mimeType":"image/jpeg"},"guest-author-96":{"file":"https://ww2.kqed.org/app/uploads/sites/24/2015/10/bacon-96x96.jpg","width":96,"height":96,"mimeType":"image/jpeg"},"guest-author-128":{"file":"https://ww2.kqed.org/app/uploads/sites/24/2015/10/bacon-128x128.jpg","width":128,"height":128,"mimeType":"image/jpeg"},"cat_post_thumb_sizecategory-posts-2":{"file":"https://ww2.kqed.org/app/uploads/sites/24/2015/10/bacon-150x150.jpg","width":150,"height":150,"mimeType":"image/jpeg"},"detail":{"file":"https://ww2.kqed.org/app/uploads/sites/24/2015/10/bacon-75x75.jpg","width":75,"height":75,"mimeType":"image/jpeg"},"kqedFullSize":{"file":"https://ww2.kqed.org/app/uploads/sites/24/2015/10/bacon.jpg","width":766,"height":575}},"fetchFailed":false,"isLoading":false}},"audioPlayerReducer":{"postId":"stream_live"},"authorsReducer":{"byline_bayareabites_115852":{"type":"authors","id":"byline_bayareabites_115852","meta":{"override":true},"slug":"byline_bayareabites_115852","name":"Allison Aubrey, NPR Food","isLoading":false},"byline_bayareabites_102469":{"type":"authors","id":"byline_bayareabites_102469","meta":{"override":true},"slug":"byline_bayareabites_102469","name":"Allison Aubrey, \u003ca href=\"http://ww2.kqed.org/bayareabites/category/npr-food/\">NPR Food\u003c/a>","isLoading":false},"wendy-goodfriend":{"type":"authors","id":"5014","meta":{"index":"authors_1591205172","id":"5014","found":true},"name":"Wendy Goodfriend","firstName":"Wendy","lastName":"Goodfriend","slug":"wendy-goodfriend","email":"wendy@wendygoodfriend.com","display_author_email":false,"staff_mastheads":[],"title":null,"bio":"I was the Senior Digital Producer for KQED Food up until July, 2018. Since 2001, I designed, produced, managed and contributed to mostly food-related websites and blogs for KQED including: KQED.org; KQED Food; Bay Area Bites; Check, Please! Bay Area; Taste This; Celebrity Chefs; seven of Jacques Pepin's TV series websites; and Joanne Weir's Cooking in the City. I initiated the majority of KQED Food's social media feeds and maintained them up until 2017. As far as content creation, photography is my passion and I also shoot video and write stories. My photos have been used in articles for KQED Food, News, Arts, and Science as well as for promotional purposes in print and online. Professional education and training includes: clinical psychology, photography, commercial cooking, web design, information architecture and UX.","avatar":"https://secure.gravatar.com/avatar/dfba64372339cc34cf17e446e6f18fa8?s=600&d=blank&r=g","twitter":null,"facebook":"bayareabites","instagram":null,"linkedin":"wendygoodfriend","sites":[{"site":"jpepinheart","roles":["administrator"]},{"site":"about","roles":["editor"]},{"site":"bayareabites","roles":["subscriber"]},{"site":"science","roles":["administrator"]},{"site":"checkplease","roles":["subscriber"]},{"site":"food","roles":["author"]},{"site":"essentialpepin","roles":["administrator"]}],"headData":{"title":"Wendy Goodfriend | KQED","description":null,"ogImgSrc":"https://secure.gravatar.com/avatar/dfba64372339cc34cf17e446e6f18fa8?s=600&d=blank&r=g","twImgSrc":"https://secure.gravatar.com/avatar/dfba64372339cc34cf17e446e6f18fa8?s=600&d=blank&r=g"},"isLoading":false,"link":"/author/wendy-goodfriend"},"kim-laidlaw":{"type":"authors","id":"5015","meta":{"index":"authors_1591205172","id":"5015","found":true},"name":"Kim Laidlaw","firstName":"Kim","lastName":"Laidlaw","slug":"kim-laidlaw","email":"kim_laidlaw@yahoo.com","display_author_email":false,"staff_mastheads":[],"title":null,"bio":"Kim Laidlaw is a cookbook author, editor, food writer, producer, project manager, and baker who has been in the kitchen covered in flour since she was big enough to stir the biscuit dough. She has over 16 years of experience in book and online publishing, and a lifetime of experience in the kitchen. \r\n\r\nHer first cookbook, Home Baked Comfort, was published in 2011; her second cookbook, Baby & Toddler On the Go, was published in April 2013; and her third cookbook, Williams-Sonoma Dessert of the Day, was published in October 2013. \r\n\r\nShe was the first blogger on KQED’s Bay Area Bites blog, which launched in 2005, and previously worked as a professional baker at La Farine French Bakery in Oakland, CA. She lives in Petaluma with her husband and their child, whom she cooks for everyday. Find out more at \u003ca href=\"http://www.kimlaidlaw.com\">http://www.kimlaidlaw.com\u003c/a>.","avatar":"https://secure.gravatar.com/avatar/284503bc296b6f7822eb38b816292376?s=600&d=blank&r=g","twitter":null,"facebook":"kimilaw","instagram":null,"linkedin":"kimlaidlaw","sites":[{"site":"bayareabites","roles":["contributor"]},{"site":"food","roles":["contributor"]}],"headData":{"title":"Kim Laidlaw | KQED","description":null,"ogImgSrc":"https://secure.gravatar.com/avatar/284503bc296b6f7822eb38b816292376?s=600&d=blank&r=g","twImgSrc":"https://secure.gravatar.com/avatar/284503bc296b6f7822eb38b816292376?s=600&d=blank&r=g"},"isLoading":false,"link":"/author/kim-laidlaw"},"shelbypope":{"type":"authors","id":"5566","meta":{"index":"authors_1591205172","id":"5566","found":true},"name":"Shelby Pope","firstName":"Shelby","lastName":"Pope","slug":"shelbypope","email":"shelbylpope@gmail.com","display_author_email":false,"staff_mastheads":[],"title":null,"bio":"Shelby Pope is a freelance writer living and eating her way through the East Bay. She’s written about food, art and science for publications including the Smithsonian, Lucky Peach, and the Washington Post's pet blog. When she’s not taste testing sourdough bread to find the Bay Area’s best loaf, you can find her on Twitter \u003ca href=\"https://twitter.com/shelbylpope\">@shelbylpope\u003c/a> or at \u003ca href=\"https://shelbypope.com/\" target=\"_blank\">shelbypope.com\u003c/a>","avatar":"https://secure.gravatar.com/avatar/f0bc7c2dc7ea404f67cbf922a5393d8a?s=600&d=blank&r=g","twitter":"shelbylpope","facebook":null,"instagram":null,"linkedin":null,"sites":[{"site":"bayareabites","roles":["author"]},{"site":"food","roles":["contributor"]}],"headData":{"title":"Shelby Pope | KQED","description":null,"ogImgSrc":"https://secure.gravatar.com/avatar/f0bc7c2dc7ea404f67cbf922a5393d8a?s=600&d=blank&r=g","twImgSrc":"https://secure.gravatar.com/avatar/f0bc7c2dc7ea404f67cbf922a5393d8a?s=600&d=blank&r=g"},"isLoading":false,"link":"/author/shelbypope"},"monicalo":{"type":"authors","id":"11548","meta":{"index":"authors_1591205172","id":"11548","found":true},"name":"Monica Lo","firstName":"Monica","lastName":"Lo","slug":"monicalo","email":"monicalo@gmail.com","display_author_email":false,"staff_mastheads":[],"title":null,"bio":"Monica Lo is a photographer and creative director working to change public perception of cannabis users. Monica is the creator of Sous Weed and a photo contributor for Stock Pot Images, Menu Stories, and KQED.\r\n\r\nIn 2016, Monica shot and styled for the award-winning Sous Vide at Home cookbook with Penguin Random and Nomiku. The sequel, Sous Vide Made Simple, will be released fall 2018 along with a chef feature and recipe in the upcoming Edibles: Small Bites for the Modern Cannabis Kitchen cookbook with Chronicle Books.\r\n\r\nMonica has recently been featured on the TODAY Show, Nightly News with Lester Holt, MSNBC, Huffington Post, ABC7, PopSugar, UPROXX, High Times, CANNABIS NOW, CULTURE Magazine, MARY Magazine, VICE Munchies, CNET, NPR, and Leafly for her work with Sous Weed.","avatar":"https://secure.gravatar.com/avatar/ba2dd5788a1aa2d99e86f5d26605b3f1?s=600&d=blank&r=g","twitter":null,"facebook":null,"instagram":null,"linkedin":null,"sites":[{"site":"bayareabites","roles":["author"]}],"headData":{"title":"Monica Lo | KQED","description":null,"ogImgSrc":"https://secure.gravatar.com/avatar/ba2dd5788a1aa2d99e86f5d26605b3f1?s=600&d=blank&r=g","twImgSrc":"https://secure.gravatar.com/avatar/ba2dd5788a1aa2d99e86f5d26605b3f1?s=600&d=blank&r=g"},"isLoading":false,"link":"/author/monicalo"}},"breakingNewsReducer":{},"campaignFinanceReducer":{},"firebase":{"requesting":{},"requested":{},"timestamps":{},"data":{},"ordered":{},"auth":{"isLoaded":false,"isEmpty":true},"authError":null,"profile":{"isLoaded":false,"isEmpty":true},"listeners":{"byId":{},"allIds":[]},"isInitializing":false,"errors":[]},"navBarReducer":{"navBarId":"arts","fullView":true,"showPlayer":false},"navMenuReducer":{"menus":[{"key":"menu1","items":[{"name":"News","link":"/","type":"title"},{"name":"Politics","link":"/politics"},{"name":"Science","link":"/science"},{"name":"Education","link":"/educationnews"},{"name":"Housing","link":"/housing"},{"name":"Immigration","link":"/immigration"},{"name":"Criminal Justice","link":"/criminaljustice"},{"name":"Silicon Valley","link":"/siliconvalley"},{"name":"Forum","link":"/forum"},{"name":"The California Report","link":"/californiareport"}]},{"key":"menu2","items":[{"name":"Arts & Culture","link":"/arts","type":"title"},{"name":"Critics’ Picks","link":"/thedolist"},{"name":"Cultural Commentary","link":"/artscommentary"},{"name":"Food & Drink","link":"/food"},{"name":"Bay Area Hip-Hop","link":"/bayareahiphop"},{"name":"Rebel Girls","link":"/rebelgirls"},{"name":"Arts Video","link":"/artsvideos"}]},{"key":"menu3","items":[{"name":"Podcasts","link":"/podcasts","type":"title"},{"name":"Bay Curious","link":"/podcasts/baycurious"},{"name":"Rightnowish","link":"/podcasts/rightnowish"},{"name":"The Bay","link":"/podcasts/thebay"},{"name":"On Our Watch","link":"/podcasts/onourwatch"},{"name":"Mindshift","link":"/podcasts/mindshift"},{"name":"Consider This","link":"/podcasts/considerthis"},{"name":"Political Breakdown","link":"/podcasts/politicalbreakdown"}]},{"key":"menu4","items":[{"name":"Live Radio","link":"/radio","type":"title"},{"name":"TV","link":"/tv","type":"title"},{"name":"Events","link":"/events","type":"title"},{"name":"For Educators","link":"/education","type":"title"},{"name":"Support KQED","link":"/support","type":"title"},{"name":"About","link":"/about","type":"title"},{"name":"Help Center","link":"https://kqed-helpcenter.kqed.org/s","type":"title"}]}]},"pagesReducer":{},"postsReducer":{"stream_live":{"type":"live","id":"stream_live","audioUrl":"https://streams.kqed.org/kqedradio","title":"Live Stream","excerpt":"Live Stream information currently unavailable.","link":"/radio","featImg":"","label":{"name":"KQED Live","link":"/"}},"stream_kqedNewscast":{"type":"posts","id":"stream_kqedNewscast","audioUrl":"https://www.kqed.org/.stream/anon/radio/RDnews/newscast.mp3?_=1","title":"KQED Newscast","featImg":"","label":{"name":"88.5 FM","link":"/"}},"bayareabites_131287":{"type":"posts","id":"bayareabites_131287","meta":{"index":"posts_1591205157","site":"bayareabites","id":"131287","score":null,"sort":[1544463114000]},"guestAuthors":[],"slug":"bourbon-bacon-jam-with-dark-fruits","title":"Bourbon Bacon Jam with Dark Fruits","publishDate":1544463114,"format":"standard","headTitle":"Christmas Recipes | Bay Area Bites | KQED Food","labelTerm":{"term":15122,"site":"bayareabites"},"content":"\u003cdiv class=\"mceTemp\">\u003c/div>\n\u003cp>Bacon jam is where the best of sweet and savory meet. I whipped up my first batch of bacon jam a few years back when I lived in Brooklyn. I brought it to work the next day with a loaf of bread and it was gone in seconds. Colleagues demanded more and I thought it would be so much fun to have a little bacon jam side hustle. The bacon jam company never came to fruition but I still make it when requested.\u003c/p>\n\u003cp>This bacon jam is chock full of dark fruits soaked in bourbon and coffee to add natural sweetness, depth, and personality to the jam while cutting down on refined sugar.\u003c/p>\n\u003cp>Slather it on crusty bread, brussels sprouts, corn muffins, or on a juicy burger and enjoy the flavor explosion.\u003c/p>\n\u003ch2>\u003cb>Bourbon Bacon Jam with Dark Fruits\u003cbr>\n\u003c/b>\u003c/h2>\n\u003cp>\u003cem>Makes six 4 oz jars \u003c/em>\u003c/p>\n\u003cfigure id=\"attachment_131290\" class=\"wp-caption alignnone\" style=\"max-width: 1920px\">\u003cimg class=\"wp-image-131290\" src=\"https://ww2.kqed.org/bayareabites/wp-content/uploads/sites/24/2018/11/KQED_MonicaLo_Holiday2018_BaconJam-5614-800x589.jpg\" alt=\"Bacon jam on tartine.\" width=\"1920\" height=\"1413\">\u003cfigcaption class=\"wp-caption-text\">Bacon jam on tartine. \u003ccite>(Monica Lo)\u003c/cite>\u003c/figcaption>\u003c/figure>\n\u003cp>\u003cb>Ingredients:\u003c/b>\u003c/p>\n\u003cul>\n\u003cli>\u003cb>\u003cspan style=\"font-weight: 400\">½ cup bourbon\u003cbr>\n\u003c/span>\u003c/b>\u003c/li>\n\u003cli>\u003cspan style=\"font-weight: 400\">½ cup brewed coffee\u003c/span>\u003c/li>\n\u003cli>\u003cspan style=\"font-weight: 400\">5 pitted dates, chopped\u003c/span>\u003c/li>\n\u003cli>\u003cspan style=\"font-weight: 400\">¼ cup dried cherries \u003c/span>\u003c/li>\n\u003cli>\u003cspan style=\"font-weight: 400\">1.5 lb bacon (24 oz package)\u003c/span>\u003c/li>\n\u003cli>\u003cspan style=\"font-weight: 400\">1 Tbsp bacon fat, reserved\u003c/span>\u003c/li>\n\u003cli>\u003cspan style=\"font-weight: 400\">1 cup shallots, diced\u003c/span>\u003c/li>\n\u003cli>\u003cspan style=\"font-weight: 400\">½ cup balsamic vinegar\u003c/span>\u003c/li>\n\u003cli>\u003cspan style=\"font-weight: 400\">⅓ cup light brown sugar\u003c/span>\u003c/li>\n\u003cli>\u003cspan style=\"font-weight: 400\">½ tsp smoked paprika\u003c/span>\u003c/li>\n\u003cli>\u003cspan style=\"font-weight: 400\">¼ Cracked black pepper\u003c/span>\u003c/li>\n\u003c/ul>\n\u003cp>\u003cb>Instructions:\u003c/b>\u003c/p>\n\u003col>\n\u003cli style=\"font-weight: 400\">\u003cspan style=\"font-weight: 400\">In a small mixing bowl, soak pitted dates and dried cherries in bourbon and coffee. Set aside.\u003c/span>\u003c/li>\n\u003cli style=\"font-weight: 400\">\u003cspan style=\"font-weight: 400\">In a large cast iron skillet, cook bacon in batches, according to the package, until crisp. Transfer to paper towels to drain. Reserve 1 Tbsp of bacon fat. \u003c/span>\u003c/li>\n\u003cli style=\"font-weight: 400\">\u003cspan style=\"font-weight: 400\">Add reserved bacon fat to cast iron skillet over medium heat, add shallots and cook until lightly brown, stirring occasionally. Turn the heat to medium-low and continue to caramelize and soften for 5 minutes. \u003c/span>\u003c/li>\n\u003cli style=\"font-weight: 400\">\u003cspan style=\"font-weight: 400\">Increase the heat to medium-high and add the bourbon soaked fruit and liquid from the mixing bowl. Stir and scrape the skillet to make sure the shallots do not burn. Cook for an additional minute. \u003c/span>\u003c/li>\n\u003cli style=\"font-weight: 400\">\u003cspan style=\"font-weight: 400\">Add bacon, caramelized onions, dates, and cherries in a food processor and pulse to your preferred texture. Some like it more rustic, others like it more fine. \u003c/span>\u003c/li>\n\u003cli style=\"font-weight: 400\">\u003cspan style=\"font-weight: 400\">Return the bacon mixture to the skillet over medium-low heat and add balsamic vinegar, light brown sugar, smoked paprika, and cracked black pepper. Stir until the mixture is uniform and simmer for another 10-13 minutes until the jam thickens to your liking. \u003c/span>\u003c/li>\n\u003cli style=\"font-weight: 400\">\u003cspan style=\"font-weight: 400\">Taste to see if more paprika or cracked pepper is needed. \u003c/span>\u003c/li>\n\u003c/ol>\n\u003cp>[ad fullwidth]\u003c/p>\u003cp>\u003c/p>\n","blocks":[],"excerpt":"Bacon jam is where the best of sweet and savory meet.","status":"publish","parent":0,"modified":1544643789,"stats":{"hasAudio":false,"hasVideo":false,"hasChartOrMap":false,"iframeSrcs":[],"hasGoogleForm":false,"hasGallery":false,"hasHearkenModule":false,"hasPolis":false,"paragraphCount":8,"wordCount":403},"headData":{"title":"Bourbon Bacon Jam with Dark Fruits | KQED","description":"Bacon jam is where the best of sweet and savory meet.","ogTitle":"","ogDescription":"","ogImgId":"","twTitle":"","twDescription":"","twImgId":"","schema":{"@context":"http://schema.org","@type":"Article","headline":"Bourbon Bacon Jam with Dark Fruits","datePublished":"2018-12-10T17:31:54.000Z","dateModified":"2018-12-12T19:43:09.000Z","image":"https://cdn.kqed.org/wp-content/uploads/2020/02/KQED-OG-Image@1x.png"}},"disqusIdentifier":"131287 https://ww2.kqed.org/bayareabites/?p=131287","disqusUrl":"https://ww2.kqed.org/bayareabites/2018/12/10/bourbon-bacon-jam-with-dark-fruits/","disqusTitle":"Bourbon Bacon Jam with Dark Fruits","path":"/bayareabites/131287/bourbon-bacon-jam-with-dark-fruits","audioTrackLength":null,"parsedContent":[{"type":"contentString","content":"\u003cdiv class=\"post-body\">\u003cp>\u003cdiv class=\"mceTemp\">\u003c/div>\n\u003cp>Bacon jam is where the best of sweet and savory meet. I whipped up my first batch of bacon jam a few years back when I lived in Brooklyn. I brought it to work the next day with a loaf of bread and it was gone in seconds. Colleagues demanded more and I thought it would be so much fun to have a little bacon jam side hustle. The bacon jam company never came to fruition but I still make it when requested.\u003c/p>\n\u003cp>This bacon jam is chock full of dark fruits soaked in bourbon and coffee to add natural sweetness, depth, and personality to the jam while cutting down on refined sugar.\u003c/p>\n\u003cp>Slather it on crusty bread, brussels sprouts, corn muffins, or on a juicy burger and enjoy the flavor explosion.\u003c/p>\n\u003ch2>\u003cb>Bourbon Bacon Jam with Dark Fruits\u003cbr>\n\u003c/b>\u003c/h2>\n\u003cp>\u003cem>Makes six 4 oz jars \u003c/em>\u003c/p>\n\u003cfigure id=\"attachment_131290\" class=\"wp-caption alignnone\" style=\"max-width: 1920px\">\u003cimg class=\"wp-image-131290\" src=\"https://ww2.kqed.org/bayareabites/wp-content/uploads/sites/24/2018/11/KQED_MonicaLo_Holiday2018_BaconJam-5614-800x589.jpg\" alt=\"Bacon jam on tartine.\" width=\"1920\" height=\"1413\">\u003cfigcaption class=\"wp-caption-text\">Bacon jam on tartine. \u003ccite>(Monica Lo)\u003c/cite>\u003c/figcaption>\u003c/figure>\n\u003cp>\u003cb>Ingredients:\u003c/b>\u003c/p>\n\u003cul>\n\u003cli>\u003cb>\u003cspan style=\"font-weight: 400\">½ cup bourbon\u003cbr>\n\u003c/span>\u003c/b>\u003c/li>\n\u003cli>\u003cspan style=\"font-weight: 400\">½ cup brewed coffee\u003c/span>\u003c/li>\n\u003cli>\u003cspan style=\"font-weight: 400\">5 pitted dates, chopped\u003c/span>\u003c/li>\n\u003cli>\u003cspan style=\"font-weight: 400\">¼ cup dried cherries \u003c/span>\u003c/li>\n\u003cli>\u003cspan style=\"font-weight: 400\">1.5 lb bacon (24 oz package)\u003c/span>\u003c/li>\n\u003cli>\u003cspan style=\"font-weight: 400\">1 Tbsp bacon fat, reserved\u003c/span>\u003c/li>\n\u003cli>\u003cspan style=\"font-weight: 400\">1 cup shallots, diced\u003c/span>\u003c/li>\n\u003cli>\u003cspan style=\"font-weight: 400\">½ cup balsamic vinegar\u003c/span>\u003c/li>\n\u003cli>\u003cspan style=\"font-weight: 400\">⅓ cup light brown sugar\u003c/span>\u003c/li>\n\u003cli>\u003cspan style=\"font-weight: 400\">½ tsp smoked paprika\u003c/span>\u003c/li>\n\u003cli>\u003cspan style=\"font-weight: 400\">¼ Cracked black pepper\u003c/span>\u003c/li>\n\u003c/ul>\n\u003cp>\u003cb>Instructions:\u003c/b>\u003c/p>\n\u003col>\n\u003cli style=\"font-weight: 400\">\u003cspan style=\"font-weight: 400\">In a small mixing bowl, soak pitted dates and dried cherries in bourbon and coffee. Set aside.\u003c/span>\u003c/li>\n\u003cli style=\"font-weight: 400\">\u003cspan style=\"font-weight: 400\">In a large cast iron skillet, cook bacon in batches, according to the package, until crisp. Transfer to paper towels to drain. Reserve 1 Tbsp of bacon fat. \u003c/span>\u003c/li>\n\u003cli style=\"font-weight: 400\">\u003cspan style=\"font-weight: 400\">Add reserved bacon fat to cast iron skillet over medium heat, add shallots and cook until lightly brown, stirring occasionally. Turn the heat to medium-low and continue to caramelize and soften for 5 minutes. \u003c/span>\u003c/li>\n\u003cli style=\"font-weight: 400\">\u003cspan style=\"font-weight: 400\">Increase the heat to medium-high and add the bourbon soaked fruit and liquid from the mixing bowl. Stir and scrape the skillet to make sure the shallots do not burn. Cook for an additional minute. \u003c/span>\u003c/li>\n\u003cli style=\"font-weight: 400\">\u003cspan style=\"font-weight: 400\">Add bacon, caramelized onions, dates, and cherries in a food processor and pulse to your preferred texture. Some like it more rustic, others like it more fine. \u003c/span>\u003c/li>\n\u003cli style=\"font-weight: 400\">\u003cspan style=\"font-weight: 400\">Return the bacon mixture to the skillet over medium-low heat and add balsamic vinegar, light brown sugar, smoked paprika, and cracked black pepper. Stir until the mixture is uniform and simmer for another 10-13 minutes until the jam thickens to your liking. \u003c/span>\u003c/li>\n\u003cli style=\"font-weight: 400\">\u003cspan style=\"font-weight: 400\">Taste to see if more paprika or cracked pepper is needed. \u003c/span>\u003c/li>\n\u003c/ol>\n\u003cp>\u003c/p>\u003c/div>","attributes":{"named":{},"numeric":[]}},{"type":"component","content":"","name":"ad","attributes":{"named":{"label":"fullwidth"},"numeric":["fullwidth"]}},{"type":"contentString","content":"\u003cdiv class=\"post-body\">\u003cp>\u003c/p>\u003cp>\u003c/p>\n\u003c/div>\u003c/p>","attributes":{"named":{},"numeric":[]}}],"link":"/bayareabites/131287/bourbon-bacon-jam-with-dark-fruits","authors":["11548"],"series":["bayareabites_15122"],"categories":["bayareabites_1516","bayareabites_12744","bayareabites_1653","bayareabites_11028","bayareabites_10028","bayareabites_12550","bayareabites_12"],"tags":["bayareabites_278","bayareabites_987"],"featImg":"bayareabites_131289","label":"bayareabites_15122"},"bayareabites_115852":{"type":"posts","id":"bayareabites_115852","meta":{"index":"posts_1591205157","site":"bayareabites","id":"115852","score":null,"sort":[1489428905000]},"guestAuthors":[],"slug":"eating-more-or-less-of-10-foods-may-cut-risk-of-early-death","title":"Eating More — Or Less — Of 10 Foods May Cut Risk Of Early Death","publishDate":1489428905,"format":"aside","headTitle":"Bay Area Bites | KQED Food","labelTerm":{},"content":"\u003cfigure id=\"attachment_115854\" class=\"wp-caption aligncenter\" style=\"max-width: 2000px\">\u003cimg src=\"https://ww2.kqed.org/bayareabites/wp-content/uploads/sites/24/2017/03/bacon1_custom-867257bd89cf2ad8849abbe694e9e05895478412.jpg\" alt=\"Consuming a diet that contains high amounts of red and processed meat such as bacon was linked to 8 percent of cardiometabolic deaths in the U.S.\" width=\"2000\" height=\"1332\" class=\"size-full wp-image-115854\" srcset=\"https://ww2.kqed.org/app/uploads/sites/24/2017/03/bacon1_custom-867257bd89cf2ad8849abbe694e9e05895478412.jpg 2000w, https://ww2.kqed.org/app/uploads/sites/24/2017/03/bacon1_custom-867257bd89cf2ad8849abbe694e9e05895478412-160x107.jpg 160w, https://ww2.kqed.org/app/uploads/sites/24/2017/03/bacon1_custom-867257bd89cf2ad8849abbe694e9e05895478412-800x533.jpg 800w, https://ww2.kqed.org/app/uploads/sites/24/2017/03/bacon1_custom-867257bd89cf2ad8849abbe694e9e05895478412-768x511.jpg 768w, https://ww2.kqed.org/app/uploads/sites/24/2017/03/bacon1_custom-867257bd89cf2ad8849abbe694e9e05895478412-1020x679.jpg 1020w, https://ww2.kqed.org/app/uploads/sites/24/2017/03/bacon1_custom-867257bd89cf2ad8849abbe694e9e05895478412-1180x786.jpg 1180w, https://ww2.kqed.org/app/uploads/sites/24/2017/03/bacon1_custom-867257bd89cf2ad8849abbe694e9e05895478412-960x639.jpg 960w, https://ww2.kqed.org/app/uploads/sites/24/2017/03/bacon1_custom-867257bd89cf2ad8849abbe694e9e05895478412-240x160.jpg 240w, https://ww2.kqed.org/app/uploads/sites/24/2017/03/bacon1_custom-867257bd89cf2ad8849abbe694e9e05895478412-375x250.jpg 375w, https://ww2.kqed.org/app/uploads/sites/24/2017/03/bacon1_custom-867257bd89cf2ad8849abbe694e9e05895478412-520x346.jpg 520w\" sizes=\"(max-width: 2000px) 100vw, 2000px\">\u003cfigcaption class=\"wp-caption-text\">Consuming a diet that contains high amounts of red and processed meat such as bacon was linked to 8 percent of cardiometabolic deaths in the U.S. \u003ccite>(Paul Taylor/Getty Images)\u003c/cite>\u003c/figcaption>\u003c/figure>\n\u003cp>About half of all U.S. deaths from heart disease, stroke and Type 2 diabetes are linked to poor diets, \u003ca href=\"http://jamanetwork.com/journals/jama/fullarticle/2608221\">according to a new study\u003c/a> published in the Journal of the American Medical Association.\u003c/p>\n\u003cp>And eating more — or less — of just 10 types of food can help raise or lower the risk of death from these causes.\u003c/p>\n\u003cp>Scientists at Tufts University identified the foods that seem to contribute the most to the risk. At the top of the list? Salt. Consuming too much salt was associated with 9.5 percent of the deaths.\u003c/p>\n\u003cp>Next — and I sympathize with all of you who love to eat these — high intake of red meat and processed meats such as bacon was linked to 8 percent of the deaths. And sugary drinks were a factor in 7.4 percent of the deaths.\u003c/p>\n\u003cp>We know, it may be tough to cut back on foods you love. Bacon is so alluring to many that it has even been called the '\u003ca href=\"http://www.npr.org/sections/health-shots/2011/02/02/133304206/why-bacon-is-a-gateway-to-meat-for-vegetarians\">gateway' to meat \u003c/a>for vegetarians!\u003c/p>\n\u003cp>[ad fullwidth]\u003c/p>\n\u003cp>But, here's the flip side: The researchers also found there's a significant risk in eating too little of certain healthy foods. So, think of it this way: You can start consuming more of the foods that are protective.\u003c/p>\n\u003cp>For instance, the study found that low consumption of nuts and seeds was linked to about 9 percent of deaths.\u003c/p>\n\u003cp>In addition, diets low in seafood, whole grains and fruits and vegetables were found to contribute to about 6-8 percent of the deaths.\u003c/p>\n\u003cfigure id=\"attachment_115855\" class=\"wp-caption aligncenter\" style=\"max-width: 2000px\">\u003cimg src=\"https://ww2.kqed.org/bayareabites/wp-content/uploads/sites/24/2017/03/nuts1_custom-2c2df4db5264f538b9909ed81edad561d0248011.jpg\" alt=\"On the flip side, the study found that diets containing low amounts of nuts and seeds were linked to about 9 percent of deaths from heart disease and Type 2 diabetes.\" width=\"2000\" height=\"1335\" class=\"size-full wp-image-115855\" srcset=\"https://ww2.kqed.org/app/uploads/sites/24/2017/03/nuts1_custom-2c2df4db5264f538b9909ed81edad561d0248011.jpg 2000w, https://ww2.kqed.org/app/uploads/sites/24/2017/03/nuts1_custom-2c2df4db5264f538b9909ed81edad561d0248011-160x107.jpg 160w, https://ww2.kqed.org/app/uploads/sites/24/2017/03/nuts1_custom-2c2df4db5264f538b9909ed81edad561d0248011-800x534.jpg 800w, https://ww2.kqed.org/app/uploads/sites/24/2017/03/nuts1_custom-2c2df4db5264f538b9909ed81edad561d0248011-768x513.jpg 768w, https://ww2.kqed.org/app/uploads/sites/24/2017/03/nuts1_custom-2c2df4db5264f538b9909ed81edad561d0248011-1020x681.jpg 1020w, https://ww2.kqed.org/app/uploads/sites/24/2017/03/nuts1_custom-2c2df4db5264f538b9909ed81edad561d0248011-1180x788.jpg 1180w, https://ww2.kqed.org/app/uploads/sites/24/2017/03/nuts1_custom-2c2df4db5264f538b9909ed81edad561d0248011-960x641.jpg 960w, https://ww2.kqed.org/app/uploads/sites/24/2017/03/nuts1_custom-2c2df4db5264f538b9909ed81edad561d0248011-240x160.jpg 240w, https://ww2.kqed.org/app/uploads/sites/24/2017/03/nuts1_custom-2c2df4db5264f538b9909ed81edad561d0248011-375x250.jpg 375w, https://ww2.kqed.org/app/uploads/sites/24/2017/03/nuts1_custom-2c2df4db5264f538b9909ed81edad561d0248011-520x347.jpg 520w\" sizes=\"(max-width: 2000px) 100vw, 2000px\">\u003cfigcaption class=\"wp-caption-text\">On the flip side, the study found that diets containing low amounts of nuts and seeds were linked to about 9 percent of deaths from heart disease and Type 2 diabetes. \u003ccite>(John Lawson/Belhaven/Getty Images)\u003c/cite>\u003c/figcaption>\u003c/figure>\n\u003cp>\"The good news is that we now understand which foods we need to target to prevent Americans from dying prematurely from cardiometabolic diseases,\" says lead study author \u003ca href=\"https://nutrition.tufts.edu/profile/faculty/renata-micha\">Renata Micha\u003c/a>, a public health nutritionist and epidemiologist at the Friedman School at Tufts University.\u003c/p>\n\u003cp>In 2012, about 700,000 Americans died from these diseases. Diet was linked to nearly 319,000 of these deaths. \"This is a remarkable burden, nearly 1,000 deaths each day\" linked to dietary habits, says senior study author \u003ca href=\"http://nutrition.tufts.edu/profile/faculty/dariush-mozaffarian\">Dariush Mozaffarian\u003c/a>, dean of the Friedman School at Tufts.\u003c/p>\n\u003cp>So, changing Americans dietary habits could have a significant impact, the authors argue. \"Our research suggests that nearly half of the risk can be reduced [by] eating a healthy diet,\" Mozaffarian says.\u003c/p>\n\u003cp>The new analysis is based on data from the federal survey known as NHANES, the National Health and Nutrition Examination Survey. Researchers asked some 8,500 participants about their eating habits. In addition, Mozaffarian and his colleagues estimated associations of diet and disease from prior studies and clinical trials.\u003c/p>\n\u003cp>Now, the task of estimating death or disease linked to diet is tricky. Scientists use statistical methods to try to tease apart the impact of diet as part of people's overall lifestyle.\u003c/p>\n\u003cp>One challenge: People who have healthy diets often have other healthy habits, too — such as getting regular exercise. Dietary habits also track with socio-economic status. So, people with lower incomes are more likely to have poorer diets compared with wealthier people.\u003c/p>\n\u003cp>The Tufts researchers used studies that had controlled for these lifestyle factors, but it's not a perfect science.\u003c/p>\n\u003cp>\"Relying on evidence from observational studies...carries the potential limitation of confounding bias,\" states an editorial that was \u003ca href=\"http://jamanetwork.com/journals/jama/fullarticle/2608201\">published\u003c/a> alongside the study. The editorial raises the possibility that the effect of confounding factors such as socioeconomic status and physical activity could be substantial. \"For instance, it's possible that processed meat consumption merely reflects a Westernized dietary pattern.\"\u003c/p>\n\u003cp>Mozaffarian acknowledges the limitations. \"At the end of the day, our findings might modestly over - or under-estimate the health burdens, he told us.\u003c/p>\n\u003cp>He says the bigger point is this: \"Whether poor diet is causing 1,000 cardiovascular and diabetes deaths per day, or 500, it remains among the leading causes of preventable suffering.\"\u003c/p>\n\u003cp>Poor diets are also linked to billions of dollars in healthcare spending. For instance, diabetes \u003ca href=\"https://www.cdc.gov/diabetes/pubs/statsreport14/national-diabetes-report-web.pdf\">costs\u003c/a> the U.S. $245 billion a year. In the U.S., a women with diabetes\u003ca href=\"https://www.ncbi.nlm.nih.gov/pubmed/14675789.\"> incurs\u003c/a>, on average, about $283,000 in lifetime health care costs. (Many cost studies don't separate Type 1 and Type 2 diabetes.)\u003c/p>\n\u003cp>If you love foods that are associated with cardiovascular risks, you don't have to give them up entirely. As most nutrition studies show, it's excessive consumption that drives up the risk.\u003c/p>\n\u003cp>For instance, dietary guidelines recommend limiting sugar consumption to no more than 10 percent of daily calories. This means that a single 200-calorie sugary drink may be OK for a person who typically consumes a 2,000 calorie-per-day diet.\u003c/p>\n\u003cp>The problem: Most Americans \u003ca href=\"http://www.npr.org/sections/thesalt/2014/02/03/271130613/sweet-tooth-gone-bad-why-22-teaspoons-of-sugar-per-day-is-deadly\">consume much more.\u003c/a> \u003c/p>\n\u003cp>\u003c/p>\n\u003cp>\u003cem>Copyright 2017 \u003ca href=\"http://www.npr.org/\" target=\"_blank\">NPR\u003c/a>.\u003c/em>\u003c/p>\n\n","blocks":[],"excerpt":"Too much bacon, or too few nuts, can influence the risk of death from heart disease and Type 2 diabetes, a study finds. Nearly half of U.S. deaths from these causes were linked to diet.","status":"publish","parent":0,"modified":1489429065,"stats":{"hasAudio":false,"hasVideo":false,"hasChartOrMap":false,"iframeSrcs":[],"hasGoogleForm":false,"hasGallery":false,"hasHearkenModule":false,"hasPolis":false,"paragraphCount":25,"wordCount":844},"headData":{"title":"Eating More — Or Less — Of 10 Foods May Cut Risk Of Early Death | KQED","description":"Too much bacon, or too few nuts, can influence the risk of death from heart disease and Type 2 diabetes, a study finds. Nearly half of U.S. deaths from these causes were linked to diet.","ogTitle":"","ogDescription":"","ogImgId":"","twTitle":"","twDescription":"","twImgId":"","schema":{"@context":"http://schema.org","@type":"Article","headline":"Eating More — Or Less — Of 10 Foods May Cut Risk Of Early Death","datePublished":"2017-03-13T18:15:05.000Z","dateModified":"2017-03-13T18:17:45.000Z","image":"https://cdn.kqed.org/wp-content/uploads/2020/02/KQED-OG-Image@1x.png"}},"disqusIdentifier":"115852 https://ww2.kqed.org/bayareabites/?p=115852","disqusUrl":"https://ww2.kqed.org/bayareabites/2017/03/13/eating-more-or-less-of-10-foods-may-cut-risk-of-early-death/","disqusTitle":"Eating More — Or Less — Of 10 Foods May Cut Risk Of Early Death","source":"Health and Nutrition","sourceUrl":"https://ww2.kqed.org/bayareabites/category/health-and-nutrition/","nprByline":"Allison Aubrey, NPR Food","nprImageAgency":"Paul Taylor/Getty Images, John Lawson/Belhaven/Getty Images","nprStoryId":"519443324","nprApiLink":"http://api.npr.org/query?id=519443324&apiKey=MDAxOTAwOTE4MDEyMTkxMDAzNjczZDljZA004","nprHtmlLink":"http://www.npr.org/sections/thesalt/2017/03/11/519443324/eating-more-or-less-of-10-foods-may-cut-risk-of-death-from-heart-disease?ft=nprml&f=519443324","nprRetrievedStory":"1","nprPubDate":"Sat, 11 Mar 2017 08:10:00 -0500","nprStoryDate":"Sat, 11 Mar 2017 07:00:00 -0500","nprLastModifiedDate":"Sat, 11 Mar 2017 08:10:50 -0500","path":"/bayareabites/115852/eating-more-or-less-of-10-foods-may-cut-risk-of-early-death","audioTrackLength":null,"parsedContent":[{"type":"contentString","content":"\u003cdiv class=\"post-body\">\u003cp>\u003cfigure id=\"attachment_115854\" class=\"wp-caption aligncenter\" style=\"max-width: 2000px\">\u003cimg src=\"https://ww2.kqed.org/bayareabites/wp-content/uploads/sites/24/2017/03/bacon1_custom-867257bd89cf2ad8849abbe694e9e05895478412.jpg\" alt=\"Consuming a diet that contains high amounts of red and processed meat such as bacon was linked to 8 percent of cardiometabolic deaths in the U.S.\" width=\"2000\" height=\"1332\" class=\"size-full wp-image-115854\" srcset=\"https://ww2.kqed.org/app/uploads/sites/24/2017/03/bacon1_custom-867257bd89cf2ad8849abbe694e9e05895478412.jpg 2000w, https://ww2.kqed.org/app/uploads/sites/24/2017/03/bacon1_custom-867257bd89cf2ad8849abbe694e9e05895478412-160x107.jpg 160w, https://ww2.kqed.org/app/uploads/sites/24/2017/03/bacon1_custom-867257bd89cf2ad8849abbe694e9e05895478412-800x533.jpg 800w, https://ww2.kqed.org/app/uploads/sites/24/2017/03/bacon1_custom-867257bd89cf2ad8849abbe694e9e05895478412-768x511.jpg 768w, https://ww2.kqed.org/app/uploads/sites/24/2017/03/bacon1_custom-867257bd89cf2ad8849abbe694e9e05895478412-1020x679.jpg 1020w, https://ww2.kqed.org/app/uploads/sites/24/2017/03/bacon1_custom-867257bd89cf2ad8849abbe694e9e05895478412-1180x786.jpg 1180w, https://ww2.kqed.org/app/uploads/sites/24/2017/03/bacon1_custom-867257bd89cf2ad8849abbe694e9e05895478412-960x639.jpg 960w, https://ww2.kqed.org/app/uploads/sites/24/2017/03/bacon1_custom-867257bd89cf2ad8849abbe694e9e05895478412-240x160.jpg 240w, https://ww2.kqed.org/app/uploads/sites/24/2017/03/bacon1_custom-867257bd89cf2ad8849abbe694e9e05895478412-375x250.jpg 375w, https://ww2.kqed.org/app/uploads/sites/24/2017/03/bacon1_custom-867257bd89cf2ad8849abbe694e9e05895478412-520x346.jpg 520w\" sizes=\"(max-width: 2000px) 100vw, 2000px\">\u003cfigcaption class=\"wp-caption-text\">Consuming a diet that contains high amounts of red and processed meat such as bacon was linked to 8 percent of cardiometabolic deaths in the U.S. \u003ccite>(Paul Taylor/Getty Images)\u003c/cite>\u003c/figcaption>\u003c/figure>\n\u003cp>About half of all U.S. deaths from heart disease, stroke and Type 2 diabetes are linked to poor diets, \u003ca href=\"http://jamanetwork.com/journals/jama/fullarticle/2608221\">according to a new study\u003c/a> published in the Journal of the American Medical Association.\u003c/p>\n\u003cp>And eating more — or less — of just 10 types of food can help raise or lower the risk of death from these causes.\u003c/p>\n\u003cp>Scientists at Tufts University identified the foods that seem to contribute the most to the risk. At the top of the list? Salt. Consuming too much salt was associated with 9.5 percent of the deaths.\u003c/p>\n\u003cp>Next — and I sympathize with all of you who love to eat these — high intake of red meat and processed meats such as bacon was linked to 8 percent of the deaths. And sugary drinks were a factor in 7.4 percent of the deaths.\u003c/p>\n\u003cp>We know, it may be tough to cut back on foods you love. Bacon is so alluring to many that it has even been called the '\u003ca href=\"http://www.npr.org/sections/health-shots/2011/02/02/133304206/why-bacon-is-a-gateway-to-meat-for-vegetarians\">gateway' to meat \u003c/a>for vegetarians!\u003c/p>\n\u003cp>\u003c/p>\u003c/div>","attributes":{"named":{},"numeric":[]}},{"type":"component","content":"","name":"ad","attributes":{"named":{"label":"fullwidth"},"numeric":["fullwidth"]}},{"type":"contentString","content":"\u003cdiv class=\"post-body\">\u003cp>\u003c/p>\n\u003cp>But, here's the flip side: The researchers also found there's a significant risk in eating too little of certain healthy foods. So, think of it this way: You can start consuming more of the foods that are protective.\u003c/p>\n\u003cp>For instance, the study found that low consumption of nuts and seeds was linked to about 9 percent of deaths.\u003c/p>\n\u003cp>In addition, diets low in seafood, whole grains and fruits and vegetables were found to contribute to about 6-8 percent of the deaths.\u003c/p>\n\u003cfigure id=\"attachment_115855\" class=\"wp-caption aligncenter\" style=\"max-width: 2000px\">\u003cimg src=\"https://ww2.kqed.org/bayareabites/wp-content/uploads/sites/24/2017/03/nuts1_custom-2c2df4db5264f538b9909ed81edad561d0248011.jpg\" alt=\"On the flip side, the study found that diets containing low amounts of nuts and seeds were linked to about 9 percent of deaths from heart disease and Type 2 diabetes.\" width=\"2000\" height=\"1335\" class=\"size-full wp-image-115855\" srcset=\"https://ww2.kqed.org/app/uploads/sites/24/2017/03/nuts1_custom-2c2df4db5264f538b9909ed81edad561d0248011.jpg 2000w, https://ww2.kqed.org/app/uploads/sites/24/2017/03/nuts1_custom-2c2df4db5264f538b9909ed81edad561d0248011-160x107.jpg 160w, https://ww2.kqed.org/app/uploads/sites/24/2017/03/nuts1_custom-2c2df4db5264f538b9909ed81edad561d0248011-800x534.jpg 800w, https://ww2.kqed.org/app/uploads/sites/24/2017/03/nuts1_custom-2c2df4db5264f538b9909ed81edad561d0248011-768x513.jpg 768w, https://ww2.kqed.org/app/uploads/sites/24/2017/03/nuts1_custom-2c2df4db5264f538b9909ed81edad561d0248011-1020x681.jpg 1020w, https://ww2.kqed.org/app/uploads/sites/24/2017/03/nuts1_custom-2c2df4db5264f538b9909ed81edad561d0248011-1180x788.jpg 1180w, https://ww2.kqed.org/app/uploads/sites/24/2017/03/nuts1_custom-2c2df4db5264f538b9909ed81edad561d0248011-960x641.jpg 960w, https://ww2.kqed.org/app/uploads/sites/24/2017/03/nuts1_custom-2c2df4db5264f538b9909ed81edad561d0248011-240x160.jpg 240w, https://ww2.kqed.org/app/uploads/sites/24/2017/03/nuts1_custom-2c2df4db5264f538b9909ed81edad561d0248011-375x250.jpg 375w, https://ww2.kqed.org/app/uploads/sites/24/2017/03/nuts1_custom-2c2df4db5264f538b9909ed81edad561d0248011-520x347.jpg 520w\" sizes=\"(max-width: 2000px) 100vw, 2000px\">\u003cfigcaption class=\"wp-caption-text\">On the flip side, the study found that diets containing low amounts of nuts and seeds were linked to about 9 percent of deaths from heart disease and Type 2 diabetes. \u003ccite>(John Lawson/Belhaven/Getty Images)\u003c/cite>\u003c/figcaption>\u003c/figure>\n\u003cp>\"The good news is that we now understand which foods we need to target to prevent Americans from dying prematurely from cardiometabolic diseases,\" says lead study author \u003ca href=\"https://nutrition.tufts.edu/profile/faculty/renata-micha\">Renata Micha\u003c/a>, a public health nutritionist and epidemiologist at the Friedman School at Tufts University.\u003c/p>\n\u003cp>In 2012, about 700,000 Americans died from these diseases. Diet was linked to nearly 319,000 of these deaths. \"This is a remarkable burden, nearly 1,000 deaths each day\" linked to dietary habits, says senior study author \u003ca href=\"http://nutrition.tufts.edu/profile/faculty/dariush-mozaffarian\">Dariush Mozaffarian\u003c/a>, dean of the Friedman School at Tufts.\u003c/p>\n\u003cp>So, changing Americans dietary habits could have a significant impact, the authors argue. \"Our research suggests that nearly half of the risk can be reduced [by] eating a healthy diet,\" Mozaffarian says.\u003c/p>\n\u003cp>The new analysis is based on data from the federal survey known as NHANES, the National Health and Nutrition Examination Survey. Researchers asked some 8,500 participants about their eating habits. In addition, Mozaffarian and his colleagues estimated associations of diet and disease from prior studies and clinical trials.\u003c/p>\n\u003cp>Now, the task of estimating death or disease linked to diet is tricky. Scientists use statistical methods to try to tease apart the impact of diet as part of people's overall lifestyle.\u003c/p>\n\u003cp>One challenge: People who have healthy diets often have other healthy habits, too — such as getting regular exercise. Dietary habits also track with socio-economic status. So, people with lower incomes are more likely to have poorer diets compared with wealthier people.\u003c/p>\n\u003cp>The Tufts researchers used studies that had controlled for these lifestyle factors, but it's not a perfect science.\u003c/p>\n\u003cp>\"Relying on evidence from observational studies...carries the potential limitation of confounding bias,\" states an editorial that was \u003ca href=\"http://jamanetwork.com/journals/jama/fullarticle/2608201\">published\u003c/a> alongside the study. The editorial raises the possibility that the effect of confounding factors such as socioeconomic status and physical activity could be substantial. \"For instance, it's possible that processed meat consumption merely reflects a Westernized dietary pattern.\"\u003c/p>\n\u003cp>Mozaffarian acknowledges the limitations. \"At the end of the day, our findings might modestly over - or under-estimate the health burdens, he told us.\u003c/p>\n\u003cp>He says the bigger point is this: \"Whether poor diet is causing 1,000 cardiovascular and diabetes deaths per day, or 500, it remains among the leading causes of preventable suffering.\"\u003c/p>\n\u003cp>Poor diets are also linked to billions of dollars in healthcare spending. For instance, diabetes \u003ca href=\"https://www.cdc.gov/diabetes/pubs/statsreport14/national-diabetes-report-web.pdf\">costs\u003c/a> the U.S. $245 billion a year. In the U.S., a women with diabetes\u003ca href=\"https://www.ncbi.nlm.nih.gov/pubmed/14675789.\"> incurs\u003c/a>, on average, about $283,000 in lifetime health care costs. (Many cost studies don't separate Type 1 and Type 2 diabetes.)\u003c/p>\n\u003cp>If you love foods that are associated with cardiovascular risks, you don't have to give them up entirely. As most nutrition studies show, it's excessive consumption that drives up the risk.\u003c/p>\n\u003cp>For instance, dietary guidelines recommend limiting sugar consumption to no more than 10 percent of daily calories. This means that a single 200-calorie sugary drink may be OK for a person who typically consumes a 2,000 calorie-per-day diet.\u003c/p>\n\u003cp>The problem: Most Americans \u003ca href=\"http://www.npr.org/sections/thesalt/2014/02/03/271130613/sweet-tooth-gone-bad-why-22-teaspoons-of-sugar-per-day-is-deadly\">consume much more.\u003c/a> \u003c/p>\n\u003cp>\u003c/p>\n\u003cp>\u003cem>Copyright 2017 \u003ca href=\"http://www.npr.org/\" target=\"_blank\">NPR\u003c/a>.\u003c/em>\u003c/p>\n\n\u003c/div>\u003c/p>","attributes":{"named":{},"numeric":[]}}],"link":"/bayareabites/115852/eating-more-or-less-of-10-foods-may-cut-risk-of-early-death","authors":["byline_bayareabites_115852"],"categories":["bayareabites_10028","bayareabites_1245","bayareabites_358"],"tags":["bayareabites_278","bayareabites_11215","bayareabites_1828"],"featImg":"bayareabites_115853","label":"source_bayareabites_115852"},"bayareabites_114520":{"type":"posts","id":"bayareabites_114520","meta":{"index":"posts_1591205157","site":"bayareabites","id":"114520","score":null,"sort":[1483718406000]},"guestAuthors":[],"slug":"gastropig-a-new-destination-for-breakfast-sandwiches-in-uptown-oakland","title":"Gastropig: A New Destination For Breakfast Sandwiches In Uptown Oakland","publishDate":1483718406,"format":"standard","headTitle":"Bay Area Bites | KQED Food","labelTerm":{},"content":"\u003cp>Why is it that some restaurateurs feel compelled to give common breakfast dishes names better suited to a Pornhub search? Is it a desire to sex up the wholesome meal? A need to edgily prove that they’re no IHOP or Denny’s? Or is it simply a canny marketing move, designed to serve as a memorable hashtag and something easy for Yelpers to remember? In Southern California, there’s \u003ca href=\"http://www.eggslut.com/#eggslut\" target=\"_blank\">Egg Slut\u003c/a>, a “chef driven, gourmet food concept” with locations in LA, Glendale and Venice. On a recent trip to Seattle, I enjoyed a “Straight-Up Bitch” biscuit and egg sandwich from \u003ca href=\"http://biscuitbitch.com/\" target=\"_blank\">Biscuit Bitch\u003c/a>, a “trailer park to table” eatery with three locations across the city. And now, in Oakland, we have the #Baconslut sandwich, from new breakfast and lunch spot \u003cstrong>Gastropig\u003c/strong>.\u003c/p>\n\u003cfigure id=\"attachment_114514\" class=\"wp-caption aligncenter\" style=\"max-width: 1920px\">\u003cimg class=\"size-full wp-image-114514\" src=\"http://ww2.kqed.org/bayareabites/wp-content/uploads/sites/24/2017/01/IMG_1189.jpg\" alt=\"Inside the Gastropig.\" width=\"1920\" height=\"1440\" srcset=\"https://ww2.kqed.org/app/uploads/sites/24/2017/01/IMG_1189.jpg 1920w, https://ww2.kqed.org/app/uploads/sites/24/2017/01/IMG_1189-160x120.jpg 160w, https://ww2.kqed.org/app/uploads/sites/24/2017/01/IMG_1189-800x600.jpg 800w, https://ww2.kqed.org/app/uploads/sites/24/2017/01/IMG_1189-768x576.jpg 768w, https://ww2.kqed.org/app/uploads/sites/24/2017/01/IMG_1189-1020x765.jpg 1020w, https://ww2.kqed.org/app/uploads/sites/24/2017/01/IMG_1189-1180x885.jpg 1180w, https://ww2.kqed.org/app/uploads/sites/24/2017/01/IMG_1189-960x720.jpg 960w, https://ww2.kqed.org/app/uploads/sites/24/2017/01/IMG_1189-240x180.jpg 240w, https://ww2.kqed.org/app/uploads/sites/24/2017/01/IMG_1189-375x281.jpg 375w, https://ww2.kqed.org/app/uploads/sites/24/2017/01/IMG_1189-520x390.jpg 520w\" sizes=\"(max-width: 1920px) 100vw, 1920px\">\u003cfigcaption class=\"wp-caption-text\">Inside the Gastropig. \u003ccite>(Shelby Pope)\u003c/cite>\u003c/figcaption>\u003c/figure>\n\u003cp>“Honestly, it was a selfish want,” co-owner Ann Thai said of restaurant’s focus on breakfast sandwiches, ranging from a simple scrambled egg version to an elaborate avocado toast. “I love breakfast sandwiches, I love breakfast for dinner.” Gastropig is her and business partner Loren Goodwin’s first restaurant, though the two have lots of industry experience: Thai opened and managed restaurants, while Goodwin was a cook at Chez Panisse. Gastropig is conveniently located a few blocks from BART in Uptown, in the shadow of the Pandora office. The space is spacious and modern, with posters of the Oakland skyline and a combination of communal tables and counter seating. They opened on January 2, and just a few days later, it’s already packed with hungry office workers on their lunch break (“Twenty Yelp reviews already,” someone behind me in line noted.)\u003c/p>\n\u003cfigure id=\"attachment_114519\" class=\"wp-caption aligncenter\" style=\"max-width: 1920px\">\u003cimg class=\"size-full wp-image-114519\" src=\"http://ww2.kqed.org/bayareabites/wp-content/uploads/sites/24/2017/01/unnamed-4.jpg\" alt=\"Gastropig co-owners Ann Thai and Loren Goodwin.\" width=\"1920\" height=\"1564\" srcset=\"https://ww2.kqed.org/app/uploads/sites/24/2017/01/unnamed-4.jpg 1920w, https://ww2.kqed.org/app/uploads/sites/24/2017/01/unnamed-4-160x130.jpg 160w, https://ww2.kqed.org/app/uploads/sites/24/2017/01/unnamed-4-800x652.jpg 800w, https://ww2.kqed.org/app/uploads/sites/24/2017/01/unnamed-4-768x626.jpg 768w, https://ww2.kqed.org/app/uploads/sites/24/2017/01/unnamed-4-1020x831.jpg 1020w, https://ww2.kqed.org/app/uploads/sites/24/2017/01/unnamed-4-1180x961.jpg 1180w, https://ww2.kqed.org/app/uploads/sites/24/2017/01/unnamed-4-960x782.jpg 960w, https://ww2.kqed.org/app/uploads/sites/24/2017/01/unnamed-4-240x196.jpg 240w, https://ww2.kqed.org/app/uploads/sites/24/2017/01/unnamed-4-375x305.jpg 375w, https://ww2.kqed.org/app/uploads/sites/24/2017/01/unnamed-4-520x424.jpg 520w\" sizes=\"(max-width: 1920px) 100vw, 1920px\">\u003cfigcaption class=\"wp-caption-text\">Gastropig co-owners Ann Thai and Loren Goodwin. \u003ccite>(Nikki Ritcher)\u003c/cite>\u003c/figcaption>\u003c/figure>\n\u003cp>Both Thai and Goodwin live in Oakland, and Thai said she wants Gastropig to become a local institution--like beloved, recently shuttered \u003ca href=\"http://www.eastbaytimes.com/2016/04/30/genova-delicatessen-serves-its-last-sandwiches-in-oakland/\" target=\"_blank\">Genova Deli\u003c/a>, which they’ve named a deli sandwich after. The sandwich is one of the few traditional lunch items on the menu, and while they do plan to expand to a full lunch menu in coming months, the current focus is eggy breakfast and brunch dishes. There are hashbrowns (made in a waffle iron and spiked with cheese and green onions), biscuits, and a few items that fall in the You Could Probably Make It At Home But Not As Well category: avocado toast with pickled red onions and cilantro crema, and a PB&J featuring seasonal jam and chunky peanut butter on a \u003ca href=\"http://www.firebrandartisanbreads.com/\" target=\"_blank\">Firebrand\u003c/a> croissant. They offer fresh squeezed orange juice and coffee from Vallejo roasters \u003ca href=\"https://moschetti.com/\" target=\"_blank\">Moschetti\u003c/a>, and their cold brew is hearty and full-bodied from a mix of light, medium and dark roasted beans.\u003c/p>\n\u003cp>And, of course, there are the breakfast sandwiches. The #Baconslut is obviously being positioned as their signature menu item, and the \u003ca href=\"https://www.instagram.com/p/BO3SfnnlZKm/?taken-by=thegastropig\" target=\"_blank\">hype machine\u003c/a> seems to be working: during my visit, every few minutes the chef yelled “Two more BS’s, with avocado!” and “Four more BS’s!” Yes, the sandwich is good enough to suffer the mild awkwardness that comes with saying the name aloud (I believe the # is silent). It comes with a good amount of crispy applewood bacon piled on a fluffy brioche roll from San Francisco’s \u003ca href=\"http://www.panoramabaking.com/\" target=\"_blank\">PANoRAMA\u003c/a>, topped with cheddar and a perfectly cooked, runny egg. The only disappointment is the aioli. Its orange hue suggests spice, but tasting it reveals none. Aside from that lack of heat--which you can add yourself via their multicultural hot sauce collection--it was a rich, satisfying meal.\u003c/p>\n\u003cfigure id=\"attachment_114538\" class=\"wp-caption aligncenter\" style=\"max-width: 1180px\">\u003cimg src=\"http://ww2.kqed.org/bayareabites/wp-content/uploads/sites/24/2017/01/baconslut.jpg\" alt=\"The #Baconslut.\" width=\"1180\" height=\"885\" class=\"size-full wp-image-114538\" srcset=\"https://ww2.kqed.org/app/uploads/sites/24/2017/01/baconslut.jpg 1180w, https://ww2.kqed.org/app/uploads/sites/24/2017/01/baconslut-160x120.jpg 160w, https://ww2.kqed.org/app/uploads/sites/24/2017/01/baconslut-800x600.jpg 800w, https://ww2.kqed.org/app/uploads/sites/24/2017/01/baconslut-768x576.jpg 768w, https://ww2.kqed.org/app/uploads/sites/24/2017/01/baconslut-1020x765.jpg 1020w, https://ww2.kqed.org/app/uploads/sites/24/2017/01/baconslut-960x720.jpg 960w, https://ww2.kqed.org/app/uploads/sites/24/2017/01/baconslut-240x180.jpg 240w, https://ww2.kqed.org/app/uploads/sites/24/2017/01/baconslut-375x281.jpg 375w, https://ww2.kqed.org/app/uploads/sites/24/2017/01/baconslut-520x390.jpg 520w\" sizes=\"(max-width: 1180px) 100vw, 1180px\">\u003cfigcaption class=\"wp-caption-text\">The #Baconslut. \u003ccite>(Shelby Pope)\u003c/cite>\u003c/figcaption>\u003c/figure>\n\u003cp>(And in case you’re wondering about that name, Thai said it comes from her and Goodwin’s obsession with bacon--there are bacon-themed posters all around the restaurant proclaiming that “Bacon makes the world taste better” and “When in doubt, add bacon”--and isn’t a reference to the LA chain. They did, however, drive down just to try it once they realized the similarity between the names).\u003c/p>\n\u003cfigure id=\"attachment_114540\" class=\"wp-caption aligncenter\" style=\"max-width: 1920px\">\u003cimg src=\"http://ww2.kqed.org/bayareabites/wp-content/uploads/sites/24/2017/01/sausage-sandwich.jpg\" alt=\"The Sausage Sandwich. \" width=\"1920\" height=\"1440\" class=\"size-full wp-image-114540\" srcset=\"https://ww2.kqed.org/app/uploads/sites/24/2017/01/sausage-sandwich.jpg 1920w, https://ww2.kqed.org/app/uploads/sites/24/2017/01/sausage-sandwich-160x120.jpg 160w, https://ww2.kqed.org/app/uploads/sites/24/2017/01/sausage-sandwich-800x600.jpg 800w, https://ww2.kqed.org/app/uploads/sites/24/2017/01/sausage-sandwich-768x576.jpg 768w, https://ww2.kqed.org/app/uploads/sites/24/2017/01/sausage-sandwich-1020x765.jpg 1020w, https://ww2.kqed.org/app/uploads/sites/24/2017/01/sausage-sandwich-1180x885.jpg 1180w, https://ww2.kqed.org/app/uploads/sites/24/2017/01/sausage-sandwich-960x720.jpg 960w, https://ww2.kqed.org/app/uploads/sites/24/2017/01/sausage-sandwich-240x180.jpg 240w, https://ww2.kqed.org/app/uploads/sites/24/2017/01/sausage-sandwich-375x281.jpg 375w, https://ww2.kqed.org/app/uploads/sites/24/2017/01/sausage-sandwich-520x390.jpg 520w\" sizes=\"(max-width: 1920px) 100vw, 1920px\">\u003cfigcaption class=\"wp-caption-text\">The Sausage Sandwich. \u003ccite>(Shelby Pope)\u003c/cite>\u003c/figcaption>\u003c/figure>\n\u003cp>Their sausage sandwich was also delicious: your choice of chicken or pork sausage, smoked gouda, an over easy egg, on the same brioche roll. The sausage is homemade and flavorful, tender, juicy and well-spiced--a far cry from the masses of salty gray matter that usually serve as breakfast sausage.\u003c/p>\n\u003cp>[ad fullwidth]\u003c/p>\n\u003cp>And while Gastropig is a decidedly pork-centric restaurant, even down to its name, it’s nice to see that despite the menu’s small size, it’s adaptable to most diets: there are vegetarian, gluten-free, and even pork-free options.\u003c/p>\n\u003cfigure id=\"attachment_114542\" class=\"wp-caption aligncenter\" style=\"max-width: 1920px\">\u003cimg src=\"http://ww2.kqed.org/bayareabites/wp-content/uploads/sites/24/2017/01/sandwiches-coffee.jpg\" alt=\"Some of the Gatropig's breakfast sandwich options, and their cold brew.\" width=\"1920\" height=\"1440\" class=\"size-full wp-image-114542\" srcset=\"https://ww2.kqed.org/app/uploads/sites/24/2017/01/sandwiches-coffee.jpg 1920w, https://ww2.kqed.org/app/uploads/sites/24/2017/01/sandwiches-coffee-160x120.jpg 160w, https://ww2.kqed.org/app/uploads/sites/24/2017/01/sandwiches-coffee-800x600.jpg 800w, https://ww2.kqed.org/app/uploads/sites/24/2017/01/sandwiches-coffee-768x576.jpg 768w, https://ww2.kqed.org/app/uploads/sites/24/2017/01/sandwiches-coffee-1020x765.jpg 1020w, https://ww2.kqed.org/app/uploads/sites/24/2017/01/sandwiches-coffee-1180x885.jpg 1180w, https://ww2.kqed.org/app/uploads/sites/24/2017/01/sandwiches-coffee-960x720.jpg 960w, https://ww2.kqed.org/app/uploads/sites/24/2017/01/sandwiches-coffee-240x180.jpg 240w, https://ww2.kqed.org/app/uploads/sites/24/2017/01/sandwiches-coffee-375x281.jpg 375w, https://ww2.kqed.org/app/uploads/sites/24/2017/01/sandwiches-coffee-520x390.jpg 520w\" sizes=\"(max-width: 1920px) 100vw, 1920px\">\u003cfigcaption class=\"wp-caption-text\">Some of the Gatropig's breakfast sandwich options, and their cold brew. \u003ccite>(Shelby Pope)\u003c/cite>\u003c/figcaption>\u003c/figure>\n\u003cp>It’s a good time to a breakfast sandwich fan in the East Bay. Around the corner from Gastropig, there’s the wallet-friendly version at \u003ca href=\"http://www.welocol.com/locol-oakland\" target=\"_blank\">LocoL\u003c/a>, their egg-in-the-hole “melty”; and in Temescal, there’s \u003ca href=\"http://www.crackedsandwich.com/#cracked\" target=\"_blank\">Cracked\u003c/a>, a newish pop-up inside Blackwater Station, offering Spam and corned beef breakfast sandwiches in addition to more traditional versions. Eventually, Thai said, they hope to expand, opening other Gastropig locations in other cities. But until then, it’s just for downtown Oakland, and we’re lucky to have it: a simple, reasonably affordable spot with a menu of creative dishes that manage to be filling and inclusive enough to feed any modern Bay Area group.\u003c/p>\n\u003cp>\u003c/p>\n\u003cp>\u003ca href=\"https://www.thegastropig.com/\" target=\"_blank\">\u003cstrong>The Gastropig\u003c/strong>\u003c/a>\u003cbr>\n2123 Franklin St. [\u003ca href=\"https://goo.gl/maps/2y3a3Br3UqL2\" target=\"_blank\">Map\u003c/a>]\u003cbr>\nOakland, CA 94612\u003cbr>\nPh: (510) 817-4663\u003cbr>\nHours: Mon-Fri, 7am-3pm; Sun, 9am-2pm; closed Sat.\u003cbr>\nFacebook: \u003ca href=\"https://www.facebook.com/thegastropig/\" target=\"_blank\">The Gastropig\u003c/a>\u003cbr>\nTwitter: \u003ca href=\"https://twitter.com/thegastropig\" target=\"_blank\">@thegastropig\u003c/a>\u003cbr>\nInstagram: \u003ca href=\"https://www.instagram.com/thegastropig/\" target=\"_blank\">@thegastropig\u003c/a>\u003cbr>\nPrice range: $ (Entrees $10 and under)\u003c/p>\n\u003cfigure id=\"attachment_114518\" class=\"wp-caption aligncenter\" style=\"max-width: 1920px\">\u003cimg class=\"size-full wp-image-114518\" src=\"http://ww2.kqed.org/bayareabites/wp-content/uploads/sites/24/2017/01/IMG_1233.jpg\" alt=\"The Gastropig, a new Uptown Oakland breakfast and lunch spot.\" width=\"1920\" height=\"1440\" srcset=\"https://ww2.kqed.org/app/uploads/sites/24/2017/01/IMG_1233.jpg 1920w, https://ww2.kqed.org/app/uploads/sites/24/2017/01/IMG_1233-160x120.jpg 160w, https://ww2.kqed.org/app/uploads/sites/24/2017/01/IMG_1233-800x600.jpg 800w, https://ww2.kqed.org/app/uploads/sites/24/2017/01/IMG_1233-768x576.jpg 768w, https://ww2.kqed.org/app/uploads/sites/24/2017/01/IMG_1233-1020x765.jpg 1020w, https://ww2.kqed.org/app/uploads/sites/24/2017/01/IMG_1233-1180x885.jpg 1180w, https://ww2.kqed.org/app/uploads/sites/24/2017/01/IMG_1233-960x720.jpg 960w, https://ww2.kqed.org/app/uploads/sites/24/2017/01/IMG_1233-240x180.jpg 240w, https://ww2.kqed.org/app/uploads/sites/24/2017/01/IMG_1233-375x281.jpg 375w, https://ww2.kqed.org/app/uploads/sites/24/2017/01/IMG_1233-520x390.jpg 520w\" sizes=\"(max-width: 1920px) 100vw, 1920px\">\u003cfigcaption class=\"wp-caption-text\">The Gastropig, a new Uptown Oakland breakfast and lunch spot. \u003ccite>(Shelby Pope)\u003c/cite>\u003c/figcaption>\u003c/figure>\n\n","blocks":[],"excerpt":"If you can get past the cheeky name of their star dish, you’ll be rewarded with a tasty breakfast!\r\n","status":"publish","parent":0,"modified":1483980723,"stats":{"hasAudio":false,"hasVideo":false,"hasChartOrMap":false,"iframeSrcs":[],"hasGoogleForm":false,"hasGallery":false,"hasHearkenModule":false,"hasPolis":false,"paragraphCount":11,"wordCount":984},"headData":{"title":"Gastropig: A New Destination For Breakfast Sandwiches In Uptown Oakland | KQED","description":"If you can get past the cheeky name of their star dish, you’ll be rewarded with a tasty breakfast!\r\n","ogTitle":"","ogDescription":"","ogImgId":"","twTitle":"","twDescription":"","twImgId":"","schema":{"@context":"http://schema.org","@type":"Article","headline":"Gastropig: A New Destination For Breakfast Sandwiches In Uptown Oakland","datePublished":"2017-01-06T16:00:06.000Z","dateModified":"2017-01-09T16:52:03.000Z","image":"https://cdn.kqed.org/wp-content/uploads/2020/02/KQED-OG-Image@1x.png"}},"disqusIdentifier":"114520 http://ww2.kqed.org/bayareabites/?p=114520","disqusUrl":"https://ww2.kqed.org/bayareabites/2017/01/06/gastropig-a-new-destination-for-breakfast-sandwiches-in-uptown-oakland/","disqusTitle":"Gastropig: A New Destination For Breakfast Sandwiches In Uptown Oakland","source":"Restaurants, Bars, Cafes, Pop-Ups","sourceUrl":"https://ww2.kqed.org/bayareabites/category/restaurants-and-bars/","path":"/bayareabites/114520/gastropig-a-new-destination-for-breakfast-sandwiches-in-uptown-oakland","audioTrackLength":null,"parsedContent":[{"type":"contentString","content":"\u003cdiv class=\"post-body\">\u003cp>\u003cp>Why is it that some restaurateurs feel compelled to give common breakfast dishes names better suited to a Pornhub search? Is it a desire to sex up the wholesome meal? A need to edgily prove that they’re no IHOP or Denny’s? Or is it simply a canny marketing move, designed to serve as a memorable hashtag and something easy for Yelpers to remember? In Southern California, there’s \u003ca href=\"http://www.eggslut.com/#eggslut\" target=\"_blank\">Egg Slut\u003c/a>, a “chef driven, gourmet food concept” with locations in LA, Glendale and Venice. On a recent trip to Seattle, I enjoyed a “Straight-Up Bitch” biscuit and egg sandwich from \u003ca href=\"http://biscuitbitch.com/\" target=\"_blank\">Biscuit Bitch\u003c/a>, a “trailer park to table” eatery with three locations across the city. And now, in Oakland, we have the #Baconslut sandwich, from new breakfast and lunch spot \u003cstrong>Gastropig\u003c/strong>.\u003c/p>\n\u003cfigure id=\"attachment_114514\" class=\"wp-caption aligncenter\" style=\"max-width: 1920px\">\u003cimg class=\"size-full wp-image-114514\" src=\"http://ww2.kqed.org/bayareabites/wp-content/uploads/sites/24/2017/01/IMG_1189.jpg\" alt=\"Inside the Gastropig.\" width=\"1920\" height=\"1440\" srcset=\"https://ww2.kqed.org/app/uploads/sites/24/2017/01/IMG_1189.jpg 1920w, https://ww2.kqed.org/app/uploads/sites/24/2017/01/IMG_1189-160x120.jpg 160w, https://ww2.kqed.org/app/uploads/sites/24/2017/01/IMG_1189-800x600.jpg 800w, https://ww2.kqed.org/app/uploads/sites/24/2017/01/IMG_1189-768x576.jpg 768w, https://ww2.kqed.org/app/uploads/sites/24/2017/01/IMG_1189-1020x765.jpg 1020w, https://ww2.kqed.org/app/uploads/sites/24/2017/01/IMG_1189-1180x885.jpg 1180w, https://ww2.kqed.org/app/uploads/sites/24/2017/01/IMG_1189-960x720.jpg 960w, https://ww2.kqed.org/app/uploads/sites/24/2017/01/IMG_1189-240x180.jpg 240w, https://ww2.kqed.org/app/uploads/sites/24/2017/01/IMG_1189-375x281.jpg 375w, https://ww2.kqed.org/app/uploads/sites/24/2017/01/IMG_1189-520x390.jpg 520w\" sizes=\"(max-width: 1920px) 100vw, 1920px\">\u003cfigcaption class=\"wp-caption-text\">Inside the Gastropig. \u003ccite>(Shelby Pope)\u003c/cite>\u003c/figcaption>\u003c/figure>\n\u003cp>“Honestly, it was a selfish want,” co-owner Ann Thai said of restaurant’s focus on breakfast sandwiches, ranging from a simple scrambled egg version to an elaborate avocado toast. “I love breakfast sandwiches, I love breakfast for dinner.” Gastropig is her and business partner Loren Goodwin’s first restaurant, though the two have lots of industry experience: Thai opened and managed restaurants, while Goodwin was a cook at Chez Panisse. Gastropig is conveniently located a few blocks from BART in Uptown, in the shadow of the Pandora office. The space is spacious and modern, with posters of the Oakland skyline and a combination of communal tables and counter seating. They opened on January 2, and just a few days later, it’s already packed with hungry office workers on their lunch break (“Twenty Yelp reviews already,” someone behind me in line noted.)\u003c/p>\n\u003cfigure id=\"attachment_114519\" class=\"wp-caption aligncenter\" style=\"max-width: 1920px\">\u003cimg class=\"size-full wp-image-114519\" src=\"http://ww2.kqed.org/bayareabites/wp-content/uploads/sites/24/2017/01/unnamed-4.jpg\" alt=\"Gastropig co-owners Ann Thai and Loren Goodwin.\" width=\"1920\" height=\"1564\" srcset=\"https://ww2.kqed.org/app/uploads/sites/24/2017/01/unnamed-4.jpg 1920w, https://ww2.kqed.org/app/uploads/sites/24/2017/01/unnamed-4-160x130.jpg 160w, https://ww2.kqed.org/app/uploads/sites/24/2017/01/unnamed-4-800x652.jpg 800w, https://ww2.kqed.org/app/uploads/sites/24/2017/01/unnamed-4-768x626.jpg 768w, https://ww2.kqed.org/app/uploads/sites/24/2017/01/unnamed-4-1020x831.jpg 1020w, https://ww2.kqed.org/app/uploads/sites/24/2017/01/unnamed-4-1180x961.jpg 1180w, https://ww2.kqed.org/app/uploads/sites/24/2017/01/unnamed-4-960x782.jpg 960w, https://ww2.kqed.org/app/uploads/sites/24/2017/01/unnamed-4-240x196.jpg 240w, https://ww2.kqed.org/app/uploads/sites/24/2017/01/unnamed-4-375x305.jpg 375w, https://ww2.kqed.org/app/uploads/sites/24/2017/01/unnamed-4-520x424.jpg 520w\" sizes=\"(max-width: 1920px) 100vw, 1920px\">\u003cfigcaption class=\"wp-caption-text\">Gastropig co-owners Ann Thai and Loren Goodwin. \u003ccite>(Nikki Ritcher)\u003c/cite>\u003c/figcaption>\u003c/figure>\n\u003cp>Both Thai and Goodwin live in Oakland, and Thai said she wants Gastropig to become a local institution--like beloved, recently shuttered \u003ca href=\"http://www.eastbaytimes.com/2016/04/30/genova-delicatessen-serves-its-last-sandwiches-in-oakland/\" target=\"_blank\">Genova Deli\u003c/a>, which they’ve named a deli sandwich after. The sandwich is one of the few traditional lunch items on the menu, and while they do plan to expand to a full lunch menu in coming months, the current focus is eggy breakfast and brunch dishes. There are hashbrowns (made in a waffle iron and spiked with cheese and green onions), biscuits, and a few items that fall in the You Could Probably Make It At Home But Not As Well category: avocado toast with pickled red onions and cilantro crema, and a PB&J featuring seasonal jam and chunky peanut butter on a \u003ca href=\"http://www.firebrandartisanbreads.com/\" target=\"_blank\">Firebrand\u003c/a> croissant. They offer fresh squeezed orange juice and coffee from Vallejo roasters \u003ca href=\"https://moschetti.com/\" target=\"_blank\">Moschetti\u003c/a>, and their cold brew is hearty and full-bodied from a mix of light, medium and dark roasted beans.\u003c/p>\n\u003cp>And, of course, there are the breakfast sandwiches. The #Baconslut is obviously being positioned as their signature menu item, and the \u003ca href=\"https://www.instagram.com/p/BO3SfnnlZKm/?taken-by=thegastropig\" target=\"_blank\">hype machine\u003c/a> seems to be working: during my visit, every few minutes the chef yelled “Two more BS’s, with avocado!” and “Four more BS’s!” Yes, the sandwich is good enough to suffer the mild awkwardness that comes with saying the name aloud (I believe the # is silent). It comes with a good amount of crispy applewood bacon piled on a fluffy brioche roll from San Francisco’s \u003ca href=\"http://www.panoramabaking.com/\" target=\"_blank\">PANoRAMA\u003c/a>, topped with cheddar and a perfectly cooked, runny egg. The only disappointment is the aioli. Its orange hue suggests spice, but tasting it reveals none. Aside from that lack of heat--which you can add yourself via their multicultural hot sauce collection--it was a rich, satisfying meal.\u003c/p>\n\u003cfigure id=\"attachment_114538\" class=\"wp-caption aligncenter\" style=\"max-width: 1180px\">\u003cimg src=\"http://ww2.kqed.org/bayareabites/wp-content/uploads/sites/24/2017/01/baconslut.jpg\" alt=\"The #Baconslut.\" width=\"1180\" height=\"885\" class=\"size-full wp-image-114538\" srcset=\"https://ww2.kqed.org/app/uploads/sites/24/2017/01/baconslut.jpg 1180w, https://ww2.kqed.org/app/uploads/sites/24/2017/01/baconslut-160x120.jpg 160w, https://ww2.kqed.org/app/uploads/sites/24/2017/01/baconslut-800x600.jpg 800w, https://ww2.kqed.org/app/uploads/sites/24/2017/01/baconslut-768x576.jpg 768w, https://ww2.kqed.org/app/uploads/sites/24/2017/01/baconslut-1020x765.jpg 1020w, https://ww2.kqed.org/app/uploads/sites/24/2017/01/baconslut-960x720.jpg 960w, https://ww2.kqed.org/app/uploads/sites/24/2017/01/baconslut-240x180.jpg 240w, https://ww2.kqed.org/app/uploads/sites/24/2017/01/baconslut-375x281.jpg 375w, https://ww2.kqed.org/app/uploads/sites/24/2017/01/baconslut-520x390.jpg 520w\" sizes=\"(max-width: 1180px) 100vw, 1180px\">\u003cfigcaption class=\"wp-caption-text\">The #Baconslut. \u003ccite>(Shelby Pope)\u003c/cite>\u003c/figcaption>\u003c/figure>\n\u003cp>(And in case you’re wondering about that name, Thai said it comes from her and Goodwin’s obsession with bacon--there are bacon-themed posters all around the restaurant proclaiming that “Bacon makes the world taste better” and “When in doubt, add bacon”--and isn’t a reference to the LA chain. They did, however, drive down just to try it once they realized the similarity between the names).\u003c/p>\n\u003cfigure id=\"attachment_114540\" class=\"wp-caption aligncenter\" style=\"max-width: 1920px\">\u003cimg src=\"http://ww2.kqed.org/bayareabites/wp-content/uploads/sites/24/2017/01/sausage-sandwich.jpg\" alt=\"The Sausage Sandwich. \" width=\"1920\" height=\"1440\" class=\"size-full wp-image-114540\" srcset=\"https://ww2.kqed.org/app/uploads/sites/24/2017/01/sausage-sandwich.jpg 1920w, https://ww2.kqed.org/app/uploads/sites/24/2017/01/sausage-sandwich-160x120.jpg 160w, https://ww2.kqed.org/app/uploads/sites/24/2017/01/sausage-sandwich-800x600.jpg 800w, https://ww2.kqed.org/app/uploads/sites/24/2017/01/sausage-sandwich-768x576.jpg 768w, https://ww2.kqed.org/app/uploads/sites/24/2017/01/sausage-sandwich-1020x765.jpg 1020w, https://ww2.kqed.org/app/uploads/sites/24/2017/01/sausage-sandwich-1180x885.jpg 1180w, https://ww2.kqed.org/app/uploads/sites/24/2017/01/sausage-sandwich-960x720.jpg 960w, https://ww2.kqed.org/app/uploads/sites/24/2017/01/sausage-sandwich-240x180.jpg 240w, https://ww2.kqed.org/app/uploads/sites/24/2017/01/sausage-sandwich-375x281.jpg 375w, https://ww2.kqed.org/app/uploads/sites/24/2017/01/sausage-sandwich-520x390.jpg 520w\" sizes=\"(max-width: 1920px) 100vw, 1920px\">\u003cfigcaption class=\"wp-caption-text\">The Sausage Sandwich. \u003ccite>(Shelby Pope)\u003c/cite>\u003c/figcaption>\u003c/figure>\n\u003cp>Their sausage sandwich was also delicious: your choice of chicken or pork sausage, smoked gouda, an over easy egg, on the same brioche roll. The sausage is homemade and flavorful, tender, juicy and well-spiced--a far cry from the masses of salty gray matter that usually serve as breakfast sausage.\u003c/p>\n\u003cp>\u003c/p>\u003c/div>","attributes":{"named":{},"numeric":[]}},{"type":"component","content":"","name":"ad","attributes":{"named":{"label":"fullwidth"},"numeric":["fullwidth"]}},{"type":"contentString","content":"\u003cdiv class=\"post-body\">\u003cp>\u003c/p>\n\u003cp>And while Gastropig is a decidedly pork-centric restaurant, even down to its name, it’s nice to see that despite the menu’s small size, it’s adaptable to most diets: there are vegetarian, gluten-free, and even pork-free options.\u003c/p>\n\u003cfigure id=\"attachment_114542\" class=\"wp-caption aligncenter\" style=\"max-width: 1920px\">\u003cimg src=\"http://ww2.kqed.org/bayareabites/wp-content/uploads/sites/24/2017/01/sandwiches-coffee.jpg\" alt=\"Some of the Gatropig's breakfast sandwich options, and their cold brew.\" width=\"1920\" height=\"1440\" class=\"size-full wp-image-114542\" srcset=\"https://ww2.kqed.org/app/uploads/sites/24/2017/01/sandwiches-coffee.jpg 1920w, https://ww2.kqed.org/app/uploads/sites/24/2017/01/sandwiches-coffee-160x120.jpg 160w, https://ww2.kqed.org/app/uploads/sites/24/2017/01/sandwiches-coffee-800x600.jpg 800w, https://ww2.kqed.org/app/uploads/sites/24/2017/01/sandwiches-coffee-768x576.jpg 768w, https://ww2.kqed.org/app/uploads/sites/24/2017/01/sandwiches-coffee-1020x765.jpg 1020w, https://ww2.kqed.org/app/uploads/sites/24/2017/01/sandwiches-coffee-1180x885.jpg 1180w, https://ww2.kqed.org/app/uploads/sites/24/2017/01/sandwiches-coffee-960x720.jpg 960w, https://ww2.kqed.org/app/uploads/sites/24/2017/01/sandwiches-coffee-240x180.jpg 240w, https://ww2.kqed.org/app/uploads/sites/24/2017/01/sandwiches-coffee-375x281.jpg 375w, https://ww2.kqed.org/app/uploads/sites/24/2017/01/sandwiches-coffee-520x390.jpg 520w\" sizes=\"(max-width: 1920px) 100vw, 1920px\">\u003cfigcaption class=\"wp-caption-text\">Some of the Gatropig's breakfast sandwich options, and their cold brew. \u003ccite>(Shelby Pope)\u003c/cite>\u003c/figcaption>\u003c/figure>\n\u003cp>It’s a good time to a breakfast sandwich fan in the East Bay. Around the corner from Gastropig, there’s the wallet-friendly version at \u003ca href=\"http://www.welocol.com/locol-oakland\" target=\"_blank\">LocoL\u003c/a>, their egg-in-the-hole “melty”; and in Temescal, there’s \u003ca href=\"http://www.crackedsandwich.com/#cracked\" target=\"_blank\">Cracked\u003c/a>, a newish pop-up inside Blackwater Station, offering Spam and corned beef breakfast sandwiches in addition to more traditional versions. Eventually, Thai said, they hope to expand, opening other Gastropig locations in other cities. But until then, it’s just for downtown Oakland, and we’re lucky to have it: a simple, reasonably affordable spot with a menu of creative dishes that manage to be filling and inclusive enough to feed any modern Bay Area group.\u003c/p>\n\u003cp>\u003c/p>\n\u003cp>\u003ca href=\"https://www.thegastropig.com/\" target=\"_blank\">\u003cstrong>The Gastropig\u003c/strong>\u003c/a>\u003cbr>\n2123 Franklin St. [\u003ca href=\"https://goo.gl/maps/2y3a3Br3UqL2\" target=\"_blank\">Map\u003c/a>]\u003cbr>\nOakland, CA 94612\u003cbr>\nPh: (510) 817-4663\u003cbr>\nHours: Mon-Fri, 7am-3pm; Sun, 9am-2pm; closed Sat.\u003cbr>\nFacebook: \u003ca href=\"https://www.facebook.com/thegastropig/\" target=\"_blank\">The Gastropig\u003c/a>\u003cbr>\nTwitter: \u003ca href=\"https://twitter.com/thegastropig\" target=\"_blank\">@thegastropig\u003c/a>\u003cbr>\nInstagram: \u003ca href=\"https://www.instagram.com/thegastropig/\" target=\"_blank\">@thegastropig\u003c/a>\u003cbr>\nPrice range: $ (Entrees $10 and under)\u003c/p>\n\u003cfigure id=\"attachment_114518\" class=\"wp-caption aligncenter\" style=\"max-width: 1920px\">\u003cimg class=\"size-full wp-image-114518\" src=\"http://ww2.kqed.org/bayareabites/wp-content/uploads/sites/24/2017/01/IMG_1233.jpg\" alt=\"The Gastropig, a new Uptown Oakland breakfast and lunch spot.\" width=\"1920\" height=\"1440\" srcset=\"https://ww2.kqed.org/app/uploads/sites/24/2017/01/IMG_1233.jpg 1920w, https://ww2.kqed.org/app/uploads/sites/24/2017/01/IMG_1233-160x120.jpg 160w, https://ww2.kqed.org/app/uploads/sites/24/2017/01/IMG_1233-800x600.jpg 800w, https://ww2.kqed.org/app/uploads/sites/24/2017/01/IMG_1233-768x576.jpg 768w, https://ww2.kqed.org/app/uploads/sites/24/2017/01/IMG_1233-1020x765.jpg 1020w, https://ww2.kqed.org/app/uploads/sites/24/2017/01/IMG_1233-1180x885.jpg 1180w, https://ww2.kqed.org/app/uploads/sites/24/2017/01/IMG_1233-960x720.jpg 960w, https://ww2.kqed.org/app/uploads/sites/24/2017/01/IMG_1233-240x180.jpg 240w, https://ww2.kqed.org/app/uploads/sites/24/2017/01/IMG_1233-375x281.jpg 375w, https://ww2.kqed.org/app/uploads/sites/24/2017/01/IMG_1233-520x390.jpg 520w\" sizes=\"(max-width: 1920px) 100vw, 1920px\">\u003cfigcaption class=\"wp-caption-text\">The Gastropig, a new Uptown Oakland breakfast and lunch spot. \u003ccite>(Shelby Pope)\u003c/cite>\u003c/figcaption>\u003c/figure>\n\n\u003c/div>\u003c/p>","attributes":{"named":{},"numeric":[]}}],"link":"/bayareabites/114520/gastropig-a-new-destination-for-breakfast-sandwiches-in-uptown-oakland","authors":["5566"],"categories":["bayareabites_109","bayareabites_8770","bayareabites_1875","bayareabites_366","bayareabites_1807","bayareabites_10"],"tags":["bayareabites_278","bayareabites_14804","bayareabites_15712","bayareabites_616","bayareabites_1180"],"featImg":"bayareabites_114538","label":"source_bayareabites_114520"},"bayareabites_110434":{"type":"posts","id":"bayareabites_110434","meta":{"index":"posts_1591205157","site":"bayareabites","id":"110434","score":null,"sort":[1467563894000]},"guestAuthors":[],"slug":"time-to-grill-for-the-4th-of-july-grilled-bacon-wrapped-pork-tenderloin-with-mustard","title":"Time to Grill for the 4th of July: Grilled Bacon-Wrapped Pork Tenderloin with Mustard","publishDate":1467563894,"format":"image","headTitle":"Bay Area Bites | KQED Food","labelTerm":{"site":"bayareabites"},"content":"\u003cp>Pork tenderloin is one of those cuts of meat that I always love but always seem to forget about. Not that it isn’t a memorable meal, but it always feels kind of special. It’s always a kind of “ah-ha!” moment when I think, “What should I make for dinner?” especially if we have friends or family coming over.\u003c/p>\n\u003cp>The great thing about pork tenderloin is that it’s so easy to prepare, plus it’s incredibly delicious and endlessly versatile. You can grill it as is, simply seasoned with a bit of salt and pepper and rubbed with olive oil, and then serve it with all kinds of different sauces, salsas, chutneys, or even grilled stone fruit. Because pork fares well with fruit and sweeter sauces, I tend to pair it with things in season: grilled peaches or nectarines, a fresh plum chutney, or even mango salsa.\u003c/p>\n\u003cp>But I also like it’s savory side, and this dish is everything savory. It couldn’t be easier too. Just slather the tenderloin with a good country-style brown mustard, then wrap it up with strips of bacon. Of course, when I made this I didn’t secure the bacon with toothpicks, so I’d recommend it. Ideally, soak the toothpicks in water for about 30 minutes before you use them.\u003c/p>\n\u003cfigure id=\"attachment_110513\" class=\"wp-caption aligncenter\" style=\"max-width: 1920px\">\u003cimg class=\"size-full wp-image-110513\" src=\"http://ww2.kqed.org/bayareabites/wp-content/uploads/sites/24/2016/06/pork-finish-sideview.jpg\" alt=\"Grilled Bacon-Wrapped Pork Tenderloin\" width=\"1920\" height=\"1280\" srcset=\"https://ww2.kqed.org/app/uploads/sites/24/2016/06/pork-finish-sideview.jpg 1920w, https://ww2.kqed.org/app/uploads/sites/24/2016/06/pork-finish-sideview-400x267.jpg 400w, https://ww2.kqed.org/app/uploads/sites/24/2016/06/pork-finish-sideview-800x533.jpg 800w, https://ww2.kqed.org/app/uploads/sites/24/2016/06/pork-finish-sideview-768x512.jpg 768w, https://ww2.kqed.org/app/uploads/sites/24/2016/06/pork-finish-sideview-1440x960.jpg 1440w, https://ww2.kqed.org/app/uploads/sites/24/2016/06/pork-finish-sideview-1180x787.jpg 1180w, https://ww2.kqed.org/app/uploads/sites/24/2016/06/pork-finish-sideview-960x640.jpg 960w\" sizes=\"(max-width: 1920px) 100vw, 1920px\">\u003cfigcaption class=\"wp-caption-text\">Grilled Bacon-Wrapped Pork Tenderloin \u003ccite>(Wendy Goodfriend)\u003c/cite>\u003c/figcaption>\u003c/figure>\n\u003ch2>Recipe: Grilled Bacon-Wrapped Pork Tenderloin\u003c/h2>\n\u003cp>\u003cem>Makes 6-8 servings\u003c/em>\u003c/p>\n\u003cp>\u003cstrong>Ingredients:\u003c/strong>\u003c/p>\n\u003cul>\n\u003cli>1 pork tenderloin\u003c/li>\n\u003cli>Kosher salt and freshly ground black pepper\u003c/li>\n\u003cli>About 1 heaping tbsp country Dijon mustard\u003c/li>\n\u003cli>8 to 10 slices thin cut bacon strips\u003c/li>\n\u003c/ul>\n\u003cp>\u003cstrong>Instructions:\u003c/strong>\u003c/p>\n\u003col>\n\u003cli style=\"list-style-type: none\">\n\u003col>\n\u003cli>Rub the tenderloin all over with the mustard, then season with salt and pepper. Wrap the bacon around the tenderloin, securing it in place with toothpicks (soak the toothpicks in water for about 30 minutes before you use them). Place on a plate, cover with plastic wrap, and refrigerate for 1 hour or up to overnight.\u003c/li>\n\u003c/ol>\n\u003c/li>\n\u003c/ol>\n\u003cfigure id=\"attachment_110526\" class=\"wp-caption aligncenter\" style=\"max-width: 1920px\">\u003cimg class=\"size-full wp-image-110526\" src=\"http://ww2.kqed.org/bayareabites/wp-content/uploads/sites/24/2016/06/pork-mustard-rub.jpg\" alt=\"Rub the tenderloin all over with the mustard, then season with salt and pepper.\" width=\"1920\" height=\"1280\" srcset=\"https://ww2.kqed.org/app/uploads/sites/24/2016/06/pork-mustard-rub.jpg 1920w, https://ww2.kqed.org/app/uploads/sites/24/2016/06/pork-mustard-rub-400x267.jpg 400w, https://ww2.kqed.org/app/uploads/sites/24/2016/06/pork-mustard-rub-800x533.jpg 800w, https://ww2.kqed.org/app/uploads/sites/24/2016/06/pork-mustard-rub-768x512.jpg 768w, https://ww2.kqed.org/app/uploads/sites/24/2016/06/pork-mustard-rub-1440x960.jpg 1440w, https://ww2.kqed.org/app/uploads/sites/24/2016/06/pork-mustard-rub-1180x787.jpg 1180w, https://ww2.kqed.org/app/uploads/sites/24/2016/06/pork-mustard-rub-960x640.jpg 960w\" sizes=\"(max-width: 1920px) 100vw, 1920px\">\u003cfigcaption class=\"wp-caption-text\">Rub the tenderloin all over with the mustard, then season with salt and pepper. \u003ccite>(Wendy Goodfriend)\u003c/cite>\u003c/figcaption>\u003c/figure>\n\u003cfigure id=\"attachment_110511\" class=\"wp-caption aligncenter\" style=\"max-width: 1920px\">\u003cimg class=\"size-full wp-image-110511\" src=\"http://ww2.kqed.org/bayareabites/wp-content/uploads/sites/24/2016/06/pork-bacon-wrap.jpg\" alt=\"Wrap the bacon around the tenderloin.\" width=\"1920\" height=\"1280\" srcset=\"https://ww2.kqed.org/app/uploads/sites/24/2016/06/pork-bacon-wrap.jpg 1920w, https://ww2.kqed.org/app/uploads/sites/24/2016/06/pork-bacon-wrap-400x267.jpg 400w, https://ww2.kqed.org/app/uploads/sites/24/2016/06/pork-bacon-wrap-800x533.jpg 800w, https://ww2.kqed.org/app/uploads/sites/24/2016/06/pork-bacon-wrap-768x512.jpg 768w, https://ww2.kqed.org/app/uploads/sites/24/2016/06/pork-bacon-wrap-1440x960.jpg 1440w, https://ww2.kqed.org/app/uploads/sites/24/2016/06/pork-bacon-wrap-1180x787.jpg 1180w, https://ww2.kqed.org/app/uploads/sites/24/2016/06/pork-bacon-wrap-960x640.jpg 960w\" sizes=\"(max-width: 1920px) 100vw, 1920px\">\u003cfigcaption class=\"wp-caption-text\">Wrap the bacon around the tenderloin. \u003ccite>(Wendy Goodfriend)\u003c/cite>\u003c/figcaption>\u003c/figure>\n\u003cfigure id=\"attachment_110530\" class=\"wp-caption aligncenter\" style=\"max-width: 1920px\">\u003cimg class=\"size-full wp-image-110530\" src=\"http://ww2.kqed.org/bayareabites/wp-content/uploads/sites/24/2016/06/pork-wrapped-bacon.jpg\" alt=\"After bacon is wrapped, place on a plate, cover with plastic wrap, and refrigerate for 1 hour or up to overnight.\" width=\"1920\" height=\"1280\" srcset=\"https://ww2.kqed.org/app/uploads/sites/24/2016/06/pork-wrapped-bacon.jpg 1920w, https://ww2.kqed.org/app/uploads/sites/24/2016/06/pork-wrapped-bacon-400x267.jpg 400w, https://ww2.kqed.org/app/uploads/sites/24/2016/06/pork-wrapped-bacon-800x533.jpg 800w, https://ww2.kqed.org/app/uploads/sites/24/2016/06/pork-wrapped-bacon-768x512.jpg 768w, https://ww2.kqed.org/app/uploads/sites/24/2016/06/pork-wrapped-bacon-1440x960.jpg 1440w, https://ww2.kqed.org/app/uploads/sites/24/2016/06/pork-wrapped-bacon-1180x787.jpg 1180w, https://ww2.kqed.org/app/uploads/sites/24/2016/06/pork-wrapped-bacon-960x640.jpg 960w\" sizes=\"(max-width: 1920px) 100vw, 1920px\">\u003cfigcaption class=\"wp-caption-text\">After bacon is wrapped, place on a plate, cover with plastic wrap, and refrigerate for 1 hour or up to overnight. \u003ccite>(Wendy Goodfriend)\u003c/cite>\u003c/figcaption>\u003c/figure>\n\u003col>\n\u003cli style=\"list-style-type: none\">\n\u003col>\n\u003cli>Prepare a charcoal or gas grill for medium-high indirect heat. Clean the grill grate.\u003c/li>\n\u003cli>Brush the bacon all over with olive oil. Grill over the fire, turning occasionally, until the bacon is crisp and browned.\u003c/li>\n\u003c/ol>\n\u003c/li>\n\u003c/ol>\n\u003cfigure id=\"attachment_110527\" class=\"wp-caption aligncenter\" style=\"max-width: 1920px\">\u003cimg class=\"size-full wp-image-110527\" src=\"http://ww2.kqed.org/bayareabites/wp-content/uploads/sites/24/2016/06/pork-oil.jpg\" alt=\"Brush the bacon all over with olive oil.\" width=\"1920\" height=\"1280\" srcset=\"https://ww2.kqed.org/app/uploads/sites/24/2016/06/pork-oil.jpg 1920w, https://ww2.kqed.org/app/uploads/sites/24/2016/06/pork-oil-400x267.jpg 400w, https://ww2.kqed.org/app/uploads/sites/24/2016/06/pork-oil-800x533.jpg 800w, https://ww2.kqed.org/app/uploads/sites/24/2016/06/pork-oil-768x512.jpg 768w, https://ww2.kqed.org/app/uploads/sites/24/2016/06/pork-oil-1440x960.jpg 1440w, https://ww2.kqed.org/app/uploads/sites/24/2016/06/pork-oil-1180x787.jpg 1180w, https://ww2.kqed.org/app/uploads/sites/24/2016/06/pork-oil-960x640.jpg 960w\" sizes=\"(max-width: 1920px) 100vw, 1920px\">\u003cfigcaption class=\"wp-caption-text\">Brush the bacon all over with olive oil. \u003ccite>(Wendy Goodfriend)\u003c/cite>\u003c/figcaption>\u003c/figure>\n\u003cfigure id=\"attachment_110522\" class=\"wp-caption aligncenter\" style=\"max-width: 1920px\">\u003cimg class=\"size-full wp-image-110522\" src=\"http://ww2.kqed.org/bayareabites/wp-content/uploads/sites/24/2016/06/pork-grilled-cooked-fave.jpg\" alt=\"Grill over the fire, turning occasionally, until the bacon is crisp and browned.\" width=\"1920\" height=\"1280\" srcset=\"https://ww2.kqed.org/app/uploads/sites/24/2016/06/pork-grilled-cooked-fave.jpg 1920w, https://ww2.kqed.org/app/uploads/sites/24/2016/06/pork-grilled-cooked-fave-400x267.jpg 400w, https://ww2.kqed.org/app/uploads/sites/24/2016/06/pork-grilled-cooked-fave-800x533.jpg 800w, https://ww2.kqed.org/app/uploads/sites/24/2016/06/pork-grilled-cooked-fave-768x512.jpg 768w, https://ww2.kqed.org/app/uploads/sites/24/2016/06/pork-grilled-cooked-fave-1440x960.jpg 1440w, https://ww2.kqed.org/app/uploads/sites/24/2016/06/pork-grilled-cooked-fave-1180x787.jpg 1180w, https://ww2.kqed.org/app/uploads/sites/24/2016/06/pork-grilled-cooked-fave-960x640.jpg 960w\" sizes=\"(max-width: 1920px) 100vw, 1920px\">\u003cfigcaption class=\"wp-caption-text\">Grill over the fire, turning occasionally, until the bacon is crisp and browned. \u003ccite>(Wendy Goodfriend)\u003c/cite>\u003c/figcaption>\u003c/figure>\n\u003col>\n\u003cli style=\"list-style-type: none\">\n\u003col>\n\u003cli>Transfer to the cooler side of the grill, cover, and cook until a meat thermometer reads 145-150F. Transfer to a platter, tent with foil, and let rest for 10 minutes. Slice and serve!\u003c/li>\n\u003c/ol>\n\u003c/li>\n\u003c/ol>\n\u003cfigure id=\"attachment_110517\" class=\"wp-caption aligncenter\" style=\"max-width: 1920px\">\u003cimg class=\"size-full wp-image-110517\" src=\"http://ww2.kqed.org/bayareabites/wp-content/uploads/sites/24/2016/06/pork-finish-vertical.jpg\" alt=\"Slice and serve!\" width=\"1920\" height=\"2880\" srcset=\"https://ww2.kqed.org/app/uploads/sites/24/2016/06/pork-finish-vertical.jpg 1920w, https://ww2.kqed.org/app/uploads/sites/24/2016/06/pork-finish-vertical-400x600.jpg 400w, https://ww2.kqed.org/app/uploads/sites/24/2016/06/pork-finish-vertical-800x1200.jpg 800w, https://ww2.kqed.org/app/uploads/sites/24/2016/06/pork-finish-vertical-768x1152.jpg 768w, https://ww2.kqed.org/app/uploads/sites/24/2016/06/pork-finish-vertical-1440x2160.jpg 1440w, https://ww2.kqed.org/app/uploads/sites/24/2016/06/pork-finish-vertical-1180x1770.jpg 1180w, https://ww2.kqed.org/app/uploads/sites/24/2016/06/pork-finish-vertical-960x1440.jpg 960w\" sizes=\"(max-width: 1920px) 100vw, 1920px\">\u003cfigcaption class=\"wp-caption-text\">Slice and serve! \u003ccite>(Wendy Goodfriend)\u003c/cite>\u003c/figcaption>\u003c/figure>\n\u003cp>[ad fullwidth]\u003c/p>\u003cp>\u003c/p>\n","blocks":[],"excerpt":"Pork tenderloin is one of our favorite things to throw on the grill, but for this holiday we’ve taken it up a notch by wrapping it in bacon first.","status":"publish","parent":0,"modified":1550608763,"stats":{"hasAudio":false,"hasVideo":false,"hasChartOrMap":false,"iframeSrcs":[],"hasGoogleForm":false,"hasGallery":false,"hasHearkenModule":false,"hasPolis":false,"paragraphCount":8,"wordCount":483},"headData":{"title":"Time to Grill for the 4th of July: Grilled Bacon-Wrapped Pork Tenderloin with Mustard | KQED","description":"Pork tenderloin is one of our favorite things to throw on the grill, but for this holiday we’ve taken it up a notch by wrapping it in bacon first.","ogTitle":"","ogDescription":"","ogImgId":"","twTitle":"","twDescription":"","twImgId":"","schema":{"@context":"http://schema.org","@type":"Article","headline":"Time to Grill for the 4th of July: Grilled Bacon-Wrapped Pork Tenderloin with Mustard","datePublished":"2016-07-03T16:38:14.000Z","dateModified":"2019-02-19T20:39:23.000Z","image":"https://cdn.kqed.org/wp-content/uploads/2020/02/KQED-OG-Image@1x.png"}},"disqusIdentifier":"110434 http://ww2.kqed.org/bayareabites/?p=110434","disqusUrl":"https://ww2.kqed.org/bayareabites/2016/07/03/time-to-grill-for-the-4th-of-july-grilled-bacon-wrapped-pork-tenderloin-with-mustard/","disqusTitle":"Time to Grill for the 4th of July: Grilled Bacon-Wrapped Pork Tenderloin with Mustard","path":"/bayareabites/110434/time-to-grill-for-the-4th-of-july-grilled-bacon-wrapped-pork-tenderloin-with-mustard","audioTrackLength":null,"parsedContent":[{"type":"contentString","content":"\u003cdiv class=\"post-body\">\u003cp>\u003cp>Pork tenderloin is one of those cuts of meat that I always love but always seem to forget about. Not that it isn’t a memorable meal, but it always feels kind of special. It’s always a kind of “ah-ha!” moment when I think, “What should I make for dinner?” especially if we have friends or family coming over.\u003c/p>\n\u003cp>The great thing about pork tenderloin is that it’s so easy to prepare, plus it’s incredibly delicious and endlessly versatile. You can grill it as is, simply seasoned with a bit of salt and pepper and rubbed with olive oil, and then serve it with all kinds of different sauces, salsas, chutneys, or even grilled stone fruit. Because pork fares well with fruit and sweeter sauces, I tend to pair it with things in season: grilled peaches or nectarines, a fresh plum chutney, or even mango salsa.\u003c/p>\n\u003cp>But I also like it’s savory side, and this dish is everything savory. It couldn’t be easier too. Just slather the tenderloin with a good country-style brown mustard, then wrap it up with strips of bacon. Of course, when I made this I didn’t secure the bacon with toothpicks, so I’d recommend it. Ideally, soak the toothpicks in water for about 30 minutes before you use them.\u003c/p>\n\u003cfigure id=\"attachment_110513\" class=\"wp-caption aligncenter\" style=\"max-width: 1920px\">\u003cimg class=\"size-full wp-image-110513\" src=\"http://ww2.kqed.org/bayareabites/wp-content/uploads/sites/24/2016/06/pork-finish-sideview.jpg\" alt=\"Grilled Bacon-Wrapped Pork Tenderloin\" width=\"1920\" height=\"1280\" srcset=\"https://ww2.kqed.org/app/uploads/sites/24/2016/06/pork-finish-sideview.jpg 1920w, https://ww2.kqed.org/app/uploads/sites/24/2016/06/pork-finish-sideview-400x267.jpg 400w, https://ww2.kqed.org/app/uploads/sites/24/2016/06/pork-finish-sideview-800x533.jpg 800w, https://ww2.kqed.org/app/uploads/sites/24/2016/06/pork-finish-sideview-768x512.jpg 768w, https://ww2.kqed.org/app/uploads/sites/24/2016/06/pork-finish-sideview-1440x960.jpg 1440w, https://ww2.kqed.org/app/uploads/sites/24/2016/06/pork-finish-sideview-1180x787.jpg 1180w, https://ww2.kqed.org/app/uploads/sites/24/2016/06/pork-finish-sideview-960x640.jpg 960w\" sizes=\"(max-width: 1920px) 100vw, 1920px\">\u003cfigcaption class=\"wp-caption-text\">Grilled Bacon-Wrapped Pork Tenderloin \u003ccite>(Wendy Goodfriend)\u003c/cite>\u003c/figcaption>\u003c/figure>\n\u003ch2>Recipe: Grilled Bacon-Wrapped Pork Tenderloin\u003c/h2>\n\u003cp>\u003cem>Makes 6-8 servings\u003c/em>\u003c/p>\n\u003cp>\u003cstrong>Ingredients:\u003c/strong>\u003c/p>\n\u003cul>\n\u003cli>1 pork tenderloin\u003c/li>\n\u003cli>Kosher salt and freshly ground black pepper\u003c/li>\n\u003cli>About 1 heaping tbsp country Dijon mustard\u003c/li>\n\u003cli>8 to 10 slices thin cut bacon strips\u003c/li>\n\u003c/ul>\n\u003cp>\u003cstrong>Instructions:\u003c/strong>\u003c/p>\n\u003col>\n\u003cli style=\"list-style-type: none\">\n\u003col>\n\u003cli>Rub the tenderloin all over with the mustard, then season with salt and pepper. Wrap the bacon around the tenderloin, securing it in place with toothpicks (soak the toothpicks in water for about 30 minutes before you use them). Place on a plate, cover with plastic wrap, and refrigerate for 1 hour or up to overnight.\u003c/li>\n\u003c/ol>\n\u003c/li>\n\u003c/ol>\n\u003cfigure id=\"attachment_110526\" class=\"wp-caption aligncenter\" style=\"max-width: 1920px\">\u003cimg class=\"size-full wp-image-110526\" src=\"http://ww2.kqed.org/bayareabites/wp-content/uploads/sites/24/2016/06/pork-mustard-rub.jpg\" alt=\"Rub the tenderloin all over with the mustard, then season with salt and pepper.\" width=\"1920\" height=\"1280\" srcset=\"https://ww2.kqed.org/app/uploads/sites/24/2016/06/pork-mustard-rub.jpg 1920w, https://ww2.kqed.org/app/uploads/sites/24/2016/06/pork-mustard-rub-400x267.jpg 400w, https://ww2.kqed.org/app/uploads/sites/24/2016/06/pork-mustard-rub-800x533.jpg 800w, https://ww2.kqed.org/app/uploads/sites/24/2016/06/pork-mustard-rub-768x512.jpg 768w, https://ww2.kqed.org/app/uploads/sites/24/2016/06/pork-mustard-rub-1440x960.jpg 1440w, https://ww2.kqed.org/app/uploads/sites/24/2016/06/pork-mustard-rub-1180x787.jpg 1180w, https://ww2.kqed.org/app/uploads/sites/24/2016/06/pork-mustard-rub-960x640.jpg 960w\" sizes=\"(max-width: 1920px) 100vw, 1920px\">\u003cfigcaption class=\"wp-caption-text\">Rub the tenderloin all over with the mustard, then season with salt and pepper. \u003ccite>(Wendy Goodfriend)\u003c/cite>\u003c/figcaption>\u003c/figure>\n\u003cfigure id=\"attachment_110511\" class=\"wp-caption aligncenter\" style=\"max-width: 1920px\">\u003cimg class=\"size-full wp-image-110511\" src=\"http://ww2.kqed.org/bayareabites/wp-content/uploads/sites/24/2016/06/pork-bacon-wrap.jpg\" alt=\"Wrap the bacon around the tenderloin.\" width=\"1920\" height=\"1280\" srcset=\"https://ww2.kqed.org/app/uploads/sites/24/2016/06/pork-bacon-wrap.jpg 1920w, https://ww2.kqed.org/app/uploads/sites/24/2016/06/pork-bacon-wrap-400x267.jpg 400w, https://ww2.kqed.org/app/uploads/sites/24/2016/06/pork-bacon-wrap-800x533.jpg 800w, https://ww2.kqed.org/app/uploads/sites/24/2016/06/pork-bacon-wrap-768x512.jpg 768w, https://ww2.kqed.org/app/uploads/sites/24/2016/06/pork-bacon-wrap-1440x960.jpg 1440w, https://ww2.kqed.org/app/uploads/sites/24/2016/06/pork-bacon-wrap-1180x787.jpg 1180w, https://ww2.kqed.org/app/uploads/sites/24/2016/06/pork-bacon-wrap-960x640.jpg 960w\" sizes=\"(max-width: 1920px) 100vw, 1920px\">\u003cfigcaption class=\"wp-caption-text\">Wrap the bacon around the tenderloin. \u003ccite>(Wendy Goodfriend)\u003c/cite>\u003c/figcaption>\u003c/figure>\n\u003cfigure id=\"attachment_110530\" class=\"wp-caption aligncenter\" style=\"max-width: 1920px\">\u003cimg class=\"size-full wp-image-110530\" src=\"http://ww2.kqed.org/bayareabites/wp-content/uploads/sites/24/2016/06/pork-wrapped-bacon.jpg\" alt=\"After bacon is wrapped, place on a plate, cover with plastic wrap, and refrigerate for 1 hour or up to overnight.\" width=\"1920\" height=\"1280\" srcset=\"https://ww2.kqed.org/app/uploads/sites/24/2016/06/pork-wrapped-bacon.jpg 1920w, https://ww2.kqed.org/app/uploads/sites/24/2016/06/pork-wrapped-bacon-400x267.jpg 400w, https://ww2.kqed.org/app/uploads/sites/24/2016/06/pork-wrapped-bacon-800x533.jpg 800w, https://ww2.kqed.org/app/uploads/sites/24/2016/06/pork-wrapped-bacon-768x512.jpg 768w, https://ww2.kqed.org/app/uploads/sites/24/2016/06/pork-wrapped-bacon-1440x960.jpg 1440w, https://ww2.kqed.org/app/uploads/sites/24/2016/06/pork-wrapped-bacon-1180x787.jpg 1180w, https://ww2.kqed.org/app/uploads/sites/24/2016/06/pork-wrapped-bacon-960x640.jpg 960w\" sizes=\"(max-width: 1920px) 100vw, 1920px\">\u003cfigcaption class=\"wp-caption-text\">After bacon is wrapped, place on a plate, cover with plastic wrap, and refrigerate for 1 hour or up to overnight. \u003ccite>(Wendy Goodfriend)\u003c/cite>\u003c/figcaption>\u003c/figure>\n\u003col>\n\u003cli style=\"list-style-type: none\">\n\u003col>\n\u003cli>Prepare a charcoal or gas grill for medium-high indirect heat. Clean the grill grate.\u003c/li>\n\u003cli>Brush the bacon all over with olive oil. Grill over the fire, turning occasionally, until the bacon is crisp and browned.\u003c/li>\n\u003c/ol>\n\u003c/li>\n\u003c/ol>\n\u003cfigure id=\"attachment_110527\" class=\"wp-caption aligncenter\" style=\"max-width: 1920px\">\u003cimg class=\"size-full wp-image-110527\" src=\"http://ww2.kqed.org/bayareabites/wp-content/uploads/sites/24/2016/06/pork-oil.jpg\" alt=\"Brush the bacon all over with olive oil.\" width=\"1920\" height=\"1280\" srcset=\"https://ww2.kqed.org/app/uploads/sites/24/2016/06/pork-oil.jpg 1920w, https://ww2.kqed.org/app/uploads/sites/24/2016/06/pork-oil-400x267.jpg 400w, https://ww2.kqed.org/app/uploads/sites/24/2016/06/pork-oil-800x533.jpg 800w, https://ww2.kqed.org/app/uploads/sites/24/2016/06/pork-oil-768x512.jpg 768w, https://ww2.kqed.org/app/uploads/sites/24/2016/06/pork-oil-1440x960.jpg 1440w, https://ww2.kqed.org/app/uploads/sites/24/2016/06/pork-oil-1180x787.jpg 1180w, https://ww2.kqed.org/app/uploads/sites/24/2016/06/pork-oil-960x640.jpg 960w\" sizes=\"(max-width: 1920px) 100vw, 1920px\">\u003cfigcaption class=\"wp-caption-text\">Brush the bacon all over with olive oil. \u003ccite>(Wendy Goodfriend)\u003c/cite>\u003c/figcaption>\u003c/figure>\n\u003cfigure id=\"attachment_110522\" class=\"wp-caption aligncenter\" style=\"max-width: 1920px\">\u003cimg class=\"size-full wp-image-110522\" src=\"http://ww2.kqed.org/bayareabites/wp-content/uploads/sites/24/2016/06/pork-grilled-cooked-fave.jpg\" alt=\"Grill over the fire, turning occasionally, until the bacon is crisp and browned.\" width=\"1920\" height=\"1280\" srcset=\"https://ww2.kqed.org/app/uploads/sites/24/2016/06/pork-grilled-cooked-fave.jpg 1920w, https://ww2.kqed.org/app/uploads/sites/24/2016/06/pork-grilled-cooked-fave-400x267.jpg 400w, https://ww2.kqed.org/app/uploads/sites/24/2016/06/pork-grilled-cooked-fave-800x533.jpg 800w, https://ww2.kqed.org/app/uploads/sites/24/2016/06/pork-grilled-cooked-fave-768x512.jpg 768w, https://ww2.kqed.org/app/uploads/sites/24/2016/06/pork-grilled-cooked-fave-1440x960.jpg 1440w, https://ww2.kqed.org/app/uploads/sites/24/2016/06/pork-grilled-cooked-fave-1180x787.jpg 1180w, https://ww2.kqed.org/app/uploads/sites/24/2016/06/pork-grilled-cooked-fave-960x640.jpg 960w\" sizes=\"(max-width: 1920px) 100vw, 1920px\">\u003cfigcaption class=\"wp-caption-text\">Grill over the fire, turning occasionally, until the bacon is crisp and browned. \u003ccite>(Wendy Goodfriend)\u003c/cite>\u003c/figcaption>\u003c/figure>\n\u003col>\n\u003cli style=\"list-style-type: none\">\n\u003col>\n\u003cli>Transfer to the cooler side of the grill, cover, and cook until a meat thermometer reads 145-150F. Transfer to a platter, tent with foil, and let rest for 10 minutes. Slice and serve!\u003c/li>\n\u003c/ol>\n\u003c/li>\n\u003c/ol>\n\u003cfigure id=\"attachment_110517\" class=\"wp-caption aligncenter\" style=\"max-width: 1920px\">\u003cimg class=\"size-full wp-image-110517\" src=\"http://ww2.kqed.org/bayareabites/wp-content/uploads/sites/24/2016/06/pork-finish-vertical.jpg\" alt=\"Slice and serve!\" width=\"1920\" height=\"2880\" srcset=\"https://ww2.kqed.org/app/uploads/sites/24/2016/06/pork-finish-vertical.jpg 1920w, https://ww2.kqed.org/app/uploads/sites/24/2016/06/pork-finish-vertical-400x600.jpg 400w, https://ww2.kqed.org/app/uploads/sites/24/2016/06/pork-finish-vertical-800x1200.jpg 800w, https://ww2.kqed.org/app/uploads/sites/24/2016/06/pork-finish-vertical-768x1152.jpg 768w, https://ww2.kqed.org/app/uploads/sites/24/2016/06/pork-finish-vertical-1440x2160.jpg 1440w, https://ww2.kqed.org/app/uploads/sites/24/2016/06/pork-finish-vertical-1180x1770.jpg 1180w, https://ww2.kqed.org/app/uploads/sites/24/2016/06/pork-finish-vertical-960x1440.jpg 960w\" sizes=\"(max-width: 1920px) 100vw, 1920px\">\u003cfigcaption class=\"wp-caption-text\">Slice and serve! \u003ccite>(Wendy Goodfriend)\u003c/cite>\u003c/figcaption>\u003c/figure>\n\u003cp>\u003c/p>\u003c/div>","attributes":{"named":{},"numeric":[]}},{"type":"component","content":"","name":"ad","attributes":{"named":{"label":"fullwidth"},"numeric":["fullwidth"]}},{"type":"contentString","content":"\u003cdiv class=\"post-body\">\u003cp>\u003c/p>\u003cp>\u003c/p>\n\u003c/div>\u003c/p>","attributes":{"named":{},"numeric":[]}}],"link":"/bayareabites/110434/time-to-grill-for-the-4th-of-july-grilled-bacon-wrapped-pork-tenderloin-with-mustard","authors":["5015","5014"],"categories":["bayareabites_12550","bayareabites_1763","bayareabites_12","bayareabites_14362"],"tags":["bayareabites_8243","bayareabites_278","bayareabites_16297","bayareabites_616","bayareabites_3682"],"featImg":"bayareabites_110516","label":"bayareabites"},"bayareabites_109637":{"type":"posts","id":"bayareabites_109637","meta":{"index":"posts_1591205157","site":"bayareabites","id":"109637","score":null,"sort":[1464361245000]},"guestAuthors":[],"slug":"bay-area-bites-memorial-day-summer-grilling-recipes","title":"Bay Area Bites Memorial Day Summer Grilling Recipes","publishDate":1464361245,"format":"standard","headTitle":"Bay Area Bites | KQED Food","labelTerm":{"site":"bayareabites"},"content":"\u003cp>\u003cstrong>Start the summer off right by throwing everything on the grill this Memorial Day Weekend!\u003c/strong> \u003c/p>\n\u003cp>\u003ca href=\"https://ww2.kqed.org/bayareabites/2016/05/16/springtime-grilled-artichokes-with-romesco-sauce/\" target=\"_blank\">\u003cstrong>Springtime Grilled Artichokes with Romesco Sauce\u003c/strong>\u003c/a>\u003cbr>\nIt's grilling time! Smoky, lightly charred artichokes make a healthy and unexpected barbecue side dish when served with sweet pepper romesco sauce.\u003c/p>\n\u003cfigure id=\"attachment_109642\" class=\"wp-caption aligncenter\" style=\"max-width: 1920px\">\u003ca href=\"https://ww2.kqed.org/bayareabites/2016/05/16/springtime-grilled-artichokes-with-romesco-sauce/\">\u003cimg src=\"http://ww2.kqed.org/bayareabites/wp-content/uploads/sites/24/2016/05/artichokes-sauce-final3.jpg\" alt=\"Grilled Artichokes with Romesco Sauce\" width=\"1920\" height=\"1280\" class=\"size-full wp-image-109642\" srcset=\"https://ww2.kqed.org/app/uploads/sites/24/2016/05/artichokes-sauce-final3.jpg 1920w, https://ww2.kqed.org/app/uploads/sites/24/2016/05/artichokes-sauce-final3-400x267.jpg 400w, https://ww2.kqed.org/app/uploads/sites/24/2016/05/artichokes-sauce-final3-800x533.jpg 800w, https://ww2.kqed.org/app/uploads/sites/24/2016/05/artichokes-sauce-final3-768x512.jpg 768w, https://ww2.kqed.org/app/uploads/sites/24/2016/05/artichokes-sauce-final3-1440x960.jpg 1440w, https://ww2.kqed.org/app/uploads/sites/24/2016/05/artichokes-sauce-final3-1180x787.jpg 1180w, https://ww2.kqed.org/app/uploads/sites/24/2016/05/artichokes-sauce-final3-960x640.jpg 960w\" sizes=\"(max-width: 1920px) 100vw, 1920px\">\u003c/a>\u003cfigcaption class=\"wp-caption-text\">Grilled Artichokes with Romesco Sauce \u003ccite>(Wendy Goodfriend)\u003c/cite>\u003c/figcaption>\u003c/figure>\n\u003cp>\u003ca href=\"http://ww2.kqed.org/bayareabites/?p=109288\" target=\"_blank\">\u003cstrong>Memorial Day Grilled Japanese Eggplant with Yogurt, Za’atar, Mint & Feta\u003c/strong>\u003c/a>\u003cbr>\nSweet and smoky eggplant makes a terrific starter or side dish when topped with the Mediterranean flavors of za’atar, mint, and feta.\u003c/p>\n\u003cfigure id=\"attachment_109640\" class=\"wp-caption aligncenter\" style=\"max-width: 1920px\">\u003ca href=\"http://ww2.kqed.org/bayareabites/?p=109288\">\u003cimg src=\"http://ww2.kqed.org/bayareabites/wp-content/uploads/sites/24/2016/05/eggplant-final-new-1.jpg\" alt=\"Grilled Japanese Eggplant with Yogurt, Za’atar, Mint & Feta\" width=\"1920\" height=\"1280\" class=\"size-full wp-image-109640\" srcset=\"https://ww2.kqed.org/app/uploads/sites/24/2016/05/eggplant-final-new-1.jpg 1920w, https://ww2.kqed.org/app/uploads/sites/24/2016/05/eggplant-final-new-1-400x267.jpg 400w, https://ww2.kqed.org/app/uploads/sites/24/2016/05/eggplant-final-new-1-800x533.jpg 800w, https://ww2.kqed.org/app/uploads/sites/24/2016/05/eggplant-final-new-1-768x512.jpg 768w, https://ww2.kqed.org/app/uploads/sites/24/2016/05/eggplant-final-new-1-1440x960.jpg 1440w, https://ww2.kqed.org/app/uploads/sites/24/2016/05/eggplant-final-new-1-1180x787.jpg 1180w, https://ww2.kqed.org/app/uploads/sites/24/2016/05/eggplant-final-new-1-960x640.jpg 960w\" sizes=\"(max-width: 1920px) 100vw, 1920px\">\u003c/a>\u003cfigcaption class=\"wp-caption-text\">Grilled Japanese Eggplant with Yogurt, Za’atar, Mint & Feta \u003ccite>(Wendy Goodfriend)\u003c/cite>\u003c/figcaption>\u003c/figure>\n\u003cp>\u003ca href=\"http://ww2.kqed.org/bayareabites/?p=109295\" target=\"_blank\">\u003cstrong>Memorial Day BBQ: Simply Awesome Grilled Bone-in Ribeye Steak\u003c/strong>\u003c/a>\u003cbr>\nIf you are going to eat steak, make sure it’s a really good steak. Choose it well, treat it right, keep it simple, and make it an event worth eating.\u003c/p>\n\u003cfigure id=\"attachment_109639\" class=\"wp-caption aligncenter\" style=\"max-width: 1920px\">\u003ca href=\"http://ww2.kqed.org/bayareabites/?p=109295\">\u003cimg src=\"http://ww2.kqed.org/bayareabites/wp-content/uploads/sites/24/2016/05/steak-final-sliced.jpg\" alt=\"Simply Awesome Grilled Bone-in Ribeye Steak\" width=\"1920\" height=\"1280\" class=\"size-full wp-image-109639\" srcset=\"https://ww2.kqed.org/app/uploads/sites/24/2016/05/steak-final-sliced.jpg 1920w, https://ww2.kqed.org/app/uploads/sites/24/2016/05/steak-final-sliced-400x267.jpg 400w, https://ww2.kqed.org/app/uploads/sites/24/2016/05/steak-final-sliced-800x533.jpg 800w, https://ww2.kqed.org/app/uploads/sites/24/2016/05/steak-final-sliced-768x512.jpg 768w, https://ww2.kqed.org/app/uploads/sites/24/2016/05/steak-final-sliced-1440x960.jpg 1440w, https://ww2.kqed.org/app/uploads/sites/24/2016/05/steak-final-sliced-1180x787.jpg 1180w, https://ww2.kqed.org/app/uploads/sites/24/2016/05/steak-final-sliced-960x640.jpg 960w\" sizes=\"(max-width: 1920px) 100vw, 1920px\">\u003c/a>\u003cfigcaption class=\"wp-caption-text\">Simply Awesome Grilled Bone-in Ribeye Steak \u003ccite>(Wendy Goodfriend)\u003c/cite>\u003c/figcaption>\u003c/figure>\n\u003cp>\u003ca href=\"http://ww2.kqed.org/bayareabites/?p=109293\" target=\"_blank\">\u003cstrong>Memorial Day Salad with Burrata, Fresh Peas, Mint, Speck and Arugula\u003c/strong>\u003c/a>\u003cbr>\nCreamy burrata and salty charcuterie make up the base of this elegant salad, but its true glory lies in its homage to spring, when baby peas are sweet and fresh mint pops up in the garden.\u003c/p>\n\u003cfigure id=\"attachment_109641\" class=\"wp-caption aligncenter\" style=\"max-width: 1920px\">\u003ca href=\"http://ww2.kqed.org/bayareabites/?p=109293\">\u003cimg src=\"http://ww2.kqed.org/bayareabites/wp-content/uploads/sites/24/2016/05/burrata-salad-final-peas-1.jpg\" alt=\"Burrata, Peas, Mint, Speck and Arugula Salad\" width=\"1920\" height=\"1280\" class=\"size-full wp-image-109641\" srcset=\"https://ww2.kqed.org/app/uploads/sites/24/2016/05/burrata-salad-final-peas-1.jpg 1920w, https://ww2.kqed.org/app/uploads/sites/24/2016/05/burrata-salad-final-peas-1-400x267.jpg 400w, https://ww2.kqed.org/app/uploads/sites/24/2016/05/burrata-salad-final-peas-1-800x533.jpg 800w, https://ww2.kqed.org/app/uploads/sites/24/2016/05/burrata-salad-final-peas-1-768x512.jpg 768w, https://ww2.kqed.org/app/uploads/sites/24/2016/05/burrata-salad-final-peas-1-1440x960.jpg 1440w, https://ww2.kqed.org/app/uploads/sites/24/2016/05/burrata-salad-final-peas-1-1180x787.jpg 1180w, https://ww2.kqed.org/app/uploads/sites/24/2016/05/burrata-salad-final-peas-1-960x640.jpg 960w\" sizes=\"(max-width: 1920px) 100vw, 1920px\">\u003c/a>\u003cfigcaption class=\"wp-caption-text\">Burrata, Peas, Mint, Speck and Arugula Salad \u003ccite>(Wendy Goodfriend)\u003c/cite>\u003c/figcaption>\u003c/figure>\n\u003cp>\u003ca href=\"https://ww2.kqed.org/bayareabites/2015/05/18/memorial-day-recipe-fall-off-the-bone-bbq-baby-back-ribs-with-homemade-barbecue-sauce/\" target=\"_blank\">\u003cstrong>Fall-Off-The-Bone BBQ Baby Back Ribs with Homemade Barbecue Sauce\u003c/strong>\u003c/a>\u003cbr>\nYou don’t need 15 hours and a smoker to make fabulous baby back ribs – just follow this shortcut method and wow your guests at your next backyard get together.\u003c/p>\n\u003cfigure id=\"attachment_109657\" class=\"wp-caption aligncenter\" style=\"max-width: 1920px\">\u003ca href=\"https://ww2.kqed.org/bayareabites/2015/05/18/memorial-day-recipe-fall-off-the-bone-bbq-baby-back-ribs-with-homemade-barbecue-sauce/\">\u003cimg src=\"http://ww2.kqed.org/bayareabites/wp-content/uploads/sites/24/2016/05/ribs-finished-whole.jpg\" alt=\"BBQ Baby Back Ribs with Homemade Barbecue Sauce\" width=\"1920\" height=\"1280\" class=\"size-full wp-image-109657\" srcset=\"https://ww2.kqed.org/app/uploads/sites/24/2016/05/ribs-finished-whole.jpg 1920w, https://ww2.kqed.org/app/uploads/sites/24/2016/05/ribs-finished-whole-400x267.jpg 400w, https://ww2.kqed.org/app/uploads/sites/24/2016/05/ribs-finished-whole-800x533.jpg 800w, https://ww2.kqed.org/app/uploads/sites/24/2016/05/ribs-finished-whole-768x512.jpg 768w, https://ww2.kqed.org/app/uploads/sites/24/2016/05/ribs-finished-whole-1440x960.jpg 1440w, https://ww2.kqed.org/app/uploads/sites/24/2016/05/ribs-finished-whole-1180x787.jpg 1180w, https://ww2.kqed.org/app/uploads/sites/24/2016/05/ribs-finished-whole-960x640.jpg 960w\" sizes=\"(max-width: 1920px) 100vw, 1920px\">\u003c/a>\u003cfigcaption class=\"wp-caption-text\">BBQ Baby Back Ribs with Homemade Barbecue Sauce \u003ccite>(Wendy Goodfriend)\u003c/cite>\u003c/figcaption>\u003c/figure>\n\u003cp>\u003ca href=\"https://ww2.kqed.org/bayareabites/2014/08/23/throw-your-salad-on-the-grill-grilled-mushroom-kale-and-bacon-salad/\" target=\"_blank\">\u003cstrong>Throw Your Salad on the Grill: Grilled Mushroom, Kale, and Bacon Salad\u003c/strong>\u003c/a>\u003cbr>\nGrilling meaty mushrooms, especially when brushed with garlic and herb oil, highlights their umami flavors. Tossing them into a kale salad graced with bacon and lemon will highlight your meal.\u003c/p>\n\u003cfigure id=\"attachment_109659\" class=\"wp-caption aligncenter\" style=\"max-width: 1000px\">\u003ca href=\"https://ww2.kqed.org/bayareabites/2014/08/23/throw-your-salad-on-the-grill-grilled-mushroom-kale-and-bacon-salad/\">\u003cimg src=\"http://ww2.kqed.org/bayareabites/wp-content/uploads/sites/24/2016/05/salad-final1000a.jpg\" alt=\"Grilled King Trumpet Mushroom, Kale, and Bacon Salad with Lemon-Herb Vinaigrette\" width=\"1000\" height=\"980\" class=\"size-full wp-image-109659\" srcset=\"https://ww2.kqed.org/app/uploads/sites/24/2016/05/salad-final1000a.jpg 1000w, https://ww2.kqed.org/app/uploads/sites/24/2016/05/salad-final1000a-400x392.jpg 400w, https://ww2.kqed.org/app/uploads/sites/24/2016/05/salad-final1000a-800x784.jpg 800w, https://ww2.kqed.org/app/uploads/sites/24/2016/05/salad-final1000a-768x753.jpg 768w, https://ww2.kqed.org/app/uploads/sites/24/2016/05/salad-final1000a-960x941.jpg 960w, https://ww2.kqed.org/app/uploads/sites/24/2016/05/salad-final1000a-32x32.jpg 32w, https://ww2.kqed.org/app/uploads/sites/24/2016/05/salad-final1000a-50x50.jpg 50w, https://ww2.kqed.org/app/uploads/sites/24/2016/05/salad-final1000a-64x64.jpg 64w\" sizes=\"(max-width: 1000px) 100vw, 1000px\">\u003c/a>\u003cfigcaption class=\"wp-caption-text\">Grilled King Trumpet Mushroom, Kale, and Bacon Salad with Lemon-Herb Vinaigrette\u003c/figcaption>\u003c/figure>\n\u003cp> \u003ca href=\"https://ww2.kqed.org/bayareabites/2014/06/12/fathers-day-recipe-throw-your-potato-salad-on-the-grill/\" target=\"_blank\">\u003cstrong>Throw Your Potato Salad On The Grill: Grilled Potato Salad with Warm Bacon Vinaigrette\u003c/strong>\u003c/a>\u003cbr>\nGrilled potatoes with plenty of crisp bacon all bathed in mustardy vinaigrette? Sounds like potato salad has a whole new life at your next BBQ.\u003c/p>\n\u003cfigure id=\"attachment_109663\" class=\"wp-caption aligncenter\" style=\"max-width: 1000px\">\u003ca href=\"https://ww2.kqed.org/bayareabites/2014/06/12/fathers-day-recipe-throw-your-potato-salad-on-the-grill/\">\u003cimg src=\"http://ww2.kqed.org/bayareabites/wp-content/uploads/sites/24/2016/05/finished-potatoes1000a.jpg\" alt=\"Grilled Potato Salad with Warm Bacon Vinaigrette\" width=\"1000\" height=\"667\" class=\"size-full wp-image-109663\" srcset=\"https://ww2.kqed.org/app/uploads/sites/24/2016/05/finished-potatoes1000a.jpg 1000w, https://ww2.kqed.org/app/uploads/sites/24/2016/05/finished-potatoes1000a-400x267.jpg 400w, https://ww2.kqed.org/app/uploads/sites/24/2016/05/finished-potatoes1000a-800x534.jpg 800w, https://ww2.kqed.org/app/uploads/sites/24/2016/05/finished-potatoes1000a-768x512.jpg 768w, https://ww2.kqed.org/app/uploads/sites/24/2016/05/finished-potatoes1000a-960x640.jpg 960w\" sizes=\"(max-width: 1000px) 100vw, 1000px\">\u003c/a>\u003cfigcaption class=\"wp-caption-text\">Grilled Potato Salad with Warm Bacon Vinaigrette\u003c/figcaption>\u003c/figure>\n\u003cp>\u003ca href=\"https://ww2.kqed.org/bayareabites/2014/06/11/fathers-day-recipe-fire-up-the-grill-for-spicy-chili-burgers/\" target=\"_blank\">\u003cstrong>Fire Up the Grill for Spicy Chili Burgers\u003c/strong>\u003c/a>\u003cbr>\nIf you like a spicy burger that is anything but the norm, you have to try these: piled high with roasted green chiles and ripe slices of avocado and embellished with creamy, spicy chipotle mayo. These are sure to be the star of your next BBQ.\u003c/p>\n\u003cfigure id=\"attachment_109666\" class=\"wp-caption aligncenter\" style=\"max-width: 1000px\">\u003ca href=\"https://ww2.kqed.org/bayareabites/2014/06/11/fathers-day-recipe-fire-up-the-grill-for-spicy-chili-burgers/\">\u003cimg src=\"http://ww2.kqed.org/bayareabites/wp-content/uploads/sites/24/2016/05/final-burger1000.jpg\" alt=\"Chili Burgers with Chipotle Mayo, Pepper Jack, Roasted Green Chiles, and Avocado\" width=\"1000\" height=\"667\" class=\"size-full wp-image-109666\" srcset=\"https://ww2.kqed.org/app/uploads/sites/24/2016/05/final-burger1000.jpg 1000w, https://ww2.kqed.org/app/uploads/sites/24/2016/05/final-burger1000-400x267.jpg 400w, https://ww2.kqed.org/app/uploads/sites/24/2016/05/final-burger1000-800x534.jpg 800w, https://ww2.kqed.org/app/uploads/sites/24/2016/05/final-burger1000-768x512.jpg 768w, https://ww2.kqed.org/app/uploads/sites/24/2016/05/final-burger1000-960x640.jpg 960w\" sizes=\"(max-width: 1000px) 100vw, 1000px\">\u003c/a>\u003cfigcaption class=\"wp-caption-text\">Chili Burgers with Chipotle Mayo, Pepper Jack, Roasted Green Chiles, and Avocado \u003ccite>(Wendy Goodfriend)\u003c/cite>\u003c/figcaption>\u003c/figure>\n\u003cp>[ad fullwidth]\u003c/p>\u003cp>\u003c/p>\n","blocks":[],"excerpt":"Start the summer off right by throwing everything on the grill this Memorial Day Weekend!\r\n","status":"publish","parent":0,"modified":1526318030,"stats":{"hasAudio":false,"hasVideo":false,"hasChartOrMap":false,"iframeSrcs":[],"hasGoogleForm":false,"hasGallery":false,"hasHearkenModule":false,"hasPolis":false,"paragraphCount":11,"wordCount":432},"headData":{"title":"Bay Area Bites Memorial Day Summer Grilling Recipes | KQED","description":"Start the summer off right by throwing everything on the grill this Memorial Day Weekend!\r\n","ogTitle":"","ogDescription":"","ogImgId":"","twTitle":"","twDescription":"","twImgId":"","schema":{"@context":"http://schema.org","@type":"Article","headline":"Bay Area Bites Memorial Day Summer Grilling Recipes","datePublished":"2016-05-27T15:00:45.000Z","dateModified":"2018-05-14T17:13:50.000Z","image":"https://cdn.kqed.org/wp-content/uploads/2020/02/KQED-OG-Image@1x.png"}},"disqusIdentifier":"109637 http://ww2.kqed.org/bayareabites/?p=109637","disqusUrl":"https://ww2.kqed.org/bayareabites/2016/05/27/bay-area-bites-memorial-day-summer-grilling-recipes/","disqusTitle":"Bay Area Bites Memorial Day Summer Grilling Recipes","path":"/bayareabites/109637/bay-area-bites-memorial-day-summer-grilling-recipes","audioTrackLength":null,"parsedContent":[{"type":"contentString","content":"\u003cdiv class=\"post-body\">\u003cp>\u003cp>\u003cstrong>Start the summer off right by throwing everything on the grill this Memorial Day Weekend!\u003c/strong> \u003c/p>\n\u003cp>\u003ca href=\"https://ww2.kqed.org/bayareabites/2016/05/16/springtime-grilled-artichokes-with-romesco-sauce/\" target=\"_blank\">\u003cstrong>Springtime Grilled Artichokes with Romesco Sauce\u003c/strong>\u003c/a>\u003cbr>\nIt's grilling time! Smoky, lightly charred artichokes make a healthy and unexpected barbecue side dish when served with sweet pepper romesco sauce.\u003c/p>\n\u003cfigure id=\"attachment_109642\" class=\"wp-caption aligncenter\" style=\"max-width: 1920px\">\u003ca href=\"https://ww2.kqed.org/bayareabites/2016/05/16/springtime-grilled-artichokes-with-romesco-sauce/\">\u003cimg src=\"http://ww2.kqed.org/bayareabites/wp-content/uploads/sites/24/2016/05/artichokes-sauce-final3.jpg\" alt=\"Grilled Artichokes with Romesco Sauce\" width=\"1920\" height=\"1280\" class=\"size-full wp-image-109642\" srcset=\"https://ww2.kqed.org/app/uploads/sites/24/2016/05/artichokes-sauce-final3.jpg 1920w, https://ww2.kqed.org/app/uploads/sites/24/2016/05/artichokes-sauce-final3-400x267.jpg 400w, https://ww2.kqed.org/app/uploads/sites/24/2016/05/artichokes-sauce-final3-800x533.jpg 800w, https://ww2.kqed.org/app/uploads/sites/24/2016/05/artichokes-sauce-final3-768x512.jpg 768w, https://ww2.kqed.org/app/uploads/sites/24/2016/05/artichokes-sauce-final3-1440x960.jpg 1440w, https://ww2.kqed.org/app/uploads/sites/24/2016/05/artichokes-sauce-final3-1180x787.jpg 1180w, https://ww2.kqed.org/app/uploads/sites/24/2016/05/artichokes-sauce-final3-960x640.jpg 960w\" sizes=\"(max-width: 1920px) 100vw, 1920px\">\u003c/a>\u003cfigcaption class=\"wp-caption-text\">Grilled Artichokes with Romesco Sauce \u003ccite>(Wendy Goodfriend)\u003c/cite>\u003c/figcaption>\u003c/figure>\n\u003cp>\u003ca href=\"http://ww2.kqed.org/bayareabites/?p=109288\" target=\"_blank\">\u003cstrong>Memorial Day Grilled Japanese Eggplant with Yogurt, Za’atar, Mint & Feta\u003c/strong>\u003c/a>\u003cbr>\nSweet and smoky eggplant makes a terrific starter or side dish when topped with the Mediterranean flavors of za’atar, mint, and feta.\u003c/p>\n\u003cfigure id=\"attachment_109640\" class=\"wp-caption aligncenter\" style=\"max-width: 1920px\">\u003ca href=\"http://ww2.kqed.org/bayareabites/?p=109288\">\u003cimg src=\"http://ww2.kqed.org/bayareabites/wp-content/uploads/sites/24/2016/05/eggplant-final-new-1.jpg\" alt=\"Grilled Japanese Eggplant with Yogurt, Za’atar, Mint & Feta\" width=\"1920\" height=\"1280\" class=\"size-full wp-image-109640\" srcset=\"https://ww2.kqed.org/app/uploads/sites/24/2016/05/eggplant-final-new-1.jpg 1920w, https://ww2.kqed.org/app/uploads/sites/24/2016/05/eggplant-final-new-1-400x267.jpg 400w, https://ww2.kqed.org/app/uploads/sites/24/2016/05/eggplant-final-new-1-800x533.jpg 800w, https://ww2.kqed.org/app/uploads/sites/24/2016/05/eggplant-final-new-1-768x512.jpg 768w, https://ww2.kqed.org/app/uploads/sites/24/2016/05/eggplant-final-new-1-1440x960.jpg 1440w, https://ww2.kqed.org/app/uploads/sites/24/2016/05/eggplant-final-new-1-1180x787.jpg 1180w, https://ww2.kqed.org/app/uploads/sites/24/2016/05/eggplant-final-new-1-960x640.jpg 960w\" sizes=\"(max-width: 1920px) 100vw, 1920px\">\u003c/a>\u003cfigcaption class=\"wp-caption-text\">Grilled Japanese Eggplant with Yogurt, Za’atar, Mint & Feta \u003ccite>(Wendy Goodfriend)\u003c/cite>\u003c/figcaption>\u003c/figure>\n\u003cp>\u003ca href=\"http://ww2.kqed.org/bayareabites/?p=109295\" target=\"_blank\">\u003cstrong>Memorial Day BBQ: Simply Awesome Grilled Bone-in Ribeye Steak\u003c/strong>\u003c/a>\u003cbr>\nIf you are going to eat steak, make sure it’s a really good steak. Choose it well, treat it right, keep it simple, and make it an event worth eating.\u003c/p>\n\u003cfigure id=\"attachment_109639\" class=\"wp-caption aligncenter\" style=\"max-width: 1920px\">\u003ca href=\"http://ww2.kqed.org/bayareabites/?p=109295\">\u003cimg src=\"http://ww2.kqed.org/bayareabites/wp-content/uploads/sites/24/2016/05/steak-final-sliced.jpg\" alt=\"Simply Awesome Grilled Bone-in Ribeye Steak\" width=\"1920\" height=\"1280\" class=\"size-full wp-image-109639\" srcset=\"https://ww2.kqed.org/app/uploads/sites/24/2016/05/steak-final-sliced.jpg 1920w, https://ww2.kqed.org/app/uploads/sites/24/2016/05/steak-final-sliced-400x267.jpg 400w, https://ww2.kqed.org/app/uploads/sites/24/2016/05/steak-final-sliced-800x533.jpg 800w, https://ww2.kqed.org/app/uploads/sites/24/2016/05/steak-final-sliced-768x512.jpg 768w, https://ww2.kqed.org/app/uploads/sites/24/2016/05/steak-final-sliced-1440x960.jpg 1440w, https://ww2.kqed.org/app/uploads/sites/24/2016/05/steak-final-sliced-1180x787.jpg 1180w, https://ww2.kqed.org/app/uploads/sites/24/2016/05/steak-final-sliced-960x640.jpg 960w\" sizes=\"(max-width: 1920px) 100vw, 1920px\">\u003c/a>\u003cfigcaption class=\"wp-caption-text\">Simply Awesome Grilled Bone-in Ribeye Steak \u003ccite>(Wendy Goodfriend)\u003c/cite>\u003c/figcaption>\u003c/figure>\n\u003cp>\u003ca href=\"http://ww2.kqed.org/bayareabites/?p=109293\" target=\"_blank\">\u003cstrong>Memorial Day Salad with Burrata, Fresh Peas, Mint, Speck and Arugula\u003c/strong>\u003c/a>\u003cbr>\nCreamy burrata and salty charcuterie make up the base of this elegant salad, but its true glory lies in its homage to spring, when baby peas are sweet and fresh mint pops up in the garden.\u003c/p>\n\u003cfigure id=\"attachment_109641\" class=\"wp-caption aligncenter\" style=\"max-width: 1920px\">\u003ca href=\"http://ww2.kqed.org/bayareabites/?p=109293\">\u003cimg src=\"http://ww2.kqed.org/bayareabites/wp-content/uploads/sites/24/2016/05/burrata-salad-final-peas-1.jpg\" alt=\"Burrata, Peas, Mint, Speck and Arugula Salad\" width=\"1920\" height=\"1280\" class=\"size-full wp-image-109641\" srcset=\"https://ww2.kqed.org/app/uploads/sites/24/2016/05/burrata-salad-final-peas-1.jpg 1920w, https://ww2.kqed.org/app/uploads/sites/24/2016/05/burrata-salad-final-peas-1-400x267.jpg 400w, https://ww2.kqed.org/app/uploads/sites/24/2016/05/burrata-salad-final-peas-1-800x533.jpg 800w, https://ww2.kqed.org/app/uploads/sites/24/2016/05/burrata-salad-final-peas-1-768x512.jpg 768w, https://ww2.kqed.org/app/uploads/sites/24/2016/05/burrata-salad-final-peas-1-1440x960.jpg 1440w, https://ww2.kqed.org/app/uploads/sites/24/2016/05/burrata-salad-final-peas-1-1180x787.jpg 1180w, https://ww2.kqed.org/app/uploads/sites/24/2016/05/burrata-salad-final-peas-1-960x640.jpg 960w\" sizes=\"(max-width: 1920px) 100vw, 1920px\">\u003c/a>\u003cfigcaption class=\"wp-caption-text\">Burrata, Peas, Mint, Speck and Arugula Salad \u003ccite>(Wendy Goodfriend)\u003c/cite>\u003c/figcaption>\u003c/figure>\n\u003cp>\u003ca href=\"https://ww2.kqed.org/bayareabites/2015/05/18/memorial-day-recipe-fall-off-the-bone-bbq-baby-back-ribs-with-homemade-barbecue-sauce/\" target=\"_blank\">\u003cstrong>Fall-Off-The-Bone BBQ Baby Back Ribs with Homemade Barbecue Sauce\u003c/strong>\u003c/a>\u003cbr>\nYou don’t need 15 hours and a smoker to make fabulous baby back ribs – just follow this shortcut method and wow your guests at your next backyard get together.\u003c/p>\n\u003cfigure id=\"attachment_109657\" class=\"wp-caption aligncenter\" style=\"max-width: 1920px\">\u003ca href=\"https://ww2.kqed.org/bayareabites/2015/05/18/memorial-day-recipe-fall-off-the-bone-bbq-baby-back-ribs-with-homemade-barbecue-sauce/\">\u003cimg src=\"http://ww2.kqed.org/bayareabites/wp-content/uploads/sites/24/2016/05/ribs-finished-whole.jpg\" alt=\"BBQ Baby Back Ribs with Homemade Barbecue Sauce\" width=\"1920\" height=\"1280\" class=\"size-full wp-image-109657\" srcset=\"https://ww2.kqed.org/app/uploads/sites/24/2016/05/ribs-finished-whole.jpg 1920w, https://ww2.kqed.org/app/uploads/sites/24/2016/05/ribs-finished-whole-400x267.jpg 400w, https://ww2.kqed.org/app/uploads/sites/24/2016/05/ribs-finished-whole-800x533.jpg 800w, https://ww2.kqed.org/app/uploads/sites/24/2016/05/ribs-finished-whole-768x512.jpg 768w, https://ww2.kqed.org/app/uploads/sites/24/2016/05/ribs-finished-whole-1440x960.jpg 1440w, https://ww2.kqed.org/app/uploads/sites/24/2016/05/ribs-finished-whole-1180x787.jpg 1180w, https://ww2.kqed.org/app/uploads/sites/24/2016/05/ribs-finished-whole-960x640.jpg 960w\" sizes=\"(max-width: 1920px) 100vw, 1920px\">\u003c/a>\u003cfigcaption class=\"wp-caption-text\">BBQ Baby Back Ribs with Homemade Barbecue Sauce \u003ccite>(Wendy Goodfriend)\u003c/cite>\u003c/figcaption>\u003c/figure>\n\u003cp>\u003ca href=\"https://ww2.kqed.org/bayareabites/2014/08/23/throw-your-salad-on-the-grill-grilled-mushroom-kale-and-bacon-salad/\" target=\"_blank\">\u003cstrong>Throw Your Salad on the Grill: Grilled Mushroom, Kale, and Bacon Salad\u003c/strong>\u003c/a>\u003cbr>\nGrilling meaty mushrooms, especially when brushed with garlic and herb oil, highlights their umami flavors. Tossing them into a kale salad graced with bacon and lemon will highlight your meal.\u003c/p>\n\u003cfigure id=\"attachment_109659\" class=\"wp-caption aligncenter\" style=\"max-width: 1000px\">\u003ca href=\"https://ww2.kqed.org/bayareabites/2014/08/23/throw-your-salad-on-the-grill-grilled-mushroom-kale-and-bacon-salad/\">\u003cimg src=\"http://ww2.kqed.org/bayareabites/wp-content/uploads/sites/24/2016/05/salad-final1000a.jpg\" alt=\"Grilled King Trumpet Mushroom, Kale, and Bacon Salad with Lemon-Herb Vinaigrette\" width=\"1000\" height=\"980\" class=\"size-full wp-image-109659\" srcset=\"https://ww2.kqed.org/app/uploads/sites/24/2016/05/salad-final1000a.jpg 1000w, https://ww2.kqed.org/app/uploads/sites/24/2016/05/salad-final1000a-400x392.jpg 400w, https://ww2.kqed.org/app/uploads/sites/24/2016/05/salad-final1000a-800x784.jpg 800w, https://ww2.kqed.org/app/uploads/sites/24/2016/05/salad-final1000a-768x753.jpg 768w, https://ww2.kqed.org/app/uploads/sites/24/2016/05/salad-final1000a-960x941.jpg 960w, https://ww2.kqed.org/app/uploads/sites/24/2016/05/salad-final1000a-32x32.jpg 32w, https://ww2.kqed.org/app/uploads/sites/24/2016/05/salad-final1000a-50x50.jpg 50w, https://ww2.kqed.org/app/uploads/sites/24/2016/05/salad-final1000a-64x64.jpg 64w\" sizes=\"(max-width: 1000px) 100vw, 1000px\">\u003c/a>\u003cfigcaption class=\"wp-caption-text\">Grilled King Trumpet Mushroom, Kale, and Bacon Salad with Lemon-Herb Vinaigrette\u003c/figcaption>\u003c/figure>\n\u003cp> \u003ca href=\"https://ww2.kqed.org/bayareabites/2014/06/12/fathers-day-recipe-throw-your-potato-salad-on-the-grill/\" target=\"_blank\">\u003cstrong>Throw Your Potato Salad On The Grill: Grilled Potato Salad with Warm Bacon Vinaigrette\u003c/strong>\u003c/a>\u003cbr>\nGrilled potatoes with plenty of crisp bacon all bathed in mustardy vinaigrette? Sounds like potato salad has a whole new life at your next BBQ.\u003c/p>\n\u003cfigure id=\"attachment_109663\" class=\"wp-caption aligncenter\" style=\"max-width: 1000px\">\u003ca href=\"https://ww2.kqed.org/bayareabites/2014/06/12/fathers-day-recipe-throw-your-potato-salad-on-the-grill/\">\u003cimg src=\"http://ww2.kqed.org/bayareabites/wp-content/uploads/sites/24/2016/05/finished-potatoes1000a.jpg\" alt=\"Grilled Potato Salad with Warm Bacon Vinaigrette\" width=\"1000\" height=\"667\" class=\"size-full wp-image-109663\" srcset=\"https://ww2.kqed.org/app/uploads/sites/24/2016/05/finished-potatoes1000a.jpg 1000w, https://ww2.kqed.org/app/uploads/sites/24/2016/05/finished-potatoes1000a-400x267.jpg 400w, https://ww2.kqed.org/app/uploads/sites/24/2016/05/finished-potatoes1000a-800x534.jpg 800w, https://ww2.kqed.org/app/uploads/sites/24/2016/05/finished-potatoes1000a-768x512.jpg 768w, https://ww2.kqed.org/app/uploads/sites/24/2016/05/finished-potatoes1000a-960x640.jpg 960w\" sizes=\"(max-width: 1000px) 100vw, 1000px\">\u003c/a>\u003cfigcaption class=\"wp-caption-text\">Grilled Potato Salad with Warm Bacon Vinaigrette\u003c/figcaption>\u003c/figure>\n\u003cp>\u003ca href=\"https://ww2.kqed.org/bayareabites/2014/06/11/fathers-day-recipe-fire-up-the-grill-for-spicy-chili-burgers/\" target=\"_blank\">\u003cstrong>Fire Up the Grill for Spicy Chili Burgers\u003c/strong>\u003c/a>\u003cbr>\nIf you like a spicy burger that is anything but the norm, you have to try these: piled high with roasted green chiles and ripe slices of avocado and embellished with creamy, spicy chipotle mayo. These are sure to be the star of your next BBQ.\u003c/p>\n\u003cfigure id=\"attachment_109666\" class=\"wp-caption aligncenter\" style=\"max-width: 1000px\">\u003ca href=\"https://ww2.kqed.org/bayareabites/2014/06/11/fathers-day-recipe-fire-up-the-grill-for-spicy-chili-burgers/\">\u003cimg src=\"http://ww2.kqed.org/bayareabites/wp-content/uploads/sites/24/2016/05/final-burger1000.jpg\" alt=\"Chili Burgers with Chipotle Mayo, Pepper Jack, Roasted Green Chiles, and Avocado\" width=\"1000\" height=\"667\" class=\"size-full wp-image-109666\" srcset=\"https://ww2.kqed.org/app/uploads/sites/24/2016/05/final-burger1000.jpg 1000w, https://ww2.kqed.org/app/uploads/sites/24/2016/05/final-burger1000-400x267.jpg 400w, https://ww2.kqed.org/app/uploads/sites/24/2016/05/final-burger1000-800x534.jpg 800w, https://ww2.kqed.org/app/uploads/sites/24/2016/05/final-burger1000-768x512.jpg 768w, https://ww2.kqed.org/app/uploads/sites/24/2016/05/final-burger1000-960x640.jpg 960w\" sizes=\"(max-width: 1000px) 100vw, 1000px\">\u003c/a>\u003cfigcaption class=\"wp-caption-text\">Chili Burgers with Chipotle Mayo, Pepper Jack, Roasted Green Chiles, and Avocado \u003ccite>(Wendy Goodfriend)\u003c/cite>\u003c/figcaption>\u003c/figure>\n\u003cp>\u003c/p>\u003c/div>","attributes":{"named":{},"numeric":[]}},{"type":"component","content":"","name":"ad","attributes":{"named":{"label":"fullwidth"},"numeric":["fullwidth"]}},{"type":"contentString","content":"\u003cdiv class=\"post-body\">\u003cp>\u003c/p>\u003cp>\u003c/p>\n\u003c/div>\u003c/p>","attributes":{"named":{},"numeric":[]}}],"link":"/bayareabites/109637/bay-area-bites-memorial-day-summer-grilling-recipes","authors":["5015","5014"],"categories":["bayareabites_13746","bayareabites_12550","bayareabites_1763","bayareabites_12","bayareabites_14362"],"tags":["bayareabites_1009","bayareabites_2113","bayareabites_278","bayareabites_2250","bayareabites_1289","bayareabites_1964","bayareabites_15468","bayareabites_2292","bayareabites_2550","bayareabites_3050","bayareabites_12805","bayareabites_2198","bayareabites_16159","bayareabites_9329","bayareabites_14407","bayareabites_1815","bayareabites_15469","bayareabites_753","bayareabites_218","bayareabites_11920"],"featImg":"bayareabites_109638","label":"bayareabites"},"bayareabites_109087":{"type":"posts","id":"bayareabites_109087","meta":{"index":"posts_1591205157","site":"bayareabites","id":"109087","score":null,"sort":[1462633709000]},"guestAuthors":[],"slug":"celebrate-mothers-day-with-a-breakfast-salad","title":"Celebrate Mother’s Day with a Breakfast Salad!","publishDate":1462633709,"format":"image","headTitle":"Bay Area Bites | KQED Food","labelTerm":{"site":"bayareabites"},"content":"\u003cp>Salad for breakfast? It’s not as strange as it might sound. And while I’m a big fan of the occasional sweet breakfast (I love me some blueberry pancakes and crisp bacon from \u003ca href=\"http://www.stfrancisfountainsf.com/\" target=\"_blank\">St. Francis Fountain\u003c/a> in San Francisco!), I really love savory breakfasts. Besides, my husband—a Brit—doesn’t understand the “American obsession with dessert for breakfast” so we eat a LOT of eggs in our house.\u003c/p>\n\u003cp>Because of this, I’m always looking for creative ways to serve eggs for breakfast, beyond the usual fried over medium, soft-boiled, hard-boiled, poached, or softly scrambled. I’m inspired by innovative brunch offerings at some of my favorite cafes.\u003c/p>\n\u003cp>More and more popular brunch spots are offering up savory, salad-y, egg-topped dishes for us early risers. On a recent trip to L.A. I discovered an amazing breakfast spot (adored by many LA brunchers): an adorable café called \u003ca href=\"http://sqirlla.com/\" target=\"_blank\">Sqirl\u003c/a>. At Sqirl, they serve up a crave-worthy, vinegar-laced crispy brown rice “salad” with runny egg, avocado, plenty of herbs, and salty sausage. There’s also a terrific breakfast-y salad at my beloved local breakfast bakery, \u003ca href=\"http://www.dellafattoria.com/\" target=\"_blank\">Della Fattoria\u003c/a>.\u003c/p>\n\u003cp>This version is perfect for springtime (or Mother’s Day), with plenty of tender greens, earthy asparagus, and salty bacon. All topped with a soft-boiled runny egg. \u003c/p>\n\u003cp>When making boiled eggs, if you have an egg poker it works wonders for getting the peel cleanly off. Soft boiling eggs is a bit trickier, and every second matters, so pay close attention to the timing.\u003c/p>\n\u003cfigure id=\"attachment_109142\" class=\"wp-caption aligncenter\" style=\"max-width: 1920px\">\u003cimg src=\"http://ww2.kqed.org/bayareabites/wp-content/uploads/sites/24/2016/05/breakfast-salad-final4.jpg\" alt=\"Mother's Day Breakfast Salad\" width=\"1920\" height=\"1280\" class=\"size-full wp-image-109142\" srcset=\"https://ww2.kqed.org/app/uploads/sites/24/2016/05/breakfast-salad-final4.jpg 1920w, https://ww2.kqed.org/app/uploads/sites/24/2016/05/breakfast-salad-final4-400x267.jpg 400w, https://ww2.kqed.org/app/uploads/sites/24/2016/05/breakfast-salad-final4-800x533.jpg 800w, https://ww2.kqed.org/app/uploads/sites/24/2016/05/breakfast-salad-final4-768x512.jpg 768w, https://ww2.kqed.org/app/uploads/sites/24/2016/05/breakfast-salad-final4-1440x960.jpg 1440w, https://ww2.kqed.org/app/uploads/sites/24/2016/05/breakfast-salad-final4-1180x787.jpg 1180w, https://ww2.kqed.org/app/uploads/sites/24/2016/05/breakfast-salad-final4-960x640.jpg 960w\" sizes=\"(max-width: 1920px) 100vw, 1920px\">\u003cfigcaption class=\"wp-caption-text\">Mother's Day Breakfast Salad \u003ccite>(Wendy Goodfriend)\u003c/cite>\u003c/figcaption>\u003c/figure>\n\u003ch3>Recipe: Breakfast Salad\u003c/h3>\n\u003cp>\u003cem>Makes 4 servings\u003c/em>\u003c/p>\n\u003cul>\n\u003cstrong>Ingredients:\u003c/strong>\n\u003cli>4 slices thick-cut smoked bacon\u003c/li>\n\u003cli>1 lb asparagus, trimmed\u003c/li>\n\u003cli>Olive oil\u003c/li>\n\u003cli>Kosher salt and freshly ground black pepper\u003c/li>\n\u003cli>4 large eggs (depending on how many you want)\u003c/li>\n\u003cli>4 cups fresh baby salad greens\u003c/li>\n\u003c/ul>\n\u003cul>\n\u003cstrong>\u003cem>For the vinaigrette\u003c/em>\u003c/strong>\n\u003cli>3 tbsp olive oil\u003c/li>\n\u003cli>2 tbsp white wine or champagne vinegar\u003c/li>\n\u003cli>1 tbsp lemon juice\u003c/li>\n\u003cli>1/4 tsp Dijon mustard\u003c/li>\n\u003c/ul>\n\u003col>\n\u003cstrong>Instructions:\u003c/strong>\n\u003cli>To make the vinaigrette, in a small jam jar with a screw-top lid, add the ingredients for the vinaigrette. Cover and shake well until creamy.\u003c/li>\n\u003cfigure id=\"attachment_109149\" class=\"wp-caption aligncenter\" style=\"max-width: 1920px\">\u003cimg src=\"http://ww2.kqed.org/bayareabites/wp-content/uploads/sites/24/2016/05/breakfast-salad-dressing1.jpg\" alt=\"To make the vinaigrette, in a small jam jar with a screw-top lid, add the ingredients for the vinaigrette. Cover and shake well until creamy.\" width=\"1920\" height=\"1280\" class=\"size-full wp-image-109149\" srcset=\"https://ww2.kqed.org/app/uploads/sites/24/2016/05/breakfast-salad-dressing1.jpg 1920w, https://ww2.kqed.org/app/uploads/sites/24/2016/05/breakfast-salad-dressing1-400x267.jpg 400w, https://ww2.kqed.org/app/uploads/sites/24/2016/05/breakfast-salad-dressing1-800x533.jpg 800w, https://ww2.kqed.org/app/uploads/sites/24/2016/05/breakfast-salad-dressing1-768x512.jpg 768w, https://ww2.kqed.org/app/uploads/sites/24/2016/05/breakfast-salad-dressing1-1440x960.jpg 1440w, https://ww2.kqed.org/app/uploads/sites/24/2016/05/breakfast-salad-dressing1-1180x787.jpg 1180w, https://ww2.kqed.org/app/uploads/sites/24/2016/05/breakfast-salad-dressing1-960x640.jpg 960w\" sizes=\"(max-width: 1920px) 100vw, 1920px\">\u003cfigcaption class=\"wp-caption-text\">To make the vinaigrette, in a small jam jar with a screw-top lid, add the ingredients for the vinaigrette. Cover and shake well until creamy. \u003ccite>(Wendy Goodfriend)\u003c/cite>\u003c/figcaption>\u003c/figure>\n\u003cli>Bring a saucepan half full of salted water to a boil over medium-high heat. Add the asparagus and cook, stirring occasionally, until crisp-tender. Drain in a strainer set in the sink. Run under cold water to stop the cooking and drain again.\u003c/li>\n\u003cfigure id=\"attachment_109480\" class=\"wp-caption aligncenter\" style=\"max-width: 1920px\">\u003cimg src=\"http://ww2.kqed.org/bayareabites/wp-content/uploads/sites/24/2016/05/breakfast-salad-asparagus-cook.jpg\" alt=\"Add the asparagus and cook, stirring occasionally, until crisp-tender.\" width=\"1920\" height=\"1280\" class=\"size-full wp-image-109480\" srcset=\"https://ww2.kqed.org/app/uploads/sites/24/2016/05/breakfast-salad-asparagus-cook.jpg 1920w, https://ww2.kqed.org/app/uploads/sites/24/2016/05/breakfast-salad-asparagus-cook-400x267.jpg 400w, https://ww2.kqed.org/app/uploads/sites/24/2016/05/breakfast-salad-asparagus-cook-800x533.jpg 800w, https://ww2.kqed.org/app/uploads/sites/24/2016/05/breakfast-salad-asparagus-cook-768x512.jpg 768w, https://ww2.kqed.org/app/uploads/sites/24/2016/05/breakfast-salad-asparagus-cook-1440x960.jpg 1440w, https://ww2.kqed.org/app/uploads/sites/24/2016/05/breakfast-salad-asparagus-cook-1180x787.jpg 1180w, https://ww2.kqed.org/app/uploads/sites/24/2016/05/breakfast-salad-asparagus-cook-960x640.jpg 960w\" sizes=\"(max-width: 1920px) 100vw, 1920px\">\u003cfigcaption class=\"wp-caption-text\">Add the asparagus and cook, stirring occasionally, until crisp-tender. \u003ccite>(Wendy Goodfriend)\u003c/cite>\u003c/figcaption>\u003c/figure>\n\u003cli>Meanwhile, in a frying pan over medium heat, cook the bacon until crisp. Drain on paper towels.\u003c/li>\n\u003cfigure id=\"attachment_109147\" class=\"wp-caption aligncenter\" style=\"max-width: 1920px\">\u003cimg src=\"http://ww2.kqed.org/bayareabites/wp-content/uploads/sites/24/2016/05/breakfast-salad-bacon.jpg\" alt=\"Cook the bacon until crisp.\" width=\"1920\" height=\"1280\" class=\"size-full wp-image-109147\" srcset=\"https://ww2.kqed.org/app/uploads/sites/24/2016/05/breakfast-salad-bacon.jpg 1920w, https://ww2.kqed.org/app/uploads/sites/24/2016/05/breakfast-salad-bacon-400x267.jpg 400w, https://ww2.kqed.org/app/uploads/sites/24/2016/05/breakfast-salad-bacon-800x533.jpg 800w, https://ww2.kqed.org/app/uploads/sites/24/2016/05/breakfast-salad-bacon-768x512.jpg 768w, https://ww2.kqed.org/app/uploads/sites/24/2016/05/breakfast-salad-bacon-1440x960.jpg 1440w, https://ww2.kqed.org/app/uploads/sites/24/2016/05/breakfast-salad-bacon-1180x787.jpg 1180w, https://ww2.kqed.org/app/uploads/sites/24/2016/05/breakfast-salad-bacon-960x640.jpg 960w\" sizes=\"(max-width: 1920px) 100vw, 1920px\">\u003cfigcaption class=\"wp-caption-text\">Cook the bacon until crisp. \u003ccite>(Wendy Goodfriend)\u003c/cite>\u003c/figcaption>\u003c/figure>\n\u003cli>Bring the saucepan, two-thirds filled with water, to a boil over high heat, then reduce the heat to medium so that the water is simmering. Gently lower the eggs into the water using the slotted spoon. Cook for a few seconds more than 7 minutes (this should give you a very slightly runny yolk; if you like it less runny, cook it for another minute or two). Remove the eggs with the slotted spoon and run under cold water. Gently crack the egg shells, then peel. Set aside.\u003c/li>\n\u003cfigure id=\"attachment_109153\" class=\"wp-caption aligncenter\" style=\"max-width: 1920px\">\u003cimg src=\"http://ww2.kqed.org/bayareabites/wp-content/uploads/sites/24/2016/05/breakfast-salad-eggs-boil1.jpg\" alt=\" Gently lower the eggs into the simmering water using the slotted spoon.\" width=\"1920\" height=\"1280\" class=\"size-full wp-image-109153\" srcset=\"https://ww2.kqed.org/app/uploads/sites/24/2016/05/breakfast-salad-eggs-boil1.jpg 1920w, https://ww2.kqed.org/app/uploads/sites/24/2016/05/breakfast-salad-eggs-boil1-400x267.jpg 400w, https://ww2.kqed.org/app/uploads/sites/24/2016/05/breakfast-salad-eggs-boil1-800x533.jpg 800w, https://ww2.kqed.org/app/uploads/sites/24/2016/05/breakfast-salad-eggs-boil1-768x512.jpg 768w, https://ww2.kqed.org/app/uploads/sites/24/2016/05/breakfast-salad-eggs-boil1-1440x960.jpg 1440w, https://ww2.kqed.org/app/uploads/sites/24/2016/05/breakfast-salad-eggs-boil1-1180x787.jpg 1180w, https://ww2.kqed.org/app/uploads/sites/24/2016/05/breakfast-salad-eggs-boil1-960x640.jpg 960w\" sizes=\"(max-width: 1920px) 100vw, 1920px\">\u003cfigcaption class=\"wp-caption-text\">Gently lower the eggs into the simmering water using the slotted spoon. \u003ccite>(Wendy Goodfriend)\u003c/cite>\u003c/figcaption>\u003c/figure>\n\u003cfigure id=\"attachment_109152\" class=\"wp-caption aligncenter\" style=\"max-width: 1920px\">\u003cimg src=\"http://ww2.kqed.org/bayareabites/wp-content/uploads/sites/24/2016/05/breakfast-salad-eggs-boil.jpg\" alt=\"Cook for a few seconds more than 7 minutes. \" width=\"1920\" height=\"1280\" class=\"size-full wp-image-109152\" srcset=\"https://ww2.kqed.org/app/uploads/sites/24/2016/05/breakfast-salad-eggs-boil.jpg 1920w, https://ww2.kqed.org/app/uploads/sites/24/2016/05/breakfast-salad-eggs-boil-400x267.jpg 400w, https://ww2.kqed.org/app/uploads/sites/24/2016/05/breakfast-salad-eggs-boil-800x533.jpg 800w, https://ww2.kqed.org/app/uploads/sites/24/2016/05/breakfast-salad-eggs-boil-768x512.jpg 768w, https://ww2.kqed.org/app/uploads/sites/24/2016/05/breakfast-salad-eggs-boil-1440x960.jpg 1440w, https://ww2.kqed.org/app/uploads/sites/24/2016/05/breakfast-salad-eggs-boil-1180x787.jpg 1180w, https://ww2.kqed.org/app/uploads/sites/24/2016/05/breakfast-salad-eggs-boil-960x640.jpg 960w\" sizes=\"(max-width: 1920px) 100vw, 1920px\">\u003cfigcaption class=\"wp-caption-text\">Cook for a few seconds more than 7 minutes. \u003ccite>(Wendy Goodfriend)\u003c/cite>\u003c/figcaption>\u003c/figure>\n\u003cfigure id=\"attachment_109150\" class=\"wp-caption aligncenter\" style=\"max-width: 1920px\">\u003cimg src=\"http://ww2.kqed.org/bayareabites/wp-content/uploads/sites/24/2016/05/breakfast-salad-egg-peel.jpg\" alt=\"Gently crack the egg shells, then peel.\" width=\"1920\" height=\"1280\" class=\"size-full wp-image-109150\" srcset=\"https://ww2.kqed.org/app/uploads/sites/24/2016/05/breakfast-salad-egg-peel.jpg 1920w, https://ww2.kqed.org/app/uploads/sites/24/2016/05/breakfast-salad-egg-peel-400x267.jpg 400w, https://ww2.kqed.org/app/uploads/sites/24/2016/05/breakfast-salad-egg-peel-800x533.jpg 800w, https://ww2.kqed.org/app/uploads/sites/24/2016/05/breakfast-salad-egg-peel-768x512.jpg 768w, https://ww2.kqed.org/app/uploads/sites/24/2016/05/breakfast-salad-egg-peel-1440x960.jpg 1440w, https://ww2.kqed.org/app/uploads/sites/24/2016/05/breakfast-salad-egg-peel-1180x787.jpg 1180w, https://ww2.kqed.org/app/uploads/sites/24/2016/05/breakfast-salad-egg-peel-960x640.jpg 960w\" sizes=\"(max-width: 1920px) 100vw, 1920px\">\u003cfigcaption class=\"wp-caption-text\">Gently crack the egg shells, then peel. \u003ccite>(Wendy Goodfriend)\u003c/cite>\u003c/figcaption>\u003c/figure>\n\u003cli>Tear the bacon into bite-sized pieces and add to a mixing bowl. Add the salad greens and asparagus and drizzle with some of the vinaigrette. Toss to coat, then divide between individual plates. Place an egg on each salad and cut in half lengthwise. Season with a little salt and pepper and serve, with more vinaigrette alongside.\u003c/li>\n\u003cfigure id=\"attachment_109164\" class=\"wp-caption aligncenter\" style=\"max-width: 1920px\">\u003cimg src=\"http://ww2.kqed.org/bayareabites/wp-content/uploads/sites/24/2016/05/breakfast-salad-plated-whole-egg.jpg\" alt=\"Toss to coat with vinaigrette, then divide between individual plates. Place an egg on each salad.\" width=\"1920\" height=\"1280\" class=\"size-full wp-image-109164\" srcset=\"https://ww2.kqed.org/app/uploads/sites/24/2016/05/breakfast-salad-plated-whole-egg.jpg 1920w, https://ww2.kqed.org/app/uploads/sites/24/2016/05/breakfast-salad-plated-whole-egg-400x267.jpg 400w, https://ww2.kqed.org/app/uploads/sites/24/2016/05/breakfast-salad-plated-whole-egg-800x533.jpg 800w, https://ww2.kqed.org/app/uploads/sites/24/2016/05/breakfast-salad-plated-whole-egg-768x512.jpg 768w, https://ww2.kqed.org/app/uploads/sites/24/2016/05/breakfast-salad-plated-whole-egg-1440x960.jpg 1440w, https://ww2.kqed.org/app/uploads/sites/24/2016/05/breakfast-salad-plated-whole-egg-1180x787.jpg 1180w, https://ww2.kqed.org/app/uploads/sites/24/2016/05/breakfast-salad-plated-whole-egg-960x640.jpg 960w\" sizes=\"(max-width: 1920px) 100vw, 1920px\">\u003cfigcaption class=\"wp-caption-text\">Toss to coat with vinaigrette, then divide between individual plates. Place an egg on each salad. \u003ccite>(Wendy Goodfriend)\u003c/cite>\u003c/figcaption>\u003c/figure>\n\u003cfigure id=\"attachment_109136\" class=\"wp-caption aligncenter\" style=\"max-width: 1920px\">\u003cimg src=\"http://ww2.kqed.org/bayareabites/wp-content/uploads/sites/24/2016/05/breakfast-salad-egg1.jpg\" alt=\"Cut the egg in half lengthwise\" width=\"1920\" height=\"1280\" class=\"size-full wp-image-109136\" srcset=\"https://ww2.kqed.org/app/uploads/sites/24/2016/05/breakfast-salad-egg1.jpg 1920w, https://ww2.kqed.org/app/uploads/sites/24/2016/05/breakfast-salad-egg1-400x267.jpg 400w, https://ww2.kqed.org/app/uploads/sites/24/2016/05/breakfast-salad-egg1-800x533.jpg 800w, https://ww2.kqed.org/app/uploads/sites/24/2016/05/breakfast-salad-egg1-768x512.jpg 768w, https://ww2.kqed.org/app/uploads/sites/24/2016/05/breakfast-salad-egg1-1440x960.jpg 1440w, https://ww2.kqed.org/app/uploads/sites/24/2016/05/breakfast-salad-egg1-1180x787.jpg 1180w, https://ww2.kqed.org/app/uploads/sites/24/2016/05/breakfast-salad-egg1-960x640.jpg 960w\" sizes=\"(max-width: 1920px) 100vw, 1920px\">\u003cfigcaption class=\"wp-caption-text\">Cut the egg in half lengthwise. \u003ccite>(Wendy Goodfriend)\u003c/cite>\u003c/figcaption>\u003c/figure>\n\u003c/ol>\n\u003cfigure id=\"attachment_109128\" class=\"wp-caption aligncenter\" style=\"max-width: 1920px\">\u003cimg src=\"http://ww2.kqed.org/bayareabites/wp-content/uploads/sites/24/2016/05/breakfast-salad-vertical.jpg\" alt=\"Mother’s Day Breakfast Salad with Baby Greens, Soft Boiled Eggs, Asparagus, and Thick-Cut Bacon with Lemon-Pepper Vinaigrette\" width=\"1920\" height=\"2880\" class=\"size-full wp-image-109128\" srcset=\"https://ww2.kqed.org/app/uploads/sites/24/2016/05/breakfast-salad-vertical.jpg 1920w, https://ww2.kqed.org/app/uploads/sites/24/2016/05/breakfast-salad-vertical-400x600.jpg 400w, https://ww2.kqed.org/app/uploads/sites/24/2016/05/breakfast-salad-vertical-800x1200.jpg 800w, https://ww2.kqed.org/app/uploads/sites/24/2016/05/breakfast-salad-vertical-768x1152.jpg 768w, https://ww2.kqed.org/app/uploads/sites/24/2016/05/breakfast-salad-vertical-1440x2160.jpg 1440w, https://ww2.kqed.org/app/uploads/sites/24/2016/05/breakfast-salad-vertical-1180x1770.jpg 1180w, https://ww2.kqed.org/app/uploads/sites/24/2016/05/breakfast-salad-vertical-960x1440.jpg 960w\" sizes=\"(max-width: 1920px) 100vw, 1920px\">\u003cfigcaption class=\"wp-caption-text\">Mother’s Day Breakfast Salad with Baby Greens, Soft Boiled Eggs, Asparagus, and Thick-Cut Bacon with Lemon-Pepper Vinaigrette \u003ccite>(Wendy Goodfriend)\u003c/cite>\u003c/figcaption>\u003c/figure>\n\u003cp>[ad fullwidth]\u003c/p>\u003cp>\u003c/p>\n","blocks":[],"excerpt":"Savory breakfast lovers unite! Here’s a hearty and scrumptious way to eat salad for breakfast. This is an easy and flavorful dish to make for a Mother's Day Brunch!","status":"publish","parent":0,"modified":1526138759,"stats":{"hasAudio":false,"hasVideo":false,"hasChartOrMap":false,"iframeSrcs":[],"hasGoogleForm":false,"hasGallery":false,"hasHearkenModule":false,"hasPolis":false,"paragraphCount":8,"wordCount":711},"headData":{"title":"Celebrate Mother’s Day with a Breakfast Salad! | KQED","description":"Savory breakfast lovers unite! Here’s a hearty and scrumptious way to eat salad for breakfast. This is an easy and flavorful dish to make for a Mother's Day Brunch!","ogTitle":"","ogDescription":"","ogImgId":"","twTitle":"","twDescription":"","twImgId":"","schema":{"@context":"http://schema.org","@type":"Article","headline":"Celebrate Mother’s Day with a Breakfast Salad!","datePublished":"2016-05-07T15:08:29.000Z","dateModified":"2018-05-12T15:25:59.000Z","image":"https://cdn.kqed.org/wp-content/uploads/2020/02/KQED-OG-Image@1x.png"}},"disqusIdentifier":"109087 http://ww2.kqed.org/bayareabites/?p=109087","disqusUrl":"https://ww2.kqed.org/bayareabites/2016/05/07/celebrate-mothers-day-with-a-breakfast-salad/","disqusTitle":"Celebrate Mother’s Day with a Breakfast Salad!","path":"/bayareabites/109087/celebrate-mothers-day-with-a-breakfast-salad","audioTrackLength":null,"parsedContent":[{"type":"contentString","content":"\u003cdiv class=\"post-body\">\u003cp>\u003cp>Salad for breakfast? It’s not as strange as it might sound. And while I’m a big fan of the occasional sweet breakfast (I love me some blueberry pancakes and crisp bacon from \u003ca href=\"http://www.stfrancisfountainsf.com/\" target=\"_blank\">St. Francis Fountain\u003c/a> in San Francisco!), I really love savory breakfasts. Besides, my husband—a Brit—doesn’t understand the “American obsession with dessert for breakfast” so we eat a LOT of eggs in our house.\u003c/p>\n\u003cp>Because of this, I’m always looking for creative ways to serve eggs for breakfast, beyond the usual fried over medium, soft-boiled, hard-boiled, poached, or softly scrambled. I’m inspired by innovative brunch offerings at some of my favorite cafes.\u003c/p>\n\u003cp>More and more popular brunch spots are offering up savory, salad-y, egg-topped dishes for us early risers. On a recent trip to L.A. I discovered an amazing breakfast spot (adored by many LA brunchers): an adorable café called \u003ca href=\"http://sqirlla.com/\" target=\"_blank\">Sqirl\u003c/a>. At Sqirl, they serve up a crave-worthy, vinegar-laced crispy brown rice “salad” with runny egg, avocado, plenty of herbs, and salty sausage. There’s also a terrific breakfast-y salad at my beloved local breakfast bakery, \u003ca href=\"http://www.dellafattoria.com/\" target=\"_blank\">Della Fattoria\u003c/a>.\u003c/p>\n\u003cp>This version is perfect for springtime (or Mother’s Day), with plenty of tender greens, earthy asparagus, and salty bacon. All topped with a soft-boiled runny egg. \u003c/p>\n\u003cp>When making boiled eggs, if you have an egg poker it works wonders for getting the peel cleanly off. Soft boiling eggs is a bit trickier, and every second matters, so pay close attention to the timing.\u003c/p>\n\u003cfigure id=\"attachment_109142\" class=\"wp-caption aligncenter\" style=\"max-width: 1920px\">\u003cimg src=\"http://ww2.kqed.org/bayareabites/wp-content/uploads/sites/24/2016/05/breakfast-salad-final4.jpg\" alt=\"Mother's Day Breakfast Salad\" width=\"1920\" height=\"1280\" class=\"size-full wp-image-109142\" srcset=\"https://ww2.kqed.org/app/uploads/sites/24/2016/05/breakfast-salad-final4.jpg 1920w, https://ww2.kqed.org/app/uploads/sites/24/2016/05/breakfast-salad-final4-400x267.jpg 400w, https://ww2.kqed.org/app/uploads/sites/24/2016/05/breakfast-salad-final4-800x533.jpg 800w, https://ww2.kqed.org/app/uploads/sites/24/2016/05/breakfast-salad-final4-768x512.jpg 768w, https://ww2.kqed.org/app/uploads/sites/24/2016/05/breakfast-salad-final4-1440x960.jpg 1440w, https://ww2.kqed.org/app/uploads/sites/24/2016/05/breakfast-salad-final4-1180x787.jpg 1180w, https://ww2.kqed.org/app/uploads/sites/24/2016/05/breakfast-salad-final4-960x640.jpg 960w\" sizes=\"(max-width: 1920px) 100vw, 1920px\">\u003cfigcaption class=\"wp-caption-text\">Mother's Day Breakfast Salad \u003ccite>(Wendy Goodfriend)\u003c/cite>\u003c/figcaption>\u003c/figure>\n\u003ch3>Recipe: Breakfast Salad\u003c/h3>\n\u003cp>\u003cem>Makes 4 servings\u003c/em>\u003c/p>\n\u003cul>\n\u003cstrong>Ingredients:\u003c/strong>\n\u003cli>4 slices thick-cut smoked bacon\u003c/li>\n\u003cli>1 lb asparagus, trimmed\u003c/li>\n\u003cli>Olive oil\u003c/li>\n\u003cli>Kosher salt and freshly ground black pepper\u003c/li>\n\u003cli>4 large eggs (depending on how many you want)\u003c/li>\n\u003cli>4 cups fresh baby salad greens\u003c/li>\n\u003c/ul>\n\u003cul>\n\u003cstrong>\u003cem>For the vinaigrette\u003c/em>\u003c/strong>\n\u003cli>3 tbsp olive oil\u003c/li>\n\u003cli>2 tbsp white wine or champagne vinegar\u003c/li>\n\u003cli>1 tbsp lemon juice\u003c/li>\n\u003cli>1/4 tsp Dijon mustard\u003c/li>\n\u003c/ul>\n\u003col>\n\u003cstrong>Instructions:\u003c/strong>\n\u003cli>To make the vinaigrette, in a small jam jar with a screw-top lid, add the ingredients for the vinaigrette. Cover and shake well until creamy.\u003c/li>\n\u003cfigure id=\"attachment_109149\" class=\"wp-caption aligncenter\" style=\"max-width: 1920px\">\u003cimg src=\"http://ww2.kqed.org/bayareabites/wp-content/uploads/sites/24/2016/05/breakfast-salad-dressing1.jpg\" alt=\"To make the vinaigrette, in a small jam jar with a screw-top lid, add the ingredients for the vinaigrette. Cover and shake well until creamy.\" width=\"1920\" height=\"1280\" class=\"size-full wp-image-109149\" srcset=\"https://ww2.kqed.org/app/uploads/sites/24/2016/05/breakfast-salad-dressing1.jpg 1920w, https://ww2.kqed.org/app/uploads/sites/24/2016/05/breakfast-salad-dressing1-400x267.jpg 400w, https://ww2.kqed.org/app/uploads/sites/24/2016/05/breakfast-salad-dressing1-800x533.jpg 800w, https://ww2.kqed.org/app/uploads/sites/24/2016/05/breakfast-salad-dressing1-768x512.jpg 768w, https://ww2.kqed.org/app/uploads/sites/24/2016/05/breakfast-salad-dressing1-1440x960.jpg 1440w, https://ww2.kqed.org/app/uploads/sites/24/2016/05/breakfast-salad-dressing1-1180x787.jpg 1180w, https://ww2.kqed.org/app/uploads/sites/24/2016/05/breakfast-salad-dressing1-960x640.jpg 960w\" sizes=\"(max-width: 1920px) 100vw, 1920px\">\u003cfigcaption class=\"wp-caption-text\">To make the vinaigrette, in a small jam jar with a screw-top lid, add the ingredients for the vinaigrette. Cover and shake well until creamy. \u003ccite>(Wendy Goodfriend)\u003c/cite>\u003c/figcaption>\u003c/figure>\n\u003cli>Bring a saucepan half full of salted water to a boil over medium-high heat. Add the asparagus and cook, stirring occasionally, until crisp-tender. Drain in a strainer set in the sink. Run under cold water to stop the cooking and drain again.\u003c/li>\n\u003cfigure id=\"attachment_109480\" class=\"wp-caption aligncenter\" style=\"max-width: 1920px\">\u003cimg src=\"http://ww2.kqed.org/bayareabites/wp-content/uploads/sites/24/2016/05/breakfast-salad-asparagus-cook.jpg\" alt=\"Add the asparagus and cook, stirring occasionally, until crisp-tender.\" width=\"1920\" height=\"1280\" class=\"size-full wp-image-109480\" srcset=\"https://ww2.kqed.org/app/uploads/sites/24/2016/05/breakfast-salad-asparagus-cook.jpg 1920w, https://ww2.kqed.org/app/uploads/sites/24/2016/05/breakfast-salad-asparagus-cook-400x267.jpg 400w, https://ww2.kqed.org/app/uploads/sites/24/2016/05/breakfast-salad-asparagus-cook-800x533.jpg 800w, https://ww2.kqed.org/app/uploads/sites/24/2016/05/breakfast-salad-asparagus-cook-768x512.jpg 768w, https://ww2.kqed.org/app/uploads/sites/24/2016/05/breakfast-salad-asparagus-cook-1440x960.jpg 1440w, https://ww2.kqed.org/app/uploads/sites/24/2016/05/breakfast-salad-asparagus-cook-1180x787.jpg 1180w, https://ww2.kqed.org/app/uploads/sites/24/2016/05/breakfast-salad-asparagus-cook-960x640.jpg 960w\" sizes=\"(max-width: 1920px) 100vw, 1920px\">\u003cfigcaption class=\"wp-caption-text\">Add the asparagus and cook, stirring occasionally, until crisp-tender. \u003ccite>(Wendy Goodfriend)\u003c/cite>\u003c/figcaption>\u003c/figure>\n\u003cli>Meanwhile, in a frying pan over medium heat, cook the bacon until crisp. Drain on paper towels.\u003c/li>\n\u003cfigure id=\"attachment_109147\" class=\"wp-caption aligncenter\" style=\"max-width: 1920px\">\u003cimg src=\"http://ww2.kqed.org/bayareabites/wp-content/uploads/sites/24/2016/05/breakfast-salad-bacon.jpg\" alt=\"Cook the bacon until crisp.\" width=\"1920\" height=\"1280\" class=\"size-full wp-image-109147\" srcset=\"https://ww2.kqed.org/app/uploads/sites/24/2016/05/breakfast-salad-bacon.jpg 1920w, https://ww2.kqed.org/app/uploads/sites/24/2016/05/breakfast-salad-bacon-400x267.jpg 400w, https://ww2.kqed.org/app/uploads/sites/24/2016/05/breakfast-salad-bacon-800x533.jpg 800w, https://ww2.kqed.org/app/uploads/sites/24/2016/05/breakfast-salad-bacon-768x512.jpg 768w, https://ww2.kqed.org/app/uploads/sites/24/2016/05/breakfast-salad-bacon-1440x960.jpg 1440w, https://ww2.kqed.org/app/uploads/sites/24/2016/05/breakfast-salad-bacon-1180x787.jpg 1180w, https://ww2.kqed.org/app/uploads/sites/24/2016/05/breakfast-salad-bacon-960x640.jpg 960w\" sizes=\"(max-width: 1920px) 100vw, 1920px\">\u003cfigcaption class=\"wp-caption-text\">Cook the bacon until crisp. \u003ccite>(Wendy Goodfriend)\u003c/cite>\u003c/figcaption>\u003c/figure>\n\u003cli>Bring the saucepan, two-thirds filled with water, to a boil over high heat, then reduce the heat to medium so that the water is simmering. Gently lower the eggs into the water using the slotted spoon. Cook for a few seconds more than 7 minutes (this should give you a very slightly runny yolk; if you like it less runny, cook it for another minute or two). Remove the eggs with the slotted spoon and run under cold water. Gently crack the egg shells, then peel. Set aside.\u003c/li>\n\u003cfigure id=\"attachment_109153\" class=\"wp-caption aligncenter\" style=\"max-width: 1920px\">\u003cimg src=\"http://ww2.kqed.org/bayareabites/wp-content/uploads/sites/24/2016/05/breakfast-salad-eggs-boil1.jpg\" alt=\" Gently lower the eggs into the simmering water using the slotted spoon.\" width=\"1920\" height=\"1280\" class=\"size-full wp-image-109153\" srcset=\"https://ww2.kqed.org/app/uploads/sites/24/2016/05/breakfast-salad-eggs-boil1.jpg 1920w, https://ww2.kqed.org/app/uploads/sites/24/2016/05/breakfast-salad-eggs-boil1-400x267.jpg 400w, https://ww2.kqed.org/app/uploads/sites/24/2016/05/breakfast-salad-eggs-boil1-800x533.jpg 800w, https://ww2.kqed.org/app/uploads/sites/24/2016/05/breakfast-salad-eggs-boil1-768x512.jpg 768w, https://ww2.kqed.org/app/uploads/sites/24/2016/05/breakfast-salad-eggs-boil1-1440x960.jpg 1440w, https://ww2.kqed.org/app/uploads/sites/24/2016/05/breakfast-salad-eggs-boil1-1180x787.jpg 1180w, https://ww2.kqed.org/app/uploads/sites/24/2016/05/breakfast-salad-eggs-boil1-960x640.jpg 960w\" sizes=\"(max-width: 1920px) 100vw, 1920px\">\u003cfigcaption class=\"wp-caption-text\">Gently lower the eggs into the simmering water using the slotted spoon. \u003ccite>(Wendy Goodfriend)\u003c/cite>\u003c/figcaption>\u003c/figure>\n\u003cfigure id=\"attachment_109152\" class=\"wp-caption aligncenter\" style=\"max-width: 1920px\">\u003cimg src=\"http://ww2.kqed.org/bayareabites/wp-content/uploads/sites/24/2016/05/breakfast-salad-eggs-boil.jpg\" alt=\"Cook for a few seconds more than 7 minutes. \" width=\"1920\" height=\"1280\" class=\"size-full wp-image-109152\" srcset=\"https://ww2.kqed.org/app/uploads/sites/24/2016/05/breakfast-salad-eggs-boil.jpg 1920w, https://ww2.kqed.org/app/uploads/sites/24/2016/05/breakfast-salad-eggs-boil-400x267.jpg 400w, https://ww2.kqed.org/app/uploads/sites/24/2016/05/breakfast-salad-eggs-boil-800x533.jpg 800w, https://ww2.kqed.org/app/uploads/sites/24/2016/05/breakfast-salad-eggs-boil-768x512.jpg 768w, https://ww2.kqed.org/app/uploads/sites/24/2016/05/breakfast-salad-eggs-boil-1440x960.jpg 1440w, https://ww2.kqed.org/app/uploads/sites/24/2016/05/breakfast-salad-eggs-boil-1180x787.jpg 1180w, https://ww2.kqed.org/app/uploads/sites/24/2016/05/breakfast-salad-eggs-boil-960x640.jpg 960w\" sizes=\"(max-width: 1920px) 100vw, 1920px\">\u003cfigcaption class=\"wp-caption-text\">Cook for a few seconds more than 7 minutes. \u003ccite>(Wendy Goodfriend)\u003c/cite>\u003c/figcaption>\u003c/figure>\n\u003cfigure id=\"attachment_109150\" class=\"wp-caption aligncenter\" style=\"max-width: 1920px\">\u003cimg src=\"http://ww2.kqed.org/bayareabites/wp-content/uploads/sites/24/2016/05/breakfast-salad-egg-peel.jpg\" alt=\"Gently crack the egg shells, then peel.\" width=\"1920\" height=\"1280\" class=\"size-full wp-image-109150\" srcset=\"https://ww2.kqed.org/app/uploads/sites/24/2016/05/breakfast-salad-egg-peel.jpg 1920w, https://ww2.kqed.org/app/uploads/sites/24/2016/05/breakfast-salad-egg-peel-400x267.jpg 400w, https://ww2.kqed.org/app/uploads/sites/24/2016/05/breakfast-salad-egg-peel-800x533.jpg 800w, https://ww2.kqed.org/app/uploads/sites/24/2016/05/breakfast-salad-egg-peel-768x512.jpg 768w, https://ww2.kqed.org/app/uploads/sites/24/2016/05/breakfast-salad-egg-peel-1440x960.jpg 1440w, https://ww2.kqed.org/app/uploads/sites/24/2016/05/breakfast-salad-egg-peel-1180x787.jpg 1180w, https://ww2.kqed.org/app/uploads/sites/24/2016/05/breakfast-salad-egg-peel-960x640.jpg 960w\" sizes=\"(max-width: 1920px) 100vw, 1920px\">\u003cfigcaption class=\"wp-caption-text\">Gently crack the egg shells, then peel. \u003ccite>(Wendy Goodfriend)\u003c/cite>\u003c/figcaption>\u003c/figure>\n\u003cli>Tear the bacon into bite-sized pieces and add to a mixing bowl. Add the salad greens and asparagus and drizzle with some of the vinaigrette. Toss to coat, then divide between individual plates. Place an egg on each salad and cut in half lengthwise. Season with a little salt and pepper and serve, with more vinaigrette alongside.\u003c/li>\n\u003cfigure id=\"attachment_109164\" class=\"wp-caption aligncenter\" style=\"max-width: 1920px\">\u003cimg src=\"http://ww2.kqed.org/bayareabites/wp-content/uploads/sites/24/2016/05/breakfast-salad-plated-whole-egg.jpg\" alt=\"Toss to coat with vinaigrette, then divide between individual plates. Place an egg on each salad.\" width=\"1920\" height=\"1280\" class=\"size-full wp-image-109164\" srcset=\"https://ww2.kqed.org/app/uploads/sites/24/2016/05/breakfast-salad-plated-whole-egg.jpg 1920w, https://ww2.kqed.org/app/uploads/sites/24/2016/05/breakfast-salad-plated-whole-egg-400x267.jpg 400w, https://ww2.kqed.org/app/uploads/sites/24/2016/05/breakfast-salad-plated-whole-egg-800x533.jpg 800w, https://ww2.kqed.org/app/uploads/sites/24/2016/05/breakfast-salad-plated-whole-egg-768x512.jpg 768w, https://ww2.kqed.org/app/uploads/sites/24/2016/05/breakfast-salad-plated-whole-egg-1440x960.jpg 1440w, https://ww2.kqed.org/app/uploads/sites/24/2016/05/breakfast-salad-plated-whole-egg-1180x787.jpg 1180w, https://ww2.kqed.org/app/uploads/sites/24/2016/05/breakfast-salad-plated-whole-egg-960x640.jpg 960w\" sizes=\"(max-width: 1920px) 100vw, 1920px\">\u003cfigcaption class=\"wp-caption-text\">Toss to coat with vinaigrette, then divide between individual plates. Place an egg on each salad. \u003ccite>(Wendy Goodfriend)\u003c/cite>\u003c/figcaption>\u003c/figure>\n\u003cfigure id=\"attachment_109136\" class=\"wp-caption aligncenter\" style=\"max-width: 1920px\">\u003cimg src=\"http://ww2.kqed.org/bayareabites/wp-content/uploads/sites/24/2016/05/breakfast-salad-egg1.jpg\" alt=\"Cut the egg in half lengthwise\" width=\"1920\" height=\"1280\" class=\"size-full wp-image-109136\" srcset=\"https://ww2.kqed.org/app/uploads/sites/24/2016/05/breakfast-salad-egg1.jpg 1920w, https://ww2.kqed.org/app/uploads/sites/24/2016/05/breakfast-salad-egg1-400x267.jpg 400w, https://ww2.kqed.org/app/uploads/sites/24/2016/05/breakfast-salad-egg1-800x533.jpg 800w, https://ww2.kqed.org/app/uploads/sites/24/2016/05/breakfast-salad-egg1-768x512.jpg 768w, https://ww2.kqed.org/app/uploads/sites/24/2016/05/breakfast-salad-egg1-1440x960.jpg 1440w, https://ww2.kqed.org/app/uploads/sites/24/2016/05/breakfast-salad-egg1-1180x787.jpg 1180w, https://ww2.kqed.org/app/uploads/sites/24/2016/05/breakfast-salad-egg1-960x640.jpg 960w\" sizes=\"(max-width: 1920px) 100vw, 1920px\">\u003cfigcaption class=\"wp-caption-text\">Cut the egg in half lengthwise. \u003ccite>(Wendy Goodfriend)\u003c/cite>\u003c/figcaption>\u003c/figure>\n\u003c/ol>\n\u003cfigure id=\"attachment_109128\" class=\"wp-caption aligncenter\" style=\"max-width: 1920px\">\u003cimg src=\"http://ww2.kqed.org/bayareabites/wp-content/uploads/sites/24/2016/05/breakfast-salad-vertical.jpg\" alt=\"Mother’s Day Breakfast Salad with Baby Greens, Soft Boiled Eggs, Asparagus, and Thick-Cut Bacon with Lemon-Pepper Vinaigrette\" width=\"1920\" height=\"2880\" class=\"size-full wp-image-109128\" srcset=\"https://ww2.kqed.org/app/uploads/sites/24/2016/05/breakfast-salad-vertical.jpg 1920w, https://ww2.kqed.org/app/uploads/sites/24/2016/05/breakfast-salad-vertical-400x600.jpg 400w, https://ww2.kqed.org/app/uploads/sites/24/2016/05/breakfast-salad-vertical-800x1200.jpg 800w, https://ww2.kqed.org/app/uploads/sites/24/2016/05/breakfast-salad-vertical-768x1152.jpg 768w, https://ww2.kqed.org/app/uploads/sites/24/2016/05/breakfast-salad-vertical-1440x2160.jpg 1440w, https://ww2.kqed.org/app/uploads/sites/24/2016/05/breakfast-salad-vertical-1180x1770.jpg 1180w, https://ww2.kqed.org/app/uploads/sites/24/2016/05/breakfast-salad-vertical-960x1440.jpg 960w\" sizes=\"(max-width: 1920px) 100vw, 1920px\">\u003cfigcaption class=\"wp-caption-text\">Mother’s Day Breakfast Salad with Baby Greens, Soft Boiled Eggs, Asparagus, and Thick-Cut Bacon with Lemon-Pepper Vinaigrette \u003ccite>(Wendy Goodfriend)\u003c/cite>\u003c/figcaption>\u003c/figure>\n\u003cp>\u003c/p>\u003c/div>","attributes":{"named":{},"numeric":[]}},{"type":"component","content":"","name":"ad","attributes":{"named":{"label":"fullwidth"},"numeric":["fullwidth"]}},{"type":"contentString","content":"\u003cdiv class=\"post-body\">\u003cp>\u003c/p>\u003cp>\u003c/p>\n\u003c/div>\u003c/p>","attributes":{"named":{},"numeric":[]}}],"link":"/bayareabites/109087/celebrate-mothers-day-with-a-breakfast-salad","authors":["5015","5014"],"categories":["bayareabites_12550","bayareabites_12","bayareabites_14362"],"tags":["bayareabites_828","bayareabites_278","bayareabites_477","bayareabites_15447","bayareabites_33","bayareabites_3992","bayareabites_16157","bayareabites_1815","bayareabites_11793"],"featImg":"bayareabites_109137","label":"bayareabites"},"bayareabites_105321":{"type":"posts","id":"bayareabites_105321","meta":{"index":"posts_1591205157","site":"bayareabites","id":"105321","score":null,"sort":[1451520452000]},"guestAuthors":[],"slug":"new-years-eve-appetizers-sweet-and-savory-maple-bacon-donut-holes","title":"New Year’s Eve Appetizers: Sweet and Savory Maple-Bacon Donut Holes","publishDate":1451520452,"format":"image","headTitle":"New Year’s Recipes | Bay Area Bites | KQED Food","labelTerm":{},"content":"\u003cp>Nothing screams “Let’s Party!” like a whole mess of fresh donuts. I don’t know too many people who wouldn’t get a very large grin on their faces if presented with these maple bacon donuts. In fact, there could even be marriage proposals. \u003c/p>\n\u003cp>Made from a yeasted dough, these little bite-sized gems aren’t over-the-top sweet, and the bacon adds a nice salty tone, which pairs beautifully with the maple syrup added to both the donuts and the glaze. \u003c/p>\n\u003cp>This recipe makes a pile of donut holes, but you can certainly make bigger donuts from this dough if you like. Use a larger round cutter and for \u003ca href=\"http://ww2.kqed.org/bayareabites/2015/10/02/fresh-from-the-fryer-vanilla-bean-glazed-raised-donuts/\" target=\"_blank\">classic raised donuts\u003c/a>, use a donut cutter. You’ll need to increase the fry time slightly if cooking larger donuts. \u003c/p>\n\u003cp>If you want to get really crazy, sauté some diced apple (peeled and cored of course) in a little butter, sugar, and cinnamon and add that to the dough with the bacon. I’d probably use about a cup of cooked apple, so maybe 2 apples total. \u003c/p>\n\u003cp>Any way you make them, these will definitely get the party started.\u003c/p>\n\u003cfigure id=\"attachment_105588\" class=\"wp-caption aligncenter\" style=\"max-width: 1920px\">\u003cimg src=\"http://ww2.kqed.org/bayareabites/wp-content/uploads/sites/24/2015/12/maplebacon-donuts-final.jpg\" alt=\"Maple-Bacon Donut Holes\" width=\"1920\" height=\"1280\" class=\"size-full wp-image-105588\" srcset=\"https://ww2.kqed.org/app/uploads/sites/24/2015/12/maplebacon-donuts-final.jpg 1920w, https://ww2.kqed.org/app/uploads/sites/24/2015/12/maplebacon-donuts-final-400x267.jpg 400w, https://ww2.kqed.org/app/uploads/sites/24/2015/12/maplebacon-donuts-final-800x533.jpg 800w, https://ww2.kqed.org/app/uploads/sites/24/2015/12/maplebacon-donuts-final-768x512.jpg 768w, https://ww2.kqed.org/app/uploads/sites/24/2015/12/maplebacon-donuts-final-1440x960.jpg 1440w, https://ww2.kqed.org/app/uploads/sites/24/2015/12/maplebacon-donuts-final-1180x787.jpg 1180w, https://ww2.kqed.org/app/uploads/sites/24/2015/12/maplebacon-donuts-final-960x640.jpg 960w\" sizes=\"(max-width: 1920px) 100vw, 1920px\">\u003cfigcaption class=\"wp-caption-text\">Maple-Bacon Donut Holes \u003ccite>(Wendy Goodfriend)\u003c/cite>\u003c/figcaption>\u003c/figure>\n\u003ch3>Recipe: Maple-Bacon Donut Holes\u003c/h3>\n\u003cp>\u003cem>Makes about 56 donut holes\u003c/em>\u003c/p>\n\u003cp>[ad fullwidth]\u003c/p>\n\u003cp>\u003c/p>\n\u003cp>\u003cstrong>Ingredients:\u003c/strong>\u003c/p>\n\u003cul>\n\u003cstrong>\u003cem>Donuts\u003c/em>\u003c/strong>\n\u003cli>2¾ cups bread flour\u003c/li>\n\u003cli>1 cup whole milk, lukewarm (105 to 115˚F)\u003c/li>\n\u003cli>1/4 cup granulated sugar\u003c/li>\n\u003cli>1 packet (2¼ tsp) active dry yeast\u003c/li>\n\u003cli>1/2 teaspoon kosher salt\u003c/li>\n\u003cli>1 tbsp maple syrup\u003c/li>\n\u003cli>3 large egg yolks\u003c/li>\n\u003cli>1/4 cup unsalted butter, softened\u003c/li>\n\u003cli>1/2 lb thick slices good-quality bacon, cooked until crisp and finely chopped\u003c/li>\n\u003cli>Canola oil, for frying\u003c/li>\n\u003c/ul>\n\u003cfigure id=\"attachment_105606\" class=\"wp-caption aligncenter\" style=\"max-width: 1920px\">\u003cimg src=\"http://ww2.kqed.org/bayareabites/wp-content/uploads/sites/24/2015/12/maplebacon-donuts-ingredients.jpg\" alt=\"Ingredients for the donut holes.\" width=\"1920\" height=\"1280\" class=\"size-full wp-image-105606\" srcset=\"https://ww2.kqed.org/app/uploads/sites/24/2015/12/maplebacon-donuts-ingredients.jpg 1920w, https://ww2.kqed.org/app/uploads/sites/24/2015/12/maplebacon-donuts-ingredients-400x267.jpg 400w, https://ww2.kqed.org/app/uploads/sites/24/2015/12/maplebacon-donuts-ingredients-800x533.jpg 800w, https://ww2.kqed.org/app/uploads/sites/24/2015/12/maplebacon-donuts-ingredients-768x512.jpg 768w, https://ww2.kqed.org/app/uploads/sites/24/2015/12/maplebacon-donuts-ingredients-1440x960.jpg 1440w, https://ww2.kqed.org/app/uploads/sites/24/2015/12/maplebacon-donuts-ingredients-1180x787.jpg 1180w, https://ww2.kqed.org/app/uploads/sites/24/2015/12/maplebacon-donuts-ingredients-960x640.jpg 960w\" sizes=\"(max-width: 1920px) 100vw, 1920px\">\u003cfigcaption class=\"wp-caption-text\">Ingredients for the donut holes. \u003ccite>(Wendy Goodfriend)\u003c/cite>\u003c/figcaption>\u003c/figure>\n\u003cul>\n\u003cstrong>\u003cem>Maple glaze\u003c/em>\u003c/strong>\n\u003cli>2 cups powdered sugar, sifted\u003c/li>\n\u003cli>1/4 cup maple syrup\u003c/li>\n\u003cli>2 tbsp warm water, plus more as needed\u003c/li>\n\u003cli>2 tsp vanilla extract\u003c/li>\n\u003cli>Pinch of kosher salt \u003c/li>\n\u003c/ul>\n\u003col>\n\u003cstrong>Instructions:\u003c/strong> \n\u003cli>In the bowl of a stand mixer fitted with the paddle attachment, whisk together 3/4 cup flour, the warm milk, sugar, and yeast. Let stand for 10 minutes. Add the remaining 2 cups flour, the salt, egg yolks, butter, vanilla, and 1/3 cup of the finely chopped bacon (reserve the rest for decorating) and beat until the dough is well mixed, about 5 minutes; the dough will be slightly sticky. Cover the bowl with plastic wrap and set aside in a warm place to rise for 1 hour, or refrigerate for up to overnight (if refrigerated, let come to room temperature for 1 hour before proceeding).\u003c/li>\n\u003cfigure id=\"attachment_105599\" class=\"wp-caption aligncenter\" style=\"max-width: 1920px\">\u003cimg src=\"http://ww2.kqed.org/bayareabites/wp-content/uploads/sites/24/2015/12/maplebacon-donuts-dough-prerise.jpg\" alt=\"The prepared dough before it rises.\" width=\"1920\" height=\"1280\" class=\"size-full wp-image-105599\" srcset=\"https://ww2.kqed.org/app/uploads/sites/24/2015/12/maplebacon-donuts-dough-prerise.jpg 1920w, https://ww2.kqed.org/app/uploads/sites/24/2015/12/maplebacon-donuts-dough-prerise-400x267.jpg 400w, https://ww2.kqed.org/app/uploads/sites/24/2015/12/maplebacon-donuts-dough-prerise-800x533.jpg 800w, https://ww2.kqed.org/app/uploads/sites/24/2015/12/maplebacon-donuts-dough-prerise-768x512.jpg 768w, https://ww2.kqed.org/app/uploads/sites/24/2015/12/maplebacon-donuts-dough-prerise-1440x960.jpg 1440w, https://ww2.kqed.org/app/uploads/sites/24/2015/12/maplebacon-donuts-dough-prerise-1180x787.jpg 1180w, https://ww2.kqed.org/app/uploads/sites/24/2015/12/maplebacon-donuts-dough-prerise-960x640.jpg 960w\" sizes=\"(max-width: 1920px) 100vw, 1920px\">\u003cfigcaption class=\"wp-caption-text\">The prepared dough before it rises. \u003ccite>(Wendy Goodfriend)\u003c/cite>\u003c/figcaption>\u003c/figure>\n\u003cfigure id=\"attachment_105600\" class=\"wp-caption aligncenter\" style=\"max-width: 1920px\">\u003cimg src=\"http://ww2.kqed.org/bayareabites/wp-content/uploads/sites/24/2015/12/maplebacon-donuts-dough-postrise.jpg\" alt=\"The prepared dough after it rises.\" width=\"1920\" height=\"1280\" class=\"size-full wp-image-105600\" srcset=\"https://ww2.kqed.org/app/uploads/sites/24/2015/12/maplebacon-donuts-dough-postrise.jpg 1920w, https://ww2.kqed.org/app/uploads/sites/24/2015/12/maplebacon-donuts-dough-postrise-400x267.jpg 400w, https://ww2.kqed.org/app/uploads/sites/24/2015/12/maplebacon-donuts-dough-postrise-800x533.jpg 800w, https://ww2.kqed.org/app/uploads/sites/24/2015/12/maplebacon-donuts-dough-postrise-768x512.jpg 768w, https://ww2.kqed.org/app/uploads/sites/24/2015/12/maplebacon-donuts-dough-postrise-1440x960.jpg 1440w, https://ww2.kqed.org/app/uploads/sites/24/2015/12/maplebacon-donuts-dough-postrise-1180x787.jpg 1180w, https://ww2.kqed.org/app/uploads/sites/24/2015/12/maplebacon-donuts-dough-postrise-960x640.jpg 960w\" sizes=\"(max-width: 1920px) 100vw, 1920px\">\u003cfigcaption class=\"wp-caption-text\">The prepared dough after it rises. \u003ccite>(Wendy Goodfriend)\u003c/cite>\u003c/figcaption>\u003c/figure>\n\u003cli>Flour 1 to 2 large rimmed baking sheets. On a floured work surface, roll out the dough to 1/2-inch thick. With a 1 1/2-inch round biscuit cutter, cut out donut holes. Re-roll the scraps and cut out additional holes.\u003c/li>\n\u003cfigure id=\"attachment_105595\" class=\"wp-caption aligncenter\" style=\"max-width: 1908px\">\u003cimg src=\"http://ww2.kqed.org/bayareabites/wp-content/uploads/sites/24/2015/12/maplebacon-donuts-rolling.jpg\" alt=\"On a floured work surface, roll out the dough to 1/2-inch thick. \" width=\"1908\" height=\"1070\" class=\"size-full wp-image-105595\" srcset=\"https://ww2.kqed.org/app/uploads/sites/24/2015/12/maplebacon-donuts-rolling.jpg 1908w, https://ww2.kqed.org/app/uploads/sites/24/2015/12/maplebacon-donuts-rolling-400x224.jpg 400w, https://ww2.kqed.org/app/uploads/sites/24/2015/12/maplebacon-donuts-rolling-800x449.jpg 800w, https://ww2.kqed.org/app/uploads/sites/24/2015/12/maplebacon-donuts-rolling-768x431.jpg 768w, https://ww2.kqed.org/app/uploads/sites/24/2015/12/maplebacon-donuts-rolling-1440x808.jpg 1440w, https://ww2.kqed.org/app/uploads/sites/24/2015/12/maplebacon-donuts-rolling-1180x662.jpg 1180w, https://ww2.kqed.org/app/uploads/sites/24/2015/12/maplebacon-donuts-rolling-960x538.jpg 960w\" sizes=\"(max-width: 1908px) 100vw, 1908px\">\u003cfigcaption class=\"wp-caption-text\">On a floured work surface, roll out the dough to 1/2-inch thick. \u003ccite>(Wendy Goodfriend)\u003c/cite>\u003c/figcaption>\u003c/figure>\n\u003cp>https://youtu.be/Ei8Aoqc-SGg\u003c/p>\n\u003cfigure id=\"attachment_105591\" class=\"wp-caption aligncenter\" style=\"max-width: 1920px\">\u003cimg src=\"http://ww2.kqed.org/bayareabites/wp-content/uploads/sites/24/2015/12/maplebacon-donuts-dough-cut.jpg\" alt=\"After cutting out the holes, re-roll the scraps to cut out additional holes.\" width=\"1920\" height=\"1280\" class=\"size-full wp-image-105591\" srcset=\"https://ww2.kqed.org/app/uploads/sites/24/2015/12/maplebacon-donuts-dough-cut.jpg 1920w, https://ww2.kqed.org/app/uploads/sites/24/2015/12/maplebacon-donuts-dough-cut-400x267.jpg 400w, https://ww2.kqed.org/app/uploads/sites/24/2015/12/maplebacon-donuts-dough-cut-800x533.jpg 800w, https://ww2.kqed.org/app/uploads/sites/24/2015/12/maplebacon-donuts-dough-cut-768x512.jpg 768w, https://ww2.kqed.org/app/uploads/sites/24/2015/12/maplebacon-donuts-dough-cut-1440x960.jpg 1440w, https://ww2.kqed.org/app/uploads/sites/24/2015/12/maplebacon-donuts-dough-cut-1180x787.jpg 1180w, https://ww2.kqed.org/app/uploads/sites/24/2015/12/maplebacon-donuts-dough-cut-960x640.jpg 960w\" sizes=\"(max-width: 1920px) 100vw, 1920px\">\u003cfigcaption class=\"wp-caption-text\">After cutting out the holes, re-roll the scraps to cut out additional holes. \u003ccite>(Wendy Goodfriend)\u003c/cite>\u003c/figcaption>\u003c/figure>\n\u003cli>Place the donuts at least 1 inch apart on the baking sheets and cover loosely with plastic wrap. Set in a warm place to rise until they are puffy, 15 to 30 minutes. They are ready when the dough springs back slowly after being touched with a fingertip (if it springs back at once, it needs more time; if it collapses it has over-proofed and you can re-roll the dough and cut it once).\u003c/li>\n\u003cli>While the donuts rise, make the glaze: Sift the confectioners’ sugar into a bowl. Stir in the maple syrup, warm water, vanilla, and salt until smooth. Add more water if needed to make a loose glaze. Set aside, covered with plastic wrap, until needed.\u003c/li>\n\u003cfigure id=\"attachment_105604\" class=\"wp-caption aligncenter\" style=\"max-width: 1920px\">\u003cimg src=\"http://ww2.kqed.org/bayareabites/wp-content/uploads/sites/24/2015/12/maplebacon-donuts-glaze-final.jpg\" alt=\"While the donuts rise, make the glaze: Sift the confectioners’ sugar into a bowl. Stir in the maple syrup, warm water, vanilla, and salt until smooth.\" width=\"1920\" height=\"1280\" class=\"size-full wp-image-105604\" srcset=\"https://ww2.kqed.org/app/uploads/sites/24/2015/12/maplebacon-donuts-glaze-final.jpg 1920w, https://ww2.kqed.org/app/uploads/sites/24/2015/12/maplebacon-donuts-glaze-final-400x267.jpg 400w, https://ww2.kqed.org/app/uploads/sites/24/2015/12/maplebacon-donuts-glaze-final-800x533.jpg 800w, https://ww2.kqed.org/app/uploads/sites/24/2015/12/maplebacon-donuts-glaze-final-768x512.jpg 768w, https://ww2.kqed.org/app/uploads/sites/24/2015/12/maplebacon-donuts-glaze-final-1440x960.jpg 1440w, https://ww2.kqed.org/app/uploads/sites/24/2015/12/maplebacon-donuts-glaze-final-1180x787.jpg 1180w, https://ww2.kqed.org/app/uploads/sites/24/2015/12/maplebacon-donuts-glaze-final-960x640.jpg 960w\" sizes=\"(max-width: 1920px) 100vw, 1920px\">\u003cfigcaption class=\"wp-caption-text\">While the donuts rise, make the glaze: Sift the confectioners’ sugar into a bowl. Stir in the maple syrup, warm water, vanilla, and salt until smooth. \u003ccite>(Wendy Goodfriend)\u003c/cite>\u003c/figcaption>\u003c/figure>\n\u003cli>Fill a heavy pot with at least 2 inches of oil (the oil should not go more than halfway up the pan). Heat the oil over medium-high heat until a deep-frying thermometer registers 360˚F.\u003c/li>\n\u003cli>Using a spider or slotted spoon, carefully lower a few donuts in the oil; do not crowd the pot. Fry for 1 to 2 minutes per side, turning a few times (metal tongs are good for this), until golden brown and cooked through. Remove with the spider, slotted spoon or tongs; drain on a wire rack over a paper towel, and let cool slightly before glazing. Repeat with the remaining donuts. Adjust the temperature while frying to keep the heat consistent.\n\u003c/li>\n\u003cp>https://youtu.be/o5iBX__B_QM\u003c/p>\n\u003cfigure id=\"attachment_105614\" class=\"wp-caption aligncenter\" style=\"max-width: 1920px\">\u003cimg src=\"http://ww2.kqed.org/bayareabites/wp-content/uploads/sites/24/2015/12/maplebacon-donuts-fried.jpg\" alt=\"Remove the donuts, drain on a wire rack over a paper towel, and let cool slightly before glazing.\" width=\"1920\" height=\"1280\" class=\"size-full wp-image-105614\" srcset=\"https://ww2.kqed.org/app/uploads/sites/24/2015/12/maplebacon-donuts-fried.jpg 1920w, https://ww2.kqed.org/app/uploads/sites/24/2015/12/maplebacon-donuts-fried-400x267.jpg 400w, https://ww2.kqed.org/app/uploads/sites/24/2015/12/maplebacon-donuts-fried-800x533.jpg 800w, https://ww2.kqed.org/app/uploads/sites/24/2015/12/maplebacon-donuts-fried-768x512.jpg 768w, https://ww2.kqed.org/app/uploads/sites/24/2015/12/maplebacon-donuts-fried-1440x960.jpg 1440w, https://ww2.kqed.org/app/uploads/sites/24/2015/12/maplebacon-donuts-fried-1180x787.jpg 1180w, https://ww2.kqed.org/app/uploads/sites/24/2015/12/maplebacon-donuts-fried-960x640.jpg 960w\" sizes=\"(max-width: 1920px) 100vw, 1920px\">\u003cfigcaption class=\"wp-caption-text\">Remove the donuts, drain on a wire rack over a paper towel, and let cool slightly before glazing. \u003ccite>(Wendy Goodfriend)\u003c/cite>\u003c/figcaption>\u003c/figure>\n\u003cli>While the donuts are still warm, dip them into the glaze. Let the excess glaze drip off, and place on a wire rack set over a baking sheet. Immediately sprinkle them with bacon while the glaze is wet; let the glaze set before serving. The donuts are best the day they are made.\u003cbr>\n\u003cfigure id=\"attachment_105596\" class=\"wp-caption aligncenter\" style=\"max-width: 1920px\">\u003cimg src=\"http://ww2.kqed.org/bayareabites/wp-content/uploads/sites/24/2015/12/maplebacon-donuts-glazed.jpg\" alt=\"While the donuts are still warm, dip them into the glaze. Let the excess glaze drip off, and place on a wire rack set over a baking sheet. \" width=\"1920\" height=\"1280\" class=\"size-full wp-image-105596\" srcset=\"https://ww2.kqed.org/app/uploads/sites/24/2015/12/maplebacon-donuts-glazed.jpg 1920w, https://ww2.kqed.org/app/uploads/sites/24/2015/12/maplebacon-donuts-glazed-400x267.jpg 400w, https://ww2.kqed.org/app/uploads/sites/24/2015/12/maplebacon-donuts-glazed-800x533.jpg 800w, https://ww2.kqed.org/app/uploads/sites/24/2015/12/maplebacon-donuts-glazed-768x512.jpg 768w, https://ww2.kqed.org/app/uploads/sites/24/2015/12/maplebacon-donuts-glazed-1440x960.jpg 1440w, https://ww2.kqed.org/app/uploads/sites/24/2015/12/maplebacon-donuts-glazed-1180x787.jpg 1180w, https://ww2.kqed.org/app/uploads/sites/24/2015/12/maplebacon-donuts-glazed-960x640.jpg 960w\" sizes=\"(max-width: 1920px) 100vw, 1920px\">\u003cfigcaption class=\"wp-caption-text\">While the donuts are still warm, dip them into the glaze. Let the excess glaze drip off, and place on a wire rack set over a baking sheet. \u003ccite>(Wendy Goodfriend)\u003c/cite>\u003c/figcaption>\u003c/figure>\n\u003cfigure id=\"attachment_105602\" class=\"wp-caption aligncenter\" style=\"max-width: 1920px\">\u003cimg src=\"http://ww2.kqed.org/bayareabites/wp-content/uploads/sites/24/2015/12/maplebacon-donuts-wirerack.jpg\" alt=\" Immediately sprinkle them with bacon while the glaze is wet; let the glaze set before serving.\" width=\"1920\" height=\"1280\" class=\"size-full wp-image-105602\" srcset=\"https://ww2.kqed.org/app/uploads/sites/24/2015/12/maplebacon-donuts-wirerack.jpg 1920w, https://ww2.kqed.org/app/uploads/sites/24/2015/12/maplebacon-donuts-wirerack-400x267.jpg 400w, https://ww2.kqed.org/app/uploads/sites/24/2015/12/maplebacon-donuts-wirerack-800x533.jpg 800w, https://ww2.kqed.org/app/uploads/sites/24/2015/12/maplebacon-donuts-wirerack-768x512.jpg 768w, https://ww2.kqed.org/app/uploads/sites/24/2015/12/maplebacon-donuts-wirerack-1440x960.jpg 1440w, https://ww2.kqed.org/app/uploads/sites/24/2015/12/maplebacon-donuts-wirerack-1180x787.jpg 1180w, https://ww2.kqed.org/app/uploads/sites/24/2015/12/maplebacon-donuts-wirerack-960x640.jpg 960w\" sizes=\"(max-width: 1920px) 100vw, 1920px\">\u003cfigcaption class=\"wp-caption-text\">Immediately sprinkle them with bacon while the glaze is wet; let the glaze set before serving. \u003ccite>(Wendy Goodfriend)\u003c/cite>\u003c/figcaption>\u003c/figure>\n\u003c/li>\n\u003c/ol>\n\n","blocks":[],"excerpt":"Maple and bacon are a match made in heaven, so why not stick them into donut holes for the ultimate in decadence.","status":"publish","parent":0,"modified":1451578985,"stats":{"hasAudio":false,"hasVideo":false,"hasChartOrMap":false,"iframeSrcs":[],"hasGoogleForm":false,"hasGallery":false,"hasHearkenModule":false,"hasPolis":false,"paragraphCount":9,"wordCount":921},"headData":{"title":"New Year’s Eve Appetizers: Sweet and Savory Maple-Bacon Donut Holes | KQED","description":"Maple and bacon are a match made in heaven, so why not stick them into donut holes for the ultimate in decadence.","ogTitle":"","ogDescription":"","ogImgId":"","twTitle":"","twDescription":"","twImgId":"","schema":{"@context":"http://schema.org","@type":"Article","headline":"New Year’s Eve Appetizers: Sweet and Savory Maple-Bacon Donut Holes","datePublished":"2015-12-31T00:07:32.000Z","dateModified":"2015-12-31T16:23:05.000Z","image":"https://cdn.kqed.org/wp-content/uploads/2020/02/KQED-OG-Image@1x.png"}},"disqusIdentifier":"105321 http://ww2.kqed.org/bayareabites/?p=105321","disqusUrl":"https://ww2.kqed.org/bayareabites/2015/12/30/new-years-eve-appetizers-sweet-and-savory-maple-bacon-donut-holes/","disqusTitle":"New Year’s Eve Appetizers: Sweet and Savory Maple-Bacon Donut Holes","source":"Holiday Recipes","sourceUrl":"https://ww2.kqed.org/bayareabites/category/recipes/holiday-recipes/","path":"/bayareabites/105321/new-years-eve-appetizers-sweet-and-savory-maple-bacon-donut-holes","audioTrackLength":null,"parsedContent":[{"type":"contentString","content":"\u003cdiv class=\"post-body\">\u003cp>\u003cp>Nothing screams “Let’s Party!” like a whole mess of fresh donuts. I don’t know too many people who wouldn’t get a very large grin on their faces if presented with these maple bacon donuts. In fact, there could even be marriage proposals. \u003c/p>\n\u003cp>Made from a yeasted dough, these little bite-sized gems aren’t over-the-top sweet, and the bacon adds a nice salty tone, which pairs beautifully with the maple syrup added to both the donuts and the glaze. \u003c/p>\n\u003cp>This recipe makes a pile of donut holes, but you can certainly make bigger donuts from this dough if you like. Use a larger round cutter and for \u003ca href=\"http://ww2.kqed.org/bayareabites/2015/10/02/fresh-from-the-fryer-vanilla-bean-glazed-raised-donuts/\" target=\"_blank\">classic raised donuts\u003c/a>, use a donut cutter. You’ll need to increase the fry time slightly if cooking larger donuts. \u003c/p>\n\u003cp>If you want to get really crazy, sauté some diced apple (peeled and cored of course) in a little butter, sugar, and cinnamon and add that to the dough with the bacon. I’d probably use about a cup of cooked apple, so maybe 2 apples total. \u003c/p>\n\u003cp>Any way you make them, these will definitely get the party started.\u003c/p>\n\u003cfigure id=\"attachment_105588\" class=\"wp-caption aligncenter\" style=\"max-width: 1920px\">\u003cimg src=\"http://ww2.kqed.org/bayareabites/wp-content/uploads/sites/24/2015/12/maplebacon-donuts-final.jpg\" alt=\"Maple-Bacon Donut Holes\" width=\"1920\" height=\"1280\" class=\"size-full wp-image-105588\" srcset=\"https://ww2.kqed.org/app/uploads/sites/24/2015/12/maplebacon-donuts-final.jpg 1920w, https://ww2.kqed.org/app/uploads/sites/24/2015/12/maplebacon-donuts-final-400x267.jpg 400w, https://ww2.kqed.org/app/uploads/sites/24/2015/12/maplebacon-donuts-final-800x533.jpg 800w, https://ww2.kqed.org/app/uploads/sites/24/2015/12/maplebacon-donuts-final-768x512.jpg 768w, https://ww2.kqed.org/app/uploads/sites/24/2015/12/maplebacon-donuts-final-1440x960.jpg 1440w, https://ww2.kqed.org/app/uploads/sites/24/2015/12/maplebacon-donuts-final-1180x787.jpg 1180w, https://ww2.kqed.org/app/uploads/sites/24/2015/12/maplebacon-donuts-final-960x640.jpg 960w\" sizes=\"(max-width: 1920px) 100vw, 1920px\">\u003cfigcaption class=\"wp-caption-text\">Maple-Bacon Donut Holes \u003ccite>(Wendy Goodfriend)\u003c/cite>\u003c/figcaption>\u003c/figure>\n\u003ch3>Recipe: Maple-Bacon Donut Holes\u003c/h3>\n\u003cp>\u003cem>Makes about 56 donut holes\u003c/em>\u003c/p>\n\u003cp>\u003c/p>\u003c/div>","attributes":{"named":{},"numeric":[]}},{"type":"component","content":"","name":"ad","attributes":{"named":{"label":"fullwidth"},"numeric":["fullwidth"]}},{"type":"contentString","content":"\u003cdiv class=\"post-body\">\u003cp>\u003c/p>\n\u003cp>\u003c/p>\n\u003cp>\u003cstrong>Ingredients:\u003c/strong>\u003c/p>\n\u003cul>\n\u003cstrong>\u003cem>Donuts\u003c/em>\u003c/strong>\n\u003cli>2¾ cups bread flour\u003c/li>\n\u003cli>1 cup whole milk, lukewarm (105 to 115˚F)\u003c/li>\n\u003cli>1/4 cup granulated sugar\u003c/li>\n\u003cli>1 packet (2¼ tsp) active dry yeast\u003c/li>\n\u003cli>1/2 teaspoon kosher salt\u003c/li>\n\u003cli>1 tbsp maple syrup\u003c/li>\n\u003cli>3 large egg yolks\u003c/li>\n\u003cli>1/4 cup unsalted butter, softened\u003c/li>\n\u003cli>1/2 lb thick slices good-quality bacon, cooked until crisp and finely chopped\u003c/li>\n\u003cli>Canola oil, for frying\u003c/li>\n\u003c/ul>\n\u003cfigure id=\"attachment_105606\" class=\"wp-caption aligncenter\" style=\"max-width: 1920px\">\u003cimg src=\"http://ww2.kqed.org/bayareabites/wp-content/uploads/sites/24/2015/12/maplebacon-donuts-ingredients.jpg\" alt=\"Ingredients for the donut holes.\" width=\"1920\" height=\"1280\" class=\"size-full wp-image-105606\" srcset=\"https://ww2.kqed.org/app/uploads/sites/24/2015/12/maplebacon-donuts-ingredients.jpg 1920w, https://ww2.kqed.org/app/uploads/sites/24/2015/12/maplebacon-donuts-ingredients-400x267.jpg 400w, https://ww2.kqed.org/app/uploads/sites/24/2015/12/maplebacon-donuts-ingredients-800x533.jpg 800w, https://ww2.kqed.org/app/uploads/sites/24/2015/12/maplebacon-donuts-ingredients-768x512.jpg 768w, https://ww2.kqed.org/app/uploads/sites/24/2015/12/maplebacon-donuts-ingredients-1440x960.jpg 1440w, https://ww2.kqed.org/app/uploads/sites/24/2015/12/maplebacon-donuts-ingredients-1180x787.jpg 1180w, https://ww2.kqed.org/app/uploads/sites/24/2015/12/maplebacon-donuts-ingredients-960x640.jpg 960w\" sizes=\"(max-width: 1920px) 100vw, 1920px\">\u003cfigcaption class=\"wp-caption-text\">Ingredients for the donut holes. \u003ccite>(Wendy Goodfriend)\u003c/cite>\u003c/figcaption>\u003c/figure>\n\u003cul>\n\u003cstrong>\u003cem>Maple glaze\u003c/em>\u003c/strong>\n\u003cli>2 cups powdered sugar, sifted\u003c/li>\n\u003cli>1/4 cup maple syrup\u003c/li>\n\u003cli>2 tbsp warm water, plus more as needed\u003c/li>\n\u003cli>2 tsp vanilla extract\u003c/li>\n\u003cli>Pinch of kosher salt \u003c/li>\n\u003c/ul>\n\u003col>\n\u003cstrong>Instructions:\u003c/strong> \n\u003cli>In the bowl of a stand mixer fitted with the paddle attachment, whisk together 3/4 cup flour, the warm milk, sugar, and yeast. Let stand for 10 minutes. Add the remaining 2 cups flour, the salt, egg yolks, butter, vanilla, and 1/3 cup of the finely chopped bacon (reserve the rest for decorating) and beat until the dough is well mixed, about 5 minutes; the dough will be slightly sticky. Cover the bowl with plastic wrap and set aside in a warm place to rise for 1 hour, or refrigerate for up to overnight (if refrigerated, let come to room temperature for 1 hour before proceeding).\u003c/li>\n\u003cfigure id=\"attachment_105599\" class=\"wp-caption aligncenter\" style=\"max-width: 1920px\">\u003cimg src=\"http://ww2.kqed.org/bayareabites/wp-content/uploads/sites/24/2015/12/maplebacon-donuts-dough-prerise.jpg\" alt=\"The prepared dough before it rises.\" width=\"1920\" height=\"1280\" class=\"size-full wp-image-105599\" srcset=\"https://ww2.kqed.org/app/uploads/sites/24/2015/12/maplebacon-donuts-dough-prerise.jpg 1920w, https://ww2.kqed.org/app/uploads/sites/24/2015/12/maplebacon-donuts-dough-prerise-400x267.jpg 400w, https://ww2.kqed.org/app/uploads/sites/24/2015/12/maplebacon-donuts-dough-prerise-800x533.jpg 800w, https://ww2.kqed.org/app/uploads/sites/24/2015/12/maplebacon-donuts-dough-prerise-768x512.jpg 768w, https://ww2.kqed.org/app/uploads/sites/24/2015/12/maplebacon-donuts-dough-prerise-1440x960.jpg 1440w, https://ww2.kqed.org/app/uploads/sites/24/2015/12/maplebacon-donuts-dough-prerise-1180x787.jpg 1180w, https://ww2.kqed.org/app/uploads/sites/24/2015/12/maplebacon-donuts-dough-prerise-960x640.jpg 960w\" sizes=\"(max-width: 1920px) 100vw, 1920px\">\u003cfigcaption class=\"wp-caption-text\">The prepared dough before it rises. \u003ccite>(Wendy Goodfriend)\u003c/cite>\u003c/figcaption>\u003c/figure>\n\u003cfigure id=\"attachment_105600\" class=\"wp-caption aligncenter\" style=\"max-width: 1920px\">\u003cimg src=\"http://ww2.kqed.org/bayareabites/wp-content/uploads/sites/24/2015/12/maplebacon-donuts-dough-postrise.jpg\" alt=\"The prepared dough after it rises.\" width=\"1920\" height=\"1280\" class=\"size-full wp-image-105600\" srcset=\"https://ww2.kqed.org/app/uploads/sites/24/2015/12/maplebacon-donuts-dough-postrise.jpg 1920w, https://ww2.kqed.org/app/uploads/sites/24/2015/12/maplebacon-donuts-dough-postrise-400x267.jpg 400w, https://ww2.kqed.org/app/uploads/sites/24/2015/12/maplebacon-donuts-dough-postrise-800x533.jpg 800w, https://ww2.kqed.org/app/uploads/sites/24/2015/12/maplebacon-donuts-dough-postrise-768x512.jpg 768w, https://ww2.kqed.org/app/uploads/sites/24/2015/12/maplebacon-donuts-dough-postrise-1440x960.jpg 1440w, https://ww2.kqed.org/app/uploads/sites/24/2015/12/maplebacon-donuts-dough-postrise-1180x787.jpg 1180w, https://ww2.kqed.org/app/uploads/sites/24/2015/12/maplebacon-donuts-dough-postrise-960x640.jpg 960w\" sizes=\"(max-width: 1920px) 100vw, 1920px\">\u003cfigcaption class=\"wp-caption-text\">The prepared dough after it rises. \u003ccite>(Wendy Goodfriend)\u003c/cite>\u003c/figcaption>\u003c/figure>\n\u003cli>Flour 1 to 2 large rimmed baking sheets. On a floured work surface, roll out the dough to 1/2-inch thick. With a 1 1/2-inch round biscuit cutter, cut out donut holes. Re-roll the scraps and cut out additional holes.\u003c/li>\n\u003cfigure id=\"attachment_105595\" class=\"wp-caption aligncenter\" style=\"max-width: 1908px\">\u003cimg src=\"http://ww2.kqed.org/bayareabites/wp-content/uploads/sites/24/2015/12/maplebacon-donuts-rolling.jpg\" alt=\"On a floured work surface, roll out the dough to 1/2-inch thick. \" width=\"1908\" height=\"1070\" class=\"size-full wp-image-105595\" srcset=\"https://ww2.kqed.org/app/uploads/sites/24/2015/12/maplebacon-donuts-rolling.jpg 1908w, https://ww2.kqed.org/app/uploads/sites/24/2015/12/maplebacon-donuts-rolling-400x224.jpg 400w, https://ww2.kqed.org/app/uploads/sites/24/2015/12/maplebacon-donuts-rolling-800x449.jpg 800w, https://ww2.kqed.org/app/uploads/sites/24/2015/12/maplebacon-donuts-rolling-768x431.jpg 768w, https://ww2.kqed.org/app/uploads/sites/24/2015/12/maplebacon-donuts-rolling-1440x808.jpg 1440w, https://ww2.kqed.org/app/uploads/sites/24/2015/12/maplebacon-donuts-rolling-1180x662.jpg 1180w, https://ww2.kqed.org/app/uploads/sites/24/2015/12/maplebacon-donuts-rolling-960x538.jpg 960w\" sizes=\"(max-width: 1908px) 100vw, 1908px\">\u003cfigcaption class=\"wp-caption-text\">On a floured work surface, roll out the dough to 1/2-inch thick. \u003ccite>(Wendy Goodfriend)\u003c/cite>\u003c/figcaption>\u003c/figure>\u003c/p>\u003cp>\u003cspan class='utils-parseShortcode-shortcodes-__youtubeShortcode__embedYoutube'>\n \u003cspan class='utils-parseShortcode-shortcodes-__youtubeShortcode__embedYoutubeInside'>\n \u003ciframe\n loading='lazy'\n class='utils-parseShortcode-shortcodes-__youtubeShortcode__youtubePlayer'\n type='text/html'\n src='//www.youtube.com/embed/Ei8Aoqc-SGg'\n title='//www.youtube.com/embed/Ei8Aoqc-SGg'\n allowfullscreen='true'\n style='border:0;'>\u003c/iframe>\n \u003c/span>\n \u003c/span>\u003c/p>\u003cp>\u003cfigure id=\"attachment_105591\" class=\"wp-caption aligncenter\" style=\"max-width: 1920px\">\u003cimg src=\"http://ww2.kqed.org/bayareabites/wp-content/uploads/sites/24/2015/12/maplebacon-donuts-dough-cut.jpg\" alt=\"After cutting out the holes, re-roll the scraps to cut out additional holes.\" width=\"1920\" height=\"1280\" class=\"size-full wp-image-105591\" srcset=\"https://ww2.kqed.org/app/uploads/sites/24/2015/12/maplebacon-donuts-dough-cut.jpg 1920w, https://ww2.kqed.org/app/uploads/sites/24/2015/12/maplebacon-donuts-dough-cut-400x267.jpg 400w, https://ww2.kqed.org/app/uploads/sites/24/2015/12/maplebacon-donuts-dough-cut-800x533.jpg 800w, https://ww2.kqed.org/app/uploads/sites/24/2015/12/maplebacon-donuts-dough-cut-768x512.jpg 768w, https://ww2.kqed.org/app/uploads/sites/24/2015/12/maplebacon-donuts-dough-cut-1440x960.jpg 1440w, https://ww2.kqed.org/app/uploads/sites/24/2015/12/maplebacon-donuts-dough-cut-1180x787.jpg 1180w, https://ww2.kqed.org/app/uploads/sites/24/2015/12/maplebacon-donuts-dough-cut-960x640.jpg 960w\" sizes=\"(max-width: 1920px) 100vw, 1920px\">\u003cfigcaption class=\"wp-caption-text\">After cutting out the holes, re-roll the scraps to cut out additional holes. \u003ccite>(Wendy Goodfriend)\u003c/cite>\u003c/figcaption>\u003c/figure>\n\u003cli>Place the donuts at least 1 inch apart on the baking sheets and cover loosely with plastic wrap. Set in a warm place to rise until they are puffy, 15 to 30 minutes. They are ready when the dough springs back slowly after being touched with a fingertip (if it springs back at once, it needs more time; if it collapses it has over-proofed and you can re-roll the dough and cut it once).\u003c/li>\n\u003cli>While the donuts rise, make the glaze: Sift the confectioners’ sugar into a bowl. Stir in the maple syrup, warm water, vanilla, and salt until smooth. Add more water if needed to make a loose glaze. Set aside, covered with plastic wrap, until needed.\u003c/li>\n\u003cfigure id=\"attachment_105604\" class=\"wp-caption aligncenter\" style=\"max-width: 1920px\">\u003cimg src=\"http://ww2.kqed.org/bayareabites/wp-content/uploads/sites/24/2015/12/maplebacon-donuts-glaze-final.jpg\" alt=\"While the donuts rise, make the glaze: Sift the confectioners’ sugar into a bowl. Stir in the maple syrup, warm water, vanilla, and salt until smooth.\" width=\"1920\" height=\"1280\" class=\"size-full wp-image-105604\" srcset=\"https://ww2.kqed.org/app/uploads/sites/24/2015/12/maplebacon-donuts-glaze-final.jpg 1920w, https://ww2.kqed.org/app/uploads/sites/24/2015/12/maplebacon-donuts-glaze-final-400x267.jpg 400w, https://ww2.kqed.org/app/uploads/sites/24/2015/12/maplebacon-donuts-glaze-final-800x533.jpg 800w, https://ww2.kqed.org/app/uploads/sites/24/2015/12/maplebacon-donuts-glaze-final-768x512.jpg 768w, https://ww2.kqed.org/app/uploads/sites/24/2015/12/maplebacon-donuts-glaze-final-1440x960.jpg 1440w, https://ww2.kqed.org/app/uploads/sites/24/2015/12/maplebacon-donuts-glaze-final-1180x787.jpg 1180w, https://ww2.kqed.org/app/uploads/sites/24/2015/12/maplebacon-donuts-glaze-final-960x640.jpg 960w\" sizes=\"(max-width: 1920px) 100vw, 1920px\">\u003cfigcaption class=\"wp-caption-text\">While the donuts rise, make the glaze: Sift the confectioners’ sugar into a bowl. Stir in the maple syrup, warm water, vanilla, and salt until smooth. \u003ccite>(Wendy Goodfriend)\u003c/cite>\u003c/figcaption>\u003c/figure>\n\u003cli>Fill a heavy pot with at least 2 inches of oil (the oil should not go more than halfway up the pan). Heat the oil over medium-high heat until a deep-frying thermometer registers 360˚F.\u003c/li>\n\u003cli>Using a spider or slotted spoon, carefully lower a few donuts in the oil; do not crowd the pot. Fry for 1 to 2 minutes per side, turning a few times (metal tongs are good for this), until golden brown and cooked through. Remove with the spider, slotted spoon or tongs; drain on a wire rack over a paper towel, and let cool slightly before glazing. Repeat with the remaining donuts. Adjust the temperature while frying to keep the heat consistent.\n\u003c/li>\u003c/p>\u003cp>\u003cspan class='utils-parseShortcode-shortcodes-__youtubeShortcode__embedYoutube'>\n \u003cspan class='utils-parseShortcode-shortcodes-__youtubeShortcode__embedYoutubeInside'>\n \u003ciframe\n loading='lazy'\n class='utils-parseShortcode-shortcodes-__youtubeShortcode__youtubePlayer'\n type='text/html'\n src='//www.youtube.com/embed/o5iBX__B_QM'\n title='//www.youtube.com/embed/o5iBX__B_QM'\n allowfullscreen='true'\n style='border:0;'>\u003c/iframe>\n \u003c/span>\n \u003c/span>\u003c/p>\u003cp>\u003cfigure id=\"attachment_105614\" class=\"wp-caption aligncenter\" style=\"max-width: 1920px\">\u003cimg src=\"http://ww2.kqed.org/bayareabites/wp-content/uploads/sites/24/2015/12/maplebacon-donuts-fried.jpg\" alt=\"Remove the donuts, drain on a wire rack over a paper towel, and let cool slightly before glazing.\" width=\"1920\" height=\"1280\" class=\"size-full wp-image-105614\" srcset=\"https://ww2.kqed.org/app/uploads/sites/24/2015/12/maplebacon-donuts-fried.jpg 1920w, https://ww2.kqed.org/app/uploads/sites/24/2015/12/maplebacon-donuts-fried-400x267.jpg 400w, https://ww2.kqed.org/app/uploads/sites/24/2015/12/maplebacon-donuts-fried-800x533.jpg 800w, https://ww2.kqed.org/app/uploads/sites/24/2015/12/maplebacon-donuts-fried-768x512.jpg 768w, https://ww2.kqed.org/app/uploads/sites/24/2015/12/maplebacon-donuts-fried-1440x960.jpg 1440w, https://ww2.kqed.org/app/uploads/sites/24/2015/12/maplebacon-donuts-fried-1180x787.jpg 1180w, https://ww2.kqed.org/app/uploads/sites/24/2015/12/maplebacon-donuts-fried-960x640.jpg 960w\" sizes=\"(max-width: 1920px) 100vw, 1920px\">\u003cfigcaption class=\"wp-caption-text\">Remove the donuts, drain on a wire rack over a paper towel, and let cool slightly before glazing. \u003ccite>(Wendy Goodfriend)\u003c/cite>\u003c/figcaption>\u003c/figure>\n\u003cli>While the donuts are still warm, dip them into the glaze. Let the excess glaze drip off, and place on a wire rack set over a baking sheet. Immediately sprinkle them with bacon while the glaze is wet; let the glaze set before serving. The donuts are best the day they are made.\u003cbr>\n\u003cfigure id=\"attachment_105596\" class=\"wp-caption aligncenter\" style=\"max-width: 1920px\">\u003cimg src=\"http://ww2.kqed.org/bayareabites/wp-content/uploads/sites/24/2015/12/maplebacon-donuts-glazed.jpg\" alt=\"While the donuts are still warm, dip them into the glaze. Let the excess glaze drip off, and place on a wire rack set over a baking sheet. \" width=\"1920\" height=\"1280\" class=\"size-full wp-image-105596\" srcset=\"https://ww2.kqed.org/app/uploads/sites/24/2015/12/maplebacon-donuts-glazed.jpg 1920w, https://ww2.kqed.org/app/uploads/sites/24/2015/12/maplebacon-donuts-glazed-400x267.jpg 400w, https://ww2.kqed.org/app/uploads/sites/24/2015/12/maplebacon-donuts-glazed-800x533.jpg 800w, https://ww2.kqed.org/app/uploads/sites/24/2015/12/maplebacon-donuts-glazed-768x512.jpg 768w, https://ww2.kqed.org/app/uploads/sites/24/2015/12/maplebacon-donuts-glazed-1440x960.jpg 1440w, https://ww2.kqed.org/app/uploads/sites/24/2015/12/maplebacon-donuts-glazed-1180x787.jpg 1180w, https://ww2.kqed.org/app/uploads/sites/24/2015/12/maplebacon-donuts-glazed-960x640.jpg 960w\" sizes=\"(max-width: 1920px) 100vw, 1920px\">\u003cfigcaption class=\"wp-caption-text\">While the donuts are still warm, dip them into the glaze. Let the excess glaze drip off, and place on a wire rack set over a baking sheet. \u003ccite>(Wendy Goodfriend)\u003c/cite>\u003c/figcaption>\u003c/figure>\n\u003cfigure id=\"attachment_105602\" class=\"wp-caption aligncenter\" style=\"max-width: 1920px\">\u003cimg src=\"http://ww2.kqed.org/bayareabites/wp-content/uploads/sites/24/2015/12/maplebacon-donuts-wirerack.jpg\" alt=\" Immediately sprinkle them with bacon while the glaze is wet; let the glaze set before serving.\" width=\"1920\" height=\"1280\" class=\"size-full wp-image-105602\" srcset=\"https://ww2.kqed.org/app/uploads/sites/24/2015/12/maplebacon-donuts-wirerack.jpg 1920w, https://ww2.kqed.org/app/uploads/sites/24/2015/12/maplebacon-donuts-wirerack-400x267.jpg 400w, https://ww2.kqed.org/app/uploads/sites/24/2015/12/maplebacon-donuts-wirerack-800x533.jpg 800w, https://ww2.kqed.org/app/uploads/sites/24/2015/12/maplebacon-donuts-wirerack-768x512.jpg 768w, https://ww2.kqed.org/app/uploads/sites/24/2015/12/maplebacon-donuts-wirerack-1440x960.jpg 1440w, https://ww2.kqed.org/app/uploads/sites/24/2015/12/maplebacon-donuts-wirerack-1180x787.jpg 1180w, https://ww2.kqed.org/app/uploads/sites/24/2015/12/maplebacon-donuts-wirerack-960x640.jpg 960w\" sizes=\"(max-width: 1920px) 100vw, 1920px\">\u003cfigcaption class=\"wp-caption-text\">Immediately sprinkle them with bacon while the glaze is wet; let the glaze set before serving. \u003ccite>(Wendy Goodfriend)\u003c/cite>\u003c/figcaption>\u003c/figure>\n\u003c/li>\n\u003c/ol>\n\n\u003c/div>\u003c/p>","attributes":{"named":{},"numeric":[]}}],"link":"/bayareabites/105321/new-years-eve-appetizers-sweet-and-savory-maple-bacon-donut-holes","authors":["5014","5015"],"series":["bayareabites_15124"],"categories":["bayareabites_12550","bayareabites_1763","bayareabites_12"],"tags":["bayareabites_278","bayareabites_12011","bayareabites_11795","bayareabites_15178","bayareabites_3202","bayareabites_1686"],"featImg":"bayareabites_105582","label":"source_bayareabites_105321"},"bayareabites_102926":{"type":"posts","id":"bayareabites_102926","meta":{"index":"posts_1591205157","site":"bayareabites","id":"102926","score":null,"sort":[1447344050000]},"guestAuthors":[],"slug":"thanksgiving-side-dish-creamy-brussels-sprouts-gratin-and-bacon-gratin-with-shallots-and-gruyere","title":"Thanksgiving Side Dish: Creamy Brussels Sprouts and Bacon Gratin with Shallots and Gruyère","publishDate":1447344050,"format":"image","headTitle":"Thanksgiving Recipes | Bay Area Bites | KQED Food","labelTerm":{},"content":"\u003cp>I hate Brussels sprouts. I think I say this every year. But everyone else seems to love them and want them on their holiday table. So this year, since I know I’ll be forced to make them (my entire family loves them), I am going all out and creating something I might actually eat. Introducing the richest, most decadent recipe involving the lowly Brussels sprout: a bacon-studded gratin bathed in Gruyère cheese sauce.\u003cbr>\n[aside postID='bayareabites_89601,bayareabites_53169' label='Thanksgiving Sides to Try']\u003cbr>\nNow, don’t get me wrong. At one point in my life I liked Brussels sprouts. And then I got pregnant (at Christmas, when Every Single Restaurant in the Universe serves Brussels sprouts with Everything) and completely went off winter vegetables. (So you see, it’s not my fault that I hate them, it’s my daughter's. She, of course, likes them. Go figure.)\u003c/p>\n\u003cp>I’ve since recovered and love kale, chard, butternut squash, parsnips, etc. But I just can’t find the love for these little cabbage heads.\u003c/p>\n\u003cp>Anyway, this year I had a brainstorm. Throw them into a gratin! With bacon! And Gruyère cheese sauce!\u003c/p>\n\u003cp>But watch out, this incredible side dish will have you picking away nonstop at the crispy-cheesy edges until half of it is gone. I know, because I ate a ton of it.\u003c/p>\n\u003cfigure id=\"attachment_103089\" class=\"wp-caption aligncenter\" style=\"max-width: 1920px\">\u003cimg class=\"size-full wp-image-103089\" src=\"http://ww2.kqed.org/bayareabites/wp-content/uploads/sites/24/2015/11/brusselsprouts-finish1.jpg\" alt=\"Brussels Sprouts Gratin with Bacon and Gruyere\" width=\"1920\" height=\"1280\" srcset=\"https://ww2.kqed.org/app/uploads/sites/24/2015/11/brusselsprouts-finish1.jpg 1920w, https://ww2.kqed.org/app/uploads/sites/24/2015/11/brusselsprouts-finish1-400x267.jpg 400w, https://ww2.kqed.org/app/uploads/sites/24/2015/11/brusselsprouts-finish1-800x533.jpg 800w, https://ww2.kqed.org/app/uploads/sites/24/2015/11/brusselsprouts-finish1-1440x960.jpg 1440w, https://ww2.kqed.org/app/uploads/sites/24/2015/11/brusselsprouts-finish1-1180x787.jpg 1180w, https://ww2.kqed.org/app/uploads/sites/24/2015/11/brusselsprouts-finish1-960x640.jpg 960w\" sizes=\"(max-width: 1920px) 100vw, 1920px\">\u003cfigcaption class=\"wp-caption-text\">Brussels Sprouts Gratin with Bacon and Gruyere \u003ccite>(Wendy Goodfriend)\u003c/cite>\u003c/figcaption>\u003c/figure>\n\u003ch3>Brussels Sprouts Gratin with Bacon and Gruyère\u003c/h3>\n\u003cp>\u003cem>Makes 6 to 8 servings\u003c/em>\u003c/p>\n\u003cp>[ad fullwidth]\u003c/p>\n\u003cp>\u003cstrong>Ingredients:\u003c/strong>\u003c/p>\n\u003cul>\n\u003cli>2 lbs small, tender Brussels sprouts, trimmed and halved\u003c/li>\n\u003cli>4 oz thick sliced bacon, chopped\u003c/li>\n\u003cli>3 large shallots, trimmed and thinly sliced\u003c/li>\n\u003cli>1 tbsp butter\u003c/li>\n\u003cli>3 tbsp flour\u003c/li>\n\u003cli>1/2 cup chicken broth\u003c/li>\n\u003cli>1 1/2 cups milk\u003c/li>\n\u003cli>1 packed cup shredded Gruyere cheese (about 6 oz)\u003c/li>\n\u003cli>Kosher salt and freshly ground black pepper\u003c/li>\n\u003c/ul>\n\u003cfigure id=\"attachment_103094\" class=\"wp-caption aligncenter\" style=\"max-width: 1920px\">\u003cimg class=\"size-full wp-image-103094\" src=\"http://ww2.kqed.org/bayareabites/wp-content/uploads/sites/24/2015/11/brusselsprouts-sprouts.jpg\" alt=\"Tender Brussels sprouts, trimmed and halved.\" width=\"1920\" height=\"1280\" srcset=\"https://ww2.kqed.org/app/uploads/sites/24/2015/11/brusselsprouts-sprouts.jpg 1920w, https://ww2.kqed.org/app/uploads/sites/24/2015/11/brusselsprouts-sprouts-400x267.jpg 400w, https://ww2.kqed.org/app/uploads/sites/24/2015/11/brusselsprouts-sprouts-800x533.jpg 800w, https://ww2.kqed.org/app/uploads/sites/24/2015/11/brusselsprouts-sprouts-1440x960.jpg 1440w, https://ww2.kqed.org/app/uploads/sites/24/2015/11/brusselsprouts-sprouts-1180x787.jpg 1180w, https://ww2.kqed.org/app/uploads/sites/24/2015/11/brusselsprouts-sprouts-960x640.jpg 960w\" sizes=\"(max-width: 1920px) 100vw, 1920px\">\u003cfigcaption class=\"wp-caption-text\">Tender Brussels sprouts, trimmed and halved. \u003ccite>(Wendy Goodfriend)\u003c/cite>\u003c/figcaption>\u003c/figure>\n\u003cfigure id=\"attachment_103083\" class=\"wp-caption aligncenter\" style=\"max-width: 1920px\">\u003cimg class=\"size-full wp-image-103083\" src=\"http://ww2.kqed.org/bayareabites/wp-content/uploads/sites/24/2015/11/brusselsprouts-bacon-shallots.jpg\" alt=\"Chop the bacon and thinly slice the shallots.\" width=\"1920\" height=\"1280\" srcset=\"https://ww2.kqed.org/app/uploads/sites/24/2015/11/brusselsprouts-bacon-shallots.jpg 1920w, https://ww2.kqed.org/app/uploads/sites/24/2015/11/brusselsprouts-bacon-shallots-400x267.jpg 400w, https://ww2.kqed.org/app/uploads/sites/24/2015/11/brusselsprouts-bacon-shallots-800x533.jpg 800w, https://ww2.kqed.org/app/uploads/sites/24/2015/11/brusselsprouts-bacon-shallots-1440x960.jpg 1440w, https://ww2.kqed.org/app/uploads/sites/24/2015/11/brusselsprouts-bacon-shallots-1180x787.jpg 1180w, https://ww2.kqed.org/app/uploads/sites/24/2015/11/brusselsprouts-bacon-shallots-960x640.jpg 960w\" sizes=\"(max-width: 1920px) 100vw, 1920px\">\u003cfigcaption class=\"wp-caption-text\">Chop the bacon and thinly slice the shallots. \u003ccite>(Wendy Goodfriend)\u003c/cite>\u003c/figcaption>\u003c/figure>\n\u003cp>\u003c/p>\n\u003cp>\u003cstrong>Instructions:\u003c/strong>\u003c/p>\n\u003col>\n\u003cli style=\"list-style-type: none\">\n\u003col>\n\u003cli>Preheat the oven to 400F.\u003c/li>\n\u003cli>Bring a large saucepan half filled with salted water to a boil over medium-high heat. Blanch the sprouts until just tender, 3 to 7 minutes (depends on the freshness and size of the sprouts). Drain in a colander and rinse under cold water to stop the cooking.\u003c/li>\n\u003c/ol>\n\u003c/li>\n\u003c/ol>\n\u003cfigure id=\"attachment_103084\" class=\"wp-caption aligncenter\" style=\"max-width: 1920px\">\u003cimg class=\"size-full wp-image-103084\" src=\"http://ww2.kqed.org/bayareabites/wp-content/uploads/sites/24/2015/11/brusselsprouts-cooked.jpg\" alt=\"Blanch the sprouts until just tender, 3 to 7 minutes. \" width=\"1920\" height=\"1280\" srcset=\"https://ww2.kqed.org/app/uploads/sites/24/2015/11/brusselsprouts-cooked.jpg 1920w, https://ww2.kqed.org/app/uploads/sites/24/2015/11/brusselsprouts-cooked-400x267.jpg 400w, https://ww2.kqed.org/app/uploads/sites/24/2015/11/brusselsprouts-cooked-800x533.jpg 800w, https://ww2.kqed.org/app/uploads/sites/24/2015/11/brusselsprouts-cooked-1440x960.jpg 1440w, https://ww2.kqed.org/app/uploads/sites/24/2015/11/brusselsprouts-cooked-1180x787.jpg 1180w, https://ww2.kqed.org/app/uploads/sites/24/2015/11/brusselsprouts-cooked-960x640.jpg 960w\" sizes=\"(max-width: 1920px) 100vw, 1920px\">\u003cfigcaption class=\"wp-caption-text\">Blanch the sprouts until just tender, 3 to 7 minutes. \u003ccite>(Wendy Goodfriend)\u003c/cite>\u003c/figcaption>\u003c/figure>\n\u003col>\n\u003cli style=\"list-style-type: none\">\n\u003col>\n\u003cli>In a large heatproof frying pan over medium heat, fry the bacon until crisp. Using a slotted spoon, transfer the bacon to paper towels and add the shallots. Fry until tender, stirring, about 5 minutes.\u003c/li>\n\u003cli>Drain off all but 2 tbsp fat and add the bacon and butter to the pan (if you don’t have 2 tbsp bacon fat, use 2 tbsp butter).\u003c/li>\n\u003c/ol>\n\u003c/li>\n\u003c/ol>\n\u003cfigure id=\"attachment_103081\" class=\"wp-caption aligncenter\" style=\"max-width: 1920px\">\u003cimg class=\"size-full wp-image-103081\" src=\"http://ww2.kqed.org/bayareabites/wp-content/uploads/sites/24/2015/11/brusselsprouts-bacon-butter.jpg\" alt=\"Drain off all but 2 tbsp fat and add the bacon and butter to the pan.\" width=\"1920\" height=\"1280\" srcset=\"https://ww2.kqed.org/app/uploads/sites/24/2015/11/brusselsprouts-bacon-butter.jpg 1920w, https://ww2.kqed.org/app/uploads/sites/24/2015/11/brusselsprouts-bacon-butter-400x267.jpg 400w, https://ww2.kqed.org/app/uploads/sites/24/2015/11/brusselsprouts-bacon-butter-800x533.jpg 800w, https://ww2.kqed.org/app/uploads/sites/24/2015/11/brusselsprouts-bacon-butter-1440x960.jpg 1440w, https://ww2.kqed.org/app/uploads/sites/24/2015/11/brusselsprouts-bacon-butter-1180x787.jpg 1180w, https://ww2.kqed.org/app/uploads/sites/24/2015/11/brusselsprouts-bacon-butter-960x640.jpg 960w\" sizes=\"(max-width: 1920px) 100vw, 1920px\">\u003cfigcaption class=\"wp-caption-text\">Drain off all but 2 tbsp fat and add the bacon and butter to the pan. \u003ccite>(Wendy Goodfriend)\u003c/cite>\u003c/figcaption>\u003c/figure>\n\u003col>\n\u003cli style=\"list-style-type: none\">\n\u003col>\n\u003cli>Sprinkle the flour over the butter and cook, stirring with a whisk, until smooth. Slowly add the chicken broth, then the milk, while whisking, until thickened and smooth. Add 1/2 cup of the cheese and stir until smooth. Season to taste with salt and pepper.\u003c/li>\n\u003c/ol>\n\u003c/li>\n\u003c/ol>\n\u003cfigure id=\"attachment_103082\" class=\"wp-caption aligncenter\" style=\"max-width: 1920px\">\u003cimg class=\"size-full wp-image-103082\" src=\"http://ww2.kqed.org/bayareabites/wp-content/uploads/sites/24/2015/11/brusselsprouts-bacon-roux.jpg\" alt=\"Sprinkle the flour over the butter and cook, stirring with a whisk, until smooth.\" width=\"1920\" height=\"1280\" srcset=\"https://ww2.kqed.org/app/uploads/sites/24/2015/11/brusselsprouts-bacon-roux.jpg 1920w, https://ww2.kqed.org/app/uploads/sites/24/2015/11/brusselsprouts-bacon-roux-400x267.jpg 400w, https://ww2.kqed.org/app/uploads/sites/24/2015/11/brusselsprouts-bacon-roux-800x533.jpg 800w, https://ww2.kqed.org/app/uploads/sites/24/2015/11/brusselsprouts-bacon-roux-1440x960.jpg 1440w, https://ww2.kqed.org/app/uploads/sites/24/2015/11/brusselsprouts-bacon-roux-1180x787.jpg 1180w, https://ww2.kqed.org/app/uploads/sites/24/2015/11/brusselsprouts-bacon-roux-960x640.jpg 960w\" sizes=\"(max-width: 1920px) 100vw, 1920px\">\u003cfigcaption class=\"wp-caption-text\">Sprinkle the flour over the butter and cook, stirring with a whisk, until smooth. \u003ccite>(Wendy Goodfriend)\u003c/cite>\u003c/figcaption>\u003c/figure>\n\u003cfigure id=\"attachment_103078\" class=\"wp-caption aligncenter\" style=\"max-width: 1920px\">\u003cimg class=\"size-full wp-image-103078\" src=\"http://ww2.kqed.org/bayareabites/wp-content/uploads/sites/24/2015/11/brusselsprouts-add-cheese.jpg\" alt=\"Add 1/2 cup of the cheese and stir until smooth. \" width=\"1920\" height=\"1280\" srcset=\"https://ww2.kqed.org/app/uploads/sites/24/2015/11/brusselsprouts-add-cheese.jpg 1920w, https://ww2.kqed.org/app/uploads/sites/24/2015/11/brusselsprouts-add-cheese-400x267.jpg 400w, https://ww2.kqed.org/app/uploads/sites/24/2015/11/brusselsprouts-add-cheese-800x533.jpg 800w, https://ww2.kqed.org/app/uploads/sites/24/2015/11/brusselsprouts-add-cheese-1440x960.jpg 1440w, https://ww2.kqed.org/app/uploads/sites/24/2015/11/brusselsprouts-add-cheese-1180x787.jpg 1180w, https://ww2.kqed.org/app/uploads/sites/24/2015/11/brusselsprouts-add-cheese-960x640.jpg 960w\" sizes=\"(max-width: 1920px) 100vw, 1920px\">\u003cfigcaption class=\"wp-caption-text\">Add 1/2 cup of the cheese and stir until smooth. \u003ccite>(Wendy Goodfriend)\u003c/cite>\u003c/figcaption>\u003c/figure>\n\u003col>\n\u003cli style=\"list-style-type: none\">\n\u003col>\n\u003cli>Add the Brussels sprouts to the sauce and stir to combine. Spread into an even later. Sprinkle with the remaining cheese.\u003c/li>\n\u003c/ol>\n\u003c/li>\n\u003c/ol>\n\u003cfigure id=\"attachment_103080\" class=\"wp-caption aligncenter\" style=\"max-width: 1920px\">\u003cimg class=\"size-full wp-image-103080\" src=\"http://ww2.kqed.org/bayareabites/wp-content/uploads/sites/24/2015/11/brusselsprouts-add-sprouts.jpg\" alt=\"Add the Brussels sprouts to the sauce and stir to combine. \" width=\"1920\" height=\"1280\" srcset=\"https://ww2.kqed.org/app/uploads/sites/24/2015/11/brusselsprouts-add-sprouts.jpg 1920w, https://ww2.kqed.org/app/uploads/sites/24/2015/11/brusselsprouts-add-sprouts-400x267.jpg 400w, https://ww2.kqed.org/app/uploads/sites/24/2015/11/brusselsprouts-add-sprouts-800x533.jpg 800w, https://ww2.kqed.org/app/uploads/sites/24/2015/11/brusselsprouts-add-sprouts-1440x960.jpg 1440w, https://ww2.kqed.org/app/uploads/sites/24/2015/11/brusselsprouts-add-sprouts-1180x787.jpg 1180w, https://ww2.kqed.org/app/uploads/sites/24/2015/11/brusselsprouts-add-sprouts-960x640.jpg 960w\" sizes=\"(max-width: 1920px) 100vw, 1920px\">\u003cfigcaption class=\"wp-caption-text\">Add the Brussels sprouts to the sauce and stir to combine. \u003ccite>(Wendy Goodfriend)\u003c/cite>\u003c/figcaption>\u003c/figure>\n\u003cfigure id=\"attachment_103079\" class=\"wp-caption aligncenter\" style=\"max-width: 1920px\">\u003cimg class=\"size-full wp-image-103079\" src=\"http://ww2.kqed.org/bayareabites/wp-content/uploads/sites/24/2015/11/brusselsprouts-add-cheese1.jpg\" alt=\" Spread into an even later. Sprinkle with the remaining cheese.\" width=\"1920\" height=\"1280\" srcset=\"https://ww2.kqed.org/app/uploads/sites/24/2015/11/brusselsprouts-add-cheese1.jpg 1920w, https://ww2.kqed.org/app/uploads/sites/24/2015/11/brusselsprouts-add-cheese1-400x267.jpg 400w, https://ww2.kqed.org/app/uploads/sites/24/2015/11/brusselsprouts-add-cheese1-800x533.jpg 800w, https://ww2.kqed.org/app/uploads/sites/24/2015/11/brusselsprouts-add-cheese1-1440x960.jpg 1440w, https://ww2.kqed.org/app/uploads/sites/24/2015/11/brusselsprouts-add-cheese1-1180x787.jpg 1180w, https://ww2.kqed.org/app/uploads/sites/24/2015/11/brusselsprouts-add-cheese1-960x640.jpg 960w\" sizes=\"(max-width: 1920px) 100vw, 1920px\">\u003cfigcaption class=\"wp-caption-text\">Spread into an even later. Sprinkle with the remaining cheese. \u003ccite>(Wendy Goodfriend)\u003c/cite>\u003c/figcaption>\u003c/figure>\n\u003col>\n\u003cli style=\"list-style-type: none\">\n\u003col>\n\u003cli>Bake until bubbly and golden brown, about 30 minutes. (If you like, pop it under the broiler to brown the top a bit more.) Let sit for about 10 minutes before serving.\u003c/li>\n\u003c/ol>\n\u003c/li>\n\u003c/ol>\n\u003cfigure id=\"attachment_103090\" class=\"wp-caption aligncenter\" style=\"max-width: 1920px\">\u003cimg class=\"size-full wp-image-103090\" src=\"http://ww2.kqed.org/bayareabites/wp-content/uploads/sites/24/2015/11/brusselsprouts-in-oven.jpg\" alt=\"Bake until bubbly and golden brown, about 30 minutes.\" width=\"1920\" height=\"1280\" srcset=\"https://ww2.kqed.org/app/uploads/sites/24/2015/11/brusselsprouts-in-oven.jpg 1920w, https://ww2.kqed.org/app/uploads/sites/24/2015/11/brusselsprouts-in-oven-400x267.jpg 400w, https://ww2.kqed.org/app/uploads/sites/24/2015/11/brusselsprouts-in-oven-800x533.jpg 800w, https://ww2.kqed.org/app/uploads/sites/24/2015/11/brusselsprouts-in-oven-1440x960.jpg 1440w, https://ww2.kqed.org/app/uploads/sites/24/2015/11/brusselsprouts-in-oven-1180x787.jpg 1180w, https://ww2.kqed.org/app/uploads/sites/24/2015/11/brusselsprouts-in-oven-960x640.jpg 960w\" sizes=\"(max-width: 1920px) 100vw, 1920px\">\u003cfigcaption class=\"wp-caption-text\">Bake until bubbly and golden brown, about 30 minutes. \u003ccite>(Wendy Goodfriend)\u003c/cite>\u003c/figcaption>\u003c/figure>\n\u003cfigure id=\"attachment_103087\" class=\"wp-caption aligncenter\" style=\"max-width: 1920px\">\u003cimg class=\"size-full wp-image-103087\" src=\"http://ww2.kqed.org/bayareabites/wp-content/uploads/sites/24/2015/11/brusselsprouts-finish-spoon.jpg\" alt=\"Let sit for about 10 minutes before serving.\" width=\"1920\" height=\"1280\" srcset=\"https://ww2.kqed.org/app/uploads/sites/24/2015/11/brusselsprouts-finish-spoon.jpg 1920w, https://ww2.kqed.org/app/uploads/sites/24/2015/11/brusselsprouts-finish-spoon-400x267.jpg 400w, https://ww2.kqed.org/app/uploads/sites/24/2015/11/brusselsprouts-finish-spoon-800x533.jpg 800w, https://ww2.kqed.org/app/uploads/sites/24/2015/11/brusselsprouts-finish-spoon-1440x960.jpg 1440w, https://ww2.kqed.org/app/uploads/sites/24/2015/11/brusselsprouts-finish-spoon-1180x787.jpg 1180w, https://ww2.kqed.org/app/uploads/sites/24/2015/11/brusselsprouts-finish-spoon-960x640.jpg 960w\" sizes=\"(max-width: 1920px) 100vw, 1920px\">\u003cfigcaption class=\"wp-caption-text\">Let sit for about 10 minutes before serving. \u003ccite>(Wendy Goodfriend)\u003c/cite>\u003c/figcaption>\u003c/figure>\n\n","blocks":[],"excerpt":"Flecked with bacon and oozing with Gruyère cheese, Brussels sprouts have never been so extravagantly presented as in this over-the-top gratin. A perfect accompaniment to any winter holiday meal.","status":"publish","parent":0,"modified":1571962207,"stats":{"hasAudio":false,"hasVideo":false,"hasChartOrMap":false,"iframeSrcs":[],"hasGoogleForm":false,"hasGallery":false,"hasHearkenModule":false,"hasPolis":false,"paragraphCount":9,"wordCount":656},"headData":{"title":"Thanksgiving Side Dish: Creamy Brussels Sprouts and Bacon Gratin with Shallots and Gruyère | KQED","description":"Flecked with bacon and oozing with Gruyère cheese, Brussels sprouts have never been so extravagantly presented as in this over-the-top gratin. A perfect accompaniment to any winter holiday meal.","ogTitle":"","ogDescription":"","ogImgId":"","twTitle":"","twDescription":"","twImgId":"","schema":{"@context":"http://schema.org","@type":"Article","headline":"Thanksgiving Side Dish: Creamy Brussels Sprouts and Bacon Gratin with Shallots and Gruyère","datePublished":"2015-11-12T16:00:50.000Z","dateModified":"2019-10-25T00:10:07.000Z","image":"https://cdn.kqed.org/wp-content/uploads/2020/02/KQED-OG-Image@1x.png"}},"disqusIdentifier":"102926 http://ww2.kqed.org/bayareabites/?p=102926","disqusUrl":"https://ww2.kqed.org/bayareabites/2015/11/12/thanksgiving-side-dish-creamy-brussels-sprouts-gratin-and-bacon-gratin-with-shallots-and-gruyere/","disqusTitle":"Thanksgiving Side Dish: Creamy Brussels Sprouts and Bacon Gratin with Shallots and Gruyère","source":"Thanksgiving Recipes","sourceUrl":"https://ww2.kqed.org/bayareabites/series/thanksgiving-recipes/","path":"/bayareabites/102926/thanksgiving-side-dish-creamy-brussels-sprouts-gratin-and-bacon-gratin-with-shallots-and-gruyere","audioTrackLength":null,"parsedContent":[{"type":"contentString","content":"\u003cdiv class=\"post-body\">\u003cp>\u003cp>I hate Brussels sprouts. I think I say this every year. But everyone else seems to love them and want them on their holiday table. So this year, since I know I’ll be forced to make them (my entire family loves them), I am going all out and creating something I might actually eat. Introducing the richest, most decadent recipe involving the lowly Brussels sprout: a bacon-studded gratin bathed in Gruyère cheese sauce.\u003cbr>\n\u003c/p>\u003c/div>","attributes":{"named":{},"numeric":[]}},{"type":"component","content":"","name":"aside","attributes":{"named":{"postid":"bayareabites_89601,bayareabites_53169","label":"Thanksgiving Sides to Try "},"numeric":[]}},{"type":"contentString","content":"\u003cdiv class=\"post-body\">\u003cp>\u003cbr>\nNow, don’t get me wrong. At one point in my life I liked Brussels sprouts. And then I got pregnant (at Christmas, when Every Single Restaurant in the Universe serves Brussels sprouts with Everything) and completely went off winter vegetables. (So you see, it’s not my fault that I hate them, it’s my daughter's. She, of course, likes them. Go figure.)\u003c/p>\n\u003cp>I’ve since recovered and love kale, chard, butternut squash, parsnips, etc. But I just can’t find the love for these little cabbage heads.\u003c/p>\n\u003cp>Anyway, this year I had a brainstorm. Throw them into a gratin! With bacon! And Gruyère cheese sauce!\u003c/p>\n\u003cp>But watch out, this incredible side dish will have you picking away nonstop at the crispy-cheesy edges until half of it is gone. I know, because I ate a ton of it.\u003c/p>\n\u003cfigure id=\"attachment_103089\" class=\"wp-caption aligncenter\" style=\"max-width: 1920px\">\u003cimg class=\"size-full wp-image-103089\" src=\"http://ww2.kqed.org/bayareabites/wp-content/uploads/sites/24/2015/11/brusselsprouts-finish1.jpg\" alt=\"Brussels Sprouts Gratin with Bacon and Gruyere\" width=\"1920\" height=\"1280\" srcset=\"https://ww2.kqed.org/app/uploads/sites/24/2015/11/brusselsprouts-finish1.jpg 1920w, https://ww2.kqed.org/app/uploads/sites/24/2015/11/brusselsprouts-finish1-400x267.jpg 400w, https://ww2.kqed.org/app/uploads/sites/24/2015/11/brusselsprouts-finish1-800x533.jpg 800w, https://ww2.kqed.org/app/uploads/sites/24/2015/11/brusselsprouts-finish1-1440x960.jpg 1440w, https://ww2.kqed.org/app/uploads/sites/24/2015/11/brusselsprouts-finish1-1180x787.jpg 1180w, https://ww2.kqed.org/app/uploads/sites/24/2015/11/brusselsprouts-finish1-960x640.jpg 960w\" sizes=\"(max-width: 1920px) 100vw, 1920px\">\u003cfigcaption class=\"wp-caption-text\">Brussels Sprouts Gratin with Bacon and Gruyere \u003ccite>(Wendy Goodfriend)\u003c/cite>\u003c/figcaption>\u003c/figure>\n\u003ch3>Brussels Sprouts Gratin with Bacon and Gruyère\u003c/h3>\n\u003cp>\u003cem>Makes 6 to 8 servings\u003c/em>\u003c/p>\n\u003cp>\u003c/p>\u003c/div>","attributes":{"named":{},"numeric":[]}},{"type":"component","content":"","name":"ad","attributes":{"named":{"label":"fullwidth"},"numeric":["fullwidth"]}},{"type":"contentString","content":"\u003cdiv class=\"post-body\">\u003cp>\u003c/p>\n\u003cp>\u003cstrong>Ingredients:\u003c/strong>\u003c/p>\n\u003cul>\n\u003cli>2 lbs small, tender Brussels sprouts, trimmed and halved\u003c/li>\n\u003cli>4 oz thick sliced bacon, chopped\u003c/li>\n\u003cli>3 large shallots, trimmed and thinly sliced\u003c/li>\n\u003cli>1 tbsp butter\u003c/li>\n\u003cli>3 tbsp flour\u003c/li>\n\u003cli>1/2 cup chicken broth\u003c/li>\n\u003cli>1 1/2 cups milk\u003c/li>\n\u003cli>1 packed cup shredded Gruyere cheese (about 6 oz)\u003c/li>\n\u003cli>Kosher salt and freshly ground black pepper\u003c/li>\n\u003c/ul>\n\u003cfigure id=\"attachment_103094\" class=\"wp-caption aligncenter\" style=\"max-width: 1920px\">\u003cimg class=\"size-full wp-image-103094\" src=\"http://ww2.kqed.org/bayareabites/wp-content/uploads/sites/24/2015/11/brusselsprouts-sprouts.jpg\" alt=\"Tender Brussels sprouts, trimmed and halved.\" width=\"1920\" height=\"1280\" srcset=\"https://ww2.kqed.org/app/uploads/sites/24/2015/11/brusselsprouts-sprouts.jpg 1920w, https://ww2.kqed.org/app/uploads/sites/24/2015/11/brusselsprouts-sprouts-400x267.jpg 400w, https://ww2.kqed.org/app/uploads/sites/24/2015/11/brusselsprouts-sprouts-800x533.jpg 800w, https://ww2.kqed.org/app/uploads/sites/24/2015/11/brusselsprouts-sprouts-1440x960.jpg 1440w, https://ww2.kqed.org/app/uploads/sites/24/2015/11/brusselsprouts-sprouts-1180x787.jpg 1180w, https://ww2.kqed.org/app/uploads/sites/24/2015/11/brusselsprouts-sprouts-960x640.jpg 960w\" sizes=\"(max-width: 1920px) 100vw, 1920px\">\u003cfigcaption class=\"wp-caption-text\">Tender Brussels sprouts, trimmed and halved. \u003ccite>(Wendy Goodfriend)\u003c/cite>\u003c/figcaption>\u003c/figure>\n\u003cfigure id=\"attachment_103083\" class=\"wp-caption aligncenter\" style=\"max-width: 1920px\">\u003cimg class=\"size-full wp-image-103083\" src=\"http://ww2.kqed.org/bayareabites/wp-content/uploads/sites/24/2015/11/brusselsprouts-bacon-shallots.jpg\" alt=\"Chop the bacon and thinly slice the shallots.\" width=\"1920\" height=\"1280\" srcset=\"https://ww2.kqed.org/app/uploads/sites/24/2015/11/brusselsprouts-bacon-shallots.jpg 1920w, https://ww2.kqed.org/app/uploads/sites/24/2015/11/brusselsprouts-bacon-shallots-400x267.jpg 400w, https://ww2.kqed.org/app/uploads/sites/24/2015/11/brusselsprouts-bacon-shallots-800x533.jpg 800w, https://ww2.kqed.org/app/uploads/sites/24/2015/11/brusselsprouts-bacon-shallots-1440x960.jpg 1440w, https://ww2.kqed.org/app/uploads/sites/24/2015/11/brusselsprouts-bacon-shallots-1180x787.jpg 1180w, https://ww2.kqed.org/app/uploads/sites/24/2015/11/brusselsprouts-bacon-shallots-960x640.jpg 960w\" sizes=\"(max-width: 1920px) 100vw, 1920px\">\u003cfigcaption class=\"wp-caption-text\">Chop the bacon and thinly slice the shallots. \u003ccite>(Wendy Goodfriend)\u003c/cite>\u003c/figcaption>\u003c/figure>\n\u003cp>\u003c/p>\n\u003cp>\u003cstrong>Instructions:\u003c/strong>\u003c/p>\n\u003col>\n\u003cli style=\"list-style-type: none\">\n\u003col>\n\u003cli>Preheat the oven to 400F.\u003c/li>\n\u003cli>Bring a large saucepan half filled with salted water to a boil over medium-high heat. Blanch the sprouts until just tender, 3 to 7 minutes (depends on the freshness and size of the sprouts). Drain in a colander and rinse under cold water to stop the cooking.\u003c/li>\n\u003c/ol>\n\u003c/li>\n\u003c/ol>\n\u003cfigure id=\"attachment_103084\" class=\"wp-caption aligncenter\" style=\"max-width: 1920px\">\u003cimg class=\"size-full wp-image-103084\" src=\"http://ww2.kqed.org/bayareabites/wp-content/uploads/sites/24/2015/11/brusselsprouts-cooked.jpg\" alt=\"Blanch the sprouts until just tender, 3 to 7 minutes. \" width=\"1920\" height=\"1280\" srcset=\"https://ww2.kqed.org/app/uploads/sites/24/2015/11/brusselsprouts-cooked.jpg 1920w, https://ww2.kqed.org/app/uploads/sites/24/2015/11/brusselsprouts-cooked-400x267.jpg 400w, https://ww2.kqed.org/app/uploads/sites/24/2015/11/brusselsprouts-cooked-800x533.jpg 800w, https://ww2.kqed.org/app/uploads/sites/24/2015/11/brusselsprouts-cooked-1440x960.jpg 1440w, https://ww2.kqed.org/app/uploads/sites/24/2015/11/brusselsprouts-cooked-1180x787.jpg 1180w, https://ww2.kqed.org/app/uploads/sites/24/2015/11/brusselsprouts-cooked-960x640.jpg 960w\" sizes=\"(max-width: 1920px) 100vw, 1920px\">\u003cfigcaption class=\"wp-caption-text\">Blanch the sprouts until just tender, 3 to 7 minutes. \u003ccite>(Wendy Goodfriend)\u003c/cite>\u003c/figcaption>\u003c/figure>\n\u003col>\n\u003cli style=\"list-style-type: none\">\n\u003col>\n\u003cli>In a large heatproof frying pan over medium heat, fry the bacon until crisp. Using a slotted spoon, transfer the bacon to paper towels and add the shallots. Fry until tender, stirring, about 5 minutes.\u003c/li>\n\u003cli>Drain off all but 2 tbsp fat and add the bacon and butter to the pan (if you don’t have 2 tbsp bacon fat, use 2 tbsp butter).\u003c/li>\n\u003c/ol>\n\u003c/li>\n\u003c/ol>\n\u003cfigure id=\"attachment_103081\" class=\"wp-caption aligncenter\" style=\"max-width: 1920px\">\u003cimg class=\"size-full wp-image-103081\" src=\"http://ww2.kqed.org/bayareabites/wp-content/uploads/sites/24/2015/11/brusselsprouts-bacon-butter.jpg\" alt=\"Drain off all but 2 tbsp fat and add the bacon and butter to the pan.\" width=\"1920\" height=\"1280\" srcset=\"https://ww2.kqed.org/app/uploads/sites/24/2015/11/brusselsprouts-bacon-butter.jpg 1920w, https://ww2.kqed.org/app/uploads/sites/24/2015/11/brusselsprouts-bacon-butter-400x267.jpg 400w, https://ww2.kqed.org/app/uploads/sites/24/2015/11/brusselsprouts-bacon-butter-800x533.jpg 800w, https://ww2.kqed.org/app/uploads/sites/24/2015/11/brusselsprouts-bacon-butter-1440x960.jpg 1440w, https://ww2.kqed.org/app/uploads/sites/24/2015/11/brusselsprouts-bacon-butter-1180x787.jpg 1180w, https://ww2.kqed.org/app/uploads/sites/24/2015/11/brusselsprouts-bacon-butter-960x640.jpg 960w\" sizes=\"(max-width: 1920px) 100vw, 1920px\">\u003cfigcaption class=\"wp-caption-text\">Drain off all but 2 tbsp fat and add the bacon and butter to the pan. \u003ccite>(Wendy Goodfriend)\u003c/cite>\u003c/figcaption>\u003c/figure>\n\u003col>\n\u003cli style=\"list-style-type: none\">\n\u003col>\n\u003cli>Sprinkle the flour over the butter and cook, stirring with a whisk, until smooth. Slowly add the chicken broth, then the milk, while whisking, until thickened and smooth. Add 1/2 cup of the cheese and stir until smooth. Season to taste with salt and pepper.\u003c/li>\n\u003c/ol>\n\u003c/li>\n\u003c/ol>\n\u003cfigure id=\"attachment_103082\" class=\"wp-caption aligncenter\" style=\"max-width: 1920px\">\u003cimg class=\"size-full wp-image-103082\" src=\"http://ww2.kqed.org/bayareabites/wp-content/uploads/sites/24/2015/11/brusselsprouts-bacon-roux.jpg\" alt=\"Sprinkle the flour over the butter and cook, stirring with a whisk, until smooth.\" width=\"1920\" height=\"1280\" srcset=\"https://ww2.kqed.org/app/uploads/sites/24/2015/11/brusselsprouts-bacon-roux.jpg 1920w, https://ww2.kqed.org/app/uploads/sites/24/2015/11/brusselsprouts-bacon-roux-400x267.jpg 400w, https://ww2.kqed.org/app/uploads/sites/24/2015/11/brusselsprouts-bacon-roux-800x533.jpg 800w, https://ww2.kqed.org/app/uploads/sites/24/2015/11/brusselsprouts-bacon-roux-1440x960.jpg 1440w, https://ww2.kqed.org/app/uploads/sites/24/2015/11/brusselsprouts-bacon-roux-1180x787.jpg 1180w, https://ww2.kqed.org/app/uploads/sites/24/2015/11/brusselsprouts-bacon-roux-960x640.jpg 960w\" sizes=\"(max-width: 1920px) 100vw, 1920px\">\u003cfigcaption class=\"wp-caption-text\">Sprinkle the flour over the butter and cook, stirring with a whisk, until smooth. \u003ccite>(Wendy Goodfriend)\u003c/cite>\u003c/figcaption>\u003c/figure>\n\u003cfigure id=\"attachment_103078\" class=\"wp-caption aligncenter\" style=\"max-width: 1920px\">\u003cimg class=\"size-full wp-image-103078\" src=\"http://ww2.kqed.org/bayareabites/wp-content/uploads/sites/24/2015/11/brusselsprouts-add-cheese.jpg\" alt=\"Add 1/2 cup of the cheese and stir until smooth. \" width=\"1920\" height=\"1280\" srcset=\"https://ww2.kqed.org/app/uploads/sites/24/2015/11/brusselsprouts-add-cheese.jpg 1920w, https://ww2.kqed.org/app/uploads/sites/24/2015/11/brusselsprouts-add-cheese-400x267.jpg 400w, https://ww2.kqed.org/app/uploads/sites/24/2015/11/brusselsprouts-add-cheese-800x533.jpg 800w, https://ww2.kqed.org/app/uploads/sites/24/2015/11/brusselsprouts-add-cheese-1440x960.jpg 1440w, https://ww2.kqed.org/app/uploads/sites/24/2015/11/brusselsprouts-add-cheese-1180x787.jpg 1180w, https://ww2.kqed.org/app/uploads/sites/24/2015/11/brusselsprouts-add-cheese-960x640.jpg 960w\" sizes=\"(max-width: 1920px) 100vw, 1920px\">\u003cfigcaption class=\"wp-caption-text\">Add 1/2 cup of the cheese and stir until smooth. \u003ccite>(Wendy Goodfriend)\u003c/cite>\u003c/figcaption>\u003c/figure>\n\u003col>\n\u003cli style=\"list-style-type: none\">\n\u003col>\n\u003cli>Add the Brussels sprouts to the sauce and stir to combine. Spread into an even later. Sprinkle with the remaining cheese.\u003c/li>\n\u003c/ol>\n\u003c/li>\n\u003c/ol>\n\u003cfigure id=\"attachment_103080\" class=\"wp-caption aligncenter\" style=\"max-width: 1920px\">\u003cimg class=\"size-full wp-image-103080\" src=\"http://ww2.kqed.org/bayareabites/wp-content/uploads/sites/24/2015/11/brusselsprouts-add-sprouts.jpg\" alt=\"Add the Brussels sprouts to the sauce and stir to combine. \" width=\"1920\" height=\"1280\" srcset=\"https://ww2.kqed.org/app/uploads/sites/24/2015/11/brusselsprouts-add-sprouts.jpg 1920w, https://ww2.kqed.org/app/uploads/sites/24/2015/11/brusselsprouts-add-sprouts-400x267.jpg 400w, https://ww2.kqed.org/app/uploads/sites/24/2015/11/brusselsprouts-add-sprouts-800x533.jpg 800w, https://ww2.kqed.org/app/uploads/sites/24/2015/11/brusselsprouts-add-sprouts-1440x960.jpg 1440w, https://ww2.kqed.org/app/uploads/sites/24/2015/11/brusselsprouts-add-sprouts-1180x787.jpg 1180w, https://ww2.kqed.org/app/uploads/sites/24/2015/11/brusselsprouts-add-sprouts-960x640.jpg 960w\" sizes=\"(max-width: 1920px) 100vw, 1920px\">\u003cfigcaption class=\"wp-caption-text\">Add the Brussels sprouts to the sauce and stir to combine. \u003ccite>(Wendy Goodfriend)\u003c/cite>\u003c/figcaption>\u003c/figure>\n\u003cfigure id=\"attachment_103079\" class=\"wp-caption aligncenter\" style=\"max-width: 1920px\">\u003cimg class=\"size-full wp-image-103079\" src=\"http://ww2.kqed.org/bayareabites/wp-content/uploads/sites/24/2015/11/brusselsprouts-add-cheese1.jpg\" alt=\" Spread into an even later. Sprinkle with the remaining cheese.\" width=\"1920\" height=\"1280\" srcset=\"https://ww2.kqed.org/app/uploads/sites/24/2015/11/brusselsprouts-add-cheese1.jpg 1920w, https://ww2.kqed.org/app/uploads/sites/24/2015/11/brusselsprouts-add-cheese1-400x267.jpg 400w, https://ww2.kqed.org/app/uploads/sites/24/2015/11/brusselsprouts-add-cheese1-800x533.jpg 800w, https://ww2.kqed.org/app/uploads/sites/24/2015/11/brusselsprouts-add-cheese1-1440x960.jpg 1440w, https://ww2.kqed.org/app/uploads/sites/24/2015/11/brusselsprouts-add-cheese1-1180x787.jpg 1180w, https://ww2.kqed.org/app/uploads/sites/24/2015/11/brusselsprouts-add-cheese1-960x640.jpg 960w\" sizes=\"(max-width: 1920px) 100vw, 1920px\">\u003cfigcaption class=\"wp-caption-text\">Spread into an even later. Sprinkle with the remaining cheese. \u003ccite>(Wendy Goodfriend)\u003c/cite>\u003c/figcaption>\u003c/figure>\n\u003col>\n\u003cli style=\"list-style-type: none\">\n\u003col>\n\u003cli>Bake until bubbly and golden brown, about 30 minutes. (If you like, pop it under the broiler to brown the top a bit more.) Let sit for about 10 minutes before serving.\u003c/li>\n\u003c/ol>\n\u003c/li>\n\u003c/ol>\n\u003cfigure id=\"attachment_103090\" class=\"wp-caption aligncenter\" style=\"max-width: 1920px\">\u003cimg class=\"size-full wp-image-103090\" src=\"http://ww2.kqed.org/bayareabites/wp-content/uploads/sites/24/2015/11/brusselsprouts-in-oven.jpg\" alt=\"Bake until bubbly and golden brown, about 30 minutes.\" width=\"1920\" height=\"1280\" srcset=\"https://ww2.kqed.org/app/uploads/sites/24/2015/11/brusselsprouts-in-oven.jpg 1920w, https://ww2.kqed.org/app/uploads/sites/24/2015/11/brusselsprouts-in-oven-400x267.jpg 400w, https://ww2.kqed.org/app/uploads/sites/24/2015/11/brusselsprouts-in-oven-800x533.jpg 800w, https://ww2.kqed.org/app/uploads/sites/24/2015/11/brusselsprouts-in-oven-1440x960.jpg 1440w, https://ww2.kqed.org/app/uploads/sites/24/2015/11/brusselsprouts-in-oven-1180x787.jpg 1180w, https://ww2.kqed.org/app/uploads/sites/24/2015/11/brusselsprouts-in-oven-960x640.jpg 960w\" sizes=\"(max-width: 1920px) 100vw, 1920px\">\u003cfigcaption class=\"wp-caption-text\">Bake until bubbly and golden brown, about 30 minutes. \u003ccite>(Wendy Goodfriend)\u003c/cite>\u003c/figcaption>\u003c/figure>\n\u003cfigure id=\"attachment_103087\" class=\"wp-caption aligncenter\" style=\"max-width: 1920px\">\u003cimg class=\"size-full wp-image-103087\" src=\"http://ww2.kqed.org/bayareabites/wp-content/uploads/sites/24/2015/11/brusselsprouts-finish-spoon.jpg\" alt=\"Let sit for about 10 minutes before serving.\" width=\"1920\" height=\"1280\" srcset=\"https://ww2.kqed.org/app/uploads/sites/24/2015/11/brusselsprouts-finish-spoon.jpg 1920w, https://ww2.kqed.org/app/uploads/sites/24/2015/11/brusselsprouts-finish-spoon-400x267.jpg 400w, https://ww2.kqed.org/app/uploads/sites/24/2015/11/brusselsprouts-finish-spoon-800x533.jpg 800w, https://ww2.kqed.org/app/uploads/sites/24/2015/11/brusselsprouts-finish-spoon-1440x960.jpg 1440w, https://ww2.kqed.org/app/uploads/sites/24/2015/11/brusselsprouts-finish-spoon-1180x787.jpg 1180w, https://ww2.kqed.org/app/uploads/sites/24/2015/11/brusselsprouts-finish-spoon-960x640.jpg 960w\" sizes=\"(max-width: 1920px) 100vw, 1920px\">\u003cfigcaption class=\"wp-caption-text\">Let sit for about 10 minutes before serving. \u003ccite>(Wendy Goodfriend)\u003c/cite>\u003c/figcaption>\u003c/figure>\n\n\u003c/div>\u003c/p>","attributes":{"named":{},"numeric":[]}}],"link":"/bayareabites/102926/thanksgiving-side-dish-creamy-brussels-sprouts-gratin-and-bacon-gratin-with-shallots-and-gruyere","authors":["5015","5014"],"series":["bayareabites_15149","bayareabites_15012"],"categories":["bayareabites_12550","bayareabites_1763","bayareabites_12","bayareabites_14362"],"tags":["bayareabites_278","bayareabites_2898","bayareabites_14750","bayareabites_15035","bayareabites_12787","bayareabites_530","bayareabites_2962"],"featImg":"bayareabites_103086","label":"source_bayareabites_102926"},"bayareabites_102469":{"type":"posts","id":"bayareabites_102469","meta":{"index":"posts_1591205157","site":"bayareabites","id":"102469","score":null,"sort":[1445890502000]},"guestAuthors":[],"slug":"bad-day-for-bacon-processed-meats-cause-cancer-who-says","title":"Bad Day For Bacon: Processed Meats Cause Cancer, WHO Says","publishDate":1445890502,"format":"standard","headTitle":"Bay Area Bites | KQED Food","labelTerm":{},"content":"\u003cp>The World Health Organization has deemed that processed meats — such as bacon, sausages and hot dogs — cause cancer.\u003c/p>\n\u003cp>In addition, the WHO says red meats including beef, pork, veal and lamb are \"probably carcinogenic\" to people.\u003c/p>\n\u003cp>A group of 22 scientists reviewed the evidence linking red meat and processed meat consumption to cancer, and concluded that eating processed meats regularly increases the risk of colorectal cancer. Their evidence review is explained in an \u003ca href=\"http://www.thelancet.com/journals/lanonc/article/PIIS1470-2045%2815%2900444-1/fulltext\">article\u003c/a> published in \u003cem>The Lancet.\u003c/em>\u003c/p>\n\u003cp>The conclusion puts processed meats in the same \u003ca href=\"http://monographs.iarc.fr/ENG/Classification/ClassificationsAlphaOrder.pdf\" target=\"_blank\">category of cancer risk\u003c/a> as tobacco smoking and asbestos. This does not mean that they are equally dangerous, says the \u003ca href=\"http://www.iarc.fr/\">International Agency for Research on Cancer\u003c/a> — the agency within the WHO that sets the classifications. And it's important to note that even things such as aloe vera are on the list of possible carcinogens.\u003c/p>\n\u003cp>In a Q & A released by the IARC, the agency says that \"eating meat has known health benefits,\" but it also points out that the cancer risk increases with the amount of meat consumed. As we've \u003ca href=\"http://www.npr.org/sections/thesalt/2012/03/12/148457233/death-by-bacon-study-finds-eating-meat-is-risky\">reported\u003c/a>, studies show that the heaviest meat eaters tend to have the highest risk.\u003c/p>\n\u003cp>[ad fullwidth]\u003c/p>\n\u003cp>The IARC says high-temperature cooking methods (such as cooking meat in direct contact with a flame) produce more carcinogenic compounds. However, the group says there were not enough data \"to reach a conclusion about whether the way meat is cooked affects the risk of cancer.\"\u003c/p>\n\u003cp>\u003ca href=\"http://www.cancer.org/research/acsresearchers/susan-gapstur-phd-mph\">Susan Gapstur\u003c/a> of the American Cancer Society says the society recommends \"consuming a healthy diet with an emphasis on plant foods and limiting consumption of processed meat and red meat,\" she told us in a written statement.\u003c/p>\n\u003cp>The recommendation, Gapstur tells The Salt, is based on research. For instance, a systematic literature review on colorectal cancer published in 2011 by the World Cancer Research Fund found a statistically significant, 16 percent increased risk of colorectal cancer associated with each 3.5 ounces of red and processed meat consumed per day. As the ACS points out, this is an amount of meat roughly equivalent in size to a deck of cards. And according to the experts convened by IARC to make its new evaluation, eating just half that amount of processed meats daily – about 1.8 ounces per day — will increase the risk of colorectal cancer — by about 18 percent. \u003c/p>\n\u003cp>\u003cem>The Lancet\u003c/em> paper points out that red meat also contains \"high biological-value proteins and important micronutrients such as B vitamins, iron and zinc.\" And the North American Meat Institute says lots of research points to the benefits of red meat consumption.\u003c/p>\n\u003cp>\"Scientific evidence shows cancer is a complex disease not caused by single foods and that a balanced diet and healthy lifestyle choices are essential to good health,\" writes Barry Carpenter, president of the North American Meat Institute, in a \u003ca href=\"https://www.meatinstitute.org/index.php?ht=display/ReleaseDetails/i/116609\">statement\u003c/a> on the new WHO classification.\u003c/p>\n\u003cp>Carpenter says it's important to put this new classification in context. \"IARC's panel was given the basic task of looking at hazards that meat could pose at some level, under circumstance, but was not asked to consider any off-setting benefits, like the nutrition that meat delivers or the implications of drastically reducing or removing meat from the diet altogether,\" the statement concludes.\u003c/p>\n\u003cp>\u003c/p>\n\u003cp>\u003cem>Copyright 2015 \u003ca href=\"http://www.npr.org/\" target=\"_blank\">NPR\u003c/a>.\u003c/em> \u003c/p>\n\n","blocks":[],"excerpt":"The World Health Organization's decision puts bacon, hot dogs and sausages in the same category of cancer risk as tobacco smoking. And beef, pork, veal and lamb are \"probably carcinogenic,\" WHO says.","status":"publish","parent":0,"modified":1445890642,"stats":{"hasAudio":false,"hasVideo":false,"hasChartOrMap":false,"iframeSrcs":[],"hasGoogleForm":false,"hasGallery":false,"hasHearkenModule":false,"hasPolis":false,"paragraphCount":14,"wordCount":551},"headData":{"title":"Bad Day For Bacon: Processed Meats Cause Cancer, WHO Says | KQED","description":"The World Health Organization's decision puts bacon, hot dogs and sausages in the same category of cancer risk as tobacco smoking. And beef, pork, veal and lamb are "probably carcinogenic," WHO says.","ogTitle":"","ogDescription":"","ogImgId":"","twTitle":"","twDescription":"","twImgId":"","schema":{"@context":"http://schema.org","@type":"Article","headline":"Bad Day For Bacon: Processed Meats Cause Cancer, WHO Says","datePublished":"2015-10-26T20:15:02.000Z","dateModified":"2015-10-26T20:17:22.000Z","image":"https://cdn.kqed.org/wp-content/uploads/2020/02/KQED-OG-Image@1x.png"}},"disqusIdentifier":"102469 http://ww2.kqed.org/bayareabites/?p=102469","disqusUrl":"https://ww2.kqed.org/bayareabites/2015/10/26/bad-day-for-bacon-processed-meats-cause-cancer-who-says/","disqusTitle":"Bad Day For Bacon: Processed Meats Cause Cancer, WHO Says","source":"Health & Nutrition","sourceUrl":"https://ww2.kqed.org/bayareabites/category/health-and-nutrition/","nprByline":"Allison Aubrey, \u003ca href=\"http://ww2.kqed.org/bayareabites/category/npr-food/\">NPR Food\u003c/a>","nprStoryId":"451211964","nprApiLink":"http://api.npr.org/query?id=451211964&apiKey=MDAxOTAwOTE4MDEyMTkxMDAzNjczZDljZA004","nprHtmlLink":"http://www.npr.org/sections/thesalt/2015/10/26/451211964/bad-day-for-bacon-processed-red-meats-cause-cancer-says-who?ft=nprml&f=451211964","nprRetrievedStory":"1","nprPubDate":"Mon, 26 Oct 2015 13:53:00 -0400","nprStoryDate":"Mon, 26 Oct 2015 10:31:00 -0400","nprLastModifiedDate":"Mon, 26 Oct 2015 13:53:51 -0400","path":"/bayareabites/102469/bad-day-for-bacon-processed-meats-cause-cancer-who-says","audioTrackLength":null,"parsedContent":[{"type":"contentString","content":"\u003cdiv class=\"post-body\">\u003cp>\u003cp>The World Health Organization has deemed that processed meats — such as bacon, sausages and hot dogs — cause cancer.\u003c/p>\n\u003cp>In addition, the WHO says red meats including beef, pork, veal and lamb are \"probably carcinogenic\" to people.\u003c/p>\n\u003cp>A group of 22 scientists reviewed the evidence linking red meat and processed meat consumption to cancer, and concluded that eating processed meats regularly increases the risk of colorectal cancer. Their evidence review is explained in an \u003ca href=\"http://www.thelancet.com/journals/lanonc/article/PIIS1470-2045%2815%2900444-1/fulltext\">article\u003c/a> published in \u003cem>The Lancet.\u003c/em>\u003c/p>\n\u003cp>The conclusion puts processed meats in the same \u003ca href=\"http://monographs.iarc.fr/ENG/Classification/ClassificationsAlphaOrder.pdf\" target=\"_blank\">category of cancer risk\u003c/a> as tobacco smoking and asbestos. This does not mean that they are equally dangerous, says the \u003ca href=\"http://www.iarc.fr/\">International Agency for Research on Cancer\u003c/a> — the agency within the WHO that sets the classifications. And it's important to note that even things such as aloe vera are on the list of possible carcinogens.\u003c/p>\n\u003cp>In a Q & A released by the IARC, the agency says that \"eating meat has known health benefits,\" but it also points out that the cancer risk increases with the amount of meat consumed. As we've \u003ca href=\"http://www.npr.org/sections/thesalt/2012/03/12/148457233/death-by-bacon-study-finds-eating-meat-is-risky\">reported\u003c/a>, studies show that the heaviest meat eaters tend to have the highest risk.\u003c/p>\n\u003cp>\u003c/p>\u003c/div>","attributes":{"named":{},"numeric":[]}},{"type":"component","content":"","name":"ad","attributes":{"named":{"label":"fullwidth"},"numeric":["fullwidth"]}},{"type":"contentString","content":"\u003cdiv class=\"post-body\">\u003cp>\u003c/p>\n\u003cp>The IARC says high-temperature cooking methods (such as cooking meat in direct contact with a flame) produce more carcinogenic compounds. However, the group says there were not enough data \"to reach a conclusion about whether the way meat is cooked affects the risk of cancer.\"\u003c/p>\n\u003cp>\u003ca href=\"http://www.cancer.org/research/acsresearchers/susan-gapstur-phd-mph\">Susan Gapstur\u003c/a> of the American Cancer Society says the society recommends \"consuming a healthy diet with an emphasis on plant foods and limiting consumption of processed meat and red meat,\" she told us in a written statement.\u003c/p>\n\u003cp>The recommendation, Gapstur tells The Salt, is based on research. For instance, a systematic literature review on colorectal cancer published in 2011 by the World Cancer Research Fund found a statistically significant, 16 percent increased risk of colorectal cancer associated with each 3.5 ounces of red and processed meat consumed per day. As the ACS points out, this is an amount of meat roughly equivalent in size to a deck of cards. And according to the experts convened by IARC to make its new evaluation, eating just half that amount of processed meats daily – about 1.8 ounces per day — will increase the risk of colorectal cancer — by about 18 percent. \u003c/p>\n\u003cp>\u003cem>The Lancet\u003c/em> paper points out that red meat also contains \"high biological-value proteins and important micronutrients such as B vitamins, iron and zinc.\" And the North American Meat Institute says lots of research points to the benefits of red meat consumption.\u003c/p>\n\u003cp>\"Scientific evidence shows cancer is a complex disease not caused by single foods and that a balanced diet and healthy lifestyle choices are essential to good health,\" writes Barry Carpenter, president of the North American Meat Institute, in a \u003ca href=\"https://www.meatinstitute.org/index.php?ht=display/ReleaseDetails/i/116609\">statement\u003c/a> on the new WHO classification.\u003c/p>\n\u003cp>Carpenter says it's important to put this new classification in context. \"IARC's panel was given the basic task of looking at hazards that meat could pose at some level, under circumstance, but was not asked to consider any off-setting benefits, like the nutrition that meat delivers or the implications of drastically reducing or removing meat from the diet altogether,\" the statement concludes.\u003c/p>\n\u003cp>\u003c/p>\n\u003cp>\u003cem>Copyright 2015 \u003ca href=\"http://www.npr.org/\" target=\"_blank\">NPR\u003c/a>.\u003c/em> \u003c/p>\n\n\u003c/div>\u003c/p>","attributes":{"named":{},"numeric":[]}}],"link":"/bayareabites/102469/bad-day-for-bacon-processed-meats-cause-cancer-who-says","authors":["byline_bayareabites_102469"],"categories":["bayareabites_10028","bayareabites_1245","bayareabites_10916"],"tags":["bayareabites_278","bayareabites_635","bayareabites_2346","bayareabites_15000","bayareabites_13103","bayareabites_14185"],"featImg":"bayareabites_102474","label":"source_bayareabites_102469"}},"programsReducer":{"possible":{"id":"possible","title":"Possible","info":"Possible is hosted by entrepreneur Reid Hoffman and writer Aria Finger. Together in Possible, Hoffman and Finger lead enlightening discussions about building a brighter collective future. The show features interviews with visionary guests like Trevor Noah, Sam Altman and Janette Sadik-Khan. Possible paints an optimistic portrait of the world we can create through science, policy, business, art and our shared humanity. It asks: What if everything goes right for once? How can we get there? Each episode also includes a short fiction story generated by advanced AI GPT-4, serving as a thought-provoking springboard to speculate how humanity could leverage technology for good.","airtime":"SUN 2pm","imageSrc":"https://cdn.kqed.org/wp-content/uploads/2024/04/Possible-Podcast-Tile-360x360-1.jpg","officialWebsiteLink":"https://www.possible.fm/","meta":{"site":"news","source":"Possible"},"link":"/radio/program/possible","subscribe":{"apple":"https://podcasts.apple.com/us/podcast/possible/id1677184070","spotify":"https://open.spotify.com/show/730YpdUSNlMyPQwNnyjp4k"}},"1a":{"id":"1a","title":"1A","info":"1A is home to the national conversation. 1A brings on great guests and frames the best debate in ways that make you think, share and engage.","airtime":"MON-THU 11pm-12am","imageSrc":"https://ww2.kqed.org/radio/wp-content/uploads/sites/50/2018/04/1a.jpg","officialWebsiteLink":"https://the1a.org/","meta":{"site":"news","source":"npr"},"link":"/radio/program/1a","subscribe":{"npr":"https://rpb3r.app.goo.gl/RBrW","apple":"https://itunes.apple.com/WebObjects/MZStore.woa/wa/viewPodcast?s=143441&mt=2&id=1188724250&at=11l79Y&ct=nprdirectory","tuneIn":"https://tunein.com/radio/1A-p947376/","rss":"https://feeds.npr.org/510316/podcast.xml"}},"all-things-considered":{"id":"all-things-considered","title":"All Things Considered","info":"Every weekday, \u003cem>All Things Considered\u003c/em> hosts Robert Siegel, Audie Cornish, Ari Shapiro, and Kelly McEvers present the program's trademark mix of news, interviews, commentaries, reviews, and offbeat features. Michel Martin hosts on the weekends.","airtime":"MON-FRI 1pm-2pm, 4:30pm-6:30pm\u003cbr />SAT-SUN 5pm-6pm","imageSrc":"https://cdn.kqed.org/wp-content/uploads/2024/04/All-Things-Considered-Podcast-Tile-360x360-1.jpg","officialWebsiteLink":"https://www.npr.org/programs/all-things-considered/","meta":{"site":"news","source":"npr"},"link":"/radio/program/all-things-considered"},"american-suburb-podcast":{"id":"american-suburb-podcast","title":"American Suburb: The Podcast","tagline":"The flip side of gentrification, told through one town","info":"Gentrification is changing cities across America, forcing people from neighborhoods they have long called home. Call them the displaced. Now those priced out of the Bay Area are looking for a better life in an unlikely place. American Suburb follows this migration to one California town along the Delta, 45 miles from San Francisco. But is this once sleepy suburb ready for them?","imageSrc":"https://cdn.kqed.org/wp-content/uploads/2024/04/American-Suburb-Podcast-Tile-703x703-1.jpg","officialWebsiteLink":"/news/series/american-suburb-podcast","meta":{"site":"news","source":"kqed","order":"13"},"link":"/news/series/american-suburb-podcast/","subscribe":{"npr":"https://rpb3r.app.goo.gl/RBrW","apple":"https://itunes.apple.com/WebObjects/MZStore.woa/wa/viewPodcast?mt=2&id=1287748328","tuneIn":"https://tunein.com/radio/American-Suburb-p1086805/","rss":"https://ww2.kqed.org/news/series/american-suburb-podcast/feed/podcast","google":"https://podcasts.google.com/feed/aHR0cHM6Ly9mZWVkcy5tZWdhcGhvbmUuZm0vS1FJTkMzMDExODgxNjA5"}},"baycurious":{"id":"baycurious","title":"Bay Curious","tagline":"Exploring the Bay Area, one question at a time","info":"KQED’s new podcast, Bay Curious, gets to the bottom of the mysteries — both profound and peculiar — that give the Bay Area its unique identity. And we’ll do it with your help! You ask the questions. You decide what Bay Curious investigates. And you join us on the journey to find the answers.","imageSrc":"https://cdn.kqed.org/wp-content/uploads/2024/04/Bay-Curious-Podcast-Tile-703x703-1.jpg","imageAlt":"\"KQED Bay Curious","officialWebsiteLink":"/news/series/baycurious","meta":{"site":"news","source":"kqed","order":"4"},"link":"/podcasts/baycurious","subscribe":{"apple":"https://podcasts.apple.com/us/podcast/bay-curious/id1172473406","npr":"https://www.npr.org/podcasts/500557090/bay-curious","rss":"https://ww2.kqed.org/news/category/bay-curious-podcast/feed/podcast","google":"https://podcasts.google.com/feed/aHR0cHM6Ly93dzIua3FlZC5vcmcvbmV3cy9jYXRlZ29yeS9iYXktY3VyaW91cy1wb2RjYXN0L2ZlZWQvcG9kY2FzdA","stitcher":"https://www.stitcher.com/podcast/kqed/bay-curious","spotify":"https://open.spotify.com/show/6O76IdmhixfijmhTZLIJ8k"}},"bbc-world-service":{"id":"bbc-world-service","title":"BBC World Service","info":"The day's top stories from BBC News compiled twice daily in the week, once at weekends.","airtime":"MON-FRI 9pm-10pm, TUE-FRI 1am-2am","imageSrc":"https://cdn.kqed.org/wp-content/uploads/2024/04/BBC-World-Service-Podcast-Tile-360x360-1.jpg","officialWebsiteLink":"https://www.bbc.co.uk/sounds/play/live:bbc_world_service","meta":{"site":"news","source":"BBC World Service"},"link":"/radio/program/bbc-world-service","subscribe":{"apple":"https://itunes.apple.com/us/podcast/global-news-podcast/id135067274?mt=2","tuneIn":"https://tunein.com/radio/BBC-World-Service-p455581/","rss":"https://podcasts.files.bbci.co.uk/p02nq0gn.rss"}},"code-switch-life-kit":{"id":"code-switch-life-kit","title":"Code Switch / Life Kit","info":"\u003cem>Code Switch\u003c/em>, which listeners will hear in the first part of the hour, has fearless and much-needed conversations about race. Hosted by journalists of color, the show tackles the subject of race head-on, exploring how it impacts every part of society — from politics and pop culture to history, sports and more.\u003cbr />\u003cbr />\u003cem>Life Kit\u003c/em>, which will be in the second part of the hour, guides you through spaces and feelings no one prepares you for — from finances to mental health, from workplace microaggressions to imposter syndrome, from relationships to parenting. The show features experts with real world experience and shares their knowledge. Because everyone needs a little help being human.\u003cbr />\u003cbr />\u003ca href=\"https://www.npr.org/podcasts/510312/codeswitch\">\u003cem>Code Switch\u003c/em> offical site and podcast\u003c/a>\u003cbr />\u003ca href=\"https://www.npr.org/lifekit\">\u003cem>Life Kit\u003c/em> offical site and podcast\u003c/a>\u003cbr />","airtime":"SUN 9pm-10pm","imageSrc":"https://cdn.kqed.org/wp-content/uploads/2024/04/Code-Switch-Life-Kit-Podcast-Tile-360x360-1.jpg","meta":{"site":"radio","source":"npr"},"link":"/radio/program/code-switch-life-kit","subscribe":{"apple":"https://podcasts.apple.com/podcast/1112190608?mt=2&at=11l79Y&ct=nprdirectory","google":"https://podcasts.google.com/feed/aHR0cHM6Ly93d3cubnByLm9yZy9yc3MvcG9kY2FzdC5waHA_aWQ9NTEwMzEy","spotify":"https://open.spotify.com/show/3bExJ9JQpkwNhoHvaIIuyV","rss":"https://feeds.npr.org/510312/podcast.xml"}},"commonwealth-club":{"id":"commonwealth-club","title":"Commonwealth Club of California Podcast","info":"The Commonwealth Club of California is the nation's oldest and largest public affairs forum. As a non-partisan forum, The Club brings to the public airwaves diverse viewpoints on important topics. The Club's weekly radio broadcast - the oldest in the U.S., dating back to 1924 - is carried across the nation on public radio stations and is now podcasting. Our website archive features audio of our recent programs, as well as selected speeches from our long and distinguished history. This podcast feed is usually updated twice a week and is always un-edited.","airtime":"THU 10pm, FRI 1am","imageSrc":"https://cdn.kqed.org/wp-content/uploads/2024/04/Commonwealth-Club-Podcast-Tile-360x360-1.jpg","officialWebsiteLink":"https://www.commonwealthclub.org/podcasts","meta":{"site":"news","source":"Commonwealth Club of California"},"link":"/radio/program/commonwealth-club","subscribe":{"apple":"https://itunes.apple.com/us/podcast/commonwealth-club-of-california-podcast/id976334034?mt=2","google":"https://podcasts.google.com/feed/aHR0cDovL3d3dy5jb21tb253ZWFsdGhjbHViLm9yZy9hdWRpby9wb2RjYXN0L3dlZWtseS54bWw","tuneIn":"https://tunein.com/radio/Commonwealth-Club-of-California-p1060/"}},"considerthis":{"id":"considerthis","title":"Consider This","tagline":"Make sense of the day","info":"Make sense of the day. Every weekday afternoon, Consider This helps you consider the major stories of the day in less than 15 minutes, featuring the reporting and storytelling resources of NPR. Plus, KQED’s Bianca Taylor brings you the local KQED news you need to know.","imageSrc":"https://cdn.kqed.org/wp-content/uploads/2024/04/Consider-This-Podcast-Tile-703x703-1.jpg","imageAlt":"Consider This from NPR and KQED","officialWebsiteLink":"/podcasts/considerthis","meta":{"site":"news","source":"kqed","order":"7"},"link":"/podcasts/considerthis","subscribe":{"apple":"https://podcasts.apple.com/podcast/id1503226625?mt=2&at=11l79Y&ct=nprdirectory","npr":"https://rpb3r.app.goo.gl/coronavirusdaily","google":"https://podcasts.google.com/feed/aHR0cHM6Ly9mZWVkcy5ucHIub3JnLzUxMDM1NS9wb2RjYXN0LnhtbA","spotify":"https://open.spotify.com/show/3Z6JdCS2d0eFEpXHKI6WqH"}},"forum":{"id":"forum","title":"Forum","tagline":"The conversation starts here","info":"KQED’s live call-in program discussing local, state, national and international issues, as well as in-depth interviews.","airtime":"MON-FRI 9am-11am, 10pm-11pm","imageSrc":"https://cdn.kqed.org/wp-content/uploads/2024/04/Forum-Podcast-Tile-703x703-1.jpg","imageAlt":"KQED Forum with Mina Kim and Alexis Madrigal","officialWebsiteLink":"/forum","meta":{"site":"news","source":"kqed","order":"8"},"link":"/forum","subscribe":{"apple":"https://podcasts.apple.com/us/podcast/kqeds-forum/id73329719","google":"https://podcasts.google.com/feed/aHR0cHM6Ly9mZWVkcy5tZWdhcGhvbmUuZm0vS1FJTkM5NTU3MzgxNjMz","npr":"https://www.npr.org/podcasts/432307980/forum","stitcher":"https://www.stitcher.com/podcast/kqedfm-kqeds-forum-podcast","rss":"https://feeds.megaphone.fm/KQINC9557381633"}},"freakonomics-radio":{"id":"freakonomics-radio","title":"Freakonomics Radio","info":"Freakonomics Radio is a one-hour award-winning podcast and public-radio project hosted by Stephen Dubner, with co-author Steve Levitt as a regular guest. It is produced in partnership with WNYC.","imageSrc":"https://ww2.kqed.org/news/wp-content/uploads/sites/10/2018/05/freakonomicsRadio.png","officialWebsiteLink":"http://freakonomics.com/","airtime":"SUN 1am-2am, SAT 3pm-4pm","meta":{"site":"radio","source":"WNYC"},"link":"/radio/program/freakonomics-radio","subscribe":{"npr":"https://rpb3r.app.goo.gl/4s8b","apple":"https://itunes.apple.com/us/podcast/freakonomics-radio/id354668519","tuneIn":"https://tunein.com/podcasts/WNYC-Podcasts/Freakonomics-Radio-p272293/","rss":"https://feeds.feedburner.com/freakonomicsradio"}},"fresh-air":{"id":"fresh-air","title":"Fresh Air","info":"Hosted by Terry Gross, \u003cem>Fresh Air from WHYY\u003c/em> is the Peabody Award-winning weekday magazine of contemporary arts and issues. One of public radio's most popular programs, Fresh Air features intimate conversations with today's biggest luminaries.","airtime":"MON-FRI 7pm-8pm","imageSrc":"https://cdn.kqed.org/wp-content/uploads/2024/04/Fresh-Air-Podcast-Tile-360x360-1.jpg","officialWebsiteLink":"https://www.npr.org/programs/fresh-air/","meta":{"site":"radio","source":"npr"},"link":"/radio/program/fresh-air","subscribe":{"npr":"https://rpb3r.app.goo.gl/4s8b","apple":"https://itunes.apple.com/WebObjects/MZStore.woa/wa/viewPodcast?s=143441&mt=2&id=214089682&at=11l79Y&ct=nprdirectory","tuneIn":"https://tunein.com/radio/Fresh-Air-p17/","rss":"https://feeds.npr.org/381444908/podcast.xml"}},"here-and-now":{"id":"here-and-now","title":"Here & Now","info":"A live production of NPR and WBUR Boston, in collaboration with stations across the country, Here & Now reflects the fluid world of news as it's happening in the middle of the day, with timely, in-depth news, interviews and conversation. Hosted by Robin Young, Jeremy Hobson and Tonya Mosley.","airtime":"MON-THU 11am-12pm","imageSrc":"https://cdn.kqed.org/wp-content/uploads/2024/04/Here-And-Now-Podcast-Tile-360x360-1.jpg","officialWebsiteLink":"http://www.wbur.org/hereandnow","meta":{"site":"news","source":"npr"},"link":"/radio/program/here-and-now","subsdcribe":{"apple":"https://itunes.apple.com/WebObjects/MZStore.woa/wa/viewPodcast?mt=2&id=426698661","tuneIn":"https://tunein.com/radio/Here--Now-p211/","rss":"https://feeds.npr.org/510051/podcast.xml"}},"how-i-built-this":{"id":"how-i-built-this","title":"How I Built This with Guy Raz","info":"Guy Raz dives into the stories behind some of the world's best known companies. How I Built This weaves a narrative journey about innovators, entrepreneurs and idealists—and the movements they built.","imageSrc":"https://ww2.kqed.org/news/wp-content/uploads/sites/10/2018/05/howIBuiltThis.png","officialWebsiteLink":"https://www.npr.org/podcasts/510313/how-i-built-this","airtime":"SUN 7:30pm-8pm","meta":{"site":"news","source":"npr"},"link":"/radio/program/how-i-built-this","subscribe":{"npr":"https://rpb3r.app.goo.gl/3zxy","apple":"https://itunes.apple.com/us/podcast/how-i-built-this-with-guy-raz/id1150510297?mt=2","tuneIn":"https://tunein.com/podcasts/Arts--Culture-Podcasts/How-I-Built-This-p910896/","rss":"https://feeds.npr.org/510313/podcast.xml"}},"inside-europe":{"id":"inside-europe","title":"Inside Europe","info":"Inside Europe, a one-hour weekly news magazine hosted by Helen Seeney and Keith Walker, explores the topical issues shaping the continent. No other part of the globe has experienced such dynamic political and social change in recent years.","airtime":"SAT 3am-4am","imageSrc":"https://cdn.kqed.org/wp-content/uploads/2024/04/Inside-Europe-Podcast-Tile-300x300-1.jpg","meta":{"site":"news","source":"Deutsche Welle"},"link":"/radio/program/inside-europe","subscribe":{"apple":"https://itunes.apple.com/us/podcast/inside-europe/id80106806?mt=2","tuneIn":"https://tunein.com/radio/Inside-Europe-p731/","rss":"https://partner.dw.com/xml/podcast_inside-europe"}},"latino-usa":{"id":"latino-usa","title":"Latino USA","airtime":"MON 1am-2am, SUN 6pm-7pm","info":"Latino USA, the radio journal of news and culture, is the only national, English-language radio program produced from a Latino perspective.","imageSrc":"https://ww2.kqed.org/radio/wp-content/uploads/sites/50/2018/04/latinoUsa.jpg","officialWebsiteLink":"http://latinousa.org/","meta":{"site":"news","source":"npr"},"link":"/radio/program/latino-usa","subscribe":{"npr":"https://rpb3r.app.goo.gl/xtTd","apple":"https://itunes.apple.com/WebObjects/MZStore.woa/wa/viewPodcast?s=143441&mt=2&id=79681317&at=11l79Y&ct=nprdirectory","tuneIn":"https://tunein.com/radio/Latino-USA-p621/","rss":"https://feeds.npr.org/510016/podcast.xml"}},"live-from-here-highlights":{"id":"live-from-here-highlights","title":"Live from Here Highlights","info":"Chris Thile steps to the mic as the host of Live from Here (formerly A Prairie Home Companion), a live public radio variety show. Download Chris’s Song of the Week plus other highlights from the broadcast. Produced by American Public Media.","airtime":"SAT 6pm-8pm, SUN 11am-1pm","imageSrc":"https://cdn.kqed.org/wp-content/uploads/2024/04/Live-From-Here-Podcast-Tile-360x360-1.jpg","officialWebsiteLink":"https://www.livefromhere.org/","meta":{"site":"arts","source":"american public media"},"link":"/radio/program/live-from-here-highlights","subscribe":{"apple":"https://itunes.apple.com/us/podcast/id1167173941","tuneIn":"https://tunein.com/radio/Live-from-Here-Highlights-p921744/","rss":"https://feeds.publicradio.org/public_feeds/a-prairie-home-companion-highlights/rss/rss"}},"marketplace":{"id":"marketplace","title":"Marketplace","info":"Our flagship program, helmed by Kai Ryssdal, examines what the day in money delivered, through stories, conversations, newsworthy numbers and more. Updated Monday through Friday at about 3:30 p.m. PT.","airtime":"MON-FRI 4pm-4:30pm, MON-WED 6:30pm-7pm","imageSrc":"https://cdn.kqed.org/wp-content/uploads/2024/04/Marketplace-Podcast-Tile-360x360-1.jpg","officialWebsiteLink":"https://www.marketplace.org/","meta":{"site":"news","source":"American Public Media"},"link":"/radio/program/marketplace","subscribe":{"apple":"https://itunes.apple.com/WebObjects/MZStore.woa/wa/viewPodcast?s=143441&mt=2&id=201853034&at=11l79Y&ct=nprdirectory","tuneIn":"https://tunein.com/radio/APM-Marketplace-p88/","rss":"https://feeds.publicradio.org/public_feeds/marketplace-pm/rss/rss"}},"mindshift":{"id":"mindshift","title":"MindShift","tagline":"A podcast about the future of learning and how we raise our kids","info":"The MindShift podcast explores the innovations in education that are shaping how kids learn. Hosts Ki Sung and Katrina Schwartz introduce listeners to educators, researchers, parents and students who are developing effective ways to improve how kids learn. We cover topics like how fed-up administrators are developing surprising tactics to deal with classroom disruptions; how listening to podcasts are helping kids develop reading skills; the consequences of overparenting; and why interdisciplinary learning can engage students on all ends of the traditional achievement spectrum. This podcast is part of the MindShift education site, a division of KQED News. KQED is an NPR/PBS member station based in San Francisco. You can also visit the MindShift website for episodes and supplemental blog posts or tweet us \u003ca href=\"https://twitter.com/MindShiftKQED\">@MindShiftKQED\u003c/a> or visit us at \u003ca href=\"/mindshift\">MindShift.KQED.org\u003c/a>","imageSrc":"https://cdn.kqed.org/wp-content/uploads/2024/04/Mindshift-Podcast-Tile-703x703-1.jpg","imageAlt":"KQED MindShift: How We Will Learn","officialWebsiteLink":"/mindshift/","meta":{"site":"news","source":"kqed","order":"2"},"link":"/podcasts/mindshift","subscribe":{"apple":"https://podcasts.apple.com/us/podcast/mindshift-podcast/id1078765985","google":"https://podcasts.google.com/feed/aHR0cHM6Ly9mZWVkcy5tZWdhcGhvbmUuZm0vS1FJTkM1NzY0NjAwNDI5","npr":"https://www.npr.org/podcasts/464615685/mind-shift-podcast","stitcher":"https://www.stitcher.com/podcast/kqed/stories-teachers-share","spotify":"https://open.spotify.com/show/0MxSpNYZKNprFLCl7eEtyx"}},"morning-edition":{"id":"morning-edition","title":"Morning Edition","info":"\u003cem>Morning Edition\u003c/em> takes listeners around the country and the world with multi-faceted stories and commentaries every weekday. Hosts Steve Inskeep, David Greene and Rachel Martin bring you the latest breaking news and features to prepare you for the day.","airtime":"MON-FRI 3am-9am","imageSrc":"https://cdn.kqed.org/wp-content/uploads/2024/04/Morning-Edition-Podcast-Tile-360x360-1.jpg","officialWebsiteLink":"https://www.npr.org/programs/morning-edition/","meta":{"site":"news","source":"npr"},"link":"/radio/program/morning-edition"},"onourwatch":{"id":"onourwatch","title":"On Our Watch","tagline":"Police secrets, unsealed","info":"For decades, the process for how police police themselves has been inconsistent – if not opaque. In some states, like California, these proceedings were completely hidden. After a new police transparency law unsealed scores of internal affairs files, our reporters set out to examine these cases and the shadow world of police discipline. On Our Watch brings listeners into the rooms where officers are questioned and witnesses are interrogated to find out who this system is really protecting. Is it the officers, or the public they've sworn to serve?","imageSrc":"https://cdn.kqed.org/wp-content/uploads/2024/04/On-Our-Watch-Podcast-Tile-703x703-1.jpg","imageAlt":"On Our Watch from NPR and KQED","officialWebsiteLink":"/podcasts/onourwatch","meta":{"site":"news","source":"kqed","order":"1"},"link":"/podcasts/onourwatch","subscribe":{"apple":"https://podcasts.apple.com/podcast/id1567098962","google":"https://podcasts.google.com/feed/aHR0cHM6Ly9mZWVkcy5ucHIub3JnLzUxMDM2MC9wb2RjYXN0LnhtbD9zYz1nb29nbGVwb2RjYXN0cw","npr":"https://rpb3r.app.goo.gl/onourwatch","spotify":"https://open.spotify.com/show/0OLWoyizopu6tY1XiuX70x","tuneIn":"https://tunein.com/radio/On-Our-Watch-p1436229/","stitcher":"https://www.stitcher.com/show/on-our-watch","rss":"https://feeds.npr.org/510360/podcast.xml"}},"on-the-media":{"id":"on-the-media","title":"On The Media","info":"Our weekly podcast explores how the media 'sausage' is made, casts an incisive eye on fluctuations in the marketplace of ideas, and examines threats to the freedom of information and expression in America and abroad. For one hour a week, the show tries to lift the veil from the process of \"making media,\" especially news media, because it's through that lens that we see the world and the world sees us","airtime":"SUN 2pm-3pm, MON 12am-1am","imageSrc":"https://ww2.kqed.org/radio/wp-content/uploads/sites/50/2018/04/onTheMedia.png","officialWebsiteLink":"https://www.wnycstudios.org/shows/otm","meta":{"site":"news","source":"wnyc"},"link":"/radio/program/on-the-media","subscribe":{"apple":"https://itunes.apple.com/us/podcast/on-the-media/id73330715?mt=2","tuneIn":"https://tunein.com/radio/On-the-Media-p69/","rss":"http://feeds.wnyc.org/onthemedia"}},"our-body-politic":{"id":"our-body-politic","title":"Our Body Politic","info":"Presented by KQED, KCRW and KPCC, and created and hosted by award-winning journalist Farai Chideya, Our Body Politic is unapologetically centered on reporting on not just how women of color experience the major political events of today, but how they’re impacting those very issues.","airtime":"SAT 6pm-7pm, SUN 1am-2am","imageSrc":"https://cdn.kqed.org/wp-content/uploads/2024/04/Our-Body-Politic-Podcast-Tile-360x360-1.jpg","officialWebsiteLink":"https://our-body-politic.simplecast.com/","meta":{"site":"news","source":"kcrw"},"link":"/radio/program/our-body-politic","subscribe":{"apple":"https://podcasts.apple.com/us/podcast/our-body-politic/id1533069868","google":"https://podcasts.google.com/feed/aHR0cHM6Ly9mZWVkcy5zaW1wbGVjYXN0LmNvbS9feGFQaHMxcw","spotify":"https://open.spotify.com/show/4ApAiLT1kV153TttWAmqmc","rss":"https://feeds.simplecast.com/_xaPhs1s","tuneIn":"https://tunein.com/podcasts/News--Politics-Podcasts/Our-Body-Politic-p1369211/"}},"pbs-newshour":{"id":"pbs-newshour","title":"PBS NewsHour","info":"Analysis, background reports and updates from the PBS NewsHour putting today's news in context.","airtime":"MON-FRI 3pm-4pm","imageSrc":"https://cdn.kqed.org/wp-content/uploads/2024/04/PBS-News-Hour-Podcast-Tile-360x360-1.jpg","officialWebsiteLink":"https://www.pbs.org/newshour/","meta":{"site":"news","source":"pbs"},"link":"/radio/program/pbs-newshour","subscribe":{"apple":"https://itunes.apple.com/us/podcast/pbs-newshour-full-show/id394432287?mt=2","tuneIn":"https://tunein.com/radio/PBS-NewsHour---Full-Show-p425698/","rss":"https://www.pbs.org/newshour/feeds/rss/podcasts/show"}},"perspectives":{"id":"perspectives","title":"Perspectives","tagline":"KQED's series of of daily listener commentaries since 1991","info":"KQED's series of of daily listener commentaries since 1991.","imageSrc":"https://cdn.kqed.org/wp-content/uploads/2024/04/Perspectives-Podcast-Tile-703x703-1.jpg","officialWebsiteLink":"/perspectives/","meta":{"site":"radio","source":"kqed","order":"15"},"link":"/perspectives","subscribe":{"apple":"https://podcasts.apple.com/us/podcast/id73801135","npr":"https://www.npr.org/podcasts/432309616/perspectives","rss":"https://ww2.kqed.org/perspectives/category/perspectives/feed/","google":"https://podcasts.google.com/feed/aHR0cHM6Ly93dzIua3FlZC5vcmcvcGVyc3BlY3RpdmVzL2NhdGVnb3J5L3BlcnNwZWN0aXZlcy9mZWVkLw"}},"planet-money":{"id":"planet-money","title":"Planet Money","info":"The economy explained. Imagine you could call up a friend and say, Meet me at the bar and tell me what's going on with the economy. Now imagine that's actually a fun evening.","airtime":"SUN 3pm-4pm","imageSrc":"https://ww2.kqed.org/radio/wp-content/uploads/sites/50/2018/04/planetmoney.jpg","officialWebsiteLink":"https://www.npr.org/sections/money/","meta":{"site":"news","source":"npr"},"link":"/radio/program/planet-money","subscribe":{"npr":"https://rpb3r.app.goo.gl/M4f5","apple":"https://itunes.apple.com/us/podcast/planet-money/id290783428?mt=2","tuneIn":"https://tunein.com/podcasts/Business--Economics-Podcasts/Planet-Money-p164680/","rss":"https://feeds.npr.org/510289/podcast.xml"}},"politicalbreakdown":{"id":"politicalbreakdown","title":"Political Breakdown","tagline":"Politics from a personal perspective","info":"Political Breakdown is a new series that explores the political intersection of California and the nation. Each week hosts Scott Shafer and Marisa Lagos are joined with a new special guest to unpack politics -- with personality — and offer an insider’s glimpse at how politics happens.","airtime":"THU 6:30pm-7pm","imageSrc":"https://cdn.kqed.org/wp-content/uploads/2024/04/Political-Breakdown-2024-Podcast-Tile-703x703-1.jpg","imageAlt":"KQED Political Breakdown","officialWebsiteLink":"/podcasts/politicalbreakdown","meta":{"site":"radio","source":"kqed","order":"11"},"link":"/podcasts/politicalbreakdown","subscribe":{"apple":"https://podcasts.apple.com/us/podcast/political-breakdown/id1327641087","google":"https://podcasts.google.com/feed/aHR0cHM6Ly9mZWVkcy5tZWdhcGhvbmUuZm0vS1FJTkM5Nzk2MzI2MTEx","npr":"https://www.npr.org/podcasts/572155894/political-breakdown","stitcher":"https://www.stitcher.com/podcast/kqed/political-breakdown","spotify":"https://open.spotify.com/show/07RVyIjIdk2WDuVehvBMoN","rss":"https://ww2.kqed.org/news/tag/political-breakdown/feed/podcast"}},"pri-the-world":{"id":"pri-the-world","title":"PRI's The World: Latest Edition","info":"Each weekday, host Marco Werman and his team of producers bring you the world's most interesting stories in an hour of radio that reminds us just how small our planet really is.","airtime":"MON-FRI 2pm-3pm","imageSrc":"https://cdn.kqed.org/wp-content/uploads/2024/04/The-World-Podcast-Tile-360x360-1.jpg","officialWebsiteLink":"https://www.pri.org/programs/the-world","meta":{"site":"news","source":"PRI"},"link":"/radio/program/pri-the-world","subscribe":{"apple":"https://itunes.apple.com/us/podcast/pris-the-world-latest-edition/id278196007?mt=2","tuneIn":"https://tunein.com/podcasts/News--Politics-Podcasts/PRIs-The-World-p24/","rss":"http://feeds.feedburner.com/pri/theworld"}},"radiolab":{"id":"radiolab","title":"Radiolab","info":"A two-time Peabody Award-winner, Radiolab is an investigation told through sounds and stories, and centered around one big idea. In the Radiolab world, information sounds like music and science and culture collide. Hosted by Jad Abumrad and Robert Krulwich, the show is designed for listeners who demand skepticism, but appreciate wonder. WNYC Studios is the producer of other leading podcasts including Freakonomics Radio, Death, Sex & Money, On the Media and many more.","airtime":"SUN 12am-1am, SAT 2pm-3pm","imageSrc":"https://ww2.kqed.org/radio/wp-content/uploads/sites/50/2018/04/radiolab1400.png","officialWebsiteLink":"https://www.wnycstudios.org/shows/radiolab/","meta":{"site":"science","source":"WNYC"},"link":"/radio/program/radiolab","subscribe":{"apple":"https://itunes.apple.com/us/podcast/radiolab/id152249110?mt=2","tuneIn":"https://tunein.com/radio/RadioLab-p68032/","rss":"https://feeds.wnyc.org/radiolab"}},"reveal":{"id":"reveal","title":"Reveal","info":"Created by The Center for Investigative Reporting and PRX, Reveal is public radios first one-hour weekly radio show and podcast dedicated to investigative reporting. Credible, fact based and without a partisan agenda, Reveal combines the power and artistry of driveway moment storytelling with data-rich reporting on critically important issues. The result is stories that inform and inspire, arming our listeners with information to right injustices, hold the powerful accountable and improve lives.Reveal is hosted by Al Letson and showcases the award-winning work of CIR and newsrooms large and small across the nation. In a radio and podcast market crowded with choices, Reveal focuses on important and often surprising stories that illuminate the world for our listeners.","airtime":"SAT 4pm-5pm","imageSrc":"https://ww2.kqed.org/radio/wp-content/uploads/sites/50/2018/04/reveal300px.png","officialWebsiteLink":"https://www.revealnews.org/episodes/","meta":{"site":"news","source":"npr"},"link":"/radio/program/reveal","subscribe":{"apple":"https://itunes.apple.com/us/podcast/reveal/id886009669","tuneIn":"https://tunein.com/radio/Reveal-p679597/","rss":"http://feeds.revealradio.org/revealpodcast"}},"says-you":{"id":"says-you","title":"Says You!","info":"Public radio's game show of bluff and bluster, words and whimsy. The warmest, wittiest cocktail party - it's spirited and civil, brainy and boisterous, peppered with musical interludes. Fast paced and playful, it's the most fun you can have with language without getting your mouth washed out with soap. Our motto: It's not important to know the answers, it's important to like the answers!","airtime":"SUN 4pm-5pm","imageSrc":"https://cdn.kqed.org/wp-content/uploads/2024/04/Says-You-Podcast-Tile-360x360-1.jpg","officialWebsiteLink":"http://www.saysyouradio.com/","meta":{"site":"comedy","source":"Pipit and Finch"},"link":"/radio/program/says-you","subscribe":{"apple":"https://itunes.apple.com/us/podcast/says-you!/id1050199826","tuneIn":"https://tunein.com/radio/Says-You-p480/","rss":"https://saysyou.libsyn.com/rss"}},"science-friday":{"id":"science-friday","title":"Science Friday","info":"Science Friday is a weekly science talk show, broadcast live over public radio stations nationwide. Each week, the show focuses on science topics that are in the news and tries to bring an educated, balanced discussion to bear on the scientific issues at hand. Panels of expert guests join host Ira Flatow, a veteran science journalist, to discuss science and to take questions from listeners during the call-in portion of the program.","airtime":"FRI 11am-1pm","imageSrc":"https://cdn.kqed.org/wp-content/uploads/2024/04/Science-Friday-Podcast-Tile-360x360-1.jpg","officialWebsiteLink":"https://www.wnycstudios.org/shows/science-friday","meta":{"site":"news","source":"npr"},"link":"/radio/program/science-friday","subscribe":{"apple":"https://itunes.apple.com/WebObjects/MZStore.woa/wa/viewPodcast?s=143441&mt=2&id=73329284&at=11l79Y&ct=nprdirectory","tuneIn":"https://tunein.com/radio/Science-Friday-p394/","rss":"http://feeds.wnyc.org/science-friday"}},"science-podcast":{"id":"science-podcast","title":"KQED Science News","tagline":"From the lab, to your ears","info":"KQED Science explores science and environment news, trends, and events from the Bay Area and beyond.","imageSrc":"https://cdn.kqed.org/wp-content/uploads/2024/04/Science-News-Podcast-Tile-703x703-1.jpg","officialWebsiteLink":"https://ww2.kqed.org/science/category/science-podcast/","meta":{"site":"science","source":"kqed","order":"17"},"link":"/science/category/science-podcast","subscribe":{"apple":"https://podcasts.apple.com/us/podcast/kqed-science-news/id214663465","google":"https://podcasts.google.com/feed/aHR0cDovL2Jsb2dzLmtxZWQub3JnL3NjaWVuY2UvZmVlZC8","stitcher":"https://www.stitcher.com/podcast/kqed-science-news","rss":"https://ww2.kqed.org/science/category/science-podcast/feed/podcast"}},"selected-shorts":{"id":"selected-shorts","title":"Selected Shorts","info":"Spellbinding short stories by established and emerging writers take on a new life when they are performed by stars of the stage and screen.","airtime":"SAT 8pm-9pm","imageSrc":"https://cdn.kqed.org/wp-content/uploads/2024/04/Selected-Shorts-Podcast-Tile-360x360-1.jpg","officialWebsiteLink":"https://www.pri.org/programs/selected-shorts","meta":{"site":"arts","source":"pri"},"link":"/radio/program/selected-shorts","subscribe":{"apple":"https://itunes.apple.com/WebObjects/MZStore.woa/wa/viewPodcast?s=143441&mt=2&id=253191824&at=11l79Y&ct=nprdirectory","tuneIn":"https://tunein.com/radio/Selected-Shorts-p31792/","rss":"https://feeds.megaphone.fm/selectedshorts"}},"snap-judgment":{"id":"snap-judgment","title":"Snap Judgment","info":"Snap Judgment (Storytelling, with a BEAT) mixes real stories with killer beats to produce cinematic, dramatic, kick-ass radio. Snap’s raw, musical brand of storytelling dares listeners to see the world through the eyes of another. WNYC studios is the producer of leading podcasts including Radiolab, Freakonomics Radio, Note To Self, Here’s The Thing With Alec Baldwin, and more.","airtime":"SAT 1pm-2pm, 9pm-10pm","imageSrc":"https://ww2.kqed.org/radio/wp-content/uploads/sites/50/2018/04/snapJudgement.jpg","officialWebsiteLink":"https://snapjudgment.org","meta":{"site":"arts","source":"WNYC"},"link":"/radio/program/snap-judgment","subscribe":{"apple":"https://itunes.apple.com/WebObjects/MZStore.woa/wa/viewPodcast?s=143441&mt=2&id=283657561&at=11l79Y&ct=nprdirectory","tuneIn":"https://tunein.com/radio/Snap-Judgment-p243817/","rss":"https://feeds.feedburner.com/snapjudgment-wnyc"}},"soldout":{"id":"soldout","title":"SOLD OUT: Rethinking Housing in America","tagline":"A new future for housing","info":"Sold Out: Rethinking Housing in America","imageSrc":"https://cdn.kqed.org/wp-content/uploads/2024/04/Sold-Out-Podcast-Tile-703x703-1.jpg","imageAlt":"KQED Sold Out: Rethinking Housing in America","officialWebsiteLink":"/podcasts/soldout","meta":{"site":"news","source":"kqed","order":3},"link":"/podcasts/soldout","subscribe":{"npr":"https://www.npr.org/podcasts/911586047/s-o-l-d-o-u-t-a-new-future-for-housing","apple":"https://podcasts.apple.com/us/podcast/introducing-sold-out-rethinking-housing-in-america/id1531354937","rss":"https://feeds.megaphone.fm/soldout","spotify":"https://open.spotify.com/show/38dTBSk2ISFoPiyYNoKn1X","stitcher":"https://www.stitcher.com/podcast/kqed/sold-out-rethinking-housing-in-america","tunein":"https://tunein.com/radio/SOLD-OUT-Rethinking-Housing-in-America-p1365871/","google":"https://podcasts.google.com/feed/aHR0cHM6Ly9mZWVkcy5tZWdhcGhvbmUuZm0vc29sZG91dA"}},"ted-radio-hour":{"id":"ted-radio-hour","title":"TED Radio Hour","info":"The TED Radio Hour is a journey through fascinating ideas, astonishing inventions, fresh approaches to old problems, and new ways to think and create.","airtime":"SUN 3pm-4pm, SAT 10pm-11pm","imageSrc":"https://ww2.kqed.org/radio/wp-content/uploads/sites/50/2018/04/tedRadioHour.jpg","officialWebsiteLink":"https://www.npr.org/programs/ted-radio-hour/?showDate=2018-06-22","meta":{"site":"news","source":"npr"},"link":"/radio/program/ted-radio-hour","subscribe":{"npr":"https://rpb3r.app.goo.gl/8vsS","apple":"https://itunes.apple.com/WebObjects/MZStore.woa/wa/viewPodcast?s=143441&mt=2&id=523121474&at=11l79Y&ct=nprdirectory","tuneIn":"https://tunein.com/radio/TED-Radio-Hour-p418021/","rss":"https://feeds.npr.org/510298/podcast.xml"}},"tech-nation":{"id":"tech-nation","title":"Tech Nation Radio Podcast","info":"Tech Nation is a weekly public radio program, hosted by Dr. Moira Gunn. Founded in 1993, it has grown from a simple interview show to a multi-faceted production, featuring conversations with noted technology and science leaders, and a weekly science and technology-related commentary.","airtime":"FRI 10pm","imageSrc":"https://cdn.kqed.org/wp-content/uploads/2024/04/Tech-Nation-Radio-Podcast-Tile-360x360-1.jpg","officialWebsiteLink":"http://technation.podomatic.com/","meta":{"site":"science","source":"Tech Nation Media"},"link":"/radio/program/tech-nation","subscribe":{"rss":"https://technation.podomatic.com/rss2.xml"}},"thebay":{"id":"thebay","title":"The Bay","tagline":"Local news to keep you rooted","info":"Host Devin Katayama walks you through the biggest story of the day with reporters and newsmakers.","imageSrc":"https://cdn.kqed.org/wp-content/uploads/2024/04/The-Bay-Podcast-Tile-703x703-1.jpg","imageAlt":"\"KQED The Bay","officialWebsiteLink":"/podcasts/thebay","meta":{"site":"radio","source":"kqed","order":"6"},"link":"/podcasts/thebay","subscribe":{"apple":"https://podcasts.apple.com/us/podcast/the-bay/id1350043452","google":"https://podcasts.google.com/feed/aHR0cHM6Ly9mZWVkcy5tZWdhcGhvbmUuZm0vS1FJTkM4MjU5Nzg2MzI3","npr":"https://www.npr.org/podcasts/586725995/the-bay","stitcher":"https://www.stitcher.com/podcast/kqed/the-bay","spotify":"https://open.spotify.com/show/4BIKBKIujizLHlIlBNaAqQ","rss":"https://feeds.megaphone.fm/KQINC8259786327"}},"californiareport":{"id":"californiareport","title":"The California Report","tagline":"California, day by day","info":"KQED’s statewide radio news program providing daily coverage of issues, trends and public policy decisions.","imageSrc":"https://cdn.kqed.org/wp-content/uploads/2024/04/The-California-Report-Podcast-Tile-703x703-1.jpg","imageAlt":"KQED The California Report","officialWebsiteLink":"/californiareport","meta":{"site":"news","source":"kqed","order":"9"},"link":"/californiareport","subscribe":{"apple":"https://podcasts.apple.com/us/podcast/kqeds-the-california-report/id79681292","google":"https://podcasts.google.com/feed/aHR0cHM6Ly9mZWVkcy5tZWdhcGhvbmUuZm0vS1FJTkM1MDAyODE4NTgz","npr":"https://www.npr.org/podcasts/432285393/the-california-report","stitcher":"https://www.stitcher.com/podcast/kqedfm-kqeds-the-california-report-podcast-8838","rss":"https://ww2.kqed.org/news/tag/tcram/feed/podcast"}},"californiareportmagazine":{"id":"californiareportmagazine","title":"The California Report Magazine","tagline":"Your state, your stories","info":"Every week, The California Report Magazine takes you on a road trip for the ears: to visit the places and meet the people who make California unique. The in-depth storytelling podcast from the California Report.","airtime":"FRI 4:30pm-5pm, 6:30pm-7pm, 11pm-11:30pm","imageSrc":"https://cdn.kqed.org/wp-content/uploads/2024/04/The-California-Report-Magazine-Podcast-Tile-703x703-1.jpg","officialWebsiteLink":"/californiareportmagazine","meta":{"site":"news","source":"kqed","order":"10"},"link":"/californiareportmagazine","subscribe":{"apple":"https://podcasts.apple.com/us/podcast/the-california-report-magazine/id1314750545","google":"https://podcasts.google.com/feed/aHR0cHM6Ly9mZWVkcy5tZWdhcGhvbmUuZm0vS1FJTkM3NjkwNjk1OTAz","npr":"https://www.npr.org/podcasts/564733126/the-california-report-magazine","stitcher":"https://www.stitcher.com/podcast/kqed/the-california-report-magazine","rss":"https://ww2.kqed.org/news/tag/tcrmag/feed/podcast"}},"theleap":{"id":"theleap","title":"The Leap","tagline":"What if you closed your eyes, and jumped?","info":"Stories about people making dramatic, risky changes, told by award-winning public radio reporter Judy Campbell.","imageSrc":"https://cdn.kqed.org/wp-content/uploads/2024/04/The-Leap-Podcast-Tile-703x703-1.jpg","imageAlt":"KQED The Leap","officialWebsiteLink":"/podcasts/theleap","meta":{"site":"news","source":"kqed","order":"14"},"link":"/podcasts/theleap","subscribe":{"apple":"https://podcasts.apple.com/us/podcast/the-leap/id1046668171","google":"https://podcasts.google.com/feed/aHR0cHM6Ly9mZWVkcy5tZWdhcGhvbmUuZm0vS1FJTkM0NTcwODQ2MjY2","npr":"https://www.npr.org/podcasts/447248267/the-leap","stitcher":"https://www.stitcher.com/podcast/kqed/the-leap","spotify":"https://open.spotify.com/show/3sSlVHHzU0ytLwuGs1SD1U","rss":"https://ww2.kqed.org/news/programs/the-leap/feed/podcast"}},"masters-of-scale":{"id":"masters-of-scale","title":"Masters of Scale","info":"Masters of Scale is an original podcast in which LinkedIn co-founder and Greylock Partner Reid Hoffman sets out to describe and prove theories that explain how great entrepreneurs take their companies from zero to a gazillion in ingenious fashion.","airtime":"Every other Wednesday June 12 through October 16 at 8pm (repeats Thursdays at 2am)","imageSrc":"https://cdn.kqed.org/wp-content/uploads/2024/04/Masters-of-Scale-Podcast-Tile-360x360-1.jpg","officialWebsiteLink":"https://mastersofscale.com/","meta":{"site":"radio","source":"WaitWhat"},"link":"/radio/program/masters-of-scale","subscribe":{"apple":"http://mastersofscale.app.link/","rss":"https://rss.art19.com/masters-of-scale"}},"the-moth-radio-hour":{"id":"the-moth-radio-hour","title":"The Moth Radio Hour","info":"Since its launch in 1997, The Moth has presented thousands of true stories, told live and without notes, to standing-room-only crowds worldwide. Moth storytellers stand alone, under a spotlight, with only a microphone and a roomful of strangers. The storyteller and the audience embark on a high-wire act of shared experience which is both terrifying and exhilarating. Since 2008, The Moth podcast has featured many of our favorite stories told live on Moth stages around the country. For information on all of our programs and live events, visit themoth.org.","airtime":"SAT 8pm-9pm and SUN 11am-12pm","imageSrc":"https://ww2.kqed.org/radio/wp-content/uploads/sites/50/2018/04/theMoth.jpg","officialWebsiteLink":"https://themoth.org/","meta":{"site":"arts","source":"prx"},"link":"/radio/program/the-moth-radio-hour","subscribe":{"apple":"https://itunes.apple.com/us/podcast/the-moth-podcast/id275699983?mt=2","tuneIn":"https://tunein.com/radio/The-Moth-p273888/","rss":"http://feeds.themoth.org/themothpodcast"}},"the-new-yorker-radio-hour":{"id":"the-new-yorker-radio-hour","title":"The New Yorker Radio Hour","info":"The New Yorker Radio Hour is a weekly program presented by the magazine's editor, David Remnick, and produced by WNYC Studios and The New Yorker. Each episode features a diverse mix of interviews, profiles, storytelling, and an occasional burst of humor inspired by the magazine, and shaped by its writers, artists, and editors. This isn't a radio version of a magazine, but something all its own, reflecting the rich possibilities of audio storytelling and conversation. Theme music for the show was composed and performed by Merrill Garbus of tUnE-YArDs.","airtime":"SAT 10am-11am","imageSrc":"https://cdn.kqed.org/wp-content/uploads/2024/04/The-New-Yorker-Podcast-Tile-360x360-1.jpg","officialWebsiteLink":"https://www.wnycstudios.org/shows/tnyradiohour","meta":{"site":"arts","source":"WNYC"},"link":"/radio/program/the-new-yorker-radio-hour","subscribe":{"apple":"https://itunes.apple.com/us/podcast/id1050430296","tuneIn":"https://tunein.com/podcasts/WNYC-Podcasts/New-Yorker-Radio-Hour-p803804/","rss":"https://feeds.feedburner.com/newyorkerradiohour"}},"the-takeaway":{"id":"the-takeaway","title":"The Takeaway","info":"The Takeaway is produced in partnership with its national audience. It delivers perspective and analysis to help us better understand the day’s news. Be a part of the American conversation on-air and online.","airtime":"MON-THU 12pm-1pm","imageSrc":"https://cdn.kqed.org/wp-content/uploads/2024/04/The-Takeaway-Podcast-Tile-360x360-1.jpg","officialWebsiteLink":"https://www.wnycstudios.org/shows/takeaway","meta":{"site":"news","source":"WNYC"},"link":"/radio/program/the-takeaway","subscribe":{"apple":"https://itunes.apple.com/us/podcast/the-takeaway/id363143310?mt=2","tuneIn":"http://tunein.com/radio/The-Takeaway-p150731/","rss":"https://feeds.feedburner.com/takeawaypodcast"}},"this-american-life":{"id":"this-american-life","title":"This American Life","info":"This American Life is a weekly public radio show, heard by 2.2 million people on more than 500 stations. Another 2.5 million people download the weekly podcast. It is hosted by Ira Glass, produced in collaboration with Chicago Public Media, delivered to stations by PRX The Public Radio Exchange, and has won all of the major broadcasting awards.","airtime":"SAT 12pm-1pm, 7pm-8pm","imageSrc":"https://ww2.kqed.org/radio/wp-content/uploads/sites/50/2018/04/thisAmericanLife.png","officialWebsiteLink":"https://www.thisamericanlife.org/","meta":{"site":"news","source":"wbez"},"link":"/radio/program/this-american-life","subscribe":{"apple":"https://itunes.apple.com/WebObjects/MZStore.woa/wa/viewPodcast?s=143441&mt=2&id=201671138&at=11l79Y&ct=nprdirectory","rss":"https://www.thisamericanlife.org/podcast/rss.xml"}},"truthbetold":{"id":"truthbetold","title":"Truth Be Told","tagline":"Advice by and for people of color","info":"We’re the friend you call after a long day, the one who gets it. Through wisdom from some of the greatest thinkers of our time, host Tonya Mosley explores what it means to grow and thrive as a Black person in America, while discovering new ways of being that serve as a portal to more love, more healing, and more joy.","airtime":"","imageSrc":"https://cdn.kqed.org/wp-content/uploads/2024/04/Truth-Be-Told-Podcast-Tile-360x360-1.jpg","imageAlt":"KQED Truth Be Told with Tonya Mosley","officialWebsiteLink":"https://www.kqed.ord/podcasts/truthbetold","meta":{"site":"news","source":"npr","order":"12"},"link":"/podcasts/truthbetold","subscribe":{"apple":"https://podcasts.apple.com/us/podcast/truth-be-told/id1462216572","google":"https://podcasts.google.com/feed/aHR0cHM6Ly93dzIua3FlZC5vcmcvbmV3cy9jYXRlZ29yeS90cnV0aC1iZS10b2xkLXBvZGNhc3QvZmVlZA","npr":"https://www.npr.org/podcasts/719210818/truth-be-told","stitcher":"https://www.stitcher.com/s?fid=398170&refid=stpr","spotify":"https://open.spotify.com/show/587DhwTBxke6uvfwDfaV5N"}},"wait-wait-dont-tell-me":{"id":"wait-wait-dont-tell-me","title":"Wait Wait... Don't Tell Me!","info":"Peter Sagal and Bill Kurtis host the weekly NPR News quiz show alongside some of the best and brightest news and entertainment personalities.","airtime":"SUN 10am-11am, SAT 11am-12pm, SAT 6pm-7pm","imageSrc":"https://cdn.kqed.org/wp-content/uploads/2024/04/Wait-Wait-Podcast-Tile-300x300-1.jpg","officialWebsiteLink":"https://www.npr.org/programs/wait-wait-dont-tell-me/","meta":{"site":"news","source":"npr"},"link":"/radio/program/wait-wait-dont-tell-me","subscribe":{"npr":"https://rpb3r.app.goo.gl/Xogv","apple":"https://itunes.apple.com/WebObjects/MZStore.woa/wa/viewPodcast?s=143441&mt=2&id=121493804&at=11l79Y&ct=nprdirectory","tuneIn":"https://tunein.com/radio/Wait-Wait-Dont-Tell-Me-p46/","rss":"https://feeds.npr.org/344098539/podcast.xml"}},"washington-week":{"id":"washington-week","title":"Washington Week","info":"For 50 years, Washington Week has been the most intelligent and up to date conversation about the most important news stories of the week. Washington Week is the longest-running news and public affairs program on PBS and features journalists -- not pundits -- lending insight and perspective to the week's important news stories.","airtime":"SAT 1:30am-2am","imageSrc":"https://ww2.kqed.org/radio/wp-content/uploads/sites/50/2018/04/washington-week.jpg","officialWebsiteLink":"http://www.pbs.org/weta/washingtonweek/","meta":{"site":"news","source":"pbs"},"link":"/radio/program/washington-week","subscribe":{"apple":"https://itunes.apple.com/us/podcast/washington-week-audio-pbs/id83324702?mt=2","tuneIn":"https://tunein.com/podcasts/Current-Affairs/Washington-Week-p693/","rss":"http://feeds.pbs.org/pbs/weta/washingtonweek-audio"}},"weekend-edition-saturday":{"id":"weekend-edition-saturday","title":"Weekend Edition Saturday","info":"Weekend Edition Saturday wraps up the week's news and offers a mix of analysis and features on a wide range of topics, including arts, sports, entertainment, and human interest stories. The two-hour program is hosted by NPR's Peabody Award-winning Scott Simon.","airtime":"SAT 5am-10am","imageSrc":"https://cdn.kqed.org/wp-content/uploads/2024/04/Weekend-Edition-Podcast-Tile-360x360-1.jpg","officialWebsiteLink":"https://www.npr.org/programs/weekend-edition-saturday/","meta":{"site":"news","source":"npr"},"link":"/radio/program/weekend-edition-saturday"},"weekend-edition-sunday":{"id":"weekend-edition-sunday","title":"Weekend Edition Sunday","info":"Weekend Edition Sunday features interviews with newsmakers, artists, scientists, politicians, musicians, writers, theologians and historians. The program has covered news events from Nelson Mandela's 1990 release from a South African prison to the capture of Saddam Hussein.","airtime":"SUN 5am-10am","imageSrc":"https://cdn.kqed.org/wp-content/uploads/2024/04/Weekend-Edition-Podcast-Tile-360x360-1.jpg","officialWebsiteLink":"https://www.npr.org/programs/weekend-edition-sunday/","meta":{"site":"news","source":"npr"},"link":"/radio/program/weekend-edition-sunday"},"world-affairs":{"id":"world-affairs","title":"World Affairs","info":"The world as we knew it is undergoing a rapid transformation…so what's next? Welcome to WorldAffairs, your guide to a changing world. We give you the context you need to navigate across borders and ideologies. Through sound-rich stories and in-depth interviews, we break down what it means to be a global citizen on a hot, crowded planet. Our hosts, Ray Suarez, Teresa Cotsirilos and Philip Yun help you make sense of an uncertain world, one story at a time.","airtime":"MON 10pm, TUE 1am, SAT 3am","imageSrc":"https://cdn.kqed.org/wp-content/uploads/2024/04/World-Affairs-Podcast-Tile-360x360-1.jpg ","officialWebsiteLink":"https://www.worldaffairs.org/","meta":{"site":"news","source":"World Affairs"},"link":"/radio/program/world-affairs","subscribe":{"apple":"https://itunes.apple.com/us/podcast/world-affairs/id101215657?mt=2","tuneIn":"https://tunein.com/radio/WorldAffairs-p1665/","rss":"https://worldaffairs.libsyn.com/rss"}},"on-shifting-ground":{"id":"on-shifting-ground","title":"On Shifting Ground with Ray Suarez","info":"Geopolitical turmoil. A warming planet. Authoritarians on the rise. We live in a chaotic world that’s rapidly shifting around us. “On Shifting Ground with Ray Suarez” explores international fault lines and how they impact us all. Each week, NPR veteran Ray Suarez hosts conversations with journalists, leaders and policy experts to help us read between the headlines – and give us hope for human resilience.","airtime":"MON 10pm, TUE 1am, SAT 3am","imageSrc":"https://ww2.kqed.org/app/uploads/2022/12/onshiftingground-600x600-1.png","officialWebsiteLink":"https://worldaffairs.org/radio-podcast/","meta":{"site":"news","source":"On Shifting Ground"},"link":"/radio/program/on-shifting-ground","subscribe":{"apple":"https://podcasts.apple.com/ie/podcast/on-shifting-ground/id101215657","rss":"https://feeds.libsyn.com/36668/rss"}},"hidden-brain":{"id":"hidden-brain","title":"Hidden Brain","info":"Shankar Vedantam uses science and storytelling to reveal the unconscious patterns that drive human behavior, shape our choices and direct our relationships.","imageSrc":"https://ww2.kqed.org/radio/wp-content/uploads/sites/50/2018/05/hiddenbrain.jpg","officialWebsiteLink":"https://www.npr.org/series/423302056/hidden-brain","airtime":"SUN 7pm-8pm","meta":{"site":"news","source":"NPR"},"link":"/radio/program/hidden-brain","subscribe":{"apple":"https://itunes.apple.com/us/podcast/hidden-brain/id1028908750?mt=2","tuneIn":"https://tunein.com/podcasts/Science-Podcasts/Hidden-Brain-p787503/","rss":"https://feeds.npr.org/510308/podcast.xml"}},"city-arts":{"id":"city-arts","title":"City Arts & Lectures","info":"A one-hour radio program to hear celebrated writers, artists and thinkers address contemporary ideas and values, often discussing the creative process. Please note: tapes or transcripts are not available","imageSrc":"https://ww2.kqed.org/radio/wp-content/uploads/sites/50/2018/05/cityartsandlecture-300x300.jpg","officialWebsiteLink":"https://www.cityarts.net/","airtime":"SUN 1pm-2pm, TUE 10pm, WED 1am","meta":{"site":"news","source":"City Arts & Lectures"},"link":"https://www.cityarts.net","subscribe":{"tuneIn":"https://tunein.com/radio/City-Arts-and-Lectures-p692/","rss":"https://www.cityarts.net/feed/"}},"white-lies":{"id":"white-lies","title":"White Lies","info":"In 1965, Rev. James Reeb was murdered in Selma, Alabama. Three men were tried and acquitted, but no one was ever held to account. Fifty years later, two journalists from Alabama return to the city where it happened, expose the lies that kept the murder from being solved and uncover a story about guilt and memory that says as much about America today as it does about the past.","imageSrc":"https://cdn.kqed.org/wp-content/uploads/2024/04/White-Lies-Podcast-Tile-360x360-1.jpg","officialWebsiteLink":"https://www.npr.org/podcasts/510343/white-lies","meta":{"site":"news","source":"npr"},"link":"/radio/program/white-lies","subscribe":{"npr":"https://rpb3r.app.goo.gl/whitelies","apple":"https://podcasts.apple.com/podcast/id1462650519?mt=2&at=11l79Y&ct=nprdirectory","google":"https://podcasts.google.com/feed/aHR0cHM6Ly9mZWVkcy5ucHIub3JnLzUxMDM0My9wb2RjYXN0LnhtbA","spotify":"https://open.spotify.com/show/12yZ2j8vxqhc0QZyRES3ft?si=LfWYEK6URA63hueKVxRLAw","rss":"https://feeds.npr.org/510343/podcast.xml"}},"rightnowish":{"id":"rightnowish","title":"Rightnowish","tagline":"Art is where you find it","info":"Rightnowish digs into life in the Bay Area right now… ish. Journalist Pendarvis Harshaw takes us to galleries painted on the sides of liquor stores in West Oakland. We'll dance in warehouses in the Bayview, make smoothies with kids in South Berkeley, and listen to classical music in a 1984 Cutlass Supreme in Richmond. Every week, Pen talks to movers and shakers about how the Bay Area shapes what they create, and how they shape the place we call home.","imageSrc":"https://cdn.kqed.org/wp-content/uploads/2024/04/Rightnowish-Podcast-Tile-500x500-1.jpg","imageAlt":"KQED Rightnowish with Pendarvis Harshaw","officialWebsiteLink":"/podcasts/rightnowish","meta":{"site":"arts","source":"kqed","order":"5"},"link":"/podcasts/rightnowish","subscribe":{"npr":"https://www.npr.org/podcasts/721590300/rightnowish","rss":"https://ww2.kqed.org/arts/programs/rightnowish/feed/podcast","apple":"https://podcasts.apple.com/us/podcast/rightnowish/id1482187648","stitcher":"https://www.stitcher.com/podcast/kqed/rightnowish","google":"https://podcasts.google.com/feed/aHR0cHM6Ly9mZWVkcy5tZWdhcGhvbmUuZm0vS1FJTkMxMjU5MTY3NDc4","spotify":"https://open.spotify.com/show/7kEJuafTzTVan7B78ttz1I"}},"jerrybrown":{"id":"jerrybrown","title":"The Political Mind of Jerry Brown","tagline":"Lessons from a lifetime in politics","info":"The Political Mind of Jerry Brown brings listeners the wisdom of the former Governor, Mayor, and presidential candidate. Scott Shafer interviewed Brown for more than 40 hours, covering the former governor's life and half-century in the political game – and Brown has some lessons he'd like to share. ","imageSrc":"https://cdn.kqed.org/wp-content/uploads/2024/04/The-Political-Mind-of-Jerry-Brown-Podcast-Tile-703x703-1.jpg","imageAlt":"KQED The Political Mind of Jerry Brown","officialWebsiteLink":"/podcasts/jerrybrown","meta":{"site":"news","source":"kqed","order":"16"},"link":"/podcasts/jerrybrown","subscribe":{"npr":"https://www.npr.org/podcasts/790253322/the-political-mind-of-jerry-brown","apple":"https://itunes.apple.com/us/podcast/id1492194549","rss":"https://ww2.kqed.org/news/series/jerrybrown/feed/podcast/","tuneIn":"http://tun.in/pjGcK","stitcher":"https://www.stitcher.com/podcast/kqed/the-political-mind-of-jerry-brown","spotify":"https://open.spotify.com/show/54C1dmuyFyKMFttY6X2j6r?si=K8SgRCoISNK6ZbjpXrX5-w","google":"https://podcasts.google.com/feed/aHR0cHM6Ly93dzIua3FlZC5vcmcvbmV3cy9zZXJpZXMvamVycnlicm93bi9mZWVkL3BvZGNhc3Qv"}},"the-splendid-table":{"id":"the-splendid-table","title":"The Splendid Table","info":"\u003cem>The Splendid Table\u003c/em> hosts our nation's conversations about cooking, sustainability and food culture.","imageSrc":"https://cdn.kqed.org/wp-content/uploads/2024/04/The-Splendid-Table-Podcast-Tile-360x360-1.jpg","officialWebsiteLink":"https://www.splendidtable.org/","airtime":"SUN 10-11 pm","meta":{"site":"radio","source":"npr"},"link":"/radio/program/the-splendid-table"}},"racesReducer":{"5921":{"id":"5921","type":"apRace","location":"State of California","raceName":"U.S. House of Representatives, District 7","raceDescription":"Top candidate wins seat.","raceType":"top2","totalVotes":158422,"precinctsReportPercentage":98.97,"eevp":99,"tabulationStatus":"Tabulation Paused","dateUpdated":"March 22, 2024","timeUpdated":"4:48 PM","source":"AP","candidates":[{"candidateName":"Doris Matsui","candidateIncumbent":true,"candidateParty":"D","voteCount":89456,"isWinner":true},{"candidateName":"Tom Silva","candidateIncumbent":false,"candidateParty":"R","voteCount":48920,"isWinner":true},{"candidateName":"David Mandel","candidateIncumbent":false,"candidateParty":"D","voteCount":20046,"isWinner":false}],"winnerDateTime":"2024-03-09T01:00:38.194Z"},"5922":{"id":"5922","type":"apRace","location":"State of California","raceName":"U.S. House of Representatives, District 8","raceDescription":"Top candidate wins seat.","raceType":"top2","totalVotes":0,"uncontested":true,"precinctsReportPercentage":0,"eevp":0,"tabulationStatus":"Tabulation Paused","dateUpdated":"March 22, 2024","timeUpdated":"4:20 PM","source":"AP","candidates":[{"candidateName":"Rudy Recile","candidateIncumbent":false,"candidateParty":"R","voteCount":0,"isWinner":true},{"candidateName":"John Garamendi","candidateIncumbent":true,"candidateParty":"D","voteCount":0,"isWinner":true}],"winnerDateTime":"2024-03-06T04:00:30.000Z"},"5924":{"id":"5924","type":"apRace","location":"State of California","raceName":"U.S. House of Representatives, District 10","raceDescription":"Top candidate wins seat.","raceType":"top2","totalVotes":185034,"precinctsReportPercentage":99.07,"eevp":99,"tabulationStatus":"Tabulation Paused","dateUpdated":"March 22, 2024","timeUpdated":"4:48 PM","source":"AP","candidates":[{"candidateName":"Mark DeSaulnier","candidateIncumbent":true,"candidateParty":"D","voteCount":121265,"isWinner":true},{"candidateName":"Katherine Piccinini","candidateIncumbent":false,"candidateParty":"R","voteCount":34883,"isWinner":true},{"candidateName":"Nolan Chen","candidateIncumbent":false,"candidateParty":"R","voteCount":19459,"isWinner":false},{"candidateName":"Joe Sweeney","candidateIncumbent":false,"candidateParty":"NPP","voteCount":7606,"isWinner":false},{"candidateName":"Mohamed Elsherbini","candidateIncumbent":false,"candidateParty":"NPP","voteCount":1821,"isWinner":false}],"winnerDateTime":"2024-03-09T01:02:32.415Z"},"5926":{"id":"5926","type":"apRace","location":"State of California","raceName":"U.S. House of Representatives, District 12","raceDescription":"Top candidate wins seat.","raceType":"top2","totalVotes":153801,"precinctsReportPercentage":98.88,"eevp":99,"tabulationStatus":"Tabulation Paused","dateUpdated":"March 20, 2024","timeUpdated":"4:41 PM","source":"AP","candidates":[{"candidateName":"Lateefah Simon","candidateIncumbent":false,"candidateParty":"D","voteCount":85905,"isWinner":true},{"candidateName":"Jennifer Tran","candidateIncumbent":false,"candidateParty":"D","voteCount":22964,"isWinner":true},{"candidateName":"Tony Daysog","candidateIncumbent":false,"candidateParty":"D","voteCount":17197,"isWinner":false},{"candidateName":"Stephen Slauson","candidateIncumbent":false,"candidateParty":"R","voteCount":9699,"isWinner":false},{"candidateName":"Glenn Kaplan","candidateIncumbent":false,"candidateParty":"D","voteCount":6785,"isWinner":false},{"candidateName":"Eric Wilson","candidateIncumbent":false,"candidateParty":"D","voteCount":4243,"isWinner":false},{"candidateName":"Abdur Sikder","candidateIncumbent":false,"candidateParty":"D","voteCount":2847,"isWinner":false},{"candidateName":"Ned Nuerge","candidateIncumbent":false,"candidateParty":"R","voteCount":2532,"isWinner":false},{"candidateName":"Andre Todd","candidateIncumbent":false,"candidateParty":"D","voteCount":1629,"isWinner":false}],"winnerDateTime":"2024-03-16T00:22:36.062Z"},"5928":{"id":"5928","type":"apRace","location":"State of California","raceName":"U.S. House of Representatives, District 14","raceDescription":"Top candidate wins seat.","raceType":"top2","totalVotes":125831,"precinctsReportPercentage":99.14,"eevp":99,"tabulationStatus":"Tabulation Paused","dateUpdated":"March 20, 2024","timeUpdated":"4:41 PM","source":"AP","candidates":[{"candidateName":"Eric Swalwell","candidateIncumbent":true,"candidateParty":"D","voteCount":83989,"isWinner":true},{"candidateName":"Vin Kruttiventi","candidateIncumbent":false,"candidateParty":"R","voteCount":22106,"isWinner":true},{"candidateName":"Alison Hayden","candidateIncumbent":false,"candidateParty":"R","voteCount":11928,"isWinner":false},{"candidateName":"Luis Reynoso","candidateIncumbent":false,"candidateParty":"R","voteCount":7808,"isWinner":false}],"winnerDateTime":"2024-03-12T00:51:36.366Z"},"5930":{"id":"5930","type":"apRace","location":"State of California","raceName":"U.S. House of Representatives, District 16","raceDescription":"Top candidate wins seat.","raceType":"top2","totalVotes":182135,"precinctsReportPercentage":98.91,"eevp":99,"tabulationStatus":"Tabulation Paused","dateUpdated":"April 3, 2024","timeUpdated":"3:04 PM","source":"AP","candidates":[{"candidateName":"Sam Liccardo","candidateIncumbent":false,"candidateParty":"D","voteCount":38489,"isWinner":true},{"candidateName":"Evan Low","candidateIncumbent":false,"candidateParty":"D","voteCount":30249,"isWinner":false},{"candidateName":"Joe Simitian","candidateIncumbent":false,"candidateParty":"D","voteCount":30249,"isWinner":false},{"candidateName":"Peter Ohtaki","candidateIncumbent":false,"candidateParty":"R","voteCount":23275,"isWinner":false},{"candidateName":"Peter Dixon","candidateIncumbent":false,"candidateParty":"D","voteCount":14673,"isWinner":false},{"candidateName":"Rishi Kumar","candidateIncumbent":false,"candidateParty":"D","voteCount":12377,"isWinner":false},{"candidateName":"Karl Ryan","candidateIncumbent":false,"candidateParty":"R","voteCount":11557,"isWinner":false},{"candidateName":"Julie Lythcott-Haims","candidateIncumbent":false,"candidateParty":"D","voteCount":11383,"isWinner":false},{"candidateName":"Ahmed Mostafa","candidateIncumbent":false,"candidateParty":"D","voteCount":5811,"isWinner":false},{"candidateName":"Greg Tanaka","candidateIncumbent":false,"candidateParty":"D","voteCount":2421,"isWinner":false},{"candidateName":"Joby Bernstein","candidateIncumbent":false,"candidateParty":"D","voteCount":1651,"isWinner":false}],"winnerDateTime":"2024-03-12T00:32:05.002Z"},"5931":{"id":"5931","type":"apRace","location":"State of California","raceName":"U.S. House of Representatives, District 17","raceDescription":"Top candidate wins seat.","raceType":"top2","totalVotes":117534,"precinctsReportPercentage":98.92,"eevp":99,"tabulationStatus":"Tabulation Paused","dateUpdated":"March 22, 2024","timeUpdated":"4:20 PM","source":"AP","candidates":[{"candidateName":"Ro Khanna","candidateIncumbent":true,"candidateParty":"D","voteCount":73941,"isWinner":true},{"candidateName":"Anita Chen","candidateIncumbent":false,"candidateParty":"R","voteCount":31539,"isWinner":true},{"candidateName":"Ritesh Tandon","candidateIncumbent":false,"candidateParty":"D","voteCount":5728,"isWinner":false},{"candidateName":"Mario Ramirez","candidateIncumbent":false,"candidateParty":"D","voteCount":4491,"isWinner":false},{"candidateName":"Joe Dehn","candidateIncumbent":false,"candidateParty":"Lib","voteCount":1835,"isWinner":false}],"winnerDateTime":"2024-03-08T01:50:53.956Z"},"5932":{"id":"5932","type":"apRace","location":"State of California","raceName":"U.S. House of Representatives, District 18","raceDescription":"Top candidate wins seat.","raceType":"top2","totalVotes":96302,"precinctsReportPercentage":98.93,"eevp":98.83,"tabulationStatus":"Tabulation Paused","dateUpdated":"March 25, 2024","timeUpdated":"5:47 AM","source":"AP","candidates":[{"candidateName":"Zoe Lofgren","candidateIncumbent":true,"candidateParty":"D","voteCount":49323,"isWinner":true},{"candidateName":"Peter Hernandez","candidateIncumbent":false,"candidateParty":"R","voteCount":31622,"isWinner":true},{"candidateName":"Charlene Nijmeh","candidateIncumbent":false,"candidateParty":"D","voteCount":10614,"isWinner":false},{"candidateName":"Lawrence Milan","candidateIncumbent":false,"candidateParty":"D","voteCount":2712,"isWinner":false},{"candidateName":"Luele Kifle","candidateIncumbent":false,"candidateParty":"D","voteCount":2031,"isWinner":false}],"winnerDateTime":"2024-03-12T00:26:02.706Z"},"5963":{"id":"5963","type":"apRace","location":"State of California","raceName":"State House, District 2","raceDescription":"Top candidate wins seat.","raceType":"top2","totalVotes":139085,"precinctsReportPercentage":98.62,"eevp":98.6,"tabulationStatus":"Tabulation Paused","dateUpdated":"March 22, 2024","timeUpdated":"4:20 PM","source":"AP","candidates":[{"candidateName":"Michael Greer","candidateIncumbent":false,"candidateParty":"R","voteCount":38079,"isWinner":true},{"candidateName":"Chris Rogers","candidateIncumbent":false,"candidateParty":"D","voteCount":27126,"isWinner":true},{"candidateName":"Rusty Hicks","candidateIncumbent":false,"candidateParty":"D","voteCount":25615,"isWinner":false},{"candidateName":"Ariel Kelley","candidateIncumbent":false,"candidateParty":"D","voteCount":19483,"isWinner":false},{"candidateName":"Frankie Myers","candidateIncumbent":false,"candidateParty":"D","voteCount":17694,"isWinner":false},{"candidateName":"Ted Williams","candidateIncumbent":false,"candidateParty":"D","voteCount":9550,"isWinner":false},{"candidateName":"Cynthia Click","candidateIncumbent":false,"candidateParty":"D","voteCount":1538,"isWinner":false}],"winnerDateTime":"2024-03-22T21:38:36.711Z"},"5972":{"id":"5972","type":"apRace","location":"State of California","raceName":"State House, District 11","raceDescription":"Top candidate wins seat.","raceType":"top2","totalVotes":99775,"precinctsReportPercentage":99,"eevp":99,"tabulationStatus":"Tabulation Paused","dateUpdated":"March 22, 2024","timeUpdated":"4:48 PM","source":"AP","candidates":[{"candidateName":"Lori Wilson","candidateIncumbent":true,"candidateParty":"D","voteCount":50085,"isWinner":true},{"candidateName":"Dave Ennis","candidateIncumbent":false,"candidateParty":"R","voteCount":26074,"isWinner":true},{"candidateName":"Wanda Wallis","candidateIncumbent":false,"candidateParty":"R","voteCount":14638,"isWinner":false},{"candidateName":"Jeffrey Flack","candidateIncumbent":false,"candidateParty":"D","voteCount":8978,"isWinner":false}],"winnerDateTime":"2024-03-08T02:01:24.524Z"},"5973":{"id":"5973","type":"apRace","location":"State of California","raceName":"State House, District 12","raceDescription":"Top candidate wins seat.","raceType":"top2","totalVotes":143532,"precinctsReportPercentage":99.19,"eevp":99,"tabulationStatus":"Tabulation Paused","dateUpdated":"March 22, 2024","timeUpdated":"4:38 PM","source":"AP","candidates":[{"candidateName":"Damon Connolly","candidateIncumbent":true,"candidateParty":"D","voteCount":111275,"isWinner":true},{"candidateName":"Andy Podshadley","candidateIncumbent":false,"candidateParty":"R","voteCount":17240,"isWinner":true},{"candidateName":"Eryn Cervantes","candidateIncumbent":false,"candidateParty":"R","voteCount":15017,"isWinner":false}],"winnerDateTime":"2024-03-21T00:25:32.262Z"},"5975":{"id":"5975","type":"apRace","location":"State of California","raceName":"State House, District 14","raceDescription":"Top candidate wins seat.","raceType":"top2","totalVotes":106997,"precinctsReportPercentage":99.06,"eevp":99,"tabulationStatus":"Tabulation Paused","dateUpdated":"March 22, 2024","timeUpdated":"4:48 PM","source":"AP","candidates":[{"candidateName":"Buffy Wicks","candidateIncumbent":true,"candidateParty":"D","voteCount":78678,"isWinner":true},{"candidateName":"Margot Smith","candidateIncumbent":false,"candidateParty":"D","voteCount":18251,"isWinner":true},{"candidateName":"Utkarsh Jain","candidateIncumbent":false,"candidateParty":"R","voteCount":10068,"isWinner":false}],"winnerDateTime":"2024-03-15T01:30:34.539Z"},"5976":{"id":"5976","type":"apRace","location":"State of California","raceName":"State House, District 15","raceDescription":"Top candidate wins seat.","raceType":"top2","totalVotes":97144,"precinctsReportPercentage":98.98,"eevp":99,"tabulationStatus":"Tabulation Paused","dateUpdated":"March 22, 2024","timeUpdated":"4:48 PM","source":"AP","candidates":[{"candidateName":"Sonia Ledo","candidateIncumbent":false,"candidateParty":"R","voteCount":30946,"isWinner":true},{"candidateName":"Anamarie Farias","candidateIncumbent":false,"candidateParty":"D","voteCount":29512,"isWinner":true},{"candidateName":"Monica Wilson","candidateIncumbent":false,"candidateParty":"D","voteCount":24775,"isWinner":false},{"candidateName":"Karen Mitchoff","candidateIncumbent":false,"candidateParty":"D","voteCount":11911,"isWinner":false}],"winnerDateTime":"2024-03-14T00:19:38.858Z"},"5977":{"id":"5977","type":"apRace","location":"State of California","raceName":"State House, District 16","raceDescription":"Top candidate wins seat.","raceType":"top2","totalVotes":0,"uncontested":true,"precinctsReportPercentage":0,"eevp":0,"tabulationStatus":"Tabulation Paused","dateUpdated":"March 22, 2024","timeUpdated":"4:20 PM","source":"AP","candidates":[{"candidateName":"Joseph Rubay","candidateIncumbent":false,"candidateParty":"R","voteCount":0,"isWinner":true},{"candidateName":"Rebecca Bauer-Kahan","candidateIncumbent":true,"candidateParty":"D","voteCount":0,"isWinner":true}],"winnerDateTime":"2024-03-06T04:00:30.000Z"},"5978":{"id":"5978","type":"apRace","location":"State of California","raceName":"State House, District 17","raceDescription":"Top candidate wins seat.","raceType":"top2","totalVotes":111003,"precinctsReportPercentage":98.99,"eevp":99,"tabulationStatus":"Tabulation Paused","dateUpdated":"March 22, 2024","timeUpdated":"8:25 AM","source":"AP","candidates":[{"candidateName":"Matt Haney","candidateIncumbent":true,"candidateParty":"D","voteCount":90915,"isWinner":true},{"candidateName":"Manuel Noris-Barrera","candidateIncumbent":false,"candidateParty":"R","voteCount":13843,"isWinner":true},{"candidateName":"Otto Duke","candidateIncumbent":false,"candidateParty":"D","voteCount":6245,"isWinner":false}],"winnerDateTime":"2024-03-12T00:36:19.697Z"},"5979":{"id":"5979","type":"apRace","location":"State of California","raceName":"State House, District 18","raceDescription":"Top candidate wins seat.","raceType":"top2","totalVotes":86008,"precinctsReportPercentage":99.1,"eevp":99,"tabulationStatus":"Tabulation Paused","dateUpdated":"March 20, 2024","timeUpdated":"4:41 PM","source":"AP","candidates":[{"candidateName":"Mia Bonta","candidateIncumbent":true,"candidateParty":"D","voteCount":73040,"isWinner":true},{"candidateName":"Andre Sandford","candidateIncumbent":false,"candidateParty":"AIP","voteCount":4575,"isWinner":false},{"candidateName":"Mindy Pechenuk","candidateIncumbent":false,"candidateParty":"R","voteCount":4389,"isWinner":false},{"candidateName":"Cheyenne Kenney","candidateIncumbent":false,"candidateParty":"R","voteCount":4004,"isWinner":false}],"winnerDateTime":"2024-03-06T08:03:23.729Z"},"5980":{"id":"5980","type":"apRace","location":"State of California","raceName":"State House, District 19","raceDescription":"Top candidate wins seat.","raceType":"top2","totalVotes":113959,"precinctsReportPercentage":98.8,"eevp":99,"tabulationStatus":"Tabulation Paused","dateUpdated":"March 22, 2024","timeUpdated":"4:20 PM","source":"AP","candidates":[{"candidateName":"Catherine Stefani","candidateIncumbent":false,"candidateParty":"D","voteCount":64960,"isWinner":true},{"candidateName":"David Lee","candidateIncumbent":false,"candidateParty":"D","voteCount":33035,"isWinner":true},{"candidateName":"Nadia Flamenco","candidateIncumbent":false,"candidateParty":"R","voteCount":8335,"isWinner":false},{"candidateName":"Arjun Sodhani","candidateIncumbent":false,"candidateParty":"R","voteCount":7629,"isWinner":false}],"winnerDateTime":"2024-03-11T23:50:23.109Z"},"5981":{"id":"5981","type":"apRace","location":"State of California","raceName":"State House, District 20","raceDescription":"Top candidate wins seat.","raceType":"top2","totalVotes":0,"uncontested":true,"precinctsReportPercentage":0,"eevp":0,"tabulationStatus":"Tabulation Paused","dateUpdated":"March 20, 2024","timeUpdated":"4:36 PM","source":"AP","candidates":[{"candidateName":"Liz Ortega","candidateIncumbent":true,"candidateParty":"D","voteCount":0,"isWinner":true}],"winnerDateTime":"2024-03-06T04:00:30.000Z"},"5982":{"id":"5982","type":"apRace","location":"State of California","raceName":"State House, District 21","raceDescription":"Top candidate wins seat.","raceType":"top2","totalVotes":0,"uncontested":true,"precinctsReportPercentage":0,"eevp":0,"tabulationStatus":"Tabulation Paused","dateUpdated":"March 22, 2024","timeUpdated":"4:20 PM","source":"AP","candidates":[{"candidateName":"Mark Gilham","candidateIncumbent":false,"candidateParty":"R","voteCount":0,"isWinner":true},{"candidateName":"Diane Papan","candidateIncumbent":true,"candidateParty":"D","voteCount":0,"isWinner":true}],"winnerDateTime":"2024-03-06T04:00:30.000Z"},"5984":{"id":"5984","type":"apRace","location":"State of California","raceName":"State House, District 23","raceDescription":"Top candidate wins seat.","raceType":"top2","totalVotes":116963,"precinctsReportPercentage":98.91,"eevp":99,"tabulationStatus":"Tabulation Paused","dateUpdated":"March 22, 2024","timeUpdated":"4:20 PM","source":"AP","candidates":[{"candidateName":"Marc Berman","candidateIncumbent":true,"candidateParty":"D","voteCount":67106,"isWinner":true},{"candidateName":"Lydia Kou","candidateIncumbent":false,"candidateParty":"D","voteCount":23699,"isWinner":true},{"candidateName":"Gus Mattammal","candidateIncumbent":false,"candidateParty":"R","voteCount":13277,"isWinner":false},{"candidateName":"Allan Marson","candidateIncumbent":false,"candidateParty":"R","voteCount":12881,"isWinner":false}],"winnerDateTime":"2024-03-12T01:13:06.280Z"},"5987":{"id":"5987","type":"apRace","location":"State of California","raceName":"State House, District 26","raceDescription":"Top candidate wins seat.","raceType":"top2","totalVotes":72753,"precinctsReportPercentage":99.19,"eevp":99,"tabulationStatus":"Tabulation Paused","dateUpdated":"March 22, 2024","timeUpdated":"4:20 PM","source":"AP","candidates":[{"candidateName":"Patrick Ahrens","candidateIncumbent":false,"candidateParty":"D","voteCount":25036,"isWinner":true},{"candidateName":"Tara Sreekrishnan","candidateIncumbent":false,"candidateParty":"D","voteCount":19600,"isWinner":true},{"candidateName":"Sophie Song","candidateIncumbent":false,"candidateParty":"R","voteCount":15954,"isWinner":false},{"candidateName":"Omar Din","candidateIncumbent":false,"candidateParty":"D","voteCount":8772,"isWinner":false},{"candidateName":"Bob Goodwyn","candidateIncumbent":false,"candidateParty":"Lib","voteCount":2170,"isWinner":false},{"candidateName":"Ashish Garg","candidateIncumbent":false,"candidateParty":"NPP","voteCount":1221,"isWinner":false}],"winnerDateTime":"2024-03-13T21:06:29.070Z"},"5989":{"id":"5989","type":"apRace","location":"State of California","raceName":"State House, District 28","raceDescription":"Top candidate wins seat.","raceType":"top2","totalVotes":0,"uncontested":true,"precinctsReportPercentage":0,"eevp":0,"tabulationStatus":"Tabulation Paused","dateUpdated":"March 22, 2024","timeUpdated":"5:10 PM","source":"AP","candidates":[{"candidateName":"Gail Pellerin","candidateIncumbent":true,"candidateParty":"D","voteCount":0,"isWinner":true},{"candidateName":"Liz Lawler","candidateIncumbent":false,"candidateParty":"R","voteCount":0,"isWinner":true}],"winnerDateTime":"2024-03-06T04:00:30.000Z"},"6010":{"id":"6010","type":"apRace","location":"State of California","raceName":"State House, District 49","raceDescription":"Top candidate wins seat.","raceType":"top2","totalVotes":0,"uncontested":true,"precinctsReportPercentage":0,"eevp":0,"tabulationStatus":"Tabulation Paused","dateUpdated":"March 22, 2024","timeUpdated":"4:36 PM","source":"AP","candidates":[{"candidateName":"Mike Fong","candidateIncumbent":true,"candidateParty":"D","voteCount":0,"isWinner":true},{"candidateName":"Long Liu","candidateIncumbent":false,"candidateParty":"R","voteCount":0,"isWinner":true}],"winnerDateTime":"2024-03-06T04:00:30.000Z"},"6018":{"id":"6018","type":"apRace","location":"State of California","raceName":"U.S. House of Representatives, District 2","raceDescription":"Top candidate wins seat.","raceType":"top2","totalVotes":229348,"precinctsReportPercentage":99.05,"eevp":99,"tabulationStatus":"Tabulation Paused","dateUpdated":"March 22, 2024","timeUpdated":"4:38 PM","source":"AP","candidates":[{"candidateName":"Jared Huffman","candidateIncumbent":true,"candidateParty":"D","voteCount":169005,"isWinner":true},{"candidateName":"Chris Coulombe","candidateIncumbent":false,"candidateParty":"R","voteCount":37372,"isWinner":true},{"candidateName":"Tief Gibbs","candidateIncumbent":false,"candidateParty":"R","voteCount":18437,"isWinner":false},{"candidateName":"Jolian Kangas","candidateIncumbent":false,"candidateParty":"NPP","voteCount":3166,"isWinner":false},{"candidateName":"Jason Brisendine","candidateIncumbent":false,"candidateParty":"NPP","voteCount":1368,"isWinner":false}],"winnerDateTime":"2024-03-12T00:46:10.103Z"},"6020":{"id":"6020","type":"apRace","location":"State of California","raceName":"U.S. House of Representatives, District 4","raceDescription":"Top candidate wins seat.","raceType":"top2","totalVotes":187640,"precinctsReportPercentage":96.32,"eevp":96.36,"tabulationStatus":"Tabulation Paused","dateUpdated":"March 22, 2024","timeUpdated":"4:20 PM","source":"AP","candidates":[{"candidateName":"Mike Thompson","candidateIncumbent":true,"candidateParty":"D","voteCount":118147,"isWinner":true},{"candidateName":"John Munn","candidateIncumbent":false,"candidateParty":"R","voteCount":56232,"isWinner":true},{"candidateName":"Andrew Engdahl","candidateIncumbent":false,"candidateParty":"D","voteCount":11202,"isWinner":false},{"candidateName":"Niket Patwardhan","candidateIncumbent":false,"candidateParty":"NPP","voteCount":2059,"isWinner":false}],"winnerDateTime":"2024-03-07T00:30:57.980Z"},"6025":{"id":"6025","type":"apRace","location":"State of California","raceName":"U.S. House of Representatives, District 9","raceDescription":"Top candidate wins seat.","raceType":"top2","totalVotes":121271,"precinctsReportPercentage":99.17,"eevp":99,"tabulationStatus":"Tabulation Paused","dateUpdated":"March 22, 2024","timeUpdated":"5:10 PM","source":"AP","candidates":[{"candidateName":"Josh Harder","candidateIncumbent":true,"candidateParty":"D","voteCount":60396,"isWinner":true},{"candidateName":"Kevin Lincoln","candidateIncumbent":false,"candidateParty":"R","voteCount":36346,"isWinner":true},{"candidateName":"John McBride","candidateIncumbent":false,"candidateParty":"R","voteCount":15525,"isWinner":false},{"candidateName":"Khalid Jafri","candidateIncumbent":false,"candidateParty":"R","voteCount":9004,"isWinner":false}],"winnerDateTime":"2024-03-12T00:49:44.113Z"},"6031":{"id":"6031","type":"apRace","location":"State of California","raceName":"U.S. House of Representatives, District 15","raceDescription":"Top candidate wins seat.","raceType":"top2","totalVotes":0,"uncontested":true,"precinctsReportPercentage":0,"eevp":0,"tabulationStatus":"Tabulation Paused","dateUpdated":"March 22, 2024","timeUpdated":"4:20 PM","source":"AP","candidates":[{"candidateName":"Anna Kramer","candidateIncumbent":false,"candidateParty":"R","voteCount":0,"isWinner":true},{"candidateName":"Kevin Mullin","candidateIncumbent":true,"candidateParty":"D","voteCount":0,"isWinner":true}],"winnerDateTime":"2024-03-06T04:00:30.000Z"},"6035":{"id":"6035","type":"apRace","location":"State of California","raceName":"U.S. House of Representatives, District 19","raceDescription":"Top candidate wins seat.","raceType":"top2","totalVotes":203670,"precinctsReportPercentage":99.11,"eevp":99,"tabulationStatus":"Tabulation Paused","dateUpdated":"March 25, 2024","timeUpdated":"5:47 AM","source":"AP","candidates":[{"candidateName":"Jimmy Panetta","candidateIncumbent":true,"candidateParty":"D","voteCount":132540,"isWinner":true},{"candidateName":"Jason Anderson","candidateIncumbent":false,"candidateParty":"R","voteCount":58120,"isWinner":true},{"candidateName":"Sean Dougherty","candidateIncumbent":false,"candidateParty":"Grn","voteCount":13010,"isWinner":false}],"winnerDateTime":"2024-03-07T00:23:46.779Z"},"6066":{"id":"6066","type":"apRace","location":"State of California","raceName":"State House, District 3","raceDescription":"Top candidate wins seat.","raceType":"top2","totalVotes":0,"uncontested":true,"precinctsReportPercentage":0,"eevp":0,"tabulationStatus":"Tabulation Paused","dateUpdated":"March 22, 2024","timeUpdated":"5:10 PM","source":"AP","candidates":[{"candidateName":"Jamie Gallagher","candidateIncumbent":true,"candidateParty":"R","voteCount":0,"isWinner":true},{"candidateName":"Aaron Draper","candidateIncumbent":false,"candidateParty":"D","voteCount":0,"isWinner":true}],"winnerDateTime":"2024-03-06T04:00:30.000Z"},"6067":{"id":"6067","type":"apRace","location":"State of California","raceName":"State House, District 4","raceDescription":"Top candidate wins seat.","raceType":"top2","totalVotes":0,"uncontested":true,"precinctsReportPercentage":0,"eevp":0,"tabulationStatus":"Tabulation Paused","dateUpdated":"March 22, 2024","timeUpdated":"4:20 PM","source":"AP","candidates":[{"candidateName":"Cecilia Aguiar-Curry","candidateIncumbent":true,"candidateParty":"D","voteCount":0,"isWinner":true}],"winnerDateTime":"2024-03-06T04:00:30.000Z"},"6087":{"id":"6087","type":"apRace","location":"State of California","raceName":"State House, District 24","raceDescription":"Top candidate wins seat.","raceType":"top2","totalVotes":66643,"precinctsReportPercentage":99.19,"eevp":99,"tabulationStatus":"Tabulation Paused","dateUpdated":"March 22, 2024","timeUpdated":"4:20 PM","source":"AP","candidates":[{"candidateName":"Alex Lee","candidateIncumbent":true,"candidateParty":"D","voteCount":45544,"isWinner":true},{"candidateName":"Bob Brunton","candidateIncumbent":false,"candidateParty":"R","voteCount":14951,"isWinner":true},{"candidateName":"Marti Souza","candidateIncumbent":false,"candidateParty":"R","voteCount":6148,"isWinner":false}],"winnerDateTime":"2024-03-14T23:23:49.770Z"},"6088":{"id":"6088","type":"apRace","location":"State of California","raceName":"State House, District 25","raceDescription":"Top candidate wins seat.","raceType":"top2","totalVotes":69560,"precinctsReportPercentage":99.31,"eevp":99,"tabulationStatus":"Tabulation Paused","dateUpdated":"March 22, 2024","timeUpdated":"4:20 PM","source":"AP","candidates":[{"candidateName":"Ash Kalra","candidateIncumbent":true,"candidateParty":"D","voteCount":35821,"isWinner":true},{"candidateName":"Ted Stroll","candidateIncumbent":false,"candidateParty":"R","voteCount":18255,"isWinner":true},{"candidateName":"Lan Ngo","candidateIncumbent":false,"candidateParty":"D","voteCount":15484,"isWinner":false}],"winnerDateTime":"2024-03-14T02:40:57.200Z"},"6092":{"id":"6092","type":"apRace","location":"State of California","raceName":"State House, District 29","raceDescription":"Top candidate wins seat.","raceType":"top2","totalVotes":0,"uncontested":true,"precinctsReportPercentage":0,"eevp":0,"tabulationStatus":"Tabulation Paused","dateUpdated":"March 25, 2024","timeUpdated":"5:47 AM","source":"AP","candidates":[{"candidateName":"Robert Rivas","candidateIncumbent":true,"candidateParty":"D","voteCount":0,"isWinner":true},{"candidateName":"J.W. Paine","candidateIncumbent":false,"candidateParty":"R","voteCount":0,"isWinner":true}],"winnerDateTime":"2024-03-06T04:00:30.000Z"},"6223":{"id":"6223","type":"apRace","location":"State of California","raceName":"U.S. House of Representatives, District 46","raceDescription":"Top candidate wins seat.","raceType":"top2","totalVotes":0,"uncontested":true,"precinctsReportPercentage":0,"eevp":0,"tabulationStatus":"Tabulation Paused","dateUpdated":"March 22, 2024","timeUpdated":"5:16 PM","source":"AP","candidates":[{"candidateName":"Lou Correa","candidateIncumbent":true,"candidateParty":"D","voteCount":0,"isWinner":true},{"candidateName":"David Pan","candidateIncumbent":false,"candidateParty":"R","voteCount":0,"isWinner":true}],"winnerDateTime":"2024-03-06T04:00:30.000Z"},"6530":{"id":"6530","type":"apRace","location":"State of California","raceName":"State Senate, District 3","raceDescription":"Top candidate wins seat.","raceType":"top2","totalVotes":222193,"precinctsReportPercentage":98.99,"eevp":99,"tabulationStatus":"Tabulation Paused","dateUpdated":"March 22, 2024","timeUpdated":"4:48 PM","source":"AP","candidates":[{"candidateName":"Thom Bogue","candidateIncumbent":false,"candidateParty":"R","voteCount":61776,"isWinner":true},{"candidateName":"Christopher Cabaldon","candidateIncumbent":false,"candidateParty":"D","voteCount":59041,"isWinner":true},{"candidateName":"Rozzana Verder-Aliga","candidateIncumbent":false,"candidateParty":"D","voteCount":45546,"isWinner":false},{"candidateName":"Jackie Elward","candidateIncumbent":false,"candidateParty":"D","voteCount":41127,"isWinner":false},{"candidateName":"Jimih Jones","candidateIncumbent":false,"candidateParty":"R","voteCount":14703,"isWinner":false}],"winnerDateTime":"2024-03-15T01:24:31.539Z"},"6531":{"id":"6531","type":"apRace","location":"State of California","raceName":"State Senate, District 5","raceDescription":"Top candidate wins seat.","raceType":"top2","totalVotes":171623,"precinctsReportPercentage":99.09,"eevp":99,"tabulationStatus":"Tabulation Paused","dateUpdated":"March 22, 2024","timeUpdated":"5:10 PM","source":"AP","candidates":[{"candidateName":"Jim Shoemaker","candidateIncumbent":false,"candidateParty":"R","voteCount":74935,"isWinner":true},{"candidateName":"Jerry McNerney","candidateIncumbent":false,"candidateParty":"D","voteCount":57040,"isWinner":true},{"candidateName":"Carlos Villapudua","candidateIncumbent":false,"candidateParty":"D","voteCount":39648,"isWinner":false}],"winnerDateTime":"2024-03-13T20:07:46.382Z"},"6532":{"id":"6532","type":"apRace","location":"State of California","raceName":"State Senate, District 7","raceDescription":"Top candidate wins seat.","raceType":"top2","totalVotes":192446,"precinctsReportPercentage":98.72,"eevp":98.78,"tabulationStatus":"Tabulation Paused","dateUpdated":"March 22, 2024","timeUpdated":"4:48 PM","source":"AP","candidates":[{"candidateName":"Jesse Arreguín","candidateIncumbent":false,"candidateParty":"D","voteCount":61837,"isWinner":true},{"candidateName":"Jovanka Beckles","candidateIncumbent":false,"candidateParty":"D","voteCount":34025,"isWinner":true},{"candidateName":"Dan Kalb","candidateIncumbent":false,"candidateParty":"D","voteCount":28842,"isWinner":false},{"candidateName":"Kathryn Lybarger","candidateIncumbent":false,"candidateParty":"D","voteCount":28041,"isWinner":false},{"candidateName":"Sandre Swanson","candidateIncumbent":false,"candidateParty":"D","voteCount":22862,"isWinner":false},{"candidateName":"Jeanne Solnordal","candidateIncumbent":false,"candidateParty":"R","voteCount":16839,"isWinner":false}],"winnerDateTime":"2024-03-16T00:58:11.533Z"},"6533":{"id":"6533","type":"apRace","location":"State of California","raceName":"State Senate, District 9","raceDescription":"Top candidate wins seat.","raceType":"top2","totalVotes":0,"uncontested":true,"precinctsReportPercentage":0,"eevp":0,"tabulationStatus":"Tabulation Paused","dateUpdated":"March 22, 2024","timeUpdated":"4:20 PM","source":"AP","candidates":[{"candidateName":"Tim Grayson","candidateIncumbent":false,"candidateParty":"D","voteCount":0,"isWinner":true},{"candidateName":"Marisol Rubio","candidateIncumbent":false,"candidateParty":"D","voteCount":0,"isWinner":true}],"winnerDateTime":"2024-03-06T04:00:30.000Z"},"6534":{"id":"6534","type":"apRace","location":"State of California","raceName":"State Senate, District 11","raceDescription":"Top candidate wins seat.","raceType":"top2","totalVotes":228260,"precinctsReportPercentage":99.09,"eevp":99,"tabulationStatus":"Tabulation Paused","dateUpdated":"March 22, 2024","timeUpdated":"4:20 PM","source":"AP","candidates":[{"candidateName":"Scott Wiener","candidateIncumbent":true,"candidateParty":"D","voteCount":166592,"isWinner":true},{"candidateName":"Yvette Corkrean","candidateIncumbent":false,"candidateParty":"R","voteCount":34438,"isWinner":true},{"candidateName":"Cynthia Cravens","candidateIncumbent":false,"candidateParty":"D","voteCount":18513,"isWinner":false},{"candidateName":"Jing Xiong","candidateIncumbent":false,"candidateParty":"NPP","voteCount":8717,"isWinner":false}],"winnerDateTime":"2024-03-12T02:01:51.597Z"},"6535":{"id":"6535","type":"apRace","location":"State of California","raceName":"State Senate, District 13","raceDescription":"Top candidate wins seat.","raceType":"top2","totalVotes":227191,"precinctsReportPercentage":98.88,"eevp":99,"tabulationStatus":"Tabulation Paused","dateUpdated":"March 22, 2024","timeUpdated":"4:20 PM","source":"AP","candidates":[{"candidateName":"Josh Becker","candidateIncumbent":true,"candidateParty":"D","voteCount":167127,"isWinner":true},{"candidateName":"Alexander Glew","candidateIncumbent":false,"candidateParty":"R","voteCount":42788,"isWinner":true},{"candidateName":"Christina Laskowski","candidateIncumbent":false,"candidateParty":"R","voteCount":17276,"isWinner":false}],"winnerDateTime":"2024-03-12T01:56:24.964Z"},"6536":{"id":"6536","type":"apRace","location":"State of California","raceName":"State Senate, District 15","raceDescription":"Top candidate wins seat.","raceType":"top2","totalVotes":180231,"precinctsReportPercentage":98.81,"eevp":98.95,"tabulationStatus":"Tabulation Paused","dateUpdated":"March 22, 2024","timeUpdated":"4:20 PM","source":"AP","candidates":[{"candidateName":"Dave Cortese","candidateIncumbent":true,"candidateParty":"D","voteCount":124440,"isWinner":true},{"candidateName":"Robert Howell","candidateIncumbent":false,"candidateParty":"R","voteCount":34173,"isWinner":true},{"candidateName":"Tony Loaiza","candidateIncumbent":false,"candidateParty":"R","voteCount":21618,"isWinner":false}],"winnerDateTime":"2024-03-13T01:15:45.365Z"},"6548":{"id":"6548","type":"apRace","location":"State of California","raceName":"State Senate, District 39","raceDescription":"Top candidate wins seat.","raceType":"top2","totalVotes":0,"uncontested":true,"precinctsReportPercentage":0,"eevp":0,"tabulationStatus":"Tabulation Paused","dateUpdated":"March 20, 2024","timeUpdated":"4:55 PM","source":"AP","candidates":[{"candidateName":"Akilah Weber","candidateIncumbent":false,"candidateParty":"D","voteCount":0,"isWinner":true},{"candidateName":"Bob Divine","candidateIncumbent":false,"candidateParty":"R","voteCount":0,"isWinner":true}],"winnerDateTime":"2024-03-06T04:00:30.000Z"},"6611":{"id":"6611","type":"apRace","location":"State of California","raceName":"U.S. House of Representatives, District 11","raceDescription":"Top candidate wins seat.","raceType":"top2","totalVotes":188732,"precinctsReportPercentage":98.89,"eevp":99,"tabulationStatus":"Tabulation Paused","dateUpdated":"March 22, 2024","timeUpdated":"8:25 AM","source":"AP","candidates":[{"candidateName":"Nancy Pelosi","candidateIncumbent":true,"candidateParty":"D","voteCount":138285,"isWinner":true},{"candidateName":"Bruce Lou","candidateIncumbent":false,"candidateParty":"R","voteCount":16285,"isWinner":true},{"candidateName":"Marjorie Mikels","candidateIncumbent":false,"candidateParty":"D","voteCount":9363,"isWinner":false},{"candidateName":"Bianca Von Krieg","candidateIncumbent":false,"candidateParty":"D","voteCount":7634,"isWinner":false},{"candidateName":"Jason Zeng","candidateIncumbent":false,"candidateParty":"R","voteCount":6607,"isWinner":false},{"candidateName":"Jason Boyce","candidateIncumbent":false,"candidateParty":"D","voteCount":4325,"isWinner":false},{"candidateName":"Larry Nichelson","candidateIncumbent":false,"candidateParty":"R","voteCount":3482,"isWinner":false},{"candidateName":"Eve Del Castello","candidateIncumbent":false,"candidateParty":"R","voteCount":2751,"isWinner":false}],"winnerDateTime":"2024-03-12T00:31:55.445Z"},"8589":{"id":"8589","type":"apRace","location":"State of California","raceName":"U.S. Senate, Class I","raceDescription":"Top candidate wins seat.","raceType":"top2","totalVotes":7276537,"precinctsReportPercentage":99,"eevp":99,"tabulationStatus":"Tabulation Paused","dateUpdated":"March 25, 2024","timeUpdated":"5:47 AM","source":"AP","candidates":[{"candidateName":"Adam Schiff","candidateIncumbent":false,"candidateParty":"D","voteCount":2299507,"isWinner":true},{"candidateName":"Steve Garvey","candidateIncumbent":false,"candidateParty":"R","voteCount":2292414,"isWinner":true},{"candidateName":"Katie Porter","candidateIncumbent":false,"candidateParty":"D","voteCount":1115606,"isWinner":false},{"candidateName":"Barbara Lee","candidateIncumbent":false,"candidateParty":"D","voteCount":714408,"isWinner":false},{"candidateName":"Eric Early","candidateIncumbent":false,"candidateParty":"R","voteCount":240723,"isWinner":false},{"candidateName":"James Bradley","candidateIncumbent":false,"candidateParty":"R","voteCount":98180,"isWinner":false},{"candidateName":"Christina Pascucci","candidateIncumbent":false,"candidateParty":"D","voteCount":61755,"isWinner":false},{"candidateName":"Sharleta Bassett","candidateIncumbent":false,"candidateParty":"R","voteCount":54422,"isWinner":false},{"candidateName":"Sarah Liew","candidateIncumbent":false,"candidateParty":"R","voteCount":38483,"isWinner":false},{"candidateName":"Laura Garza ","candidateIncumbent":false,"candidateParty":"NPP","voteCount":34320,"isWinner":false},{"candidateName":"Jonathan Reiss","candidateIncumbent":false,"candidateParty":"R","voteCount":34283,"isWinner":false},{"candidateName":"Sepi Gilani","candidateIncumbent":false,"candidateParty":"D","voteCount":34056,"isWinner":false},{"candidateName":"Gail Lightfoot","candidateIncumbent":false,"candidateParty":"Lib","voteCount":33046,"isWinner":false},{"candidateName":"Denice Gary-Pandol","candidateIncumbent":false,"candidateParty":"R","voteCount":25494,"isWinner":false},{"candidateName":"James Macauley","candidateIncumbent":false,"candidateParty":"R","voteCount":23168,"isWinner":false},{"candidateName":"Harmesh Kumar","candidateIncumbent":false,"candidateParty":"D","voteCount":21522,"isWinner":false},{"candidateName":"David Peterson","candidateIncumbent":false,"candidateParty":"D","voteCount":21076,"isWinner":false},{"candidateName":"Douglas Pierce","candidateIncumbent":false,"candidateParty":"D","voteCount":19371,"isWinner":false},{"candidateName":"Major Singh","candidateIncumbent":false,"candidateParty":"NPP","voteCount":16965,"isWinner":false},{"candidateName":"John Rose","candidateIncumbent":false,"candidateParty":"D","voteCount":14577,"isWinner":false},{"candidateName":"Perry Pound","candidateIncumbent":false,"candidateParty":"D","voteCount":14134,"isWinner":false},{"candidateName":"Raji Rab","candidateIncumbent":false,"candidateParty":"D","voteCount":13558,"isWinner":false},{"candidateName":"Mark Ruzon","candidateIncumbent":false,"candidateParty":"NPP","voteCount":13429,"isWinner":false},{"candidateName":"Forrest Jones","candidateIncumbent":false,"candidateParty":"AIP","voteCount":13027,"isWinner":false},{"candidateName":"Stefan Simchowitz","candidateIncumbent":false,"candidateParty":"R","voteCount":12717,"isWinner":false},{"candidateName":"Martin Veprauskas","candidateIncumbent":false,"candidateParty":"R","voteCount":9714,"isWinner":false},{"candidateName":"Don Grundmann","candidateIncumbent":false,"candidateParty":"NPP","voteCount":6582,"isWinner":false}],"winnerDateTime":"2024-03-06T05:01:46.589Z"},"8686":{"id":"8686","type":"apRace","location":"State of California","raceName":"President,","raceDescription":"Top candidate wins seat.","raceType":"top1","totalVotes":3589127,"precinctsReportPercentage":99,"eevp":99,"tabulationStatus":"Tabulation Paused","dateUpdated":"March 25, 2024","timeUpdated":"5:48 AM","source":"AP","candidates":[{"candidateName":"Joe Biden","candidateIncumbent":true,"candidateParty":"D","voteCount":3200188,"isWinner":true},{"candidateName":"Marianne Williamson","candidateIncumbent":false,"candidateParty":"D","voteCount":145690,"isWinner":false},{"candidateName":"Dean Phillips","candidateIncumbent":false,"candidateParty":"D","voteCount":99981,"isWinner":false},{"candidateName":"Armando Perez-Serrato","candidateIncumbent":false,"candidateParty":"D","voteCount":42925,"isWinner":false},{"candidateName":"Gabriel Cornejo","candidateIncumbent":false,"candidateParty":"D","voteCount":41261,"isWinner":false},{"candidateName":"President Boddie","candidateIncumbent":false,"candidateParty":"D","voteCount":25373,"isWinner":false},{"candidateName":"Stephen Lyons","candidateIncumbent":false,"candidateParty":"D","voteCount":21008,"isWinner":false},{"candidateName":"Eban Cambridge","candidateIncumbent":false,"candidateParty":"D","voteCount":12701,"isWinner":false}],"winnerDateTime":"2024-03-06T04:12:27.559Z"},"8688":{"id":"8688","type":"apRace","location":"State of California","raceName":"President,","raceDescription":"Top candidate wins seat.","raceType":"top1","totalVotes":2466569,"precinctsReportPercentage":99,"eevp":99,"tabulationStatus":"Tabulation Paused","dateUpdated":"March 25, 2024","timeUpdated":"5:47 AM","source":"AP","candidates":[{"candidateName":"Donald Trump","candidateIncumbent":false,"candidateParty":"R","voteCount":1953947,"isWinner":true},{"candidateName":"Nikki Haley","candidateIncumbent":false,"candidateParty":"R","voteCount":430792,"isWinner":false},{"candidateName":"Ron DeSantis","candidateIncumbent":false,"candidateParty":"R","voteCount":35581,"isWinner":false},{"candidateName":"Chris Christie","candidateIncumbent":false,"candidateParty":"R","voteCount":20164,"isWinner":false},{"candidateName":"Vivek Ramaswamy","candidateIncumbent":false,"candidateParty":"R","voteCount":11069,"isWinner":false},{"candidateName":"Rachel Swift","candidateIncumbent":false,"candidateParty":"R","voteCount":4231,"isWinner":false},{"candidateName":"David Stuckenberg","candidateIncumbent":false,"candidateParty":"R","voteCount":3895,"isWinner":false},{"candidateName":"Ryan Binkley","candidateIncumbent":false,"candidateParty":"R","voteCount":3563,"isWinner":false},{"candidateName":"Asa Hutchinson","candidateIncumbent":false,"candidateParty":"R","voteCount":3327,"isWinner":false}],"winnerDateTime":"2024-03-06T04:13:19.766Z"},"81993":{"id":"81993","type":"apRace","location":"State of California","raceName":"U.S. Senate, Class I Unexpired Term","raceDescription":"Top candidate wins seat.","raceType":"top2","totalVotes":7358837,"precinctsReportPercentage":99,"eevp":99,"tabulationStatus":"Tabulation Paused","dateUpdated":"March 25, 2024","timeUpdated":"5:47 AM","source":"AP","candidates":[{"candidateName":"Steve Garvey","candidateIncumbent":false,"candidateParty":"R","voteCount":2444940,"isWinner":true},{"candidateName":"Adam Schiff","candidateIncumbent":false,"candidateParty":"D","voteCount":2155146,"isWinner":true},{"candidateName":"Katie Porter","candidateIncumbent":false,"candidateParty":"D","voteCount":1269194,"isWinner":false},{"candidateName":"Barbara Lee","candidateIncumbent":false,"candidateParty":"D","voteCount":863278,"isWinner":false},{"candidateName":"Eric Early","candidateIncumbent":false,"candidateParty":"R","voteCount":448788,"isWinner":false},{"candidateName":"Christina Pascucci","candidateIncumbent":false,"candidateParty":"D","voteCount":109421,"isWinner":false},{"candidateName":"Sepi Gilani","candidateIncumbent":false,"candidateParty":"D","voteCount":68070,"isWinner":false}],"winnerDateTime":"2024-03-06T04:31:08.186Z"},"82014":{"id":"82014","type":"apRace","location":"State of California","raceName":"Proposition, 1 - Behavioral Health Services Program","raceDescription":"Top candidate wins seat.","raceType":"top1","totalVotes":7221972,"precinctsReportPercentage":99,"eevp":99,"tabulationStatus":"Tabulation Paused","dateUpdated":"March 25, 2024","timeUpdated":"5:47 AM","source":"AP","candidates":[{"candidateName":"Yes","candidateIncumbent":false,"candidateParty":null,"voteCount":3624998,"isWinner":true},{"candidateName":"No","candidateIncumbent":false,"candidateParty":null,"voteCount":3596974,"isWinner":false}],"winnerDateTime":"2024-03-21T00:11:06.265Z"},"timeLoaded":"April 19, 2024 10:25 PM","nationalRacesLoaded":true,"localRacesLoaded":true,"overrides":[{"id":"5921","raceName":"U.S. House of Representatives, District 7","raceDescription":"Top two candidates advance to general election.","raceReadTheStory":""},{"id":"5922","raceName":"U.S. House of Representatives, District 8","raceDescription":"Top two candidates advance to general election.","raceReadTheStory":""},{"id":"5924","raceName":"U.S. House of Representatives, District 10","raceDescription":"Top two candidates advance to general election.","raceReadTheStory":""},{"id":"5926","raceName":"U.S. House of Representatives, District 12","raceDescription":"Top two candidates advance to general election.","raceReadTheStory":"https://www.kqed.org/elections/results/alameda/congress-12th-district"},{"id":"5928","raceName":"U.S. House of Representatives, District 14","raceDescription":"Top two candidates advance to general election.","raceReadTheStory":""},{"id":"5930","raceName":"U.S. House of Representatives, District 16","raceDescription":"Top two candidates advance to general election.","raceReadTheStory":"https://www.kqed.org/elections/results/california/congress-16th-district"},{"id":"5931","raceName":"U.S. House of Representatives, District 17","raceDescription":"Top two candidates advance to general election.","raceReadTheStory":""},{"id":"5932","raceName":"U.S. House of Representatives, District 18","raceDescription":"Top two candidates advance to general election.","raceReadTheStory":""},{"id":"5963","raceName":"State Assembly, District 2","raceDescription":"Top two candidates advance to general election.","raceReadTheStory":""},{"id":"5972","raceName":"State Assembly, District 11","raceDescription":"Top two candidates advance to general election.","raceReadTheStory":""},{"id":"5973","raceName":"State Assembly, District 12","raceDescription":"Top two candidates advance to general election.","raceReadTheStory":""},{"id":"5975","raceName":"State Assembly, District 14","raceDescription":"Top two candidates advance to general election.","raceReadTheStory":""},{"id":"5976","raceName":"State Assembly, District 15","raceDescription":"Top two candidates advance to general election.","raceReadTheStory":"https://www.kqed.org/elections/results/contracosta/state-assembly"},{"id":"5977","raceName":"State Assembly, District 16","raceDescription":"Top two candidates advance to general election.","raceReadTheStory":""},{"id":"5978","raceName":"State Assembly, District 17","raceDescription":"Top two candidates advance to general election.","raceReadTheStory":""},{"id":"5979","raceName":"State Assembly, District 18","raceDescription":"Top two candidates advance to general election.","raceReadTheStory":""},{"id":"5980","raceName":"State Assembly, District 19","raceDescription":"Top two candidates advance to general election.","raceReadTheStory":""},{"id":"5981","raceName":"State Assembly, District 20","raceDescription":"Top two candidates advance to general election.","raceReadTheStory":""},{"id":"5982","raceName":"State Assembly, District 21","raceDescription":"Top two candidates advance to general election.","raceReadTheStory":""},{"id":"5984","raceName":"State Assembly, District 23","raceDescription":"Top two candidates advance to general election.","raceReadTheStory":"https://www.kqed.org/elections/results/california/state-assembly-23rd-district"},{"id":"5987","raceName":"State Assembly, District 26","raceDescription":"Top two candidates advance to general election.","raceReadTheStory":"https://www.kqed.org/elections/results/santaclara/state-assembly-26th-district"},{"id":"5989","raceName":"State Assembly, District 28","raceDescription":"Top two candidates advance to general election.","raceReadTheStory":""},{"id":"6010","raceName":"State Assembly, District 4","raceDescription":"Top two candidates advance to general election.","raceReadTheStory":""},{"id":"6018","raceName":"U.S. House of Representatives, District 2","raceDescription":"Top two candidates advance to general election.","raceReadTheStory":""},{"id":"6020","raceName":"U.S. House of Representatives, District 4","raceDescription":"Top two candidates advance to general election.","raceReadTheStory":""},{"id":"6025","raceName":"U.S. House of Representatives, District 9","raceDescription":"Top two candidates advance to general election.","raceReadTheStory":""},{"id":"6031","raceName":"U.S. House of Representatives, District 15","raceDescription":"Top two candidates advance to general election.","raceReadTheStory":""},{"id":"6035","raceName":"U.S. House of Representatives, District 19","raceDescription":"Top two candidates advance to general election.","raceReadTheStory":""},{"id":"6067","raceName":"State Assembly, District 4","raceDescription":"Top two candidates advance to general election.","raceReadTheStory":""},{"id":"6087","raceName":"State Assembly, District 24","raceDescription":"Top two candidates advance to general election.","raceReadTheStory":""},{"id":"6088","raceName":"State Assembly, District 25","raceDescription":"Top two candidates advance to general election.","raceReadTheStory":""},{"id":"6092","raceName":"State Assembly, District 29","raceDescription":"Top two candidates advance to general election.","raceReadTheStory":""},{"id":"6223","raceName":"U.S. House of Representatives, District 4","raceDescription":"Top two candidates advance to general election.","raceReadTheStory":""},{"id":"6530","raceName":"State Senate, District 3","raceDescription":"Top two candidates advance to general election.","raceReadTheStory":"https://www.kqed.org/elections/results/california/state-senate-3rd-district"},{"id":"6531","raceName":"State Senate, District 5","raceDescription":"Top two candidates advance to general election.","raceReadTheStory":""},{"id":"6532","raceName":"State Senate, District 7","raceDescription":"Top two candidates advance to general election.","raceReadTheStory":"https://www.kqed.org/elections/results/california/state-senate-7th-district"},{"id":"6533","raceName":"State Senate, District 9","raceDescription":"Top two candidates advance to general election.","raceReadTheStory":""},{"id":"6534","raceName":"State Senate, District 11","raceDescription":"Top two candidates advance to general election.","raceReadTheStory":""},{"id":"6535","raceName":"State Senate, District 13","raceDescription":"Top two candidates advance to general election.","raceReadTheStory":""},{"id":"6536","raceName":"State Senate, District 15","raceDescription":"Top two candidates advance to general election.","raceReadTheStory":""},{"id":"6611","raceName":"U.S. House of Representatives, District 11","raceDescription":"Top two candidates advance to general election.","raceReadTheStory":""},{"id":"8589","raceName":"U.S. Senate (Full Term)","raceDescription":"Top two candidates advance to general election.","raceReadTheStory":"https://www.kqed.org/elections/results/california/senator"},{"id":"8686","raceName":"California Democratic Presidential Primary","raceDescription":"Candidates are competing for 496 delegates.","raceReadTheStory":"https://www.kqed.org/elections/results/president/democrat"},{"id":"8688","raceName":"California Republican Presidential Primary","raceDescription":"Candidates are competing for 169 delegates.","raceReadTheStory":"https://kqed.org/elections/results/president/republican"},{"id":"81993","raceName":"U.S. Senate (Partial/Unexpired Term)","raceDescription":"Top two candidates advance to general election."},{"id":"82014","raceName":"Proposition 1","raceDescription":"Bond and mental health reforms. Passes with majority vote.","raceReadTheStory":"https://www.kqed.org/elections/results/california/proposition-1"}],"AlamedaJudge5":{"id":"AlamedaJudge5","type":"localRace","location":"Alameda","raceName":"Superior Court Judge, Office 5","raceDescription":"Top candidate wins seat.","raceReadTheStory":"","raceType":"top1","timeUpdated":"7:02 PM","dateUpdated":"April 1, 2024","totalVotes":200601,"candidates":[{"candidateName":"Terry Wiley","candidateIncumbent":true,"candidateParty":"","voteCount":200601}]},"AlamedaJudge12":{"id":"AlamedaJudge12","type":"localRace","location":"Alameda","raceName":"Superior Court Judge, Office 12","raceDescription":"Top candidate wins seat.","raceReadTheStory":"","raceType":"top1","timeUpdated":"7:02 PM","dateUpdated":"April 1, 2024","totalVotes":240853,"candidates":[{"candidateName":"Mark Fickes","candidateIncumbent":false,"candidateParty":"","voteCount":133009},{"candidateName":"Michael P. Johnson","candidateIncumbent":false,"candidateParty":"","voteCount":107844}]},"AlamedaBoard2":{"id":"AlamedaBoard2","type":"localRace","location":"Alameda","raceName":"Board of Education, Trustee Area 2","raceDescription":"Top candidate wins seat.","raceReadTheStory":"","raceType":"top1","timeUpdated":"7:02 PM","dateUpdated":"April 1, 2024","totalVotes":33580,"candidates":[{"candidateName":"John Lewis","candidateIncumbent":false,"candidateParty":"","voteCount":6943},{"candidateName":"Angela Normand","candidateIncumbent":true,"candidateParty":"","voteCount":26637}]},"AlamedaBoard5":{"id":"AlamedaBoard5","type":"localRace","location":"Alameda","raceName":"Board of Education, Trustee Area 5","raceDescription":"Top candidate wins seat.","raceReadTheStory":"","raceType":"top1","timeUpdated":"7:02 PM","dateUpdated":"April 1, 2024","totalVotes":26072,"candidates":[{"candidateName":"Guadalupe \"Lupe\" Angulo","candidateIncumbent":false,"candidateParty":"","voteCount":7521},{"candidateName":"Janevette Cole","candidateIncumbent":true,"candidateParty":"","voteCount":13338},{"candidateName":"Joe Orlando Ramos","candidateIncumbent":false,"candidateParty":"","voteCount":5213}]},"AlamedaBoard6":{"id":"AlamedaBoard6","type":"localRace","location":"Alameda","raceName":"Board of Education, Trustee Area 6","raceDescription":"Top candidate wins seat.","raceReadTheStory":"","raceType":"top1","timeUpdated":"7:02 PM","dateUpdated":"April 1, 2024","totalVotes":30864,"candidates":[{"candidateName":"John Guerrero","candidateIncumbent":false,"candidateParty":"","voteCount":9989},{"candidateName":"Eileen McDonald","candidateIncumbent":true,"candidateParty":"","voteCount":20875}]},"AlamedaSup1":{"id":"AlamedaSup1","type":"localRace","location":"Alameda","raceName":"Board of Supervisors, District 1","raceDescription":"Candidate with majority vote wins seat. If no candidate reaches majority, top two candidates advance to runoff in general election.","raceReadTheStory":"","raceType":"top1","timeUpdated":"7:02 PM","dateUpdated":"April 1, 2024","totalVotes":41038,"candidates":[{"candidateName":"David Haubert","candidateIncumbent":true,"candidateParty":"","voteCount":41038}]},"AlamedaSup2":{"id":"AlamedaSup2","type":"localRace","location":"Alameda","raceName":"Board of Supervisors, District 2","raceDescription":"Candidate with majority vote wins seat. If no candidate reaches majority, top two candidates advance to runoff in general election.","raceReadTheStory":"","raceType":"top2","timeUpdated":"7:02 PM","dateUpdated":"April 1, 2024","totalVotes":31034,"candidates":[{"candidateName":"Elisa Márquez","candidateIncumbent":true,"candidateParty":"","voteCount":31034}]},"AlamedaSup4":{"id":"AlamedaSup4","type":"localRace","location":"Alameda","raceName":"Board of Supervisors, District 4","raceDescription":"Candidate with majority vote wins seat. If no candidate reaches majority, top two candidates advance to runoff in general election.","raceReadTheStory":"https://www.kqed.org/elections/results/alameda/supervisor-4th-district","raceType":"top2","timeUpdated":"7:02 PM","dateUpdated":"April 1, 2024","totalVotes":57007,"candidates":[{"candidateName":"Jennifer Esteen","candidateIncumbent":false,"candidateParty":"","voteCount":22400},{"candidateName":"Nate Miley","candidateIncumbent":true,"candidateParty":"","voteCount":34607}]},"AlamedaSup5":{"id":"AlamedaSup5","type":"localRace","location":"Alameda","raceName":"Board of Supervisors, District 5","raceDescription":"Candidate with majority vote wins seat. If no candidate reaches majority, top two candidates advance to runoff in general election.","raceReadTheStory":"https://www.kqed.org/elections/results/alameda/supervisor-5th-district","raceType":"top2","timeUpdated":"7:02 PM","dateUpdated":"April 1, 2024","totalVotes":81059,"candidates":[{"candidateName":"Ben Bartlett","candidateIncumbent":false,"candidateParty":"","voteCount":13518},{"candidateName":"Nikki Fortunato Bas","candidateIncumbent":false,"candidateParty":"","voteCount":27597},{"candidateName":"John J. Bauters","candidateIncumbent":false,"candidateParty":"","voteCount":16783},{"candidateName":"Ken Berrick","candidateIncumbent":false,"candidateParty":"","voteCount":7520},{"candidateName":"Omar Farmer","candidateIncumbent":false,"candidateParty":"","voteCount":1240},{"candidateName":"Gregory Hodge","candidateIncumbent":false,"candidateParty":"","voteCount":3419},{"candidateName":"Chris Moore","candidateIncumbent":false,"candidateParty":"","voteCount":7428},{"candidateName":"Gerald Pechenuk","candidateIncumbent":false,"candidateParty":"","voteCount":305},{"candidateName":"Lorrel Plimier","candidateIncumbent":false,"candidateParty":"","voteCount":3249}]},"AlamedaBoard7":{"id":"AlamedaBoard7","type":"localRace","location":"Alameda","raceName":"Flood Control & Water Conservation District Director, Zone 7, Full Term","raceDescription":"Top three candidates win seat.","raceReadTheStory":"","raceType":"top3","timeUpdated":"7:02 PM","dateUpdated":"April 1, 2024","totalVotes":134340,"candidates":[{"candidateName":"Alan Burnham","candidateIncumbent":false,"candidateParty":"","voteCount":15723},{"candidateName":"Sandy Figuers","candidateIncumbent":false,"candidateParty":"","voteCount":22454},{"candidateName":"Laurene K. Green","candidateIncumbent":false,"candidateParty":"","voteCount":30343},{"candidateName":"Kathy Narum","candidateIncumbent":true,"candidateParty":"","voteCount":23833},{"candidateName":"Seema Badar","candidateIncumbent":false,"candidateParty":"","voteCount":7468},{"candidateName":"Catherine Brown","candidateIncumbent":false,"candidateParty":"","voteCount":34519}]},"AlamedaAuditor":{"id":"AlamedaAuditor","type":"localRace","location":"Alameda","raceName":"Oakland Auditor","raceDescription":"Top candidate wins seat.","raceReadTheStory":"","raceType":"top1","timeUpdated":"7:02 PM","dateUpdated":"April 1, 2024","totalVotes":59227,"candidates":[{"candidateName":"Michael Houston","candidateIncumbent":true,"candidateParty":"","voteCount":59227}]},"AlamedaMeasureA":{"id":"AlamedaMeasureA","type":"localRace","location":"Alameda","raceName":"Measure A","raceDescription":"Alameda County. Civil service. Passes with majority vote.","raceReadTheStory":"","raceType":"yesNo","timeUpdated":"7:02 PM","dateUpdated":"April 1, 2024","totalVotes":282335,"candidates":[{"candidateName":"Yes","candidateIncumbent":false,"candidateParty":"","voteCount":167903},{"candidateName":"No","candidateIncumbent":false,"candidateParty":"","voteCount":114432}]},"AlamedaMeasureB":{"id":"AlamedaMeasureB","type":"localRace","location":"Alameda","raceName":"Measure B","raceDescription":"Alameda County. Recall rules. Passes with majority vote.","raceReadTheStory":"https://www.kqed.org/elections/results/alameda/measure-b","raceType":"yesNo","timeUpdated":"7:02 PM","dateUpdated":"April 1, 2024","totalVotes":282683,"candidates":[{"candidateName":"Yes","candidateIncumbent":false,"candidateParty":"","voteCount":182200},{"candidateName":"No","candidateIncumbent":false,"candidateParty":"","voteCount":100483}]},"AlamedaMeasureD":{"id":"AlamedaMeasureD","type":"localRace","location":"Alameda","raceName":"Measure D","raceDescription":"Oakland. Appropriations limit. Passes with majority vote.","raceReadTheStory":"","raceType":"yesNo","timeUpdated":"7:02 PM","dateUpdated":"April 1, 2024","totalVotes":79797,"candidates":[{"candidateName":"Yes","candidateIncumbent":false,"candidateParty":"","voteCount":59852},{"candidateName":"No","candidateIncumbent":false,"candidateParty":"","voteCount":19945}]},"AlamedaMeasureE":{"id":"AlamedaMeasureE","type":"localRace","location":"Alameda","raceName":"Measure E","raceDescription":"Alameda Unified School District. Parcel tax. Passes with 2/3 vote.","raceReadTheStory":"","raceType":"yesNo","timeUpdated":"7:02 PM","dateUpdated":"April 1, 2024","totalVotes":22692,"candidates":[{"candidateName":"Yes","candidateIncumbent":false,"candidateParty":"","voteCount":17280},{"candidateName":"No","candidateIncumbent":false,"candidateParty":"","voteCount":5412}]},"AlamedaMeasureF":{"id":"AlamedaMeasureF","type":"localRace","location":"Alameda","raceName":"Measure F","raceDescription":"Piedmont. Parcel tax. Passes with 2/3 vote.","raceReadTheStory":"","raceType":"yesNo","timeUpdated":"7:02 PM","dateUpdated":"April 1, 2024","totalVotes":4855,"candidates":[{"candidateName":"Yes","candidateIncumbent":false,"candidateParty":"","voteCount":3673},{"candidateName":"No","candidateIncumbent":false,"candidateParty":"","voteCount":1182}]},"AlamedaMeasureG":{"id":"AlamedaMeasureG","type":"localRace","location":"Alameda","raceName":"Measure G","raceDescription":"Albany Unified School District. Parcel tax. Passes with 2/3 vote. ","raceReadTheStory":"","raceType":"yesNo","timeUpdated":"7:02 PM","dateUpdated":"April 1, 2024","totalVotes":5898,"candidates":[{"candidateName":"Yes","candidateIncumbent":false,"candidateParty":"","voteCount":4651},{"candidateName":"No","candidateIncumbent":false,"candidateParty":"","voteCount":1247}]},"AlamedaMeasureH":{"id":"AlamedaMeasureH","type":"localRace","location":"Alameda","raceName":"Measure H","raceDescription":"Berkeley Unified School District. Parcel tax. Passes with 2/3 vote.","raceReadTheStory":"","raceType":"yesNo","timeUpdated":"7:02 PM","dateUpdated":"April 1, 2024","totalVotes":33331,"candidates":[{"candidateName":"Yes","candidateIncumbent":false,"candidateParty":"","voteCount":29418},{"candidateName":"No","candidateIncumbent":false,"candidateParty":"","voteCount":3913}]},"AlamedaMeasureI":{"id":"AlamedaMeasureI","type":"localRace","location":"Alameda","raceName":"Measure I","raceDescription":"Hayward Unified School District. School bond. Passes with 55% vote.","raceReadTheStory":"","raceType":"yesNo","timeUpdated":"7:02 PM","dateUpdated":"April 1, 2024","totalVotes":21929,"candidates":[{"candidateName":"Yes","candidateIncumbent":false,"candidateParty":"","voteCount":14151},{"candidateName":"No","candidateIncumbent":false,"candidateParty":"","voteCount":7778}]},"AlamedaMeasureJ":{"id":"AlamedaMeasureJ","type":"localRace","location":"Alameda","raceName":"Measure J","raceDescription":"San Leandro Unified School District. School bond. Passes with 55% vote.","raceReadTheStory":"","raceType":"yesNo","timeUpdated":"7:02 PM","dateUpdated":"April 1, 2024","totalVotes":12338,"candidates":[{"candidateName":"Yes","candidateIncumbent":false,"candidateParty":"","voteCount":7784},{"candidateName":"No","candidateIncumbent":false,"candidateParty":"","voteCount":4554}]},"CCD2":{"id":"CCD2","type":"localRace","location":"Contra Costa","raceName":"Board of Supervisors, District 2","raceDescription":"Candidate with majority vote wins seat. If no candidate reaches majority, top two candidates advance to runoff in general election.","raceReadTheStory":"","raceType":"yesNo","timeUpdated":"6:45 PM","dateUpdated":"March 28, 2024","totalVotes":45776,"candidates":[{"candidateName":"Candace Andersen","candidateIncumbent":true,"candidateParty":"","voteCount":45776}]},"CCD3":{"id":"CCD3","type":"localRace","location":"Contra Costa","raceName":"Board of Supervisors, District 3","raceDescription":"Candidate with majority vote wins seat. If no candidate reaches majority, top two candidates advance to runoff in general election.","raceReadTheStory":"","raceType":"top1","timeUpdated":"6:45 PM","dateUpdated":"March 28, 2024","totalVotes":25120,"candidates":[{"candidateName":"Diane Burgis","candidateIncumbent":true,"candidateParty":"","voteCount":25120}]},"CCD5":{"id":"CCD5","type":"localRace","location":"Contra Costa","raceName":"Board of Supervisors, District 5","raceDescription":"Candidate with majority vote wins seat. If no candidate reaches majority, top two candidates advance to runoff in general election.","raceReadTheStory":"https://www.kqed.org/elections/results/contracosta/supervisor-5th-district","raceType":"top2","timeUpdated":"6:45 PM","dateUpdated":"March 28, 2024","totalVotes":37045,"candidates":[{"candidateName":"Mike Barbanica","candidateIncumbent":false,"candidateParty":"","voteCount":14338},{"candidateName":"Jelani Killings","candidateIncumbent":false,"candidateParty":"","voteCount":5683},{"candidateName":"Shanelle Scales-Preston","candidateIncumbent":false,"candidateParty":"","voteCount":12993},{"candidateName":"Iztaccuauhtli Hector Gonzalez","candidateIncumbent":false,"candidateParty":"","voteCount":4031}]},"CCMeasureA":{"id":"CCMeasureA","type":"localRace","location":"Contra Costa","raceName":"Measure A","raceDescription":"Martinez. Appoint City Clerk. Passes with a majority vote.","raceReadTheStory":"","raceType":"yesNo","timeUpdated":"6:45 PM","dateUpdated":"March 28, 2024","totalVotes":11513,"candidates":[{"candidateName":"Yes","candidateIncumbent":false,"candidateParty":"","voteCount":7554},{"candidateName":"No","candidateIncumbent":false,"candidateParty":"","voteCount":3959}]},"CCMeasureB":{"id":"CCMeasureB","type":"localRace","location":"Contra Costa","raceName":"Measure B","raceDescription":"Antioch Unified School District. School bond. Passes with 55% vote.","raceReadTheStory":"","raceType":"yesNo","timeUpdated":"6:45 PM","dateUpdated":"March 28, 2024","totalVotes":17971,"candidates":[{"candidateName":"Yes","candidateIncumbent":false,"candidateParty":"","voteCount":10397},{"candidateName":"No","candidateIncumbent":false,"candidateParty":"","voteCount":7574}]},"CCMeasureC":{"id":"CCMeasureC","type":"localRace","location":"Contra Costa","raceName":"Measure C","raceDescription":"Martinez Unified School District. Parcel tax. Passes with 2/3 vote.","raceReadTheStory":"","raceType":"yesNo","timeUpdated":"6:45 PM","dateUpdated":"March 28, 2024","totalVotes":9230,"candidates":[{"candidateName":"Yes","candidateIncumbent":false,"candidateParty":"","voteCount":6917},{"candidateName":"No","candidateIncumbent":false,"candidateParty":"","voteCount":2313}]},"CCMeasureD":{"id":"CCMeasureD","type":"localRace","location":"Contra Costa","raceName":"Measure D","raceDescription":"Moraga School District. School bond. Passes with 55% vote.","raceReadTheStory":"","raceType":"yesNo","timeUpdated":"6:45 PM","dateUpdated":"March 28, 2024","totalVotes":6007,"candidates":[{"candidateName":"Yes","candidateIncumbent":false,"candidateParty":"","voteCount":4052},{"candidateName":"No","candidateIncumbent":false,"candidateParty":"","voteCount":1955}]},"MarinD2":{"id":"MarinD2","type":"localRace","location":"Marin","raceName":"Board of Supervisors, District 2","raceDescription":"Candidate with majority vote wins seat. If no candidate reaches majority, top two candidates advance to runoff in general election.","raceReadTheStory":"https://www.kqed.org/elections/results/marin/supervisor-2nd-district","raceType":"top2","timeUpdated":"6:54 PM","dateUpdated":"March 27, 2024","totalVotes":18466,"candidates":[{"candidateName":"Brian Colbert","candidateIncumbent":false,"candidateParty":"","voteCount":7971},{"candidateName":"Heather McPhail Sridharan","candidateIncumbent":false,"candidateParty":"","voteCount":4851},{"candidateName":"Ryan O'Neil","candidateIncumbent":false,"candidateParty":"","voteCount":2647},{"candidateName":"Gabe Paulson","candidateIncumbent":false,"candidateParty":"","voteCount":2997}]},"MarinD3":{"id":"MarinD3","type":"localRace","location":"Marin","raceName":"Board of Supervisors, District 3","raceDescription":"Candidate with majority vote wins seat. If no candidate reaches majority, top two candidates advance to runoff in general election.","raceReadTheStory":"","raceType":"top1","timeUpdated":"6:54 PM","dateUpdated":"March 27, 2024","totalVotes":13274,"candidates":[{"candidateName":"Stephanie Moulton-Peters","candidateIncumbent":true,"candidateParty":"","voteCount":13274}]},"MarinD4":{"id":"MarinD4","type":"localRace","location":"Marin","raceName":"Board of Supervisors, District 4","raceDescription":"Candidate with majority vote wins seat. If no candidate reaches majority, top two candidates advance to runoff in general election.","raceReadTheStory":"","raceType":"top1","timeUpdated":"6:54 PM","dateUpdated":"March 27, 2024","totalVotes":12986,"candidates":[{"candidateName":"Dennis Rodoni","candidateIncumbent":true,"candidateParty":"","voteCount":10086},{"candidateName":"Francis Drouillard","candidateIncumbent":false,"candidateParty":"","voteCount":2900}]},"MarinLarkspurCC":{"id":"MarinLarkspurCC","type":"localRace","location":"Marin","raceName":"Larkspur City Council (Short Term)","raceDescription":"Top candidate wins seat.","raceReadTheStory":"","raceType":"top1","timeUpdated":"6:54 PM","dateUpdated":"March 27, 2024","totalVotes":4176,"candidates":[{"candidateName":"Stephanie Andre","candidateIncumbent":false,"candidateParty":"","voteCount":2514},{"candidateName":"Claire Paquette","candidateIncumbent":false,"candidateParty":"","voteCount":1008},{"candidateName":"Lana Scott","candidateIncumbent":false,"candidateParty":"","voteCount":654}]},"MarinRossCouncil":{"id":"MarinRossCouncil","type":"localRace","location":"Marin","raceName":"Ross Town Council","raceDescription":"Top three candidates win seat.","raceReadTheStory":"","raceType":"top3","timeUpdated":"6:54 PM","dateUpdated":"March 27, 2024","totalVotes":1740,"candidates":[{"candidateName":"Charles William \"Bill\" Kircher, Jr.","candidateIncumbent":false,"candidateParty":"","voteCount":536},{"candidateName":"Mathew Salter","candidateIncumbent":false,"candidateParty":"","voteCount":502},{"candidateName":"Shadi Aboukhater","candidateIncumbent":false,"candidateParty":"","voteCount":187},{"candidateName":"Teri Dowling","candidateIncumbent":false,"candidateParty":"","voteCount":515}]},"MarinMeasureA":{"id":"MarinMeasureA","type":"localRace","location":"Marin","raceName":"Measure A","raceDescription":"Tamalpais Union High School District. School bond. Passes with 55% vote.","raceReadTheStory":"","raceType":"yesNo","timeUpdated":"6:54 PM","dateUpdated":"March 27, 2024","totalVotes":45345,"candidates":[{"candidateName":"Yes","candidateIncumbent":false,"candidateParty":"","voteCount":24376},{"candidateName":"No","candidateIncumbent":false,"candidateParty":"","voteCount":20969}]},"MarinMeasureB":{"id":"MarinMeasureB","type":"localRace","location":"Marin","raceName":"Measure B","raceDescription":"Petaluma Joint Union High School District. Parcel tax. Passes with 2/3 vote.","raceReadTheStory":"","raceType":"yesNo","timeUpdated":"6:54 PM","dateUpdated":"March 27, 2024","totalVotes":132,"candidates":[{"candidateName":"Yes","candidateIncumbent":false,"candidateParty":"","voteCount":62},{"candidateName":"No","candidateIncumbent":false,"candidateParty":"","voteCount":70}]},"MarinMeasureC":{"id":"MarinMeasureC","type":"localRace","location":"Marin","raceName":"Measure C","raceDescription":"Belvedere. Appropriation limit. Passes with majority vote.","raceReadTheStory":"","raceType":"yesNo","timeUpdated":"6:54 PM","dateUpdated":"March 27, 2024","totalVotes":870,"candidates":[{"candidateName":"Yes","candidateIncumbent":false,"candidateParty":"","voteCount":679},{"candidateName":"No","candidateIncumbent":false,"candidateParty":"","voteCount":191}]},"MarinMeasureD":{"id":"MarinMeasureD","type":"localRace","location":"Marin","raceName":"Measure D","raceDescription":"Larkspur. Rent stabilization. Passes with majority vote.","raceReadTheStory":"https://www.kqed.org/elections/results/marin/measure-d","raceType":"yesNo","timeUpdated":"6:54 PM","dateUpdated":"March 27, 2024","totalVotes":4955,"candidates":[{"candidateName":"Yes","candidateIncumbent":false,"candidateParty":"","voteCount":2573},{"candidateName":"No","candidateIncumbent":false,"candidateParty":"","voteCount":2382}]},"MarinMeasureE":{"id":"MarinMeasureE","type":"localRace","location":"Marin","raceName":"Measure E","raceDescription":"Ross. Special tax. Passes with 2/3 vote.","raceReadTheStory":"https://www.kqed.org/elections/results/marin/measure-e","raceType":"yesNo","timeUpdated":"6:54 PM","dateUpdated":"March 27, 2024","totalVotes":874,"candidates":[{"candidateName":"Yes","candidateIncumbent":false,"candidateParty":"","voteCount":683},{"candidateName":"No","candidateIncumbent":false,"candidateParty":"","voteCount":191}]},"MarinMeasureF":{"id":"MarinMeasureF","type":"localRace","location":"Marin","raceName":"Measure F","raceDescription":"San Anselmo. Flood Control and Water Conservation District. Passes with majority vote.","raceReadTheStory":"","raceType":"yesNo","timeUpdated":"6:54 PM","dateUpdated":"March 27, 2024","totalVotes":5193,"candidates":[{"candidateName":"Yes","candidateIncumbent":false,"candidateParty":"","voteCount":3083},{"candidateName":"No","candidateIncumbent":false,"candidateParty":"","voteCount":2110}]},"MarinMeasureG":{"id":"MarinMeasureG","type":"localRace","location":"Marin","raceName":"Measure G","raceDescription":"Bel Marin Keys Community Services District. Special tax. Passes with 2/3 vote.","raceReadTheStory":"","raceType":"yesNo","timeUpdated":"6:54 PM","dateUpdated":"March 27, 2024","totalVotes":830,"candidates":[{"candidateName":"Yes","candidateIncumbent":false,"candidateParty":"","voteCount":661},{"candidateName":"No","candidateIncumbent":false,"candidateParty":"","voteCount":169}]},"MarinMeasureH":{"id":"MarinMeasureH","type":"localRace","location":"Marin","raceName":"Measure H","raceDescription":"Marinwood Community Services District. Appropriations limit, fire protection. Passes with a majority vote.","raceReadTheStory":"","raceType":"yesNo","timeUpdated":"6:54 PM","dateUpdated":"March 27, 2024","totalVotes":1738,"candidates":[{"candidateName":"Yes","candidateIncumbent":false,"candidateParty":"","voteCount":1369},{"candidateName":"No","candidateIncumbent":false,"candidateParty":"","voteCount":369}]},"MarinMeasureI":{"id":"MarinMeasureI","type":"localRace","location":"Marin","raceName":"Measure I","raceDescription":"Marinwood Community Services District. Appropriations limit, parks. Passes with a majority vote.","raceReadTheStory":"","raceType":"yesNo","timeUpdated":"6:54 PM","dateUpdated":"March 27, 2024","totalVotes":1735,"candidates":[{"candidateName":"Yes","candidateIncumbent":false,"candidateParty":"","voteCount":1336},{"candidateName":"No","candidateIncumbent":false,"candidateParty":"","voteCount":399}]},"NapaD2":{"id":"NapaD2","type":"localRace","location":"Napa","raceName":"Board of Supervisors, District 2","raceDescription":"Candidate with majority vote wins seat. If no candidate reaches majority, top two candidates advance to runoff in general election.","raceReadTheStory":"","raceType":"top1","timeUpdated":"6:50 PM","dateUpdated":"April 3, 2024","totalVotes":8351,"candidates":[{"candidateName":"Liz Alessio","candidateIncumbent":false,"candidateParty":"","voteCount":6340},{"candidateName":"Doris Gentry","candidateIncumbent":false,"candidateParty":"","voteCount":2011}]},"NapaD4":{"id":"NapaD4","type":"localRace","location":"Napa","raceName":"Board of Supervisors, District 4","raceDescription":"Candidate with majority vote wins seat. If no candidate reaches majority, top two candidates advance to runoff in general election.","raceReadTheStory":"https://www.kqed.org/elections/results/napa/supervisor-4th-district","raceType":"top1","timeUpdated":"6:50 PM","dateUpdated":"April 3, 2024","totalVotes":7306,"candidates":[{"candidateName":"Amber Manfree","candidateIncumbent":false,"candidateParty":"","voteCount":3913},{"candidateName":"Pete Mott","candidateIncumbent":false,"candidateParty":"","voteCount":3393}]},"NapaD5":{"id":"NapaD5","type":"localRace","location":"Napa","raceName":"Board of Supervisors, District 5","raceDescription":"Candidate with majority vote wins seat. If no candidate reaches majority, top two candidates advance to runoff in general election.","raceReadTheStory":"https://www.kqed.org/elections/results/napa/supervisor-5th-district","raceType":"top1","timeUpdated":"6:50 PM","dateUpdated":"April 3, 2024","totalVotes":5356,"candidates":[{"candidateName":"Mariam Aboudamous","candidateIncumbent":false,"candidateParty":"","voteCount":2379},{"candidateName":"Belia Ramos","candidateIncumbent":true,"candidateParty":"","voteCount":2977}]},"NapaMeasureD":{"id":"NapaMeasureD","type":"localRace","location":"Napa","raceName":"Measure D","raceDescription":"Howell Mountain Elementary School District. School bond. Passes with 55% vote.","raceReadTheStory":"","raceType":"yesNo","timeUpdated":"6:50 PM","dateUpdated":"April 3, 2024","totalVotes":741,"candidates":[{"candidateName":"Yes","candidateIncumbent":false,"candidateParty":"","voteCount":367},{"candidateName":"No","candidateIncumbent":false,"candidateParty":"","voteCount":374}]},"NapaMeasureU":{"id":"NapaMeasureU","type":"localRace","location":"Napa","raceName":"Measure U","raceDescription":"Lake Berryessa Resort Improvement District. Appropriations limit. Passes with majority vote. ","raceReadTheStory":"","raceType":"yesNo","timeUpdated":"6:50 PM","dateUpdated":"April 3, 2024","totalVotes":86,"candidates":[{"candidateName":"Yes","candidateIncumbent":false,"candidateParty":"","voteCount":63},{"candidateName":"No","candidateIncumbent":false,"candidateParty":"","voteCount":23}]},"NapaMeasureU1":{"id":"NapaMeasureU1","type":"localRace","location":"Napa","raceName":"Measure U","raceDescription":"Yountville. Appropriations limit. Passes with majority vote. ","raceReadTheStory":"","raceType":"yesNo","timeUpdated":"6:50 PM","dateUpdated":"April 3, 2024","totalVotes":925,"candidates":[{"candidateName":"Yes","candidateIncumbent":false,"candidateParty":"","voteCount":793},{"candidateName":"No","candidateIncumbent":false,"candidateParty":"","voteCount":132}]},"SFJudge1":{"id":"SFJudge1","type":"localRace","location":"San Francisco","raceName":"Superior Court Judge, Seat 1","raceDescription":"Candidate with majority vote wins seat. If no candidate reaches majority, top two candidates advance to runoff in general election.","raceReadTheStory":"https://www.kqed.org/elections/results/sanfrancisco/superior-court-seat-1","raceType":"top1","timeUpdated":"6:50 PM","dateUpdated":"March 21, 2024","totalVotes":202960,"candidates":[{"candidateName":"Michael Begert","candidateIncumbent":true,"candidateParty":"","voteCount":124943},{"candidateName":"Chip Zecher","candidateIncumbent":false,"candidateParty":"","voteCount":78017}]},"SFJudge13":{"id":"SFJudge13","type":"localRace","location":"San Francisco","raceName":"Superior Court Judge, Seat 13","raceDescription":"Candidate with majority vote wins seat. If no candidate reaches majority, top two candidates advance to runoff in general election.","raceReadTheStory":"https://www.kqed.org/elections/results/sanfrancisco/superior-court-seat-13","raceType":"top1","timeUpdated":"6:50 PM","dateUpdated":"March 21, 2024","totalVotes":202386,"candidates":[{"candidateName":"Jean Myungjin Roland","candidateIncumbent":false,"candidateParty":"","voteCount":90012},{"candidateName":"Patrick S. Thompson","candidateIncumbent":true,"candidateParty":"","voteCount":112374}]},"SFPropA":{"id":"SFPropA","type":"localRace","location":"San Francisco","raceName":"Proposition A","raceDescription":"Housing bond. Passes with 2/3 vote.","raceReadTheStory":"https://www.kqed.org/elections/results/sanfrancisco/proposition-a","raceType":"yesNo","timeUpdated":"6:50 PM","dateUpdated":"March 21, 2024","totalVotes":225187,"candidates":[{"candidateName":"Yes","candidateIncumbent":false,"candidateParty":"","voteCount":158497},{"candidateName":"No","candidateIncumbent":false,"candidateParty":"","voteCount":66690}]},"SFPropB":{"id":"SFPropB","type":"localRace","location":"San Francisco","raceName":"Proposition B","raceDescription":"Police staffing. Passes with majority vote.","raceReadTheStory":"","raceType":"yesNo","timeUpdated":"6:50 PM","dateUpdated":"March 21, 2024","totalVotes":222954,"candidates":[{"candidateName":"Yes","candidateIncumbent":false,"candidateParty":"","voteCount":61580},{"candidateName":"No","candidateIncumbent":false,"candidateParty":"","voteCount":161374}]},"SFPropC":{"id":"SFPropC","type":"localRace","location":"San Francisco","raceName":"Proposition C","raceDescription":"Transfer tax exemption. Passes with majority vote.","raceReadTheStory":"","raceType":"yesNo","timeUpdated":"6:50 PM","dateUpdated":"March 21, 2024","totalVotes":220349,"candidates":[{"candidateName":"Yes","candidateIncumbent":false,"candidateParty":"","voteCount":116311},{"candidateName":"No","candidateIncumbent":false,"candidateParty":"","voteCount":104038}]},"SFPropD":{"id":"SFPropD","type":"localRace","location":"San Francisco","raceName":"Proposition D","raceDescription":"Ethics laws. Passes with majority vote.","raceReadTheStory":"","raceType":"yesNo","timeUpdated":"6:50 PM","dateUpdated":"March 21, 2024","totalVotes":222615,"candidates":[{"candidateName":"Yes","candidateIncumbent":false,"candidateParty":"","voteCount":198584},{"candidateName":"No","candidateIncumbent":false,"candidateParty":"","voteCount":24031}]},"SFPropE":{"id":"SFPropE","type":"localRace","location":"San Francisco","raceName":"Proposition E","raceDescription":"Police policies. Passes with majority vote.","raceReadTheStory":"https://www.kqed.org/elections/results/sanfrancisco/proposition-e","raceType":"yesNo","timeUpdated":"6:50 PM","dateUpdated":"March 21, 2024","totalVotes":222817,"candidates":[{"candidateName":"Yes","candidateIncumbent":false,"candidateParty":"","voteCount":120529},{"candidateName":"No","candidateIncumbent":false,"candidateParty":"","voteCount":102288}]},"SFPropF":{"id":"SFPropF","type":"localRace","location":"San Francisco","raceName":"Proposition F","raceDescription":"Drug screening. Passes with majority vote.","raceReadTheStory":"https://www.kqed.org/elections/results/sanfrancisco/proposition-f","raceType":"yesNo","timeUpdated":"6:50 PM","dateUpdated":"March 21, 2024","totalVotes":224004,"candidates":[{"candidateName":"Yes","candidateIncumbent":false,"candidateParty":"","voteCount":130214},{"candidateName":"No","candidateIncumbent":false,"candidateParty":"","voteCount":93790}]},"SFPropG":{"id":"SFPropG","type":"localRace","location":"San Francisco","raceName":"Proposition G","raceDescription":"Eighth-grade algebra. Passes with majority vote.","raceReadTheStory":"","raceType":"yesNo","timeUpdated":"6:50 PM","dateUpdated":"March 21, 2024","totalVotes":222704,"candidates":[{"candidateName":"Yes","candidateIncumbent":false,"candidateParty":"","voteCount":182066},{"candidateName":"No","candidateIncumbent":false,"candidateParty":"","voteCount":40638}]},"SMJudge4":{"id":"SMJudge4","type":"localRace","location":"San Mateo","raceName":"Superior Court Judge, Office 4","raceDescription":"Candidate with majority vote wins seat. If no candidate reaches majority, top two candidates advance to runoff in general election.","raceReadTheStory":"","raceType":"top1","timeUpdated":"6:56 PM","dateUpdated":"April 4, 2024","totalVotes":108919,"candidates":[{"candidateName":"Sarah Burdick","candidateIncumbent":false,"candidateParty":"","voteCount":108919}]},"SMD1":{"id":"SMD1","type":"localRace","location":"San Mateo","raceName":"Board of Supervisors, District 1","raceDescription":"Candidate with majority vote wins seat. If no candidate reaches majority, top two candidates advance to runoff in general election.","raceReadTheStory":"https://www.kqed.org/elections/results/sanmateo/supervisor-1st-district","raceType":"top1","timeUpdated":"6:56 PM","dateUpdated":"April 4, 2024","totalVotes":29650,"candidates":[{"candidateName":"Jackie Speier","candidateIncumbent":false,"candidateParty":"","voteCount":20353},{"candidateName":"Ann Schneider","candidateIncumbent":false,"candidateParty":"","voteCount":9297}]},"SMD4":{"id":"SMD4","type":"localRace","location":"San Mateo","raceName":"Board of Supervisors, District 4","raceDescription":"Candidate with majority vote wins seat. If no candidate reaches majority, top two candidates advance to runoff in general election.","raceReadTheStory":"https://www.kqed.org/elections/results/sanmateo/supervisor-4th-district","raceType":"top2","timeUpdated":"6:56 PM","dateUpdated":"April 4, 2024","totalVotes":22725,"candidates":[{"candidateName":"Antonio Lopez","candidateIncumbent":false,"candidateParty":"","voteCount":5730},{"candidateName":"Lisa Gauthier","candidateIncumbent":false,"candidateParty":"","voteCount":10358},{"candidateName":"Celeste Brevard","candidateIncumbent":false,"candidateParty":"","voteCount":1268},{"candidateName":"Paul Bocanegra","candidateIncumbent":false,"candidateParty":"","voteCount":1909},{"candidateName":"Maggie Cornejo","candidateIncumbent":false,"candidateParty":"","voteCount":3460}]},"SMD5":{"id":"SMD5","type":"localRace","location":"San Mateo","raceName":"Board of Supervisors, District 5","raceDescription":"Candidate with majority vote wins seat. If no candidate reaches majority, top two candidates advance to runoff in general election.","raceReadTheStory":"","raceType":"top1","timeUpdated":"6:56 PM","dateUpdated":"April 4, 2024","totalVotes":19937,"candidates":[{"candidateName":"David Canepa","candidateIncumbent":true,"candidateParty":"","voteCount":19937}]},"SMMeasureB":{"id":"SMMeasureB","type":"localRace","location":"San Mateo","raceName":"Measure B","raceDescription":"County Service Area #1 (Highlands). Special tax. Passes with 2/3 vote.","raceReadTheStory":"","raceType":"yesNo","timeUpdated":"6:56 PM","dateUpdated":"April 4, 2024","totalVotes":1549,"candidates":[{"candidateName":"Yes","candidateIncumbent":false,"candidateParty":"","voteCount":1360},{"candidateName":"No","candidateIncumbent":false,"candidateParty":"","voteCount":189}]},"SMMeasureC":{"id":"SMMeasureC","type":"localRace","location":"San Mateo","raceName":"Measure C","raceDescription":"Jefferson Elementary School District. Parcel tax. Passes with 2/3 vote","raceReadTheStory":"","raceType":"yesNo","timeUpdated":"6:56 PM","dateUpdated":"April 4, 2024","totalVotes":12234,"candidates":[{"candidateName":"Yes","candidateIncumbent":false,"candidateParty":"","voteCount":8543},{"candidateName":"No","candidateIncumbent":false,"candidateParty":"","voteCount":3691}]},"SMMeasureE":{"id":"SMMeasureE","type":"localRace","location":"San Mateo","raceName":"Measure E","raceDescription":"Woodside Elementary School District. School bond. Passes with 55% vote.","raceReadTheStory":"","raceType":"yesNo","timeUpdated":"6:56 PM","dateUpdated":"April 4, 2024","totalVotes":1392,"candidates":[{"candidateName":"Yes","candidateIncumbent":false,"candidateParty":"","voteCount":910},{"candidateName":"No","candidateIncumbent":false,"candidateParty":"","voteCount":482}]},"SMMeasureG":{"id":"SMMeasureG","type":"localRace","location":"San Mateo","raceName":"Measure G","raceDescription":"Pacifica School District. School bond. Passes with 55% vote.","raceReadTheStory":"","raceType":"yesNo","timeUpdated":"6:56 PM","dateUpdated":"April 4, 2024","totalVotes":11548,"candidates":[{"candidateName":"Yes","candidateIncumbent":false,"candidateParty":"","voteCount":7067},{"candidateName":"No","candidateIncumbent":false,"candidateParty":"","voteCount":4481}]},"SMMeasureH":{"id":"SMMeasureH","type":"localRace","location":"San Mateo","raceName":"Measure H","raceDescription":"San Carlos School District. School bond. Passes with 55% vote.","raceReadTheStory":"","raceType":"yesNo","timeUpdated":"6:56 PM","dateUpdated":"April 4, 2024","totalVotes":9938,"candidates":[{"candidateName":"Yes","candidateIncumbent":false,"candidateParty":"","voteCount":6283},{"candidateName":"No","candidateIncumbent":false,"candidateParty":"","voteCount":3655}]},"SCJudge5":{"id":"SCJudge5","type":"localRace","location":"Santa Clara","raceName":"Superior Court Judge, Office 5","raceDescription":"Candidate with majority vote wins seat. If no candidate reaches majority, top two candidates advance to runoff in general election.","raceReadTheStory":"","raceType":"top1","timeUpdated":"7:05 PM","dateUpdated":"April 4, 2024","totalVotes":301953,"candidates":[{"candidateName":"Jay Boyarsky","candidateIncumbent":false,"candidateParty":"","voteCount":142549},{"candidateName":"Nicole M. Ford","candidateIncumbent":false,"candidateParty":"","voteCount":52147},{"candidateName":"Johnene Linda Stebbins","candidateIncumbent":false,"candidateParty":"","voteCount":107257}]},"SCD2":{"id":"SCD2","type":"localRace","location":"Santa Clara","raceName":"Board of Supervisors, District 2","raceDescription":"Candidate with majority vote wins seat. If no candidate reaches majority, top two candidates advance to runoff in general election.","raceReadTheStory":"https://www.kqed.org/elections/results/santaclara/supervisor-2nd-district","raceType":"top2","timeUpdated":"7:05 PM","dateUpdated":"April 4, 2024","totalVotes":44059,"candidates":[{"candidateName":"Corina Herrera-Loera","candidateIncumbent":false,"candidateParty":"","voteCount":10519},{"candidateName":"Jennifer Margaret Celaya","candidateIncumbent":false,"candidateParty":"","voteCount":2394},{"candidateName":"Madison Nguyen","candidateIncumbent":false,"candidateParty":"","voteCount":12794},{"candidateName":"Betty Duong","candidateIncumbent":false,"candidateParty":"","voteCount":14031},{"candidateName":"Nelson McElmurry","candidateIncumbent":false,"candidateParty":"","voteCount":4321}]},"SCD3":{"id":"SCD3","type":"localRace","location":"Santa Clara","raceName":"Board of Supervisors, District 3","raceDescription":"Candidate with majority vote wins seat. If no candidate reaches majority, top two candidates advance to runoff in general election.","raceReadTheStory":"","raceType":"top1","timeUpdated":"7:05 PM","dateUpdated":"April 4, 2024","totalVotes":42549,"candidates":[{"candidateName":"Otto Lee","candidateIncumbent":true,"candidateParty":"","voteCount":42549}]},"SCD5":{"id":"SCD5","type":"localRace","location":"Santa Clara","raceName":"Board of Supervisors, District 5","raceDescription":"Candidate with majority vote wins seat. If no candidate reaches majority, top two candidates advance to runoff in general election.","raceReadTheStory":"https://www.kqed.org/elections/results/santaclara/supervisor-5th-district","raceType":"top2","timeUpdated":"7:05 PM","dateUpdated":"April 4, 2024","totalVotes":88712,"candidates":[{"candidateName":"Margaret Abe-Koga","candidateIncumbent":false,"candidateParty":"","voteCount":37172},{"candidateName":"Sally J. Lieber","candidateIncumbent":false,"candidateParty":"","voteCount":21962},{"candidateName":"Barry Chang","candidateIncumbent":false,"candidateParty":"","voteCount":6164},{"candidateName":"Peter C. Fung","candidateIncumbent":false,"candidateParty":"","voteCount":17892},{"candidateName":"Sandy Sans","candidateIncumbent":false,"candidateParty":"","voteCount":5522}]},"SCSJMayor":{"id":"SCSJMayor","type":"localRace","location":"Santa Clara","raceName":"San José Mayor","raceDescription":"Candidate with majority vote wins seat. If no candidate reaches majority, top two candidates advance to runoff in general election.","raceReadTheStory":"","raceType":"top1","timeUpdated":"7:05 PM","dateUpdated":"April 4, 2024","totalVotes":167064,"candidates":[{"candidateName":"Matt Mahan","candidateIncumbent":true,"candidateParty":"","voteCount":144701},{"candidateName":"Tyrone Wade","candidateIncumbent":false,"candidateParty":"","voteCount":22363}]},"SCSJD2":{"id":"SCSJD2","type":"localRace","location":"Santa Clara","raceName":"San José City Council, District 2","raceDescription":"Candidate with majority vote wins seat. If no candidate reaches majority, top two candidates advance to runoff in general election.","raceReadTheStory":"","raceType":"top2","timeUpdated":"7:05 PM","dateUpdated":"April 4, 2024","totalVotes":14131,"candidates":[{"candidateName":"Joe Lopez","candidateIncumbent":false,"candidateParty":"","voteCount":4950},{"candidateName":"Pamela Campos","candidateIncumbent":false,"candidateParty":"","voteCount":3436},{"candidateName":"Vanessa Sandoval","candidateIncumbent":false,"candidateParty":"","voteCount":2719},{"candidateName":"Babu Prasad","candidateIncumbent":false,"candidateParty":"","voteCount":3026}]},"SCSJD4":{"id":"SCSJD4","type":"localRace","location":"Santa Clara","raceName":"San José City Council, District 4","raceDescription":"Candidate with majority vote wins seat. If no candidate reaches majority, top two candidates advance to runoff in general election.","raceReadTheStory":"","raceType":"top1","timeUpdated":"7:05 PM","dateUpdated":"April 4, 2024","totalVotes":14322,"candidates":[{"candidateName":"Kansen Chu","candidateIncumbent":false,"candidateParty":"","voteCount":5931},{"candidateName":"David Cohen","candidateIncumbent":true,"candidateParty":"","voteCount":8391}]},"SCSJD6":{"id":"SCSJD6","type":"localRace","location":"Santa Clara","raceName":"San José City Council, District 6","raceDescription":"Candidate with majority vote wins seat. If no candidate reaches majority, top two candidates advance to runoff in general election.","raceReadTheStory":"","raceType":"top2","timeUpdated":"7:05 PM","dateUpdated":"April 4, 2024","totalVotes":25108,"candidates":[{"candidateName":"David Cohen","candidateIncumbent":false,"candidateParty":"","voteCount":9875},{"candidateName":"Alex Shoor","candidateIncumbent":false,"candidateParty":"","voteCount":3850},{"candidateName":"Angelo \"A.J.\" Pasciuti","candidateIncumbent":false,"candidateParty":"","voteCount":2688},{"candidateName":"Michael Mulcahy","candidateIncumbent":false,"candidateParty":"","voteCount":8695}]},"SCSJD8":{"id":"SCSJD8","type":"localRace","location":"Santa Clara","raceName":"San José City Council, District 8","raceDescription":"Candidate with majority vote wins seat. If no candidate reaches majority, top two candidates advance to runoff in general election.","raceReadTheStory":"","raceType":"top2","timeUpdated":"7:05 PM","dateUpdated":"April 4, 2024","totalVotes":21462,"candidates":[{"candidateName":"Tam Truong","candidateIncumbent":false,"candidateParty":"","voteCount":6982},{"candidateName":"Domingo Candelas","candidateIncumbent":true,"candidateParty":"","voteCount":8466},{"candidateName":"Sukhdev Singh Bainiwal","candidateIncumbent":false,"candidateParty":"","voteCount":5513},{"candidateName":"Surinder Kaur Dhaliwal","candidateIncumbent":false,"candidateParty":"","voteCount":501}]},"SCSJD10":{"id":"SCSJD10","type":"localRace","location":"Santa Clara","raceName":"San José City Council, District 10","raceDescription":"Candidate with majority vote wins seat. If no candidate reaches majority, top two candidates advance to runoff in general election.","raceReadTheStory":"","raceType":"top2","timeUpdated":"7:05 PM","dateUpdated":"April 4, 2024","totalVotes":22799,"candidates":[{"candidateName":"George Casey","candidateIncumbent":false,"candidateParty":"","voteCount":8805},{"candidateName":"Arjun Batra","candidateIncumbent":true,"candidateParty":"","voteCount":8354},{"candidateName":"Lenka Wright","candidateIncumbent":false,"candidateParty":"","voteCount":5640}]},"SCMeasureA":{"id":"SCMeasureA","type":"localRace","location":"Santa Clara","raceName":"Measure A","raceDescription":"Santa Clara. Appointed city clerk. Passes with majority vote.","raceReadTheStory":"","raceType":"yesNo","timeUpdated":"7:05 PM","dateUpdated":"April 4, 2024","totalVotes":20315,"candidates":[{"candidateName":"Yes","candidateIncumbent":false,"candidateParty":"","voteCount":6580},{"candidateName":"No","candidateIncumbent":false,"candidateParty":"","voteCount":13735}]},"SCMeasureB":{"id":"SCMeasureB","type":"localRace","location":"Santa Clara","raceName":"Measure B","raceDescription":"Santa Clara. Appointed police chief. Passes with majority vote.","raceReadTheStory":"","raceType":"yesNo","timeUpdated":"7:05 PM","dateUpdated":"April 4, 2024","totalVotes":20567,"candidates":[{"candidateName":"Yes","candidateIncumbent":false,"candidateParty":"","voteCount":5680},{"candidateName":"No","candidateIncumbent":false,"candidateParty":"","voteCount":14887}]},"SCMeasureC":{"id":"SCMeasureC","type":"localRace","location":"Santa Clara","raceName":"Measure C","raceDescription":"Sunnyvale School District. School bond. Passes with 55% vote.","raceReadTheStory":"","raceType":"yesNo","timeUpdated":"7:05 PM","dateUpdated":"April 4, 2024","totalVotes":14656,"candidates":[{"candidateName":"Yes","candidateIncumbent":false,"candidateParty":"","voteCount":10261},{"candidateName":"No","candidateIncumbent":false,"candidateParty":"","voteCount":4395}]},"SolanoD15":{"id":"SolanoD15","type":"localRace","location":"Solano","raceName":"Superior Court Judge, Department 15","raceDescription":"Candidate with majority vote wins seat. If no candidate reaches majority, top two candidates advance to runoff in general election.","raceReadTheStory":"","raceType":"","timeUpdated":"7:08 PM","dateUpdated":"March 28, 2024","totalVotes":81709,"candidates":[{"candidateName":"Mike Thompson","candidateIncumbent":false,"candidateParty":"","voteCount":36844},{"candidateName":"Bryan J. Kim","candidateIncumbent":false,"candidateParty":"","voteCount":44865}]},"SolanoD1":{"id":"SolanoD1","type":"localRace","location":"Solano","raceName":"Board of Supervisors, District 1","raceDescription":"Candidate with majority vote wins seat. If no candidate reaches majority, top two candidates advance to runoff in general election.","raceReadTheStory":"https://www.kqed.org/elections/results/solano/supervisor-1st-district","raceType":"","timeUpdated":"7:08 PM","dateUpdated":"March 28, 2024","totalVotes":13786,"candidates":[{"candidateName":"Michael Wilson","candidateIncumbent":false,"candidateParty":"","voteCount":6401},{"candidateName":"Cassandra James","candidateIncumbent":false,"candidateParty":"","voteCount":7385}]},"SolanoD2":{"id":"SolanoD2","type":"localRace","location":"Solano","raceName":"Board of Supervisors, District 2","raceDescription":"Candidate with majority vote wins seat. If no candidate reaches majority, top two candidates advance to runoff in general election.","raceReadTheStory":"","raceType":"","timeUpdated":"7:08 PM","dateUpdated":"March 28, 2024","totalVotes":19903,"candidates":[{"candidateName":"Monica Brown","candidateIncumbent":true,"candidateParty":"","voteCount":10951},{"candidateName":"Nora Dizon","candidateIncumbent":false,"candidateParty":"","voteCount":3135},{"candidateName":"Rochelle Sherlock","candidateIncumbent":false,"candidateParty":"","voteCount":5817}]},"SolanoD5":{"id":"SolanoD5","type":"localRace","location":"Solano","raceName":"Board of Supervisors, District 5","raceDescription":"Candidate with majority vote wins seat. If no candidate reaches majority, top two candidates advance to runoff in general election.","raceReadTheStory":"","raceType":"","timeUpdated":"7:08 PM","dateUpdated":"March 28, 2024","totalVotes":17888,"candidates":[{"candidateName":"Mitch Mashburn","candidateIncumbent":true,"candidateParty":"","voteCount":11210},{"candidateName":"Chadwick J. Ledoux","candidateIncumbent":false,"candidateParty":"","voteCount":6678}]},"SolanoEducation":{"id":"SolanoEducation","type":"localRace","location":"Solano","raceName":"Sacramento County Board of Education","raceDescription":"Candidate with majority vote wins seat. If no candidate reaches majority, top two candidates advance to runoff in general election.","raceReadTheStory":"","raceType":"","timeUpdated":"7:08 PM","dateUpdated":"March 28, 2024","totalVotes":3650,"candidates":[{"candidateName":"Heather Davis","candidateIncumbent":true,"candidateParty":"","voteCount":2960},{"candidateName":"Shazleen Khan","candidateIncumbent":false,"candidateParty":"","voteCount":690}]},"SolanoMeasureA":{"id":"SolanoMeasureA","type":"localRace","location":"Solano","raceName":"Measure A","raceDescription":"Benicia. Hotel tax. Passes with majority vote.","raceReadTheStory":"https://www.kqed.org/elections/results/solano/measure-a","raceType":"yesNo","timeUpdated":"7:08 PM","dateUpdated":"March 28, 2024","totalVotes":10136,"candidates":[{"candidateName":"Yes","candidateIncumbent":false,"candidateParty":"","voteCount":7869},{"candidateName":"No","candidateIncumbent":false,"candidateParty":"","voteCount":2267}]},"SolanoMeasureB":{"id":"SolanoMeasureB","type":"localRace","location":"Solano","raceName":"Measure B","raceDescription":"Benicia. Sales tax. Passes with majority vote.","raceReadTheStory":"https://www.kqed.org/elections/results/solano/measure-b","raceType":"yesNo","timeUpdated":"7:08 PM","dateUpdated":"March 28, 2024","totalVotes":10164,"candidates":[{"candidateName":"Yes","candidateIncumbent":false,"candidateParty":"","voteCount":7335},{"candidateName":"No","candidateIncumbent":false,"candidateParty":"","voteCount":2829}]},"SolanoMeasureC":{"id":"SolanoMeasureC","type":"localRace","location":"Solano","raceName":"Measure C","raceDescription":"Benicia Unified School District. School bond. Passes with 55% vote.","raceReadTheStory":"","raceType":"yesNo","timeUpdated":"7:08 PM","dateUpdated":"March 28, 2024","totalVotes":10112,"candidates":[{"candidateName":"Yes","candidateIncumbent":false,"candidateParty":"","voteCount":6316},{"candidateName":"No","candidateIncumbent":false,"candidateParty":"","voteCount":3796}]},"SolanoMeasureN":{"id":"SolanoMeasureN","type":"localRace","location":"Solano","raceName":"Measure N","raceDescription":"Davis Joint Unified School District. Parcel tax. Passes with 2/3 vote.","raceReadTheStory":"","raceType":"yesNo","timeUpdated":"7:08 PM","dateUpdated":"March 28, 2024","totalVotes":15,"candidates":[{"candidateName":"Yes","candidateIncumbent":false,"candidateParty":"","voteCount":5},{"candidateName":"No","candidateIncumbent":false,"candidateParty":"","voteCount":10}]},"SonomaJudge3":{"id":"SonomaJudge3","type":"localRace","location":"Sonoma","raceName":"Superior Court Judge, Office 3","raceDescription":"Candidate with majority vote wins seat. If no candidate reaches majority, top two candidates advance to runoff in general election.","raceReadTheStory":"","raceType":"top1","timeUpdated":"6:51 PM","dateUpdated":"March 29, 2024","totalVotes":115405,"candidates":[{"candidateName":"Kristine M. Burk","candidateIncumbent":false,"candidateParty":"","voteCount":79498},{"candidateName":"Beki Berrey","candidateIncumbent":false,"candidateParty":"","voteCount":35907}]},"SonomaJudge4":{"id":"SonomaJudge4","type":"localRace","location":"Sonoma","raceName":"Superior Court Judge, Office 4","raceDescription":"Candidate with majority vote wins seat. If no candidate reaches majority, top two candidates advance to runoff in general election.","raceReadTheStory":"","raceType":"top1","timeUpdated":"6:51 PM","dateUpdated":"March 29, 2024","totalVotes":86789,"candidates":[{"candidateName":"Paul J. Lozada","candidateIncumbent":false,"candidateParty":"","voteCount":86789}]},"SonomaJudge6":{"id":"SonomaJudge6","type":"localRace","location":"Sonoma","raceName":"Superior Court Judge, Office 6","raceDescription":"Candidate with majority vote wins seat. If no candidate reaches majority, top two candidates advance to runoff in general election.","raceReadTheStory":"","raceType":"top1","timeUpdated":"6:51 PM","dateUpdated":"March 29, 2024","totalVotes":117990,"candidates":[{"candidateName":"Omar Figueroa","candidateIncumbent":false,"candidateParty":"","voteCount":42236},{"candidateName":"Kenneth English","candidateIncumbent":false,"candidateParty":"","voteCount":75754}]},"SonomaD1":{"id":"SonomaD1","type":"localRace","location":"Sonoma","raceName":"Board of Supervisors, District 1","raceDescription":"Candidate with majority vote wins seat. If no candidate reaches majority, top two candidates advance to runoff in general election.","raceReadTheStory":"","raceType":"top1","timeUpdated":"6:51 PM","dateUpdated":"March 29, 2024","totalVotes":30348,"candidates":[{"candidateName":"Rebecca Hermosillo","candidateIncumbent":false,"candidateParty":"","voteCount":23958},{"candidateName":"Jonathan Mathieu","candidateIncumbent":false,"candidateParty":"","voteCount":6390}]},"SonomaD3":{"id":"SonomaD3","type":"localRace","location":"Sonoma","raceName":"Board of Supervisors, District 3","raceDescription":"Candidate with majority vote wins seat. If no candidate reaches majority, top two candidates advance to runoff in general election.","raceReadTheStory":"https://www.kqed.org/elections/results/sonoma/supervisor-3rd-district","raceType":"top1","timeUpdated":"6:51 PM","dateUpdated":"March 29, 2024","totalVotes":16312,"candidates":[{"candidateName":"Chris Coursey","candidateIncumbent":true,"candidateParty":"","voteCount":11346},{"candidateName":"Omar Medina","candidateIncumbent":false,"candidateParty":"","voteCount":4966}]},"SonomaD5":{"id":"SonomaD5","type":"localRace","location":"Sonoma","raceName":"Board of Supervisors, District 5","raceDescription":"Candidate with majority vote wins seat. If no candidate reaches majority, top two candidates advance to runoff in general election.","raceReadTheStory":"","raceType":"top1","timeUpdated":"6:51 PM","dateUpdated":"March 29, 2024","totalVotes":23356,"candidates":[{"candidateName":"Lynda Hopkins","candidateIncumbent":true,"candidateParty":"","voteCount":23356}]},"SonomaMeasureA":{"id":"SonomaMeasureA","type":"localRace","location":"Sonoma","raceName":"Measure A","raceDescription":"Cotati-Rohnert Park Unified School District. Parcel tax. Passes with 2/3 vote.","raceReadTheStory":"","raceType":"yesNo","timeUpdated":"6:51 PM","dateUpdated":"March 29, 2024","totalVotes":13756,"candidates":[{"candidateName":"Yes","candidateIncumbent":false,"candidateParty":"","voteCount":10320},{"candidateName":"No","candidateIncumbent":false,"candidateParty":"","voteCount":3436}]},"SonomaMeasureB":{"id":"SonomaMeasureB","type":"localRace","location":"Sonoma","raceName":"Measure B","raceDescription":"Petaluma Joint Union High School District. Parcel tax. Passes with 2/3 vote.","raceReadTheStory":"","raceType":"yesNo","timeUpdated":"6:51 PM","dateUpdated":"March 29, 2024","totalVotes":24877,"candidates":[{"candidateName":"Yes","candidateIncumbent":false,"candidateParty":"","voteCount":15795},{"candidateName":"No","candidateIncumbent":false,"candidateParty":"","voteCount":9082}]},"SonomaMeasureC":{"id":"SonomaMeasureC","type":"localRace","location":"Sonoma","raceName":"Measure C","raceDescription":"Fort Ross School District. School bond. Passes with 55% vote.","raceReadTheStory":"","raceType":"yesNo","timeUpdated":"6:51 PM","dateUpdated":"March 29, 2024","totalVotes":286,"candidates":[{"candidateName":"Yes","candidateIncumbent":false,"candidateParty":"","voteCount":159},{"candidateName":"No","candidateIncumbent":false,"candidateParty":"","voteCount":127}]},"SonomaMeasureD":{"id":"SonomaMeasureD","type":"localRace","location":"Sonoma","raceName":"Measure D","raceDescription":"Harmony Union School District. School bond. Passes with 55% vote.","raceReadTheStory":"","raceType":"yesNo","timeUpdated":"6:51 PM","dateUpdated":"March 29, 2024","totalVotes":1925,"candidates":[{"candidateName":"Yes","candidateIncumbent":false,"candidateParty":"","voteCount":1089},{"candidateName":"No","candidateIncumbent":false,"candidateParty":"","voteCount":836}]},"SonomaMeasureE":{"id":"SonomaMeasureE","type":"localRace","location":"Sonoma","raceName":"Measure E","raceDescription":"Petaluma City (Elementary) School District. Parcel tax. Passes with 2/3 vote.","raceReadTheStory":"","raceType":"yesNo","timeUpdated":"6:51 PM","dateUpdated":"March 29, 2024","totalVotes":11133,"candidates":[{"candidateName":"Yes","candidateIncumbent":false,"candidateParty":"","voteCount":7622},{"candidateName":"No","candidateIncumbent":false,"candidateParty":"","voteCount":3511}]},"SonomaMeasureG":{"id":"SonomaMeasureG","type":"localRace","location":"Sonoma","raceName":"Measure G","raceDescription":"Rincon Valley Union School District. School bond. Passes with 55% vote.","raceReadTheStory":"","raceType":"yesNo","timeUpdated":"6:51 PM","dateUpdated":"March 29, 2024","totalVotes":14577,"candidates":[{"candidateName":"Yes","candidateIncumbent":false,"candidateParty":"","voteCount":8668},{"candidateName":"No","candidateIncumbent":false,"candidateParty":"","voteCount":5909}]},"SonomaMeasureH":{"id":"SonomaMeasureH","type":"localRace","location":"Sonoma","raceName":"Measure H","raceDescription":"Sonoma County. Sales tax. Passes with majority vote.","raceReadTheStory":"https://www.kqed.org/elections/results/sonoma/measure-h","raceType":"yesNo","timeUpdated":"6:51 PM","dateUpdated":"March 29, 2024","totalVotes":145261,"candidates":[{"candidateName":"Yes","candidateIncumbent":false,"candidateParty":"","voteCount":89646},{"candidateName":"No","candidateIncumbent":false,"candidateParty":"","voteCount":55615}]}},"radioSchedulesReducer":{},"listsReducer":{"posts/bayareabites?tag=bacon":{"isFetching":false,"latestQuery":{"from":0,"postsToRender":9},"tag":null,"vitalsOnly":true,"totalRequested":9,"isLoading":false,"isLoadingMore":true,"total":28,"items":["bayareabites_131287","bayareabites_115852","bayareabites_114520","bayareabites_110434","bayareabites_109637","bayareabites_109087","bayareabites_105321","bayareabites_102926","bayareabites_102469"]}},"recallGuideReducer":{"intros":{},"policy":{},"candidates":{}},"savedPostsReducer":{},"pfsSessionReducer":{},"siteSettingsReducer":{},"subscriptionsReducer":{},"termsReducer":{"about":{"name":"About","type":"terms","id":"about","slug":"about","link":"/about","taxonomy":"site"},"arts":{"name":"Arts & Culture","grouping":["arts","pop","trulyca"],"description":"KQED Arts provides daily in-depth coverage of the Bay Area's music, art, film, performing arts, literature and arts news, as well as cultural commentary and criticism.","type":"terms","id":"arts","slug":"arts","link":"/arts","taxonomy":"site"},"artschool":{"name":"Art School","parent":"arts","type":"terms","id":"artschool","slug":"artschool","link":"/artschool","taxonomy":"site"},"bayareabites":{"name":"KQED food","grouping":["food","bayareabites","checkplease"],"parent":"food","type":"terms","id":"bayareabites","slug":"bayareabites","link":"/food","taxonomy":"site"},"bayareahiphop":{"name":"Bay Area Hiphop","type":"terms","id":"bayareahiphop","slug":"bayareahiphop","link":"/bayareahiphop","taxonomy":"site"},"campaign21":{"name":"Campaign 21","type":"terms","id":"campaign21","slug":"campaign21","link":"/campaign21","taxonomy":"site"},"checkplease":{"name":"KQED food","grouping":["food","bayareabites","checkplease"],"parent":"food","type":"terms","id":"checkplease","slug":"checkplease","link":"/food","taxonomy":"site"},"education":{"name":"Education","grouping":["education"],"type":"terms","id":"education","slug":"education","link":"/education","taxonomy":"site"},"elections":{"name":"Elections","type":"terms","id":"elections","slug":"elections","link":"/elections","taxonomy":"site"},"events":{"name":"Events","type":"terms","id":"events","slug":"events","link":"/events","taxonomy":"site"},"event":{"name":"Event","alias":"events","type":"terms","id":"event","slug":"event","link":"/event","taxonomy":"site"},"filmschoolshorts":{"name":"Film School Shorts","type":"terms","id":"filmschoolshorts","slug":"filmschoolshorts","link":"/filmschoolshorts","taxonomy":"site"},"food":{"name":"KQED food","grouping":["food","bayareabites","checkplease"],"type":"terms","id":"food","slug":"food","link":"/food","taxonomy":"site"},"forum":{"name":"Forum","relatedContentQuery":"posts/forum?","parent":"news","type":"terms","id":"forum","slug":"forum","link":"/forum","taxonomy":"site"},"futureofyou":{"name":"Future of You","grouping":["science","futureofyou"],"parent":"science","type":"terms","id":"futureofyou","slug":"futureofyou","link":"/futureofyou","taxonomy":"site"},"jpepinheart":{"name":"KQED food","relatedContentQuery":"trending/food,bayareabites,checkplease","parent":"food","type":"terms","id":"jpepinheart","slug":"jpepinheart","link":"/food","taxonomy":"site"},"liveblog":{"name":"Live Blog","type":"terms","id":"liveblog","slug":"liveblog","link":"/liveblog","taxonomy":"site"},"livetv":{"name":"Live TV","parent":"tv","type":"terms","id":"livetv","slug":"livetv","link":"/livetv","taxonomy":"site"},"lowdown":{"name":"The Lowdown","relatedContentQuery":"posts/lowdown?","parent":"news","type":"terms","id":"lowdown","slug":"lowdown","link":"/lowdown","taxonomy":"site"},"mindshift":{"name":"Mindshift","parent":"news","description":"MindShift explores the future of education by highlighting the innovative – and sometimes counterintuitive – ways educators and parents are helping all children succeed.","type":"terms","id":"mindshift","slug":"mindshift","link":"/mindshift","taxonomy":"site"},"news":{"name":"News","grouping":["news","forum"],"type":"terms","id":"news","slug":"news","link":"/news","taxonomy":"site"},"perspectives":{"name":"Perspectives","parent":"radio","type":"terms","id":"perspectives","slug":"perspectives","link":"/perspectives","taxonomy":"site"},"podcasts":{"name":"Podcasts","type":"terms","id":"podcasts","slug":"podcasts","link":"/podcasts","taxonomy":"site"},"pop":{"name":"Pop","parent":"arts","type":"terms","id":"pop","slug":"pop","link":"/pop","taxonomy":"site"},"pressroom":{"name":"Pressroom","type":"terms","id":"pressroom","slug":"pressroom","link":"/pressroom","taxonomy":"site"},"quest":{"name":"Quest","parent":"science","type":"terms","id":"quest","slug":"quest","link":"/quest","taxonomy":"site"},"radio":{"name":"Radio","grouping":["forum","perspectives"],"description":"Listen to KQED Public Radio – home of Forum and The California Report – on 88.5 FM in San Francisco, 89.3 FM in Sacramento, 88.3 FM in Santa Rosa and 88.1 FM in Martinez.","type":"terms","id":"radio","slug":"radio","link":"/radio","taxonomy":"site"},"root":{"name":"KQED","image":"https://ww2.kqed.org/app/uploads/2020/02/KQED-OG-Image@1x.png","imageWidth":1200,"imageHeight":630,"headData":{"title":"KQED | News, Radio, Podcasts, TV | Public Media for Northern California","description":"KQED provides public radio, television, and independent reporting on issues that matter to the Bay Area. We’re the NPR and PBS member station for Northern California."},"type":"terms","id":"root","slug":"root","link":"/root","taxonomy":"site"},"science":{"name":"Science","grouping":["science","futureofyou"],"description":"KQED Science brings you award-winning science and environment coverage from the Bay Area and beyond.","type":"terms","id":"science","slug":"science","link":"/science","taxonomy":"site"},"stateofhealth":{"name":"State of Health","parent":"science","type":"terms","id":"stateofhealth","slug":"stateofhealth","link":"/stateofhealth","taxonomy":"site"},"support":{"name":"Support","type":"terms","id":"support","slug":"support","link":"/support","taxonomy":"site"},"thedolist":{"name":"The Do List","parent":"arts","type":"terms","id":"thedolist","slug":"thedolist","link":"/thedolist","taxonomy":"site"},"trulyca":{"name":"Truly CA","grouping":["arts","pop","trulyca"],"parent":"arts","type":"terms","id":"trulyca","slug":"trulyca","link":"/trulyca","taxonomy":"site"},"tv":{"name":"TV","type":"terms","id":"tv","slug":"tv","link":"/tv","taxonomy":"site"},"voterguide":{"name":"Voter Guide","parent":"elections","alias":"elections","type":"terms","id":"voterguide","slug":"voterguide","link":"/voterguide","taxonomy":"site"},"bayareabites_278":{"type":"terms","id":"bayareabites_278","meta":{"index":"terms_1591234321","site":"bayareabites","id":"278","found":true},"relationships":{},"included":{},"name":"bacon","slug":"bacon","taxonomy":"tag","description":null,"featImg":null,"headData":{"title":"bacon Archives | KQED Bay Area Bites","description":null,"ogTitle":null,"ogDescription":null,"ogImgId":null,"twTitle":null,"twDescription":null,"twImgId":null,"imageData":{"ogImageSize":{"file":"https://cdn.kqed.org/wp-content/uploads/2020/02/KQED-OG-Image@1x.png","width":1200,"height":630},"twImageSize":{"file":"https://cdn.kqed.org/wp-content/uploads/2020/02/KQED-OG-Image@1x.png"},"twitterCard":"summary_large_image"}},"ttid":243,"isLoading":false,"link":"/bayareabites/tag/bacon"},"source_bayareabites_115852":{"type":"terms","id":"source_bayareabites_115852","meta":{"override":true},"name":"Health and Nutrition","link":"https://ww2.kqed.org/bayareabites/category/health-and-nutrition/","isLoading":false},"source_bayareabites_114520":{"type":"terms","id":"source_bayareabites_114520","meta":{"override":true},"name":"Restaurants, Bars, Cafes, Pop-Ups","link":"https://ww2.kqed.org/bayareabites/category/restaurants-and-bars/","isLoading":false},"source_bayareabites_105321":{"type":"terms","id":"source_bayareabites_105321","meta":{"override":true},"name":"Holiday Recipes","link":"https://ww2.kqed.org/bayareabites/category/recipes/holiday-recipes/","isLoading":false},"source_bayareabites_102926":{"type":"terms","id":"source_bayareabites_102926","meta":{"override":true},"name":"Thanksgiving Recipes","link":"https://ww2.kqed.org/bayareabites/series/thanksgiving-recipes/","isLoading":false},"source_bayareabites_102469":{"type":"terms","id":"source_bayareabites_102469","meta":{"override":true},"name":"Health & Nutrition","link":"https://ww2.kqed.org/bayareabites/category/health-and-nutrition/","isLoading":false},"bayareabites_15122":{"type":"terms","id":"bayareabites_15122","meta":{"index":"terms_1591234321","site":"bayareabites","id":"15122","found":true},"relationships":{},"included":{},"name":"Christmas Recipes","slug":"christmas-recipes","taxonomy":"series","description":"\u003cimg src=\"http://ww2.kqed.org/bayareabites/wp-content/uploads/sites/24/2014/12/xmas20141000white.jpg\" alt=\"Merry Christmas dinner menu from Bay Area Bites. Photos: Wendy Goodfriend\" width=\"1000\" height=\"668\" class=\"aligncenter size-full wp-image-91212\" />\r\n\r\nWho doesn't love a bit of decadence for the holidays? Appetizers, entrees, sides, desserts and cocktails— our special collection of 'tis the seasonal recipes will help you create a sumptuous Christmas feast for any of your holiday guests.","featImg":null,"headData":{"title":"Christmas Recipes Archives | KQED Bay Area Bites","description":"Who doesn't love a bit of decadence for the holidays? Appetizers, entrees, sides, desserts and cocktails— our special collection of 'tis the seasonal recipes will help you create a sumptuous Christmas feast for any of your holiday guests.","ogTitle":null,"ogDescription":null,"ogImgId":null,"twTitle":null,"twDescription":null,"twImgId":null},"ttid":99452,"isLoading":false,"link":"/bayareabites/series/christmas-recipes"},"bayareabites_1516":{"type":"terms","id":"bayareabites_1516","meta":{"index":"terms_1591234321","site":"bayareabites","id":"1516","found":true},"relationships":{},"included":{},"name":"baking and bakeries","slug":"baking-and-bakeries","taxonomy":"category","description":null,"featImg":null,"headData":{"title":"baking and bakeries Archives | KQED Bay Area Bites","description":null,"ogTitle":null,"ogDescription":null,"ogImgId":null,"twTitle":null,"twDescription":null,"twImgId":null},"ttid":1253,"isLoading":false,"link":"/bayareabites/category/baking-and-bakeries"},"bayareabites_12744":{"type":"terms","id":"bayareabites_12744","meta":{"index":"terms_1591234321","site":"bayareabites","id":"12744","found":true},"relationships":{},"included":{},"name":"christmas recipes","slug":"christmas-recipes","taxonomy":"category","description":null,"featImg":null,"headData":{"title":"christmas recipes Archives | KQED Bay Area Bites","description":null,"ogTitle":null,"ogDescription":null,"ogImgId":null,"twTitle":null,"twDescription":null,"twImgId":null},"ttid":7207,"isLoading":false,"link":"/bayareabites/category/christmas-recipes"},"bayareabites_1653":{"type":"terms","id":"bayareabites_1653","meta":{"index":"terms_1591234321","site":"bayareabites","id":"1653","found":true},"relationships":{},"included":{},"name":"dessert and chocolate","slug":"dessert-and-chocolate","taxonomy":"category","description":null,"featImg":null,"headData":{"title":"dessert and chocolate Archives | KQED Bay Area Bites","description":null,"ogTitle":null,"ogDescription":null,"ogImgId":null,"twTitle":null,"twDescription":null,"twImgId":null},"ttid":12,"isLoading":false,"link":"/bayareabites/category/dessert-and-chocolate"},"bayareabites_11028":{"type":"terms","id":"bayareabites_11028","meta":{"index":"terms_1591234321","site":"bayareabites","id":"11028","found":true},"relationships":{},"included":{},"name":"food art","slug":"food-art","taxonomy":"category","description":null,"featImg":null,"headData":{"title":"food art Archives | KQED Bay Area Bites","description":null,"ogTitle":null,"ogDescription":null,"ogImgId":null,"twTitle":null,"twDescription":null,"twImgId":null},"ttid":7736,"isLoading":false,"link":"/bayareabites/category/food-art"},"bayareabites_10028":{"type":"terms","id":"bayareabites_10028","meta":{"index":"terms_1591234321","site":"bayareabites","id":"10028","found":true},"relationships":{},"included":{},"name":"food news","slug":"food-news","taxonomy":"category","description":null,"featImg":null,"headData":{"title":"food news Archives | KQED Bay Area Bites","description":null,"ogTitle":null,"ogDescription":null,"ogImgId":null,"twTitle":null,"twDescription":null,"twImgId":null},"ttid":8301,"isLoading":false,"link":"/bayareabites/category/food-news"},"bayareabites_12550":{"type":"terms","id":"bayareabites_12550","meta":{"index":"terms_1591234321","site":"bayareabites","id":"12550","found":true},"relationships":{},"included":{},"name":"holiday recipes","slug":"holiday-recipes","taxonomy":"category","description":null,"featImg":null,"headData":{"title":"holiday recipes Archives | KQED Bay Area Bites","description":null,"ogTitle":null,"ogDescription":null,"ogImgId":null,"twTitle":null,"twDescription":null,"twImgId":null},"ttid":7013,"isLoading":false,"link":"/bayareabites/category/holiday-recipes"},"bayareabites_12":{"type":"terms","id":"bayareabites_12","meta":{"index":"terms_1591234321","site":"bayareabites","id":"12","found":true},"relationships":{},"included":{},"name":"recipes","slug":"recipes","taxonomy":"category","description":null,"featImg":null,"headData":{"title":"recipes Archives | KQED Bay Area Bites","description":null,"ogTitle":null,"ogDescription":null,"ogImgId":null,"twTitle":null,"twDescription":null,"twImgId":null},"ttid":10,"isLoading":false,"link":"/bayareabites/category/recipes"},"bayareabites_987":{"type":"terms","id":"bayareabites_987","meta":{"index":"terms_1591234321","site":"bayareabites","id":"987","found":true},"relationships":{},"included":{},"name":"DIY","slug":"diy","taxonomy":"tag","description":null,"featImg":null,"headData":{"title":"DIY Archives | KQED Bay Area Bites","description":null,"ogTitle":null,"ogDescription":null,"ogImgId":null,"twTitle":null,"twDescription":null,"twImgId":null},"ttid":898,"isLoading":false,"link":"/bayareabites/tag/diy"},"bayareabites_1245":{"type":"terms","id":"bayareabites_1245","meta":{"index":"terms_1591234321","site":"bayareabites","id":"1245","found":true},"relationships":{},"included":{},"name":"health and nutrition","slug":"health-and-nutrition","taxonomy":"category","description":null,"featImg":null,"headData":{"title":"health and nutrition Archives | KQED Bay Area Bites","description":null,"ogTitle":null,"ogDescription":null,"ogImgId":null,"twTitle":null,"twDescription":null,"twImgId":null},"ttid":1078,"isLoading":false,"link":"/bayareabites/category/health-and-nutrition"},"bayareabites_358":{"type":"terms","id":"bayareabites_358","meta":{"index":"terms_1591234321","site":"bayareabites","id":"358","found":true},"relationships":{},"included":{},"name":"science","slug":"science","taxonomy":"category","description":null,"featImg":null,"headData":{"title":"science Archives | KQED Bay Area Bites","description":null,"ogTitle":null,"ogDescription":null,"ogImgId":null,"twTitle":null,"twDescription":null,"twImgId":null},"ttid":7943,"isLoading":false,"link":"/bayareabites/category/science"},"bayareabites_11215":{"type":"terms","id":"bayareabites_11215","meta":{"index":"terms_1591234321","site":"bayareabites","id":"11215","found":true},"relationships":{},"included":{},"name":"diabetes","slug":"diabetes","taxonomy":"tag","description":null,"featImg":null,"headData":{"title":"diabetes Archives | KQED Bay Area Bites","description":null,"ogTitle":null,"ogDescription":null,"ogImgId":null,"twTitle":null,"twDescription":null,"twImgId":null},"ttid":5674,"isLoading":false,"link":"/bayareabites/tag/diabetes"},"bayareabites_1828":{"type":"terms","id":"bayareabites_1828","meta":{"index":"terms_1591234321","site":"bayareabites","id":"1828","found":true},"relationships":{},"included":{},"name":"nuts","slug":"nuts","taxonomy":"tag","description":null,"featImg":null,"headData":{"title":"nuts Archives | KQED Bay Area Bites","description":null,"ogTitle":null,"ogDescription":null,"ogImgId":null,"twTitle":null,"twDescription":null,"twImgId":null},"ttid":1429,"isLoading":false,"link":"/bayareabites/tag/nuts"},"bayareabites_109":{"type":"terms","id":"bayareabites_109","meta":{"index":"terms_1591234321","site":"bayareabites","id":"109","found":true},"relationships":{},"included":{},"name":"bay area","slug":"bay-area","taxonomy":"category","description":null,"featImg":null,"headData":{"title":"bay area Archives | KQED Bay Area Bites","description":null,"ogTitle":null,"ogDescription":null,"ogImgId":null,"twTitle":null,"twDescription":null,"twImgId":null},"ttid":73,"isLoading":false,"link":"/bayareabites/category/bay-area"},"bayareabites_8770":{"type":"terms","id":"bayareabites_8770","meta":{"index":"terms_1591234321","site":"bayareabites","id":"8770","found":true},"relationships":{},"included":{},"name":"east bay","slug":"east-bay","taxonomy":"category","description":null,"featImg":null,"headData":{"title":"east bay Archives | KQED Bay Area Bites","description":null,"ogTitle":null,"ogDescription":null,"ogImgId":null,"twTitle":null,"twDescription":null,"twImgId":null},"ttid":7634,"isLoading":false,"link":"/bayareabites/category/east-bay"},"bayareabites_1875":{"type":"terms","id":"bayareabites_1875","meta":{"index":"terms_1591234321","site":"bayareabites","id":"1875","found":true},"relationships":{},"included":{},"name":"local food businesses","slug":"local-food-businesses","taxonomy":"category","description":null,"featImg":null,"headData":{"title":"local food businesses Archives | KQED Bay Area Bites","description":null,"ogTitle":null,"ogDescription":null,"ogImgId":null,"twTitle":null,"twDescription":null,"twImgId":null},"ttid":1453,"isLoading":false,"link":"/bayareabites/category/local-food-businesses"},"bayareabites_366":{"type":"terms","id":"bayareabites_366","meta":{"index":"terms_1591234321","site":"bayareabites","id":"366","found":true},"relationships":{},"included":{},"name":"oakland","slug":"oakland","taxonomy":"category","description":null,"featImg":null,"headData":{"title":"oakland Archives | KQED Bay Area Bites","description":null,"ogTitle":null,"ogDescription":null,"ogImgId":null,"twTitle":null,"twDescription":null,"twImgId":null},"ttid":7635,"isLoading":false,"link":"/bayareabites/category/oakland"},"bayareabites_1807":{"type":"terms","id":"bayareabites_1807","meta":{"index":"terms_1591234321","site":"bayareabites","id":"1807","found":true},"relationships":{},"included":{},"name":"restaurants, bars, cafes, pop-ups","slug":"restaurants-and-bars","taxonomy":"category","description":null,"featImg":null,"headData":{"title":"restaurants, bars, cafes, pop-ups Archives | KQED Bay Area Bites","description":null,"ogTitle":null,"ogDescription":null,"ogImgId":null,"twTitle":null,"twDescription":null,"twImgId":null},"ttid":56,"isLoading":false,"link":"/bayareabites/category/restaurants-and-bars"},"bayareabites_10":{"type":"terms","id":"bayareabites_10","meta":{"index":"terms_1591234321","site":"bayareabites","id":"10","found":true},"relationships":{},"included":{},"name":"reviews","slug":"reviews","taxonomy":"category","description":null,"featImg":null,"headData":{"title":"reviews Archives | KQED Bay Area Bites","description":null,"ogTitle":null,"ogDescription":null,"ogImgId":null,"twTitle":null,"twDescription":null,"twImgId":null},"ttid":24,"isLoading":false,"link":"/bayareabites/category/reviews"},"bayareabites_14804":{"type":"terms","id":"bayareabites_14804","meta":{"index":"terms_1591234321","site":"bayareabites","id":"14804","found":true},"relationships":{},"included":{},"name":"breakfast sandwiches","slug":"breakfast-sandwiches","taxonomy":"tag","description":null,"featImg":null,"headData":{"title":"breakfast sandwiches Archives | KQED Bay Area Bites","description":null,"ogTitle":null,"ogDescription":null,"ogImgId":null,"twTitle":null,"twDescription":null,"twImgId":null},"ttid":99134,"isLoading":false,"link":"/bayareabites/tag/breakfast-sandwiches"},"bayareabites_15712":{"type":"terms","id":"bayareabites_15712","meta":{"index":"terms_1591234321","site":"bayareabites","id":"15712","found":true},"relationships":{},"included":{},"name":"Gastropig","slug":"gastropig","taxonomy":"tag","description":null,"featImg":null,"headData":{"title":"Gastropig Archives | KQED Bay Area Bites","description":null,"ogTitle":null,"ogDescription":null,"ogImgId":null,"twTitle":null,"twDescription":null,"twImgId":null},"ttid":100042,"isLoading":false,"link":"/bayareabites/tag/gastropig"},"bayareabites_616":{"type":"terms","id":"bayareabites_616","meta":{"index":"terms_1591234321","site":"bayareabites","id":"616","found":true},"relationships":{},"included":{},"name":"pork","slug":"pork","taxonomy":"tag","description":null,"featImg":null,"headData":{"title":"pork Archives | KQED Bay Area Bites","description":null,"ogTitle":null,"ogDescription":null,"ogImgId":null,"twTitle":null,"twDescription":null,"twImgId":null},"ttid":581,"isLoading":false,"link":"/bayareabites/tag/pork"},"bayareabites_1180":{"type":"terms","id":"bayareabites_1180","meta":{"index":"terms_1591234321","site":"bayareabites","id":"1180","found":true},"relationships":{},"included":{},"name":"sandwiches","slug":"sandwiches","taxonomy":"tag","description":null,"featImg":null,"headData":{"title":"sandwiches Archives | KQED Bay Area Bites","description":null,"ogTitle":null,"ogDescription":null,"ogImgId":null,"twTitle":null,"twDescription":null,"twImgId":null},"ttid":1040,"isLoading":false,"link":"/bayareabites/tag/sandwiches"},"bayareabites_1763":{"type":"terms","id":"bayareabites_1763","meta":{"index":"terms_1591234321","site":"bayareabites","id":"1763","found":true},"relationships":{},"included":{},"name":"holidays and traditions","slug":"holidays-and-traditions","taxonomy":"category","description":null,"featImg":null,"headData":{"title":"holidays and traditions Archives | KQED Bay Area Bites","description":null,"ogTitle":null,"ogDescription":null,"ogImgId":null,"twTitle":null,"twDescription":null,"twImgId":null},"ttid":1254,"isLoading":false,"link":"/bayareabites/category/holidays-and-traditions"},"bayareabites_14362":{"type":"terms","id":"bayareabites_14362","meta":{"index":"terms_1591234321","site":"bayareabites","id":"14362","found":true},"relationships":{},"included":{},"name":"seasonal recipes","slug":"seasonal-recipes","taxonomy":"category","description":null,"featImg":null,"headData":{"title":"seasonal recipes Archives | KQED Bay Area Bites","description":null,"ogTitle":null,"ogDescription":null,"ogImgId":null,"twTitle":null,"twDescription":null,"twImgId":null},"ttid":98738,"isLoading":false,"link":"/bayareabites/category/seasonal-recipes"},"bayareabites_8243":{"type":"terms","id":"bayareabites_8243","meta":{"index":"terms_1591234321","site":"bayareabites","id":"8243","found":true},"relationships":{},"included":{},"name":"4th of july","slug":"4th-of-july","taxonomy":"tag","description":null,"featImg":null,"headData":{"title":"4th of july Archives | KQED Bay Area Bites","description":null,"ogTitle":null,"ogDescription":null,"ogImgId":null,"twTitle":null,"twDescription":null,"twImgId":null},"ttid":2696,"isLoading":false,"link":"/bayareabites/tag/4th-of-july"},"bayareabites_16297":{"type":"terms","id":"bayareabites_16297","meta":{"index":"terms_1591234321","site":"bayareabites","id":"16297","found":true},"relationships":{},"included":{},"name":"grilling recipes","slug":"grilling-recipes","taxonomy":"tag","description":null,"featImg":null,"headData":{"title":"grilling recipes Archives | KQED Bay Area Bites","description":null,"ogTitle":null,"ogDescription":null,"ogImgId":null,"twTitle":null,"twDescription":null,"twImgId":null},"ttid":100627,"isLoading":false,"link":"/bayareabites/tag/grilling-recipes"},"bayareabites_3682":{"type":"terms","id":"bayareabites_3682","meta":{"index":"terms_1591234321","site":"bayareabites","id":"3682","found":true},"relationships":{},"included":{},"name":"summer recipes","slug":"summer-recipes","taxonomy":"tag","description":null,"featImg":null,"headData":{"title":"summer recipes Archives | KQED Bay Area Bites","description":null,"ogTitle":null,"ogDescription":null,"ogImgId":null,"twTitle":null,"twDescription":null,"twImgId":null},"ttid":2433,"isLoading":false,"link":"/bayareabites/tag/summer-recipes"},"bayareabites_13746":{"type":"terms","id":"bayareabites_13746","meta":{"index":"terms_1591234321","site":"bayareabites","id":"13746","found":true},"relationships":{},"included":{},"name":"guides","slug":"guides-2","taxonomy":"category","description":null,"featImg":null,"headData":{"title":"guides Archives | KQED Bay Area Bites","description":null,"ogTitle":null,"ogDescription":null,"ogImgId":null,"twTitle":null,"twDescription":null,"twImgId":null},"ttid":8219,"isLoading":false,"link":"/bayareabites/category/guides-2"},"bayareabites_1009":{"type":"terms","id":"bayareabites_1009","meta":{"index":"terms_1591234321","site":"bayareabites","id":"1009","found":true},"relationships":{},"included":{},"name":"artichokes","slug":"artichokes","taxonomy":"tag","description":null,"featImg":null,"headData":{"title":"artichokes Archives | KQED Bay Area Bites","description":null,"ogTitle":null,"ogDescription":null,"ogImgId":null,"twTitle":null,"twDescription":null,"twImgId":null},"ttid":920,"isLoading":false,"link":"/bayareabites/tag/artichokes"},"bayareabites_2113":{"type":"terms","id":"bayareabites_2113","meta":{"index":"terms_1591234321","site":"bayareabites","id":"2113","found":true},"relationships":{},"included":{},"name":"arugula","slug":"arugula","taxonomy":"tag","description":null,"featImg":null,"headData":{"title":"arugula Archives | KQED Bay Area Bites","description":null,"ogTitle":null,"ogDescription":null,"ogImgId":null,"twTitle":null,"twDescription":null,"twImgId":null},"ttid":1577,"isLoading":false,"link":"/bayareabites/tag/arugula"},"bayareabites_2250":{"type":"terms","id":"bayareabites_2250","meta":{"index":"terms_1591234321","site":"bayareabites","id":"2250","found":true},"relationships":{},"included":{},"name":"barbecue","slug":"barbecue","taxonomy":"tag","description":null,"featImg":null,"headData":{"title":"barbecue Archives | KQED Bay Area Bites","description":null,"ogTitle":null,"ogDescription":null,"ogImgId":null,"twTitle":null,"twDescription":null,"twImgId":null},"ttid":1673,"isLoading":false,"link":"/bayareabites/tag/barbecue"},"bayareabites_1289":{"type":"terms","id":"bayareabites_1289","meta":{"index":"terms_1591234321","site":"bayareabites","id":"1289","found":true},"relationships":{},"included":{},"name":"bbq","slug":"bbq","taxonomy":"tag","description":null,"featImg":null,"headData":{"title":"bbq Archives | KQED Bay Area Bites","description":null,"ogTitle":null,"ogDescription":null,"ogImgId":null,"twTitle":null,"twDescription":null,"twImgId":null},"ttid":1128,"isLoading":false,"link":"/bayareabites/tag/bbq"},"bayareabites_1964":{"type":"terms","id":"bayareabites_1964","meta":{"index":"terms_1591234321","site":"bayareabites","id":"1964","found":true},"relationships":{},"included":{},"name":"burgers","slug":"burgers","taxonomy":"tag","description":null,"featImg":null,"headData":{"title":"burgers Archives | KQED Bay Area Bites","description":null,"ogTitle":null,"ogDescription":null,"ogImgId":null,"twTitle":null,"twDescription":null,"twImgId":null},"ttid":1489,"isLoading":false,"link":"/bayareabites/tag/burgers"},"bayareabites_15468":{"type":"terms","id":"bayareabites_15468","meta":{"index":"terms_1591234321","site":"bayareabites","id":"15468","found":true},"relationships":{},"included":{},"name":"burrata","slug":"burrata","taxonomy":"tag","description":null,"featImg":null,"headData":{"title":"burrata Archives | KQED Bay Area Bites","description":null,"ogTitle":null,"ogDescription":null,"ogImgId":null,"twTitle":null,"twDescription":null,"twImgId":null},"ttid":99798,"isLoading":false,"link":"/bayareabites/tag/burrata"},"bayareabites_2292":{"type":"terms","id":"bayareabites_2292","meta":{"index":"terms_1591234321","site":"bayareabites","id":"2292","found":true},"relationships":{},"included":{},"name":"eggplant","slug":"eggplant","taxonomy":"tag","description":null,"featImg":null,"headData":{"title":"eggplant Archives | KQED Bay Area Bites","description":null,"ogTitle":null,"ogDescription":null,"ogImgId":null,"twTitle":null,"twDescription":null,"twImgId":null},"ttid":1706,"isLoading":false,"link":"/bayareabites/tag/eggplant"},"bayareabites_2550":{"type":"terms","id":"bayareabites_2550","meta":{"index":"terms_1591234321","site":"bayareabites","id":"2550","found":true},"relationships":{},"included":{},"name":"grilling","slug":"grilling","taxonomy":"tag","description":null,"featImg":null,"headData":{"title":"grilling Archives | KQED Bay Area Bites","description":null,"ogTitle":null,"ogDescription":null,"ogImgId":null,"twTitle":null,"twDescription":null,"twImgId":null},"ttid":1838,"isLoading":false,"link":"/bayareabites/tag/grilling"},"bayareabites_3050":{"type":"terms","id":"bayareabites_3050","meta":{"index":"terms_1591234321","site":"bayareabites","id":"3050","found":true},"relationships":{},"included":{},"name":"kale","slug":"kale","taxonomy":"tag","description":null,"featImg":null,"headData":{"title":"kale Archives | KQED Bay Area Bites","description":null,"ogTitle":null,"ogDescription":null,"ogImgId":null,"twTitle":null,"twDescription":null,"twImgId":null},"ttid":2124,"isLoading":false,"link":"/bayareabites/tag/kale"},"bayareabites_12805":{"type":"terms","id":"bayareabites_12805","meta":{"index":"terms_1591234321","site":"bayareabites","id":"12805","found":true},"relationships":{},"included":{},"name":"kale salad","slug":"kale-salad","taxonomy":"tag","description":null,"featImg":null,"headData":{"title":"kale salad Archives | KQED Bay Area Bites","description":null,"ogTitle":null,"ogDescription":null,"ogImgId":null,"twTitle":null,"twDescription":null,"twImgId":null},"ttid":7268,"isLoading":false,"link":"/bayareabites/tag/kale-salad"},"bayareabites_2198":{"type":"terms","id":"bayareabites_2198","meta":{"index":"terms_1591234321","site":"bayareabites","id":"2198","found":true},"relationships":{},"included":{},"name":"memorial day","slug":"memorial-day","taxonomy":"tag","description":null,"featImg":null,"headData":{"title":"memorial day Archives | KQED Bay Area Bites","description":null,"ogTitle":null,"ogDescription":null,"ogImgId":null,"twTitle":null,"twDescription":null,"twImgId":null},"ttid":1634,"isLoading":false,"link":"/bayareabites/tag/memorial-day"},"bayareabites_16159":{"type":"terms","id":"bayareabites_16159","meta":{"index":"terms_1591234321","site":"bayareabites","id":"16159","found":true},"relationships":{},"included":{},"name":"memorial day recipes","slug":"memorial-day-recipes","taxonomy":"tag","description":null,"featImg":null,"headData":{"title":"memorial day recipes Archives | KQED Bay Area Bites","description":null,"ogTitle":null,"ogDescription":null,"ogImgId":null,"twTitle":null,"twDescription":null,"twImgId":null},"ttid":100489,"isLoading":false,"link":"/bayareabites/tag/memorial-day-recipes"},"bayareabites_9329":{"type":"terms","id":"bayareabites_9329","meta":{"index":"terms_1591234321","site":"bayareabites","id":"9329","found":true},"relationships":{},"included":{},"name":"potato salad","slug":"potato-salad","taxonomy":"tag","description":null,"featImg":null,"headData":{"title":"potato salad Archives | KQED Bay Area Bites","description":null,"ogTitle":null,"ogDescription":null,"ogImgId":null,"twTitle":null,"twDescription":null,"twImgId":null},"ttid":3783,"isLoading":false,"link":"/bayareabites/tag/potato-salad"},"bayareabites_14407":{"type":"terms","id":"bayareabites_14407","meta":{"index":"terms_1591234321","site":"bayareabites","id":"14407","found":true},"relationships":{},"included":{},"name":"ribs","slug":"ribs","taxonomy":"tag","description":null,"featImg":null,"headData":{"title":"ribs Archives | KQED Bay Area Bites","description":null,"ogTitle":null,"ogDescription":null,"ogImgId":null,"twTitle":null,"twDescription":null,"twImgId":null},"ttid":98783,"isLoading":false,"link":"/bayareabites/tag/ribs"},"bayareabites_1815":{"type":"terms","id":"bayareabites_1815","meta":{"index":"terms_1591234321","site":"bayareabites","id":"1815","found":true},"relationships":{},"included":{},"name":"salad","slug":"salad","taxonomy":"tag","description":null,"featImg":null,"headData":{"title":"salad Archives | KQED Bay Area Bites","description":null,"ogTitle":null,"ogDescription":null,"ogImgId":null,"twTitle":null,"twDescription":null,"twImgId":null},"ttid":1418,"isLoading":false,"link":"/bayareabites/tag/salad"},"bayareabites_15469":{"type":"terms","id":"bayareabites_15469","meta":{"index":"terms_1591234321","site":"bayareabites","id":"15469","found":true},"relationships":{},"included":{},"name":"speck","slug":"speck","taxonomy":"tag","description":null,"featImg":null,"headData":{"title":"speck Archives | KQED Bay Area Bites","description":null,"ogTitle":null,"ogDescription":null,"ogImgId":null,"twTitle":null,"twDescription":null,"twImgId":null},"ttid":99799,"isLoading":false,"link":"/bayareabites/tag/speck"},"bayareabites_753":{"type":"terms","id":"bayareabites_753","meta":{"index":"terms_1591234321","site":"bayareabites","id":"753","found":true},"relationships":{},"included":{},"name":"steak","slug":"steak","taxonomy":"tag","description":null,"featImg":null,"headData":{"title":"steak Archives | KQED Bay Area Bites","description":null,"ogTitle":null,"ogDescription":null,"ogImgId":null,"twTitle":null,"twDescription":null,"twImgId":null},"ttid":771,"isLoading":false,"link":"/bayareabites/tag/steak"},"bayareabites_218":{"type":"terms","id":"bayareabites_218","meta":{"index":"terms_1591234321","site":"bayareabites","id":"218","found":true},"relationships":{},"included":{},"name":"summer","slug":"summer","taxonomy":"tag","description":null,"featImg":null,"headData":{"title":"summer Archives | KQED Bay Area Bites","description":null,"ogTitle":null,"ogDescription":null,"ogImgId":null,"twTitle":null,"twDescription":null,"twImgId":null},"ttid":183,"isLoading":false,"link":"/bayareabites/tag/summer"},"bayareabites_11920":{"type":"terms","id":"bayareabites_11920","meta":{"index":"terms_1591234321","site":"bayareabites","id":"11920","found":true},"relationships":{},"included":{},"name":"summer grilling","slug":"summer-grilling","taxonomy":"tag","description":null,"featImg":null,"headData":{"title":"summer grilling Archives | KQED Bay Area Bites","description":null,"ogTitle":null,"ogDescription":null,"ogImgId":null,"twTitle":null,"twDescription":null,"twImgId":null},"ttid":6382,"isLoading":false,"link":"/bayareabites/tag/summer-grilling"},"bayareabites_828":{"type":"terms","id":"bayareabites_828","meta":{"index":"terms_1591234321","site":"bayareabites","id":"828","found":true},"relationships":{},"included":{},"name":"asparagus","slug":"asparagus","taxonomy":"tag","description":null,"featImg":null,"headData":{"title":"asparagus Archives | KQED Bay Area Bites","description":null,"ogTitle":null,"ogDescription":null,"ogImgId":null,"twTitle":null,"twDescription":null,"twImgId":null},"ttid":825,"isLoading":false,"link":"/bayareabites/tag/asparagus"},"bayareabites_477":{"type":"terms","id":"bayareabites_477","meta":{"index":"terms_1591234321","site":"bayareabites","id":"477","found":true},"relationships":{},"included":{},"name":"breakfast","slug":"breakfast","taxonomy":"tag","description":null,"featImg":null,"headData":{"title":"breakfast Archives | KQED Bay Area Bites","description":null,"ogTitle":null,"ogDescription":null,"ogImgId":null,"twTitle":null,"twDescription":null,"twImgId":null},"ttid":442,"isLoading":false,"link":"/bayareabites/tag/breakfast"},"bayareabites_15447":{"type":"terms","id":"bayareabites_15447","meta":{"index":"terms_1591234321","site":"bayareabites","id":"15447","found":true},"relationships":{},"included":{},"name":"breakfast salad","slug":"breakfast-salad","taxonomy":"tag","description":null,"featImg":null,"headData":{"title":"breakfast salad Archives | KQED Bay Area Bites","description":null,"ogTitle":null,"ogDescription":null,"ogImgId":null,"twTitle":null,"twDescription":null,"twImgId":null},"ttid":99777,"isLoading":false,"link":"/bayareabites/tag/breakfast-salad"},"bayareabites_33":{"type":"terms","id":"bayareabites_33","meta":{"index":"terms_1591234321","site":"bayareabites","id":"33","found":true},"relationships":{},"included":{},"name":"eggs","slug":"eggs","taxonomy":"tag","description":null,"featImg":null,"headData":{"title":"eggs Archives | KQED Bay Area Bites","description":null,"ogTitle":null,"ogDescription":null,"ogImgId":null,"twTitle":null,"twDescription":null,"twImgId":null},"ttid":1497,"isLoading":false,"link":"/bayareabites/tag/eggs"},"bayareabites_3992":{"type":"terms","id":"bayareabites_3992","meta":{"index":"terms_1591234321","site":"bayareabites","id":"3992","found":true},"relationships":{},"included":{},"name":"mother's day","slug":"mothers-day","taxonomy":"tag","description":null,"featImg":null,"headData":{"title":"mother's day Archives | KQED Bay Area Bites","description":null,"ogTitle":null,"ogDescription":null,"ogImgId":null,"twTitle":null,"twDescription":null,"twImgId":null},"ttid":2522,"isLoading":false,"link":"/bayareabites/tag/mothers-day"},"bayareabites_16157":{"type":"terms","id":"bayareabites_16157","meta":{"index":"terms_1591234321","site":"bayareabites","id":"16157","found":true},"relationships":{},"included":{},"name":"mothers day recipes","slug":"mothers-day-recipes","taxonomy":"tag","description":null,"featImg":null,"headData":{"title":"mothers day recipes Archives | KQED Bay Area Bites","description":null,"ogTitle":null,"ogDescription":null,"ogImgId":null,"twTitle":null,"twDescription":null,"twImgId":null},"ttid":100487,"isLoading":false,"link":"/bayareabites/tag/mothers-day-recipes"},"bayareabites_11793":{"type":"terms","id":"bayareabites_11793","meta":{"index":"terms_1591234321","site":"bayareabites","id":"11793","found":true},"relationships":{},"included":{},"name":"vinaigrette","slug":"vinaigrette","taxonomy":"tag","description":null,"featImg":null,"headData":{"title":"vinaigrette Archives | KQED Bay Area Bites","description":null,"ogTitle":null,"ogDescription":null,"ogImgId":null,"twTitle":null,"twDescription":null,"twImgId":null},"ttid":6255,"isLoading":false,"link":"/bayareabites/tag/vinaigrette"},"bayareabites_15124":{"type":"terms","id":"bayareabites_15124","meta":{"index":"terms_1591234321","site":"bayareabites","id":"15124","found":true},"relationships":{},"included":{},"name":"New Year's Recipes","slug":"new-years-recipes","taxonomy":"series","description":"\u003cimg src=\"https://ww2.kqed.org/bayareabites/wp-content/uploads/sites/24/2014/12/nye-collage.jpg\" alt=\"Happy New Year's Menu! Photos: Wendy Goodfriend\" width=\"1000\" height=\"667\" class=\"aligncenter size-full wp-image-91763\" />\r\n\r\nThrowing a New Year’s Eve cocktail party takes gumption, and a slew of terrific appetizers (and cocktail recipes). But don’t let the idea of throwing a NYE party intimidate you! Use our special collection of tasty, fully-tested recipes and make all other parties pale in comparison.","featImg":null,"headData":{"title":"New Year's Recipes Archives | KQED Bay Area Bites","description":"Throwing a New Year’s Eve cocktail party takes gumption, and a slew of terrific appetizers (and cocktail recipes). But don’t let the idea of throwing a NYE party intimidate you! Use our special collection of tasty, fully-tested recipes and make all other parties pale in comparison.","ogTitle":null,"ogDescription":null,"ogImgId":null,"twTitle":null,"twDescription":null,"twImgId":null},"ttid":99454,"isLoading":false,"link":"/bayareabites/series/new-years-recipes"},"bayareabites_12011":{"type":"terms","id":"bayareabites_12011","meta":{"index":"terms_1591234321","site":"bayareabites","id":"12011","found":true},"relationships":{},"included":{},"name":"donut","slug":"donut","taxonomy":"tag","description":null,"featImg":null,"headData":{"title":"donut Archives | KQED Bay Area Bites","description":null,"ogTitle":null,"ogDescription":null,"ogImgId":null,"twTitle":null,"twDescription":null,"twImgId":null},"ttid":6473,"isLoading":false,"link":"/bayareabites/tag/donut"},"bayareabites_11795":{"type":"terms","id":"bayareabites_11795","meta":{"index":"terms_1591234321","site":"bayareabites","id":"11795","found":true},"relationships":{},"included":{},"name":"doughnut","slug":"doughnut","taxonomy":"tag","description":null,"featImg":null,"headData":{"title":"doughnut Archives | KQED Bay Area Bites","description":null,"ogTitle":null,"ogDescription":null,"ogImgId":null,"twTitle":null,"twDescription":null,"twImgId":null},"ttid":6257,"isLoading":false,"link":"/bayareabites/tag/doughnut"},"bayareabites_15178":{"type":"terms","id":"bayareabites_15178","meta":{"index":"terms_1591234321","site":"bayareabites","id":"15178","found":true},"relationships":{},"included":{},"name":"maple","slug":"maple","taxonomy":"tag","description":null,"featImg":null,"headData":{"title":"maple Archives | KQED Bay Area Bites","description":null,"ogTitle":null,"ogDescription":null,"ogImgId":null,"twTitle":null,"twDescription":null,"twImgId":null},"ttid":99508,"isLoading":false,"link":"/bayareabites/tag/maple"},"bayareabites_3202":{"type":"terms","id":"bayareabites_3202","meta":{"index":"terms_1591234321","site":"bayareabites","id":"3202","found":true},"relationships":{},"included":{},"name":"new year's eve","slug":"new-years-eve","taxonomy":"tag","description":null,"featImg":null,"headData":{"title":"new year's eve Archives | KQED Bay Area Bites","description":null,"ogTitle":null,"ogDescription":null,"ogImgId":null,"twTitle":null,"twDescription":null,"twImgId":null},"ttid":2195,"isLoading":false,"link":"/bayareabites/tag/new-years-eve"},"bayareabites_1686":{"type":"terms","id":"bayareabites_1686","meta":{"index":"terms_1591234321","site":"bayareabites","id":"1686","found":true},"relationships":{},"included":{},"name":"new years","slug":"new-years","taxonomy":"tag","description":null,"featImg":null,"headData":{"title":"new years Archives | KQED Bay Area Bites","description":null,"ogTitle":null,"ogDescription":null,"ogImgId":null,"twTitle":null,"twDescription":null,"twImgId":null},"ttid":1347,"isLoading":false,"link":"/bayareabites/tag/new-years"},"bayareabites_15149":{"type":"terms","id":"bayareabites_15149","meta":{"index":"terms_1591234321","site":"bayareabites","id":"15149","found":true},"relationships":{},"included":{},"name":"Our Top 10 Recipes From 2015","slug":"our-top-10-recipes-from-2015","taxonomy":"series","description":"\u003ca href=\"http://ww2.kqed.org/bayareabites/2015/11/12/thanksgiving-side-dish-creamy-brussels-sprouts-gratin-and-bacon-gratin-with-shallots-and-gruyere/\" rel=\"attachment wp-att-103088\">\u003cimg src=\"http://ww2.kqed.org/bayareabites/wp-content/uploads/sites/24/2015/11/brusselsprouts-finish.jpg\" alt=\"brusselsprouts-finish\" width=\"1920\" height=\"1280\" class=\"aligncenter size-full wp-image-103088\" />\u003c/a>\r\n\r\nBrussels sprouts were the \"it\" vegetable this past year and a \u003ca href=\"https://ww2.kqed.org/bayareabites/2015/11/12/thanksgiving-side-dish-creamy-brussels-sprouts-gratin-and-bacon-gratin-with-shallots-and-gruyere/\" target=\"_blank\">creamy gratin\u003c/a> topped the list of your favorite recipes from our Bay Area Bites contributors. Bookmark this page so you can enjoy them again!","featImg":null,"headData":{"title":"Our Top 10 Recipes From 2015 Archives | KQED Bay Area Bites","description":"Brussels sprouts were the \"it\" vegetable this past year and a creamy gratin topped the list of your favorite recipes from our Bay Area Bites contributors. Bookmark this page so you can enjoy them again!","ogTitle":null,"ogDescription":null,"ogImgId":null,"twTitle":null,"twDescription":null,"twImgId":null},"ttid":99479,"isLoading":false,"link":"/bayareabites/series/our-top-10-recipes-from-2015"},"bayareabites_15012":{"type":"terms","id":"bayareabites_15012","meta":{"index":"terms_1591234321","site":"bayareabites","id":"15012","found":true},"relationships":{},"included":{},"name":"Thanksgiving Recipes","slug":"thanksgiving-recipes","taxonomy":"series","description":"\u003cimg src=\"http://ww2.kqed.org/bayareabites/wp-content/uploads/sites/24/2015/11/THANKSGIVING-centerpiece1000-1.jpg\" alt=\"THANKSGIVING-centerpiece1000 (1)\" width=\"1000\" height=\"666\" class=\"aligncenter size-full wp-image-103674\" />\r\n\r\nEntrees, sides, desserts, vegan and gluten-free -- our special collection of autumn-themed recipes will help you create a sumptuous Thanksgiving feast for any of your holiday guests. ","featImg":null,"headData":{"title":"Thanksgiving Recipes Archives | KQED Bay Area Bites","description":"Entrees, sides, desserts, vegan and gluten-free -- our special collection of autumn-themed recipes will help you create a sumptuous Thanksgiving feast for any of your holiday guests.","ogTitle":null,"ogDescription":null,"ogImgId":null,"twTitle":null,"twDescription":null,"twImgId":null},"ttid":99342,"isLoading":false,"link":"/bayareabites/series/thanksgiving-recipes"},"bayareabites_2898":{"type":"terms","id":"bayareabites_2898","meta":{"index":"terms_1591234321","site":"bayareabites","id":"2898","found":true},"relationships":{},"included":{},"name":"brussels sprouts","slug":"brussels-sprouts","taxonomy":"tag","description":null,"featImg":null,"headData":{"title":"brussels sprouts Archives | KQED Bay Area Bites","description":null,"ogTitle":null,"ogDescription":null,"ogImgId":null,"twTitle":null,"twDescription":null,"twImgId":null},"ttid":2028,"isLoading":false,"link":"/bayareabites/tag/brussels-sprouts"},"bayareabites_14750":{"type":"terms","id":"bayareabites_14750","meta":{"index":"terms_1591234321","site":"bayareabites","id":"14750","found":true},"relationships":{},"included":{},"name":"cheese","slug":"cheese","taxonomy":"tag","description":null,"featImg":null,"headData":{"title":"cheese Archives | KQED Bay Area Bites","description":null,"ogTitle":null,"ogDescription":null,"ogImgId":null,"twTitle":null,"twDescription":null,"twImgId":null},"ttid":153,"isLoading":false,"link":"/bayareabites/tag/cheese"},"bayareabites_15035":{"type":"terms","id":"bayareabites_15035","meta":{"index":"terms_1591234321","site":"bayareabites","id":"15035","found":true},"relationships":{},"included":{},"name":"gratin","slug":"gratin","taxonomy":"tag","description":null,"featImg":null,"headData":{"title":"gratin Archives | KQED Bay Area Bites","description":null,"ogTitle":null,"ogDescription":null,"ogImgId":null,"twTitle":null,"twDescription":null,"twImgId":null},"ttid":99365,"isLoading":false,"link":"/bayareabites/tag/gratin"},"bayareabites_12787":{"type":"terms","id":"bayareabites_12787","meta":{"index":"terms_1591234321","site":"bayareabites","id":"12787","found":true},"relationships":{},"included":{},"name":"Gruyere","slug":"gruyere","taxonomy":"tag","description":null,"featImg":null,"headData":{"title":"Gruyere Archives | KQED Bay Area Bites","description":null,"ogTitle":null,"ogDescription":null,"ogImgId":null,"twTitle":null,"twDescription":null,"twImgId":null},"ttid":7250,"isLoading":false,"link":"/bayareabites/tag/gruyere"},"bayareabites_530":{"type":"terms","id":"bayareabites_530","meta":{"index":"terms_1591234321","site":"bayareabites","id":"530","found":true},"relationships":{},"included":{},"name":"thanksgiving","slug":"thanksgiving","taxonomy":"tag","description":null,"featImg":null,"headData":{"title":"thanksgiving Archives | KQED Bay Area Bites","description":null,"ogTitle":null,"ogDescription":null,"ogImgId":null,"twTitle":null,"twDescription":null,"twImgId":null},"ttid":495,"isLoading":false,"link":"/bayareabites/tag/thanksgiving"},"bayareabites_2962":{"type":"terms","id":"bayareabites_2962","meta":{"index":"terms_1591234321","site":"bayareabites","id":"2962","found":true},"relationships":{},"included":{},"name":"thanksgiving recipes","slug":"thanksgiving-recipes","taxonomy":"tag","description":null,"featImg":null,"headData":{"title":"thanksgiving recipes Archives | KQED Bay Area Bites","description":null,"ogTitle":null,"ogDescription":null,"ogImgId":null,"twTitle":null,"twDescription":null,"twImgId":null},"ttid":2067,"isLoading":false,"link":"/bayareabites/tag/thanksgiving-recipes"},"bayareabites_10916":{"type":"terms","id":"bayareabites_10916","meta":{"index":"terms_1591234321","site":"bayareabites","id":"10916","found":true},"relationships":{},"included":{},"name":"NPR food","slug":"npr-food","taxonomy":"category","description":null,"featImg":null,"headData":{"title":"NPR food Archives | KQED Bay Area Bites","description":null,"ogTitle":null,"ogDescription":null,"ogImgId":null,"twTitle":null,"twDescription":null,"twImgId":null},"ttid":5375,"isLoading":false,"link":"/bayareabites/category/npr-food"},"bayareabites_635":{"type":"terms","id":"bayareabites_635","meta":{"index":"terms_1591234321","site":"bayareabites","id":"635","found":true},"relationships":{},"included":{},"name":"cancer","slug":"cancer","taxonomy":"tag","description":null,"featImg":null,"headData":{"title":"cancer Archives | KQED Bay Area Bites","description":null,"ogTitle":null,"ogDescription":null,"ogImgId":null,"twTitle":null,"twDescription":null,"twImgId":null},"ttid":600,"isLoading":false,"link":"/bayareabites/tag/cancer"},"bayareabites_2346":{"type":"terms","id":"bayareabites_2346","meta":{"index":"terms_1591234321","site":"bayareabites","id":"2346","found":true},"relationships":{},"included":{},"name":"hot dogs","slug":"hot-dogs","taxonomy":"tag","description":null,"featImg":null,"headData":{"title":"hot dogs Archives | KQED Bay Area Bites","description":null,"ogTitle":null,"ogDescription":null,"ogImgId":null,"twTitle":null,"twDescription":null,"twImgId":null},"ttid":1743,"isLoading":false,"link":"/bayareabites/tag/hot-dogs"},"bayareabites_15000":{"type":"terms","id":"bayareabites_15000","meta":{"index":"terms_1591234321","site":"bayareabites","id":"15000","found":true},"relationships":{},"included":{},"name":"processed meats","slug":"processed-meats","taxonomy":"tag","description":null,"featImg":null,"headData":{"title":"processed meats Archives | KQED Bay Area Bites","description":null,"ogTitle":null,"ogDescription":null,"ogImgId":null,"twTitle":null,"twDescription":null,"twImgId":null},"ttid":99330,"isLoading":false,"link":"/bayareabites/tag/processed-meats"},"bayareabites_13103":{"type":"terms","id":"bayareabites_13103","meta":{"index":"terms_1591234321","site":"bayareabites","id":"13103","found":true},"relationships":{},"included":{},"name":"sausages","slug":"sausages","taxonomy":"tag","description":null,"featImg":null,"headData":{"title":"sausages Archives | KQED Bay Area Bites","description":null,"ogTitle":null,"ogDescription":null,"ogImgId":null,"twTitle":null,"twDescription":null,"twImgId":null},"ttid":7566,"isLoading":false,"link":"/bayareabites/tag/sausages"},"bayareabites_14185":{"type":"terms","id":"bayareabites_14185","meta":{"index":"terms_1591234321","site":"bayareabites","id":"14185","found":true},"relationships":{},"included":{},"name":"WHO","slug":"who","taxonomy":"tag","description":null,"featImg":null,"headData":{"title":"WHO Archives | KQED Bay Area Bites","description":null,"ogTitle":null,"ogDescription":null,"ogImgId":null,"twTitle":null,"twDescription":null,"twImgId":null},"ttid":8661,"isLoading":false,"link":"/bayareabites/tag/who"}},"userAgentReducer":{"userAgent":"Mozilla/5.0 AppleWebKit/537.36 (KHTML, like Gecko; compatible; ClaudeBot/1.0; +claudebot@anthropic.com)","isBot":true},"userPermissionsReducer":{"wpLoggedIn":false},"localStorageReducer":{},"browserHistoryReducer":[],"eventsReducer":{},"fssReducer":{},"tvDailyScheduleReducer":{},"tvWeeklyScheduleReducer":{},"tvPrimetimeScheduleReducer":{},"tvMonthlyScheduleReducer":{},"userAccountReducer":{"routeTo":"","showDeleteConfirmModal":false,"user":{"userId":"","isFound":false,"firstName":"","lastName":"","phoneNumber":"","email":"","articles":[]}},"youthMediaReducer":{},"checkPleaseReducer":{"filterData":{},"restaurantData":[]},"reframeReducer":{"attendee":null},"location":{"pathname":"/bayareabites/tag/bacon/","previousPathname":"/"}}